


Symptoms and things to look for: Inspect the control arms, they will show obvious sign of wear and tear. All 4 of my control arms were ripped and i had suspension clunk noises going over bumps. For reference the Q7 has 93k miles. IF your upper control arms are cracked there is a good chance your thrust arm control arms also has a cracked bushing and leaking fluid, this would a good time to inspect it.
Important Info: This isn't a just a slap the parts and move on type of repair. The suspension has to be pre-loaded or the vehicle has to the on the ground when you tighten the inner control arm bolts to torque. If you torque the bolts without this step your control arm bushing will crack and fail prematurely. Separately this repair requires removing the dreaded pinch bolt that secures the control arm ball joints to the top of the knuckle. This bolt is notorious for seizing and turning what should be 1 hour job into a 8+ hour job with multiple trips to harbor freight which may result you in investing into a air compressor and air hammer and torch if all goes to hell. Google Audi pinch bolt to understand what you may be getting into. On my 2017 Q7 with 93k miles the pinch bolt came out instantly, but my car is a southern car that hasn't seen a day of salt or rust in its life.
Summary: This is a very simple job and can be done with hand tools, all the bolts are 16mm bolts. I'd recommend using a torque wrench but you can get away without it as well. Shop manual requires all the bolts to be replaced. For reference i used FEBI brand upper control arms, they were about $40 per control arm. If your ball joints are good you can get away with just replacing the bushing, they are $5 each. You'll need a bushing press kit that you can buy on Amazon for $100.
Part Numbers and Quantities needed:
Pinch Bolts: VAG-WHT006542 (Quantity 2) - REPLACE THIS BOLT!! This not the bolt to reuse ever!
Pinch Bolt Locking Nut: VAG-N10272302 (Quantity 2)
Inner Control Arm Bolts: N91221601 (Quantity 4)
Front Left Upper Forward Control Arm: 4M0407505B (Quantity 1)
Front Left Upper Rearward Control Arm: 4M0407509B (Quantity 1)
Front Right Upper Forward Control Arm: 4M0407506B (Quantity 1)
Front Right Upper Rear Control Arm: 4M0407510B (Quantity 1)
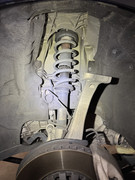
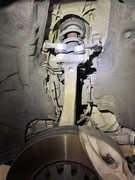
Diagram of the upper control arms:
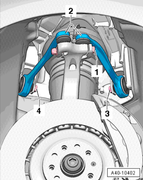
#1: Pinch bolt
#2: Upper Control Arms
#3 & 4: Inner control arm bolts
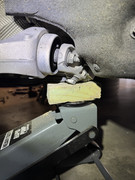
Step 1: Determine how you are going pre-load the suspension for when you get to the point of tightening the inner control arm bolts to torque. You can either jack the front from the brake rotor using a piece of wood between the rotor and jack or you can put the wheel back on and drop the car, you should have room to fit a wrench between the wheel and fender to tighten the bolt. IF you want to pre-load the suspension with the vehicle in the air then you first need to measure the distance from the center of the wheel cap to the top of the fender. On my Q7 it was 18 & 1/8" on both sides, what you do is the jack the strut until the distance between the axle and fender matches the previous measurement, this replicates curb weight. If you are going to raise the strut by the rotor, then hand screw in the wheel bolts into the hub to secure the rotor, you don't want the rotor popping out or hitting the caliper. As you can see i wrote the distance between the axle and fender on a piece tape.
Step 2: Jack up the car. There seems to be a lot of confusion on where to Jack the Q7 if you intend on putting on jack stands. You can use the point where the subframe connects to the thrustarm. Using a piece of wood and jack you can lift the Q7 there. Lift the car and then put a jack stand in the normal spots below the front door.
Step 3: Remove the pinch bolt and control arm bolts, then remove the control arms. Again, the pinch bolt can be a nightmare. I'd recommend starting here and removing this bolt first, that way if it fails you can back out of the repair.
Step 4: Install the control arms, the inner control arm bolts should be hand tight, do not tighten to torque. At this point you can tighten the pinch bolt to torque which is 40Nm.
Step 5: Preload the suspension and tighten the inner control arm bolts, the torque spec is 50Nm + 90 degree turn. It'll be really tough to fit a torque wrench up there so good n tight by hand should be fine. It's not a ridiculous torque spec.
Step 6: Reinstall the wheel and go for a test drive. Alignment is not required when changing the upper control arms per the repair manual.

 Reply With Quote


Bookmarks