Audizine - An Automotive Enthusiast Community

Results 1 to 25 of 25
  1. #1
    Senior Member Two Rings
    Join Date
    Apr 18 2012
    AZ Member #
    92081
    My Garage
    1995 Toyota Land Cruiser (FJ80/FZJ80)
    Location
    Central Texas

    engine pulled! should i hone and re-ring?

    Guest-only advertisement. Register or Log In now!
    remember this post from years ago? i finally started the work (after a cross-country move and much procrastination), but more on that later.

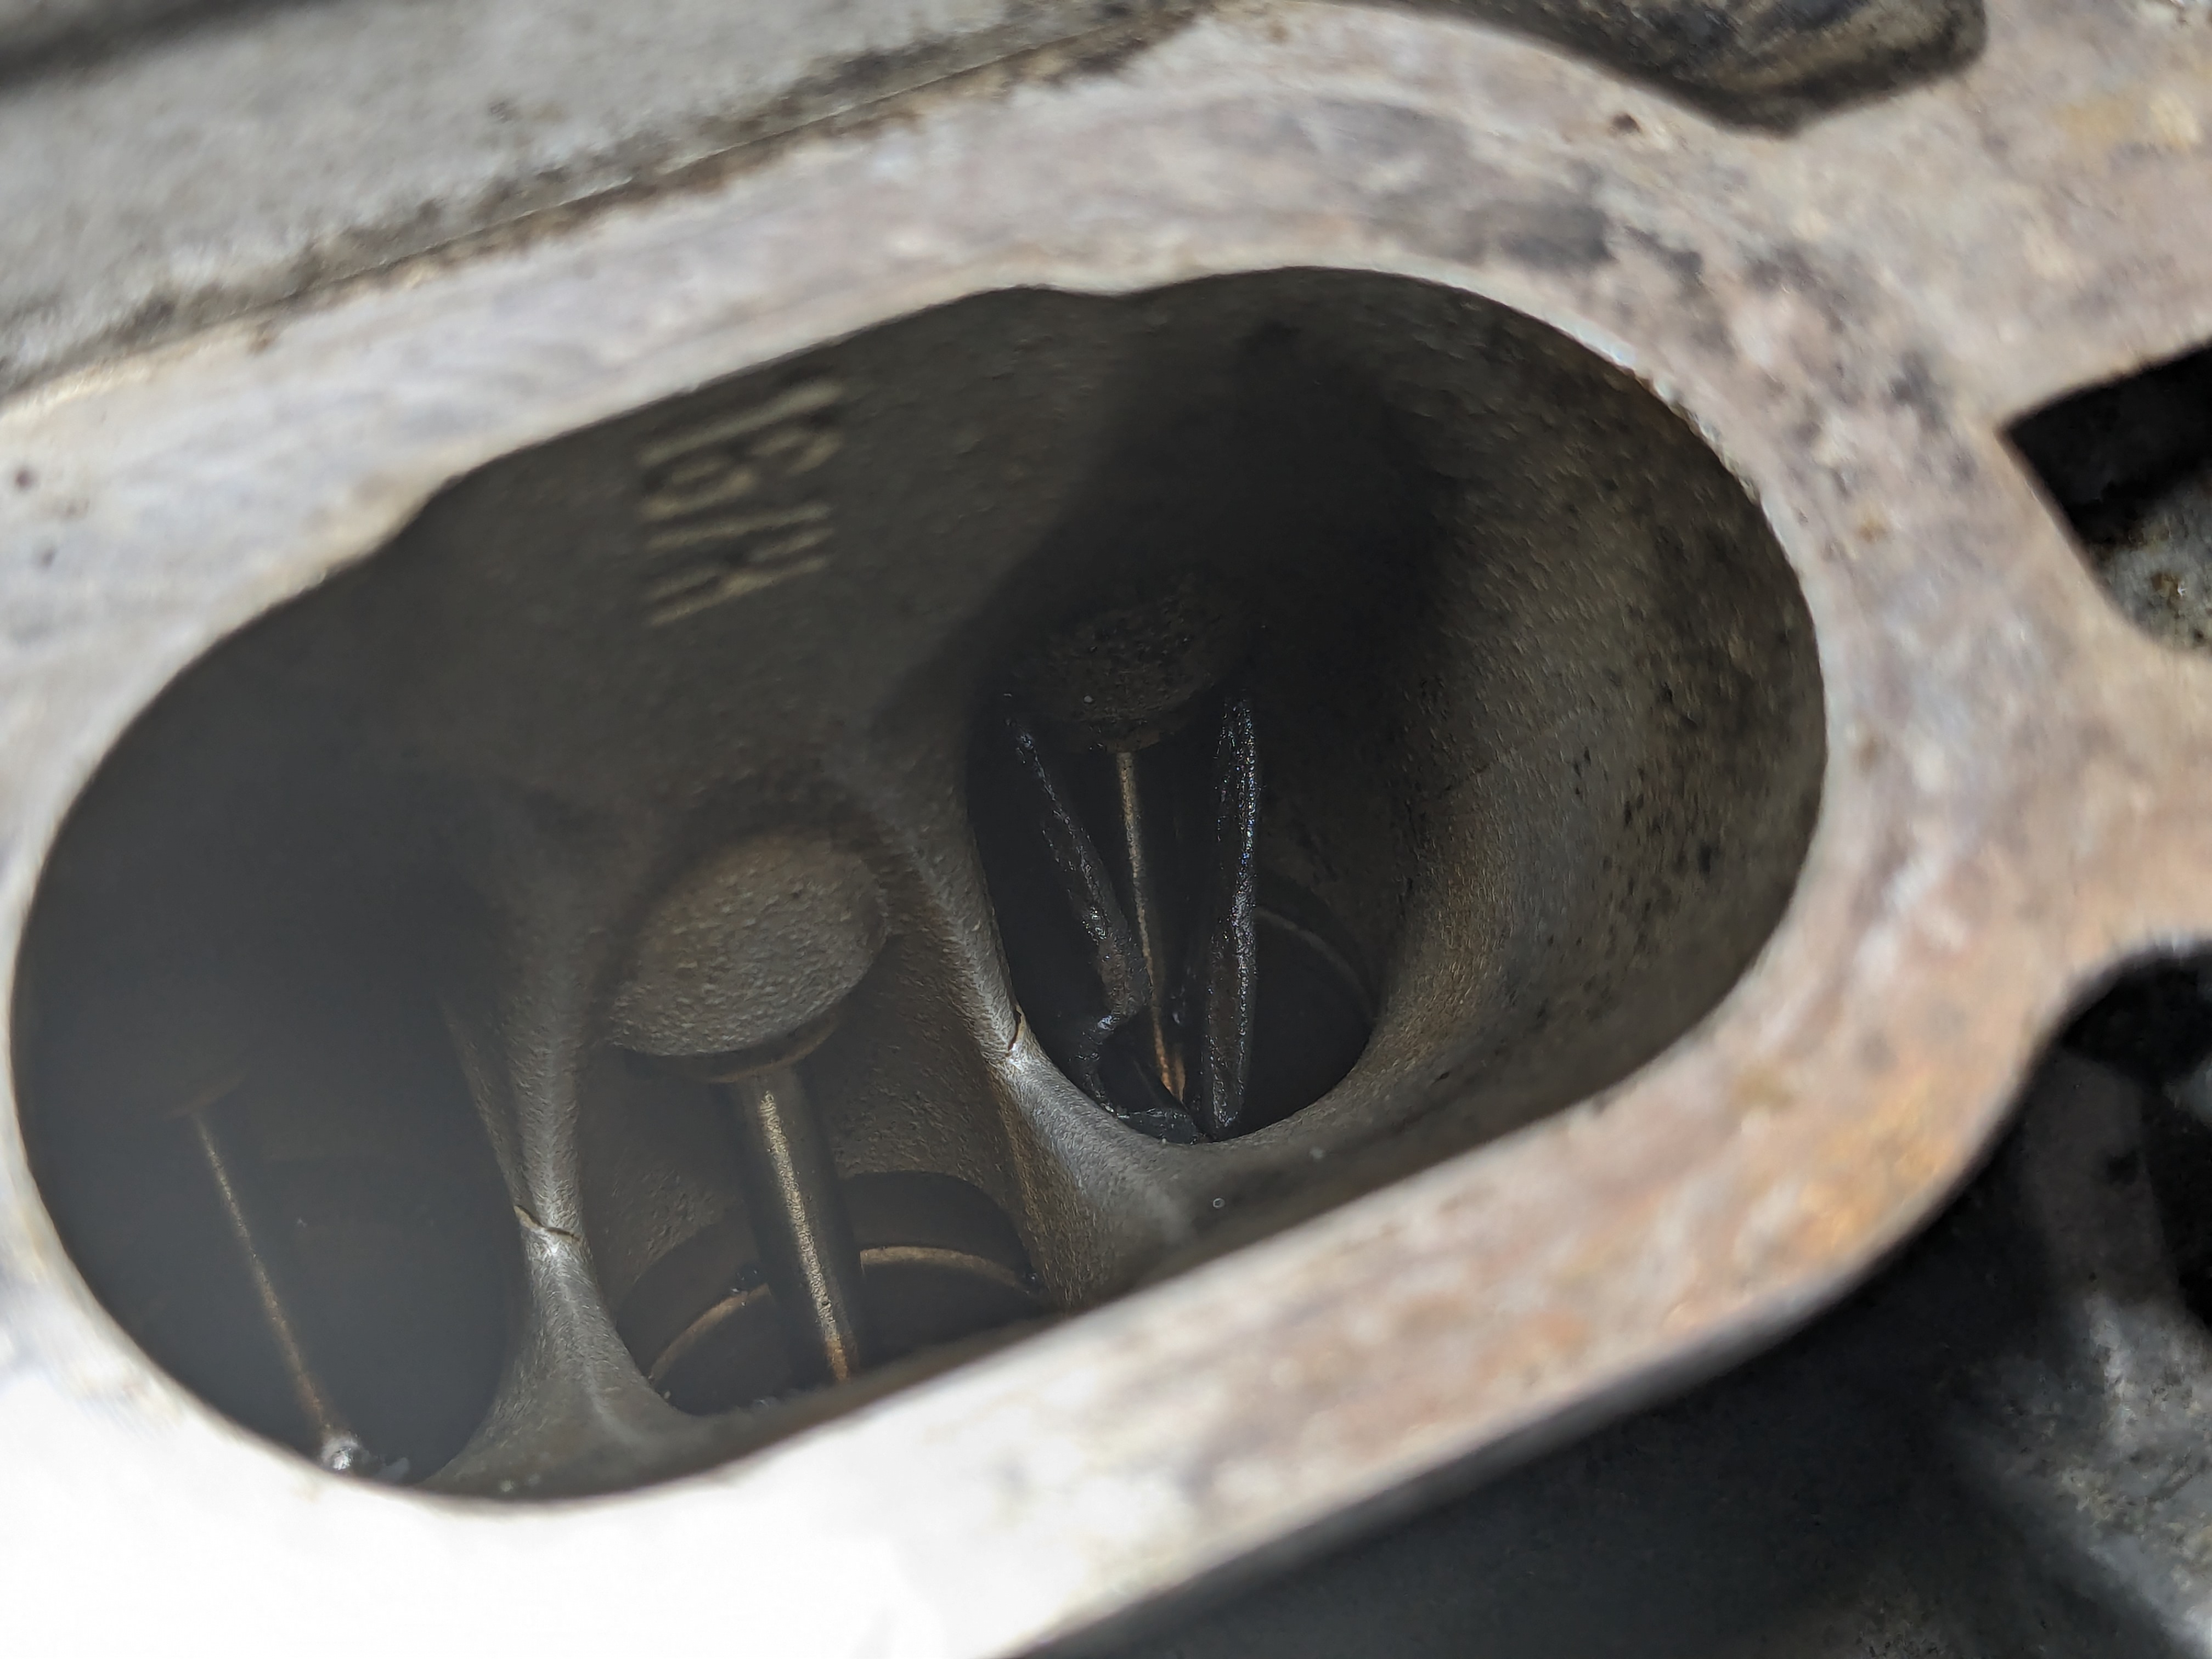
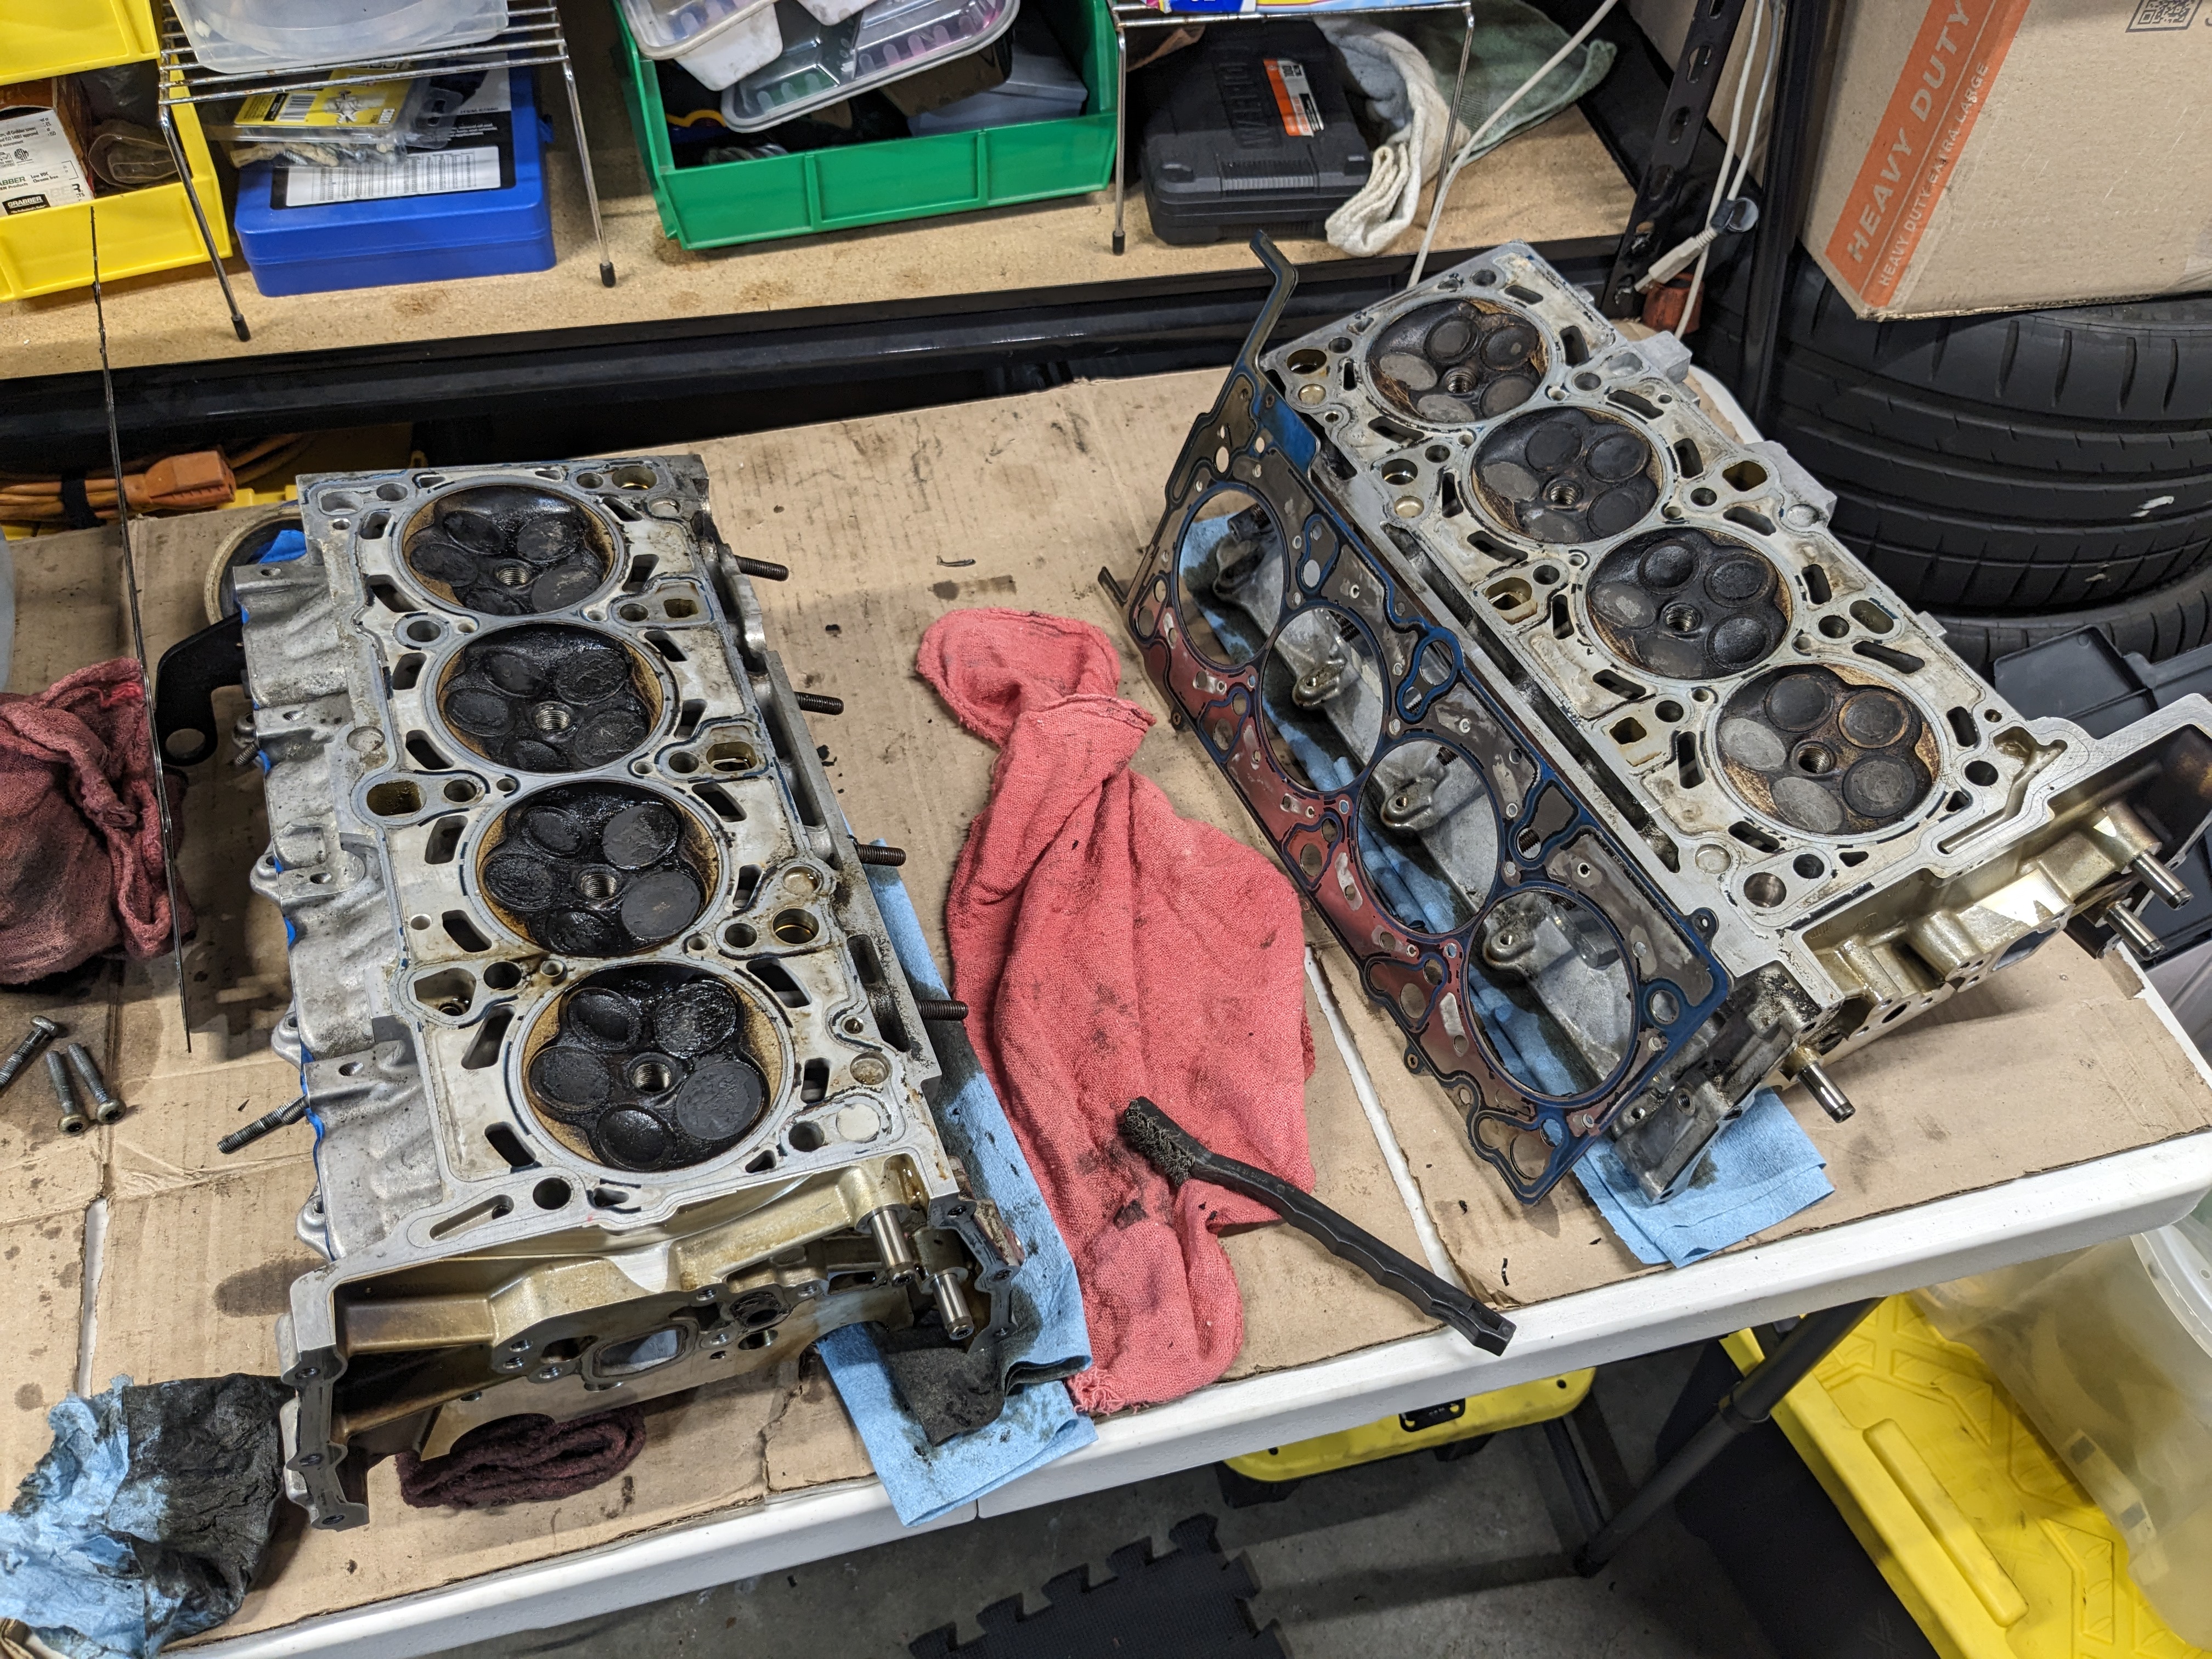
    first, the main question: should i hone the cylinders and replace the rings? a couple cylinders are lightly scored in a way that no honing could help, but the others...? this is a big added cost - $500-550 just in seals and bolts, plus the rings, honing kit, and maybe new bearings.

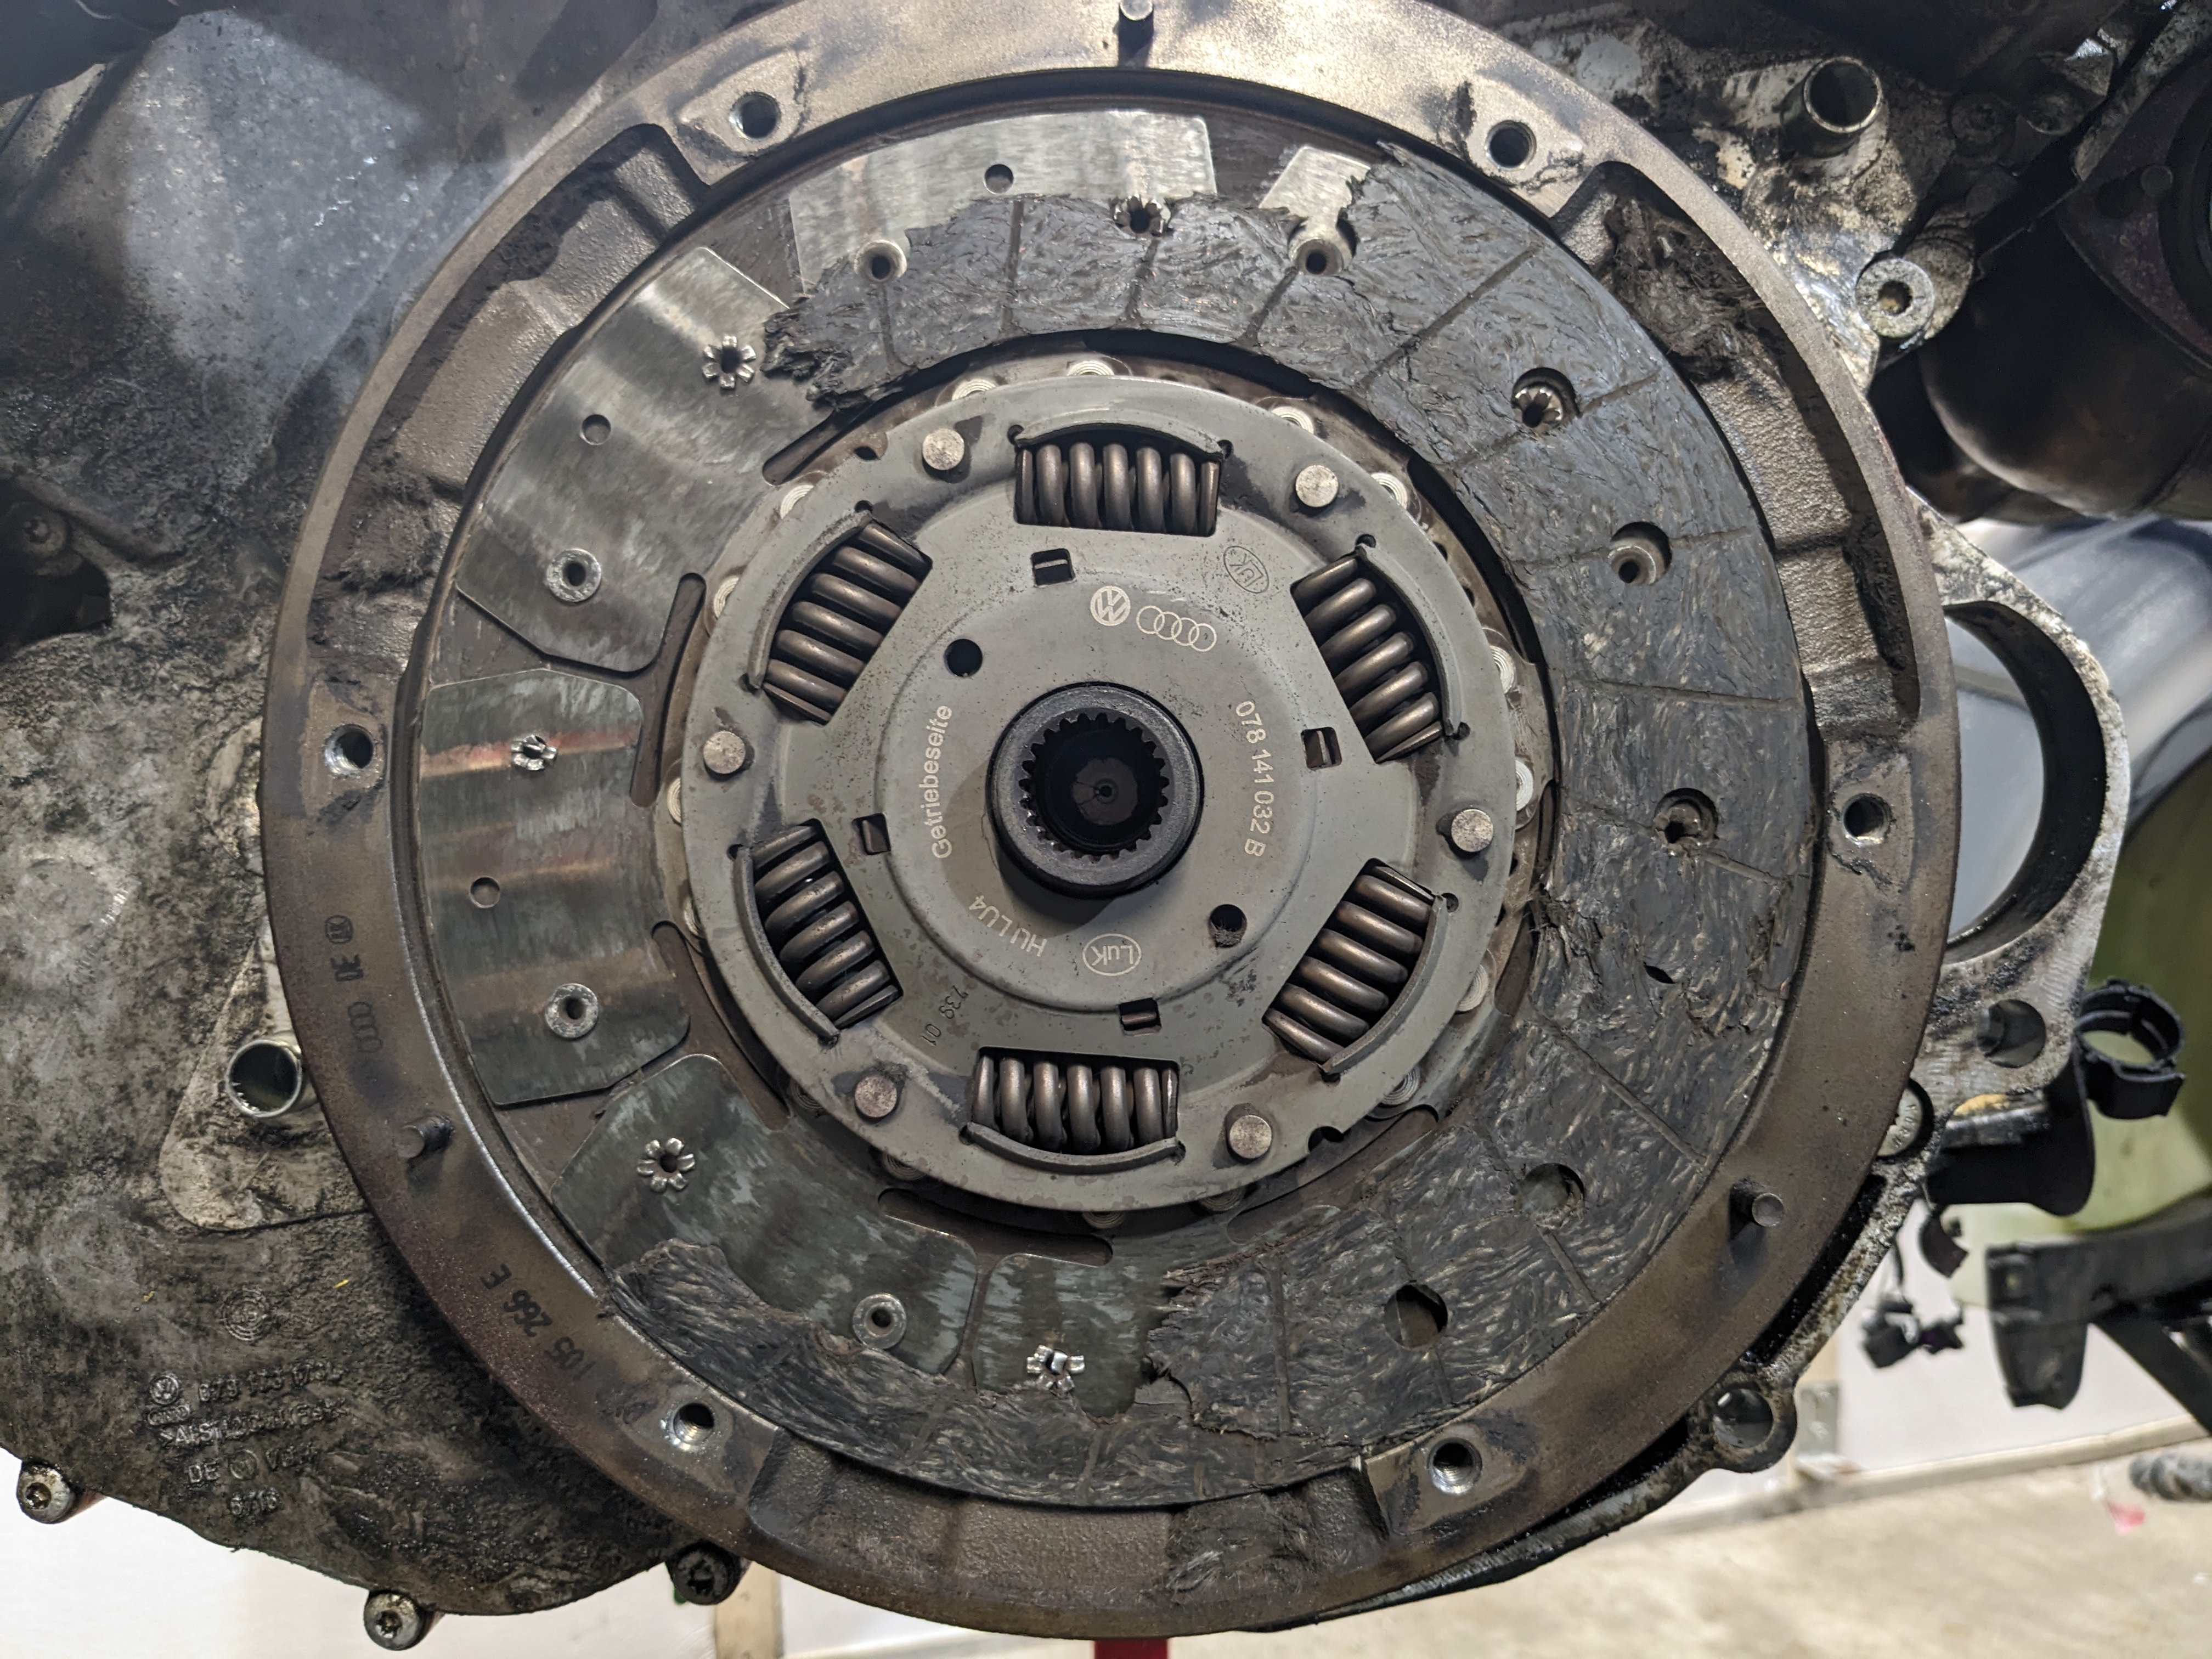
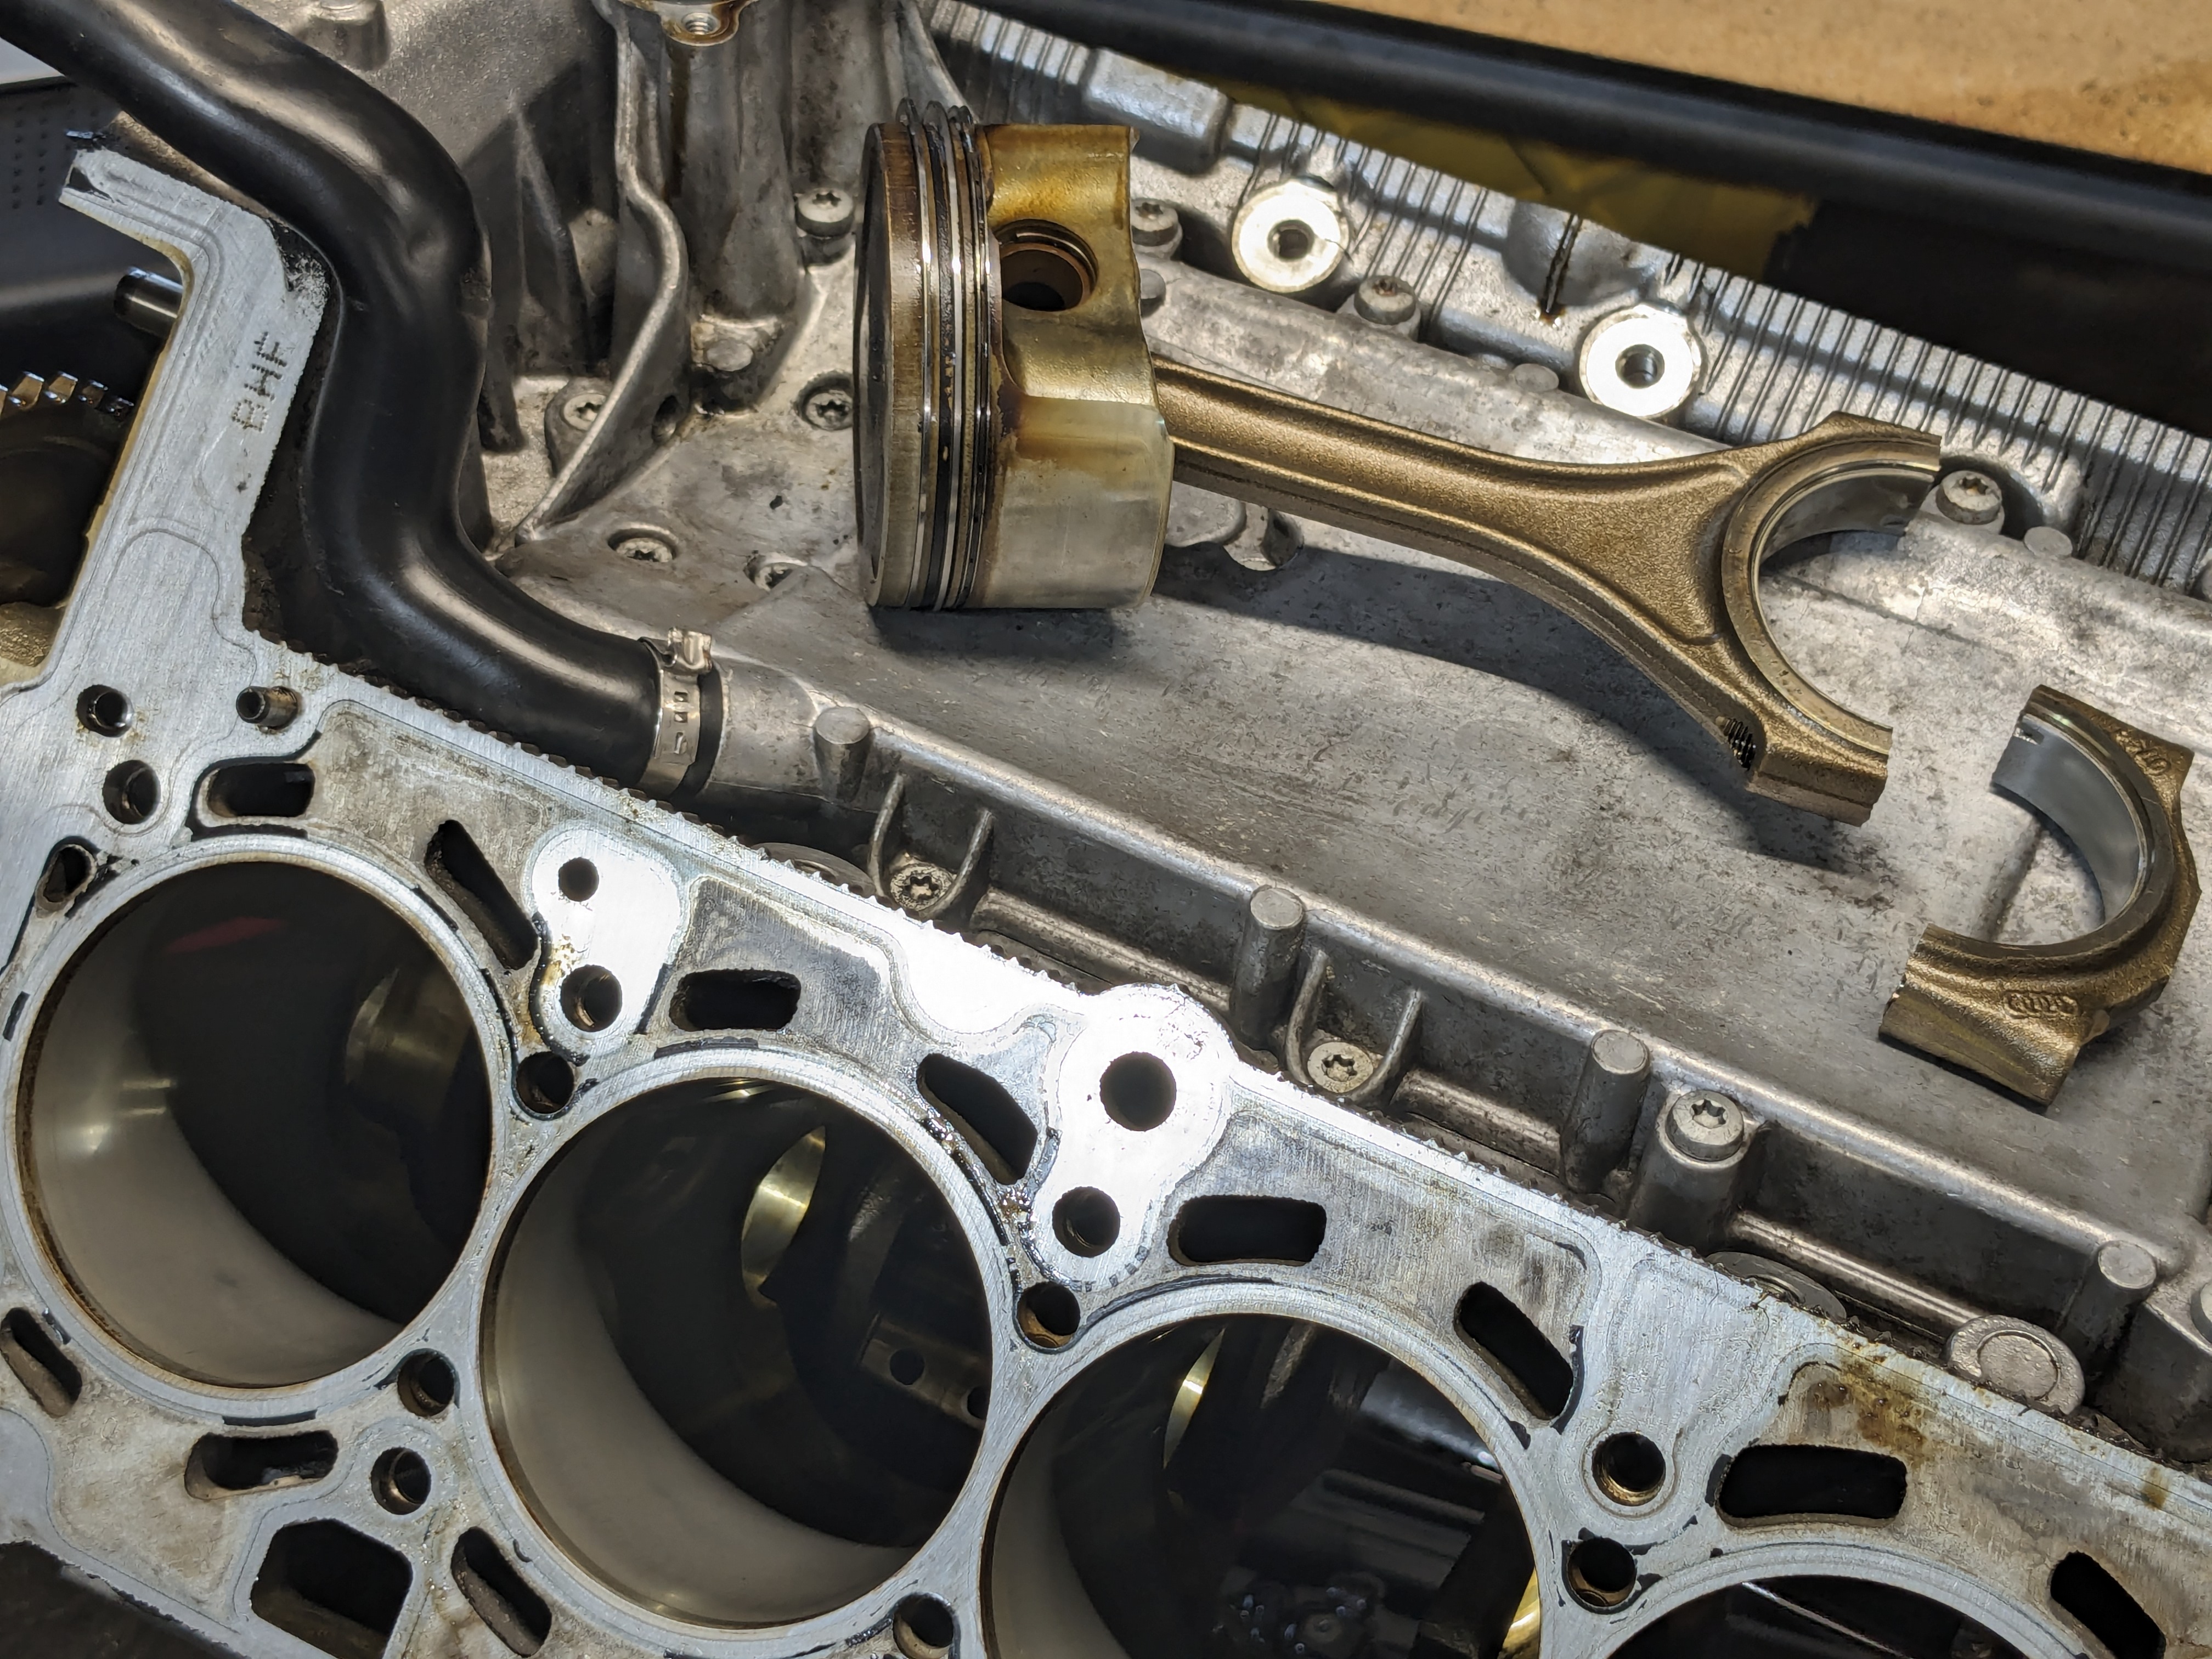
    this is a BHF around 145,000mi. i haven't run a compression test in a long time, but it was decent in the past.

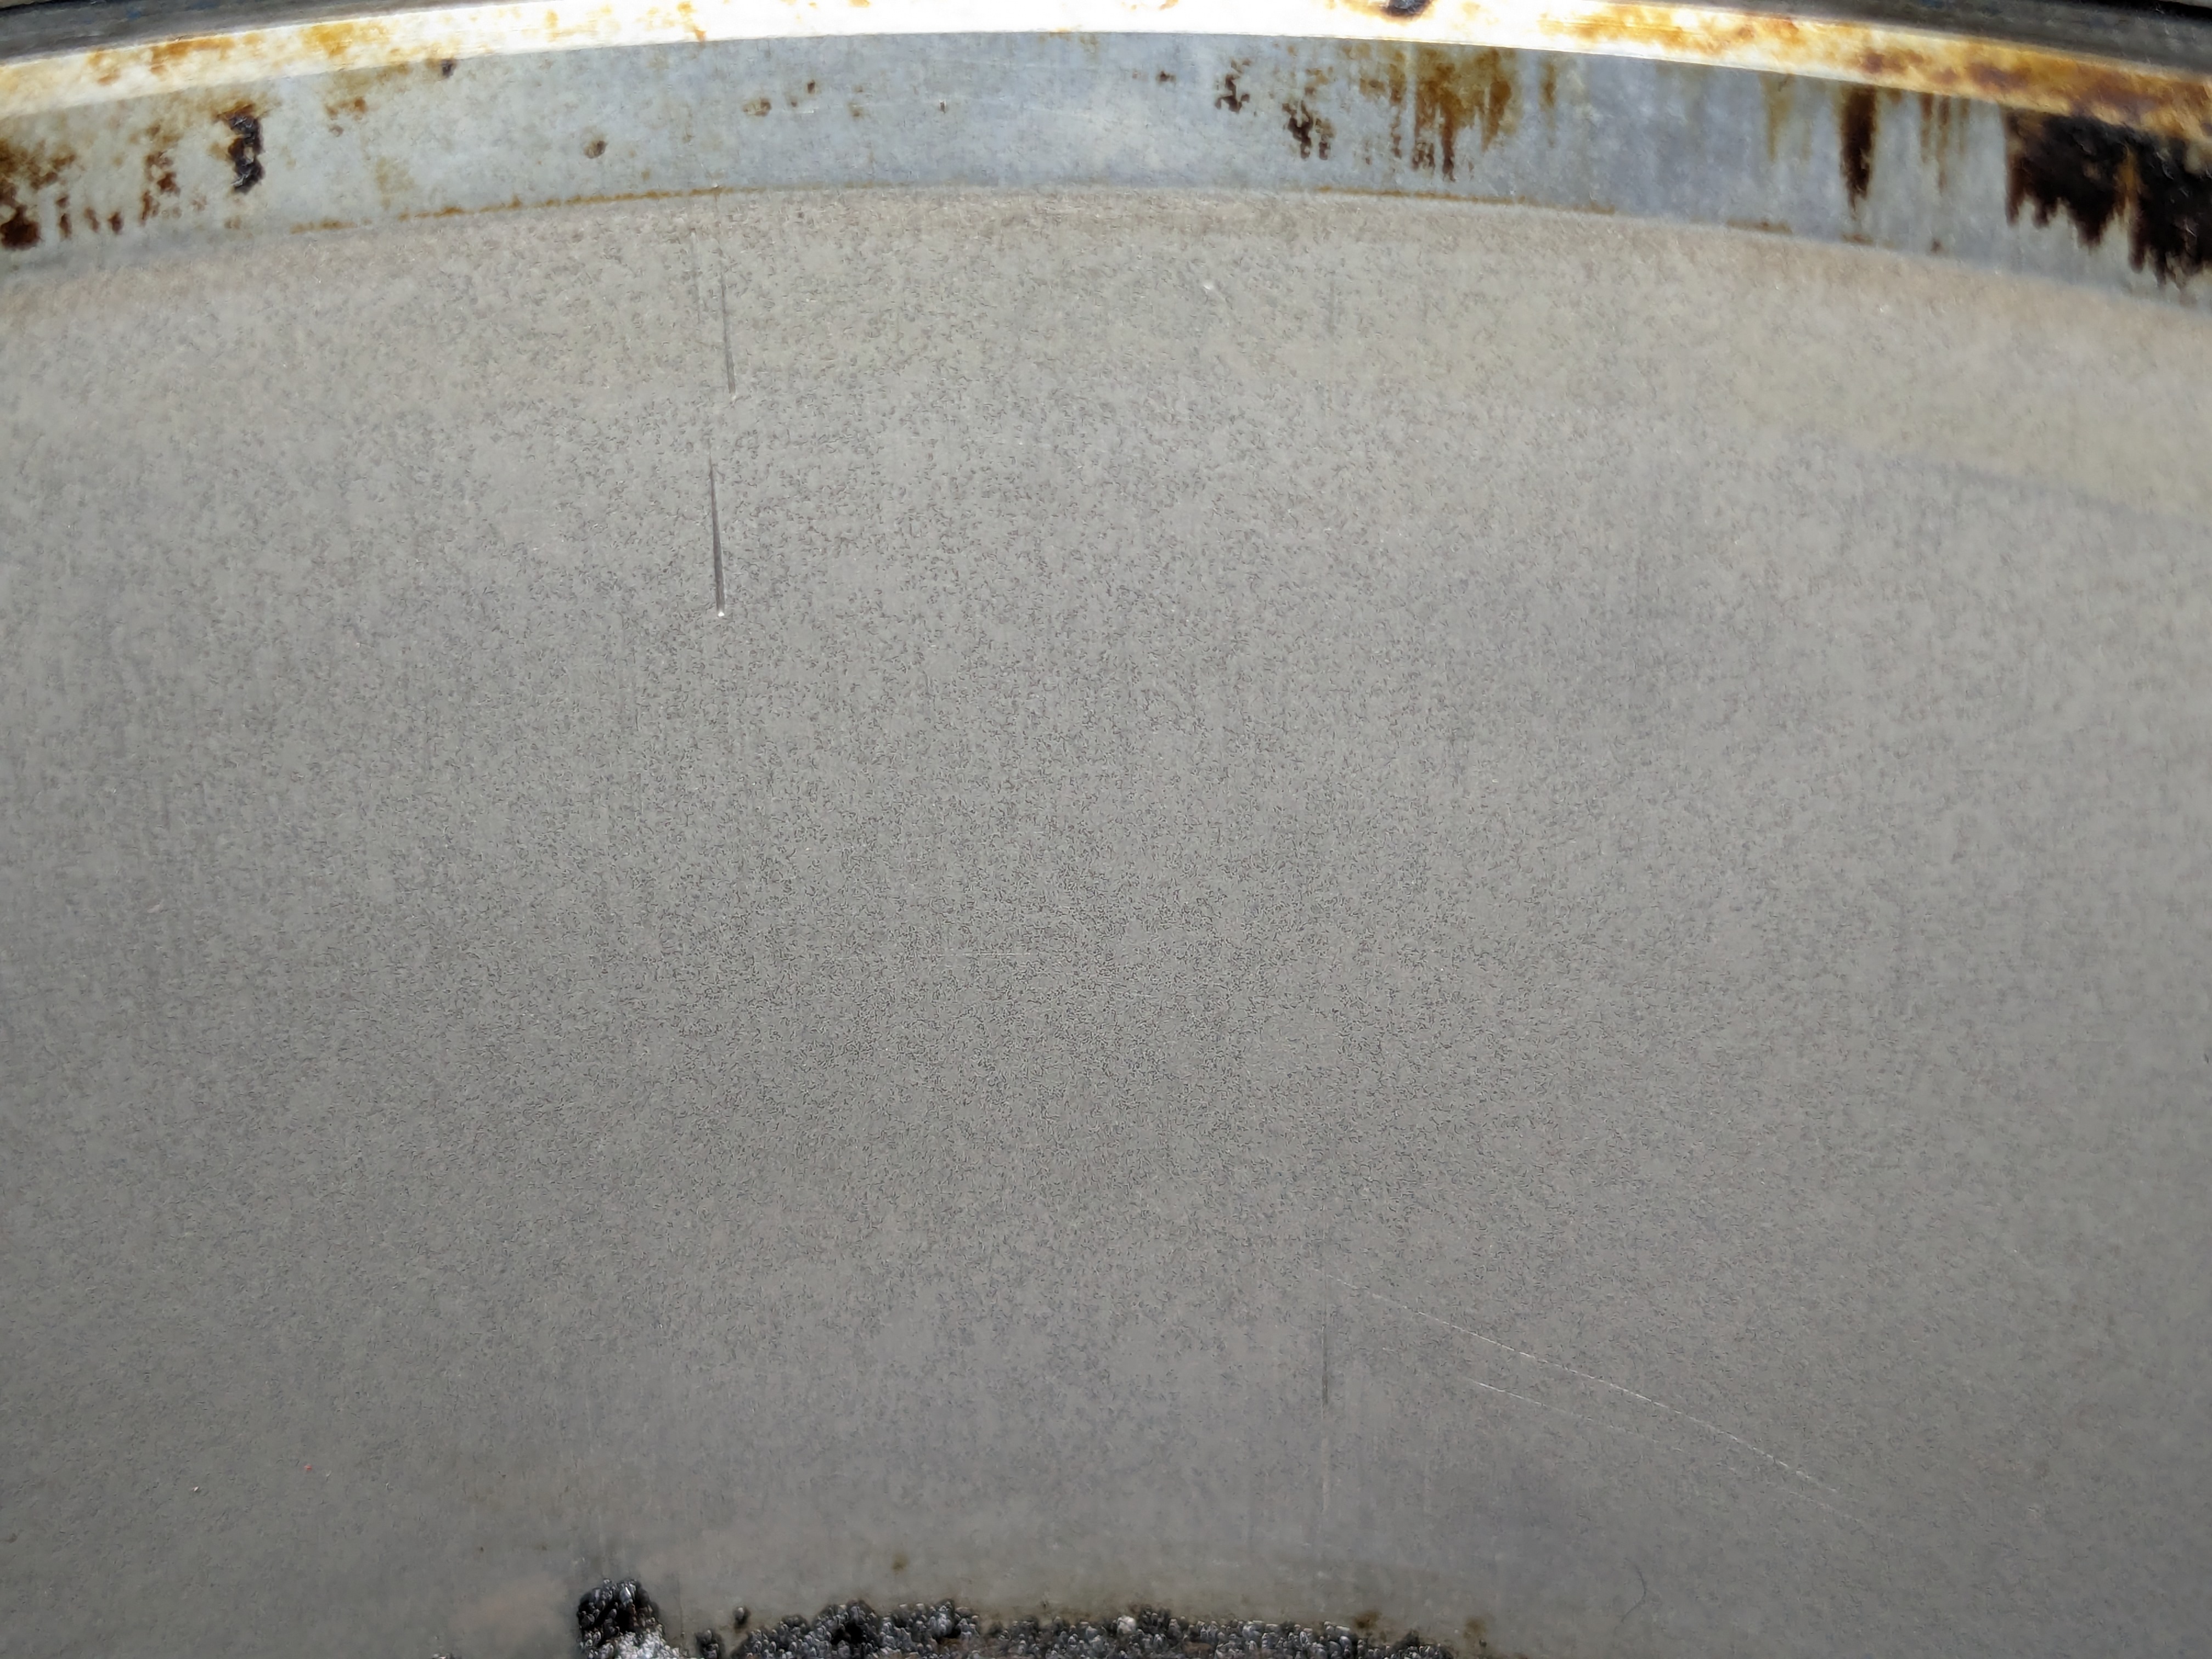
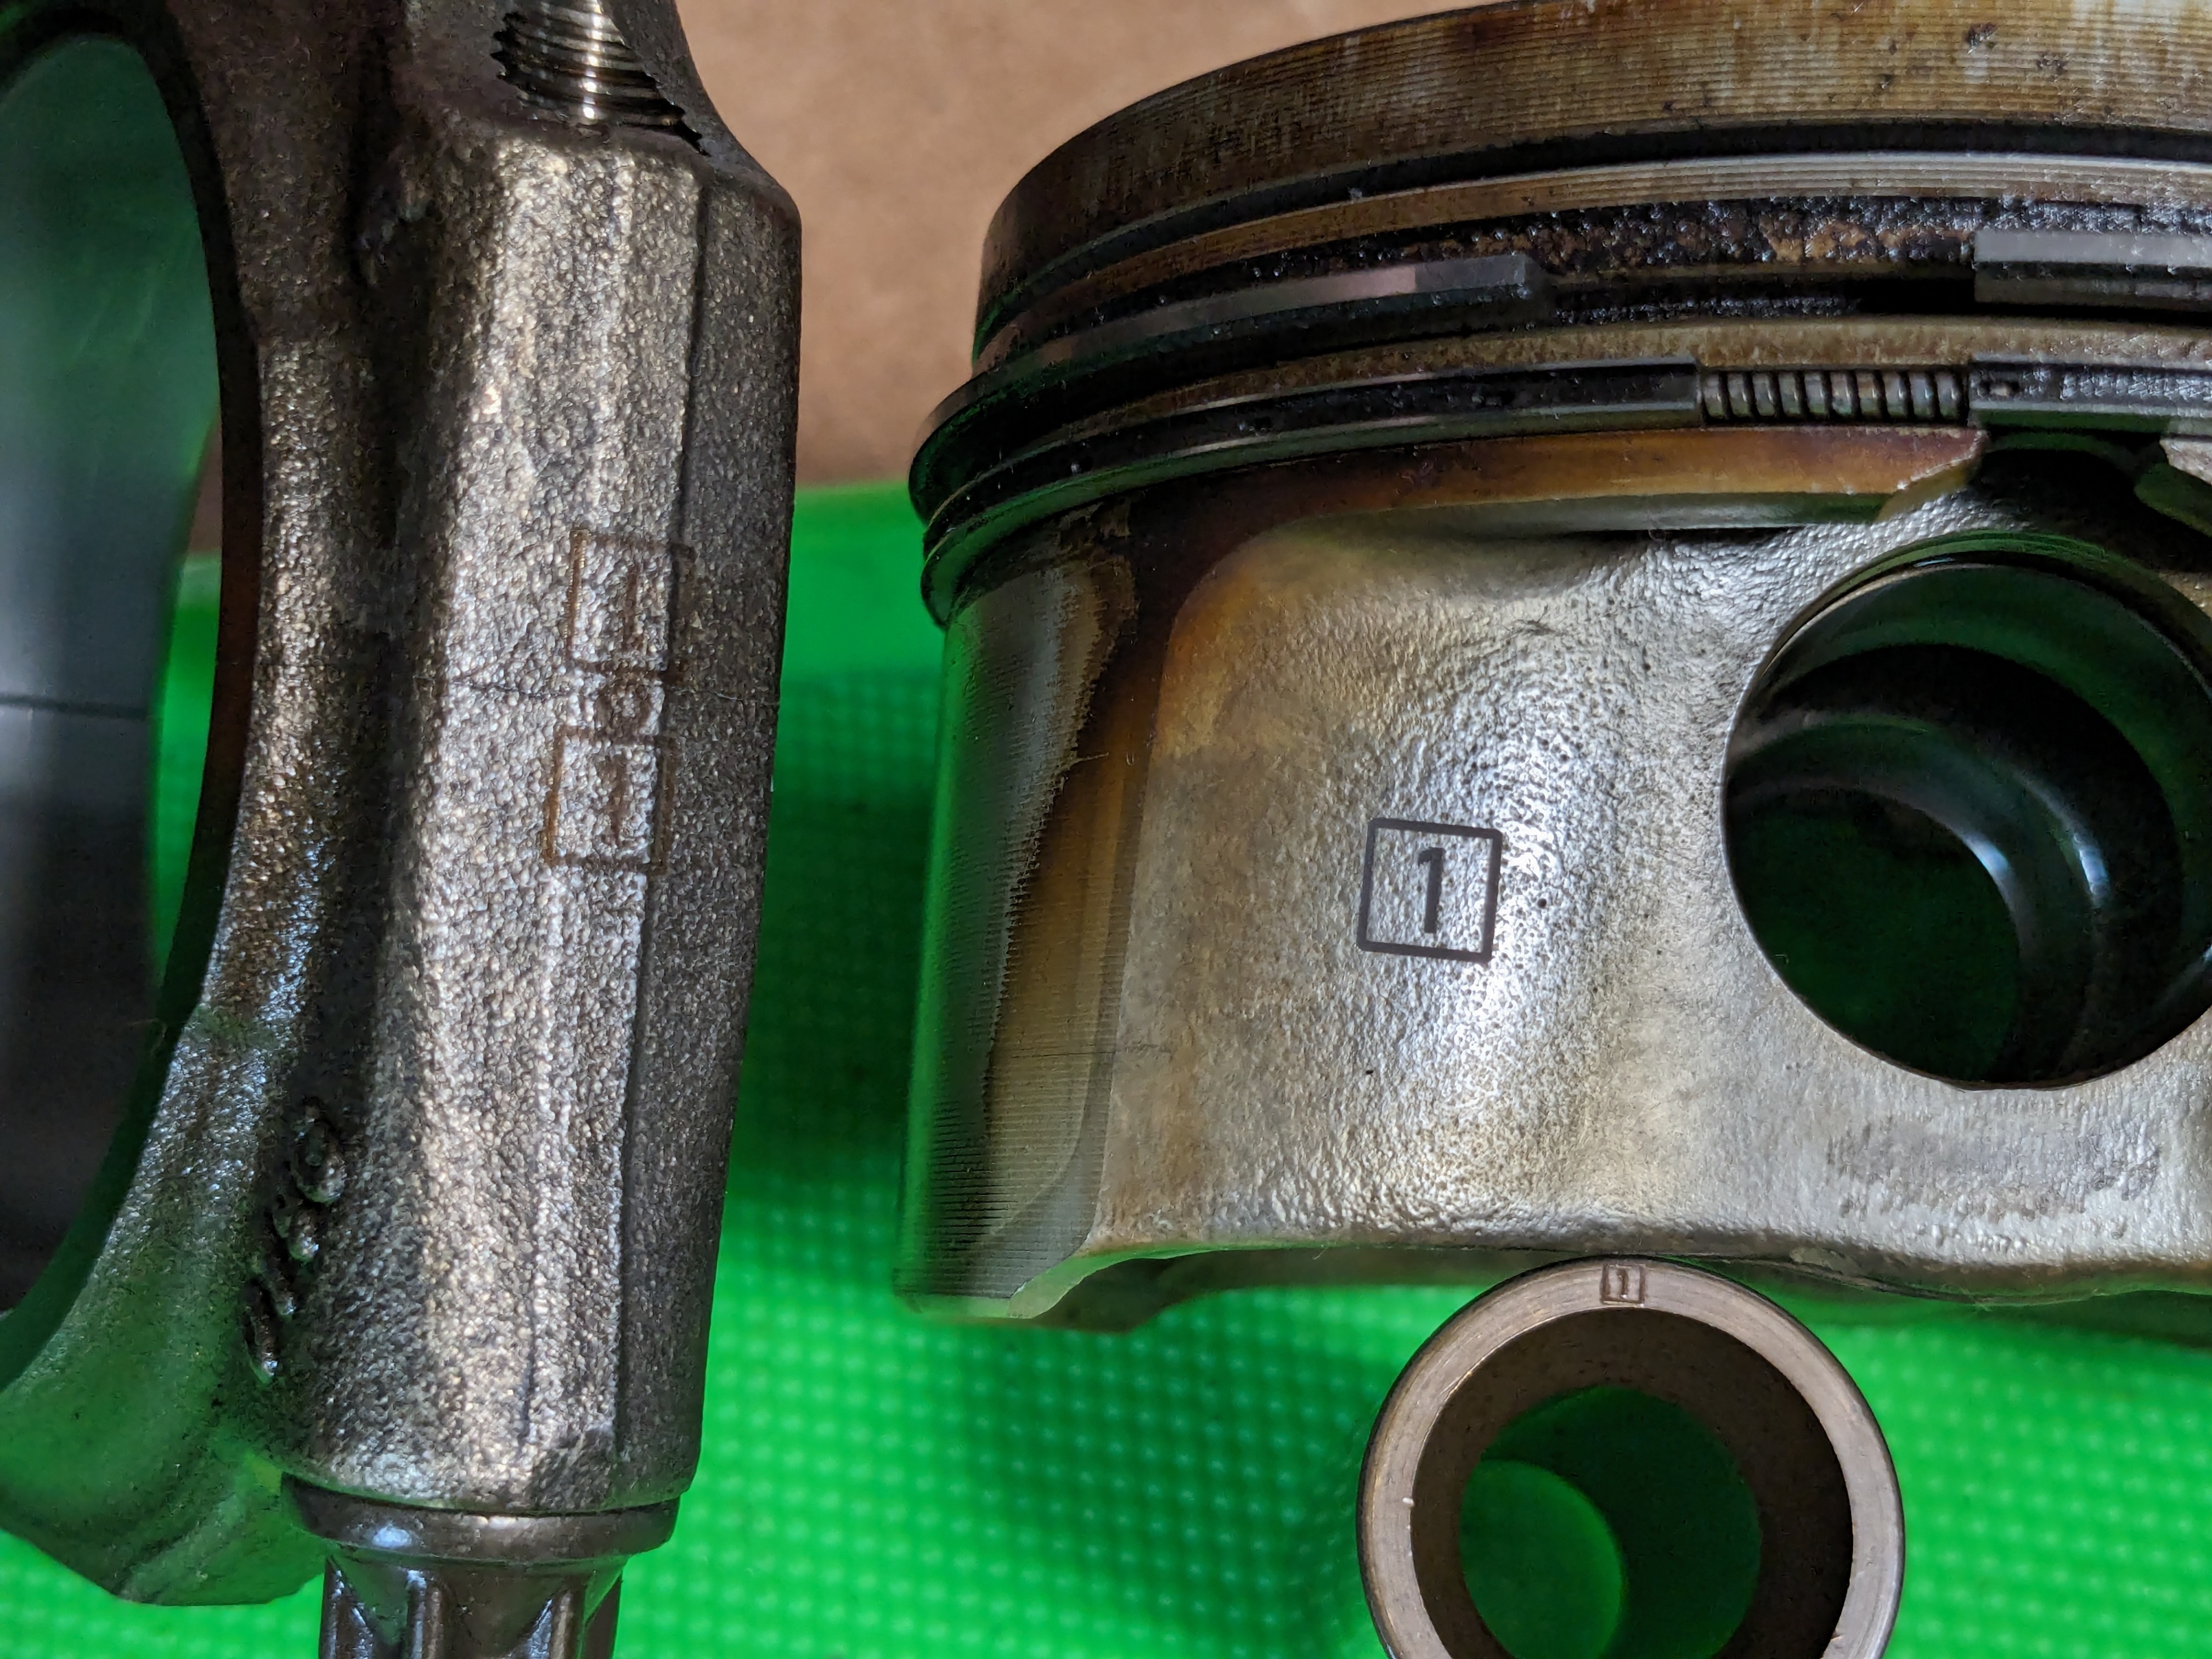
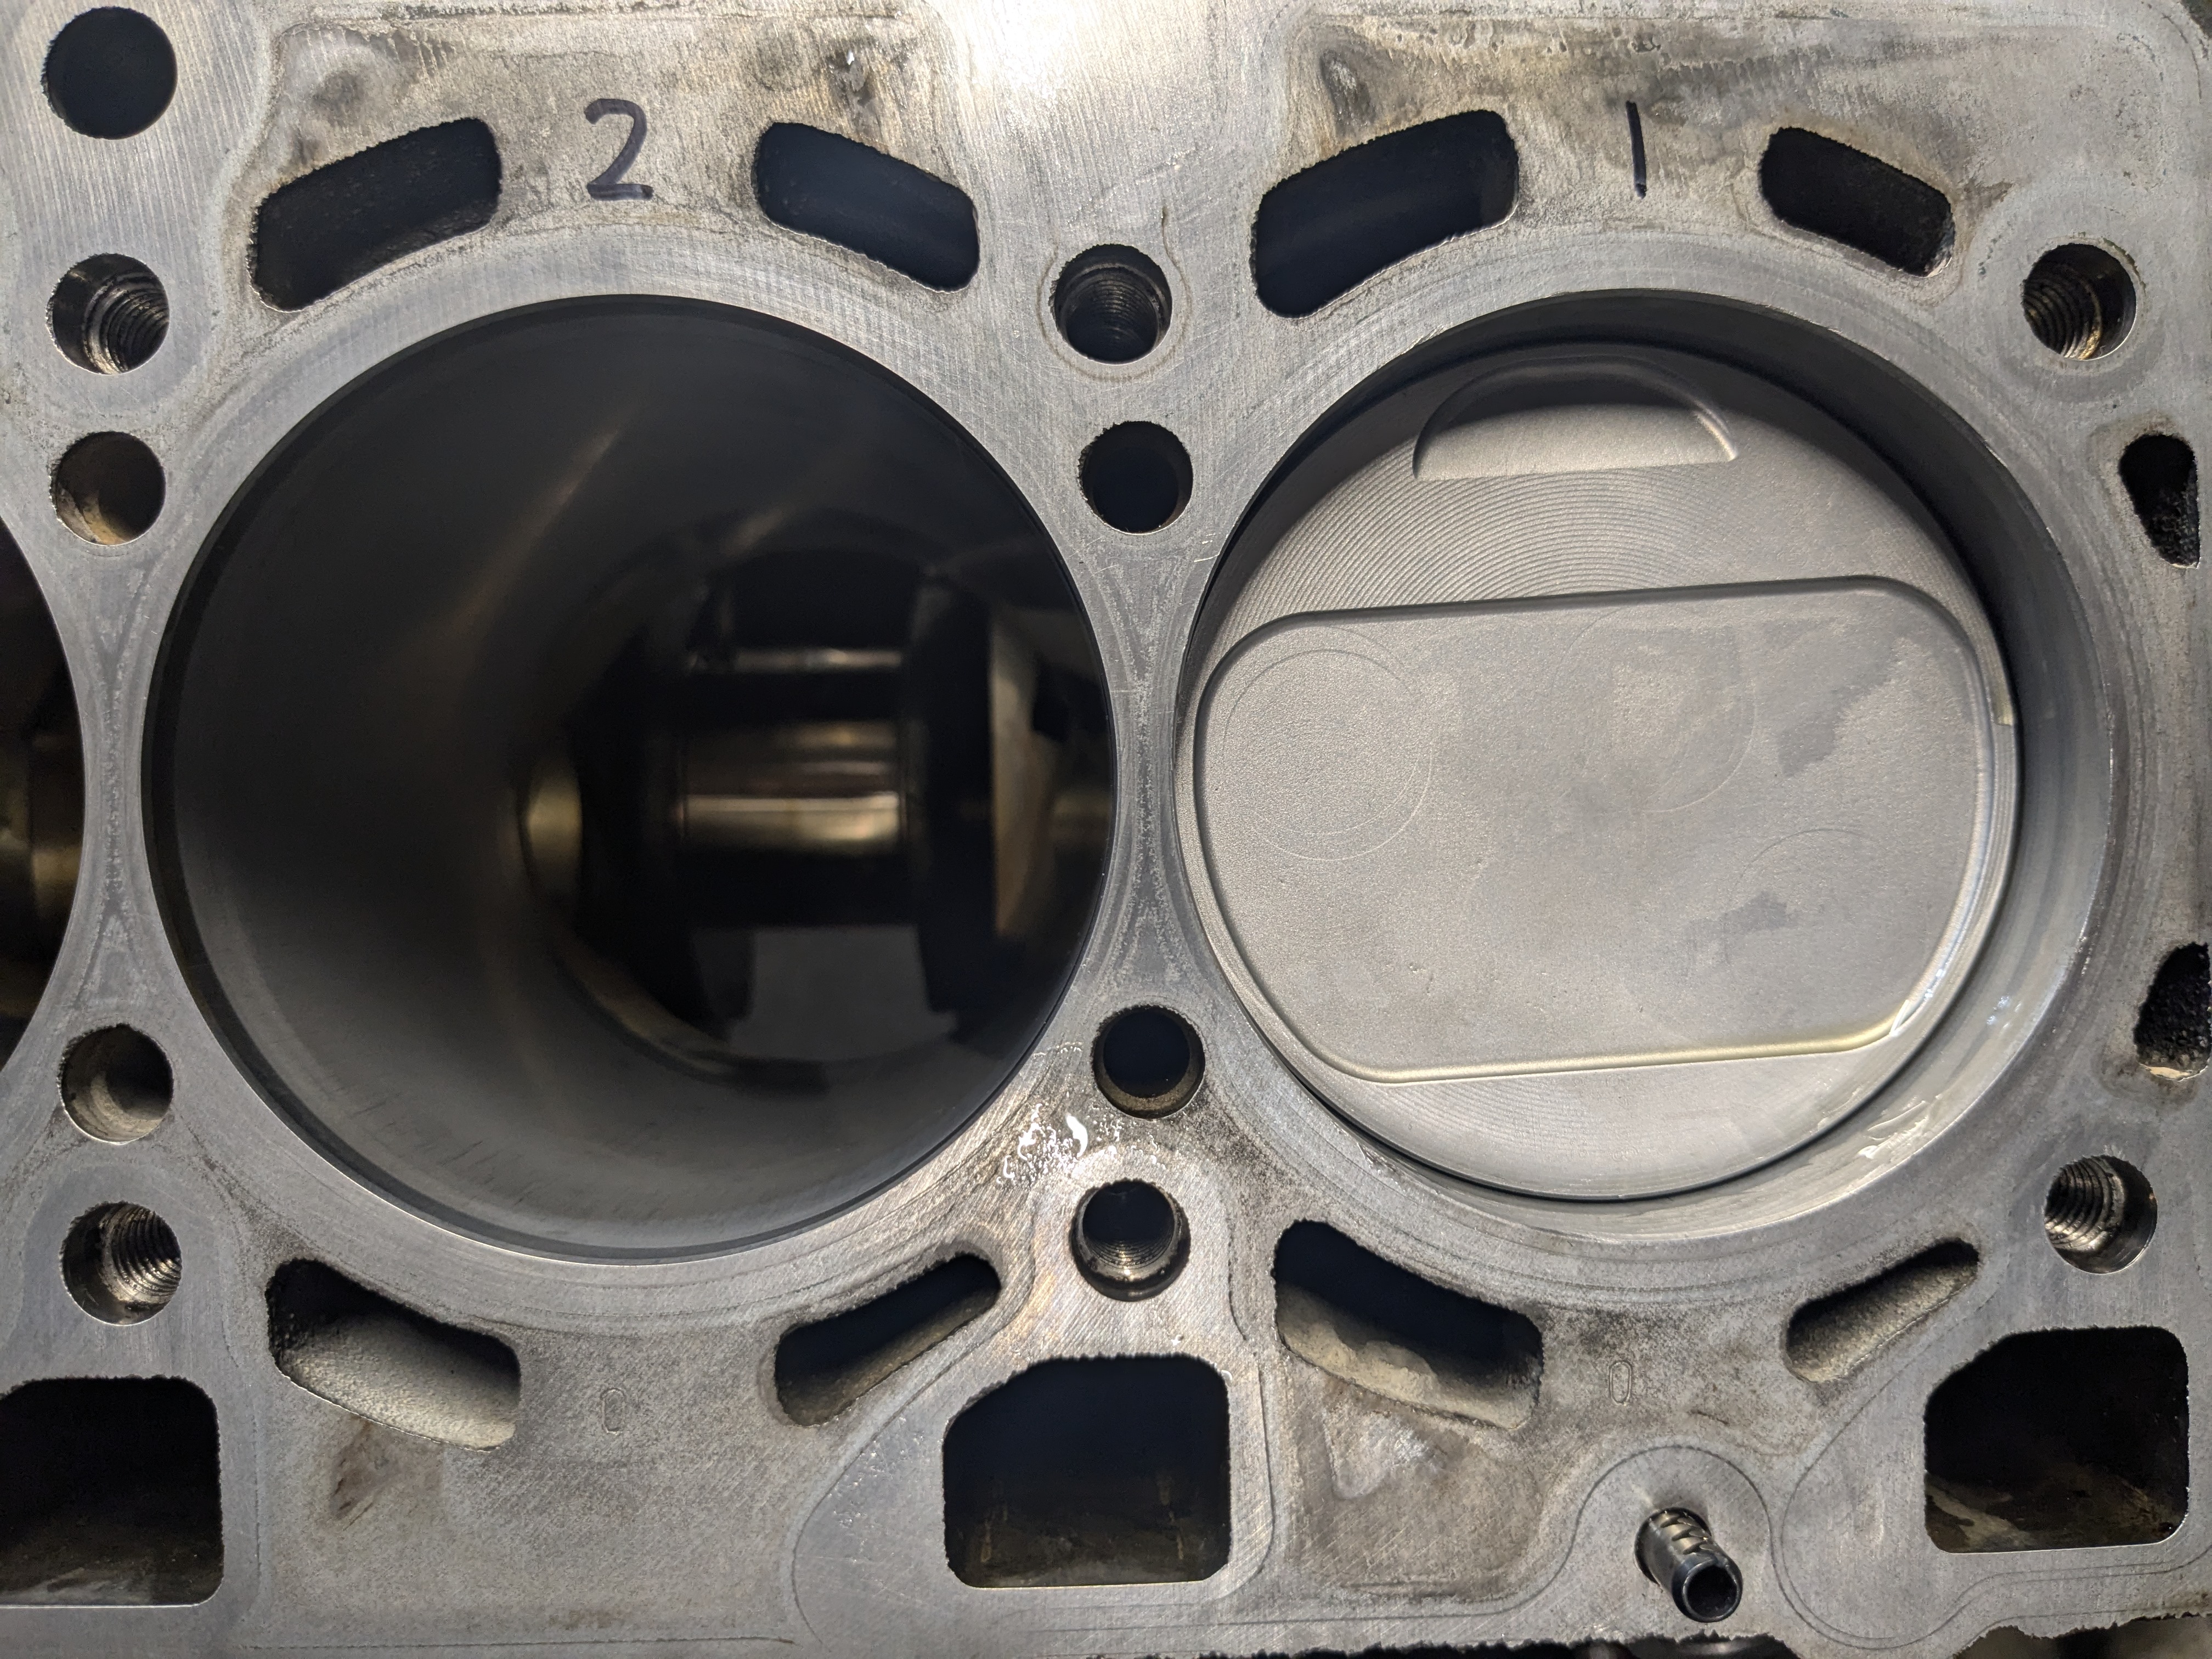
    cylinder 1 has these two short scrapes; the deeper-looking upper one just catches a fingernail.


    cylinder 3 has a long scrape that doesn't catch a fingernail, but can definitely be felt with one. these seem like some grain of sand made it into the cylinder and was pushed against the wall.


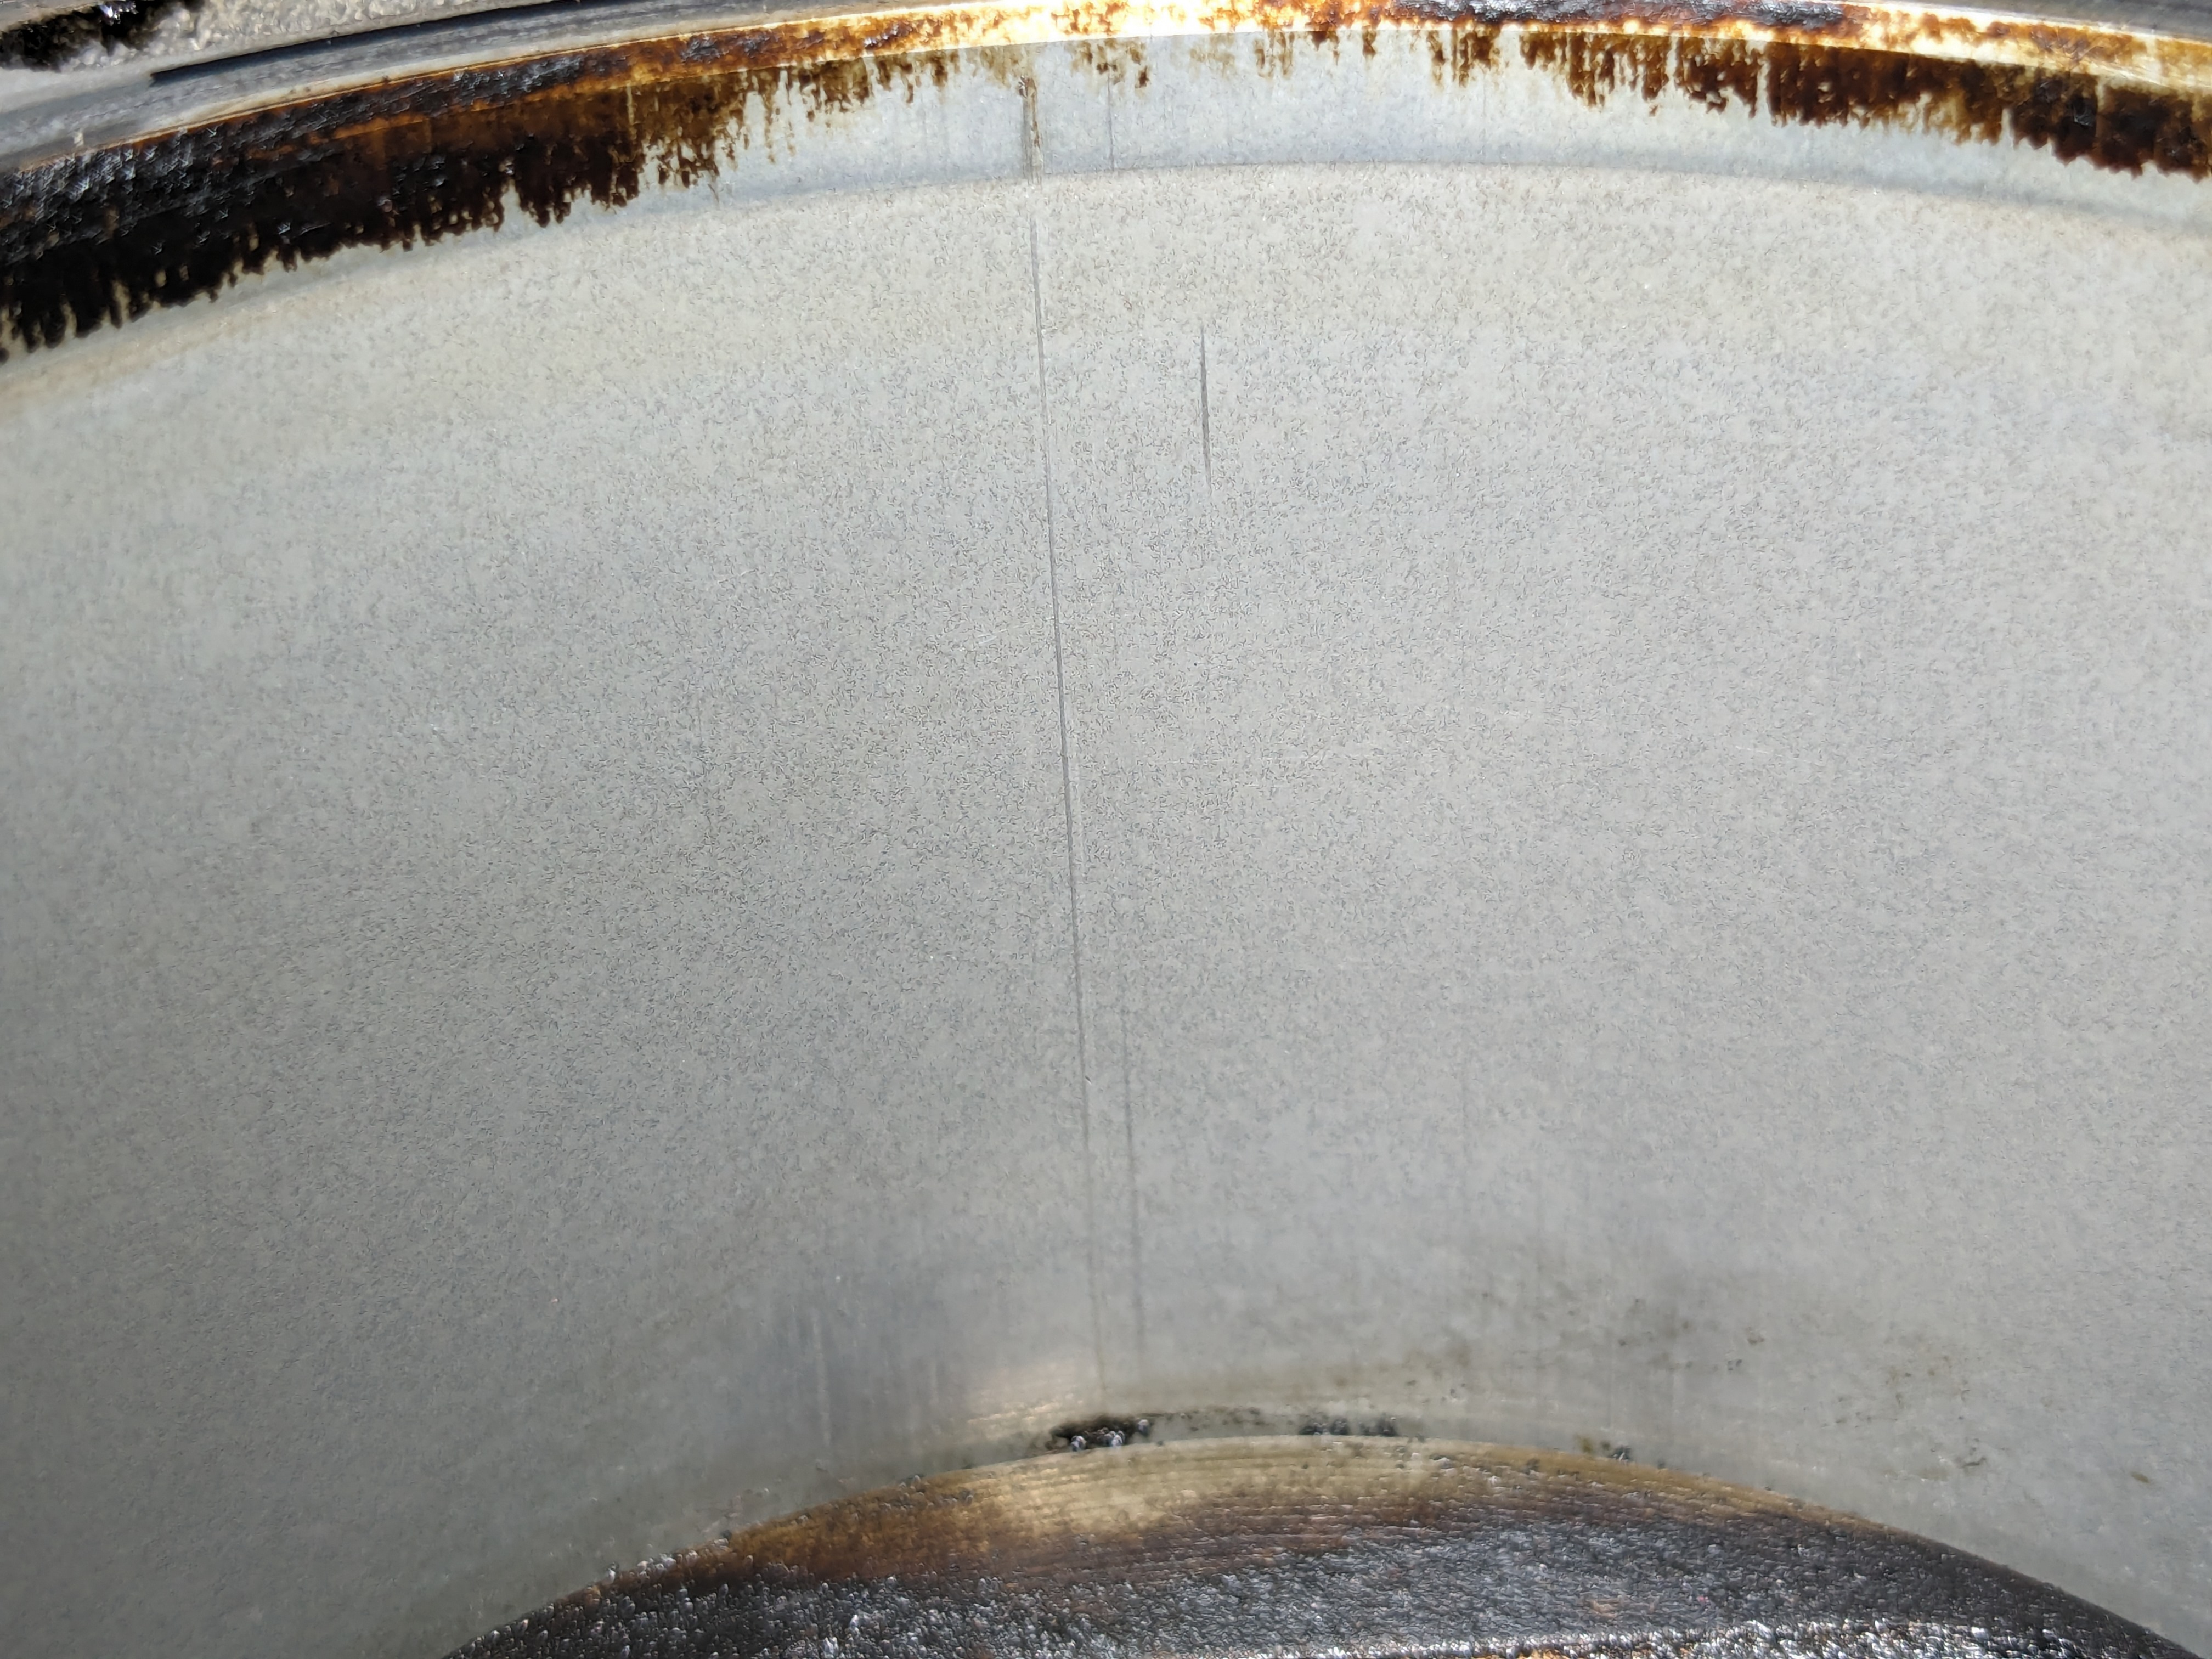
    honing probably wouldn't do much for that damage. i'm not really worried about them, though; the long one is shallow, while the deeper one is just at the top of the cylinder.

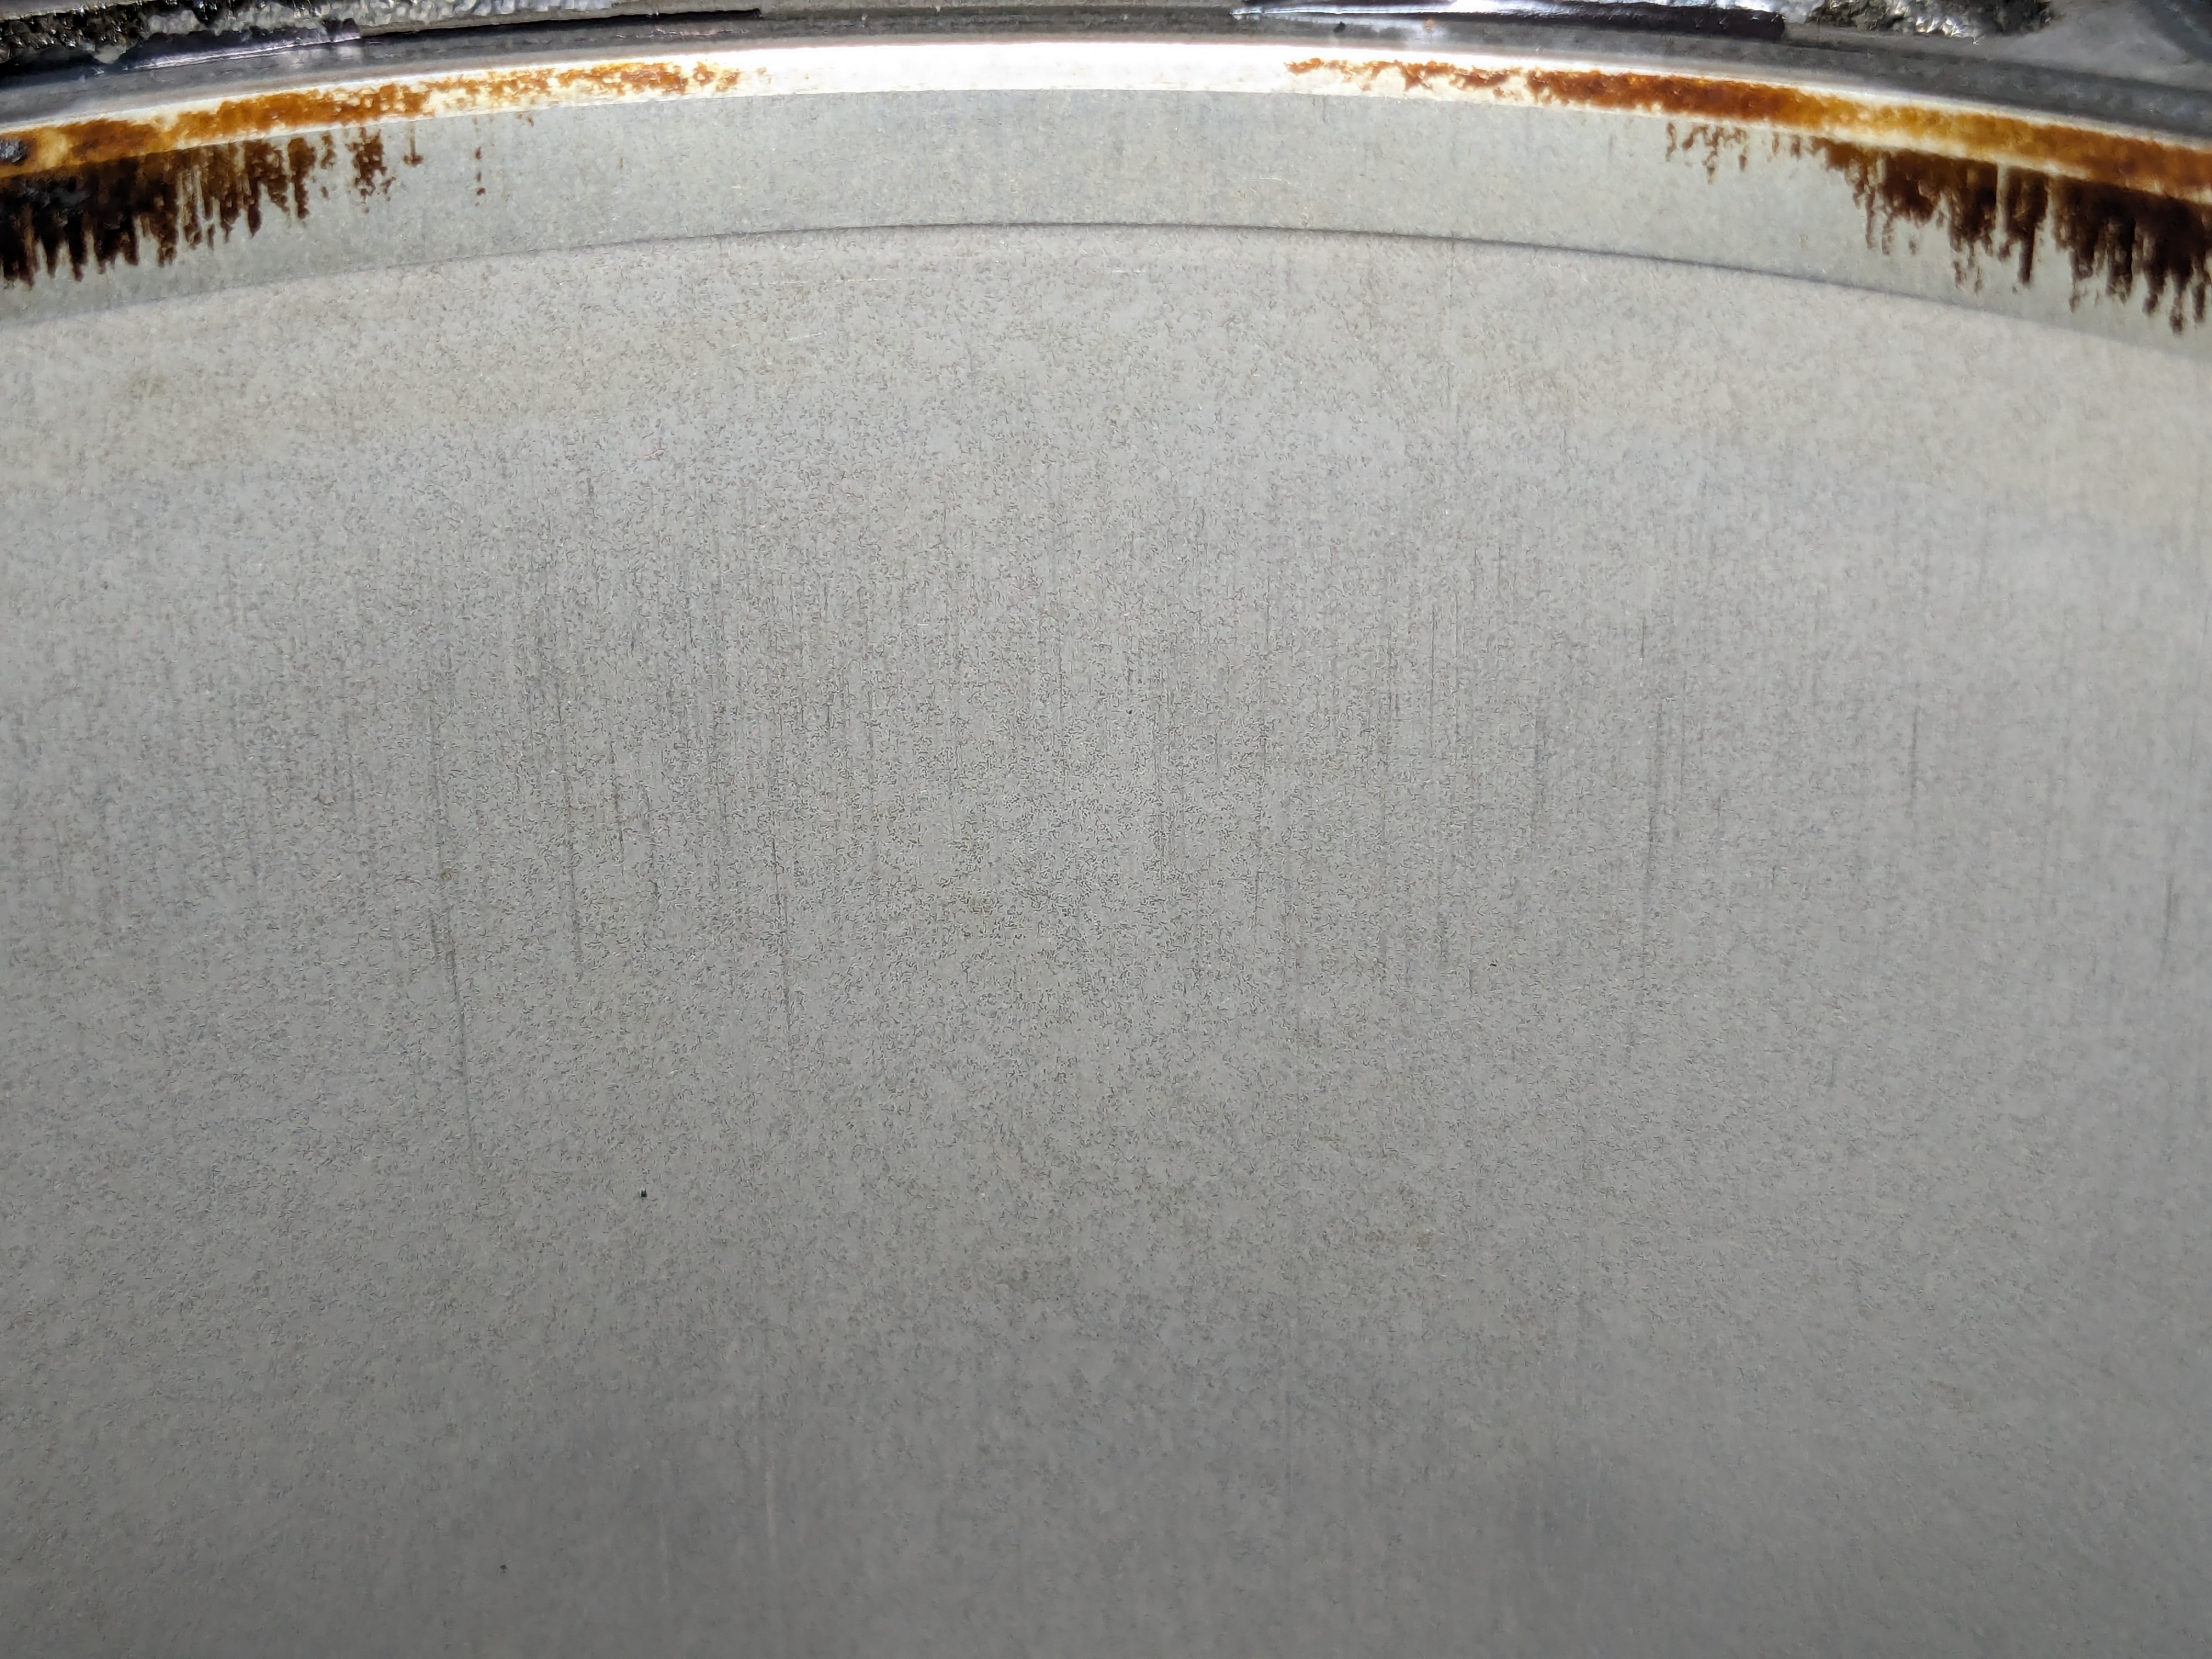
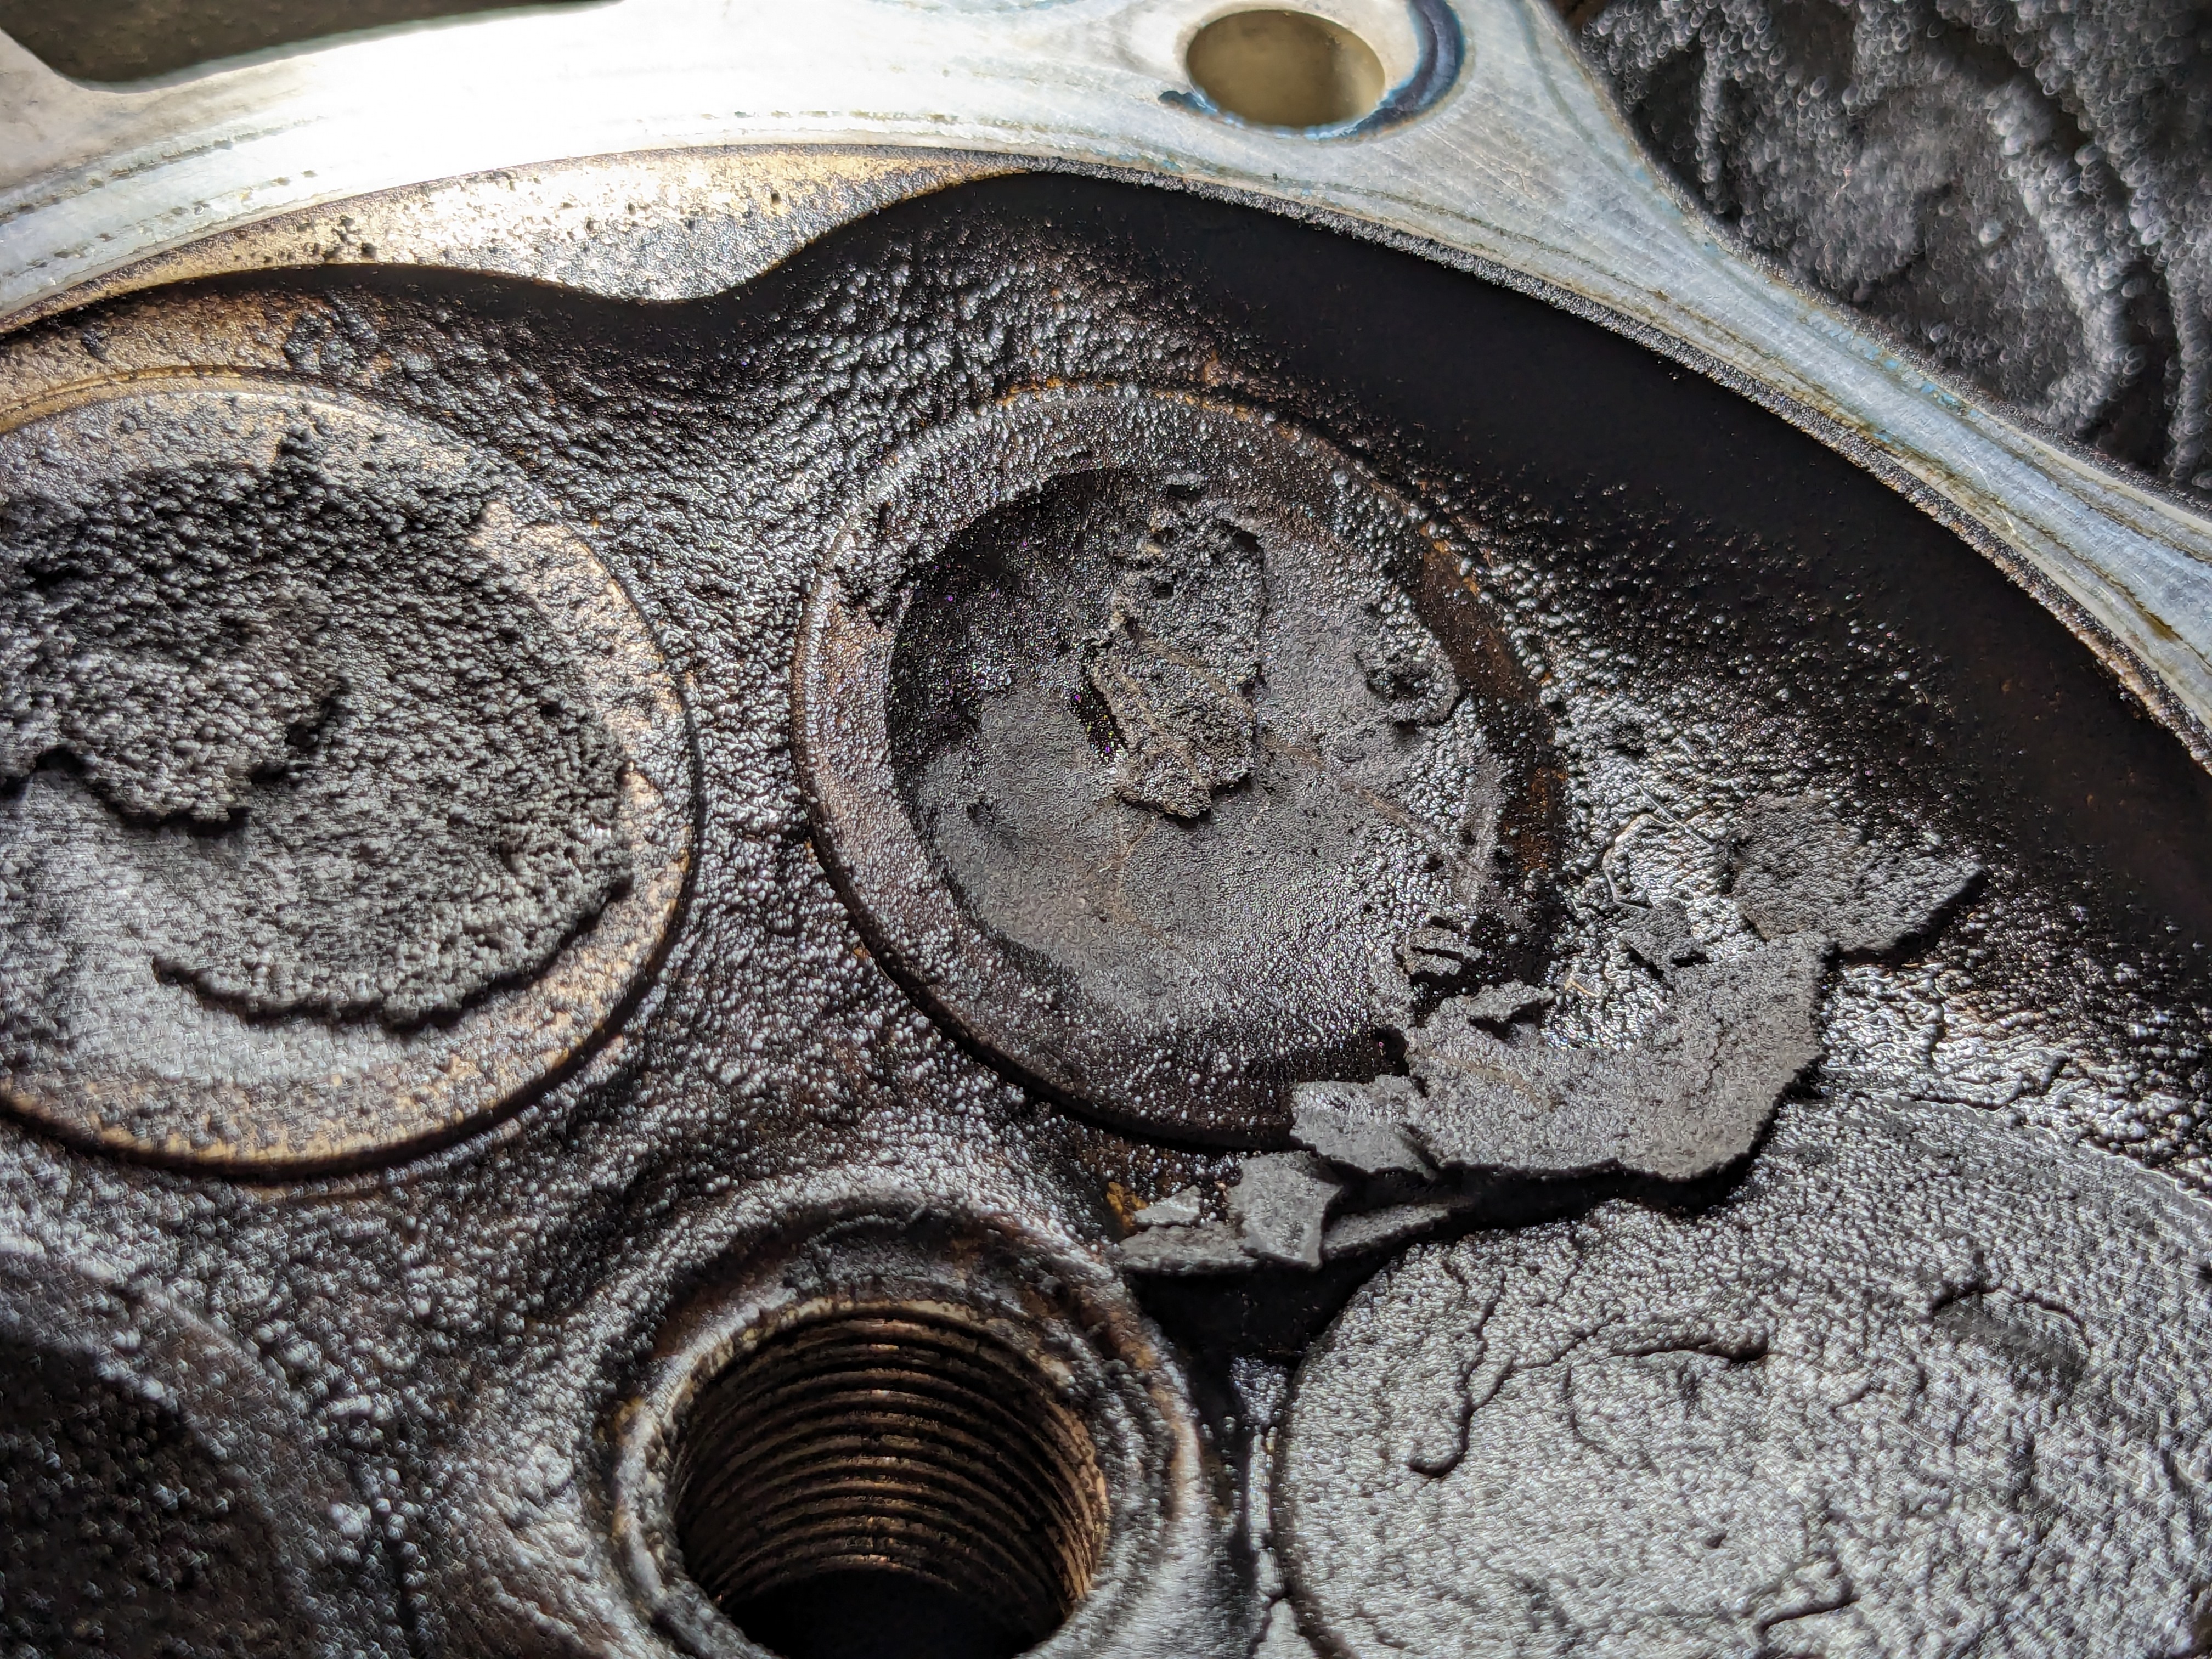
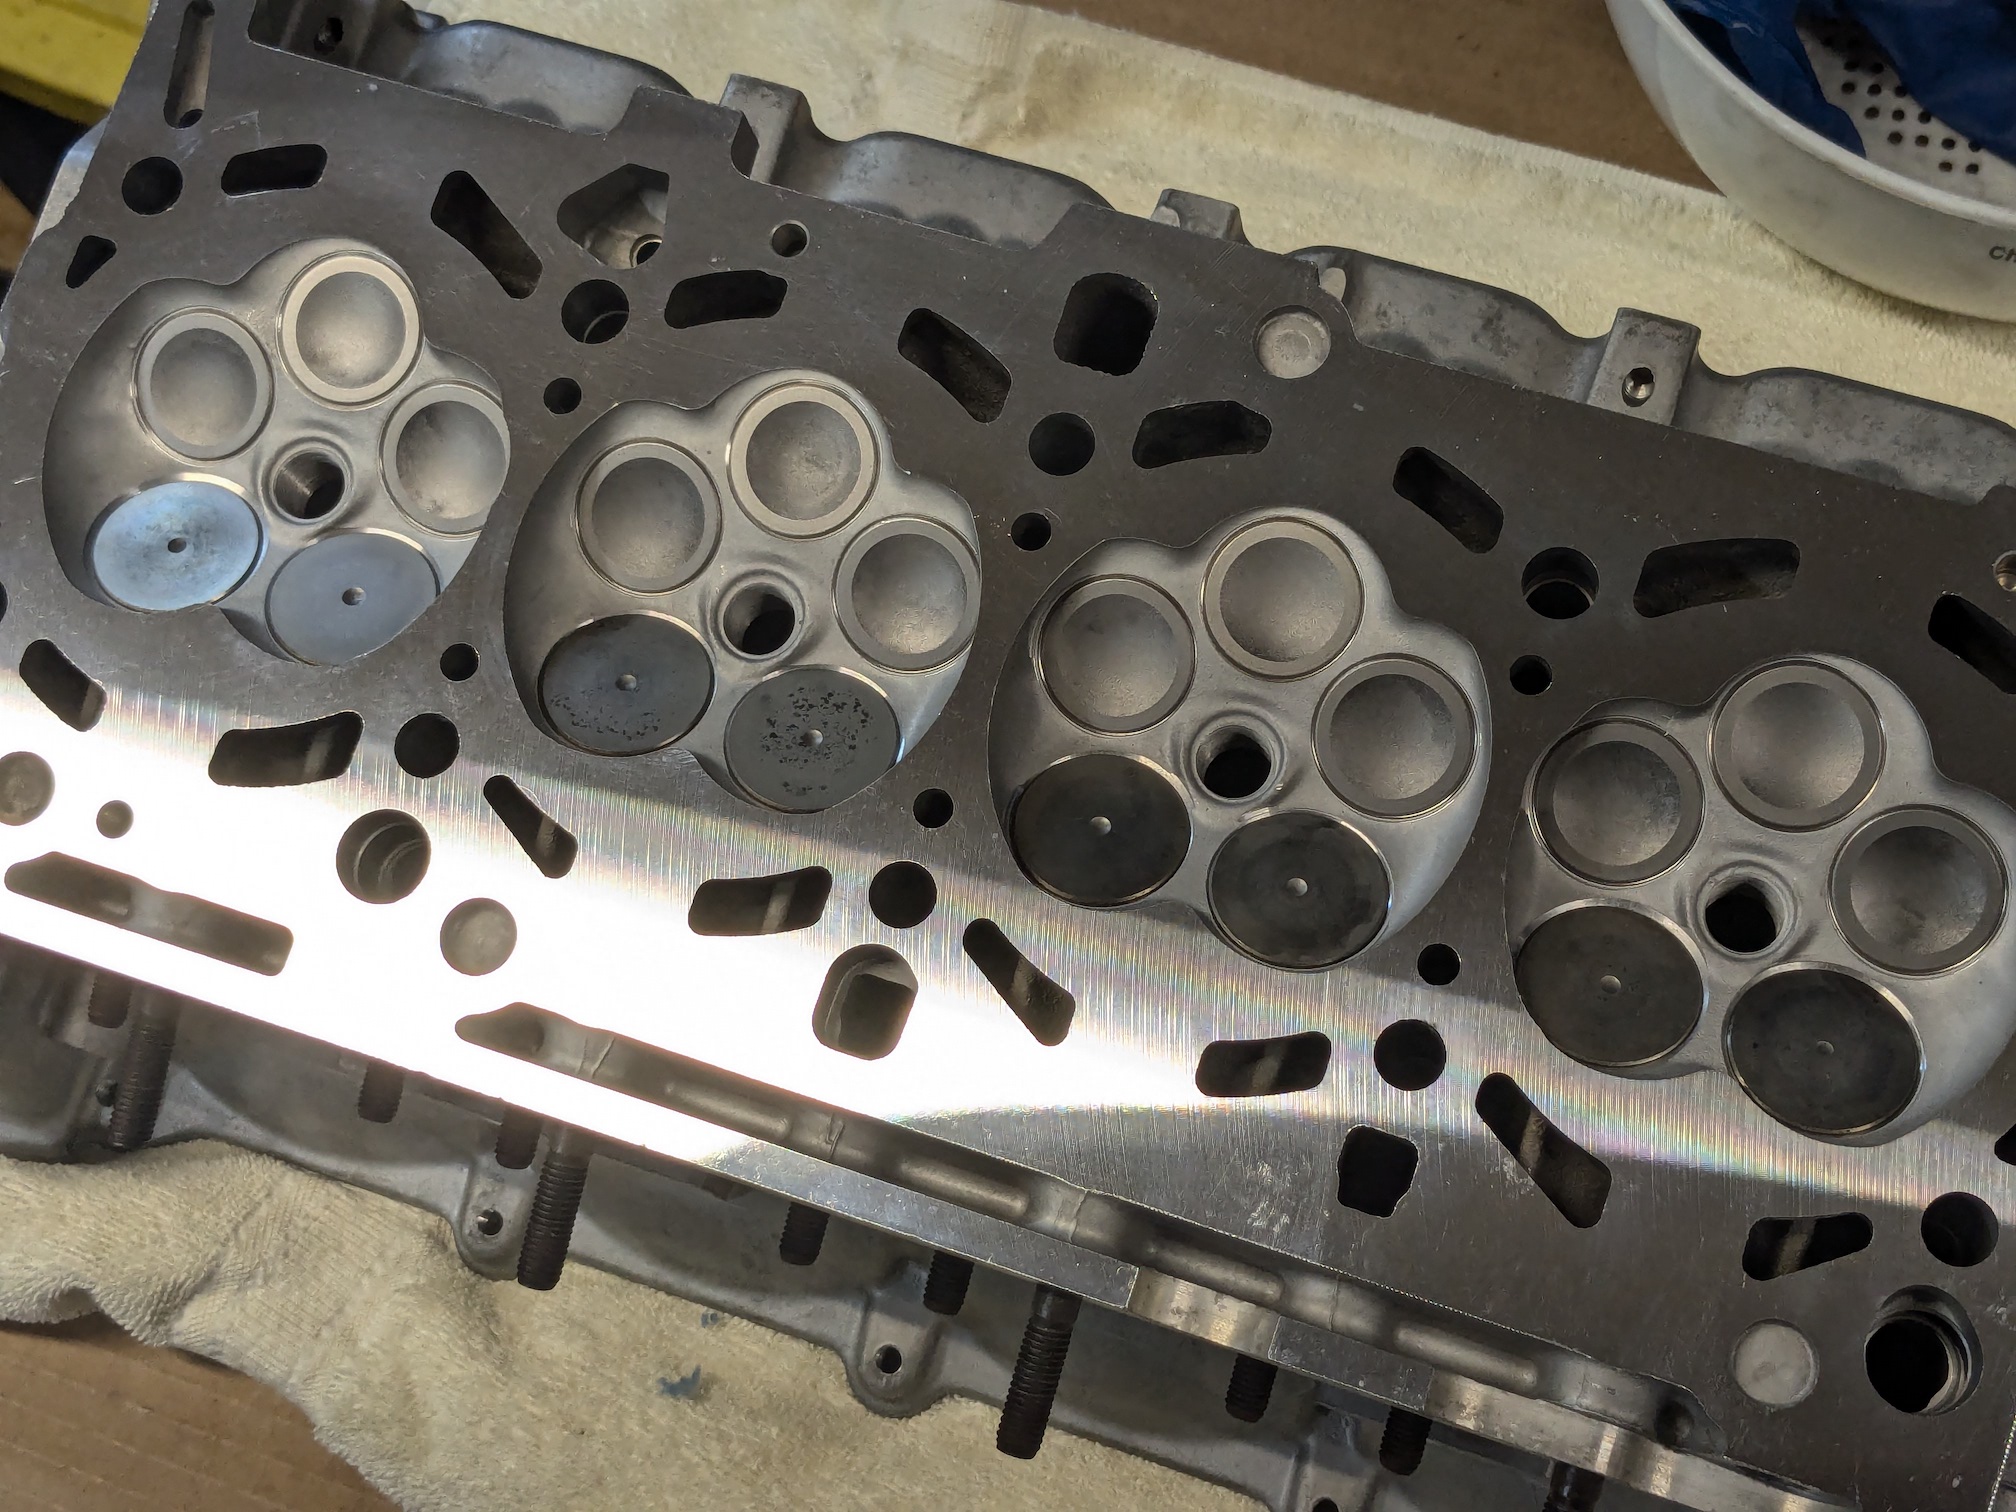
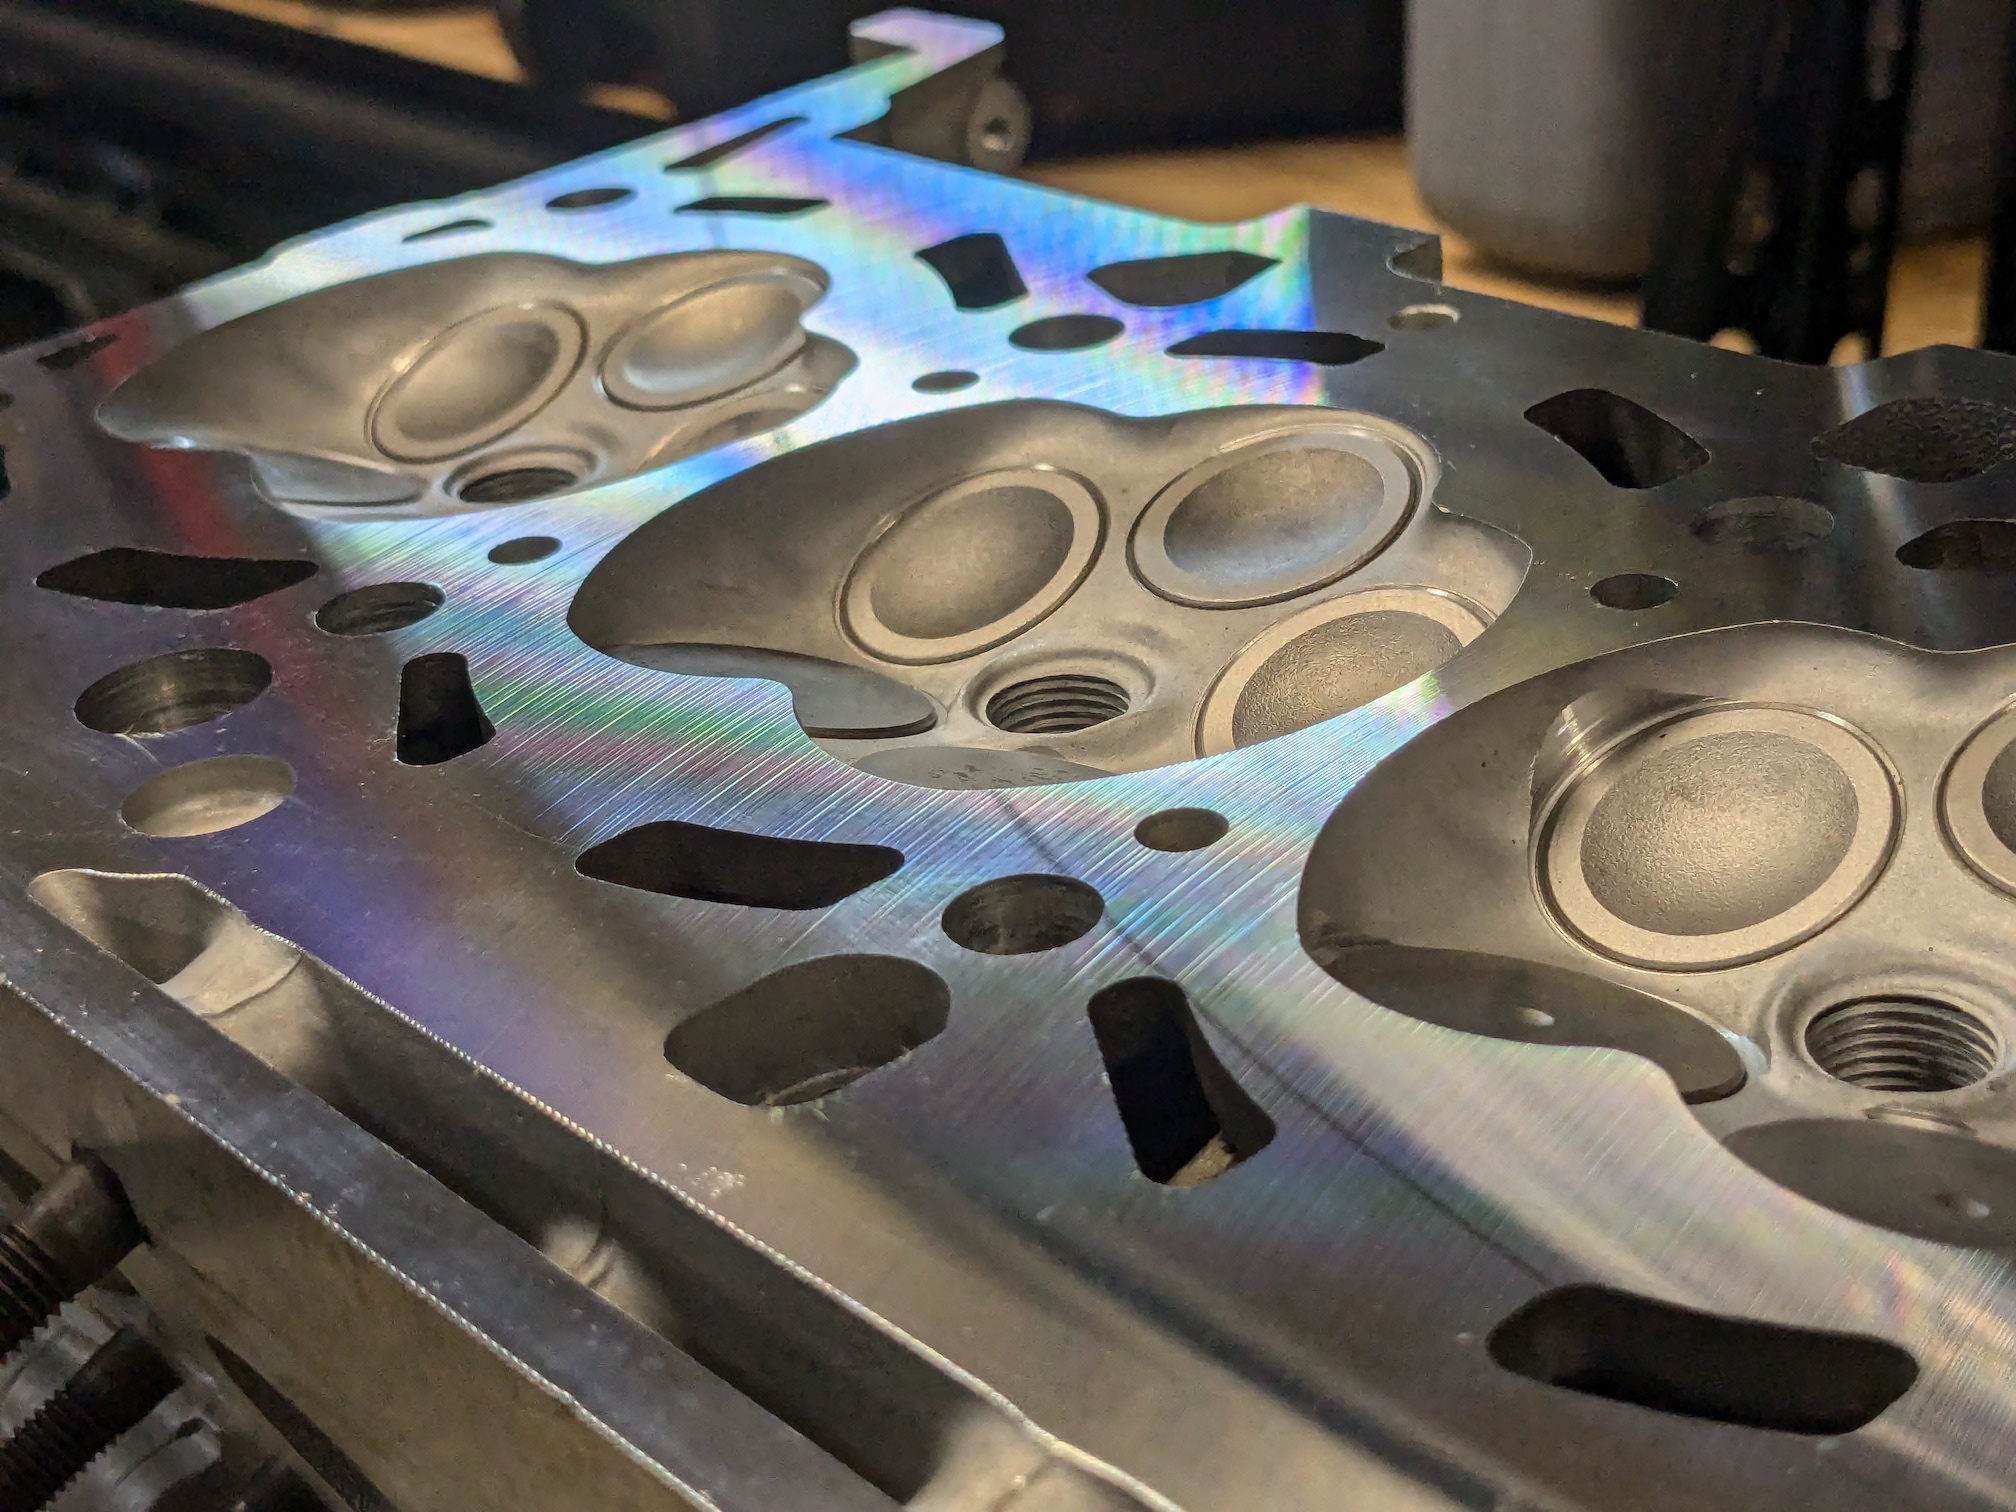
    4 is where honing might actually do something. these dark marks can't really be felt, other than maybe a very, very slight difference in surface smoothness.


    it's a bit hard to tell what's going on with 5, but the areas with dark speckles are the normal surface with silicon nodules poking out of aluminum. there are splotches of smooth grey, however, that might be where silicon was worn down...? or not properly honed in the first place?


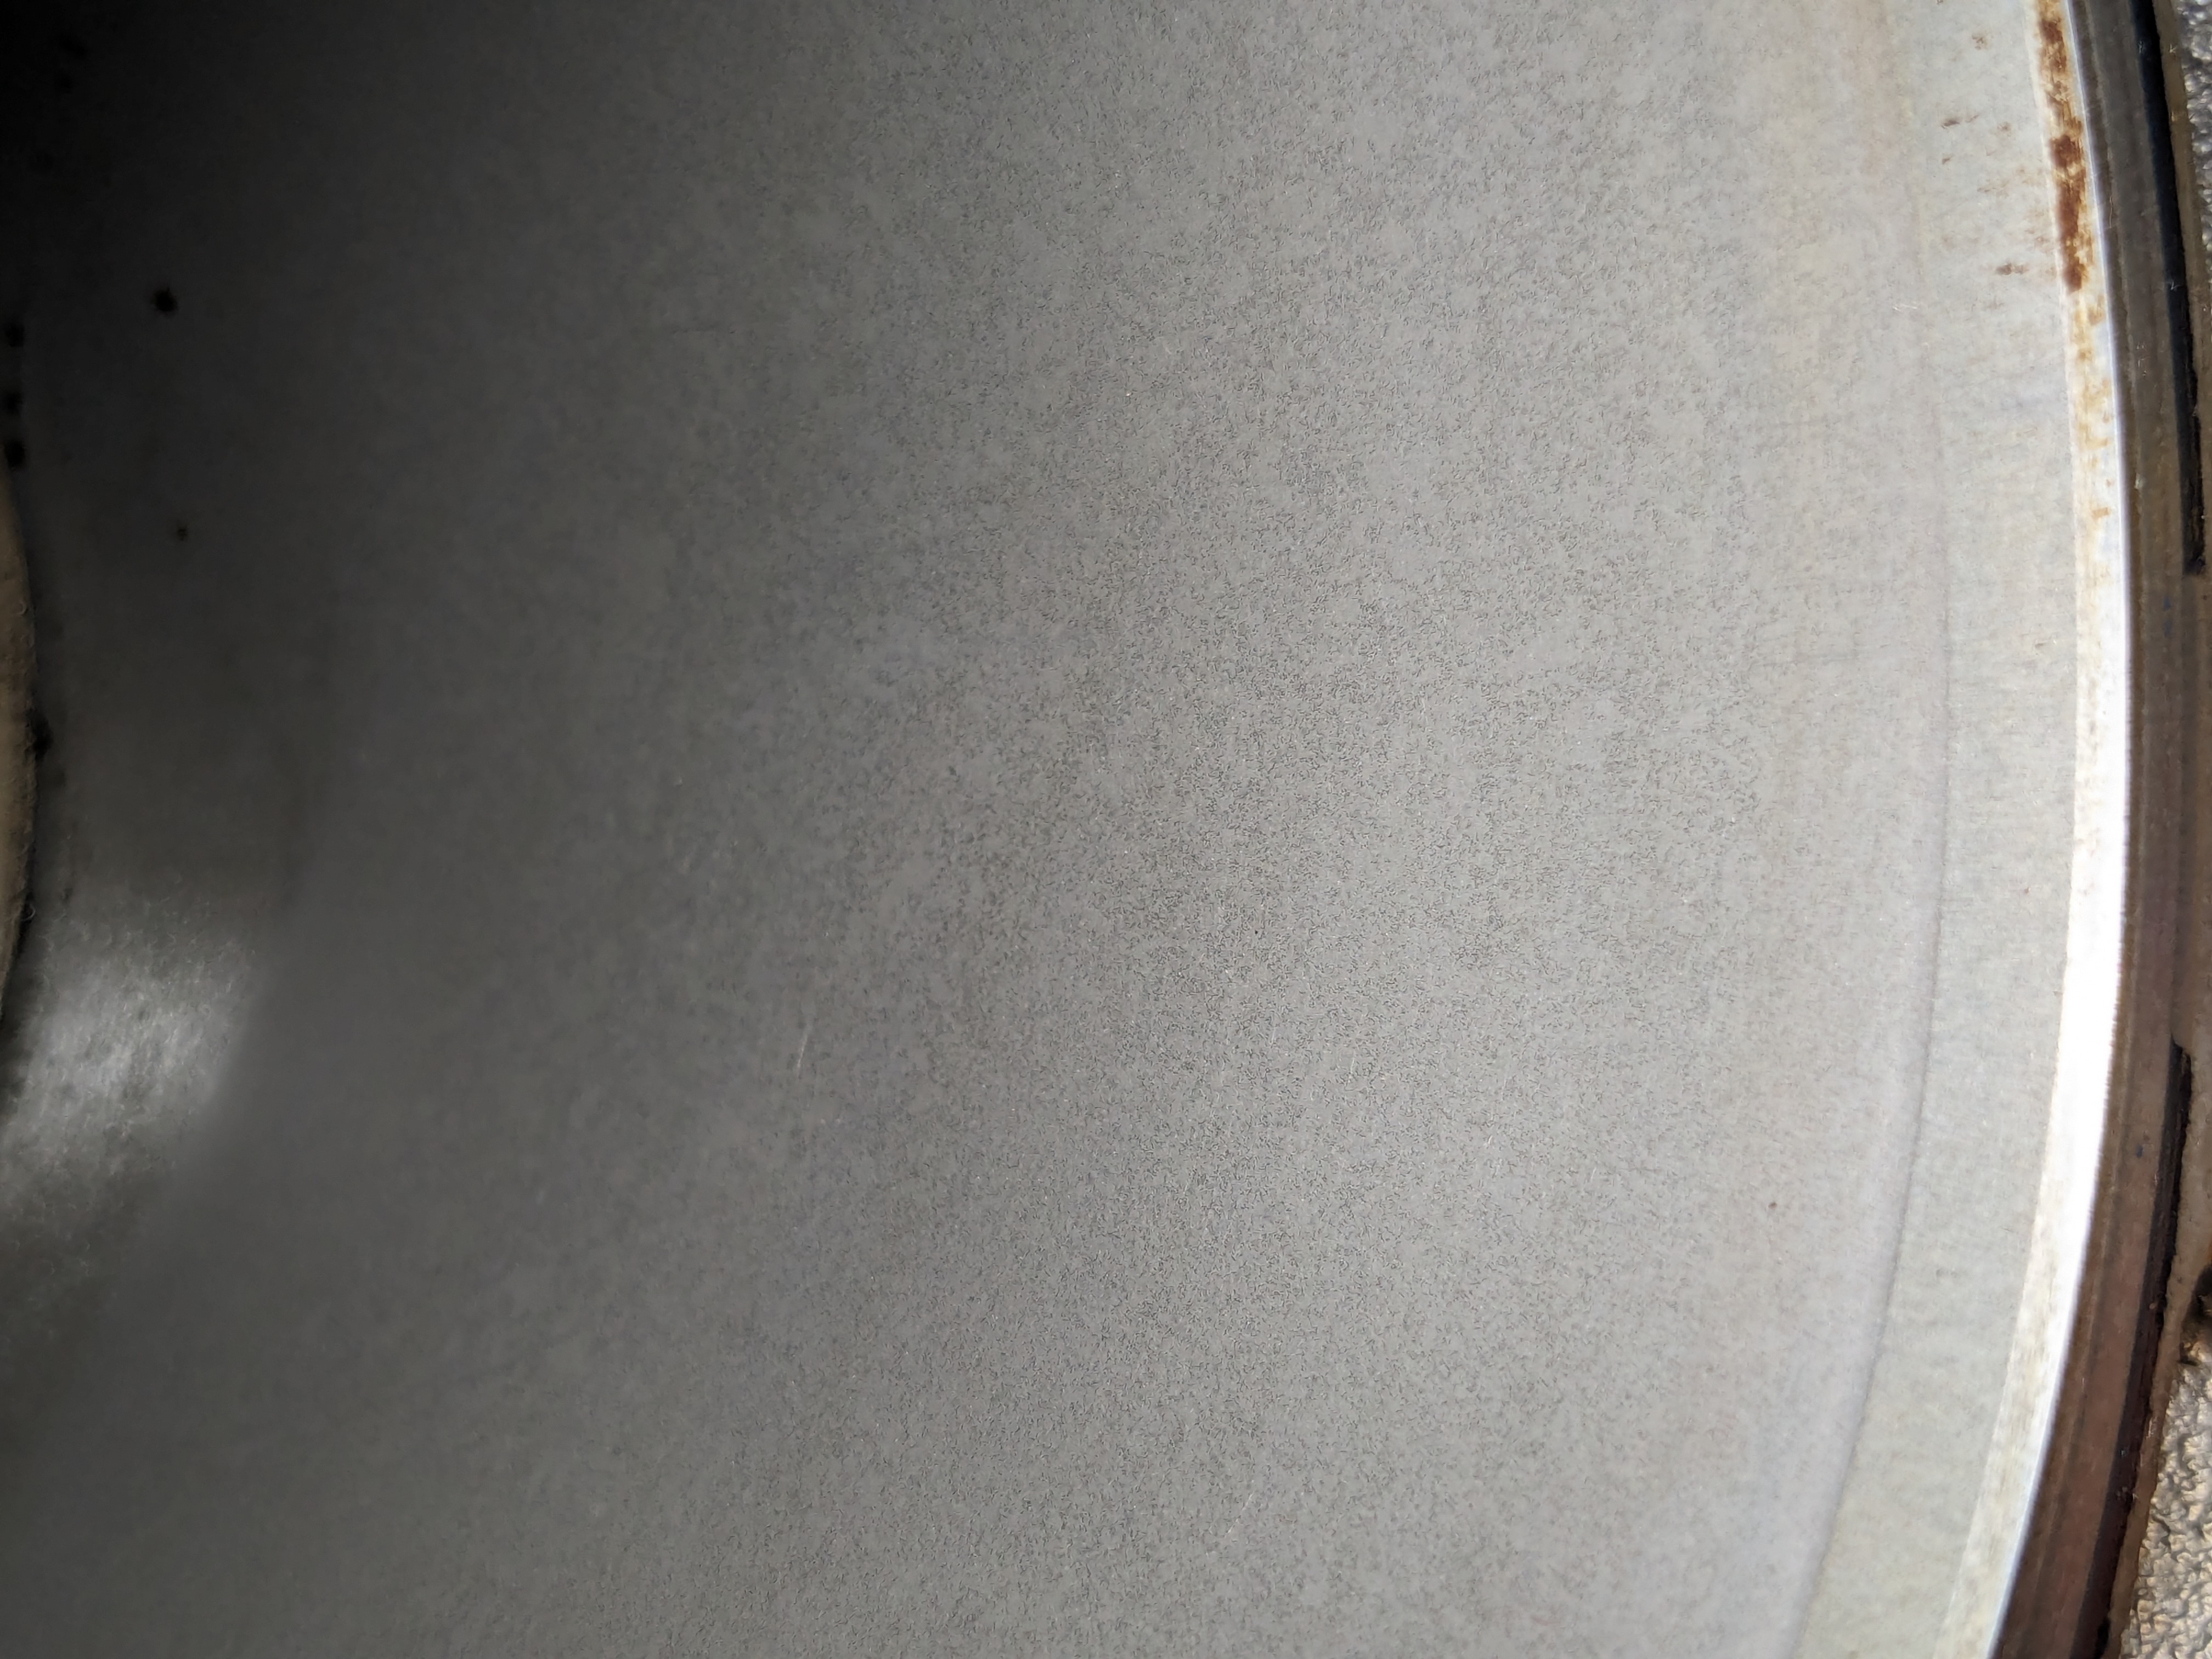
    would honing do anything here? there's a limit to what you can do to Alusil at home, so i'm not sure if it's worth the significant added cost. new rings might be a good idea for this aging engine, but is that more of a nice-to-have than critical preventative maintenance?
    Vorsprung durch Service Position
    Buy shirts & help me buy tires!

  2. #2
    Veteran Member Four Rings VinnysS4's Avatar
    Join Date
    Nov 12 2015
    AZ Member #
    364349
    My Garage
    2004 s4 Avant, 2005.5 S4 Manual swapped, 2002 A4 3.0 6 speed, 2004 A4 1.8 5 speed
    Location
    Oregon

    Leave it. Pull the pistons, clean the rings and ring grooves good, felt hone the cylinder walls it if you feel so inclined to but it won't make much difference. The walls look decent compared to some I've seen. The bigger issue is the rings and valve guides

    Sent from my SM-N960U1 using Tapatalk
    1997 VW GTI VR6 (sold), 2003 Audi RS6 (sold), 2010 Audi A4 2.0T (RIP Totaled on 11/2/2015 ) 2005.5 Audi S42011 Dieselgate Q7 TDI..... patiently waiting for my warranty to expire!!

    My build log
    http://www.audizine.com/forum/showth...-s-s4-timeline

    "Everyone is An expert when they make their own category."

  3. #3
    Senior Member Two Rings
    Join Date
    Apr 18 2012
    AZ Member #
    92081
    My Garage
    1995 Toyota Land Cruiser (FJ80/FZJ80)
    Location
    Central Texas

    bonus photos post!

    this was the first time i pulled an engine, and it wasn't all that bad. particularly annoying parts were the rear heater pipe (couldn't disconnect until the engine was loose), the axle bolts (as usual, needed them red hot), and the fact that everything was evenly grimy from the leaky valve covers.


    the basic HF engine stand worked fine without modification. i should have made sure it was better centered, though, as it's more of a pain to rotate the engine with it just a couple inches off-balance.


    the engine has been running alright - a bit of chain rattle, and overall not as smooth as it used to be - but the clutch is reason i had to stop driving it. i guess a downshifts from fourth to second only has to go badly once...


    excuse me, what the f- i'm not sure what it is, but it's marked "Made in Germany".


    obligatory chain system shot; i just sorta gawked at it for a few minutes, trying to stay sane while i stared into the madness. overall, the engine seems in very good condition!


    a clean chain guide break, but still in place:


    a whole lot of oil has gone through these heads, and one bank is definitely worse.


    the worst cylinder head, just caked & crusted with carbon


    it's not necessary to clean off the oil varnish, but it sure will be pretty once it's all put together (and just less oily to handle). the dinky little HF ultrasonic cleaner can't bust up grime, but it will degrease and strip modest varnish with a light solution of ZEP orange cleaner (too much will corrode!); a quick brushing will break up any of the thicker deposits.


    i cleaned the roller rockers and cam followers... all forty of them, phew. but, it definitely seemed worth it considering the fine metal debris that washed out. the pic of the paper towel is just the final rinse for about half of them. i soaked the roller rockers in mineral spirits, rinsed out the bearings with a spray solvent, then soaked them in oil for a bit. i rinsed and soaked the cam followers in a PEA cleaner (Gumout Tune-Up), then in engine oil. i purged them before putting them back in the rockers and making sure they were fully inserted. i started by marking the individual followers, but after a couple cylinders it was much faster to just go cylinder-by-cylinder and match the wear patterns when putting them back in. you don't have to squeeze them in a vise to purge them: use a small, dull tool to poke the check valve inside the rear while compressing it.


    i was fully prepared to need a cam adjuster fix at >145,000mi, but these are... fine? like, really good, actually?


    - emilio
    Vorsprung durch Service Position
    Buy shirts & help me buy tires!

  4. #4
    Senior Member Two Rings
    Join Date
    Apr 18 2012
    AZ Member #
    92081
    My Garage
    1995 Toyota Land Cruiser (FJ80/FZJ80)
    Location
    Central Texas

    Quote Originally Posted by VinnysS4 View Post
    Leave it. Pull the pistons, clean the rings and ring grooves good, felt hone the cylinder walls it if you feel so inclined to but it won't make much difference. The walls look decent compared to some I've seen. The bigger issue is the rings and valve guides
    gotcha, thanks. part of me wants to do it all just because i'm in here - and to deep clean the pistons - but i'm happy to skip the extra work and cost.

    yeah, this was consuming up to 1qt of oil per 800mi, and i'm pretty sure that was mostly past the stem seals. i'm going to have the heads rebuilt to address that.

    one more question: if i rotate the crank to move the pistons for cleaning, can i just rotate it back to the mark, put the locking pin back in place, and call it TDC?
    Vorsprung durch Service Position
    Buy shirts & help me buy tires!

  5. #5
    Veteran Member Four Rings VinnysS4's Avatar
    Join Date
    Nov 12 2015
    AZ Member #
    364349
    My Garage
    2004 s4 Avant, 2005.5 S4 Manual swapped, 2002 A4 3.0 6 speed, 2004 A4 1.8 5 speed
    Location
    Oregon

    I would definitely pull the pistons and clean the ring grooves and rings. I use an ultrasonic cleaner to clean them and it works quite well. The 3 places you'll burn oil is from the rings, the valve stem seals and the pcv valve. I'd address all 3 to curb the oil consumption.
    I know its a bit more work, but definitely worth it. Unless you plan on removing the crank you don't need to pull the bed plate to get the pistons out, just the upper oil pan and windage tray. Before you decide to do so, make 100% sure to secure a set of rod bolts as they quit making them so supply is limited. Alex @amtuned is one of the only places left who stocks them.
    Once the heads are off you can rotate the bottom end freely. Rotate as you wish and just put #8 up top and then insert the crank locking pin and assemble the engine.

    Sent from my SM-N960U1 using Tapatalk
    1997 VW GTI VR6 (sold), 2003 Audi RS6 (sold), 2010 Audi A4 2.0T (RIP Totaled on 11/2/2015 ) 2005.5 Audi S42011 Dieselgate Q7 TDI..... patiently waiting for my warranty to expire!!

    My build log
    http://www.audizine.com/forum/showth...-s-s4-timeline

    "Everyone is An expert when they make their own category."

  6. #6
    Veteran Member Four Rings VinnysS4's Avatar
    Join Date
    Nov 12 2015
    AZ Member #
    364349
    My Garage
    2004 s4 Avant, 2005.5 S4 Manual swapped, 2002 A4 3.0 6 speed, 2004 A4 1.8 5 speed
    Location
    Oregon

    The piece in the intake port looks to be part of the intake flapper.
    That metal flake debris is concerning... did you find any in the oil pan or pickup tube?

    Sent from my SM-N960U1 using Tapatalk
    1997 VW GTI VR6 (sold), 2003 Audi RS6 (sold), 2010 Audi A4 2.0T (RIP Totaled on 11/2/2015 ) 2005.5 Audi S42011 Dieselgate Q7 TDI..... patiently waiting for my warranty to expire!!

    My build log
    http://www.audizine.com/forum/showth...-s-s4-timeline

    "Everyone is An expert when they make their own category."

  7. #7
    Veteran Member Three Rings
    Join Date
    Jan 29 2017
    AZ Member #
    391935
    My Garage
    B7 RS4, B15 Sentra Spec V
    Location
    San Antonio, TX

    You got an O.D. and I.D. mic to measure for the bearings?

    The clutch image is concerning but I have seen similar and its not from going from 4th to 2nd, though attempting to rev match would help, but I wouldn't be surprised if you had shifting issues at higher revs getting worse over time.

  8. #8
    Senior Member Two Rings
    Join Date
    Apr 18 2012
    AZ Member #
    92081
    My Garage
    1995 Toyota Land Cruiser (FJ80/FZJ80)
    Location
    Central Texas

    Quote Originally Posted by VinnysS4 View Post
    I would definitely pull the pistons and clean the ring grooves and rings.
    ahh, i understand: disassembly & cleaning are worth it, but honing may not be. thanks!

    the procedures at least seem simple enough: take out a bunch of bolts and don't drop anything. it sounds like i'll need all the seals, 20 block bolts (10x 10mm, 10x 8mm), 16 connecting rod bolts, and a piston ring compressor. i have some credit to use with JHM, and they sell all the parts but the conrod bolts.

    Quote Originally Posted by VinnysS4 View Post
    The piece in the intake port looks to be part of the intake flapper.
    That metal flake debris is concerning... did you find any in the oil pan or pickup tube?
    hmm, i need to recoat/repaint the intake manifold top (bubbling), so i'll open it up at some point. i guess i could do the intake flap mod if it's seriously damaged. i was thinking about the JHM IM mod service, but i'm keeping this fairly stock and that kind of airflow optimization might not be worth the pretty penny.

    no noticeable metallic flakes anywhere else, nor have i noticed it in the past when doing oil changes or engine work. this engine seems quite clean: no sludge, just the usual carbon-y sediment in spots, light oil varnishing, a fairly clean oil pan, and no debris in the pan or pickup screen except for what seems to be short strings of excess sealant. the cam followers seem to have a surface finish or coating, so maybe it wore off inside and didn't really make it out.

    Quote Originally Posted by CrickiKaze View Post
    You got an O.D. and I.D. mic to measure for the bearings?
    i have some OD mics, but the only really good ID thing i have is a dial caliper that's probably too risky for bearings. i think i saw a measurement procedure in the Bentley... how often do these need bearings replaced?
    Vorsprung durch Service Position
    Buy shirts & help me buy tires!

  9. #9
    Veteran Member Three Rings
    Join Date
    Jan 29 2017
    AZ Member #
    391935
    My Garage
    B7 RS4, B15 Sentra Spec V
    Location
    San Antonio, TX

    Usually its a good idea to check the clearance since you have it apart, just in case it got out of spec and normally its a cheap part to replace but if its surface is good/even wear and measures good you could reuse them...

    Not sure how far you want to go but if you want it won't be a bad idea to have the rods checked as well to include the small end bushing.

    You could use plastigauge to check the clearance.

  10. #10
    Senior Member Two Rings
    Join Date
    Apr 18 2012
    AZ Member #
    92081
    My Garage
    1995 Toyota Land Cruiser (FJ80/FZJ80)
    Location
    Central Texas


    pistons removed, and mostly no surprises. all the rings move easily, though a few of them have a very faint gumminess to them. all the piston skirts have signs of rubbing on the cylinder, but not heavy wear.

    the bearings didn't look too bad overall: some were grey with a few slightly lighter areas, and others have a thin line on them that you can't feel. all the crank bearing surfaces look great.

    one of the bearing lines that is visible but can't be felt:


    the one surprise was this bearing with a sort of crease on it. it's not a crack, and it doesn't extend around the sides or through the back. maybe it's a manufacturing defect, or an artifact from punching the tab in the bearing? again, the crankshaft bearing surfaces all look pristine, and this seems to be old as its worn in with the rest of the bearing surface.


    the reverse of the same bearing, with no cracking through the rear:


    i'm no expert, and i haven't gauged anything yet, but the bearings seem usable. that creased bit doesn't feel like it's going to break off, but it is still weird and bearings generally shouldn't be "weird". maybe i should replace them to be extra cautious?
    Vorsprung durch Service Position
    Buy shirts & help me buy tires!

  11. #11
    Veteran Member Four Rings q_dubz's Avatar
    Join Date
    Dec 16 2008
    AZ Member #
    36417
    My Garage
    Single Turbo V8 S4
    Location
    EAST COAST

    DAMN GOOD PHOTOS!

    Overall that engine looks exceptionally healthy. I'd clean the ring grooves and if you're reusing the rings then no need to paste hone them. But while you're in there, a fresh set wouldn't hurt.

    As for the bearing, eh, i'd replace those two halves. That's a chance for debris to get caught in there (the crease).

    Check the stamps on the side of the block and on the upper oil pan (i think that's where the other is). You should see a row of G-G-G-G-G for the bearing code.

  12. #12
    Veteran Member Four Rings q_dubz's Avatar
    Join Date
    Dec 16 2008
    AZ Member #
    36417
    My Garage
    Single Turbo V8 S4
    Location
    EAST COAST

    unrelated note: i'll be moving to DC area next week so wouldn't mind coming by to drink your beer and give words of encouragement

  13. #13
    Senior Member Two Rings
    Join Date
    Apr 18 2012
    AZ Member #
    92081
    My Garage
    1995 Toyota Land Cruiser (FJ80/FZJ80)
    Location
    Central Texas

    thanks! the block does have the row of G's across two surfaces on the cylinder block. that means standard "yellow" bearings?

    i'm not having luck finding single bearings for sale at a reasonable price; OE's all seem to be around $75 each. King doesn't directly list the BHF on their site, but they do list other Audi 4.2s: i think CR894CP is a single bearing (or pair?) while CR6779CP seems to be a set for 6 cylinders... or 8? their catalog isn't entirely clear. bottom line, i may just have to order a full set from AMT since they don't even seem to be in stock anywhere else.

    part of me really wants to replace the rings and hone since i've already come this far. but, it's also almost $600 in rings & the honing kit, and the engine is in pretty good shape. i wish i'd run a compression test before removal, but the results were good when i did one years ago (maybe one cylinder a little lower, but still within spec).

    d'oh, i forgot to update my location; i've lived in a Texas for a couple years, otherwise i'd totally be down!
    Vorsprung durch Service Position
    Buy shirts & help me buy tires!

  14. #14
    Veteran Member Four Rings q_dubz's Avatar
    Join Date
    Dec 16 2008
    AZ Member #
    36417
    My Garage
    Single Turbo V8 S4
    Location
    EAST COAST


  15. #15
    Senior Member Two Rings
    Join Date
    Apr 18 2012
    AZ Member #
    92081
    My Garage
    1995 Toyota Land Cruiser (FJ80/FZJ80)
    Location
    Central Texas

    aye, that's the plan ("AMT"), though they don't seem to sell individuals or pairs. replacing all the bearings wouldn't hurt, except my wallet, but at least they're cheaper than rings. they currently have my heads, so i'm going to order some parts to ride back in the boxes (including the precious cam adjuster re-seal kit and the metal clutch slave).
    Vorsprung durch Service Position
    Buy shirts & help me buy tires!

  16. #16
    Veteran Member Three Rings charliemike's Avatar
    Join Date
    Jul 24 2008
    AZ Member #
    31231
    Location
    Virginia

    How's the project going? Have you had any issues getting parts? I was watching VAG Technik on YouTube and he was saying that parts are starting to become NLA, including the right side upper timing chain guide and some of the coolant hoses.

  17. #17
    Senior Member Two Rings
    Join Date
    Apr 18 2012
    AZ Member #
    92081
    My Garage
    1995 Toyota Land Cruiser (FJ80/FZJ80)
    Location
    Central Texas

    thanks for checking in, charliemike. i was thinking lately about posting a general update, but had to post about the damaged deck first. thankfully, it may not be that bad.

    i haven't had any problems tracking down parts, but i've been planning this (i.e. procrastinating) for years and buying parts along the way. most of the stuff i've had to buy recently has been the parts needed to get to the pistons (bearings, TTY bolts, seals), a few formed hoses, and random small parts & FIPG.

    one of the keys for this project was "stay sane", so once i decided to remove the pistons i borrowed a laser engraver (xTool F1) from a buddy. i used this to engrave the cylinder number on each piston, wrist pin, connecting rod, and rod cap - and each piston ring. this let me just chuck them in the ultrasonic cleaner, soaks, or rinses without having to separate the cylinders. i also engraved the rockers (though i already cleaned them up). the con rod bearings (but i ended up buying new ones), and i put the torque spec on the oil drain plug. these pics are just of cylinder 1, and i got even better results on the others.


    i had the pistons vapor blasted, which sounds extremely high-tech but is essentially just wet bead blasting. the results are gorgeous, though. i cleaned and re-used the piston rings, which are in good shape. i also had the timing covers and upper oil pan vapor blasted, which cost way, way more than it was worth: i thought it would save me from cleaning a ton of gasket material, but it's such a gentle process that it took too long and racked up the hourly rate. note that, in the photo below, i already cleaned the dirty piston a little bit, including experimenting with carbon removal in the laser engraver (you can see the lines on top).


    the starter has been getting a little flaky, which i think is the solenoid failing to retract. i'm going to replace the solenoid, but the inside also had grease everywhere and will get a good cleaning.


    one of the intake manifold's threaded fuel rail mounts stripped out years ago. the bolt was barely able to stay in place, but it was never a problem between the other three and the fuel injectors - really, it'd stay in place just on the injector clips. i always wanted to repair it, though, and i took the opportunity to install thread inserts (off-brand Heli-Coils) since i also had my drill press set up. all the other rail mounts were looking grey and corroded, so they all got thread inserts. i was prepared to do all the threaded holes, including the ones that hold the IM's halves together, but those are all in pretty good shape except for the two on top. i'll use thread sealant on all of them since the IM seems susceptible to corrosion.


    speaking of, my intake manifold top has bubbling paint. i'm going to contact some local powder coating shops, and hopefully get something very close to stock.

    i should have everything i need to reassemble the engine once the intake manifold is done. otherwise there's plenty more cleaning to do around the engine bay, plus i need to figure out some heat insulation improvements.


    - emilio
    Vorsprung durch Service Position
    Buy shirts & help me buy tires!

  18. #18
    Veteran Member Four Rings Rol-co's Avatar
    Join Date
    Dec 12 2020
    AZ Member #
    577522
    Location
    Europe (NL)

    Pistons look like new emilio, well done!
    Only milk and juice come in two liters, "05 S4 B7 tipt Avant phantomschwarz/schwarz

  19. #19
    Senior Member Two Rings
    Join Date
    Apr 18 2012
    AZ Member #
    92081
    My Garage
    1995 Toyota Land Cruiser (FJ80/FZJ80)
    Location
    Central Texas

    update! things have been going pretty well, but before a general update i have a critical question:

    i reinstalled all the new timing components and got a buddy over to help set the final timing and cam bolt torque. we were following the procedure, using the cam locking plates, wedges, Hall sensor tool, and crank pin at appropriate times, and everything seemed to go fine.

    once we were done, after two rotations the cam plate would go in the passenger (right) side pretty easily, with just a bit of wiggling. however, on the driver's (left) side the plate will slip into the intake cam and be slightly off the exhaust cam...
    1000006822.jpg

    ... but it doesn't take much force to press on the plate and tap it in.
    1000006823.jpg

    is this OK?

    we tried several other two-rotation tests and the results were always the same (at least it wasn't getting worse). of course, i tried to keep that damn wedge from falling out all the time, and whether the wedge was inserted did seem to make a slight difference in the amount of pressure needed to insert the alignment plate. maybe it'll all be fine with oil pressure?

    - emilio
    Last edited by emilio; 10-16-2024 at 09:27 AM.
    Vorsprung durch Service Position
    Buy shirts & help me buy tires!

  20. #20
    Veteran Member Four Rings VinnysS4's Avatar
    Join Date
    Nov 12 2015
    AZ Member #
    364349
    My Garage
    2004 s4 Avant, 2005.5 S4 Manual swapped, 2002 A4 3.0 6 speed, 2004 A4 1.8 5 speed
    Location
    Oregon

    This is normal. You'll usually have to use a wrench to wiggle the cam for the locking bar to fit into

    Sent from my SM-N975U using Tapatalk
    1997 VW GTI VR6 (sold), 2003 Audi RS6 (sold), 2010 Audi A4 2.0T (RIP Totaled on 11/2/2015 ) 2005.5 Audi S42011 Dieselgate Q7 TDI..... patiently waiting for my warranty to expire!!

    My build log
    http://www.audizine.com/forum/showth...-s-s4-timeline

    "Everyone is An expert when they make their own category."

  21. #21
    Senior Member Two Rings
    Join Date
    Apr 18 2012
    AZ Member #
    92081
    My Garage
    1995 Toyota Land Cruiser (FJ80/FZJ80)
    Location
    Central Texas

    phew, thanks! i figured it wasn't that bad since it was kinda like that before disassembly, but a sanity check is great.

    now, what everyone wants: another photo dump!

    the laser engraving continues to be very handy


    i was mildly worried about remembering the complex sealant path while focusing on a consistent bead, so i traced it out in marker - easy!


    i had the upper oil pan vapor blasted, which was probably a waste of money but looks gorgeous (until it disappears in the engine bay). if you do this, remove most of the gasket material first because vapor blasting does it slowly and you're paying by the hour...


    mmm clean five-valve heads are so hot. AMtuned did a nice job! they're very clean and the deck is beautiful, though i did have to do a tiny bit of deburring on a couple coolant passages, as well as fish a bit of excess assembly lube from the valve stems in the runners.


    more handy laser marking, plus a number for the order of head bolt torquing and a mark for each step


    the craziest thing is that i know what all this does now


    - emilio
    Vorsprung durch Service Position
    Buy shirts & help me buy tires!

  22. #22
    Veteran Member Four Rings VinnysS4's Avatar
    Join Date
    Nov 12 2015
    AZ Member #
    364349
    My Garage
    2004 s4 Avant, 2005.5 S4 Manual swapped, 2002 A4 3.0 6 speed, 2004 A4 1.8 5 speed
    Location
    Oregon

    Looks great! Good job.

    Sent from my SM-N975U using Tapatalk
    1997 VW GTI VR6 (sold), 2003 Audi RS6 (sold), 2010 Audi A4 2.0T (RIP Totaled on 11/2/2015 ) 2005.5 Audi S42011 Dieselgate Q7 TDI..... patiently waiting for my warranty to expire!!

    My build log
    http://www.audizine.com/forum/showth...-s-s4-timeline

    "Everyone is An expert when they make their own category."

  23. #23
    Junior Member Two Rings
    Join Date
    Oct 31 2019
    AZ Member #
    524547
    Location
    Woodward Ave, MI

    FYI, that plastic piece in the intake is likely part of the MAF sensor. Had it in two of the vehicles I have worked on in the past. Look at your MAF sensor and see if the cover is missing.

  24. #24
    Veteran Member Four Rings RPMtech147's Avatar
    Join Date
    Apr 05 2014
    AZ Member #
    176007
    Location
    Texas

    Fun project
    B6 S4, B8 A4, 8P A3, and something, something.

  25. #25
    Veteran Member Four Rings Rol-co's Avatar
    Join Date
    Dec 12 2020
    AZ Member #
    577522
    Location
    Europe (NL)

    Any updates?
    Only milk and juice come in two liters, "05 S4 B7 tipt Avant phantomschwarz/schwarz

Bookmarks

Posting Permissions

  • You may not post new threads
  • You may not post replies
  • You may not post attachments
  • You may not edit your posts
  •  


    © 2001-2025 Audizine, Audizine.com, and Driverzines.com
    Audizine is an independently owned and operated automotive enthusiast community and news website.
    Audi and the Audi logo(s) are copyright/trademark Audi AG. Audizine is not endorsed by or affiliated with Audi AG.