


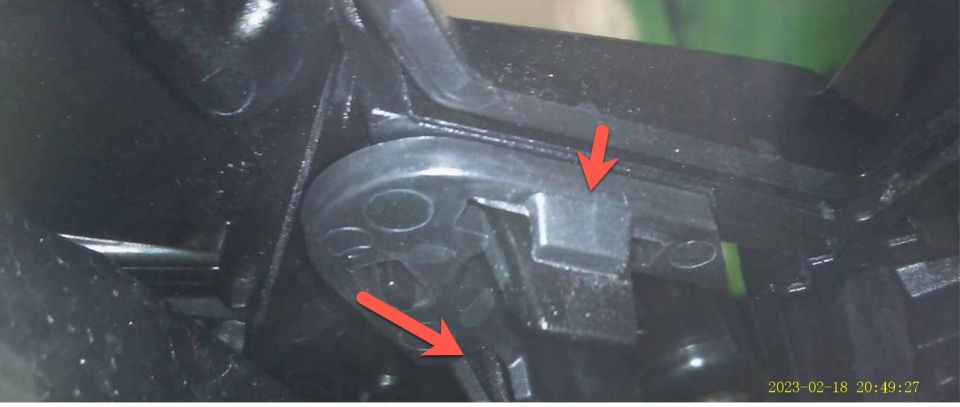
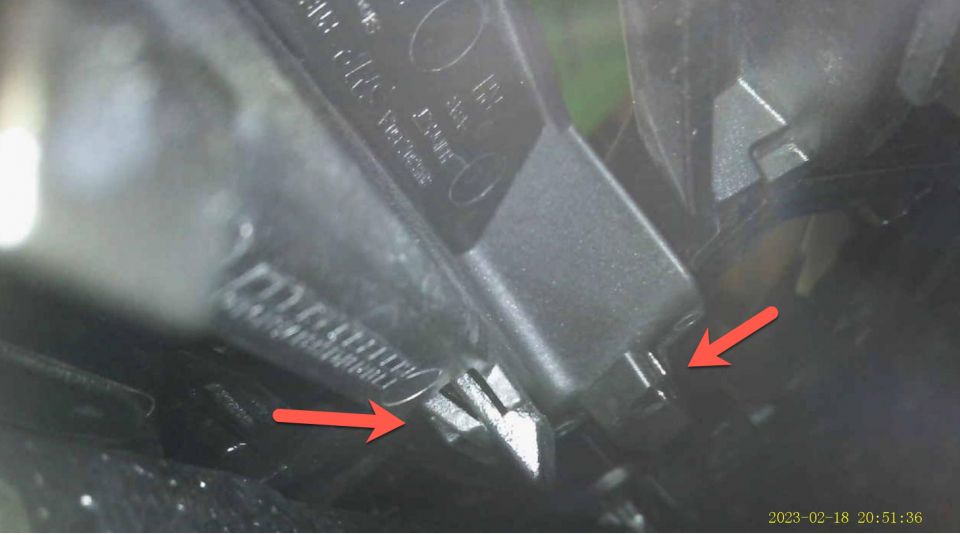
As mentioned above, there have been several threads (e.g., https://www.audizine.com/gallery/dat.../s5sbgrill.jpg and https://www.audizine.com/forum/showt...-finally-here!) mentioned here and elsewhere that mention removal of the plate holders. After reviewing them in greater detail, all mention removing the hood opening lever and then removing Torx T25 screws from the brackets before prying out the bracket pieces. However, this procedure is not viable for the type of brackets my S5 has installed as there are no T25 Torx screws on my brackets. Instead, the brackets are held together with 4 clips each, 2 horizontally oriented on the upper side of the brackets, and 2 oriented at ~45 degree angles on each end of the brackets. The clips on the outer half of the assembly have 4 "male" barbed prongs, and the inner half of the assembly have the 4 "female" equivalents.
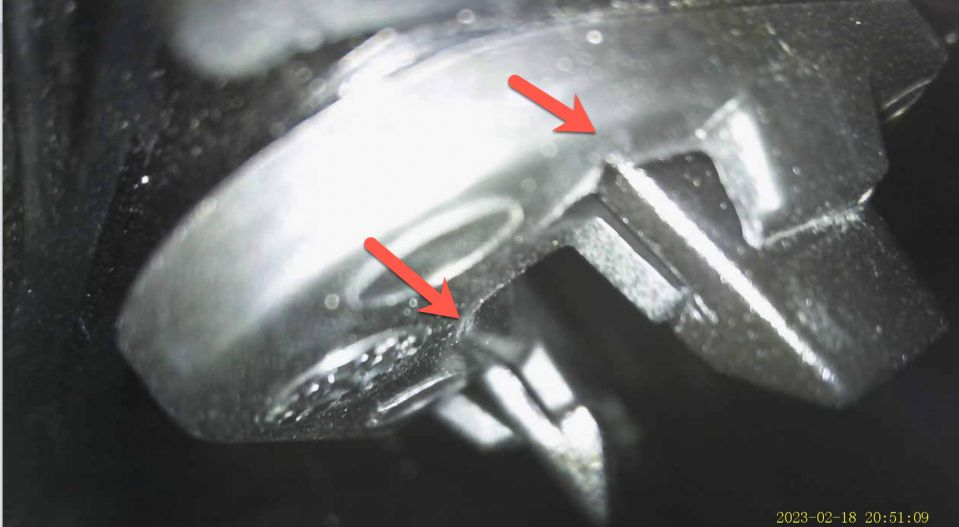
I was unsuccessful in my initial attempts to separate the clips in order to remove them. I don't currently have the plastic trim removal tools that others have suggested using, and since the joined clips are "robustly" connected together, they defied my efforts to separate them by hand, without appropriate tools. To get a better idea of why they resisted my attempts to remove them, I used a small industrial endoscope to examine exactly how the clips are constructed and joined together. In the following pics, you can see that the barbed male prongs are seated tightly into the "ahem" clip receptacles.
I worried that attempts using trim removal tools, or small screwdrivers, etc might result in breaking the clips, or scratching the hexagonal grill openings, or both. Frankly, since my state doesn't require front plates, destroying the bracket clips is not a concern for me. However, marring or breaking the hexagonal opening of the grill is a major concern! I had considered using an oscillating tool (e.g., Fein Multimaster) with a narrow/sharp blade to cut through the barbs, or perhaps an Exacto knife with a very sharp blade. After thinking about it overnight, I concluded that using a Dremel tool could get those pesky plate holders removed. Hopefully this thread will be helpful for anyone contemplating removal of their front license plate brackets of the style pictured above. If you're contemplating removal of your front license plate brackets of the style pictured above, now you know what you're up against!
Prior to firing up the dremel tool to work on the grill this afternoon. I carefully blue taped the surrounding areas to protect against accidental contacts with the diamond wheel, and the other dremel attachments I used. The entire job probably took 1.5 to 2 hours, but it was worth it.
As noted in the pics above, contrary to the images in the other threads that showed the Torx screws and two-part plate brackets, with the 23 model year, the S5's plate mounting part has been changed to a revised design that is basically a single piece with 4 female slots that 4 male barbs connect with. The kicker is that those barbs are actually molded into the back side of the overall grill. Apparently the factory assembly involves pushing the plate holder with the brass nut into the grill from the back side, locking the plate holders to the grill, before the grill is attached to the car. In my opinion, to use trim tools would be pretty difficult, given the fact that the trim tool would need to be inserted from behind the grill (blindly, by feel) and would need to separate 4 very tight snapped-together M-F connections for each of the two plate holder components.
So my approach was that after taping up the surrounding areas, I used the diamond wheel attachment and first cut off the front of the plate holder, so I could see where the interconnecting M&F connections were located. I then used a small cutting wheel and also a burr-type bit for grinding away the plastic that was in the way of removing those connection. I then used a pair of needle nose pliers that allowed me to gently bend the remains of the plate holder until the female slot holding the angled barbs cracked apart slightly, allowing me to remove the final pieces of the holder. After that, I could see the remaining portions of the barbs which I then cut off with the small cutting wheel. After a little clean up, I was done, and it looked so much better!
Here are some pictures that may help illustrate the process i used ...


fin

 Reply With Quote


Bookmarks