Audizine - An Automotive Enthusiast Community

Page 1 of 2 12 LastLast
Results 1 to 40 of 45
  1. #1
    Senior Member Two Rings defunkt's Avatar
    Join Date
    Jun 26 2005
    AZ Member #
    7017
    My Garage
    2006 A4 2.0T // MT6 // Quattro // S-Line // Nav+ // Tech II // Prem // Sun
    Location
    Scottsdale, AZ

    Side Marker Reflector Removal Pics & Tips

    Guest-only advertisement. Register or Log In now!
    This is a repost of the tutorial posted BEFORE the crash :(

    Hello all.

    For those who would like to achieve the Euro Spec look and get these little bad boys painted, I'd like to share what I have learned today.

    First off, I'd like to say thanks to Derek and Paolo at Exklusiv Motorsports in Phoenix, AZ for making short work of these.

    Tools:
    Torx 25
    Strong Fingers

    Total time for removal:
    20 minutes.

    NO BUMPER REMOVAL NECESSARY. Keep in mind that this is was done on an S-Line, but I can't imagine the standard A4 being much different.


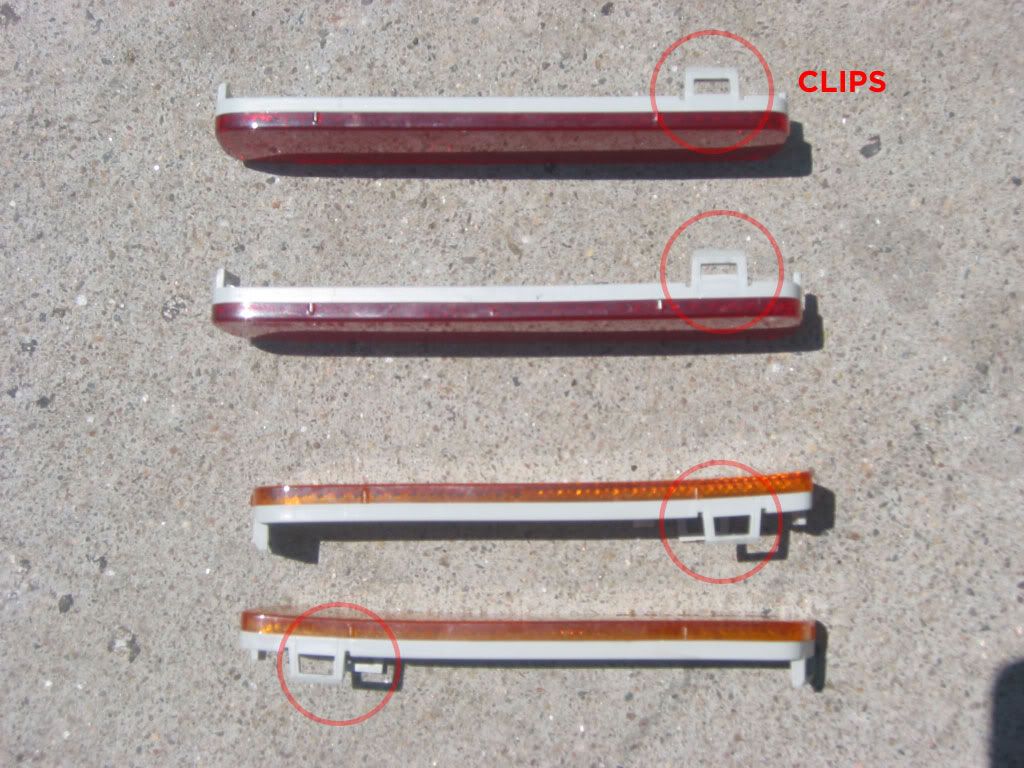
    Here is a pic of the reflectors out and the CLIPS. This is so you can get a sense of where the CLIPS are located since you'll be going by feel.
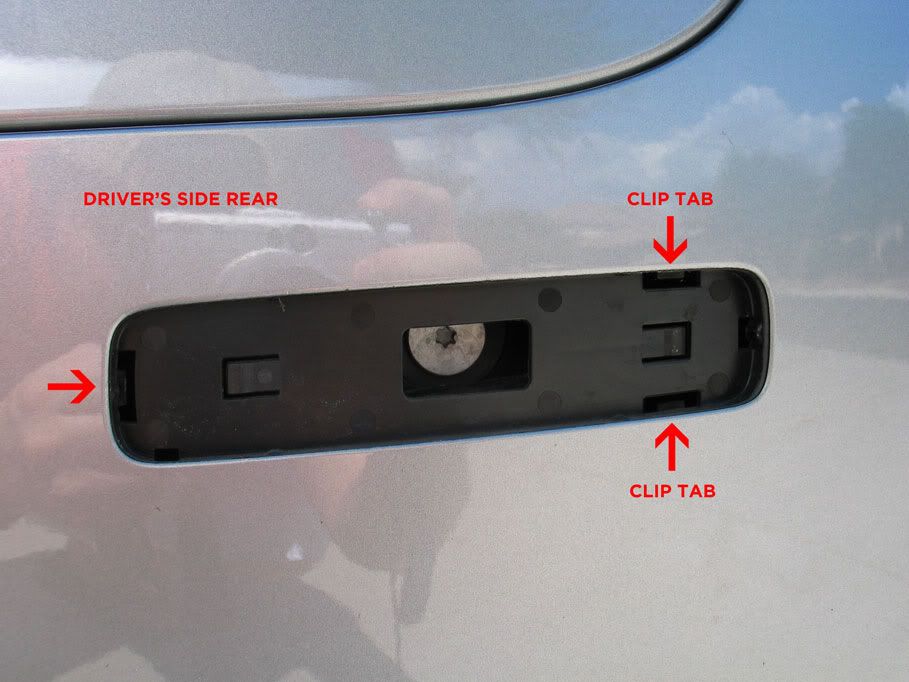
    REARS
    Start with the rears. Reach behind the bumper. There are 2 CLIPS on the top and bottom of the reflector that you pinch together to get them to release from the CLIP TABS. There's a 3RD CLIP on each of these, but once you get the 2 out it should be no problem. Your arm is going to be right by the exhaust so don't get burned. It's gonna take some force.
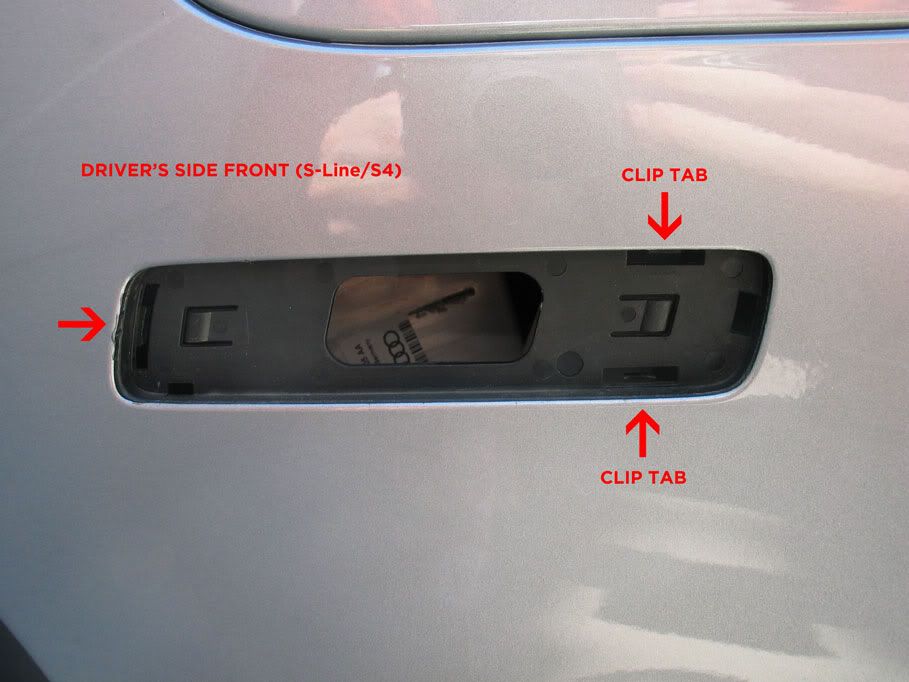


    FRONTS
    The fronts are a little harder. The best way to attack these is to crank your wheel one way for easier access to the wheel well. Unscrew the first 2 Torx 25's in the wheel well liner. Fold the liner back and reach in there. Again, pinch the CLIPS together to release. You can also get to these through the fog light area, just remove the fog light trim by pulling it out.
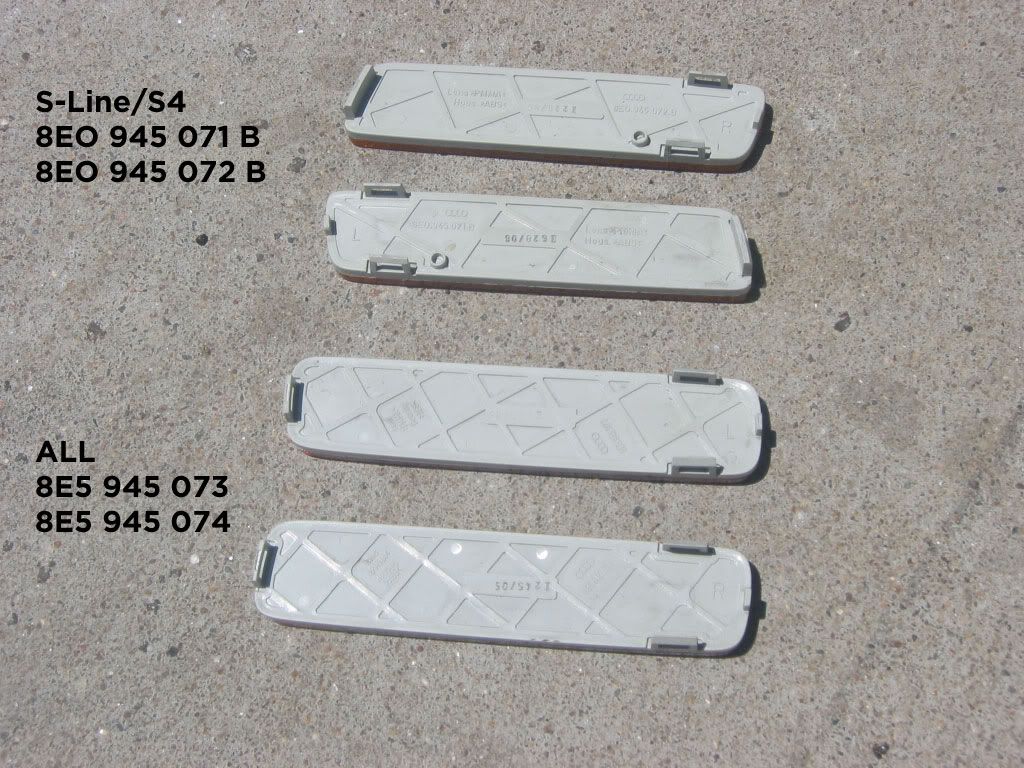


    PART NUMBERS
    If you want to keep your stock ones intact, here are the part numbers. Dealer retail is $32 each, and they have to be special ordered.


    This view also gives you a better sense of how these things are made. Take note of the 3RD CLIP, it's no big deal once you get the first 2 out.

    Done. Get 'em painted and you're on your way to Euro Spec...now if I can just source a Euro boot lid :)
    2006 A4 2.0T | MT6 | quattro | S-Line | Nav+ | Tech II | Prem | Sun
    Funktion:: Carbonio CF CAI //APR Tuned 91/93/100 //Bilstein PSS9's //APR Snub //RS4 22mm ARB //AWE Exhaust //AWE Boost Gauge //EuroCode TP //S4 Recaro's (Airbag) //19in VMR RS4's
    Form:: Euro Plate \\Huper Optik Drei 35% \\S4 Blades \\Painted Reflectors \\DTH DTM Lip Spoiler \\RS4 Pedals \\Clear Corners \\Black RS4 Grille \\Nav+ Multimedia Kit VIM Coded + iPhone A/V

  2. #2
    Veteran Member Three Rings Wimbledon's Avatar
    Join Date
    Dec 01 2005
    AZ Member #
    9046
    Location
    Tucson, AZ

    Thanks defunkt for posting this --- I'm going to try it out on the A4 tommorow.

    Also, how did everyone paint these? I have a ton of Audi touch up paint so I thought about using that. Or should I just send them to a shop?

  3. #3
    Deactivated Three Rings Coker Rat's Avatar
    Join Date
    Sep 15 2006
    AZ Member #
    11433
    My Garage
    06 2.0T A4 w/quattro
    Location
    Fort McMurray, Alberta

    pimp, i think i may do mine, i wonder how black reflective 3m tape would look? might have to expiriment.

    edit: they don't make it

    edit2:perhaps i can just smoke mine... i wonder how that would look... oh the choices
    Last edited by Coker Rat; 09-23-2006 at 10:28 PM.

  4. #4
    Registered Member Three Rings '07 S-Line Ti's Avatar
    Join Date
    Sep 15 2006
    AZ Member #
    11418
    Location
    Nor*Cal

    i jst used the audi brilliant black spray can

  5. #5
    Veteran Member Three Rings Wimbledon's Avatar
    Join Date
    Dec 01 2005
    AZ Member #
    9046
    Location
    Tucson, AZ

    S-Line Ti, did you get the can from the dealer or online from like paintscratch.com?

  6. #6
    Deactivated Two Rings
    Join Date
    Dec 23 2005
    AZ Member #
    9372
    Location
    Las Vegas

    I painted mine using the spray can from the dealer, it was pretty easy.

  7. #7
    Senior Member Three Rings A44sho's Avatar
    Join Date
    Sep 15 2006
    AZ Member #
    11408
    Location
    Santa Clarita, CALIFORNIA

    If you guys just directly paint over it you will have bumps from the s/n on it. I'd recommend sanding it a lil and when it's smooth than painting over it to make it cleaner.

  8. #8
    Registered Member Three Rings '07 S-Line Ti's Avatar
    Join Date
    Sep 15 2006
    AZ Member #
    11418
    Location
    Nor*Cal

    ^^yup thats what i did.. and i got the cans from an az member (cant remember who you are! sorry!!!)

  9. #9
    Deactivated Two Rings
    Join Date
    Dec 23 2005
    AZ Member #
    9372
    Location
    Las Vegas

    I just want to add that for the rear reflectors, when I first tried I honeslty thought there was no way I could get my hands up in there, but it is possible. The bumper is flexible and will allow you to wiggle your hands up there. Thanks again for the advice defunkt.

  10. #10
    Senior Member Two Rings defunkt's Avatar
    Join Date
    Jun 26 2005
    AZ Member #
    7017
    My Garage
    2006 A4 2.0T // MT6 // Quattro // S-Line // Nav+ // Tech II // Prem // Sun
    Location
    Scottsdale, AZ

    Yeah, dont be bashfull when you are pinching the clips down, and pressing out ward...the bumper will bow out signifigantly and it will be all good :)
    2006 A4 2.0T | MT6 | quattro | S-Line | Nav+ | Tech II | Prem | Sun
    Funktion:: Carbonio CF CAI //APR Tuned 91/93/100 //Bilstein PSS9's //APR Snub //RS4 22mm ARB //AWE Exhaust //AWE Boost Gauge //EuroCode TP //S4 Recaro's (Airbag) //19in VMR RS4's
    Form:: Euro Plate \\Huper Optik Drei 35% \\S4 Blades \\Painted Reflectors \\DTH DTM Lip Spoiler \\RS4 Pedals \\Clear Corners \\Black RS4 Grille \\Nav+ Multimedia Kit VIM Coded + iPhone A/V

  11. #11
    Senior Member Three Rings MikeyG6767's Avatar
    Join Date
    Nov 03 2005
    AZ Member #
    8634
    Location
    Eastside LBC

    thought you were selling your door blades defunkt ??

  12. #12
    Veteran Member Four Rings phillyquattro's Avatar
    Join Date
    Sep 15 2006
    AZ Member #
    11455
    Location
    San Francisco, CA

    I just put mine back on the car, I'll post pics soon after I swap all the bulbs in the front. Got the paint kit from paintscratch.com. A44sho is right on, if you don't sand it's gonna look stupid with little numbers on it.

    The rear ones are a little harder to get to but I think they actually pop out easier. The front ones were a bitch to get out, especially the driver side one.
    2019 GT3 Touring
    2019 SQ5 Premium+ (Build Thread)
    2016 S3 Premium+ (Build Thread)
    IG: brandongray

  13. #13
    Veteran Member Four Rings Fobia's Avatar
    Join Date
    Oct 04 2005
    AZ Member #
    8229
    Location
    Minnesota

    Re: Side Marker Reflector Removal Pics & Tips

    wow i cant fit my hands in the front fender...
    2010 ibis white s4
    CTS Turbo intake

  14. #14
    Veteran Member Four Rings Fobia's Avatar
    Join Date
    Oct 04 2005
    AZ Member #
    8229
    Location
    Minnesota

    Re: Side Marker Reflector Removal Pics & Tips

    this thing is being a bitch
    2010 ibis white s4
    CTS Turbo intake

  15. #15
    Veteran Member Three Rings 08lichmanj's Avatar
    Join Date
    Nov 18 2006
    AZ Member #
    13495
    Location
    PA

    Re: Side Marker Reflector Removal Pics & Tips

    this should go in the noob guide

  16. #16
    Veteran Member Three Rings parks853's Avatar
    Join Date
    Nov 20 2005
    AZ Member #
    8885
    Location
    tucson, AZ

    Re: Side Marker Reflector Removal Pics & Tips

    Quote Originally Posted by 08lichmanj View Post
    this should go in the noob guide

    getting the link now. I just have to get the mod to update it since I no longer can.
    2005.5 Quartz Grey 2.0TQ M6 CAR FOR SALE - http://www.audizine.com/forum/showthread.php?t=197624

  17. #17
    Senior Member Three Rings eLusive's Avatar
    Join Date
    Dec 19 2006
    AZ Member #
    14308
    My Garage
    Jack Purcells
    Location
    Laguna Niguel, Ca

    Re: Side Marker Reflector Removal Pics & Tips

    pics please !!

  18. #18
    Established Member Two Rings
    Join Date
    Sep 27 2006
    AZ Member #
    12076
    Location
    Vancouver

    Re: Side Marker Reflector Removal Pics & Tips

    had the reflectors painted along with my filler

  19. #19
    Senior Member Three Rings A44sho's Avatar
    Join Date
    Sep 15 2006
    AZ Member #
    11408
    Location
    Santa Clarita, CALIFORNIA

    Re: Side Marker Reflector Removal Pics & Tips

    I painted my filler it came out bad and I didn't feel like sanding so I just got a euro plate instead. Did you paint the chrome strips or was it black already?

  20. #20
    Veteran Member Three Rings 08lichmanj's Avatar
    Join Date
    Nov 18 2006
    AZ Member #
    13495
    Location
    PA

    Re: Side Marker Reflector Removal Pics & Tips

    by the look of it it was already black he has the ti package

  21. #21
    Established Member Two Rings
    Join Date
    Sep 27 2006
    AZ Member #
    12076
    Location
    Vancouver

    Re: Side Marker Reflector Removal Pics & Tips

    nope.. the a4 is non sline non ti. That is the dtm grille ( or thats what i think it is called) with an all black filler plate. The strips were black already, so i just popped it off and painted the filler and popped the strips back in.

  22. #22
    Senior Member Three Rings pyrobecks's Avatar
    Join Date
    Oct 05 2006
    AZ Member #
    12326
    My Garage
    '06 A4 2.0TQ Prem/S-Line
    Location
    SoCal - OC

    Re: Side Marker Reflector Removal Pics & Tips

    Quote Originally Posted by darkness2505 View Post
    nope.. the a4 is non sline non ti. That is the dtm grille ( or thats what i think it is called) with an all black filler plate. The strips were black already, so i just popped it off and painted the filler and popped the strips back in.
    Did you paint the filler yourself? With the paint can from the dealer or online?
    ~ pyrobecks


    06 A4 2.0T Quattro Tip | Premium | DTM
    Stasis SS's > RS4 Rear Sway > VM Onyx Black 19” RS4 Reps > Black Optic DTM Grill >
    Smoked Corner and Side Markers > Audi Sport Floor Mats > Euro OEM Clear Corner Xenon's > VAGged

  23. #23
    Established Member Two Rings
    Join Date
    Sep 27 2006
    AZ Member #
    12076
    Location
    Vancouver

    Re: Side Marker Reflector Removal Pics & Tips

    no.. painted @ bodyshop

  24. #24
    Veteran Member Four Rings
    Join Date
    Feb 17 2004
    AZ Member #
    618
    My Garage
    2010 Meteor Grey A4 Prestige
    Location
    Peoples Republic of Kalifornia

    Re: Side Marker Reflector Removal Pics & Tips

    ^^^ I bet most body shops would have a hellish time trying to match sprint blue pearl effect like on my car!
    2010 Meteor Gray A4 2.0T
    quattro | 6-spd | prestige | B&O | 19" Sport | nav| HID | black leather

    Coming: APR Chip, Exhaust, and H&R suspension

  25. #25
    Registered Member Four Rings BoSNiaN's Avatar
    Join Date
    Jun 02 2011
    AZ Member #
    76367
    My Garage
    2012 Benz ML350, 2007 BMW 325xi, 2006 Audi A4 2.0T
    Location
    Canada

    Sorry to bump an ancient thread, but has anyone else done this? It seems impossible on my 2006 B7 (non sline)....the reflectors are flat with the front and rear bumper and even pushing the bumper around it makes them barely stick out 1mm...Using my flatest flat head just damaged my bumper but taping it up or putting a cloth on it makes it too thick. Any suggestions?

    @taking the clips off from behind, I think its highly unlikely this was done on a B7 based on the post date and the fact that my car has heat shields all around the mufflers that follow the wall of the bumper making it impossible to reach these reflectors by hand without taking some stuff apart. I'd assume a sline would have the same heat shields so how the (*#($* would he have accessed them from behind? My 2 options are:

    -remove front (easy enough) and rear bumpers (never done it but how hard can it be?) and unclip them, paint them, and then reinstall everything

    -tape everything up and paint them while they on the vehicle (doubt im going to do this but)
    Last edited by BoSNiaN; 09-11-2011 at 03:10 PM.
    2006 A4 2.0T 6 SPD MT // Dolphin Grey on Black // Sport + Premium Package // Quattro

    ==> Complete Mod List <==

  26. #26
    Veteran Member Four Rings TMurt's Avatar
    Join Date
    Feb 01 2011
    AZ Member #
    70353
    Location
    Indianapolis, IN

    I did it a couple months ago on my non s-line. I went through the fender and used a flathead to get leverage on the clip to pop the nearest bottom clip out. Once I got that clip out the rest were easy. The driver's side is a PITA though. I think the washer fluid container is right there and is almost impossible to get to. I think I ended up damaging the clip a little with the screwdriver though. I was replacing mine with clear markers anyways so it didn't matter if I messed them up a bit
    Current: 2010 Imola S4 Prestige 6MT
    Past: 2007 Audi A4 3.2 Quattro

  27. #27
    Active Member Four Rings drumnjuny's Avatar
    Join Date
    Jul 12 2010
    AZ Member #
    61335
    My Garage
    848 Corse, SQ5
    Location
    washington dc area

    it took me 5 min to pop each out. done on a B7. sometimes they are really stuck... it shouldn't be THAT hard though. i thought i was going to break one of the rears but it ended up being okay. don't be afraid to use a little force on the tabs when trying to push em out form the inside just make sure that you're pushing the two horozontal tabs at once and then slip the vertical one out. everyone has to deal with the heat shielding.

    can be done with relative ease on a B7... just do it and use some force. and if you break it buy new ones off ECS
    i took em out, put em back in, and then took em out again to paint them.

  28. #28
    Active Member Four Rings drumnjuny's Avatar
    Join Date
    Jul 12 2010
    AZ Member #
    61335
    My Garage
    848 Corse, SQ5
    Location
    washington dc area

    seriously don't waste your time taking off the bumper... but if its that hard for you to pop em out and taking off the bumper is easy enough for you then it might be worth your time haha. personally the front bumper just pops off, but i've never even tried to take off the back one.

  29. #29
    Senior Member Three Rings A4_Ti's Avatar
    Join Date
    Mar 15 2011
    AZ Member #
    72424
    Location
    Canada

    For the Fronts, When I changed my oil I took the plastic skid plate off like you have to to get at the drain plug. once that was off I could easily access the back of the reflectors. Seemed super easy and your under the car so you can see what your doing. Passenger side is open, Driverside has the washer fluid tank which is kinda in the way, but still 10x easier than trying to fish around through the fender.

    Trying to jamb a screwdriver in the tiny gap then prying on the painted bumper gives me the shivers..

    For the rear's I dunno, I like the red so I left it
    2007 Audi A4 | 3.2 | S-Line | Titanium | 6MT

  30. #30
    Registered Member Four Rings BoSNiaN's Avatar
    Join Date
    Jun 02 2011
    AZ Member #
    76367
    My Garage
    2012 Benz ML350, 2007 BMW 325xi, 2006 Audi A4 2.0T
    Location
    Canada

    Quote Originally Posted by drumnjuny View Post
    everyone has to deal with the heat shielding.
    Thats the part I don't get...how do you get around the heat shield? I literally have 1cm clearance between the heat shielding and my rear bumper wall and it covers it from the rear corner to the wheel well...
    2006 A4 2.0T 6 SPD MT // Dolphin Grey on Black // Sport + Premium Package // Quattro

    ==> Complete Mod List <==

  31. #31
    Veteran Member Four Rings yungcotter's Avatar
    Join Date
    Jun 09 2010
    AZ Member #
    60091
    Location
    Queens

    When I did mine I just unscrewed the sides of the bumper it's 5 torx screws 2 on the fender liner and then 3 on the bumper it's self then just pull the sides of the bumper out and you have plenty of room to get in there.
    -Theo
    2018 S4,Florett Silver, Magma

    2014 Q5, Phantom Black Pearl, Chestnut, 2.0T,Moms Ride

    2015 S4, Daytona Gray, DSG,Gone

    06 A4 2.0 T, Quartz Gray, Quattro, Tiptronic.

  32. #32
    Registered Member Four Rings BoSNiaN's Avatar
    Join Date
    Jun 02 2011
    AZ Member #
    76367
    My Garage
    2012 Benz ML350, 2007 BMW 325xi, 2006 Audi A4 2.0T
    Location
    Canada

    Quote Originally Posted by yungcotter View Post
    When I did mine I just unscrewed the sides of the bumper it's 5 torx screws 2 on the fender liner and then 3 on the bumper it's self then just pull the sides of the bumper out and you have plenty of room to get in there.
    Are you talking about the rear? Is there a DIY for it anywhere on here? I've got one bookmarked for the front....
    2006 A4 2.0T 6 SPD MT // Dolphin Grey on Black // Sport + Premium Package // Quattro

    ==> Complete Mod List <==

  33. #33
    Veteran Member Three Rings TheKid23's Avatar
    Join Date
    May 26 2011
    AZ Member #
    76054
    Location
    PA to IA

    I think he's talking about the front. The rear was a little more difficult to get to but doesn't involve removing any screws. You just have to reach up around the exhaust, it is a very tight fit. Don't try going from in between the muffler and the bumper, go in with your arm from the inside of the muffler and then up and over towards the bumper.
    Owned

  34. #34
    Established Member Two Rings
    Join Date
    May 26 2011
    AZ Member #
    76065
    Location
    Baltimore County, MD

    much easier way, use a crdit card/gift card type card and that will push the clips down, you probably need pics but i never reached behind the bumper for the front

  35. #35
    Veteran Member Four Rings wildcat333's Avatar
    Join Date
    Feb 25 2011
    AZ Member #
    71493
    My Garage
    2016 Ford F-150; 2018 Honda Grom
    Location
    Seacoast NH

    Quote Originally Posted by 3.2L S-line View Post
    much easier way, use a crdit card/gift card type card and that will push the clips down, you probably need pics but i never reached behind the bumper for the front
    can you explain this a little more? I tried and failed at installing clear sidemarkers. thanks.
    2008 Audi A4 2.0T Quattro | Light Silver | S-Line | Automatic-Tiptronic | GIAC Stage 1+ | Autotech HPFP | 135 bar PRV | 35% Tint | KW V1 Coilovers | RS4 RSB | 034 Snub Mount | Evolution Thor Skid Plate | Osram CBI 5000K D1S | Clear-Cornered | 6000K LED City Lights | LED DRLs | Paint-Matched Sidemarkers | Hoen Endurance Fogs | Interior LEDs | Plate LEDs | Upgraded Brakes | 18" RS4 Wheels | Sirius Satellite Radio Tuner | Aux-In | Hardwired Passport 8500 X50 | Hella Super Tone Horns

  36. #36
    Active Member Four Rings drumnjuny's Avatar
    Join Date
    Jul 12 2010
    AZ Member #
    61335
    My Garage
    848 Corse, SQ5
    Location
    washington dc area

    Quote Originally Posted by BoSNiaN View Post
    Thats the part I don't get...how do you get around the heat shield? I literally have 1cm clearance between the heat shielding and my rear bumper wall and it covers it from the rear corner to the wheel well...
    just jam your hand in there, lol. credit card sounds interesting, i can see how that might work but it seems like it would need something more rigid than a card. whatever works, right? haha

  37. #37
    Registered Member Four Rings BoSNiaN's Avatar
    Join Date
    Jun 02 2011
    AZ Member #
    76367
    My Garage
    2012 Benz ML350, 2007 BMW 325xi, 2006 Audi A4 2.0T
    Location
    Canada

    Quote Originally Posted by 3.2L S-line View Post
    much easier way, use a crdit card/gift card type card and that will push the clips down, you probably need pics but i never reached behind the bumper for the front
    Just tried this today and I thought for SURE it would make because it made sense in my head but it didn't.....the space is very tight, so I had to try 10 different cards because I found some thin/strong enough to both me in the jam at the same time. But even when I heard the clips coming out, the reflecter didn't move...it stayed in and even pushing on it/the bumper around it, it didn't come out

    Any DIYs on how to remove the rear bumper or has anyone done it before and mind providing a quick summary? I'll do the front and rear ones at different times I guess...the front I'll do whenever I do my next oil change and my skid plate is off, and the rears I'll do when I figure out how to remove the rear bumper.
    2006 A4 2.0T 6 SPD MT // Dolphin Grey on Black // Sport + Premium Package // Quattro

    ==> Complete Mod List <==

  38. #38
    Veteran Member Three Rings TheKid23's Avatar
    Join Date
    May 26 2011
    AZ Member #
    76054
    Location
    PA to IA

    Again, the rear bumper does not need to come off in order to remove these. And, you don't need to mess with trying to pop them out with a credit card either. Get up under the ass end of your car and snake your arm up through the mess.
    Owned

  39. #39
    Registered Member Four Rings BoSNiaN's Avatar
    Join Date
    Jun 02 2011
    AZ Member #
    76367
    My Garage
    2012 Benz ML350, 2007 BMW 325xi, 2006 Audi A4 2.0T
    Location
    Canada

    Quote Originally Posted by TheKid23 View Post
    Again, the rear bumper does not need to come off in order to remove these. And, you don't need to mess with trying to pop them out with a credit card either. Get up under the ass end of your car and snake your arm up through the mess.
    Not possible. Your car must be different.....I have heat shielding cover the ENTIRE edge of my bumper from the rear wheel well to the muffler. That entire corner is covered on both sides and I have about an inch of clearance between that heat shielding and the inner wall of my rear bumper. If yours isn't like that (as your post suggestions) I am guessing it is a Canadian thing for winter/rust/salt prevention....
    2006 A4 2.0T 6 SPD MT // Dolphin Grey on Black // Sport + Premium Package // Quattro

    ==> Complete Mod List <==

  40. #40
    Veteran Member Four Rings A4A4A4's Avatar
    Join Date
    Jun 02 2008
    AZ Member #
    29481
    Location
    Victoria, Canada

    -Cam
    New: MK6 Volkswagen GTI
    Old: E92 BMW 335i
    Older: B7 Audi A4 2.0T Quattro

Bookmarks

Posting Permissions

  • You may not post new threads
  • You may not post replies
  • You may not post attachments
  • You may not edit your posts
  •  


    © 2001-2025 Audizine, Audizine.com, and Driverzines.com
    Audizine is an independently owned and operated automotive enthusiast community and news website.
    Audi and the Audi logo(s) are copyright/trademark Audi AG. Audizine is not endorsed by or affiliated with Audi AG.