


First and foremost, I am not an expert. This was my first turbo install but I did a fair amount of research and had help from knowledgeable people. If I refer to something wrong excuse my ignorance.
I installed a TTE710 which is why that is referenced throughout.
Supporting Mods:
When it comes to supporting modifications "needed" to run the TTE710 there really aren't many.
- First and foremost, a nice quality intercooler should be first on everyone's list. Regardless of your tune, bolts-ons etc, this should always be first in my opinion.
- The CarbnLab turbo inlet with 66mm turbo flange. This will allow you to utilize the 66mm inlet on the turbo to it's full potential.
- A catless downpipe. If you don't want a CEL I would recommend the CarbnLab catless. A quality high flow cat will also do but catalytic converter failures on this platform are not unheard of and pretty common since it is so close to the turbo.
- Obviously a tune that supports the turbo of your choice.
Parts/Recommended Tools:
There are a handful of misc parts that I replaced during the installation process. I ended up not using some so I'll focus on what I believe is really needed.
- Triple square sockets
- Torx bit sockets T25-T30
- Small multi-tool for tight areas
- G13 Violet spec coolant incase you need to top off Link
Per AudiPartsUSA:
- (4) N-908-946-01 - Lock Nut Link
- (1) 059-253-139-D - Connector Pipe Clip Link
- (1) 059-253-232-C - Connector Pipe Gasket Link
- (2) 06M-253-039-G - Gasket Link
- (1) 8W0-253-115-G - Connector & Pipe Gasket Link
- (1) 8W0-253-725-A - Catalytic Converter Clamp Link
- (3) N-101-961-03 - Engine Coolant Thermostat Housing Bolt Link
- (5) N-103-352-06 - Shield/Oil/Coolant Line Bolt Link
- (2) WHT-006-901-A - Adapter/Oil Line O-Ring Link
- (4) WHT-007-689 - Water/Coolant Pipe O-Ring Link
- LiquiMoly Turbo Additive Link
- Funk Motorsport B9 S4 Turbo Blanket (Optional) Link
Pre-Install Precautions:
A few things to do before installing a new turbo.
1. Check for shaft play. Even though the turbo is new, it's a good idea to make sure there is no shaft play on the compressor shaft. Lightly move the compressor wheel around. A very little amount of play up, down, side to side is ok as this void will be filled once the turbo has oil flowing through it. You DO NOT want the shaft to move at all inwards or outwards.
2. Fresh oil change. It's always a good idea to install a new turbo with fresh oil.
3. Set enough time aside if you plan to do the install yourself. Take your time as you don't want to rush through it and forget things.
4. Do your research. Gain and understanding on the different components of a turbocharger. It will help if you ever run into any issues down the road and need to reference something else. Understand which lines are coolant and which are oil.
5. If you have a turbo blanket, it's best to fit it to the exhaust housing before installing on the car.
Installation:
TTE710 pre-install


TTE710 with Funk Motorsports turbo blanket fitted pre-install


Parts


- Remove engine cover and heat shielding. Then carefully remove the O2 sensor and set it off to the side in a safe place where it wont get damaged. I strung mine over the fuel lines out of the way


- Remove the intake and turbo inlet. Luckily the CarbnLab inlet is very easy to pull off. I left the turbo flange attached as it doesn't need to be removed until the turbo is off of the car.

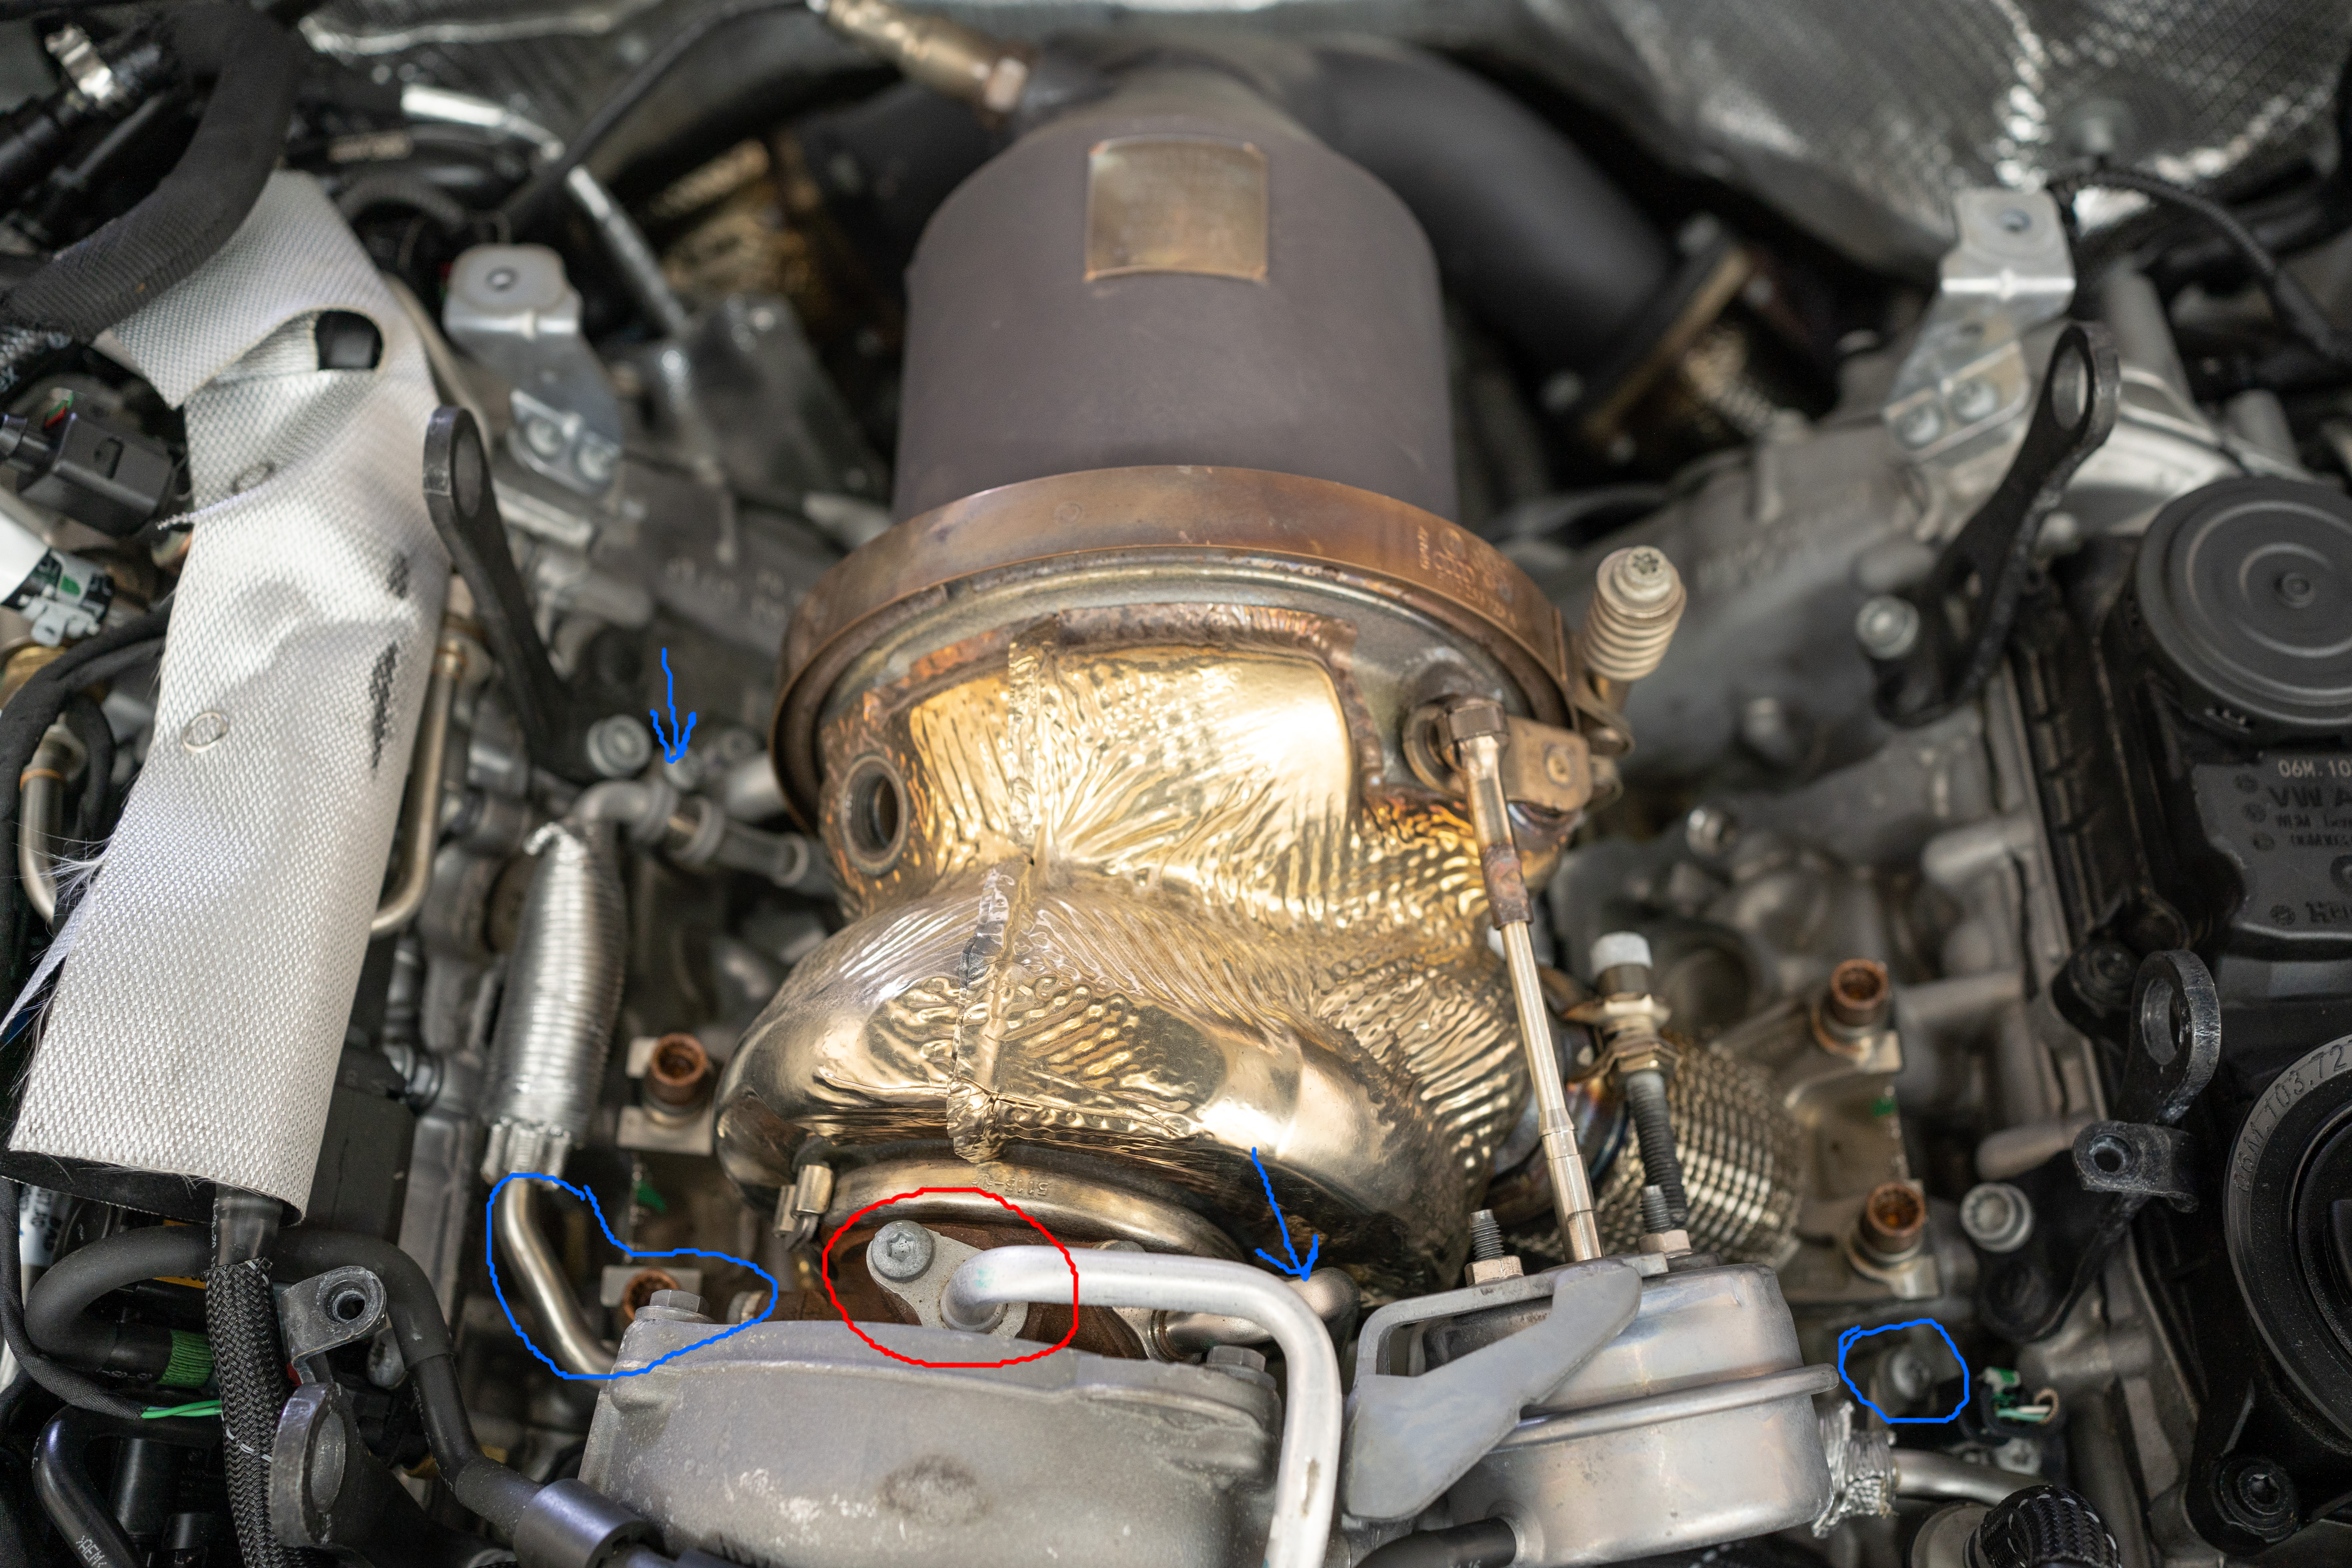
- Next we need to remove the intake manifold pipe that is connected to the bottom of the turbo. This can be tricky without the right tools. I suggest a small multi-tool with a torx bit to squeeze in between the intake manifold and the lower split piping. I took a little "easier" approach and disconnected the charge pipes from the throttle body and from the passenger side. This allowed me to pull the intake manifold towards the front of the car and allows for more room to get at the bolts attaching to the turbo. There are two, one easily visible as seen below. The other is underneath the intake manifold and can be seen by looking from the driver side. I used a 3/8 socket with a torx bit and an extension. It will take small hands to line it up and patience to unloosen as there isn't much room for movement. Fortunately both bolts are captive so you don't need to worry about dropping them.


- Then I started removing the lines. You'll see the oil supply line in Red and the coolant lines in blue. I started with the oil supply as it was right on top. Remove it from the turbo and catch any oil that comes out. I didn't have much so don't worry. There is another oil line that is a compression style fitting (it is a slightly larger black line on the driver side) which just pulls out from the turbo. Give it a tug and it will pop right out. Then for coolant; on the driver side I unbolted from the block and then from the turbo to remove the line completely. A little bit came out and drip onto the block. Not a big deal just gets some rags and dry it up. You'll need to twist and turn the line to get it out from under the actuator then set it off to the side. On the passenger side, unbolt the line holder and unbolt the line from the turbo catching any coolant that comes out. Again I didn't lose much. Now pull off the vacuum line from the waste gate actuator, it just pulls right off. Lastly there is one more line that runs vertical directly under the turbo. This is another compression style fitting, (think of it like a rubber grommet) it will just pull right out when you remove the turbo so nothing to unbolt here. (You'll need to transfer this over to the new turbo once it is completely removed.
- Now with all of the lines removed let the fun begin... There are 4 nuts on each side of the turbo that mounts to each cylinder bank. The four top nuts are triple squares (#1+#2) and easy to remove. The 4 bottom are 12mm nuts and this is where the frustration started sinking in haha. The driver side was a piece of cake. I use a 12mm wrench to get each bottom nut with ease. On the passenger side, (shown in pic) I was able to get the nut closest to the downpipe (#3) with a 12mm wrench but I could not for the life of me get the one closest to the front of the car (#4). I tried every wrench I had, bought smaller ones, bought S wrenches, nothing was working. I had to call in reinforcements (Huge thanks to MobE)... Save yourself some time and frustration and remove the waste gate actuator. To do so, you'll need to remove the oil filter cap first. With that out, there are two bolts on the back that remove it from the bracket and 3 bolts that hold the bracket to the turbo with an additional bolt underneath holding a line in place. Remove all of them and move the actuator out of the way. Now in order to get the remaining bolt on the passenger side, use a reasonably long socket extension, a swivel and 12mm socket and go from right where the waste gate actuator is mounted, under the turbo and towards the nut. You'll need to reach under the downpipe and turbo to line up your swivel at the right angle to seat the socket right on top of the nut. Due to very limited clearance due to the heat shielding, we used a mallet to lightly tap the socket onto the nut without forcing it too much. Then boom, we broke it free and were able to loosen the rest by hand. Under the two bottom bolts there is a aluminum mount that holds the "ramp" to the cylinder bank. I highly recommend reinstalling the passenger side mount and screwing on nut #4 before you install the new turbo.


- Lastly, disconnect the plug for the boost pressure relief valvue, disconnect the line that goes into the post throttle body intake manifold (press in and pull) and remove the V-band from the downpipe and you are now ready to remove the turbo. Ensure all lines are disconnected and out of the way. Give the turbo a nice pull straight up so the vertical line pulls out of the grommet. Once the turbo is out there are a few things you need to transfer over to the new turbo. 1) the vertical line that is attached to the bottom. It is held in by a plastic screw, just use a flathead to unscrew it. 2) Unscrew the three screws holding in the boost pressure relief valve and install it on the new turbo in the same orientation. 3) Remove the flex connector and cylinder bank mount and swap it to the new turbo using the replacement gasket and clamp. Lightly tighten the clamp so there is enough room to freely move the mount around. You'll completely tighten it down after its mounted to the cylinder bank.

Stock Turbo vs. TTE710

- Now for the re-install. Make sure the new 66mm inlet flange is attached (if you are using CarbnLab). Replace each gasket on the cylinder bank mounting points and ENSURE they are aligned properly around the exhaust port. Make sure the lines are out of the way and line up the vertical line into the grommet. Drop the turbo in and make sure everything lines up and sits flat. I then started with the cylinder bank bolts and tightened those down first. Next I reconnected the charge pipes and intake manifold as well as bolting the charge pipe to the throttle body. Next, attach the coolant lines and mounting clasps to hold them back in place.
- Before attaching the oil supply line I used the Liqui-Moly turbo additive to fill the the turbo as much as possible so I didn't risk dry operation on the first start. I filled the supply hole and then filled the supply line before reconnecting it. Next, grab your new downpipe gasket and V-bank and reattach the downpipe. Re-install your intake/inlet, reconnect the O2 sensor and make sure the wires aren't excessively twisted. Now double check/examine that you didn't miss anything, all lines are connected and tightened down and then you're ready to flash.
- Flash your hybrid tune of choice and you're ready to start it. I recommend leaving the hood open for the first start as you want to check for any line leaks, air leaks etc. Let the car idle for roughly 15-20 minutes to burn off any excess oil and get up to operating temps. During this time, if you are using a turbo blanket you'll see the blanket start to burn in and smoke. This is normal. I let the car sit for roughly 15 minutes before driving it and throughout the first drive it continued to smoke until it was completely burnt in.
Then there ya go, your install is complete!!
First Impressions:
First and foremost, this is my first ever hybrid turbo or any turbo swap on a car so my expectations were pretty open. I wasn't exactly sure what it should feel like haha. Another thing to keep in mind, I am currently on the base ECU map from EPL which is very conservative. So after a short drive I started to understand the characteristics of the TTE710. Down low power really isn't that bad. Since we still have 6 cylinders getting us off the line, the low end and mid range still feels fairly good. I was expecting a significant increase in turbo lag but it's very manageable. Sure it's not the same as the stock turbo but I'm starting to really enjoy how it rolls into boost and the significant improvement on the top end. I'm not certain at what RPM peak boost hits, I think it's somewhere in the 3k range but when it does, mannnn it throws you back haha. This things wants to keep pulling past red line with ease. EPL is working on a TCU tune for this turbo the extend the redline to 7150rpm which is exactly what this turbo needs since it's not out of breath at 6450. One of my biggest gripes with the stock turbo is that anything over 40-50mph is very hard to build speed quickly since the turbo is so small. It really shines down low but not at all up top. I feel like the TTE710 does a very nice job bridging the gap between midrange and top end torque and power. Now you can do faster/highway pulls whereas before you really want a dig til 80-90mph.
The TTE710 is much louder under boost and the spool is intoxicating haha. It sounds much more aggressive. The blow off is much louder and the pitch has changed quite a bit too. It sounds epic rolling into boost.
Overall I am incredibly happy with this unit. I can't wait to start turning the boost up and making even more power with this thing. I think the base file runs a peak boost of 24-25psi (don't quote me) and I've seen guys taking them up to 28-29psi easily.
A few finished product shots!


 Reply With Quote


Bookmarks