


******DISCLAIMER******
**********************
After more than a few conversations with Antigravitys tech support staff and their president, we mutually decided that it would be a good idea to put this in the lead-off post here, to address liability concerns.
If you put an Antigravity (AG) battery in your vehicle and it doesnt work, even after re-coding your BMCM for the proper size, Antigravitys party line is that you should return the battery to them. Modifying your cars control systems is NOT an approved or endorsed method of making their battery compatible with your vehicle. If you do it wrong and 1) mess up your car or its systems and/or 2) mess up the battery by operating it outside of its designed and warranteed limits, then neither they - nor I - may be held liable in any way for damage, injury, R.U.D.E. (Rapid Unscheduled Disassembly Events), or other undesirable consequences. If I were you, I would expect the same of ANY LiFePo4 battery manufacturer, so do not treat this disclaimer as though it is exclusive to AG.
BOTTOM LINE: Proceed at your own risk knowing you ALONE accept full responsibility for the outcome of any alterations or modifications to your vehicles stock configuration.
**********************
**********************
**********************
Wasn't sure which forum to stick this in, so I figured I'd just park the info in the forum I frequent the most due to the vehicle I currently drive, and people will find it if they SEARCH :)
I installed an Antigravity 60 Amp-hour Lithium battery replacement to shave some weight and free up some space in my not-a-spare-tire well for mounting a subwoofer amp. Yeah, I know, I could have mounted the amp in between the B&O and the satellite radio, but having it so close to the battery made a LOT of things easier. In any case, I had some troubles in that the car was initially providing TOO MUCH juice to the battery. The battery monitoring and control module (aka BMCM, or J367) was showing voltage climbing up to almost 15 volts within the first couple minutes of driving, then things started shutting down to protect themselves (and I think that a couple times the battery's built-in protection may have kicked in, too). In the process of trying to solve this problem, I found that I could change the way the car tried to charge the battery by playing with the Battery Energy Management (BEM) code I inputted into VCDS... if you switch in an Antigravity or other lightweight LiFePo4 replacement, you should probably start by recoding your car with a battery part number that's as close as possible in amp-hours to the new battery. Especially if you're experiencing overvoltage/undercharging problems, re-coding should be your FIRST stop. If you get lucky, you won't have to do anything else! If you don't get lucky... well, just keep reading. It's a long post.
BACKGROUND - SYSTEM ARCHITECTURE
On the A5/S5/RS5 (and perhaps some other models as well), the BMCM sits on the negative battery terminal and watches battery temperature, battery voltage, and current running through the negative terminal. It feeds this information back to module J533 (CAN Gateway) via a LIN bus (Local Interconnect Network). Think of LIN like old-school serial communications... sending ones and zeros back and forth over a single 12V line, pulsing it like a telegraph. The J533 processes this info as well as other data from the Engine Control Unit (like RPM, engine load, whether accelerating or decelerating) and other CAN bus users like the central convenience module (to find out if things like the Rear Defroster or seat heaters are on). It mashes all that information together to make a decision on how much juice to tell the alternator to put out. Using another LIN bus line, it talks to the alternator's LIN-enabled voltage regulator to tell it what voltage it wants, and the voltage regulator adjusts the alternator accordingly to put out the requested power. All of that communication and calculation takes TIME... and sometimes the car's other components are acting/reacting more rapidly (especially when driving in a "spirited" fashion) than it seems the whole loop can keep up. The huge, heavy, non-LiFePo4 chemistry batteries that our cars originally come with act like a gigantic electrical "shock absorber"... sucking up spikes and surges and changes without complaint before the rest of the car's components notice anything is amiss. I believe (though I have a masters degree in engineering, it's NOT in electrical) that the LiFePo4's rapid charge/discharge characteristics end up passing those spikes and surges along to the car's electrical components rather than absorbing them, and/or shutting down because its own internal overvoltage/overcurrent protections are being triggered. Smart car + smart battery = too many chefs in the kitchen, I guess?
POTENTIAL SOLUTION 1) RE-CODING THE BMCM
The BEM code that gets put into the BMCM is in three parts, separated by a space between parts 1 & 2 as well as between parts 2 & 3. It must be this *exact* length of 26 characters (11-character part number, 1-character space, 3-character vendor code, 1-character space, 10-character serial number) or VCDS will not accept it. A full code looks like this:
000915105DD VA0 251016AGRA
Okay, what does all that mean? Let's break it down.
1A) BATTERY PART NUMBER.
All part numbers are 000915105** where the ** is filled in by the two letters below.
2 LTRS AMP HRS DIN AMPS TYPE (I think?)
------- ---------- ----------- ------
DB 44 220 Conv
BB or DC 51 280 Conv
CB 58 340 AGM
EB 59 320 EFB
AC or DD 60 280 Conv
AD or DE 61 330 Conv
CC 68 380 AGM
DF 70 340 Conv
FC 70 420 EFB+
AE AF or DG 72 380 Conv
CD 75 420 AGM
ED 79 420 EFB
AG or DH 80 380 Conv
AJ or DJ 85 450 Conv
CE 92 520 AGM
EE 93 520 EFB
AH or DK 95 450 Conv
CF 105 580 AGM
AK or DL 110 520 Conv
DM 115 600 Conv
MANY other batteries have different series part numbers instead of "000" series... as in, +++915105*. In this case, there is only a single letter after the nine-character sequence. The list below is by no means exhaustive. If you want to use these instead when coding into VCDS, put a BLANK after the letter so you'll have the right number of characters. I've only listed the ones that I could find actual pictures of specs of them in "OEM" trim, although if you search for other letters, you'll find several hits where aftermarket manufacturers have listed their batteries as compatible with those numbers in cross reference. I am currently running a "DE" part number for my 60 AH Antigravity battery... but more on that effectiveness below.
I think the two-letter suffix in the "000" series was intended to supersede all these other series with the single letter suffix, as it seems to be the most comprehensive list. From here forward, I'll be applying limited effort to updating the list below, only if it seems to offer some novel option not already reflected by a "000" series part number in the list above... those few are indicated by a "^".
SERIES / LTR AMP HRS DIN AMPS TYPE
--------- / ----- ---------- ------------ ------
8k0 / C 70 340 Conv
8k0 / D 80 380 Conv
8k0 / F 110 520 Conv
4f0 / B 80 380 Conv
4f0 / C 95 450 Conv
4f0 / D 110 520 Conv
4f0 / E 92 520 AGM
7P0 / none 68 380 AGM
7P0 / A 75 420 AGM
7P0 / D 105 580 AGM
1S0 / A 59 320 EFB
5TA / B 70 420 EFB+
6R0 / B ^ 69 360 EFB
3D0 / G ^ 85 480 AGM
3D0 / H 75 420 AGM
Part number tips: Obviously, you're going to want to select a part number that has as close to your new LiFePo4 battery's amp-hours as possible. It would also make sense that you'd also want to select an AGM (Absorbed Glass Mat) or EFB (Enhanced Flooded Battery) type, as those more closely mirror the charge/discharge rates and voltages of a LiFePo4 battery. In practice, however, I found this resulted in some VERY undesirable behavior. Upon revving the engine, I was immediately seeing some significant voltage spikes... almost like the car was counting on the battery to buffer them, but the AG battery didn't want to play nice with that. You may have different results, but I recommend simply sticking with the "Conv" part numbers... that seemed to keep charging rates and amperages low. Regardless, ALL part numbers are still listed here for the sake of being comprehensive.
1B) BATTERY VENDORS. As far as I could tell, the only effect this had on the car's behavior was to set a flag in one of the VCDS measuring blocks indicating the battery was "OK" or "NOT OK". What does it do with this information? I have no clue. I did discover that it hardly EVER said a Varta (VA0) battery was "NOT OK" so I pretty much left those middle three characters as "VA0" for the duration of my testing:
------------------------
5DO = JFF/Boading
TU3 = Exide
MLA = Moll
JCB = JCI/JCB
VA0 (or VAO) = Varta
UM5 = Akuma
BA2 = Banner
1C) BATTERY SERIAL NUMBER
Standard format is DDMMYY of battery manufacture, followed by a four-digit arbitrary alphanumeric code assigned by the manufacturer. You could actually use any ten letters/numbers in here you want... I've had it accept "ABCDEFGHIJ" or "1234567890" with no trouble. The important thing to know is that the BMCM **STORES** the battery codes and histories associated with them according to their SERIAL NUMBERS, not their PART NUMBERS. It keeps up to three of them in its memory, then starts overwriting. How much history it keeps and what types/parameters is stores and adapts for each, I do not know. BUT, if you want a fresh start with a "new" battery, make sure you don't just change the part number... give it a new serial number, too. In the example BEM code above, I pretended that I installed the battery on October 25th, 2016, and I made up serial number "AGRA" for it. Why not? give your battery a "vanity plate". For what you paid for the f**king thing, it deserves one.
This video from Ross-tech is also super helpful in sorting out the coding process:
https://www.youtube.com/watch?v=IJAScg6JrYI
-----------------------------------------------------------------------------------------------------------------------------------------------------------------
-----------------------------------------------------------------------------------------------------------------------------------------------------------------
HOPEFULLY, THIS SOLVES ANY OVERVOLTAGE/UNDERVOLTAGE PROBLEMS YOU'RE HAVING, AND YOU CAN STOP READING NOW!
The above solution (properly re-coding your BMCM for the new-sized battery) is the ONLY ONE suggested by Antigravity. If it doesnt work, they want you to send the battery back to them. If you dont, and you instead elect to proceed with one of the solutions described below, you do so at your own risk and assume full responsibility for any adverse outcomes.
-----------------------------------------------------------------------------------------------------------------------------------------------------------------
-----------------------------------------------------------------------------------------------------------------------------------------------------------------
What? Still here? ::Sigh:: modding is never as simple as it seems, right? Have no fear... we're not out of options yet.
Despite trying a bucket of different codes, I was still seeing the same behavior, over and over again (all found by monitoring the measuring values of CAN Gateway 19). Upon startup, the alternator would start outputting 14.7V. Even at idle without driving anywhere. As the battery voltage crept up to match, the CAN gateway would start dialing up the specified alternator voltage about .1v at a time. When the battery voltage showed 14.5, it would start asking for 14.8 out of the alternator... when battery charged to 14.6, it'd bump the alternator up to 14.9, and so on... by the time the alternator was putting out 15V, the battery decided to say "screw this, I'm outta here." It would get to about 14.75 volts, then would internally disconnect. Shortly thereafter, alternator voltage would drop to 14.3 and I'd lose seat heaters and rear defroster. Sometimes the battery would decide to give it another go and reconnect (in which case the same behavior would repeat) or sometimes it would just stay disconnected until I shut the car off. Driving would result in even more unpredictable behavior. Sometimes it would do the same thing as it did at idle, but other times the alternator would somehow put out a spike in voltage and some of the car's modules (important stuff like the transmission control unit or the MMI) would freak out and reset, throwing up warning lights and beeps and other scary stuff left and right. NOT COOL. If this has happened to you... fear not. Take your pick from the menu of options below, and you'll be all squared away. Depending on your particular model or configuration, you may have to try more than one of these to find the best solution for you:
POTENTIAL SOLUTION 2) DISCONNECT BMCM. Unplug the two-wire connector at the negative battery terminal. This places the car into a "fallback" mode. Alternator puts out no more than 14.3V, whereas I was seeing up to 15V at idle with it connected. Ive only taken a couple of drives with the cars BMCM disconnected, so I cant say its been a comprehensive test, BUT, it does seem to work well. The battery voltage recovers quickly after startup and remains steady at about 14v according to the bluetooth battery tracker in all sorts of driving conditions ranging from lazy to very spirited, both with and without high-draw devices like rear defroster and seat heaters on. PROS: Laughably easy to do. Fully reversible. Free. No dashboard warnings though it will set a code in VCDS. CONS: You are defeating some of the functionality of the vehicle; this may have other side-effects of which I am not yet aware. Also, only a few Audi models use this separate, directly-on-battery-terminal-mounted BMCM... others have more integrated electrical control units that have WAY more than just two wires plugged into them; disconnecting those systems entirely is not a viable option.

POTENTIAL SOLUTION 3) DROP OUTPUT VOLTAGE OF ALTERNATOR. Install a high-amperage diode inline with what goes from the alternator to either the jumper block in the cowling under the hood, or from the jumper block to the main fuse block on the positive battery terminal. Not sure which would be better, as I haven't tested this yet. The part is on the way, though, and I intend to. Most diodes will shave off about .7V, which would be perfect in this case. PROS: A "hardware" solution for limiting alternator voltage isn't subject to software reaction time. Retain full functionality of BMCM. CONS: Costs about $25 plus installation time, may have other side effects, inefficient (wastes excess voltage as heat), and reduces alternator output voltage ALL the time (even at lower RPMs when you may not WANT voltage to be lower). BMCM may be too "smart" for this workaround and might increase alternator field current to compensate? EDIT - I think my solution #5 is going to work as desired, so I probably will NOT end up testing this route. If someone would like to try, I have a BFD (Big F**king Diode) you can buy off of me for half price).

POTENTIAL SOLUTION 4) SPOOF BMCM WITH BATTERY AND DIODE(S). Put a 1.5V (AA, C, D, doesn't matter) battery in series with the voltage-sensing lead from the positive terminal to the BMCM. Add a diode (or diodes) to drop voltage "boost" to the level that gives you the best performance. This tells the BMCM that the battery's voltage is higher than it actually is, as I theorized above. I tested this (using a potentiometer instead of a diode), and it DOES work. Adding about 0.6-1v seems to get the BMCM to tell the J533 module to tell the alternator to chillax and dial back its output voltage. It was a crude test, and I didn't do any driving to see if this solves the problem under all conditions, but it's promising. PROS: Relatively inexpensive, simple, retains functionality of J367 module to adjust alternator load to varying conditions without overcharging AG battery. CONS: May take some trial-and-error to tweak/tune, and the 1.5V battery will need to be changed out periodically. Also, this method lies to your car ALL the time, not just when its on. This could have adverse effects on starting or on what the car reads as battery health indicators.

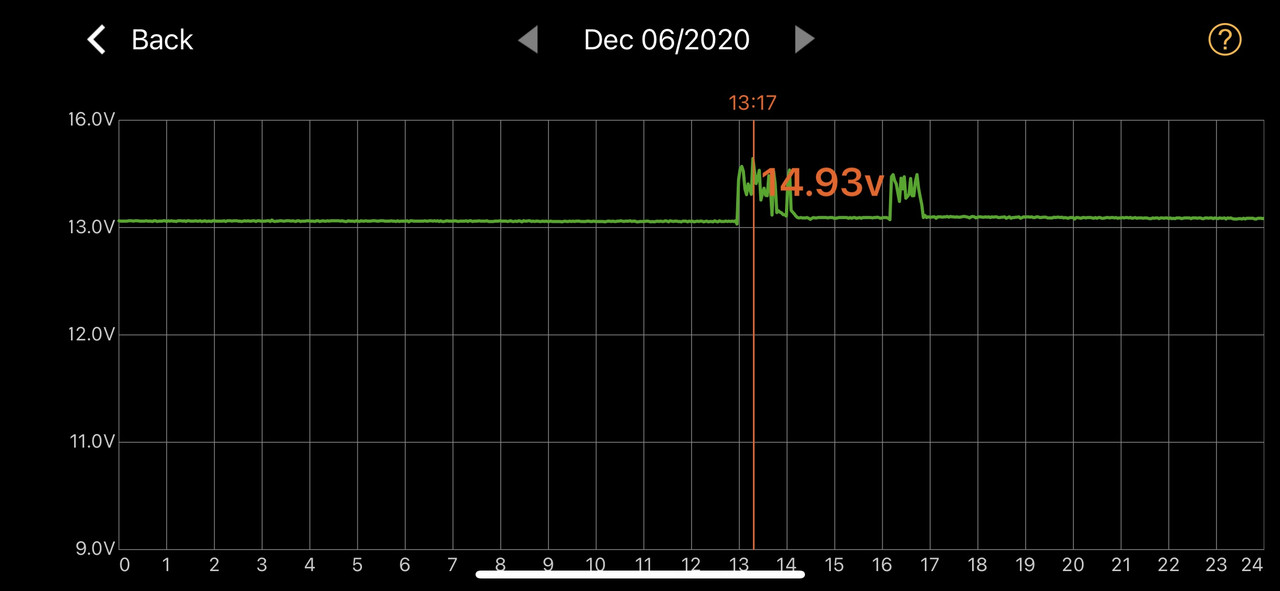
POTENTIAL SOLUTION 5) SPOOF BMCM WITH ISOLATED DC-DC CONVERTER & DIODES. Same effect as described above... lie to the BMCM. Basically replace the 1.5V battery with an isolated DC-DC converter so it never has to be changed or charged. Found one that steps down to 3.3V, then we'll have to get down to the desired "boost" voltage by adding a few diodes to drop the voltage to whatever works best (again, shooting for somewhere between 0.6 and 1v). UPDATE - the components have arrived and I built the prototype (see pics below). Haven't installed in the car yet, but it works as advertised during bench testing... providing an adjustable "boost" amount to the battery voltage the BMCM sees. SECOND UPDATE - I adjusted the design, because sticking the diodes into the IC socket was giving me an unreliable connection. I ended up going with a six-position rotary switch with five Schottky diodes bridging the six terminals, and two more regular rectifier diodes in series after that. I did this because of both the sketchy connections already described, and it was becoming a pain in the ass to open up the case every time I wanted to try a new combination of diodes. The two rectifier diodes get the voltage stepped down pretty close, then the Schottkys give me fine-tuning capability in about 0.175v increments. I can take battery voltage sitting at 13.2v and adjust what the BMCM sees all the way from 12.9v up to nearly 14.3v. It was dark, cold, and snowing, so I didn't feel like doing any testing after I got everything installed, but it IS working in the car. THIRD UPDATE: Drove today with the voltage boost set at about 0.7v. Worked like a champ. The car kept alternator voltages between 13.8 and 15v, with battery voltages (as measured by the bluetooth battery tracker) staying between 13.65 and 14.3. No electrical hiccups or undesirable side effects, no disabled seat heaters or defroster, and no codes registered in VCDS. Only a short testing window, but so far indicative of success! FOURTH UPDATE: It's now been more than a week, and I've probably driven a hundred miles over the course of 6 or 7 drives. Absolutely no issues whatsoever. Battery starting and charging performance remains exceptional, no codes or errors in VCDS, and no voltage spikes or errant electrical problems. The PROS: retains functionality of J367 module to adjust load to varying conditions without overcharging, no current draw when off, no 1.5V battery to change. CONS: Most complex solution, requires some rudimentary soldering and fabrication skills, costs about $30 in components (DC-DC converter, diodes, relay, enclosure, wiring, board, etc.).
Original design with IC socket to hold diodes

Revised design with rotary switch (final configuration of diodes ended up being slightly different than what is shown)


Revised schematic - added 8-position switch and more Schottky diodes for more fine-tuned control of voltage boost.

Thanks to @Apefactory and the folks at AntiGravity batteries for a lot of assistance and troubleshooting, as always!
-Jon
EDIT - I'm adding a fourth column to the charts... as we hammer out whether these part numbers are conventional (flooded aka "wet cell"), AGM, or EFB, I will list the type. I'll do a google image search for each part number as it seems that Audi/VW labels the top of the batteries with "AGM" or "EFB" if they are one of those, and apparently leaves it blank if it's a conventional wet cell battery.
SECOND EDIT - this is now done. For the "000" series part numbers, it would appear that if the first letter is "A", "B", or "D" it's a conventional battery; "C" means it's an AGM; "E" means it's an EFB; and "F" means it's an EFB+. What's the "+" for? I have no earthly idea.
THIRD EDIT - This now contains all the info found in post #12... at least for the "000" series.
FOURTH EDIT - Reorganized post and added more info about what the car does with the part numbers and serial numbers in the BEM code. Also, posted initial description of potential workarounds in case coding alone doesn't solve overcharging problems.
FIFTH EDIT - ***IN PROGRESS*** I'll edit this specific post further as I conduct more testing and evaluation on the workarounds. I've only just started static testing, and dynamic testing could take several weeks to try all configurations and monitor carefully for adverse/side effects across a wide range of driving conditions.
SIXTH EDIT - Added disclaimer at the top after speaking with AG staff about liability concerns.

 Reply With Quote


Bookmarks