Audizine - An Automotive Enthusiast Community

Results 1 to 33 of 33
  1. #1
    Junior Member One Ring
    Join Date
    Apr 29 2020
    AZ Member #
    546547
    Location
    Nottinghamshire, England

    Tempest RS - B5 S4 Widebody Stingray

    Guest-only advertisement. Register or Log In now!
    Hi all,

    I thought I'd make a post about my build here. I run my own specialist workshop and needed a demo project to use in advertising my business and skills.

    As this will be a lot to post in one go (as the car is nearing completion) Ill make posts over several days.

    A little about myself: My name is Troy Tempest, those of you of a certain age group may recognise the name from a Gerry Anderson TV show. Given the namesake, the business had to follow suit and it only made sense to nickname the car "Stingray". I studied motorsport engineering at the University of Brighton and worked for a VAG specialist for a little while before moving back to my roots in Nottinghamshire. I then worked for a well known kit car manufacturer before deciding to open my own workshop.

    In deciding to build a race car an important consideration is "what do I want to compete in?" - I had my eyes set on the VW Classic Cup, sponsored by the guys at KW Automotive UK. This series, at the time, had a GT class and allowed: 4WD and any VAG group vehicle that was manufactured before 2003. SO, with that in mind I started to look around for what I could buy. I knew it had to be Audi based, 4WD and I ideally wanted a wide body, so that narrowed it down to several models. The B5 RS4 is prohibitively expensive to buy and convert to a racecar and if I were to use a C5 RS6 saloon, I'd have to do the manual conversion. There's also the consideration that the C5 RS6 is a heavier car and the two extra cylinders aren't really needed.

    With the criteria in mind, the obvious solution was a B5 S4 sporting the RS4 widebody conversion - the issue was that all the cars I'd seen for sale at the time were complete, highly finished cars in road trim. To cut the story short, no more than five minutes after that thought passed I saw a post in one of the B5 Facebook groups with a widebody converted S4 for sale as a project. It pretty much ticked all the boxes...

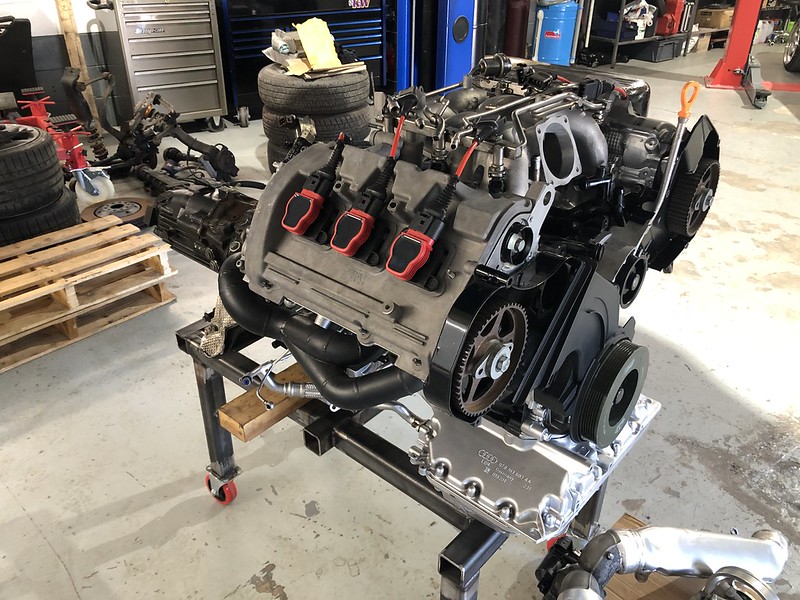
    Here's a short run down of the spec list:

    • Widebody chassis, freshly painted in Porsche Riviera Blue
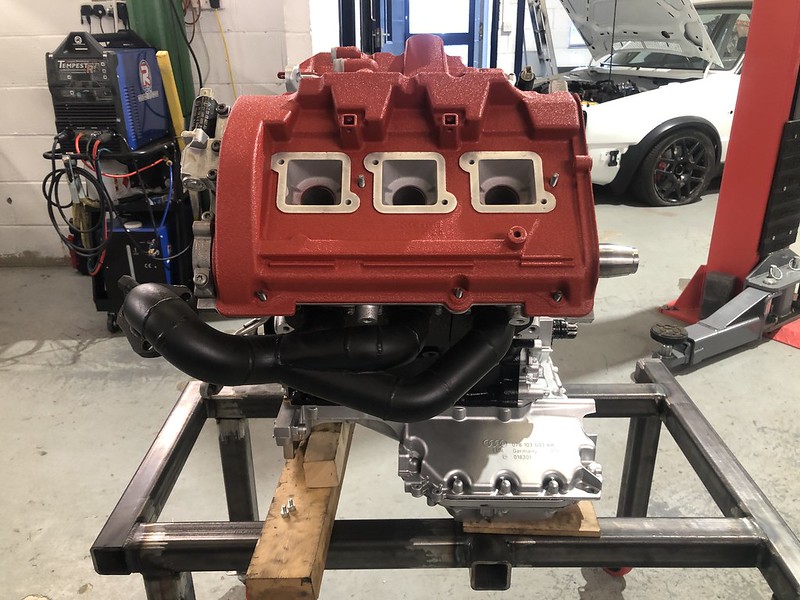
    • Freshly built engine with Mahle Motorsport Pistons, Upgraded rods, TDi oil pump conversion, Crank Girdle, 2.8 heads with Rosten Performance valves and titanium retainers, etc.
    • TTE 780 Turbos on MRC manifolds
    • Fidanza lightweight flywheel
    • Gearbox rebuilt with uprated first and second and taller 6th gear - quaife front LDS and 4:1 Torsen torque washers.


    That's pretty much the parts that piqued my interest as any interior trim, oil coolers and other parts that came as part of the deal were of no use to myself.

    After a few conversations with the owner the deal was done and I went to collect the car.

    Here's how it looked when I collected the car:

    CE80BFF3-ADC8-4E9B-9D14-5A544E361E4A.jpg

    Now it was in my posession it was time to make a spec build sheet and work out what components I would be adding to the car:

    • Link thunder ECU
    • ECU Master PMU 16
    • ECU Master CanBus Keyboard to control the PDU
    • Cosworth/Pi Omega P4 Pro Dash
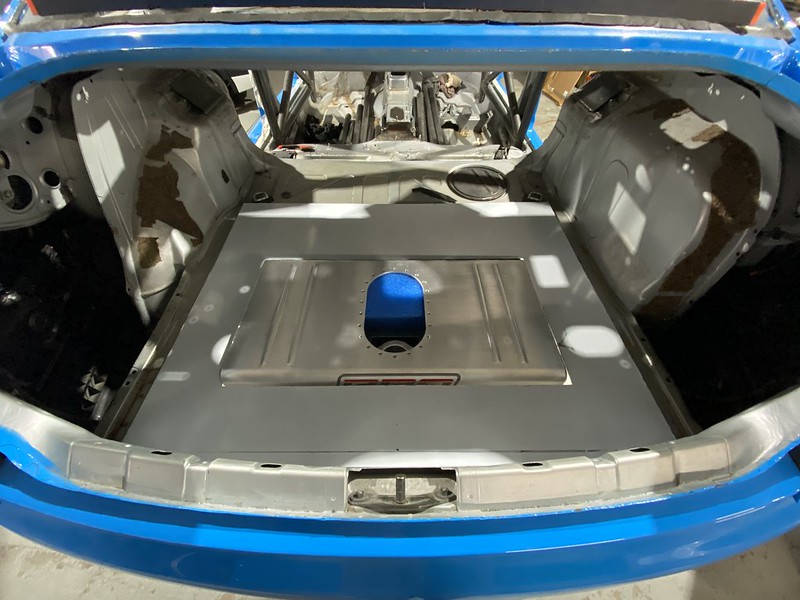
    • Pro Alloy 45 litre fuel cell
    • -8 front to back fuel system
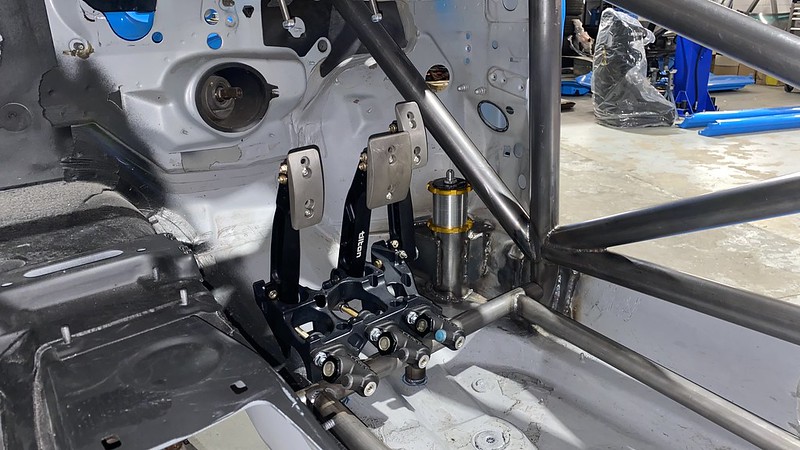
    • Tilton 600 series pedal box and master cylinders
    • KW Competition 2 Way dampers
    • Air jack system
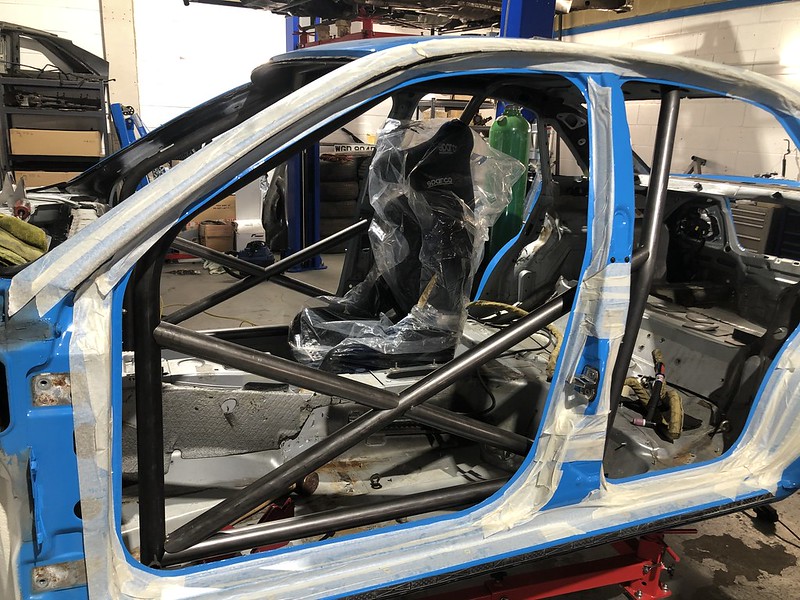
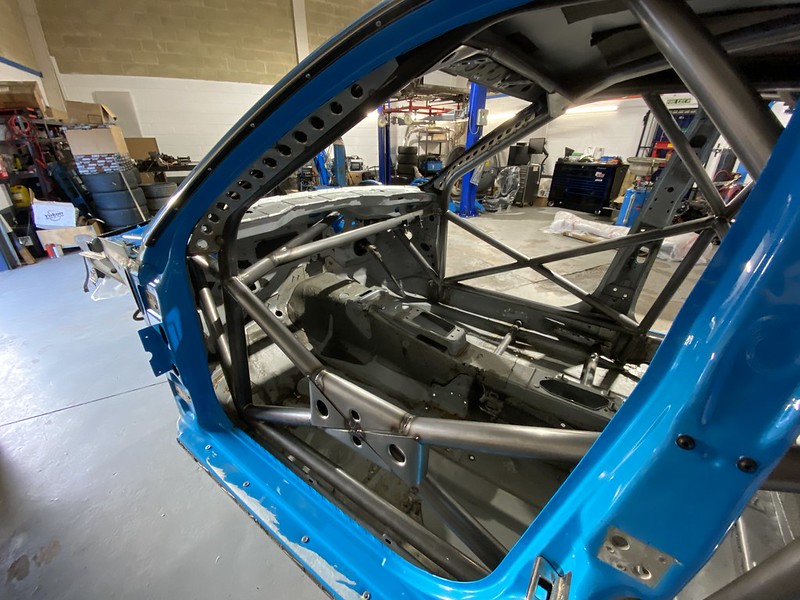
    • Custom Cages BTCC STC spec roll cage
    • Aerodynamic package including large single element rear wing.


    One the build general specs were decided upon, stage 1 is to strip the car of all in-necessary wiring, brackets and any panels such as the boot floor.
    2151426B-2954-411E-BBEA-5223A7E8EBAC.jpg8B813785-AC32-4DB1-9CCB-395EFBA99603.jpg17A5E59D-4DC8-4879-9611-5F72693AEC22.jpg7108FDCC-62D6-4945-9A7D-40047D808DAF.jpg

    Ill post some more pictures and information on those stages in my next post.

    Troy.
    Last edited by TroyTempest; 05-03-2020 at 03:21 PM.

  2. #2
    Veteran Member Four Rings Kruat's Avatar
    Join Date
    Nov 10 2004
    AZ Member #
    4121
    My Garage
    01 S4, 03 RS6, 15 A8L, 16 PSD F350
    Location
    Longview, WA

    That color looks great on a B5 widebody.

  3. #3
    Veteran Member Four Rings LJS's Avatar
    Join Date
    Apr 08 2013
    AZ Member #
    112983
    My Garage
    15 VW GTI S-Very WHITE
    Location
    Connecticut

    Looking forward to seeing your progress on this project.
    PS- I have fond memories of that TV show and I'm sure there's a large group of folks here who have NO idea what that was......

  4. #4
    Junior Member One Ring
    Join Date
    Apr 29 2020
    AZ Member #
    546547
    Location
    Nottinghamshire, England

    Quote Originally Posted by Kruat View Post
    That color looks great on a B5 widebody.
    Thanks, to be honest I wasnt keen on it at first. I wasnt really buying it for the colour, but it has grown on me a lot!

    Quote Originally Posted by LJS View Post
    Looking forward to seeing your progress on this project.
    PS- I have fond memories of that TV show and I'm sure there's a large group of folks here who have NO idea what that was......
    Haha, I think youre probably right - Im 30 but being named after it I was brought up on all the Anderson Series - Fireball XL5, Supercar, Stingray, Thunderbirds (my favourite) and Captain Scarlet. I didnt really enjoy Terrahawks, UFO and Space Precinct.

    I have just under 1k photos of the build at the moment, so Im trying to figure out whats best to host the images for posting. Once Ive worked that out Ill be posting some more content.

  5. #5
    Veteran Member Four Rings
    Join Date
    Aug 04 2013
    AZ Member #
    120269
    Location
    Pennsylvania

    That color is phenomenal, gorgeous car. I'm pretty jelly lol

    For a large number of photos a link to a Google album might be easiest. The ctrl q site can get the location for embedding from share links too

  6. #6
    Junior Member One Ring
    Join Date
    Apr 29 2020
    AZ Member #
    546547
    Location
    Nottinghamshire, England

    Quote Originally Posted by Mille Bornes View Post
    That color is phenomenal, gorgeous car. I'm pretty jelly lol

    For a large number of photos a link to a Google album might be easiest. The ctrl q site can get the location for embedding from share links too
    Thanks, as I say above - the colour has grown on me alot. Ive decided to use flickr for photos for now, I hate uploading to google - the app on my phone never works right with their apps.

  7. #7
    Junior Member One Ring
    Join Date
    Apr 29 2020
    AZ Member #
    546547
    Location
    Nottinghamshire, England

    Part 1:

    Rollcage


    The most important part of any race car build in my eyes is the ROPS (Roll Over Protection System). There's no point going fast without giving yourself at least the chance to come out alive.

    The cage was supplied by Custom Cages here in the UK - The kit is based on the cages that were used in the 1990's BTCC STC A4's driven by the likes of Frank Biela. Comparing the kit to the FIA homolgation docs, its a mix of the '97 and '98 cages.
    There are two options for material specification, CDS and T45. CDS is heavier due to needing a greater wall thickness to achieve the same strength as T45, it therefore costs less as its a less superior material. I opted for a T45 cage as I wanted to keep the weight down as much as possible on the build. Even with adding a few extra tubes, the kit comes in at 41.5 KG.

    The cage is a 12 point fitment with welded joints to the tops of the front turrets, bottom of the A pillars, bottom of the B pillars, middle of the B pillars, rear seat pans and the tops of the rear turrets.

    I wont lie - the process of getting this cage from the manufacturer was difficult and I had to spend lots of time chasing them. When I placed the order I was initially given a two week lead time. After six weks the cage arrived, however a third of it was missing - that took another two weeks to arrive. However, on the flip side, the product is good overall - I did have to adjust some of the tubes to get the best fitment possible, but the material supplied was fantastic to work with and welded very nicely.

    Once the kit was laid out it was time to strip all the panels and glass from the car. The problem with turning a freshly painted shell into a race car and welding in a roll cage is trying not to damage the paint!


    With all the panels off it is then a case of doing a dry run with the tubes, mark out the footplate positions and start to tack everything in place. This part required more than two hands ideally, so I had my friend Conor give me a hand.

    Main ROPS structure in place (A pillars, screen bar, main hoop)


    Conor tacking in the A pillar to main hoop lower brace bar


    Door bars tacked


    Most of the cage now tacked in to position


    A personal challenge for me was welding in the cage. There are two options to which welding process you can use to install the cages, MIG or TIG. I had been teaching myself TIG for about 6-8 months at this point and as part of getting the cage certified by the manufacturer you have to send a weld sample in for them to stress test. Given how new I was to TIG I was quite nervous about this part.

    weld test sample


    I got the test results back after a week and I passed with flying colours - I even got a comment on the test sheet that the visual presentation of the welds were better than the majority of what they see. I was rather proud of myself and passing this stage gave me the confidence to move on to fully welding the joints of the cage.

    As I previously mentioned, an issue with the kit was that some of the notches on the tubes weren't the best fit. The inital thought is to adjust them to make them fit better, but in most cases I was unable to do so, as the adjustment would have moved the tube into the wrong position.

    Door bar to A pillar/A pillar to Main hoop brace
    This is a good example, as I had to build the welds in order to fill them nicely.


    Here was the worst offender: LOOK AT THOSE TACKS!


    At first Custom Cages told me to just lift the tube up, so that the gap was taken up - as the other tubes around it form a triangle. I wasn't happy with this as lifting the tube up moved it away from its triagulation point and wouldn't conform to the cage design drawing they supplied with the kit. I requested they send a replacement length of T45, which I then profiled myself using my milling machine.

    Tempest's Tube!


    Finished off with a lovely weld.


    Welding the cage into the car took HOURS, TIG is a great welding process, but it is slow and you have to contort yourself in to all sorts of horible positions. I even had to do several joints with the welder amperage control foot pedal between my knees, squeezing them together and relaxing them to pulse the amps up and down on each dab of filler!

    Front lateral tube to top of the front strut mountings


    I have photos of literally every weldment on the cage, so I'll skip all that and show the finished thing!


    One thing, some eagle eyed viewers will notice that there are some extra bits of tube work I haven't covered in the write up in this section. I'm going to be posting this as 'chapters' rather than in a chronological order, as it will make more sense that way.

    I'm going to try and post a 'chapter' a week, maybe several a week.

    If you've read this far, thank you for getting through it. There's lots more to come!

  8. #8
    Established Member Two Rings darren p.'s Avatar
    Join Date
    Nov 30 2015
    AZ Member #
    365179
    My Garage
    Mk2 GTI VR6 B5 S4 Avant E90 M3s
    Location
    NYC

    Wow, great work so far, looking forward to seeing how this goes. I would have loved to study Motorsport Engineering in college, I'm not aware of any programs in the US.

    The Alpine White GTI is looking real good too...whats the story with that?

  9. #9
    Junior Member One Ring
    Join Date
    Apr 29 2020
    AZ Member #
    546547
    Location
    Nottinghamshire, England

    Quote Originally Posted by darren p. View Post
    Wow, great work so far, looking forward to seeing how this goes. I would have loved to study Motorsport Engineering in college, I'm not aware of any programs in the US.

    The Alpine White GTI is looking real good too...whats the story with that?
    Thank you! It was a great course and I learnt a lot, it was difficult as I was 23 when I started the course and I had to re-learn a lot of basic math. But it was worth it. Im not sure what its like stateside but schools in the UK rarely have metalworking or engineering workshops/classes any more. As a country we have moved away from teaching hands on trades in school.

    The GTi is a story in itself, its a customers car. Its a 20vT converted with Haldex, but using 8L S3 subframes front and rear.
    I was commissioned to complete all the vehicles wiring, plumbing and to get it running. The car has a full cage, Wilwood bias pedal box etc. However, once the car was running it became evident that there is more work to be done to rectify some poor fabrication work on various parts of the car.

  10. #10
    Veteran Member Four Rings zatch_303's Avatar
    Join Date
    Jun 13 2009
    AZ Member #
    43721
    Location
    Colorado

    Very cool! Keep up the great work!
    // 2001.5 Pearl White B5 S4 Sedan 6MT

  11. #11
    Veteran Member Four Rings CELison's Avatar
    Join Date
    Feb 23 2010
    AZ Member #
    55053
    Location
    Emmaus Pa

    Wow. This is awesome.

  12. #12
    Veteran Member Four Rings jibberjive's Avatar
    Join Date
    Jan 11 2007
    AZ Member #
    14790
    My Garage
    01.5' S4, 04' A4 USP, 04' CRF450r
    Location
    Salt Lake City, Utah

    Killer project.
    ** GT2860R-7 S4 Build Log--

    LOOKING FOR:
    --Late 2.7t Block "BF"
    --Your Broken/Sheared OEM Axles--

  13. #13
    Junior Member One Ring
    Join Date
    Apr 29 2020
    AZ Member #
    546547
    Location
    Nottinghamshire, England

    Quote Originally Posted by zatch_303 View Post
    Very cool! Keep up the great work!
    Quote Originally Posted by CELison View Post
    Wow. This is awesome.
    Quote Originally Posted by jibberjive View Post
    Killer project.
    Thank you for your kind words guys!

    Just going to start writing up the next section now!

  14. #14
    Veteran Member Three Rings avant1987's Avatar
    Join Date
    Jun 06 2016
    AZ Member #
    374356
    Location
    PA

    Wow. Who says the forums are dead. This is making to be an incredible thread. Cant wait for more!


    Sent from my iPhone using Tapatalk
    Projects
    2001 Nogaro S4 Avant 6-speed - RS4 Widebody Conversion
    1995 Audi 90 Sport Quattro 6-speed

  15. #15
    Veteran Member Four Rings
    Join Date
    May 22 2016
    AZ Member #
    373641
    My Garage
    2006 electric blue evo 9, 2jz e46, rwd b5 a4, b7 a4 sline titanium airlift 3p
    Location
    Roseville

    This is cool I guess..... jk this is beautiful. Keep it your way and do it how you want it!

    Sent from my SM-N975U using Tapatalk

  16. #16
    Junior Member One Ring
    Join Date
    Apr 29 2020
    AZ Member #
    546547
    Location
    Nottinghamshire, England

    Part 2:

    Other tube work

    As per my last post there was additional tube work that has been put into the car along with the rollcage.

    The seat mountings are made from tube also and are constructed from the same material as the cage. When it came to how to build the tubes into the car I took advice from Royce, a good friend of mine who has many years experience building BTCC and other cars here in the UK. He currently works for Motorbase on their Ford RS BTCC program, so I asked how they're mouning the seats into BTCC cars these days. So here's my take on what he told me:

    Firstly, I had to remove the original seat mountings, which is a bit of a chore to be honest. There's some 60 odd spot welds between the front mounting that runs across the floor and the runner rails at both sides.

    Original seat mounting removal by spot weld drilling


    Ignore the big bleb of weld, it fell off the end of the rod on the first pass as I finished the weld. S**t happens! haha.


    The tube is placed into the car across the floor and goes through the inner cill section and then through into the tunnel. Supporting plates were then welded around the tubes and to the existing metal panel work. The tubes themselves also have stanchions that come down to the floor, with steel threaded bushes inserted and welded inside, these are the bolted through the floor pan with spreader plates on the underside. The threaded bushes take M10x1.25 bolts (fine pitch is stronger than coarse) and there's four stanchions per seat tube set. So in order for the seat to come out with its framework in the case of an accident, the whole floor pan below the seat, a section of tunel and a section of inner cill would have to come with it all.

    I think I posted this above, but you can see the seat tubes quite clearly.


    Being able to sit in the car with the seat properly fitted was a big milestone!

    Next thing on the list was the frame work for the Tilton 600 series rear facing master cylinder pedal assembly. Again, inspiration taken from the conversation I had with my friend Royce about the seat tubes. I decided to make a framework that would come forwards from the front seat tube, to a cross bar that then would be welded near the bottom of the roll cages A pillar tube. It would also have stanchions to the floor with threaded bushes that secure it through the floor in the same manner as the seat tubes.

    The pedal assembly itself is bolted through these box section extensions


    Tube framework welded together, but just sat in position


    With the framework just sat in position and bolted through the floor with one stanchion, I could pull the whole car across the workshop on the dolly with no movement or deflection. Lovely and strong!

    Test fitting the pedal box to the framework. Notice the original steering column being used and tied into an additional tube I welded into the cage.


    Seat, pedal box and column all in


    As the car is going to be fitted with a Pro alloy fuel cell and as I am going to be running a comprehensive aerodynamic package at the back of the car, the rear floor pan with the spare wheel well had to be removed.

    This made the seat runner seem like nothing!


    About an hour later!


    Booted out


    The idea is to weld two tubes across the rear chassis legs that have enough space between them to sit the fuel tank in a new floor section made from aluminium.

    Tubes in place


    The replacement aluiminium panel was cut to shape and the opening for the tank was made. There will be stanchions that come up from the tubes for the panel to rest on.

    Fuel cell placed on jack stands to mock up positioning


    The tubes also serve as a great triangulation point to add even more connection points between the chassis and the roll cage, but also the became the support for the air jack installation.

    Every true race car needs air jacks in my opinion. If you don't have them and you have an issue during a session at the track, so much time is lost having to jack the car up and put in stands, especially with a small crew.

    I purchased a three jack set from Yellow Speed Racing, they're entry level units - the budget has grown so large on the car that I had to compromise somewhere. Ideally I'd have bought AP or Krontec units.
    You need the most jacks where most of the weight is, so in my case two at the front and one at the rear. When I looked at the FIA homologation docs for the STC BTCC A4s I noted how the front jacks were fitted and emulated this, with a little less finess but its perfectly functional.

    70mm hole in the front corners


    I fitted tube into the hole and made plate supports that are welded to the tube and the chassis. I had to MIG these parts as the metal that makes up the original panels has lots of contaminants from cavity wax, undersealer, bitumen sound absorption pads, etc. This makes it extremely difficult to TIG weld.

    Oooh my MIG work leaves alot to be desired compared to my tig


    Here's the off side unit to the side and rearward of the pedal box


    To fit the rear air jack unit I decided to make a framework that would be supported from the forward tube that was previously welded into the rear chassis legs.

    So I fabricated this, cut the notches on the milling machine and TIG welded.


    The idea behind the ally guide bushes is to tie the framework into the rear subframe, where the rear tie arms are located. This should brace the assembly from being levered forward and backward somewhat.

    I have to admit, these were some of my best welds to that point!


    Sat roughly in location


    Due to the fact that the aluminium pipe that supplies the air jacks with air comes in from the top, I had to put a tube in the middle of the lateral bar between the chassis legs to allow it to pass through.

    Supporting tubes in postition, ready for welding.


    I can't find any more photos of the completed air jack installation. So I'll get some and update this post.

    I hope this is of interest to people out there and it's worth the read!

    Troy.
    Troy Tempest

    Tempest Performance Limited
    Insta: @tempest_performance

  17. #17
    Junior Member One Ring
    Join Date
    Apr 29 2020
    AZ Member #
    546547
    Location
    Nottinghamshire, England

    Quote Originally Posted by rondog6 View Post
    This is cool I guess..... jk this is beautiful. Keep it your way and do it how you want it!

    Sent from my SM-N975U using Tapatalk
    Thank you! It will certainly be a very individual car, thats for sure!

    Quote Originally Posted by avant1987 View Post
    Wow. Who says the forums are dead. This is making to be an incredible thread. Cant wait for more!
    leb

    Sent from my iPhone using Tapatalk
    I know!!

    I like social media platforms, and utilise them a lot - but the forums give a nice progression that I feel still can't be emulated!

    The car is probably 75% complete now and theres some super sweet stuff to come! Thanks for reading this far

    Troy.
    Troy Tempest

    Tempest Performance Limited
    Insta: @tempest_performance

  18. #18
    Veteran Member Four Rings
    Join Date
    Aug 04 2013
    AZ Member #
    120269
    Location
    Pennsylvania

    Quote Originally Posted by TroyTempest View Post
    The car is probably 75% complete now and theres some super sweet stuff to come! Thanks for reading this far
    Can't wait!

  19. #19
    Veteran Member Four Rings christianb5s4's Avatar
    Join Date
    Aug 24 2014
    AZ Member #
    277489
    Location
    Newport Beach, CA

    Beautiful build so far, love seeing the fabrication and attention to detail!
    Imola 2001 Stage 3 S4: 324K - 157mph 1/2 mile - 543whp/530ftlbs Mustang Dyno - Built BEL Block - RS4 cams/intake - TTE600s - Ringer Racing Stage 5 - Etspec - SRM V3 Intercoolers - AA built trans - 4:1 Diff - Vast cooler - JHM Trio - 034 - H&R Coilovers - OZ Racing - SRM/SSAC exhaust
    2024 M3 Comp xDrive
    2016 A6 prestige w/ s-line, APR Stg 1, Melen TCU, PS4S, valcona S6 interior parts

  20. #20
    Veteran Member Three Rings Polo//S4's Avatar
    Join Date
    Jul 11 2009
    AZ Member #
    44849
    My Garage
    '01 S4 Avant
    Location
    Tampa, FL

    Awesome build!
    @gmguinan

  21. #21
    Junior Member One Ring
    Join Date
    Apr 29 2020
    AZ Member #
    546547
    Location
    Nottinghamshire, England

    Quote Originally Posted by christianb5s4 View Post
    Beautiful build so far, love seeing the fabrication and attention to detail!
    Quote Originally Posted by Polo//S4 View Post
    Awesome build!
    Thanks for your comments guys. Trying to think of what would be best to post next!
    Troy Tempest

    Tempest Performance Limited
    Insta: @tempest_performance

  22. #22
    Junior Member One Ring
    Join Date
    Apr 29 2020
    AZ Member #
    546547
    Location
    Nottinghamshire, England

    More photos of the air jack install:

    The air jack fill/release valve fitted nicely in the original fuel filler flap opening. That will confuse a few people!


    Welding detail on rear air jack carrier frame
    Troy Tempest

    Tempest Performance Limited
    Insta: @tempest_performance

  23. #23
    Junior Member One Ring
    Join Date
    Apr 29 2020
    AZ Member #
    546547
    Location
    Nottinghamshire, England

    Part 3: Engine

    The engine came built with the car when it was purchased. It's not something I would usually go for as I prefer to build my own engines, but I had a discussion with the machine shop that carried out the work and got all the sort of answers I expected from my questions.

    I did have to correct the inlet cams as they were on the opposed heads, but this was due to the fact they were unaware that TDC cylinder 1 on the timing marks isn't cylinder one on the block. Swapping the cams corrected the issue and the engine came with no cam belt fitted, so shouldn't have been turned to cause any damage.

    Some detail on the engine components:
    • S4 Engine Block
    • Ported 2.8 Cylinder heads with camshafts
    • 2.5 TDI oil pump conversion/upgrade
    • Mahle Motorsport pistons (81.5mm bore)
    • Forged connecting rods (although I have no detail on brand)
    • Silly Rabbit Motorsport main bearing girdle and ARP main cap hardware
    • Rosten Performance inlet and exhaust valves
    • FCP Performance valve springs
    • Rosten Performance titanium retainers
    • RS4 inlet manifold port matched to heads
    • Fluidampr crank auxiliary drive pulley


    The engine as it came to me.


    MRC exhaust manfolds


    I sold the red cam covers fairly quickly, as they are't my cup of tea - red and blue dont go together for me.

    There was a spare set of cam covers with the car, So i cleaned them down in my parts washer, then sand blasted them. My cabinet and compressor aren't amazing for blasting. So I'll probably get them re-blasted at some point by the powder coating company I use.

    A before and after comparison


    Before Cleaning the baked on oil/carbon


    After, not too bad


    People forget to clean out the breather traps, I don't fancy an engine full of aluminium oxide grit!


    Breather cover plates cleaned


    Engine built up with more parts including inlet and coil conversion


    Gearbox mounted to the engine, fluidampr and timing covers fitted


    The car won't be running a heater matrix in the cabin, so I turned some steel bungs on the lathe and then welded the outlets on the engine coolant pathways up.

    Balance bar outlet


    Transfer pipe outlet


    When I posted about this in one of the B5 facebook groups I had a number of people tell me the car will overheat without the heater matrix fitted! I was also told that if I blank the matrix outlets I won't get any coolant flow. If you look at the self study document for the S4 you can clearly see that there is a short circuit path that allows coolant to circulate if the matrix were to get blocked.

    SSP 198


    I decided I wanted to upgrade the engine mounts, but wanted to make my own, rather than buying something off the shelf.

    I got some aluminium bar stock in several sizes and some powerflex black series generic kit car bushes and set about making my own.

    Bushing half


    I never took any in progress images unfortunately, heres the two halves slotted together


    One mount fitted - I ended up milling some more away from the bottom edge of the bushing half to stop them bottoming out.


    Engine in on the mounts


    There's probably quite a lot more that I could post about the engine, however some of those aspects - such as the fuel system, will be covered in another post.

    Thanks for reading!
    Troy Tempest

    Tempest Performance Limited
    Insta: @tempest_performance

  24. #24
    Established Member Two Rings
    Join Date
    Apr 25 2015
    AZ Member #
    329432
    Location
    New York

    Amazing build. Respect

  25. #25
    Established Member Two Rings Jakub.J's Avatar
    Join Date
    Jul 12 2018
    AZ Member #
    422269
    Location
    Illinois

    Thanks for the refreshment, legit stuff. Thanks for posting this.

  26. #26
    Senior Member Two Rings
    Join Date
    Feb 02 2008
    AZ Member #
    24825
    My Garage
    17 pure white vr6 Touareg sport tech
    Location
    SoCal

    Absolutely insane build. you scallywag! Can't wait to see and hear her in action, please don't stop posting. PS. also my favorite Porsche color.
    Silver 01.5 a4 avant 1.8tqm (sold)
    Silver 01.5 S4 avant
    pure white 17 touareg sport tech

  27. #27
    Deactivated Three Rings
    Join Date
    Sep 05 2012
    AZ Member #
    99944
    Location
    FL

    cool build...

  28. #28
    Registered User Four Rings
    Join Date
    Sep 01 2013
    AZ Member #
    122272
    Location
    Sweden

    I remember this car from another UK fella.
    Great build. Thanx for sharing.


    Are you planning to run WMI as being a trackcar or will it be mapped for Race petrol?

  29. #29
    Junior Member One Ring
    Join Date
    Apr 29 2020
    AZ Member #
    546547
    Location
    Nottinghamshire, England

    Quote Originally Posted by b5329 View Post
    Amazing build. Respect
    Quote Originally Posted by Jakub.J View Post
    Thanks for the refreshment, legit stuff. Thanks for posting this.
    Quote Originally Posted by destrolock View Post
    Absolutely insane build. you scallywag! Can't wait to see and hear her in action, please don't stop posting. PS. also my favorite Porsche color.
    Quote Originally Posted by SupremePower1 View Post
    cool build...
    Thanks guys, I'm on with the wiring at the minute and giving myself a headache with Amphenol Mil-Spec plugs!

    Quote Originally Posted by Mocke View Post
    I remember this car from another UK fella.
    Great build. Thanx for sharing.


    Are you planning to run WMI as being a trackcar or will it be mapped for Race petrol?
    Mocke, The car is quite well known so that doesn't surprise me.

    I don't plan to run WMI - I have experience fitting and tuning Aquamist systems (I used to live 25 minutes from Mr Lamb's workshop at Aquamist and visited him a number of times), mainly on diesels where its akin to nitrous oxide for petrol engines.

    The plan with the car is to run at a lower power level initially to run in and settle the car down. This will be mapped for highest octane pump fuel. Some events and classes I may enter have regulations limiting to 99 or 100 ron.
    When I upgrade the intercoolers and try to push more power from the engine then I will get the car tuned onto race fuel for events that permit their use.

    The car will have evolutionary steps only once the previous iteration of the car has been tested and proven. Given the ammount of custom made parts that are in the car, I don't fancy breaking everything at once!!
    Troy Tempest

    Tempest Performance Limited
    Insta: @tempest_performance

  30. #30
    Junior Member One Ring
    Join Date
    Apr 29 2020
    AZ Member #
    546547
    Location
    Nottinghamshire, England

    Sorry for the lack of post updates.

    I've been busy with the build and a number of other things, such as buying a new daily car. 5.2 v10 S6 drinks enough fuel to make me feel fine when I drain the tank in the B5 when its finally running!

    Part 4: Fueling the Fire

    The fuel system on the car needs some consideration as to placement of the individual components. I prefer to spec a fuel system that is capable of handling the projected upgrade path of the car without too much hassle.

    A decent fuel cell is essential in a track car build and there are several options on the market. ATL and smiliar cells are the ideal, but when building a car from scratch, sometimes the budget just won't allow it.

    There are however some extremely good fuel cells out there made from aluminium for reasonable money, the range from ProAlloy Racing here in the UK is fantastic. I specified a 45 litre tank from them as this will be large enough for most events I plan to enter.
    The great thing about the ProAlloy cells is that they include an internal collector box that has ball valves to keep fuel around the pump pickup at all times. They're also filled with tank foam to stop the fuel moving around too much.

    I don't have any photos of the tank from when it first arrived and I unboxed it unfortunately.

    Once the cell arrived I went about making the top of the aluminium false floor that will hold the fuel cell.


    The ProAlloy cells are setup to use a walboro/TI automotive in-tank pump that sits inside the collector box, but as I already had a Bosch 044 pump here at the workshop ready for the project I fitted this instead. The 044 pump is a bit longer than the TI pumps are and once I had the filter sock on the pump I had to make a small bulge in the bottom of the tank to allow it to sit inside with the top hat fitted.

    With the eventual power target around the 600+ wheel hp area the fuel system was built with -8 teflon lined hose and fittings throughout. This meant that the stock RS4 fuel rail will be a restriction at a later date, so a set of Integrated Engineering fuel rails were purchased through Badger5 here in the UK. The guys at Badger5 were very helpful and kept chasing IE for delivery dates etc, even during our Coronavirus lockdown here.

    Integrated Enginnering Fuel Rails


    With the top hat fitted onto the tank now the pump was installed, the cell was placed back in the car and the fuel lines and unions were assembled. The fuel unions are all superflow type unions with a larger internal bore that is as close to the hose bore as possible to maximise fuel flow.

    Tank end unions fitted


    The aluminium floor still needs finishing and tidying where it joins to what remains of the steel foor...

    I see quite a few aftermarket fuel filters fitted into modified cars - many are the awful air stone type filters that just bung up after very little use. You can't beat a Bosch Motorsport 8 micron cartridge filter. Okay, they're not the cheapest but at least it wont clog up after a few hours of running and really do filter the fuel!

    Fuel Filter can be seen on the left hand side of the image


    Annoyingly, due to the way the fuel pump sits in the tank and how the rest of the fuel lines needed to be run, the lines had to cross somewhere to allow them to be in the correct orientation at the bulkhead. I may change this and make them cross over just before the bulkhead, but this isn't something that can't be changed later - but it does currently upset my OCD somewhat.

    Fuel lines passing the battery and live cable


    A view from closer to the front of the car looking back at the fuel run (coverage of the shifter will come in a later post)


    The rest of the run to the bulkhead


    I decided to pass the fuel lines through the bulkhead where the airconditioning matrix fitted into the cabin air box and the AC pipes originally protruded through in their grommet.

    I made a plate to cover the hole and fitted bulkhead unions


    A self portrait (I wear glasses, I'm blind AF!)


    Plate fitted and bulkhead unions fitted up and hoses terminated with more superflow unions


    The Fuel pressure regulator is going to sit in the plenum between the cabin firewall and the engine bay firewall.

    Several riv-nuts later...


    You can see the second set of bulkhead fittings that go through the engine bay bulkhead are already fitted.

    All plumbed up!


    Some of you may have already worked out I'm converting to e-PAS too. I'll cover that at a later date.

    I didn't specifically take an image of fuel lines going from the bulkhead connectors to the fuel rails, but they can be seen in the image below.


    So that's the fuel system pretty much completed. I have yet to come up with where I'll actually place the fuel filler port, I'm currently thinking perhaps fitted into the bottom corner of the perspex rear screen, but we will see.

    I'm currently on with electrics, just about to finish making the engine harness and the connections for the engine consumers to the PMU etc. I've also had the PMU and Cosworth dash running, so the car is at least electrically live now. Thats probably what I'll cover next, as there's quite a bit to go over.

    Once again, thanks to those who read through this latest post - I hope you enjoyed it.

    Troy.
    Troy Tempest

    Tempest Performance Limited
    Insta: @tempest_performance

  31. #31
    Active Member One Ring
    Join Date
    Jul 22 2023
    AZ Member #
    941733
    Location
    Orinda / CA

    Suspension? Rear wing? I want to see more!!!!

  32. #32
    Junior Member Two Rings
    Join Date
    Dec 01 2021
    AZ Member #
    648109
    Location
    Plymouth

    Indeed, what happened to this epic build @TroyTempest?

  33. #33
    Veteran Member Three Rings xRenesis's Avatar
    Join Date
    Jan 14 2015
    AZ Member #
    309316
    Location
    South Dakota

    Last on Audizine October 2022, Instagram looks like he's still going and driving it.
    2005.5 A4 B7 - 2.7t K04 - DTM/S4 OEM+ (My B7 Rear BBK)
    2014 Q5 B8.5 - 3.0t (My B8/B8.5 Rear BBK)
    ig 1red_b7

Bookmarks

Posting Permissions

  • You may not post new threads
  • You may not post replies
  • You may not post attachments
  • You may not edit your posts
  •  


    © 2001-2025 Audizine, Audizine.com, and Driverzines.com
    Audizine is an independently owned and operated automotive enthusiast community and news website.
    Audi and the Audi logo(s) are copyright/trademark Audi AG. Audizine is not endorsed by or affiliated with Audi AG.