Audizine - An Automotive Enthusiast Community

Results 1 to 5 of 5
  1. #1
    Active Member One Ring
    Join Date
    Jan 06 2020
    AZ Member #
    533225
    Location
    Nepal

    AUDI Q5 TFSI 2.0T engine Upper timing cover oil leak FIXED

    Guest-only advertisement. Register or Log In now!
    My 2012 Audi Q5 had the same problem. Everyday I wipe off the oil on the top of the engine and the next day, after driving 10 miles from work, same thing again, oil all over the top part of the engine. I already replaced the Water Pump twice because this gas mixed oil runs down the top and swells the Water Pump gasket. Which causes to break up or crack the top part of the Water Pump.
    So I decided to fix this oil leak which was coming from the Upper Timing Chain Cover on the front. When the oil seeps out of the cover while driving, the force of the wind blows the oil all over the top of the engine and sometimes it looks like the head cover is leaking too. Here are some pictures I took and some tips when I fixed it:-

    Tools: T30 bit (shorter the better because of the tight space), 10mm socket ( for the same T30 bolts if teeth got chewed up ), wrench (Smaller is better due to the tight space) , small screw driver
    Parts: Upper Timing Chain Cover gaskets (Audi part 06H-103-483-C and small circular one that sits Magnetic Variator Or Solenoid, Audi part 06H-103-483-D )
    Magnetic Variator Or Solenoid O-Ring Audi Part WHT-007-212-B


    Process:
    1) First thing first, I took the main top cover off (which has the Audi Logo).
    2) Unscrewed 3 bolts (T30) from the Magnetic Variator (some call it Solenoid). I put a towel in the bottom to catch any bolts just in case if I dropped the bolts.
    3) Detached the Cable that connects the Variator.
    4) Unscrewed 5 bolts (T30 or 10mm socket)
    5) Unscrewed 1 bolt that attaches Oil dip stick. This helps To remove the Timing Cover. You have to move the Oil Dip stick away a little bit to the right. (Pic 1. and 2)
    Pic 1.
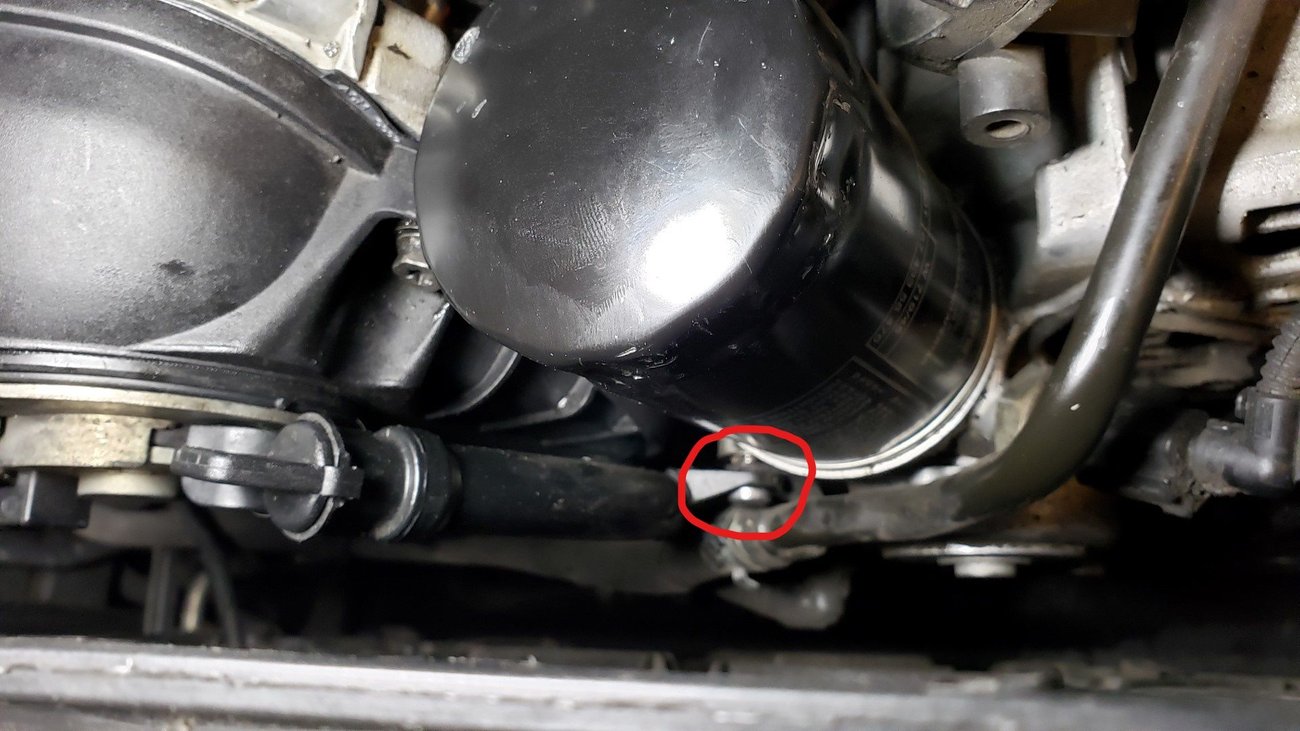
    Pic 2.
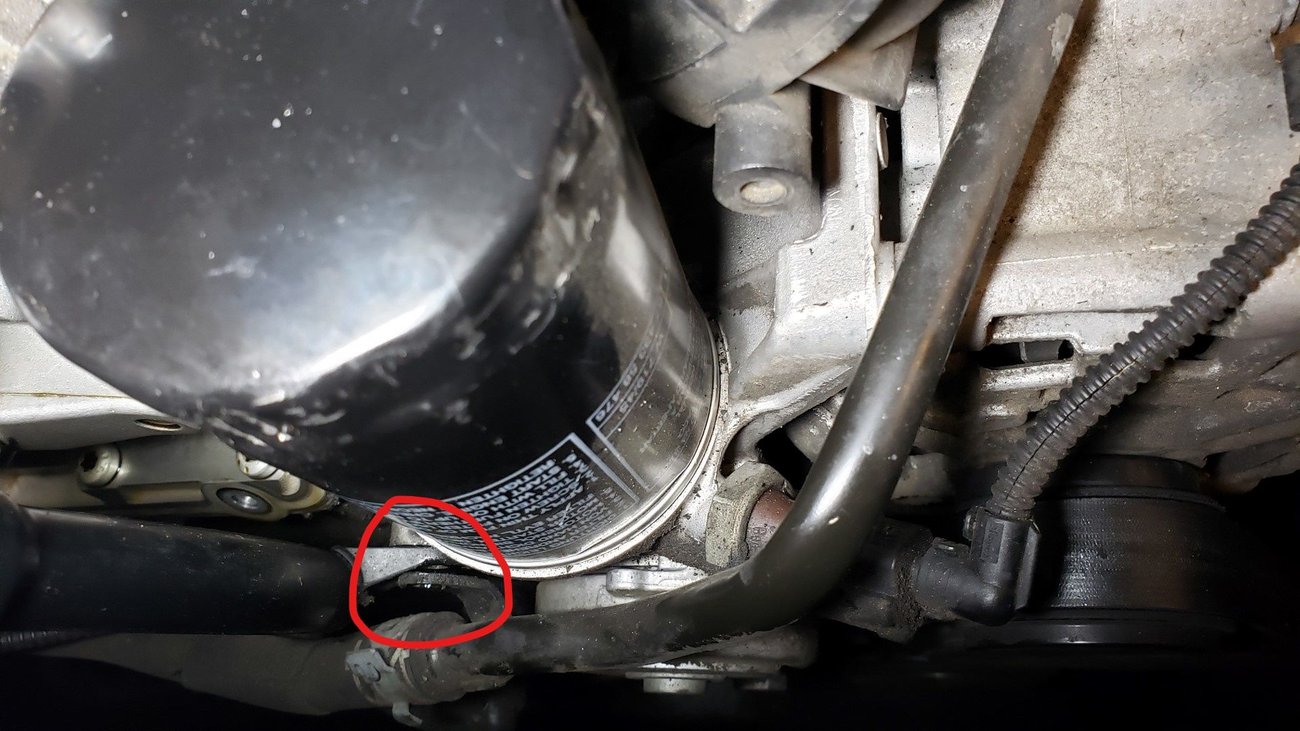

    6) Removing the cover was easy. Just have to be careful with the Cable that sometimes tangles with the bottom bolts since the bolts dont come off completely from the cover.
    7) Removed, Cleaned and Replaced new gaskets on both places ( One around the cover and small circular one inside the cover ). Bolts come off when you remove the old gasket, so put all 5 bolts back after you put the new gasket in the cover.
    8) Important: The small circular gasket MUST be installed in a correct way, meaning the inner surface is angled because the Variator is angled. See Pic 3.

    Pic 3.

    9) After done with the Cover, removed the O-ring carefully with a small flat screw driver. (See Pic 4.)
    Pic 4.

    10) Replaced the O-ring and put some oil around it with a finger.
    11) Put the Cover back.
    12) Tightened the 3 Variator bolts (No Torque Specification for these bolts). Connected the Cable.
    13) Hand Tightened the 5 Cover bolts and then tightened them in a sequence recommended by Audi which is (1- Middle Right -> 2- Middle Left -> 3- Bottom Right -> 4- Top -> 5- Bottom Left )
    14) Torque spec for the five bolts is 9 Nm which is 6.6 Ft/Lb (See Pic 5.)

    Pic 5.

    15) Put the bolt back on the Oil Dip stick and tightened it.
    -
    -
    -
    -
    -
    -
    -
    -
    16) Drank 2 Cans of Budweiser....:)

  2. #2
    New Member One Ring
    Join Date
    Nov 04 2020
    AZ Member #
    572593
    Location
    Texas

    Hi I have to fix this same problem and was just checking the part numbers you have listed for the 2 o rings say “do not for vehicle” on their website, was yours the 2.0t? And if so can you confirm these 2 parts fit, thank you and thank you for your post! It’s exactly what I need!

    It’s these 2 ....
    “and small circular one that sits Magnetic Variator Or Solenoid, Audi part 06H-103-483-D )
    Magnetic Variator Or Solenoid O-Ring Audi Part WHT-007-212-B”

  3. #3
    New Member One Ring
    Join Date
    Nov 04 2020
    AZ Member #
    572593
    Location
    Texas

    Mine is actually the petrol version, just realised yours is diesel, The timing cover gasket is the same but I can’t find the other 2 seals you have on your post, one comes up as a crankshaft seal and I think the other is for the outside - part of the cover, would really appreciate any help thank you

  4. #4
    Active Member One Ring
    Join Date
    Sep 29 2019
    AZ Member #
    520285
    Location
    Puebla, Mexico.

    Excellent guide, i did it yesterday to my 2009 audi a4 1.8T, and used this guide, it’s a bit difficult to get the screws out, but with patience took me around 3 hours to finish the job.
    Thank u!

  5. #5
    Junior Member Two Rings
    Join Date
    Dec 19 2020
    AZ Member #
    578335
    Location
    Earth

    Wanted to say THANK YOU to the OP. Great info and picts. Just did this on a 2016 allroad 2.0T and it was a BREEZE. It took me longer to clean the Upper Timing Cover and put away my tools/clean up than the actual job. I did notice that the Upper Timing Cover bolts (the 10mm/T30 combo bolts) were looser than I was expecting. I'm wondering if it was just "loose" vs. the gaskets actually being bad. I didn't notice anything wrong with the gaskets but since I already bought the gaskets and o-ring ($40 total shipped from an online Audi Dealer), I just changed them out anyways. Here's some tools/tips I'd recommend to help make this job easier/faster.

    I used a long-ish slim head ratchet like this: https://www.amazon.com/dp/B078Z3FNX7

    Though a 6"-ish would do and you want one where the head holds the HEX BIT directly to keep the thickness of the head to a minimum. There was less space to work than I thought which is why I'm recommending a slim head ratchet. Anyways, the one linked above has a Hex Bit to 1/4" Square adapter so you can switch it out to a T30 Hex Bit for the three bolts on the Magnetic Variator. I would then use the Hex to 1/4" Square adapter to then attach a deep-ish, straight bodied 10mm socket like this: https://www.amazon.com/dp/B078Z352Q8

    When I have the option of a Socket vs a Torx, I'd pick the Socket every time. Plus the socket tends to stay on the bolt better. The bolts are slightly inset on the timing cover so using a deep-ish straight walled socket help get a perfect square seat on the bolts.

    I would also clean the mating surface on the engine. The engine I worked on had some gunk on the mating surface too, I took a PLASTIC "Razor Blade" and got it all off. I wanted as clean and flat of a surface as I could get. After finishing up, I drove it (to put the engine under load) for a few miles and then used a little mechanic's mirror to check the underside of the upper timing cover for seeping. Oh, I'd also recommend having a telescoping magnetic retrieval tool handy in case you drop a bolt or tool/bit.
    Last edited by maRS5; 05-01-2024 at 08:02 PM.

Tags for this Thread

Bookmarks

Posting Permissions

  • You may not post new threads
  • You may not post replies
  • You may not post attachments
  • You may not edit your posts
  •  


    © 2001-2025 Audizine, Audizine.com, and Driverzines.com
    Audizine is an independently owned and operated automotive enthusiast community and news website.
    Audi and the Audi logo(s) are copyright/trademark Audi AG. Audizine is not endorsed by or affiliated with Audi AG.