Audizine - An Automotive Enthusiast Community

Results 1 to 9 of 9
  1. #1
    Veteran Member Three Rings
    Join Date
    Nov 03 2016
    AZ Member #
    384549
    Location
    CA

    Has anyone here successfully opened B8 A5/S5 headlights?

    Guest-only advertisement. Register or Log In now!
    Hey all I really want to customize my headlights. I did a blackout, carbon fiber reflector, and halos on my very first car and it was easy to open as it was butyl sealant.

    Based on what I've read, the pre facelift use valeo sealant which can't be melted.

    But I've found this video:


    I've also seen various pictures on instagram of various B8 A5 and S5s with modified headlights.
    Here's one example:


    Here's another:


    Is there a secret not shared around or something?
    I've gotten quotes at $600+ to do my headlights, but I'd rather do it myself.
    2011 Audi S5
    (GONE) 2011 Audi A5 2.0T [APR STAGE 2] [034 MotorSports HFC]

  2. #2
    Veteran Member Four Rings wkhanna's Avatar
    Join Date
    May 12 2017
    AZ Member #
    399355
    My Garage
    finally got cleaned so i moved
    Location
    Land of Archaic Anachronisms

    it can be done, but unless one is V experienced with such tasks you prolly should not be trying to do it yourself...
    there is a shop in nyc or brooklyn, i believe, that @bknewtype had do his a few years ago.....
    Billy

    Practicing Curmudgeon & Audio Snob

    2011 A5 2.0T Old Man Project
    Philips SimplyGo Mini o2 oxy concentrator, fully optioned
    Drive Med Walker, BBS, Brembo BBK, Kenwood 8 Track
    Avatar Chart

  3. #3
    Veteran Member Four Rings bknewtype's Avatar
    Join Date
    Jan 07 2011
    AZ Member #
    69138
    My Garage
    2013 C300 4Matic
    Location
    NYC

    pre fl headlights are next to impossible to open up without damaging the headlights. most people who did customize them. probably broke open the lens, and had a spare lens cover from somewhere. unless, like u said, theres a secret that's not shared.

    the shop in Brooklyn also quoted around 600 to just open the headlights for the pre fl. the fl/8.5 is much easier.

    not worth it unless u have a set to mess around with. I doubt ull have any luck though as its been tried for almost 10 years.
    Present:
    2019 Audi RS5 Daytona grey/Black w Rock Grey Stiching
    Past:
    2014 Audi S7 Estoril Blue/Lunar Silver
    2017 Audi TTS Mythos Black/Express Red
    2009 Audi R8 Phantom Black | Nero Satin Pearl
    2011 Audi A5 2.0T 6mt Sapphire Black
    2009 Audi S5 Phantom Black

    IG: bknewtype

  4. #4
    Veteran Member Three Rings
    Join Date
    Nov 03 2016
    AZ Member #
    384549
    Location
    CA

    I just don't understand why the B8 S4 has butyl rubber sealant and the B8 S5 has this valeo crap.
    2011 Audi S5
    (GONE) 2011 Audi A5 2.0T [APR STAGE 2] [034 MotorSports HFC]

  5. #5
    Senior Member Two Rings OlePokey's Avatar
    Join Date
    Jun 14 2020
    AZ Member #
    551683
    My Garage
    John deer riding lawnmower
    Location
    Texas

    So I know this is an old thread but I also know there isn't much out there because people basically are told its impossible or you'll just end up fucking up your lense which both may be the case all varying in each case but here are a few instructional videos on how to separate the housing and lense when sealed with permaseal which I believe most b8 s5 models used and I'm sure many more but you get the idea.

    *If you watch there's a video where the guy uses a special solvent combined with the heat that makes easy work out of it. After watching all 3 that's what I'm gonna go with . Everything else is straight forward like any other headlight but the key is the tools and the exact temp. Then "chisel" away at the seal. But headlight chisel not sledgehammer and iron chiseling stumps in half.
    https://youtu.be/i7GAbiS2-rs

    https://youtu.be/2B-ODfzqbyk

    https://youtu.be/sG27LKxCHI0

  6. #6
    Junior Member One Ring
    Join Date
    Feb 10 2021
    AZ Member #
    587001
    My Garage
    That old grey Tacoma with 287k miles
    Location
    California

    Let us invent...

    Quote Originally Posted by OlePokey View Post
    So I know this is an old thread but I also know there isn't much out there because people basically are told its impossible or you'll just end up fucking up your lense which both may be the case all varying in each case but here are a few instructional videos on how to separate the housing and lense when sealed with permaseal which I believe most b8 s5 models used and I'm sure many more but you get the idea.

    *If you watch there's a video where the guy uses a special solvent combined with the heat that makes easy work out of it. After watching all 3 that's what I'm gonna go with . Everything else is straight forward like any other headlight but the key is the tools and the exact temp. Then "chisel" away at the seal. But headlight chisel not sledgehammer and iron chiseling stumps in half.
    https://youtu.be/i7GAbiS2-rs

    https://youtu.be/2B-ODfzqbyk

    https://youtu.be/sG27LKxCHI0
    @olepokey. Firstly, I've not done this.. But...As a fellow tinker, you might be thinking about a better tool for the job at hand.

    Assuming we are dealing with thermoplastic, any high-speed tool will fail because the hole seals up with hot shavings as it moves along. Thus a cutting tool must operate below melting point, or any shavings need to clear instantly.

    Option 1 then is a wicked blade on the trusty corded Dremel with a nice flow of water to cool and wash out the kerf. Needs to be a thin blade so the fitment is not altered and only a small amount of plastic disappears. I was going to suggest a diamond blade, but that is probably not aggressive enough. Maybe the 1.5 inch diameter 60 tooth steel blade.

    You would also need a good jig to steady the saw and headlamp under a little stream of water. The saw can buck like crazy and leave a bloody mess. Good news is that the idea can be tried on a sacrificial part like the extra mounting tabs or something.

    So that's the conservative version. Given sufficient time and resources, I would love to experiment with the plastics version of a plasma torch. The 50 amp arc is, instead, a 5 watt 405 nm blue engraving laser head (100 bucks on amazon), and the tip gets fitted with vacuum instead of compressed air. Beauty of the cutting laser is that it has a short focal range. Outside of the sweet spot it throws one heck of a beam but it's not concentrated enough to damage a car part.

    Well, that's my two cents. I hope you take the shot. Good luck!

  7. #7
    Established Member Two Rings
    Join Date
    Oct 30 2018
    AZ Member #
    430088
    Location
    BC, Canada

    Subscribed.

    I've been wanting to do this for a while. Just need to get hold of a sacrificial headlamp.

    Proof of concept. Someone has already done this (or I assume):
    https://www.youtube.com/watch?v=onGejZ7QHzU

    I found this video a while ago. Left the guy a comment and a message on how he accomplished this, but he never replied back :(

  8. #8
    Senior Member Two Rings OlePokey's Avatar
    Join Date
    Jun 14 2020
    AZ Member #
    551683
    My Garage
    John deer riding lawnmower
    Location
    Texas

    Hey late reply but .... It worked. I highly HIGHLY suggest the solvent in the video. Essentially it turned the rock hard permaseal into a more malleable material and I literally just used my seperator tool, heat a dream a wish and 15 hail Marys but it definitely worked. I'm not gonna act like the solvent made easy work out of it but I could tell immediately that I was gonna be able to do it. Now idk what that solvent will do to a lense or housing if left in contact for to long so just be sure to wipe it all away before you start playing with it. I do like your ideas tho and had I seen them earlier may have tried it that way just cause I'm the guy who's warped lense before doing this so idk shit , those videos were clutch. And I did that 10 years ago on a BMW . Replacement was peanuts compared to a damn 1000+ headlight. I'd post some pics but I'm outta town but il be back soon and show ya some results.

  9. #9
    Junior Member Two Rings
    Join Date
    Jul 25 2020
    AZ Member #
    556217
    Location
    Orange County, CA

    Quote Originally Posted by Martin474 View Post
    @olepokey. Firstly, I've not done this.. But...As a fellow tinker, you might be thinking about a better tool for the job at hand.

    Assuming we are dealing with thermoplastic, any high-speed tool will fail because the hole seals up with hot shavings as it moves along. Thus a cutting tool must operate below melting point, or any shavings need to clear instantly.

    Option 1 then is a wicked blade on the trusty corded Dremel with a nice flow of water to cool and wash out the kerf. Needs to be a thin blade so the fitment is not altered and only a small amount of plastic disappears. I was going to suggest a diamond blade, but that is probably not aggressive enough. Maybe the 1.5 inch diameter 60 tooth steel blade.

    You would also need a good jig to steady the saw and headlamp under a little stream of water. The saw can buck like crazy and leave a bloody mess. Good news is that the idea can be tried on a sacrificial part like the extra mounting tabs or something.

    So that's the conservative version. Given sufficient time and resources, I would love to experiment with the plastics version of a plasma torch. The 50 amp arc is, instead, a 5 watt 405 nm blue engraving laser head (100 bucks on amazon), and the tip gets fitted with vacuum instead of compressed air. Beauty of the cutting laser is that it has a short focal range. Outside of the sweet spot it throws one heck of a beam but it's not concentrated enough to damage a car part.

    Well, that's my two cents. I hope you take the shot. Good luck!
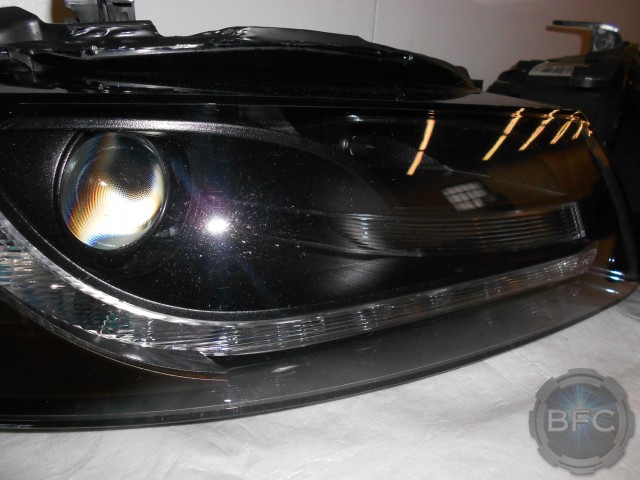
    I dremeled around the outer lip and cut off the plastic. After some heat lens popped right off. I found this to be the easiest quickest way. Secured the lens back after modifying everything with some windshield silicone followed by some two part epoxy. I don't plan on opening them again and I've had zero moisture issues. Right now I'm doing a second set and making my own led circuit boards for the Deals and swapping out the projectors for some LED pods with a nice cutoff.
    Attached Images

Bookmarks

Posting Permissions

  • You may not post new threads
  • You may not post replies
  • You may not post attachments
  • You may not edit your posts
  •  


    © 2001-2025 Audizine, Audizine.com, and Driverzines.com
    Audizine is an independently owned and operated automotive enthusiast community and news website.
    Audi and the Audi logo(s) are copyright/trademark Audi AG. Audizine is not endorsed by or affiliated with Audi AG.