Audizine - An Automotive Enthusiast Community

Results 1 to 33 of 33
  1. #1
    Veteran Member Four Rings eljay's Avatar
    Join Date
    Aug 13 2015
    AZ Member #
    348695
    Location
    NS

    Post DIY - How to replace a fender on Audi A4 B6

    Guest-only advertisement. Register or Log In now!
    Since I couldn't find any fender removal DIY, I put this together while replacing my driver's side fender and give back to the awesome Audizine community.
    Hope it helps you guys and gives an idea on what it takes to replace a fender as it was a bit more involved than I expected.

    Tools needed:
    • Jack
    • Jackstands
    • 17mm socket
    • T30 socket
    • T25 bit or socket
    • 10mm socket
    • Wrench extension
    • Philips screwdriver


    Optional:
    • Shop vacuum


    Step 1 - Put the front of the car on jackstands and remove the wheel.
    No steps for this, but a tip to raise the front and put on jack stands:
    Slide in your jack from the front and jack up on the bolt at the rear of the front subframe. Once raised up sufficiently, slide in your jackstand and lower the car onto it. Do not work on the car supported only by a jack!


    Another tip for those who are lowered: I am on Eibach springs, so just slightly lowered, but I cannot typically slide in my jack under the location above as the frame is too low for the jack plus the puck. So, I use a second jack to lift the car a bit on the rear jacking point, then I slide my front jack, making sure that the handle is in the gap between the tire and the side skirt, so I can pump it. Then I lift the car and slide the jack stand under the front of the car. Once you lift one side on a jack stand, the other side will be a bit higher, so you don't need to repeat the rear jack trick on the other side.
    Another solution could be a U-jack, which I have not used, so cannot comment how effective it is.

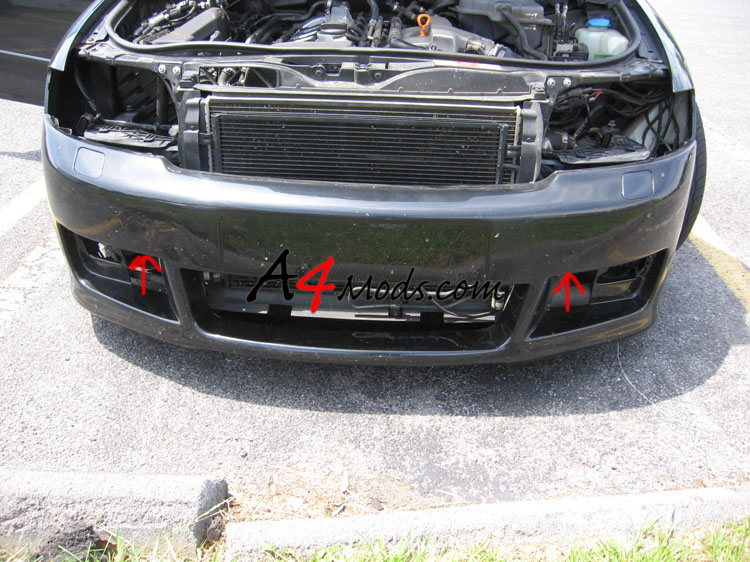
    Step 2 - Remove bottom belly pan cover, headlights and front bumper
    These steps are well covered, so I will just link to the good DIY from a4mods.com:
    http://www.a4mods.com/index.php?page...erremoval.html

    Step 3 - Remove fender liner
    First, cover your brake assembly to keep it clean. Debris will fall down during this step, unless you live in a super clean area, you are the original owner and disassemble your car twice a year and clean it with a toothbrush.

    There are 10 metal T25 screws and 1 plastic push pin/screw holding the liner in. This is in addition to the 3 twist dovels you have removed already to remove the belly pan. To help you locate them, I've highlighted them in this image of a fender liner.


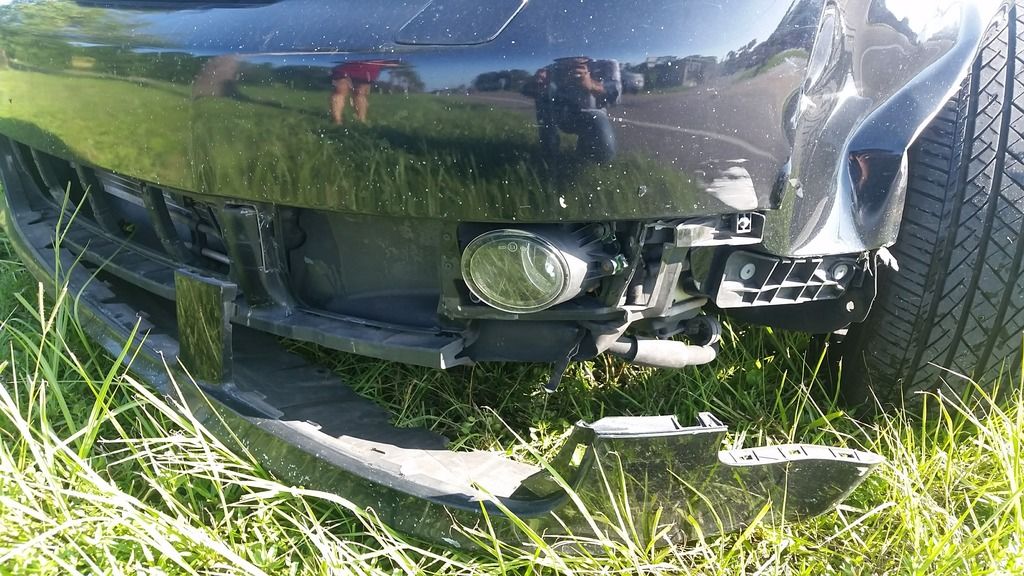
    At this point, things should look like this and you can see why I was replacing mine:


    See all this dirt behind the liner? Who knows, you may find a chipmunk family in the middle of dinner behind there.


    Vaccum and clean the area. Dirt attracts and holds moisture, moisture causes rust and you end up with the rust issue illustrated above.

    After cleanup:


    Step 4 - Loosen inner plastic weather cover
    Unclip the drain tube from the plastic cover and just leave it loose where it is. It is clipped in two places. The top one is behind the vaccum hose.


    The plastic cover is held by 2 screws. Remove them.


    To give yourself more room to access the fender screws behind the cover, remove the two 10mm nuts that secure the vacuum reservoirs, which sit in front of the cover. To access the 10mm nuts, insert your socket with an extension between the two hoses:

    Move the reservoir off the two screw posts carefully so you don't break the vacuum lines.

    TIP: Spray some penetrating oil on the nuts before you try to remove them to prevent stripping the threads due to rust/debris build-up.

    Now, move the plastic weather cover off to the outside of the fender to reveal two T30 screws holding the fender to the vertical bracket.
    Note: do not attempt to remove the plastic cover. It slides under the top part of the fender and you will not be able to fully remove it and might just break it off. It will come out with the fender.
    Remove the two fender screws:


    Step 5 - Remove/Loosen side skirt
    Remove T25 screws along the side skirt. Alternatively, you can remove only the first half of the screws instead of the whole side skirt. I found that removing the first half of the screws from the front, enabled me to move the skirt out of the way to be able to access the fender screws behind it. Removing the side skirt completely is recommended.
    The screws at the bottom are obvious. The less obvious one is accessible from the door opening. Open the driver's door fully and remove this screw:


    Step 6 - Remove fender
    After removing the screws at the bottom of the skirt, gently pull it away to the side. Please note that there are clips under the weather seal along the door sill, so feel your way around them and pull where you see them to avoid breaking anything.

    You will now reveal the two philips screws at the bottom of the fender holding a plastic bracket. Remove the two screws:


    Next remove the plastic bracket and expose the two fender screws. Remove them:


    Remove the screw at the top of the fender inside the door jamb opening:


    Moving to the bottom front leading edge of the fender, remove the plastic bracket that was holding the front bumper lip and expose the two fender screws and remove them along with the one screw by the headlight tray:


    Next, remove the 4 fender screws in the engine bay. Loosen them slowly and gradually to avoid dropping the fender or scratching your doors etc. Pay attention to the foam weather seal piece that is on the edge of the rain tray cover. It is glued to the fender and the piece that protrudes into the engine bay wraps around the bottom edge to form a seal against water intrusion into the engine bay. Lift that protruding piece slowly to "unclip" it from the edge. If you manage to rip it off, use some spray adhesive to re-attach it to the fender upon replacement.


    The fender is now free and can be removed from the body!

    Here's a picture of my clean replacement fender to give you an idea of the location of the 12 T30 screws in case you miss some:


    Re-installation is the reverse of removal with a few pointers:
    • To delay any onset of future rust, I sprayed the inside of the fender, and especially the lip, with a rust-preventive fluid. There are many on the market like Fluid Film, Lloyd's AD2000 etc. Please note that the idea is to lightly coat it, not soak it. Besides making a runny mess, soaking it will attract dirt, which attracts moisture and you start your rust cycle earlier than you thought whenever the rust-preventive fluid film wears out.
    • Clean up the area in the wheel well and along the body frame to remove any surface rust and spray it with rust-preventive fluid.
    • Re-attach the plastic weather liner to the fender before you install the fender onto the car. Use the one screw in the center to attach it properly.
    • To instal the fender, first install the 4 screws at the top in the engine bay. Do not tighten the screws!
    • Proceed to insert the remaining T30 fender screws, but do not tighten them.
    • Measure the gap between the body panels on the other side of the car and position your replacement fender to match that gap. You will want to line up a tight gap between the fender and the door and A pillar. When you are happy with it, tighten those screws by the door. Next close the hood and see how close you are with that gap. Tighten the top screws, close the hood, re-check the gap, repeat until you are happy with the gap.
    • Tighten the leading edge screws.
    • Re-attach the rest of the items going backwards through the removal procedure.


    Have a cold one!

    BEFORE:


    AFTER:
    Last edited by eljay; 07-10-2017 at 10:14 AM.
    Current: 2016 Audi A4 Allroad (in progress)
    Past: 2005 Audi A4 1.8T Quattro Avant / 6-speed / Ultrasport - SOLD

  2. #2
    Veteran Member Four Rings eljay's Avatar
    Join Date
    Aug 13 2015
    AZ Member #
    348695
    Location
    NS

    Feel free to add, correct etc. and I will edit the OP.
    Current: 2016 Audi A4 Allroad (in progress)
    Past: 2005 Audi A4 1.8T Quattro Avant / 6-speed / Ultrasport - SOLD

  3. #3
    Active Member Two Rings 8Kami6's Avatar
    Join Date
    May 04 2016
    AZ Member #
    372817
    Location
    Maryland

    Great write up! Thanks

    -Hachi Bee

  4. #4
    Established Member Two Rings Schwebe's Avatar
    Join Date
    Dec 17 2015
    AZ Member #
    365982
    Location
    Kent Ohio

    My fender looks similar to yours, only rust on the car. I have been wanting to do this but need to find a brilliant black driver side fender first! Thanks for the write up!

  5. #5
    Veteran Member Four Rings Luxus Panzer's Avatar
    Join Date
    Apr 15 2014
    AZ Member #
    187873
    My Garage
    B6 A4 Avant, B4 90 Sprot Q, B4 90 FWD, 2014 VW Tiguan
    Location
    Ottawa/Gatineau Canada

    Quote Originally Posted by eljay View Post
    Slide in your jack from the front and jack up on the bolt at the rear of the front subframe.
    Got a pic of this location for the writeup ;)
    2004 A4 Avant Quattro. (H&R springs, S100 Nav unit, Neuspeed Cat back, Torque solutions Snub mount, Thor Skid Plate, APR Stage 1, 18" S4 Rims, 2X Podi / Oil Press / Oil Temp / Boost/VAC, Full LED interior, Backup Camera/Screen, Upgraded 2.0 Coil Packs, Vag-Com, B7 Center console/B7 Hand Brake, B7 Aero wiper arms B7 rear headreasts,APR Carbonio intake, Fan washer sprayers,
    2014 VW Tiguan. (bone stock)

  6. #6
    Established Member Two Rings ralleyquattro's Avatar
    Join Date
    Feb 02 2013
    AZ Member #
    108766
    Location
    Toronto/Canada

    Got a pair of clean fenders, will be doing this myself soon, thanks for the writeup!
    Martin Pajak
    http://www.quattro.ca
    2004 Audi A4 quattro avant 1.8T UPS 6-speed

  7. #7
    Veteran Member Three Rings pablolizarraga's Avatar
    Join Date
    Jul 18 2014
    AZ Member #
    264970
    My Garage
    "Hers": SQ5 His: 1966 Ford Mustang Coupe, 1965 Ford Mustang Fastback
    Location
    Los Angeles, CA

    These write-ups are super helpful. Although I'm getting much more comfortable taking my car apart, having these DIY's make the limited amount of time I have to work on it much more productive.
    Nice job!


    Sent from my iPhone using Audizine

  8. #8
    Veteran Member Four Rings eljay's Avatar
    Join Date
    Aug 13 2015
    AZ Member #
    348695
    Location
    NS

    Quote Originally Posted by 8Kami6 View Post
    Great write up! Thanks

    -Hachi Bee
    Thanks!

    Quote Originally Posted by Schwebe View Post
    My fender looks similar to yours, only rust on the car. I have been wanting to do this but need to find a brilliant black driver side fender first! Thanks for the write up!
    I need a clean passenger side now. Every one I found is on the other side of the country and the sellers do not want to ship even though it's easy by bus. :(

    Quote Originally Posted by Luxus Panzer View Post
    Got a pic of this location for the writeup ;)
    I will take a picture in the next couple of days.
    Quote Originally Posted by ralleyquattro View Post
    Got a pair of clean fenders, will be doing this myself soon, thanks for the writeup!
    Lucky you! I'm looking for a passenger side in silver. In case you come across one, please let me know!
    Quote Originally Posted by pablolizarraga View Post
    These write-ups are super helpful. Although I'm getting much more comfortable taking my car apart, having these DIY's make the limited amount of time I have to work on it much more productive.
    Nice job!

    Sent from my iPhone using Audizine
    Thanks for the feedback.
    Current: 2016 Audi A4 Allroad (in progress)
    Past: 2005 Audi A4 1.8T Quattro Avant / 6-speed / Ultrasport - SOLD

  9. #9
    Active Member Two Rings
    Join Date
    Mar 13 2017
    AZ Member #
    395457
    Location
    Los Angeles

    Just posted in the "what did you do to your a4 today" wanted to say thank you for this. I followed it and a video on YouTube. Thanks again.

  10. #10
    Veteran Member Four Rings eljay's Avatar
    Join Date
    Aug 13 2015
    AZ Member #
    348695
    Location
    NS

    Quote Originally Posted by jveshg60tob6 View Post
    Just posted in the "what did you do to your a4 today" wanted to say thank you for this. I followed it and a video on YouTube. Thanks again.
    Excellent! Glad to hear that.
    Cheers.
    Current: 2016 Audi A4 Allroad (in progress)
    Past: 2005 Audi A4 1.8T Quattro Avant / 6-speed / Ultrasport - SOLD

  11. #11
    Veteran Member Four Rings Luxus Panzer's Avatar
    Join Date
    Apr 15 2014
    AZ Member #
    187873
    My Garage
    B6 A4 Avant, B4 90 Sprot Q, B4 90 FWD, 2014 VW Tiguan
    Location
    Ottawa/Gatineau Canada

    Quote Originally Posted by eljay View Post

    I will take a picture in the next couple of days.
    sweet
    2004 A4 Avant Quattro. (H&R springs, S100 Nav unit, Neuspeed Cat back, Torque solutions Snub mount, Thor Skid Plate, APR Stage 1, 18" S4 Rims, 2X Podi / Oil Press / Oil Temp / Boost/VAC, Full LED interior, Backup Camera/Screen, Upgraded 2.0 Coil Packs, Vag-Com, B7 Center console/B7 Hand Brake, B7 Aero wiper arms B7 rear headreasts,APR Carbonio intake, Fan washer sprayers,
    2014 VW Tiguan. (bone stock)

  12. #12
    Veteran Member Four Rings eljay's Avatar
    Join Date
    Aug 13 2015
    AZ Member #
    348695
    Location
    NS

    Quote Originally Posted by Luxus Panzer View Post
    sweet
    Thanks for the reminder.
    The OP is now updated with the pic and additional notes on lifting the car.
    Current: 2016 Audi A4 Allroad (in progress)
    Past: 2005 Audi A4 1.8T Quattro Avant / 6-speed / Ultrasport - SOLD

  13. #13
    Established Member Two Rings Menyahs's Avatar
    Join Date
    Jun 13 2010
    AZ Member #
    60206
    My Garage
    94 S-10 Blazer 4x4 85 Trans Am 88 Chevy C1500
    Location
    Clearwater, FL

    Thanks eljay. Great Detailed write up.

    I just got my new fender today and I will be following your guide.

    No rust. . .but this happened to me 2 weeks ago. Guy on a Harley tried to pass me but didn't quite make it. Must have been intoxicated or something bc he took of and never looked back.

    2004 A4 USP 1.8t 6M | 034 HFC, Breather Kit, Motor, & Transmission Mounts | ECS RA4 Stage 2 Clutch + Steel Flywheel | Forge 007 DV | K&N Filter

  14. #14
    Veteran Member Three Rings 5ktq's Avatar
    Join Date
    Aug 15 2016
    AZ Member #
    378564
    Location
    Western Canada

    I need to do this soon. I was thinking after I remove the rust and repaint, I should fill the lip with seam sealer so salty crud can't stew there as much. Or do you think it starts on the outside, from chips. Maybe the part of the lip facing the wheel, inside the arch, should get a bit of gravel guard then.

  15. #15
    Veteran Member Three Rings q20v's Avatar
    Join Date
    Nov 12 2014
    AZ Member #
    294678
    My Garage
    2001 Audi A4, 2001 Audi S4, 1988 BMW 530i
    Location
    Ottawa, ON

    Great writeup, something I need to do on both sides on the avant. Thank you very much for taking the time to document this!

  16. #16
    Veteran Member Four Rings eljay's Avatar
    Join Date
    Aug 13 2015
    AZ Member #
    348695
    Location
    NS

    Quote Originally Posted by Menyahs View Post
    Thanks eljay. Great Detailed write up.

    I just got my new fender today and I will be following your guide.

    No rust. . .but this happened to me 2 weeks ago. Guy on a Harley tried to pass me but didn't quite make it. Must have been intoxicated or something bc he took of and never looked back.

    Ouch!
    I'm glad the doy is useful.
    Cheers.
    Current: 2016 Audi A4 Allroad (in progress)
    Past: 2005 Audi A4 1.8T Quattro Avant / 6-speed / Ultrasport - SOLD

  17. #17
    Veteran Member Four Rings eljay's Avatar
    Join Date
    Aug 13 2015
    AZ Member #
    348695
    Location
    NS

    Quote Originally Posted by 5ktq View Post
    I need to do this soon. I was thinking after I remove the rust and repaint, I should fill the lip with seam sealer so salty crud can't stew there as much. Or do you think it starts on the outside, from chips. Maybe the part of the lip facing the wheel, inside the arch, should get a bit of gravel guard then.
    The top of the arch rust starts where the noise suppression/support foam piece is installed at the top. It traps moisture under the liner against the lip and that starts the process.
    Down by the door it starts with dirt accumulation under the liner, whuch traps moisture etc. You'll be schocked how much dirt collects there if you never had the liner off, unless your car sees only clean highways and is a garage queen.

    Good luck.
    Current: 2016 Audi A4 Allroad (in progress)
    Past: 2005 Audi A4 1.8T Quattro Avant / 6-speed / Ultrasport - SOLD

  18. #18
    Veteran Member Four Rings eljay's Avatar
    Join Date
    Aug 13 2015
    AZ Member #
    348695
    Location
    NS

    Quote Originally Posted by q20v View Post
    Great writeup, something I need to do on both sides on the avant. Thank you very much for taking the time to document this!
    👍 Thanks
    Current: 2016 Audi A4 Allroad (in progress)
    Past: 2005 Audi A4 1.8T Quattro Avant / 6-speed / Ultrasport - SOLD

  19. #19
    Veteran Member Three Rings pablolizarraga's Avatar
    Join Date
    Jul 18 2014
    AZ Member #
    264970
    My Garage
    "Hers": SQ5 His: 1966 Ford Mustang Coupe, 1965 Ford Mustang Fastback
    Location
    Los Angeles, CA

    This was super helpful during my junkyard pull. Only minor difference for me during re-install was that my side skirt has bolts on top as well that are covered by a rubber trim. Tedious task but stress free w/ this handy DIY.


    Sent from my iPhone using Audizine

  20. #20
    Veteran Member Four Rings eljay's Avatar
    Join Date
    Aug 13 2015
    AZ Member #
    348695
    Location
    NS

    Quote Originally Posted by pablolizarraga View Post
    This was super helpful during my junkyard pull. Only minor difference for me during re-install was that my side skirt has bolts on top as well that are covered by a rubber trim. Tedious task but stress free w/ this handy DIY.


    Sent from my iPhone using Audizine
    Glad to hear that it helped!
    I'm still hunting for a passenger side to swap.

    Sent from my LG-H873 using Audizine mobile app
    Current: 2016 Audi A4 Allroad (in progress)
    Past: 2005 Audi A4 1.8T Quattro Avant / 6-speed / Ultrasport - SOLD

  21. #21
    Registered Member One Ring
    Join Date
    Nov 11 2018
    AZ Member #
    430874
    Location
    Massachusetts

    I’m having a real hard time removing the side skirt screw behind the door, how the hell do you get that thing out!?

  22. #22
    Senior Member Two Rings
    Join Date
    Jan 22 2017
    AZ Member #
    391329
    Location
    San Jose, California

    Use a longer T handle torx or a bit with a small wrench. I did have a hard time with this also. I think that screw is a T30 so I did use T25 so you can angle it and still able to screw it out slowly.

    Sent from my SM-N960U using Tapatalk

  23. #23
    Registered Member One Ring
    Join Date
    Nov 11 2018
    AZ Member #
    430874
    Location
    Massachusetts

    Thank you so much!

  24. #24
    Veteran Member Four Rings
    Join Date
    Jul 03 2010
    AZ Member #
    61005
    My Garage
    1988 Merkur XR4Ti, 1986 911 Coupe, 1991 Alfa Romeo 164
    Location
    New York

    Quote Originally Posted by eljay View Post
    The top of the arch rust starts where the noise suppression/support foam piece is installed at the top. It traps moisture under the liner against the lip and that starts the process.
    Down by the door it starts with dirt accumulation under the liner, whuch traps moisture etc. You'll be schocked how much dirt collects there if you never had the liner off, unless your car sees only clean highways and is a garage queen.
    I just experienced this yesterday, taking a front fender off my parts car. There was a TON of dirt sandwiched between the liner and the black foam block that's wedged in there. I now have on my to-do list taking the splash shields out and thoroughly power-washing in there. I'm just seeing the first signs of rust, so hopefully I can get after it before the fender needs replacing entirely.

    I wonder if it might be a good idea to just leave the Styrofoam out entirely. I don't think it will make much of a difference noise-wise since the splash liner will still be in there. Thoughts?
    Brad 2002 Quattro 1.8T w/ 2.8 B5 5-speed

  25. #25
    Established Member Two Rings
    Join Date
    May 26 2012
    AZ Member #
    94132
    Location
    Høng, Denmark

    Nice write up
    Did you use OEM fender, or replacement fender?

  26. #26
    Veteran Member Four Rings eljay's Avatar
    Join Date
    Aug 13 2015
    AZ Member #
    348695
    Location
    NS

    Quote Originally Posted by Wahlstrom View Post
    Nice write up
    Did you use OEM fender, or replacement fender?
    Thank you.
    I used a used OEM fender.
    Current: 2016 Audi A4 Allroad (in progress)
    Past: 2005 Audi A4 1.8T Quattro Avant / 6-speed / Ultrasport - SOLD

  27. #27
    Veteran Member Four Rings
    Join Date
    Jul 03 2010
    AZ Member #
    61005
    My Garage
    1988 Merkur XR4Ti, 1986 911 Coupe, 1991 Alfa Romeo 164
    Location
    New York

    Quote Originally Posted by eljay View Post
    Moving to the bottom front leading edge of the fender, remove the plastic bracket that was holding the front bumper lip and expose the two fender screws and remove them along with the one screw by the headlight tray:
    Worked on removing my passenger side fender today. I have not removed the bumper yet and was hoping I migth be able to do this project without doing so. It would appear to me that the only reason to remove the front bumper is to get these two screws out, yes? Any chance I might be able to do it by pulling the lower plastic back and revealing these two screws? IIRC, doesn't it just snap into place?
    Brad 2002 Quattro 1.8T w/ 2.8 B5 5-speed

  28. #28
    Veteran Member Three Rings JAudi23's Avatar
    Join Date
    Oct 31 2013
    AZ Member #
    127834
    My Garage
    2003 Audi A4 3.0 Quattro 2004 Audi A4 Avant 1.8T FWD & 2000 Kawasaki Ninja ZX-6R
    Location
    Milton, ON, CA

    I was able to do this by only loosening the bumper on the passenger side. no need to remove it completely.
    I loosened the bolt that is to the right of the passenger side fog light. (shown at the left arrow in this pic)

    ------
    2003 Audi A4 3.0 Quattro, Brilliant Black
    Custom 12V USB Socket | ProClip Mount | Curt Mftg Hitch | Thinkware F800Pro Dashcam
    Retrofits:B7 Center Console Swap | RNS-E

    --
    SOLD - 2004 Audi A4 Avant 1.8T FrontTrak, Light Silver Metallic

  29. #29
    Veteran Member Four Rings
    Join Date
    Jul 03 2010
    AZ Member #
    61005
    My Garage
    1988 Merkur XR4Ti, 1986 911 Coupe, 1991 Alfa Romeo 164
    Location
    New York

    Quote Originally Posted by JAudi23 View Post
    I was able to do this by only loosening the bumper on the passenger side. no need to remove it completely.
    I loosened the bolt that is to the right of the passenger side fog light. (shown at the left arrow in this pic)
    Thanks, that was the tip I was looking for. I will report back.
    Brad 2002 Quattro 1.8T w/ 2.8 B5 5-speed

  30. #30
    Veteran Member Three Rings JAudi23's Avatar
    Join Date
    Oct 31 2013
    AZ Member #
    127834
    My Garage
    2003 Audi A4 3.0 Quattro 2004 Audi A4 Avant 1.8T FWD & 2000 Kawasaki Ninja ZX-6R
    Location
    Milton, ON, CA

    Keep in mind that's a big bolt for the whole bumper assembly and you only need to loosen it not remove it. You obviously need to still remove the other bolts holding the bumper to the fender, the headlight etc.

    i didn't attempt to remove just the lower bumper section.

    Sent from my SM-G965W using Audizine mobile app
    ------
    2003 Audi A4 3.0 Quattro, Brilliant Black
    Custom 12V USB Socket | ProClip Mount | Curt Mftg Hitch | Thinkware F800Pro Dashcam
    Retrofits:B7 Center Console Swap | RNS-E

    --
    SOLD - 2004 Audi A4 Avant 1.8T FrontTrak, Light Silver Metallic

  31. #31
    Veteran Member Four Rings
    Join Date
    Jul 03 2010
    AZ Member #
    61005
    My Garage
    1988 Merkur XR4Ti, 1986 911 Coupe, 1991 Alfa Romeo 164
    Location
    New York

    Quote Originally Posted by JAudi23 View Post
    Keep in mind that's a big bolt for the whole bumper assembly and you only need to loosen it not remove it. You obviously need to still remove the other bolts holding the bumper to the fender, the headlight etc.
    Yep, understood. I've had the front bumper off before. Just up from the garage - all fender bolts removed save for one up on top to hold it loosely in place. I've removed the one T-30 headed bolt that fastens the plastic bracket in behind the splash-shield. I'm having trouble understanding why I even need to loosen that big bolt for the bumper. It's not like you need to remove the fender to remove the bumper - it just pulls right out as long as you've removed the three acorn nuts.

    All that said, there does seem to be something binding down there. Hmmmmmm...
    Brad 2002 Quattro 1.8T w/ 2.8 B5 5-speed

  32. #32
    Veteran Member Four Rings
    Join Date
    Jul 03 2010
    AZ Member #
    61005
    My Garage
    1988 Merkur XR4Ti, 1986 911 Coupe, 1991 Alfa Romeo 164
    Location
    New York

    Got it removed today without loosening anything for the front bumper. Pics tell the story, but in short, the plastic support bracket needs to be removed with the fender and to get the lower wrap-around portionof the bumper un-coupled from the fender you just need to pull down and out.
    Attached Images
    Brad 2002 Quattro 1.8T w/ 2.8 B5 5-speed

  33. #33
    Junior Member Two Rings
    Join Date
    Nov 06 2013
    AZ Member #
    128699
    Location
    Baltimore MD

    This looks like a great write-up. I have to replace the driver side fender due to hitting a deer, not rust. Note: take T-handle Torx tools.
    I will report back on results.
    2003 A4 1.8t 5 speed - my brother

Tags for this Thread

Bookmarks

Posting Permissions

  • You may not post new threads
  • You may not post replies
  • You may not post attachments
  • You may not edit your posts
  •  


    © 2001-2025 Audizine, Audizine.com, and Driverzines.com
    Audizine is an independently owned and operated automotive enthusiast community and news website.
    Audi and the Audi logo(s) are copyright/trademark Audi AG. Audizine is not endorsed by or affiliated with Audi AG.