Audizine - An Automotive Enthusiast Community

Results 1 to 22 of 22
  1. #1
    Established Member Two Rings Hazziar's Avatar
    Join Date
    Oct 03 2010
    AZ Member #
    65197
    My Garage
    01 A4 Black
    Location
    Northeast

    Drive-Shaft Center Support Bearing Replacement — B5 A4/S4

    Guest-only advertisement. Register or Log In now!
    I replaced the drive-shaft center support bearing aka carrier bearing on my B5 A4 and this is how I went about it. The procedure is the same for the S4 so you guys can check into this too if your carrier is out of shape.

    TIME/DIFFICULTY
    5-8hrs factoring in Murphy’s Law
    Medium difficulty range
    Must make your own special tool

    PARTS
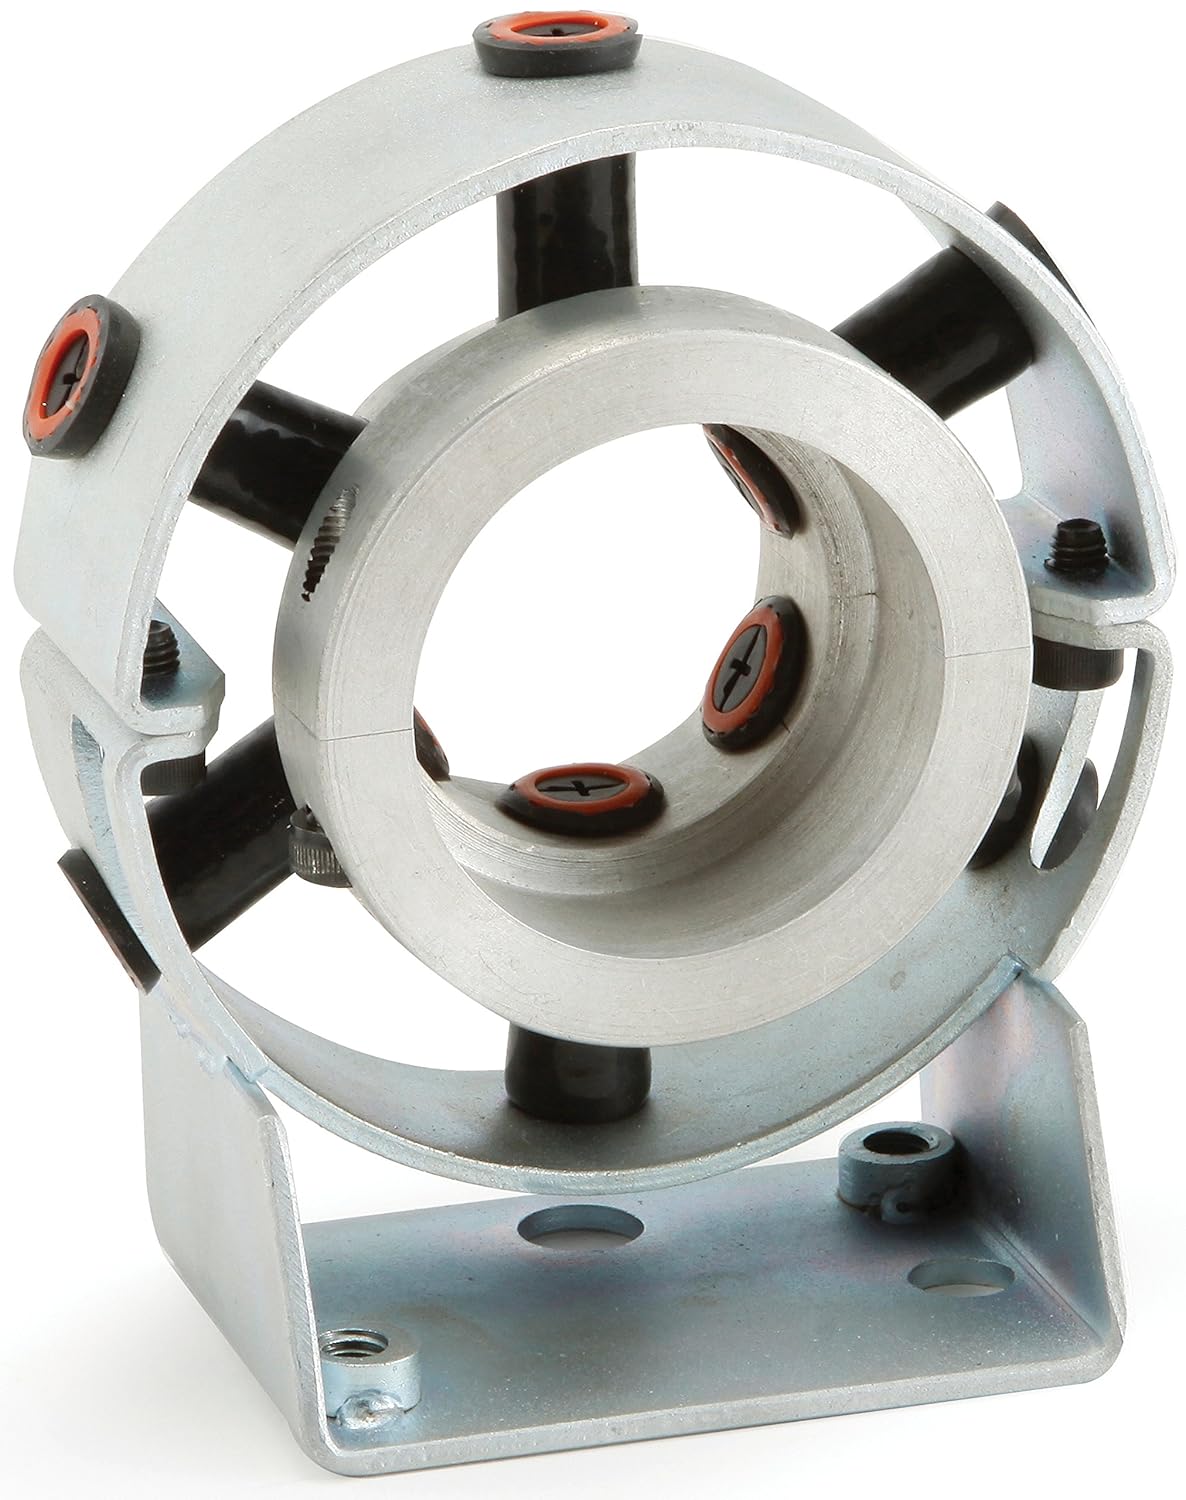
    ₪ Drive-Shaft Center Support Bearing***
    ₪ CV Gasket 183521141A x2
    ₪ CV Grease

    TOOLS
    [Key requirements]
    - 10mm Socket
    - 13mm Socket
    - 28mm or 1-1/8” Socket
    - 6mm Allen Socket
    - T45 Torx Socket
    - 3/8” Extensions
    - 16mm or 5/8” Combination Wrench [to be modified]
    - Large Flat-Head Screwdriver
    - Angle or Bench Grinder
    - Jack and Stands
    [Basic necessities]
    - a solid metric tool set
    - Allen and Torx Socket sets
    - 3/8” Torque Wrench
    - Small Flat-Head Screwdriver
    - Ball-Peen Hammer
    - Vice Grip
    - Tape Measure
    - Razor Blade
    - LocTite Blue or Red
    - Paint Pen or Sharpie
    [Misc.]
    - Penetrating Spray
    - Plastic Bags
    - Shop Rags

    ***I bought mine from Colorado Drive Shaft. Call or email David. Very knowledgeable and outstanding person to do business with, his company has been rebuilding drive-shafts for 25 years with VW/Audi drive-lines being one of their specialties. Overall I was very impressed with the part and service.


    SETUP/DRIVE-SHAFT REMOVAL

    — Apply hand-brake, raise car on jack stands.

    — Remove exhaust system from down-pipes.

    — Remove drive-shaft heat shield using a 10mm socket to undo the 4 fasteners.


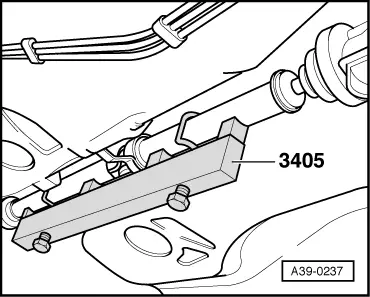
    — Remove drive-shaft shield from transmission using a T45 Torx socket to undo the 2 screws.


    — Remove the 6 allen bolts from both CV joints using a 6mm Allen socket. Loosen 2 bolts then release hand-brake, rotate shaft, reapply hand-brake, loosen the next 2 bolts, repeat for last 2 bolts.


    — Dislodge the CV joints from the flanges using the rounded end of a Ball-Peen Hammer. A few sharp hits on the CV body will do the trick.


    — Unbolt the carrier and remove drive-shaft. Loosen the 2 bolts with a 13mm socket, when the bolts are nearly off - brace the carrier with one hand while removing the bolts with the other. At this point lower the drive-shaft on your chest and “slip” out from under the car.
    Note: this step is better done with a second set of hands but you’ll miss out on some great theatrics.


    — Cover CV joints with plastic bags as soon as the drive-shaft is out.


    — Spray penetrant around the yoke bolt and let sit. Stand drive-shaft upright when doing this as to not let any of the liquid seep around the u-joint.


    __________________________________________________

    The next three procedures don’t exist in any service manual because the carrier is “Non-Serviceable” as deemed by Audi. You are literally entering the Matrix of Audi repairs. With that said; this is my way, but it’s only one way, and though it worked for me, it might not work for everyone. The following should only be considered for reference and not rule.

    SPECIAL TOOL/BOLT REMOVAL

    — A 16mm or 5/8” combination wrench and an angle or bench grinder are needed. The tool will be made in 3 stages.

    Stage 1

    — Grind the back of the wrench head as shown. If using a 5/8” wrench; trim the opening until it fits onto the 16mm bolt. Only remove enough material until wrench fits and has room to make an 1/8” turn to partially break the bolt free. Attach a Vice Grip on the yoke to hold drive-shaft in place.


    Stage 2

    — After the bolt is partially broke free continue to remove more material. Start to grind a curve into the neck. Then turn bolt further.


    Stage 3 – Final Form

    — Now continue to remove more material as needed at the neck and head until bolt is able to be turned enough to allow the wrench to be moved back to its previous position to make another turn.


    SHAFT SEPARATION

    — Make alignment marks on the yoke and shaft as shown. It’s critical to make these marks as accurate as possible for rejoining later on. The drive-shaft can become out-of-balance even if off by only one spline.


    — Unthread bolt far enough out to wedge a large screwdriver at a slight angle between the yoke and bolt as shown [do not put any pressure on the u-joint itself], force pressure against the bolt and firmly hit screwdriver with hammer. As shaft begins to separate; unthread bolt further and keep repeating previous steps until fully split.


    CARRIER INSTALLATION

    — Remove old carrier. Cut carrier frame off with a razor blade, place large flat-head screwdriver on carrier lip as shown, hit firmly with hammer until bearing comes off. Use caution as to not bend the shaft ridge.
    Note: using a bearing splitter and press is ideal for this step and the next.


    — Install new carrier. The carrier goes on with the “Cupped” side facing up. A 28mm or 1-1/8” socket fits perfectly on the bearing race to act as a strike or press point. Fully seat bearing with a few light hits by hammer or press bearing in place.


    — Rejoin drive-shaft. First apply LocTite blue or red on bolt threads, align both ends of the drive-shaft with the marks made previously and slip splined ends together. Now thread then tighten bolt as much as possible.
    Tip: holding bolt in place with a small flat-head screwdriver or pick will make getting the threads started much easier.


    — Now take time to look over the drive-shaft and admire your work.


    __________________________________________________

    DRIVE-SHAFT REINSTALLATION

    — Clean and grease both CV joints and install a new gasket on each flange.
    — Install drive-shaft in the reverse order of removal.
    — Torque CV joint bolts in a star pattern to 41ft-lb [55nm].
    — Perform alignment [see “Alignment” in the next section].
    — Torque carrier mounting bolts to 18ft-lb [25nm].
    — Give the shaft a few spins while inspecting your work.


    ALIGNMENT

    — Turn shaft until the yoke off the carrier is perfectly horizontal, now measure from the center of the u-joint cup to the ridge of the opposing yoke on both sides as shown. Slide carrier side-to-side as needed until the measurements become equal on both sides of the yokes. Tighten carrier mounting bolts, spin shaft, check measurements, and make adjustments as necessary until measurements are perfectly equal. At this point the drive-shaft is aligned.


    FINAL DETAILS

    — Reinstall drive-shaft heat shield
    — Reinstall exhaust
    — Lower off jack stands
    — Take a test drive
    — Yell out the window “I am Ze άbermensch!!!”

  2. #2
    Veteran Member Four Rings Bordom's Avatar
    Join Date
    Dec 10 2013
    AZ Member #
    134985
    Location
    Borden, Ontario, Canada

    Wow, incredible write-up. The original DIY for this never had pictures. Bravo.

    Sub'd for future use

    Everything graciously mispelled by Android
    Bordom's Allroad; Boat in the Street
    2003 Allroad 6-spd, 4.2 BBD S6 Swap

    IG: 24_et

    Sold:
    2010 Deep Sea Blue S4 6-spd

    RIP:
    2001.5 Brilliant Black S4 6-spd

  3. #3
    Veteran Member Four Rings CJ_'s Avatar
    Join Date
    Oct 27 2014
    AZ Member #
    291120
    Location
    Flag/Phx, AZ

    Nice write up! I need to put my 4:1 diff back in soon so might as well do this while I'm down there.

    2001.5 Silver S4 Avant - 6spd swap + BW K04s (Current)
    2001.5 Santorin S4 Sedan - SRM k24 build (Totaled)

    IG: CJ_s4

  4. #4
    Registered Member One Ring
    Join Date
    Apr 06 2017
    AZ Member #
    397226
    Location
    Huesca

    Amazing job !!!

    I have the same problem.

    I don't know what to do for repair.....
    1- remplace full prop shaft more easy but more expensive
    2- remplace only bearing more dificukt but cheap....and interesting to do and force muy brain and patient....laugh

    Did you have problems of balance trough this mιtod?

    Thanks....and I repeat...great job !!!

    Regards from spain.


    Enviado desde mi Aquaris X5 mediante Tapatalk

  5. #5
    Registered Member One Ring
    Join Date
    Apr 06 2017
    AZ Member #
    397226
    Location
    Huesca

    I did it !!!

    Finally I installed a new bearing in the old propsahft and it works perfect.

    Thanks and regards.

    Enviado desde mi Aquaris X5 mediante Tapatalk

  6. #6
    Veteran Member Four Rings Monty23's Avatar
    Join Date
    Oct 27 2011
    AZ Member #
    83106
    My Garage
    TOYS
    Location
    Philly Suburbs

    The easiest way to fix this problem is to get access to the support bearing, place tape on one side of the bearing/bracket assembly in order to make a cup/void that you can fill. Then fill the cup in with 3M window weld. Let it cure for 24hrs and boom.... it's fixed. Usually, the bearing is not bad, it's just the rubber support that has disintegrated.

    I also made a fixture to mimic the Audi driveshaft alignment tool to ensure the bearing would be aligned correctly.
    STK -> Compound Turbo Build Thread
    If you cannot do great things, do small things in a great way.

  7. #7
    Active Member Four Rings landfill's Avatar
    Join Date
    Nov 14 2013
    AZ Member #
    130116
    Location
    Pompano Beach, Florida

    ^Any more info on the tool Monty?

  8. #8
    Veteran Member Four Rings Monty23's Avatar
    Join Date
    Oct 27 2011
    AZ Member #
    83106
    My Garage
    TOYS
    Location
    Philly Suburbs

    STK -> Compound Turbo Build Thread
    If you cannot do great things, do small things in a great way.

  9. #9
    Veteran Member Four Rings Timtheguru's Avatar
    Join Date
    Dec 30 2009
    AZ Member #
    52711
    Location
    Seattle

    Not for our car, but what if we had a clamp on solution...


    https://www.amazon.com/Clamping-Bear.../dp/B0063GQP6S
    2001.5 S4 Sedan
    2002 A4 Avant 1.8t - Traded in
    2001.5 A4 1.8t - Sold for $5
    2013 Q7 TDI Premium Plus (RIP, rear ended and totaled, assholes)
    2013 Q7 TDI Prestige S-Line
    2018 Q5 2.0t
    2022 e-Tron Chronos Edition

  10. #10
    Veteran Member Three Rings rguil's Avatar
    Join Date
    Dec 17 2014
    AZ Member #
    303740
    Location
    San Diego CA

    Quote Originally Posted by Timtheguru View Post
    Not for our car, but what if we had a clamp on solution...


    https://www.amazon.com/Clamping-Bear.../dp/B0063GQP6S
    LOL, about to buy this for my touareg. My support bearing went to crap on the freeway today, about 2 inches of play in my driveshaft. lol

  11. #11
    Quote Originally Posted by rguil View Post
    LOL, about to buy this for my touareg. My support bearing went to crap on the freeway today, about 2 inches of play in my driveshaft. lol
    Get a bearing measurement for us while your at it thanks

  12. #12
    Veteran Member Four Rings 1sadavant's Avatar
    Join Date
    Jun 21 2005
    AZ Member #
    6962
    My Garage
    '01.5 S4 & '05.5 M3
    Location
    Murrysville, PA

    Thanks for this, my next task! Anyone else have a recommendation for a quality center support bearing? I don't doubt your source, just curious what else is out there that isn't going to fail.
    2001.5 Audi S4 6spd ASP Stg 3 Imola
    IG: dr.yellowbird

  13. #13
    Veteran Member Three Rings rguil's Avatar
    Join Date
    Dec 17 2014
    AZ Member #
    303740
    Location
    San Diego CA

    Quote Originally Posted by Cysco abt S4 View Post
    Get a bearing measurement for us while your at it thanks
    Will do.

  14. #14
    Quote Originally Posted by rguil View Post
    Will do.
    I was thinking about the good and bad of a single drive shaft
    Have you thought about going that way

  15. #15
    Established Member Two Rings 2000Stg3S4's Avatar
    Join Date
    Jun 03 2015
    AZ Member #
    335742
    Location
    canada

    Quote Originally Posted by Cysco abt S4 View Post
    I was thinking about the good and bad of a single drive shaft
    Have you thought about going that way
    There's nothing bad about a single piece driveshaft, i highly recommend it

    Sent from my Nexus 6P using Audizine mobile app

  16. #16
    Quote Originally Posted by 2000Stg3S4 View Post
    There's nothing bad about a single piece driveshaft, i highly recommend it

    Sent from my Nexus 6P using Audizine mobile app
    Oh I agree totally on the b5 s4 but rguil has a touareg also

  17. #17
    Established Member Two Rings 2000Stg3S4's Avatar
    Join Date
    Jun 03 2015
    AZ Member #
    335742
    Location
    canada

    Quote Originally Posted by Cysco abt S4 View Post
    Oh I agree totally on the b5 s4 but rguil has a touareg also
    Oh yeah...can't comment about touaregs

    Sent from my Nexus 6P using Audizine mobile app

  18. #18
    Quote Originally Posted by 2000Stg3S4 View Post
    Oh yeah...can't comment about touaregs

    Sent from my Nexus 6P using Audizine mobile app
    Me neither but if the bearings have any use on b5's we want to know

  19. #19
    Veteran Member Three Rings rguil's Avatar
    Join Date
    Dec 17 2014
    AZ Member #
    303740
    Location
    San Diego CA

    Quote Originally Posted by Cysco abt S4 View Post
    Me neither but if the bearings have any use on b5's we want to know
    I considered a single piece driveshaft for the Touareg but as its only a tow car I decided just to be cheap and get the support bearing. Hopefully, it is as much of a "permanent fix" as advertised. Other than that the Touareg drivetrain is stout, especially my OEM locking differentials. On my b5, i am going to go with a single piece driveshaft "eventually" lol

  20. #20
    Veteran Member Three Rings rguil's Avatar
    Join Date
    Dec 17 2014
    AZ Member #
    303740
    Location
    San Diego CA

    The outer diameter of my touaregs driveshaft bearing is 55mm since you were asking

  21. #21
    Quote Originally Posted by rguil View Post
    The outer diameter of my touaregs driveshaft bearing is 55mm since you were asking
    What's the id in the bearing or the od on the shaft
    Thanks

  22. #22
    Junior Member Two Rings
    Join Date
    Jun 08 2019
    AZ Member #
    491038
    Location
    Portsmouth

    You sir are a true legend! Such an awesome write up. Thank you. :)

Bookmarks

Posting Permissions

  • You may not post new threads
  • You may not post replies
  • You may not post attachments
  • You may not edit your posts
  •  


    © 2001-2025 Audizine, Audizine.com, and Driverzines.com
    Audizine is an independently owned and operated automotive enthusiast community and news website.
    Audi and the Audi logo(s) are copyright/trademark Audi AG. Audizine is not endorsed by or affiliated with Audi AG.