


Alright Heres a quick guide on converting your clusters led's to various colours, I chose to make certain LED's white instead of red to mimic a facelift cluster however you can buy any led colour if you wish.
Tools Needed:
- Small Needle Nose Pliers
- Soldering Iron
- Soldering Flux
- Solder
- Possibly a Magniftying Glass
- Surgeon-like Hands
And the supplies you'll need are these bad boys or anything like it:
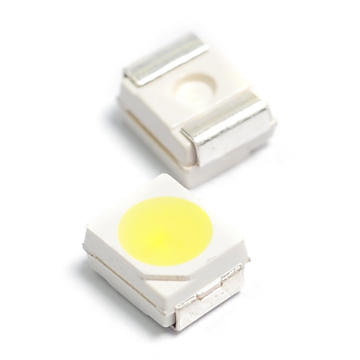
SMD
Basically what you're looking for is any PCC2 3528 SMD Led, they're tiny but pack a decent punch!
Each needle in the cluster requires 2 of these LED's, Although I Haven't counted the exact number of led's in the tacho and speedometer sections, Id estimate theres at least 6-8 LEDS in each section. For a complete colour change you'd require roughly 30 LEDS.
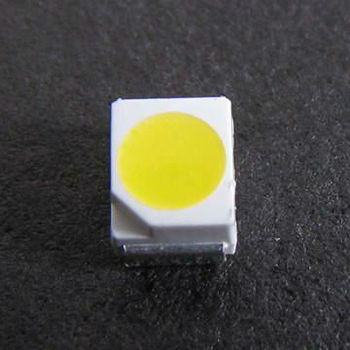
Before going too much further here is another picture of the tiny things you'll be working with:
And its also VITAL to ensure they're oriented the correct way, make not of how one edge contains a cut away of notch as below:
Method
1. Firstly start by disassembling your cluster in a similar fashion to this video, basically we want everything removed from the front face exposing the LED's on the bare circuit board of the cluster. I would advise before you begin to take everything off the front of your cluster, first take a picture of the orientation of each needle in its resting position for easy setting later, although you can easily connect to your car with vag-com and find the exact sensor readouts for more accurate setting of needle positions. Also locate which led's you want to replace and make a mental note of their location on the board, it can get confusing.
As I was only replacing needle LED's I just located the ones next to needles.
It should now look like this:

2. After getting your cluster disassembled, Heat up your soldering iron to roughly 350 degrees celcius or 650 Fahrenheit and set it aside. Locate the LED's you wish to replace. I recomend removing and replacing one led at a time to ensure correct fitment and operation.
3. I started by applying a firm grip with needle nose pliers to either side of the LED, whilst putting pressure on each side of the soldered joints with the soldering iron, moving from side to side till the led could be pulled off. At this stage you should set the LED down in the orientation it came off the board and align the new LED next to it, ensure the notch in the corner is in the same orientation as the one you pulled off the board and you're good to go
4. Start adding a little soldering flux to each soldering joint where the LED you removed was located, I Used a syringe type applicator as below. Flux aids in adhesion and prevents oxidation of the mating metals, producing a long lasting and strong contact between the two.

5. Next add a little solder to each spot with your soldering iron, ensuring the solder is just enough to ensure good contact with the LED but not too much as to bridge the two connections. The newly added solder should form a nice shaped mound on the contact point for the LED. Now you're ready to add some colour!
6. Gently lift the new LED into position over the contact points, noting the orientation once again and ensuring it is the same as the LED you pulled off. Locate the LED over the 2 points, gently touch your soldering iron on the first contact point and then drop one side of the LED into it, repeat for the other side and adjust by reheating till the LED is roughly flat. This doesnt have to be perfect as long as the 2 contacts on the board are soldered to the 2 contacts on the LEDS they will work.
You'll now have something like this:

7. After adding each LED I then went to the car and plugged only the blue connector in and turned the Key to accessories and tested its operation.
8. Reasemble your cluster and you will have something like this if you swapped white LEDS over the stock red for the coolant temp and fuel level

All done! Enjoy your newly updated cluster with bright lights!
A further idea is to sand the red off the needles which if you replace the LEDS next to the needles should give you a result like this:

A note to be made is the difference between facelft and pre-facelift clusters. The above cluster is a pre-facelift meaning the entire cluster was originally light with red leds, needles and numbers. The facelift clusters have a different setup where the plastic light guides under the cluster face and sectioned differently to allow separation of lighting sources to different pieces. In essence, this allows you to change the colour of the needle only for EVERY dial on the cluster, where as for my pre-facelift, the lighting source is the same for the needle and numbers for the voltage, coolant temp, oil temp and fuel level. I thought this was a neat design

")

 Reply With Quote


Bookmarks