Audizine - An Automotive Enthusiast Community

Results 1 to 11 of 11
  1. #1
    Senior Member Three Rings
    Join Date
    Dec 28 2011
    AZ Member #
    85832
    My Garage
    2007 RS4, 2008 Q7, 2005 4Runner V8, 2001 Impreza RS
    Location
    Upstate NY

    DIY: Exhaust Flap Control

    Guest-only advertisement. Register or Log In now!
    After a fair amount of digging through wiring diagrams and testing things out, I'm happy to share a very simple method to allow controlling the exhaust flaps so you can hold them open at will regardless of whether the car is in "S" mode or not.

    TL;DR: Cut the grey-with-black-stripe wire that goes from the ECU to the exhaust flap vacuum solenoid and install a switch & a 1k ohm resistor, interrupting that wire will cause the flaps to remain open regardless of the S-mode setting or RPM.
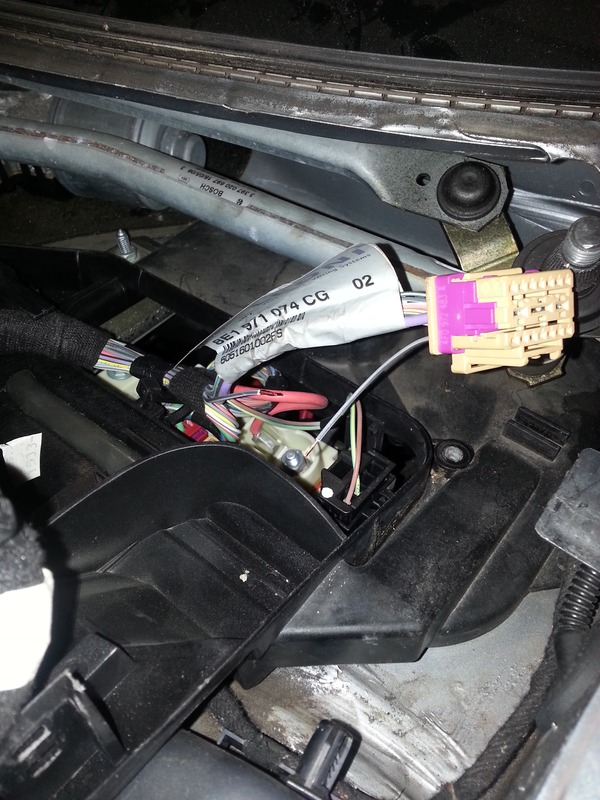


    The wire is a bit of a pain to get to since you have to remove the windshield wipers, cowl, ECM cover and ECM to get to connector T17j where the grey/black wire is on pin 10, but once you've done that it's pretty straightforward.

    The complete write-up as posted on my blog: http://aussiedan.com/blog/2015/03/29...-flap-control/

    The B7 RS4 comes with a neat feature, there are vacuum-controlled flaps in the exhaust that keep it quiet around town but can be opened when you’re enjoying the car on a back road for a little more power and to hear the V8 sing. They’re also open when the car first starts up, which is why it makes such a nice noise when you start it up!
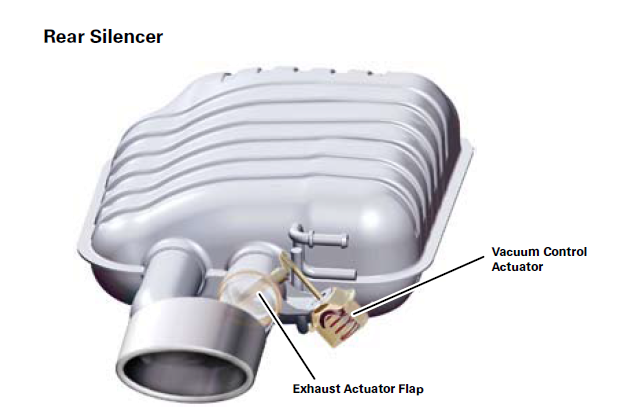


    The only problem with this system is that to open the exhaust flaps you have to put the car in “S” mode, which also means that the accelerator curve is changed to be much more abrupt (or “direct”, as Audi would describe it). I don’t particularly enjoy the non-linear throttle response in S mode, and found the car much more controllable during autox events with it disabled. The other problem with this arrangement is that even in S mode, “After engine speed is increased, however, the exhaust flaps are closed again. This ensures that the vehicle meets the statutory noise emission limits.”.
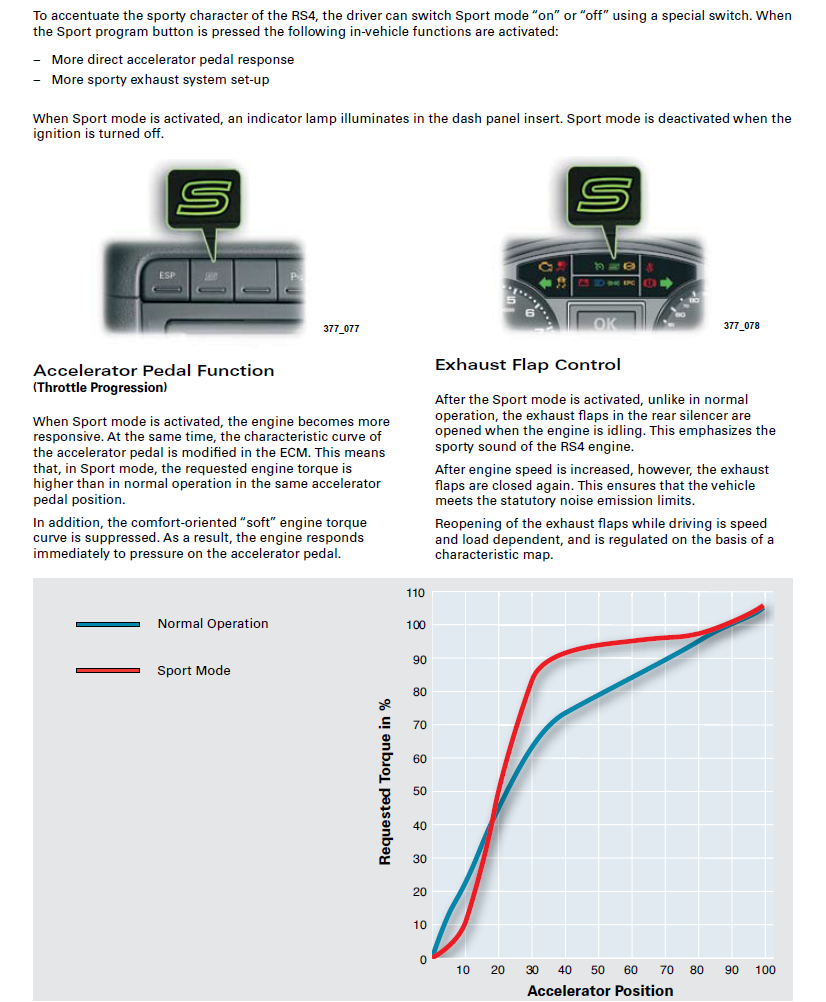


    That’s no fun, but as it happens there is a solution! The exhaust flaps are controlled by a vacuum solenoid behind the left rear wheel well, which controls whether vacuum from the engine is allowed to pull the flaps closed. The solenoid gets 12v from a connection shared with the leak detection pump, and when in “normal mode” the other pin is grounded via an ECU pin. This “opens” the solenoid and allows vacuum to close the flaps. (As an aside, this is why the flaps are open at startup, the solenoid vents when it doesn’t get 12v so the flaps stay open until there is enough vacuum from the running engine to pull them closed.)

    So, armed with this knowledge we now know that we can add a switch to the connection between the ECU and the solenoid and control whether the flaps are open or closed! The rest of this post details how to install the switch and a 1k ohm resistor which will prevent the ECM from throwing a fault code when we disconnect the solenoid.

    You will need:
    • 1x toggle switch
    • 1x 1k ohm 1/2 watt resistor
    • 2x crimp connectors
    • 1x wire tap


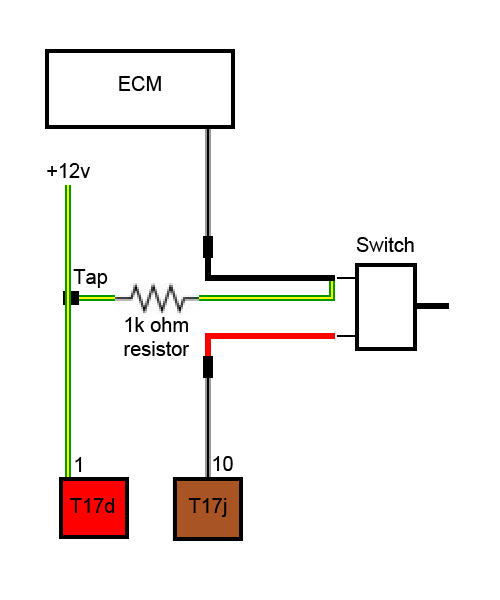
    There are 2 wires we need to locate to complete the mod. The first is grey with a black stripe, and goes through pin 10 on the T17j brown connector in the connection block just underneath ECM 1 (the RS4 needed 2 ECMs to handle all the functions required), which is under the windshield cowling. The grey/black wire is the control signal from the ECM to the exhaust flap solenoid.

    The second wire is green with a yellow stripe, and goes through pin 1 on the T17d red connector in the same connection block. This wire supplies 12v to the solenoid, and we will tap into it to fool the ECM into thinking the solenoid is always connected.

    Here is a diagram of what we're putting together, the switch cuts power to the solenoid to open the exhaust flaps while the 1k ohm resistor creates a circuit from the 12v source to the ECM pin to avoid creating an open circuit fault when the solenoid is disconnected.


    Let's get started!

    Start by disconnecting the battery!

    To remove the windshield cowling you'll first need to remove the windshield wipers by popping the rubber caps at the base of the wiper arms, undoing the nuts and wiggling the arms off. Once the arms are off, remove the cowl trim by lifting it up and pulling gently toward you.

    Next, remove the 3 small black metal clips that hold the windshield cowl trim in place and pull it free from where it clips along the bottom of the windshield. This will give you access to remove the T30 torx screws that hold down the ECM cover, and with that removed you'll be left with something like this:
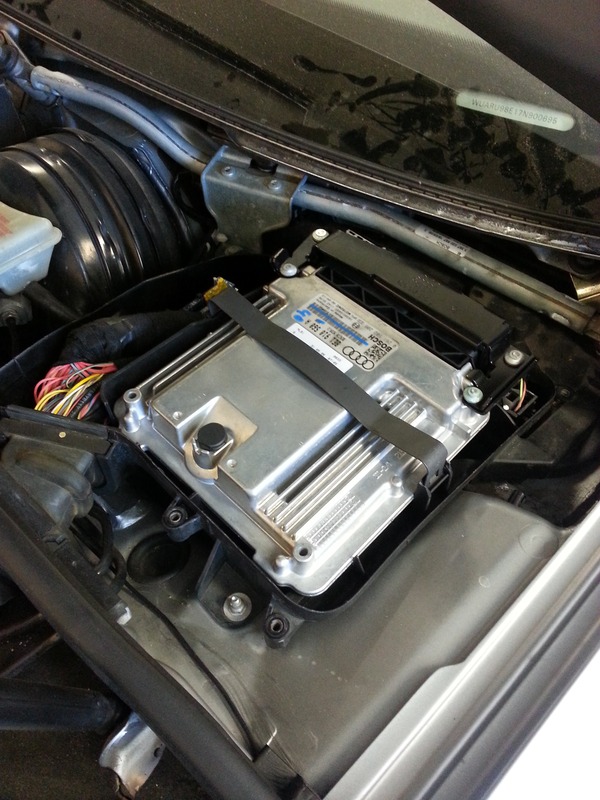


    Use a flat screwdriver to pop the hold-down clip on the ECM, and pivot it out of the way to get access to the connector station underneath. At this point you'll most likely want to remove the driver's side lower dash panel (One 8mm bolt behind the fuse panel cover and 2 more at the bottom of the dash panel), so you can get access to the dash to fish wire through and to mount your switch.

    Unplug the brown connector and locate the grey/black wire that goes to pin 10, this is the wire we need to cut. Here you can see it after I made the cut, I fished the cut end of the wire back through the harness label after I cut it to have more wire to work with in the next step.
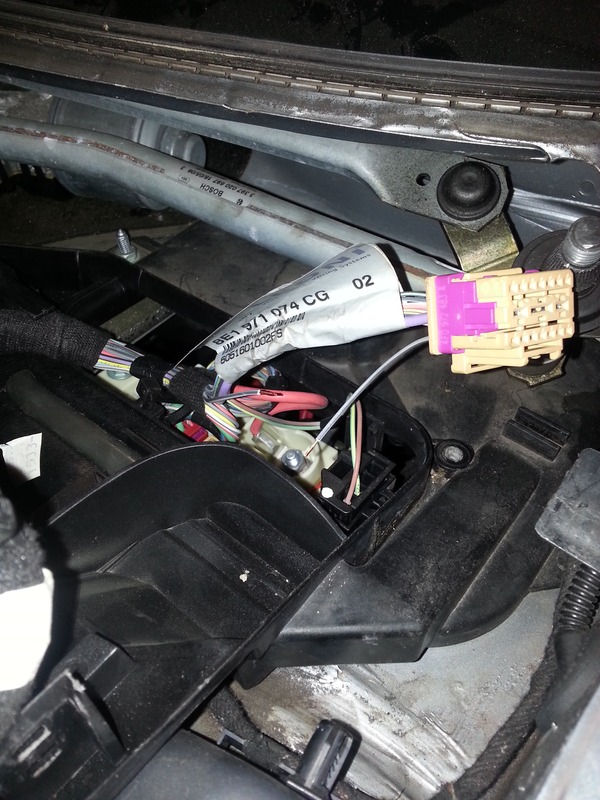


    I used male/female crimp-on spade connectors to make the connections, so that the mod is easily reversible if desired. At this point connect each of the cut ends to a separate piece of wire (I used some 18 gauge red/black "zip wire") so you can fish it back down into the dash. Note which side goes to the ECU, since this is the wire we'll connect the resistor to in the next step.
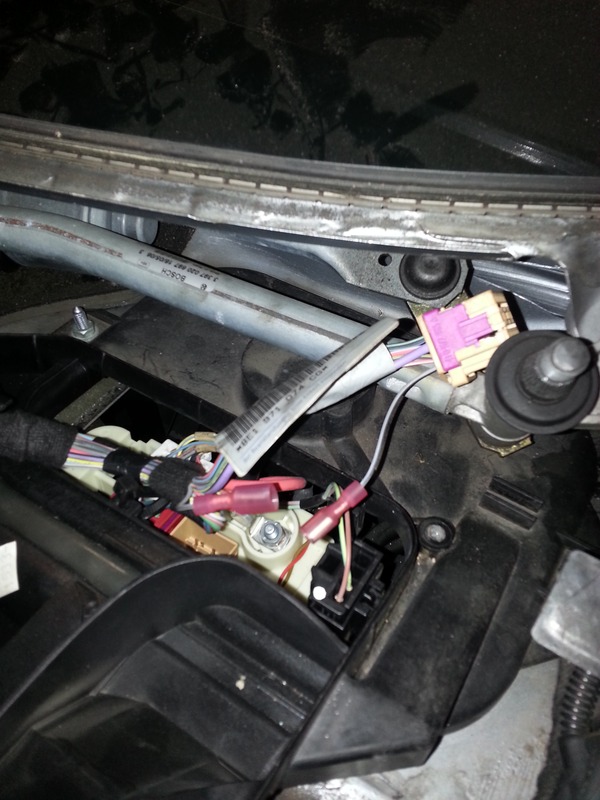


    Locate the green/yellow wire on pin 1 of the red connector, then use a wire tap (I used a Posi-Tap) to tap into it and connect a wire to one leg of the 1k ohm resistor. I tapped into this wire from inside the car, but you can also tap in where it comes out of the top of the connector.
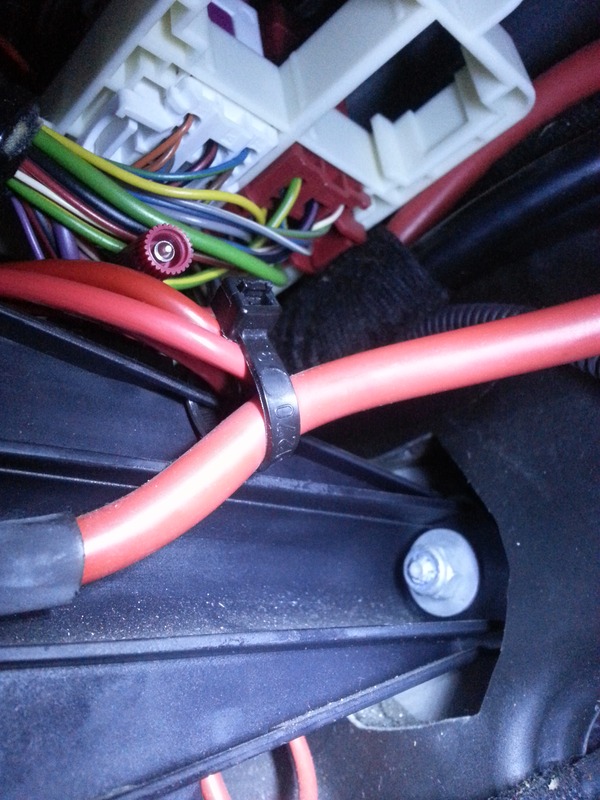


    Here you can see the resistor soldered into a piece of matching green/yellow wire I happened to have. After soldering I covered the resistor with heat-shrink tubing.
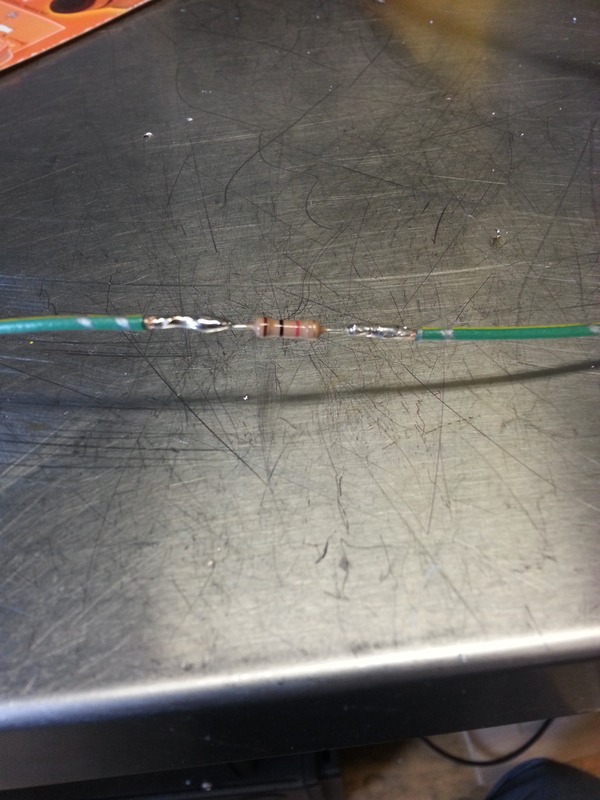


    Now, take the extension of the "upstream" grey/black wire coming from the ECU and the wire from the other leg of the resistor, and connect them both to 1 terminal on the switch. The extension of the "downstream" grey/black wire that goes to the solenoid should be connected to the 2nd terminal on the switch.

    When the switch is On the exhaust flaps will work exactly as they did from the factory, when it is Off the connection to the solenoid is interrupted and the exhaust flaps will be open all the time. I wired mine to an “RS4″ switch I picked up that fits into a factory location in the dash, but any switch will do. The solenoid only draws about 500ma when it’s operating, so a relay isn’t necessary as long as your switch can handle at least that current.
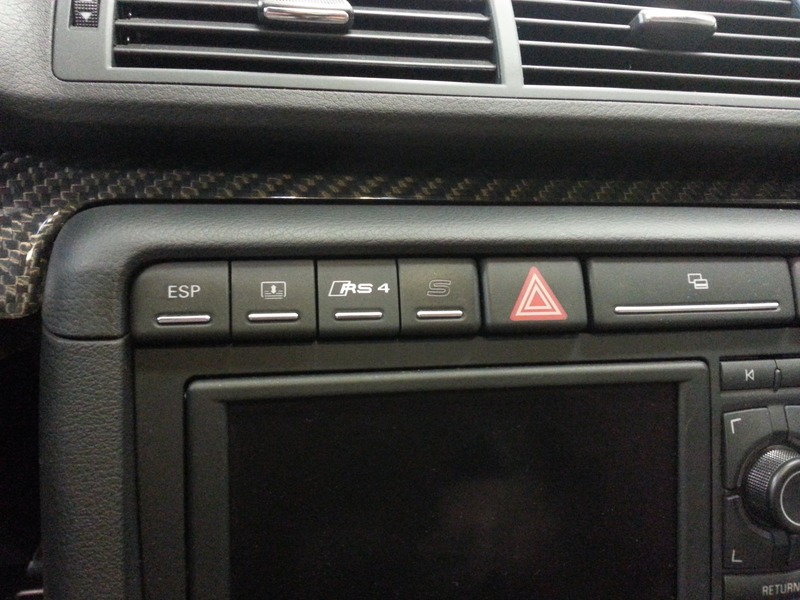


    Put everything back together and enjoy!
    Last edited by AussieDan; 04-04-2015 at 08:35 PM.
    '07 RS4 Avus w/ Silver Interior | RS4 Registry

  2. #2
    Senior Member Two Rings RSFourMe's Avatar
    Join Date
    Apr 24 2013
    AZ Member #
    114012
    My Garage
    07 Q7 4.2, 73 VW Bus, GONE: 73 VW Bus, 1996 Audi Cabriolet, 05 Cayenne S, 2000 740i MSport
    Location
    Modesto, CA

    This is probably the best write-up/D.I.Y. I've seen on here! Great job man!

    08 RS-4 Cabriolet- Phantom Blk: k40 Calibre, JHM Stage IV Kevlar Clutch with LWFW, Solid Short-Shifter, Linkage and Bushing, CD Changer delete- Dension Aux adapter mated to Blackberry BT/NFC Stereo adapter.....to be continued...

  3. #3
    Veteran Member Three Rings maxbhp's Avatar
    Join Date
    Aug 11 2007
    AZ Member #
    20244
    Location
    OC, CA

    I didn't get through the whole post to figure out why go through all of that when you could just plug the vacuum lines with a golf tee or screw and secure with a zip tie. 8 yrs of running that way with my stock exhaust and MTM with never a vacuum leak.
    Titanium, Carbon Fiber Int Trim, Front lip, B Pillar, C pillar, and seatbacks, Stasis MS, Stern CA's, H-sport Rear Sway, LI-S4 V1 Stealth Hardwired w/ hidden mute in shifter boot, OEM E- codes, JHM Tune, Hypershift SS, Apikol Rear Diff, Full Clearbra, OEM full Euro Interior in Leather/Racecloth, Quattro Suede Eurowheel, Suede shifter and e-brake, 19x10 Forgeline, 285/30, MTM exhaust, Custom 2.75" downpipes w/ HJM cats, Carbon engine cover, Fenders rolled, Color-matched mirrors, Alcon 370mm, Funk

  4. #4
    Senior Member Three Rings prfktgntlmn's Avatar
    Join Date
    Sep 24 2011
    AZ Member #
    81674
    My Garage
    2017%20gmc%20canyon%20sle%20
    Location
    Atlanta

    Quote Originally Posted by maxbhp View Post
    I didn't get through the whole post to figure out why go through all of that when you could just plug the vacuum lines with a golf tee or screw and secure with a zip tie. 8 yrs of running that way with my stock exhaust and MTM with never a vacuum leak.
    Because your method, you can't close the valves, his method you can open AND close whenever you want.
    2007 Audi RS4 Phantom Black/Black Premium

  5. #5
    Veteran Member Three Rings maxbhp's Avatar
    Join Date
    Aug 11 2007
    AZ Member #
    20244
    Location
    OC, CA

    I see. I read it now and really well done. I can see this being great for those with louder exhausts that still retain the valves. Mine's pretty tame so the valves are almost useless and I'm not loud enough to need them closed. I've also gotten used to driving with the sharper throttle so I hit the S button in my steering wheel every drive even thorough my flaps are permanently open. Great write up for those that need it.

  6. #6
    Senior Member Three Rings
    Join Date
    Dec 28 2011
    AZ Member #
    85832
    My Garage
    2007 RS4, 2008 Q7, 2005 4Runner V8, 2001 Impreza RS
    Location
    Upstate NY

    So after some research it turns out that the MKIV R32 and TTRS have a similar system and they have been able to get rid of the fault code using a 1k ohm resistor. The resistance of the solenoid is 28ohms which is why I was going to use that, but a 1k ohm will draw a lot less current. ECS actually offers a kit for the R32 that operates on the same basic principle, theirs actually has a 3 position switch which on the RS4 would let you engage sport mode while keeping the flaps closed if that was something you wanted to do.

    Anyway, I'll update the writeup and take some more pics once the resistors show up.
    '07 RS4 Avus w/ Silver Interior | RS4 Registry

  7. #7
    Senior Member Two Rings Cicatrix's Avatar
    Join Date
    Jul 30 2013
    AZ Member #
    119972
    My Garage
    SQ5
    Location
    Pennsylvania

    Perfect mod for the Funk button

  8. #8
    Senior Member Three Rings
    Join Date
    Dec 28 2011
    AZ Member #
    85832
    My Garage
    2007 RS4, 2008 Q7, 2005 4Runner V8, 2001 Impreza RS
    Location
    Upstate NY

    Updated the original post with details for using a 1k ohm resistor to prevent the ECM throwing a fault code. Hat tip to the R32 guys who figured out a 1k ohm resistor was enough to fool the ECM without drawing too much current. The Funk button could work very well with this mod, but depending on the version you get you might need to wire it up through a normal relay with a NC contact (since "off" == loud), or a latching (aka flip-flop) relay if you use a momentary switch.
    '07 RS4 Avus w/ Silver Interior | RS4 Registry

  9. #9
    Active Member One Ring Killerclown's Avatar
    Join Date
    Jan 18 2019
    AZ Member #
    443943
    Location
    Wa

    Ok question, I have no flaps in my exhaust what so ever, am I able to just delete this option totally and negate the wiring head aches all together.. just curious neighbors dont seem to get bothered by me

  10. #10
    Established Member Two Rings jcmii's Avatar
    Join Date
    Dec 08 2010
    AZ Member #
    68027
    Location
    Seattle, WA

    Previous owner of my RS did this and added the funk button. I added JHM catted Downpipes and X pipe, and I kept the stock mufflers with valves hooked to the funk. IMG_0767.jpg


    Sent from my iPhone using Audizine

  11. #11
    Veteran Member Three Rings
    Join Date
    Oct 03 2011
    AZ Member #
    82059
    Location
    Buffalo

    Anybody have a source for custom graphic buttons? Looks like carstyle4you.com doesn’t have them anymore

Bookmarks

Posting Permissions

  • You may not post new threads
  • You may not post replies
  • You may not post attachments
  • You may not edit your posts
  •  


    © 2001-2025 Audizine, Audizine.com, and Driverzines.com
    Audizine is an independently owned and operated automotive enthusiast community and news website.
    Audi and the Audi logo(s) are copyright/trademark Audi AG. Audizine is not endorsed by or affiliated with Audi AG.