Audizine - An Automotive Enthusiast Community

Results 1 to 17 of 17
  1. #1
    Active Member One Ring Yamazaki165's Avatar
    Join Date
    Nov 11 2014
    AZ Member #
    294460
    Location
    California

    D.I.Y. Door Lock Replacement w/ *Pictures*

    Guest-only advertisement. Register or Log In now!
    Hi all,

    Ok, so I've been googling online about this and there are bits of information online on different models of A4 but nothing specific seems to pop up regarding how to replace door locks on B8 A4. So I decided to try it myself and after 4 times opening up the door panel, I finally got it done today! I decided to share this so anyone can replace your broken door locks on your b8 (which seems to happen quite often). It's actually simpler than it looks (and way cheaper than going to the dealer).

    Problem

    I got my 2010 A4 used, after driving it for couple days I noticed the front passenger door won't lock/unlock with remote nor the with the button inside. The passenger side button can still lock/unlock other doors, just not itself! I can still open the door normally from door handles. This problem will cause the lock confirmation sound (the "chip" after you lock the car with the remote) doesn't come up when locking the car and interior light doesn't go out after a long time. This is because the car consider itself not locked since one of the lock is still open. The problem would stay for couple days, disappear for some times, then come back. Recently, the problem doesn't disappear anymore. When scanning the car, VCDS gives:

    02115 - Locking Unit for Central Locking
    008 - Implausible Signal

    Based on these problems and some googling online, I concluded there's a faulty lock module.

    Disclaimer: follow this guide at your own risk, I am not responsible if you damage anything. (had to get that out of the way )

    Things you need
    8mm Triple Square Socket (don't use other similar sockets, you will break the bolt!! and don't ask me how I know)
    T25 Screw driver
    Door Trim removal tools

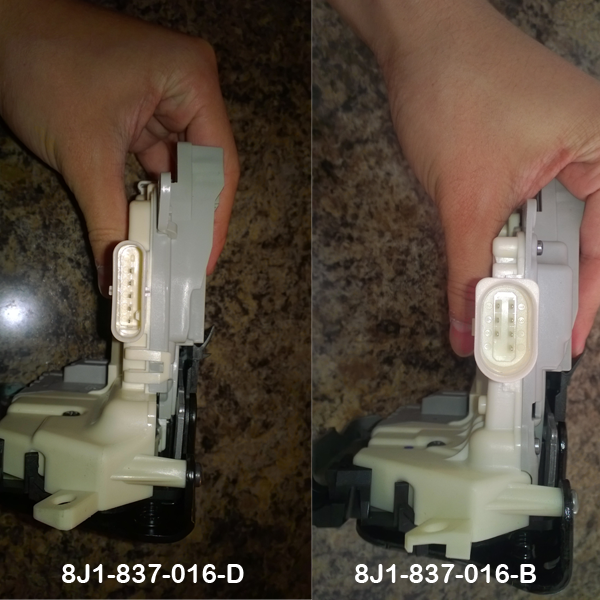
    Door Latch (lock, part number 8J1837016B/8J1837016D)
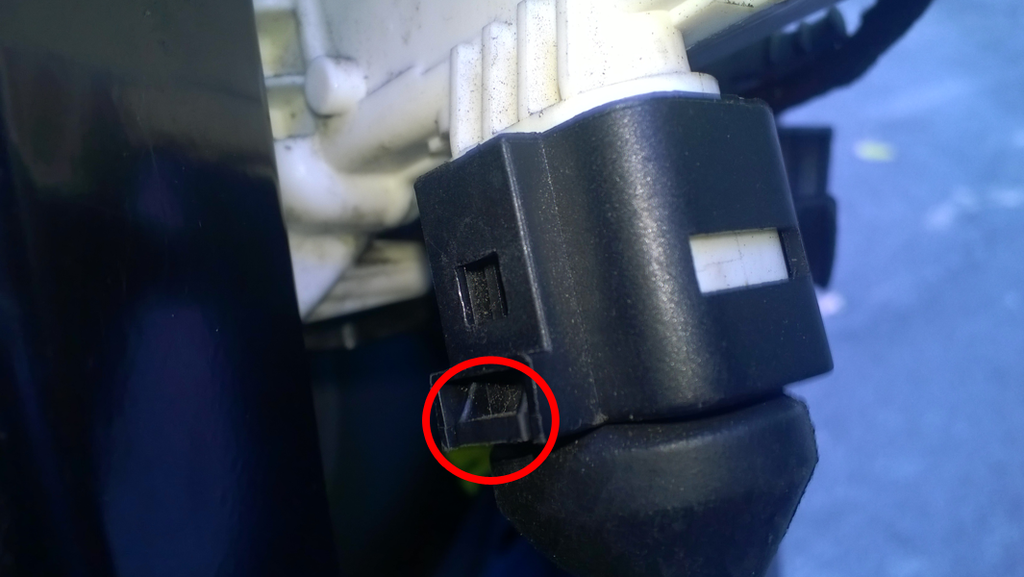
    **Be careful about which type you are replacing, they have different connectors (see picture) so the wrong type will never fit. You can follow up till step 2 to see which type you have, mine is type B.


    Door Panel Clip (part number 7L6868243, for backup purposes, usually some will break when removing the door panel)

    Lock bolt (in case you really need it, par number WHT003348)

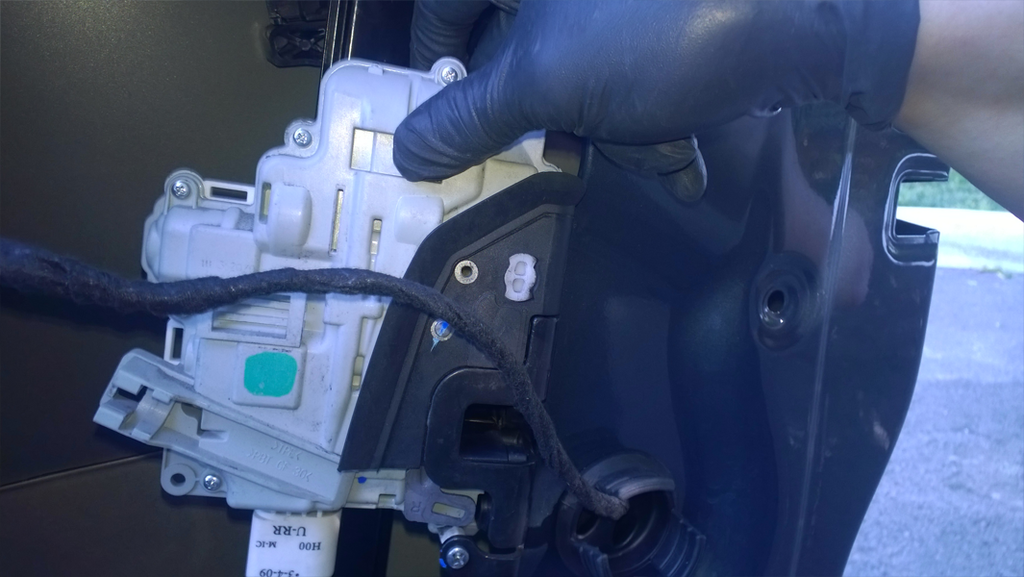
    My adventure inside the passenger side door panel...

    1. Remove the inside door trim and door panel (there are already several instructions on this online so I'll not post detail steps here. I followed this video )
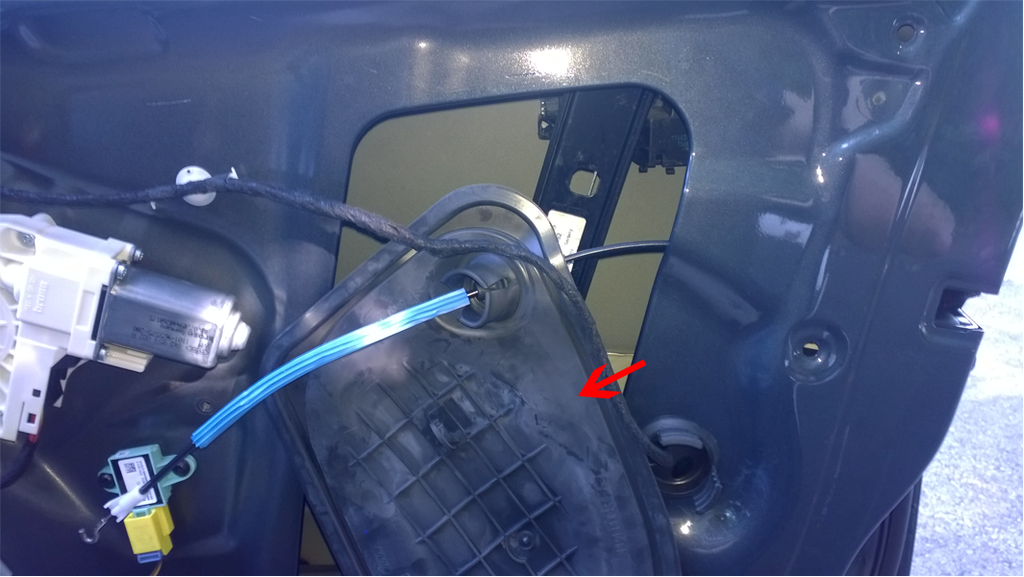
    2. After removing the door panel, remove the big plastic cover, this is what you see (red arrow), slide that out so the cover just touch the blue part of the inside handle wire (as the picture shows)


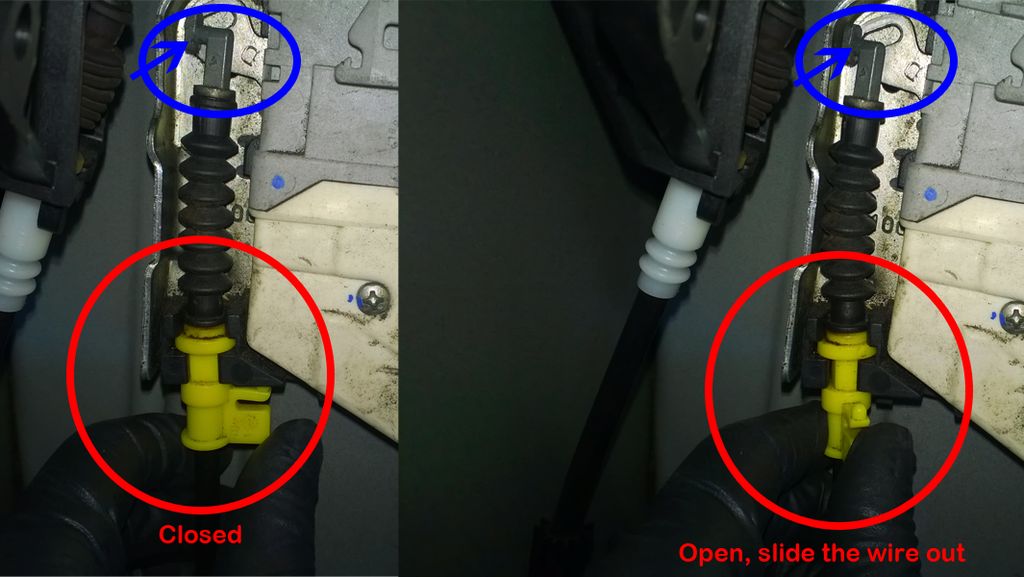
    3. Slide the wire connecting outside door handle out of the guide by rotating the guard (the yellow clip in red circle)
    Note. in this picture, the wire is already out of the lock unit (as in blue circle) because I previously removed it, you will need to remove that yourself by bending the wire upwards to align the clip (blue arrow) with the hole, I suggest you do this after step 4 because it's a lot easier after the lock is out of the place.


    Note. There might be a lock cover on the lock so you will need to remove that as well, since I don't see that in my car I can't post pictures
    4. Remove the lock bolts on the side of the door(2 black bolts around the latch, this is where 8mm Triple Square socket comes in)
    ****Be careful! these are the only things holding the lock, hold the lock with your hand while these are coming off so you wont damage the wires.
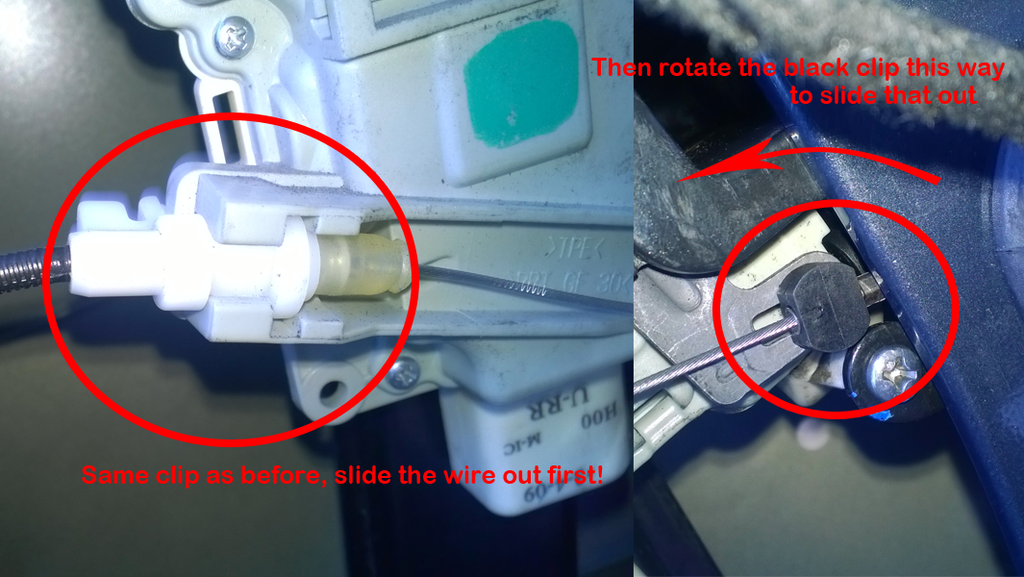
    5. After the lock is loose, carefully slide that to the opening between the window guide (a black steel bar in the picture in step 2) and the panel (the narrow side, I can never get the lock pass the window bar from behind), remove the wire for inside door handle using the same trick as 3.


    6. Here's the tricky part, while the lock doesn't seem to fit, it will actually come out if you slightly apply pressure (don't over pull it, you might damage the connecting wires) and force it out of the opening, your lock should come out the same orientation as it's installed (so no need to turn the lock around inside the door frame), like the picture.


    7. After the lock is out, disconnect the wires by first pushing the clip (red circle) down and pulling the connector out, again be careful, you don't want to destroy the wire at this point!


    8. After that just reverse the steps and put everything back. For putting the lock back in the door frame, apply slight pressure and pull the inside door frame outward to create an opening so the lock can be pushed in, the orientation should be the same as before.

    And that's it!! The lock should now lock and unlock normally (mine did! yay!).
    In the end, the lock costs $244, couple bolts and clips costs less than $10 so overall about 250. As to the afternoon I spent with my car? - priceless!

    Hope this helps someone out there

  2. #2
    Established Member Two Rings Viru5's Avatar
    Join Date
    Oct 27 2014
    AZ Member #
    291211
    Location
    Rockord Illinois

    Ugh i have to do this for my rear RH 244$ for a lock mechanism =[ Nice DiY though
    | 2009 A4 Premium+ Quattro 2.0T | 20% Window Tint | AWE Vent Gauge | RS4 Grille |

  3. #3
    Veteran Member Three Rings vacsimile's Avatar
    Join Date
    Nov 15 2008
    AZ Member #
    35298
    My Garage
    2004 Audi S4, 1991 Nissan D21, 2001 GTi VR6
    Location
    Outer Space

    Good write up. I would add that if you're having trouble getting the lock out of the hole to roll the window up and remove the lower screw for the window regulator. It makes it a lot easier and you don't have to flex the door to get it to fit.

  4. #4
    Active Member One Ring Yamazaki165's Avatar
    Join Date
    Nov 11 2014
    AZ Member #
    294460
    Location
    California

    Yea that's probably easier, I guess I was kinda tired after 4 times removing the door panel so I never bother to remove the lower screw for the window guide
    Last edited by Yamazaki165; 03-27-2015 at 12:18 PM.

  5. #5
    Senior Member Three Rings
    Join Date
    May 05 2009
    AZ Member #
    42116
    Location
    Cupertino

    Thanks for sharing, wish we had this before I had all 4 of my door locks replaced, out of warranty! Freaking faulty door lock ! there really should be a recall for this fragile part.
    2015 SQ5 :034 Trans Insert, 034 RSB, 034 X-Brace, H&R-1, Photosync front, Xpel front, OptiCoat, Windsea Sunshade, EPL....$$$$$

    SOLD : B8 A4 2.0T Quattro / Huper Optik 50% / Eurocode FMIC /Eurocode USS system/ APR Quad Tip Turboback / APR K04

  6. #6
    Veteran Member Three Rings
    Join Date
    Oct 31 2013
    AZ Member #
    127843
    My Garage
    Land Rover LR3, Harley Dyna Fat Bob, Triumph Speed Triple
    Location
    Washington DC / NoVa

    Thanks for sharing. My A6 is exhibiting the same symptoms


    Sent from my iPad using Tapatalk

  7. #7
    Senior Member Three Rings yma4's Avatar
    Join Date
    Dec 27 2011
    AZ Member #
    85785
    Location
    San Diego, CA

    Replaced the right rear (passenger) locking mechanism today on my 09 A4. Symptoms: Wasn't able to open the door from the outside (inside worked fine though) and alarm would not engage sometimes. Outcome: door works like new.

    Big thank you to Yamazaki165 for the DIY. His was on front door but similar to rears.

    Entire process took about 1.5 hrs. Part # 8K0839016A. Audi wanted about $348 for the locking mechanism and it's on ECS for $250. I picked one up at the local Porsche dealer for $200 . Found one online at another Porsche dealer for even cheaper so depending on your timing you might be able to save a few more bucks.

    The dealership wanted about $800 for the job. Definitely a simple weekend project that can save you a good chunk of change.

  8. #8
    Veteran Member Four Rings inNout's Avatar
    Join Date
    Jul 22 2009
    AZ Member #
    45361
    Location
    IL->WA

    I just replace my rear right door actuator. The biggest pain in the ass was taking the door panel off. I managed to break 2 clip holders, but everything else was straightforward.

    I sourced my actuator from Sunset Porsche Parts => And this was the Porsche part that is identical to the audi's. The cost was 1/2 of audi part from ECS tuning and it came in 2 days: https://www.sunsetporscheparts.com/o...ZyPWxheWVyXzEx
    2010 B8 2.0T 6spd K04 + [HPA Motorsport, Rays, APR, Eisenmann, Bastuck, Eurocode, KW, OSIR, StopTech, ArmaSpeed]

  9. #9
    Veteran Member Four Rings WokkerK's Avatar
    Join Date
    Nov 21 2015
    AZ Member #
    364787
    Location
    Portland, OR

    The pictures in this thread were great! I just replaced my drivers door actuator with this write up and it was perfect! Thanks OP for keeping your pictures fixed and not broken like most other DIY threads.

  10. #10
    Registered Member One Ring
    Join Date
    Oct 08 2010
    AZ Member #
    65436
    My Garage
    2011%20Q5
    Location
    El Dorado Hills CA

    fantastic DYI with pics - saved a bundle over taking it into an audi dealer.
    I was able to do this replacement in about an hour!
    front right door latch assembly for 2011 Q5 8J1837016F from europaparts.com $165.95
    thanks!

  11. #11
    Veteran Member Four Rings A4 Centaur's Avatar
    Join Date
    Jun 05 2009
    AZ Member #
    43360
    My Garage
    2020 Ducati Panigale V4S
    Location
    Scottsdale Arizona

    Thanks for the write up!
    2023 S4 Prestige Mythos Black. Brembo GT BBK, APR FMIC, 034 Stg 1
    2012 B8 A4 Avant, Phantom Black S-Line Prestige, 2014 CPMB Engine, 8 speed, JHM K04-R, Eurocode HFC, APR FMIC, 034 Alu Kreuz, Vogtland Coilovers, Stoptech 380mm BB Kit, H&R Swaybar, ECU with IE K04 Tune, Rev. "d" DV, R8 Coils, Folding Mirrors, S5 Rear Brakes, 034/Apikol mounts, OEM Facelift LED Brake lights ]

  12. #12
    Veteran Member Four Rings
    Join Date
    Jan 03 2013
    AZ Member #
    106799
    Location
    Baltimore

    Nice writeup. For those that might want to try to clean out the actuator and save some bucks, it worked for me. Disassemble as noted above and then take out the screws holding the unit together. Be careful pulling it apart - there are a lot of little gears and bits inside. Once you have it split, remove the little motor (this is what usually fails) and clean the contacts. I also blew some air in it. Re-assembled and its as good as new.

  13. #13
    Veteran Member Three Rings Aris3.2's Avatar
    Join Date
    Mar 13 2020
    AZ Member #
    541859
    Location
    New Jersey

    I would like thank the OP For the diy.Guys like you save folks money for sure.
    Thanks to you i got the courage to actually do this myself and when i was done and everything worked gave me a lot of satisfaction and you know that feeling of wow nice i actually did it.
    Cheers 👍

  14. #14
    Veteran Member Three Rings Aris3.2's Avatar
    Join Date
    Mar 13 2020
    AZ Member #
    541859
    Location
    New Jersey

    For the record the car is a4 b8 2009 made 10/08 and i replaced the rear left(drivers side) part number 8K0-839-015-A
    And also rear right(passenger side) part number 8K0-839-016-A
    I bought both from ebay for 160 & 170 each.

  15. #15
    Registered Member One Ring
    Join Date
    Jul 09 2020
    AZ Member #
    554581
    Location
    Romania

    Where can I find out how many pins it has without disassembling it, mine is from 21 october 2009

  16. #16
    Veteran Member Four Rings
    Join Date
    Jul 16 2018
    AZ Member #
    422473
    Location
    Atlanta

    Changeover date for the door locks: Nov 2, 2009. So you should have the original style plug.

    But it also mentions for those from Nov 1, 2009 - Jan 11, 2010, physically inspect the unit to confirm. Guess they had a short window of using whatever was on hand.
    2009 A4 Avant 2.0T quattro Prestige, 275k miles

  17. #17
    Active Member One Ring gedrosselt's Avatar
    Join Date
    Apr 02 2014
    AZ Member #
    169674
    Location
    MD

    Thanks for this! Unfortunately I ordered the wrong revision. However, I was able to disassemble the 'B' revision that was in my car, and the 'D' revision that I ordered, and attached the motor mechanism with the plug from the 'B' to the latch portion of the 'D'. The motors and electrical connection portions (white part) of the actuators are different, but the mechanical latch portions (black part) are identical.

Tags for this Thread

Bookmarks

Posting Permissions

  • You may not post new threads
  • You may not post replies
  • You may not post attachments
  • You may not edit your posts
  •  


    © 2001-2025 Audizine, Audizine.com, and Driverzines.com
    Audizine is an independently owned and operated automotive enthusiast community and news website.
    Audi and the Audi logo(s) are copyright/trademark Audi AG. Audizine is not endorsed by or affiliated with Audi AG.