Audizine - An Automotive Enthusiast Community

Page 1 of 3 123 LastLast
Results 1 to 40 of 87
  1. #1
    Established Member Two Rings
    Join Date
    Mar 05 2013
    AZ Member #
    110733
    My Garage
    18 TTRS, 09 Audi TTS, S5 Stage2, TT Mk1 Roadster
    Location
    Lakeland, FL

    Complete DIY for 3.0T Thermostat Parts, Manual, photos tips!

    Guest-only advertisement. Register or Log In now!
    This took 8 hours with 2 people the first time. We both think about 6 hours or less the next time. We didn't know the water pump pulley, vacuum pump and air box removal was required. The supercharger part is easy the stuff in the tight quarters up in front not so much. In the end I saved $1250 plus would feel comfortable doing this on friends vehicles.


    SUPERCHARGER REMOVAL
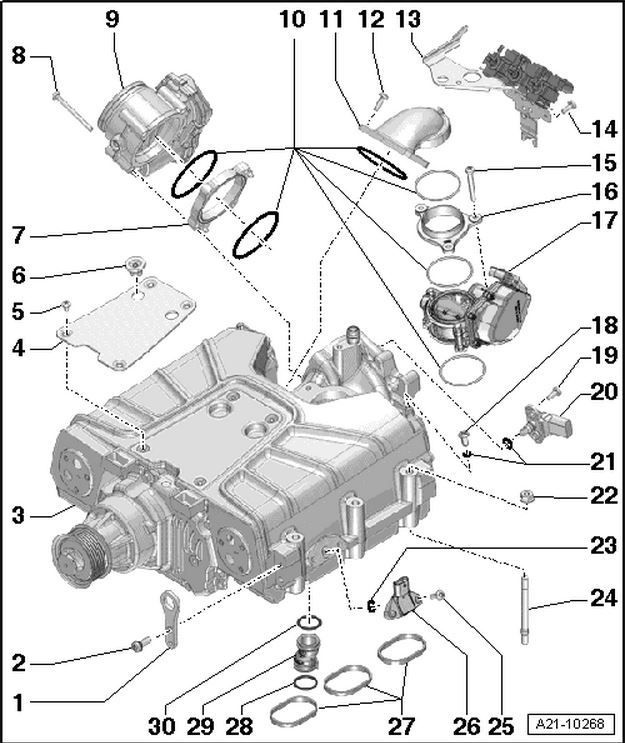


    1- Engine lifting eye

    2- Bolt
    27Nm

    3- Supercharger
    With charge air coolers
    Removing and installing supercharger.
    Charge air coolers - exploded view.

    4- Insulating plate

    5- Bolt
    5Nm

    6- Rubber grommet
    2x

    7- Intermediate flange

    8- Bolt
    Tightening torque*>*Rep. gr.24

    9- Throttle valve module -J338-
    Removing and installing > Rep. gr.24

    10- O-rings
    Renew

    11- Connection

    12- Bolt
    Tightening torque and sequence > Rep. gr.24

    13- Bracket For change-over valves

    14- Bolt
    9Nm

    15- Bolt Tightening torque and sequence > Rep. gr.24

    16- Intermediate flange

    17- Regulating flap control unit -J808-
    Removing and installing > Rep. gr.24

    18- Bleeder screw For charge air cooler (left-side)
    1.5 ... 3.0 Nm

    19- Bolt
    Tightening torque > Rep. gr.24

    20- Intake air temperature sender -G42-
    Removing and installing > Rep. gr.24

    21- O-rings
    Renew

    22- Nut
    20Nm

    23- O-ring
    Renew

    24- Threaded pin
    17Nm

    25- Bolt Self-locking
    Renew
    Before assembly, always remove residues from threaded holes using a thread tap
    10Nm

    26- Charge pressure sender
    Cylinder bank 1 (right-side): charge pressure sender -G31-
    Cylinder bank 2 (left-side): charge pressure sender*2 -G447-
    Removing and installing.

    27-Seals
    Renew

    28- O-ring
    Renew

    29- Connection For crankcase breather
    Installation position*>*Fig.

    30- O-ring
    Renew


    Removing:
    Remove poly V-belt for supercharger.
    Remove both belts:
    Supercharger easiest from underneath. 16mm
    Accessory belt from the top. 17mm

    Place drip tray for workshop hoist -VAS 6208- beneath engine.

    Tip* Extract the coolant from the reservoir, squish the radiator hose and this will force more coolant in to reservoir. No coolant will be come out of the supercharger hoses this way.

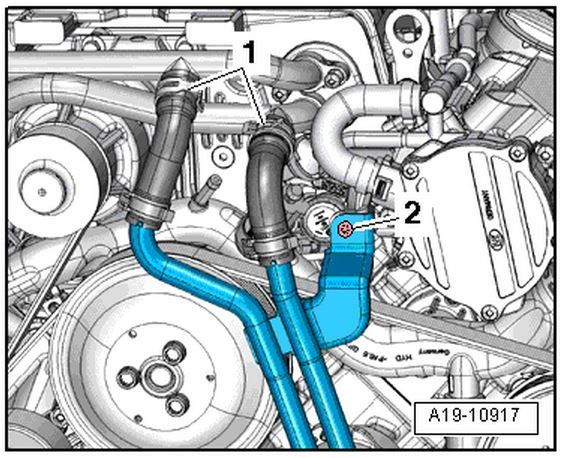
    Clamp off coolant hoses using hose clamps -3094-, release hose clips -1- and detach coolant hoses from coolant pipes on supercharger.


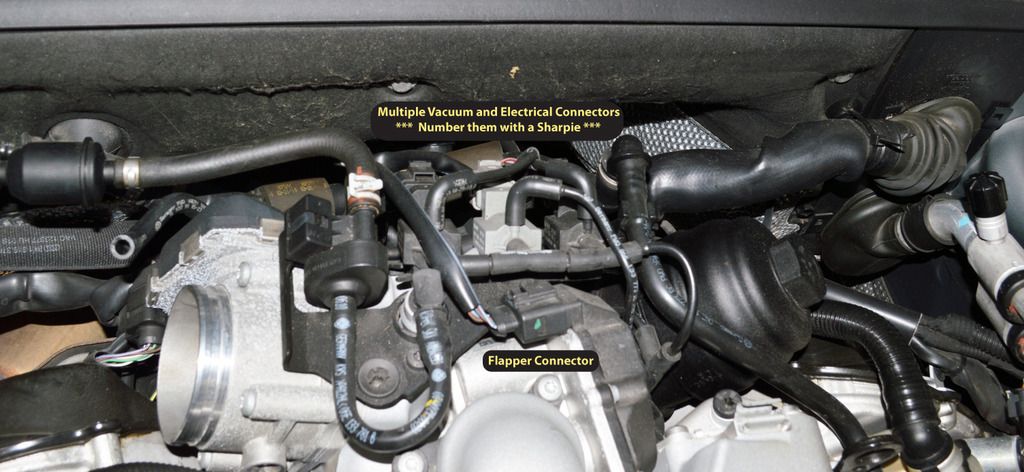
    Tip* Take a silver and black sharpie and mark ALL vacuum hoses and connectors before removing.

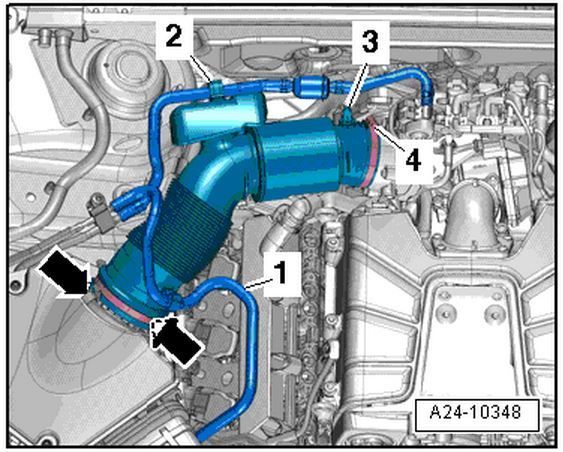
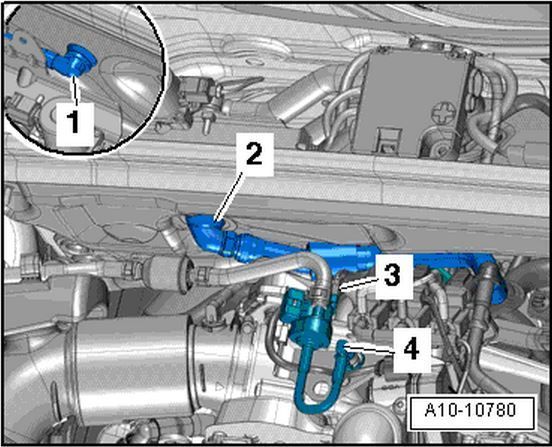
    Move fuel hose -1- and hose -2- from activated*charcoal filter clear at air pipe.
    Detach vacuum hose -3- from connection on air pipe.
    Remove air pipe. To do so, release hose clip -4- and clamps -arrows-.
    Remove air box, optional but it makes for a lot more visibility.


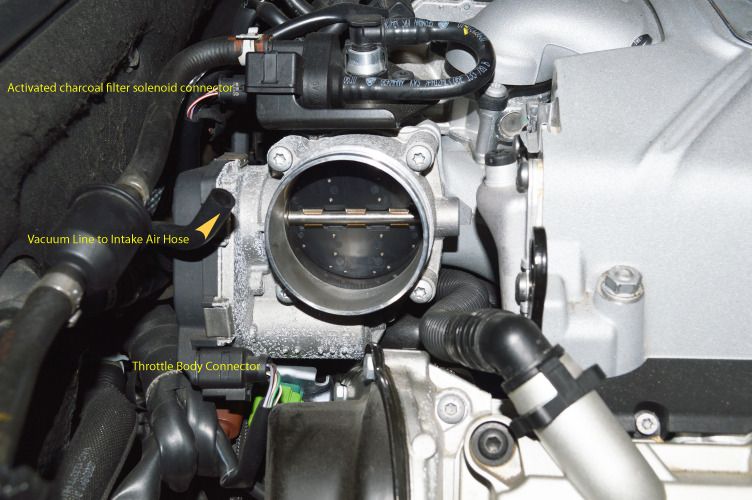
    Unplug electrical connector -3- at activated charcoal filter solenoid valve 1 -N80- and detach vacuum hose -4- (press release tabs).
    Detach activated charcoal filter solenoid valve 1 -N80- from bracket and move it clear to the side with hose still attached.


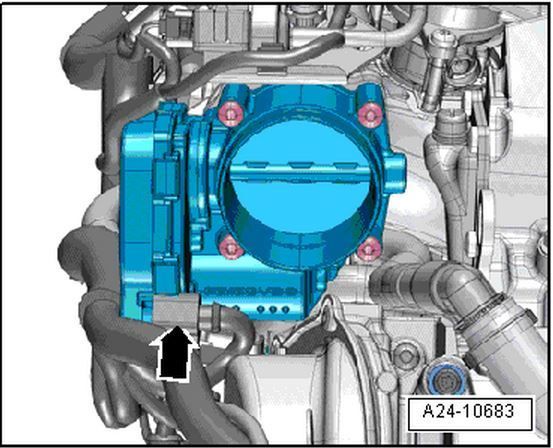
    Unplug electrical connector arrow at throttle valve module -J338-.


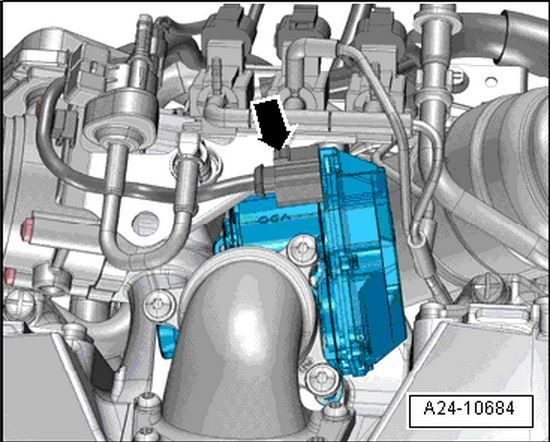
    Unplug electrical connector arrow at regulating flap control unit -J808-.


    Unplug electrical connectors 1, 2, 3.
    Note: Mark position of vacuum hoses for re-installation.
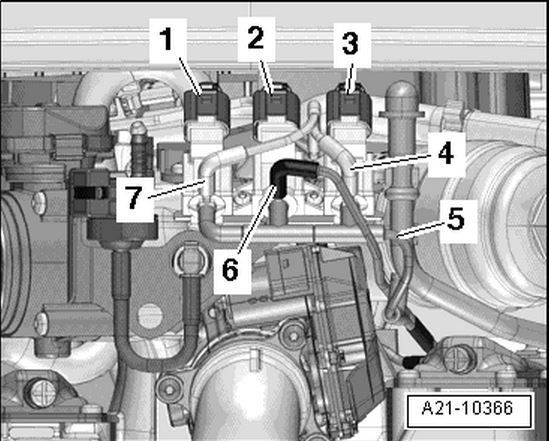


    Disconnect vacuum hoses 4...7.
    Unplug electrical connector 1 at intake air temperature sender -G42-/intake manifold pressure sender -G71-.
    Note: Disregard arrows.
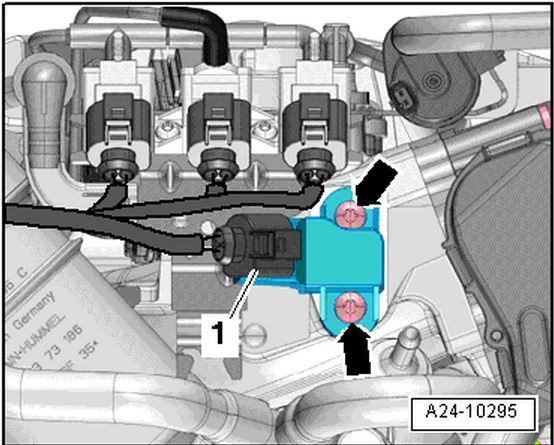


    If fitted, unplug electrical connector 3 and disconnect vacuum hoses 1 and 2.


    Move clear vacuum hose 1.
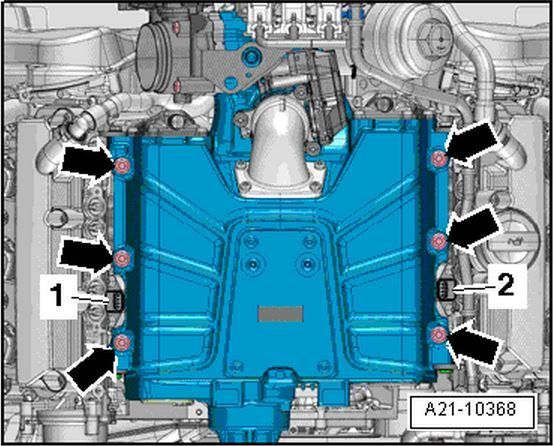
    Remove bolts -arrows-on both sides and detach cover/bracket


    Move clear vacuum hose 2 leading to brake servo at bracket 1.


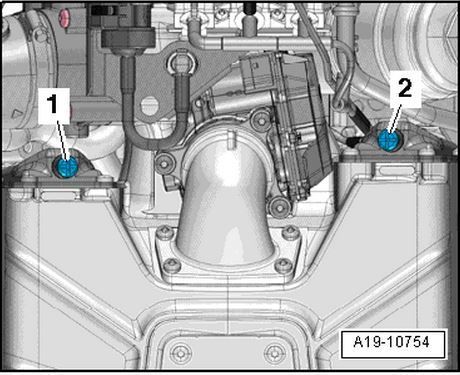
    Unplug electrical connectors -1- and -2-.


    Remove nuts -arrows- and lift off supercharger with charge air coolers.
    Tip* Place long 3/8 extensions thru the engine lifting rings to provide a good hand hold.
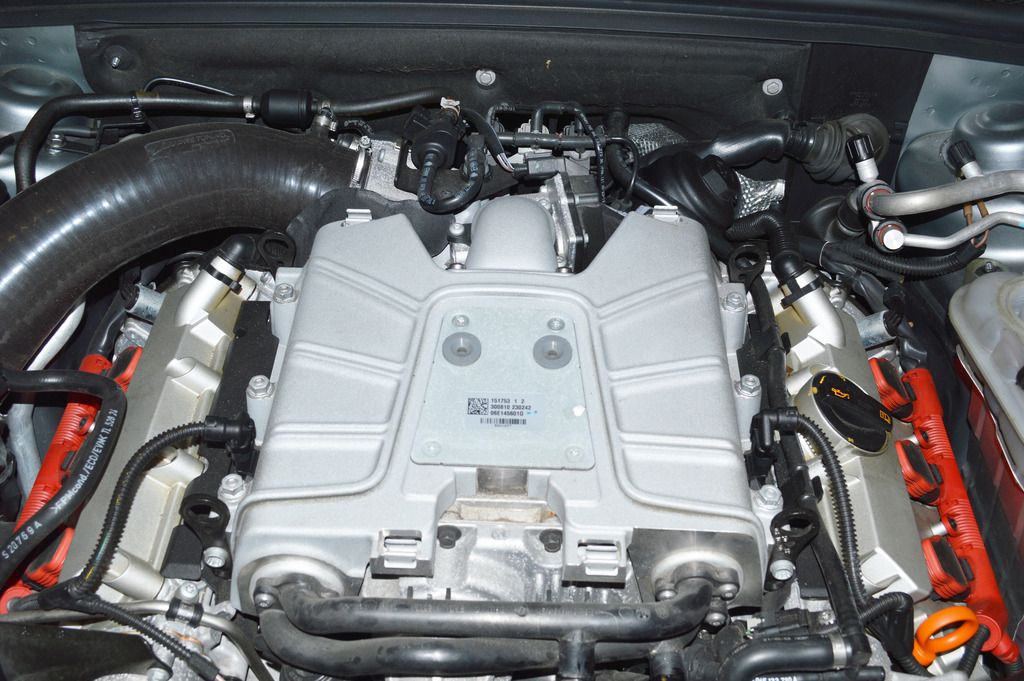


    Seal openings on supercharger and all relevant ducts and hoses of the charge air system with plugs from engine bung set -VAS 6122-.
    Detach noise insulation panels.

    Installing

    Installation is carried out in the reverse order; note the following:
    Tightening torques. „Supercharger - exploded view“
    Renew seals and/or gaskets.
    Hose connections and air pipes and hoses must be free of oil and grease before assembly.
    Secure all hose connections with the correct type of hose clips (same as original equipment)> Electronic parts catalogue.
    To secure the air hoses at their connections, spray rust remover onto the worm thread of the used hose clips before installing.
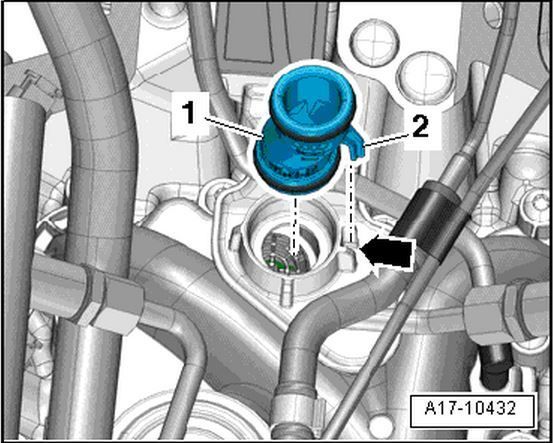
    Ensure that crankcase breather connection is positioned correctly > Fig. when fitting supercharger.
    Install poly V-belt for supercharger
    Fill up with coolant


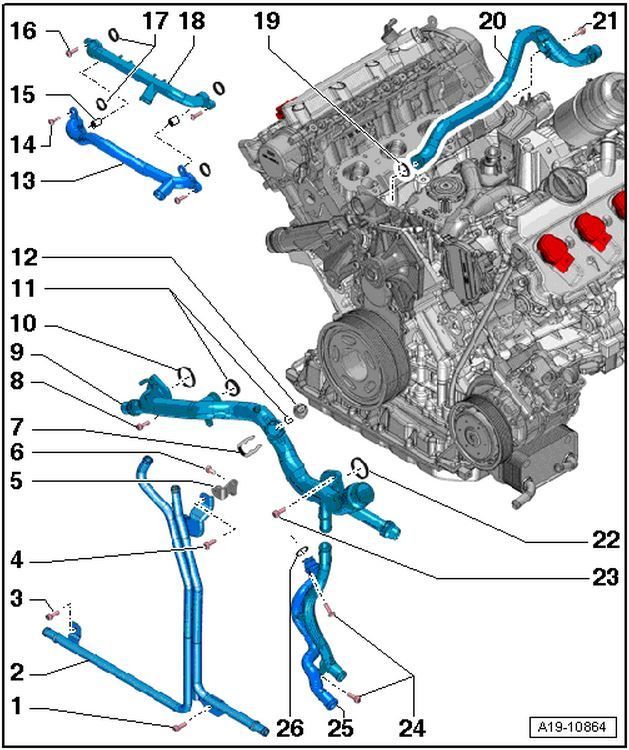
    1-Bolt
    9nm

    2-Coolant*pipes (front left).
    Removing and installing.

    3-Bolt
    9Nm

    4-Bolt
    9nm

    5-Bracket

    6-Bolt
    22Nm

    7-Retainingclip

    8-Bolt
    9Nm

    9-Coolant*pipe (front)
    Removing and installing.

    10-Seal
    Renew

    11-O-rings
    Renew

    12-Coolant*temperature sender -G62-
    Removing and installing.

    13-Coolant pipe (bottom) on supercharger
    Remove and install together with-item 17-.

    14-Bolt
    5Nm

    15-Dowel sleeve
    2x

    16-Bolt
    5Nm

    17-Seals
    Renew

    18-Coolant pipe (top) on supercharger
    Remove and install together with -item 11.

    19-O-ring
    Renew

    20-Coolant*pipe (top)
    Removing and installing .

    21-Bolt
    9*Nm

    22-Seal
    Renew

    23-Bolt.
    9Nm

    24- Bolts.
    9Nm

    25- Coolant*pipes (left-side)
    Removing and installing.

    26- O-ring
    Renew

    Coolant Pipes Remove and Replace
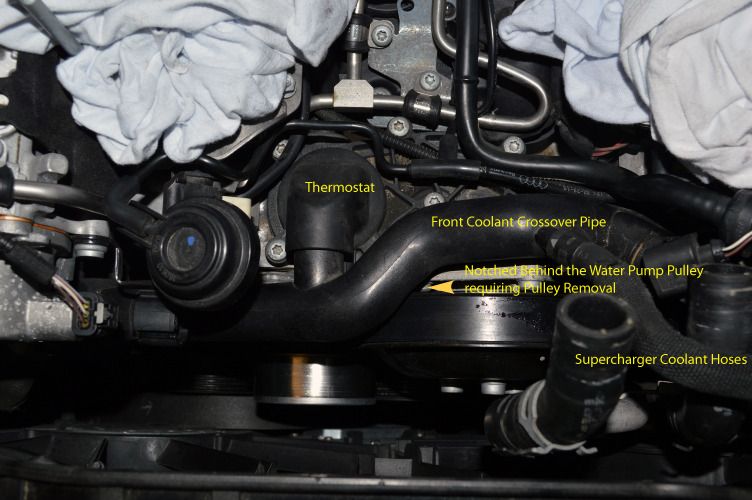


    Removing and installing coolant pipe (front)

    Special tools and workshop equipment required Pin Wrench 3212
    Tip* You must remove the water pump pulley to remove the front coolant hose out of the thermostat. I bought a Pin Wrench off Amazon for Audi and VW. $14
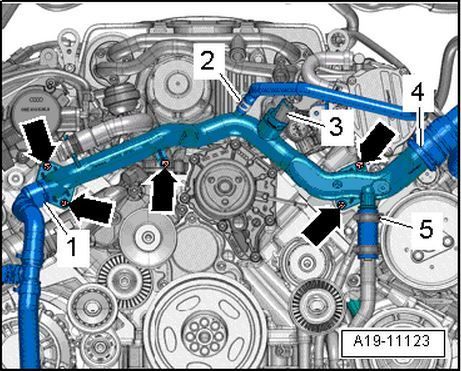


    Removing
    Drain*coolant*.*(or on vehicles equipped with*continued*coolant*circulation*pump -V51- remove*continued*coolant*circulation*pump*.).
    Remove air duct -arrow-.
    Remove coolant pipes (front left)
    Remove poly V-belt:
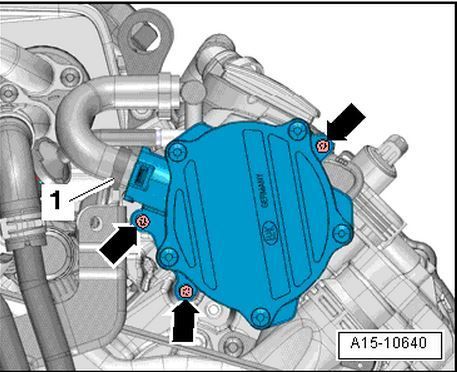
    Remove vacuum pump>Rep. gr.47.
    *Tip 3 bolts you can then flip it up out of the way.
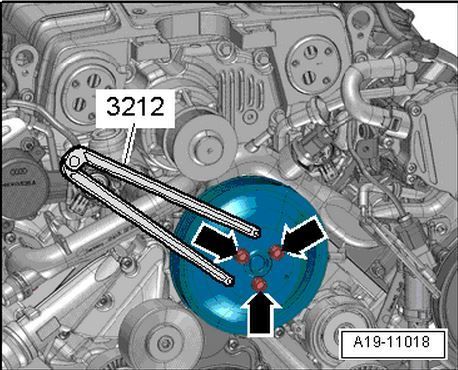
    Remove bolts for Coolant pump pulley (counterhold with pin wrench -3212-).
    Detach poly-V-belt pulley.


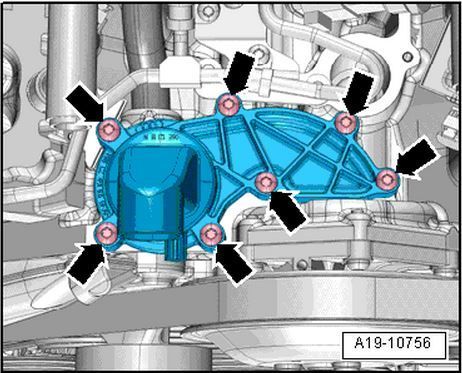
    Since we are not removing the coolant pipe all the way this is where we remove the 5 bolts holding the coolant pipe into the thermostat housing.
    Unplug electrical connector -3- at coolant temperature sender -G62-.
    Lift retaining clips and disconnect coolant hoses -1 and 4-.
    Release hose clip-2-and detach coolant hose (top).
    Loosen hose clip-5-.
    Unscrew bolts-arrows-and remove*coolant*pipe*(front)


    Installation is carried out in the reverse order; note the following:
    Tightening torques. „Coolant pipes - exploded view“
    Note
    Renew seals and O-rings.
    Secure all hose connections with the correct type of hose clips (same as original e.~uipment)>*Electronic parts catalogue.
    Clean or smoothen sealing surfaces for seals and O-rings.
    Lubricate seals and O-rings with coolant and slide onto coolant pipe.
    Connect coolant hose with plug-in connector>Fig..
    Install coolant pipes (left-side)..
    Install air conditioner compressor>Rep. gr.87.
    Install poly V-belt pulley for coolant pump..
    Install vacuum pump>Rep. gr.47.
    Install poly V-belt:
    „Removing and installing poly V-belt - vehicles with hydraulic power steering“.
    „Removing and installing poly V-belt - vehicles with electromechanical power steering“.
    Install coolant pipes (front left)..
    Install continued coolant circulation pump -V51-..

    Fill up with coolant:


    1-Bolt
    9Nm

    2-Bolt
    20Nm

    3-Poly V-belt pulley for coolant pump

    4-Coolant pump
    With seal
    Removing and installing.

    5-Bolt
    9Nm

    6-Bolt
    Tightening torque>Item

    7-Washer

    8-Idler roller for poly V-belt

    9-Connection
    For coolant hose

    10-Gasket
    Renew

    11-Gasket
    Renew

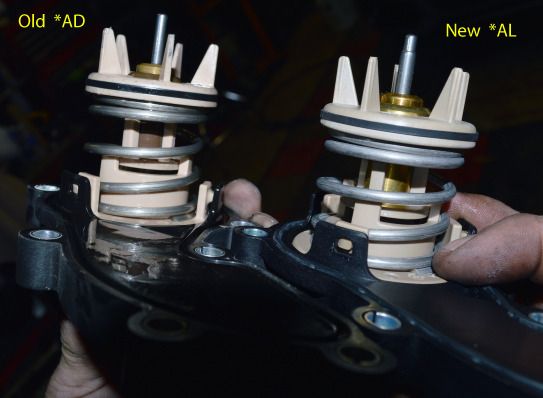
    12-Thermostat

    13-Bolt
    9*Nm

    14 -Coolant valve for cylinder head -N489-

    Thermostat Remove and Replace

    Checking Thermostat

    Heat removed thermostat in water bath.

    Starts to open
    Fully open
    Opening travel
    approx. 87 °C
    approx. 102 °C*1)
    at least 8 mm
    1)*Cannot be tested.


    COOLANT FILL and BLEED
    Place a cloth underneath to catch escaping coolant.
    Tip* A mechanical impact driver with a #3 phillips is best for loosing the bleed screws.
    2000 rpm is required for coolant to be forced into the supercharger and heater core.

    Open bleeder screws -1-and-2- one after the other until coolant flows out.

    Close bleeder screws.


    Pull seal off plenum chamber partition panel.

    Remove plenum chamber cover >Rep. gr.50.


    Release coolant hose going to heat exchanger and pull back hose until coolant flows out at bleeder hole -arrow- in coolant hose.

    Push coolant hose back onto connection and*secure*with spring-type hose clip.

    On*vehicles*with auxiliary heater, switch heater on (for about 30 seconds) and then off again.

    Tighten filler cap on expansion tank, making sure it engages.

    Start engine.

    Set temperature to „HI“ for all zones and select lowest blower speed (= 0).

    Switch off air conditioner compressor (press AC button).

    LED in button should not light up.

    Run engine for 3 minutes at 2000*rpm.

    Allow engine to run at idling speed until two large coolant hoses at radiator become warm.

    Run engine for 2 minutes at 2000rpm.

    Switch off ignition and allow engine to cool down.

    Install noise insulation*>*Rep. gr.66.


    Check coolant level.

    The coolant level must be at the MAX marking when the engine is cold.


    The coolant level can be above the MAX marking when the engine is warm
    ket.com/albums/vv257/BRD-PREY/22_heater%20core%20bleed_zpse8npsmok.jpg[/IMG][/URL]
    IE Twin Scroll EFR 6758 Stage 3+, AquaMist WMI, Wagner Intercooler, 42DD 3" Cat_Back, APR HPFP, UM DSG stage 3, Race Hadlex, 034 Catch Can, MSS springs, Nuespeed ARB front rear, 034 Rear ARB links, 034 Rear Trailing arm bushings, 034 dogbone and mtrmts, Tyrosports deadbolt, OZ Racing Wheels, Michelin PS3, P3, Schroth Quick Fit Pro harness, Stoptech Rotors and SS Brakelines, Tyrolsport Caliper Guides and Hawk Racing pads.

  2. #2
    Veteran Member Four Rings bhvrdr's Avatar
    Join Date
    Jul 21 2004
    AZ Member #
    2873
    Location
    South Florida


    2018 Audi S5
    12.72 @ 108.85mph - 93 octane - +1565DA - Bone Stock
    11.68 @ 117mph - e30 octane - (-945DA) - jb4 only

    2013 Audi S5 DSG - Unitronic ECU & 034 TCU, 3.17pr
    11.07 at 123.62mph - draggy - 93 octane - (-407ft DA)
    Gone-
    '10 A4 Avant - '13 S5 #1 -- '16 A6 -- '15 S4 -- '09 A4 -- '04 S4 -- '06 A4 -- '03 A4 -- '00 A4

  3. #3
    Veteran Member Three Rings bronz's Avatar
    Join Date
    Sep 21 2006
    AZ Member #
    11884
    Location
    Lyons, IL

    awesome!!! thanks
    2014 Audi S4 DSG

  4. #4
    Veteran Member Four Rings Usa's Avatar
    Join Date
    Dec 23 2013
    AZ Member #
    136962
    My Garage
    B8 S4
    Location
    NY

    Wow, nice DIY!
    S4 (B8) DSG / Quartz Gray Metallic / VAG-COM / 3M Crystalline 70% sides 30% rear / Roc-Euro Intake / APR Stage II / Non-res Milltek / Alu Kreuz Stabilizer / Eurocode Front & Rear Sways & Endlinks / 19x9.5 AG M590 / PSS / RS4 Grill / P3 Gauge / Bilstein PSS10 / AMS Boost Cooler System / ENLAES Rear Spoiler & Diffuser / OSIR Front Splitter

  5. #5
    Veteran Member Four Rings AudBoost's Avatar
    Join Date
    Apr 05 2005
    AZ Member #
    5983
    Location
    Tampa, FL

    That's a serious write up! Nice job!
    2016 S6

  6. #6
    Veteran Member Three Rings brainpan's Avatar
    Join Date
    Apr 11 2010
    AZ Member #
    57457
    My Garage
    sk8 banana
    Location
    ontario

    A fuckin +
    Bryan

  7. #7
    Established Member Two Rings
    Join Date
    Aug 21 2012
    AZ Member #
    99062
    Location
    Boston, MA

    Wow! I wished shop manual is like this!

  8. #8
    Veteran Member Four Rings BoostEasy's Avatar
    Join Date
    Aug 07 2013
    AZ Member #
    120502
    My Garage
    2014 S5, S-tronic
    Location
    NE

    Very nice write up! Thanks!

    I must be half-asleep as when I started reading this, I thought it was for t-stat AND water pump replacement. Then the sickening realization hit me that you literally spent 8 hours removing and replacing a t-stat. I'm not saying you work slow, it's just an overly-complicated beast to work on.

    No wonder some people were reporting $1000 repair bills from the dealer to change it.

    Nice job!
    2014 S5 S-tronic. Phantom Black, 19" AG M590s, Akebono Pads, OEM RS5 Grill, Alu-Kreuz, Black Alcantara, MMI, Quattro Sport Diff, B&O sound, side assist.
    2011 335xi (gone)
    2008 335xi (gone)

  9. #9
    Wow!!! I was thinkin bout changing my pcv valve myself this summer. This will help a lot. Thank u!!!


    Sent from my iPhone using Tapatalk

  10. #10
    Veteran Member Three Rings tanklee's Avatar
    Join Date
    Dec 31 2004
    AZ Member #
    4674
    Location
    NJ / Miami

    good write up.

    it takes me about 2hrs to do a thermostat. and i dont take the front coolant pipe, water pump pulley, belt, or vacuum pump off.
    2000 B5 A4 Quattro
    2000 B5 S4 6spd Stage 3
    2014 B8.5 S4 DSG
    2005 B6 A4 Quattro USP

  11. #11
    Veteran Member Four Rings shadycrew31's Avatar
    Join Date
    May 27 2013
    AZ Member #
    115971
    Location
    West Chester, PA

    Best DIY in the B8 section!

  12. #12
    Veteran Member Four Rings Vogz's Avatar
    Join Date
    Jul 17 2010
    AZ Member #
    61526
    My Garage
    996 Turbo
    Location
    Batavia, IL

    Subbed! Thanks!
    SOLD - 2011 S4 Sprint Blue 6MT Ti - GIAC Stage 2 - Sachs XTend clutch - AWE exhaust - Bilstein B12 suspension - strat short shifter
    [email protected] 1.85 60' (stock)
    [email protected] 1.74 60' (stage 2 - 93 octane)
    [email protected] 1.71 60' (stage 2 - 104 octane)

    2020 Tesla Model 3 Performance

    2003 Porsche 911 Turbo - SpeedTech, Cobb, Bilstein, H&R and TPC goodies
    11.69@123mph 1.82 60' (RWD on street tires)

  13. #13
    Veteran Member Four Rings o1turbo30v's Avatar
    Join Date
    Feb 06 2012
    AZ Member #
    87767
    My Garage
    Cars, guns, nuts and bolts
    Location
    Allentown, PA

    Quote Originally Posted by tanklee View Post
    good write up.

    it takes me about 2hrs to do a thermostat. and i dont take the front coolant pipe, water pump pulley, belt, or vacuum pump off.
    Then perhaps provide us your diy version........
    Stage 1 more than you RS3

  14. #14
    Established Member Two Rings
    Join Date
    Mar 05 2013
    AZ Member #
    110733
    My Garage
    18 TTRS, 09 Audi TTS, S5 Stage2, TT Mk1 Roadster
    Location
    Lakeland, FL

    Quote Originally Posted by BoostEasy View Post
    Very nice write up! Thanks!

    I must be half-asleep as when I started reading this, I thought it was for t-stat AND water pump replacement. Then the sickening realization hit me that you literally spent 8 hours removing and replacing a t-stat. I'm not saying you work slow, it's just an overly-complicated beast to work on.

    No wonder some people were reporting $1000 repair bills from the dealer to change it.

    Nice job!
    Dealer quote $1356, 6.5 hours labor.
    The water pump is actually easier.
    IE Twin Scroll EFR 6758 Stage 3+, AquaMist WMI, Wagner Intercooler, 42DD 3" Cat_Back, APR HPFP, UM DSG stage 3, Race Hadlex, 034 Catch Can, MSS springs, Nuespeed ARB front rear, 034 Rear ARB links, 034 Rear Trailing arm bushings, 034 dogbone and mtrmts, Tyrosports deadbolt, OZ Racing Wheels, Michelin PS3, P3, Schroth Quick Fit Pro harness, Stoptech Rotors and SS Brakelines, Tyrolsport Caliper Guides and Hawk Racing pads.

  15. #15
    Established Member Two Rings
    Join Date
    Mar 05 2013
    AZ Member #
    110733
    My Garage
    18 TTRS, 09 Audi TTS, S5 Stage2, TT Mk1 Roadster
    Location
    Lakeland, FL

    Quote Originally Posted by tanklee View Post
    good write up.

    it takes me about 2hrs to do a thermostat. and i dont take the front coolant pipe, water pump pulley, belt, or vacuum pump off.
    Yea, show me the video!!! since I couldn't get the thermostat out with the front coolant loose and lifting the thermostat and wigging. The water pump pulley blocked the coolant pipe from coming clear of the thermostat. So good on yea, I follow the factory service recommended procedures when available!
    IE Twin Scroll EFR 6758 Stage 3+, AquaMist WMI, Wagner Intercooler, 42DD 3" Cat_Back, APR HPFP, UM DSG stage 3, Race Hadlex, 034 Catch Can, MSS springs, Nuespeed ARB front rear, 034 Rear ARB links, 034 Rear Trailing arm bushings, 034 dogbone and mtrmts, Tyrosports deadbolt, OZ Racing Wheels, Michelin PS3, P3, Schroth Quick Fit Pro harness, Stoptech Rotors and SS Brakelines, Tyrolsport Caliper Guides and Hawk Racing pads.

  16. #16
    Veteran Member Four Rings DGVR6's Avatar
    Join Date
    Aug 03 2014
    AZ Member #
    270569
    Location
    Queens

    You've won the B8S4 section.
    C7.5 S6 P+ Mythos Black
    [email protected] 103oct Stage 2 100 File/RACECHIP
    [email protected] 100oct Stage 1 93 File
    APR Tuned Stage 2 ECU/TCU | Roc Euro | Catless Downpipes | Milltek Resonated
    Previous
    B8 S4 [email protected] 93/e85 93 map - Unitronic Stage 2 B8 S4 6MT

  17. #17
    Veteran Member Three Rings
    Join Date
    Jan 02 2011
    AZ Member #
    68958
    My Garage
    2018 4M Q7, 996 Turbo, 2014 Q5 3.0T
    Location
    MN

    Somebody get this guy an Audizine shirt. Best DIY yet.

    Kudos sir
    2018 Audi Q7 3.0T: Glacier White Metallic/Black, Prem +, Driver Asst. Pkg, Vision Pkg, 20" 10-spokes - Dadwagon 3.0
    2014 Audi Q5 3.0T: Moonlight Blue/Black, S-Line, Sport Interior, Nav, Adv Key, VAG-com's, 034 Intake tube Wife's Daily Driver - Momwagon 3.0
    2001 996 Turbo: Black/Black, Tip, Diamond Black BBS RS-GT's - Summer Car

  18. #18
    Veteran Member Four Rings AudBoost's Avatar
    Join Date
    Apr 05 2005
    AZ Member #
    5983
    Location
    Tampa, FL

    OP are you a member of Audi Sport of Tampa? Was this Pam's car?
    2016 S6

  19. #19
    Veteran Member Four Rings mrmomo313's Avatar
    Join Date
    Oct 27 2010
    AZ Member #
    66266
    My Garage
    Audi RS3, Redeye Hellcat
    Location
    Michigan

    Thanks for the write up. Will keep this bookmarked in case mine decides to fail!

  20. #20
    Veteran Member Three Rings
    Join Date
    Jul 29 2014
    AZ Member #
    269083
    My Garage
    2016 Audi A3 2.0T
    Location
    Clearwater/Florida

    Quote Originally Posted by derek.kritz View Post
    Wow!!! I was thinkin bout changing my pcv valve myself this summer. This will help a lot. Thank u!!!


    Sent from my iPhone using Tapatalk
    Replace your thermostat while doing it. You're 70% there already.

  21. #21
    Veteran Member Three Rings
    Join Date
    Jul 29 2014
    AZ Member #
    269083
    My Garage
    2016 Audi A3 2.0T
    Location
    Clearwater/Florida

    Great write up! Thanks for posting


  22. #22
    Established Member Two Rings
    Join Date
    Mar 05 2013
    AZ Member #
    110733
    My Garage
    18 TTRS, 09 Audi TTS, S5 Stage2, TT Mk1 Roadster
    Location
    Lakeland, FL

    Quote Originally Posted by AudBoost View Post
    OP are you a member of Audi Sport of Tampa? Was this Pam's car?
    Yes, I am and yes it was!
    IE Twin Scroll EFR 6758 Stage 3+, AquaMist WMI, Wagner Intercooler, 42DD 3" Cat_Back, APR HPFP, UM DSG stage 3, Race Hadlex, 034 Catch Can, MSS springs, Nuespeed ARB front rear, 034 Rear ARB links, 034 Rear Trailing arm bushings, 034 dogbone and mtrmts, Tyrosports deadbolt, OZ Racing Wheels, Michelin PS3, P3, Schroth Quick Fit Pro harness, Stoptech Rotors and SS Brakelines, Tyrolsport Caliper Guides and Hawk Racing pads.

  23. #23
    Veteran Member Four Rings AudBoost's Avatar
    Join Date
    Apr 05 2005
    AZ Member #
    5983
    Location
    Tampa, FL

    Quote Originally Posted by Brd.Prey View Post
    Yes, I am and yes it was!
    I figured as much. Wanted to swing by and lend a hand but got tied up with family duties.
    2016 S6

  24. #24
    Veteran Member Three Rings tanklee's Avatar
    Join Date
    Dec 31 2004
    AZ Member #
    4674
    Location
    NJ / Miami

    yea, ill try and see if i can get a diy up the next time i do it. not trying to one up anyone or take anything away from OPs post (good job OP, i dont think i have the time and patience to write all that up!) it's kinda hard for me as im doing it on flat rate and its going to take time to document every step.

    edit: or maybe ill just document the steps around the front coolant pipe, water pump pulley, and vacuum pump.
    Last edited by tanklee; 03-16-2015 at 12:43 PM.
    2000 B5 A4 Quattro
    2000 B5 S4 6spd Stage 3
    2014 B8.5 S4 DSG
    2005 B6 A4 Quattro USP

  25. #25
    Veteran Member Four Rings BoostEasy's Avatar
    Join Date
    Aug 07 2013
    AZ Member #
    120502
    My Garage
    2014 S5, S-tronic
    Location
    NE

    Quote Originally Posted by Brd.Prey View Post
    Yea, show me the video!!! since I couldn't get the thermostat out with the front coolant loose and lifting the thermostat and wigging. The water pump pulley blocked the coolant pipe from coming clear of the thermostat. So good on yea, I follow the factory service recommended procedures when available!
    I was wondering about this too. It LOOKS like the thermostat might possibly be able to come up and out with the coolant pipe in place but until you try it...

    Maybe a little "persuasion" with a long screw driver or small prybar could move the coolant pipe just enough to wiggle the t-stat out. But then again, I can see that plastic pipe cracking and ruining one's day!
    2014 S5 S-tronic. Phantom Black, 19" AG M590s, Akebono Pads, OEM RS5 Grill, Alu-Kreuz, Black Alcantara, MMI, Quattro Sport Diff, B&O sound, side assist.
    2011 335xi (gone)
    2008 335xi (gone)

  26. #26
    Veteran Member Three Rings tanklee's Avatar
    Join Date
    Dec 31 2004
    AZ Member #
    4674
    Location
    NJ / Miami

    Quote Originally Posted by BoostEasy View Post
    I was wondering about this too. It LOOKS like the thermostat might possibly be able to come up and out with the coolant pipe in place but until you try it...

    Maybe a little "persuasion" with a long screw driver or small prybar could move the coolant pipe just enough to wiggle the t-stat out. But then again, I can see that plastic pipe cracking and ruining one's day!
    bingo. you take out the 2 left t30 torxs bolts on the coolant pipe, and loosen the 2 right t30 torx bolts (all the way until the last couple threads) on the coolant pipe. you loosen the 3 pulley triple square bolts until the last thread or two, and just pry the pulley and coolant pipe away from thermostat as far is it goes. its a real tight fit, but with a little wiggling, it comes right out. loosening the bolts til the last couple threads gives it just enough space to pull the thermostat out. havent broken a coolant pipe yet.
    2000 B5 A4 Quattro
    2000 B5 S4 6spd Stage 3
    2014 B8.5 S4 DSG
    2005 B6 A4 Quattro USP

  27. #27
    Veteran Member Three Rings
    Join Date
    Jan 29 2013
    AZ Member #
    108516
    My Garage
    2011 Q5 2.0, 124" HD Dyna Wide Glide
    Location
    Philadelphia, PA

    Sticky!!!!!
    2010 Phantom Black S4 Prestige DSG, Silver Nappa, APR stage 1, Milltek Non-res, AG M510s, BC Racing BR series coilovers

  28. #28
    Established Member Two Rings
    Join Date
    Mar 05 2013
    AZ Member #
    110733
    My Garage
    18 TTRS, 09 Audi TTS, S5 Stage2, TT Mk1 Roadster
    Location
    Lakeland, FL

    Quote Originally Posted by tanklee View Post
    bingo. you take out the 2 left t30 torxs bolts on the coolant pipe, and loosen the 2 right t30 torx bolts (all the way until the last couple threads) on the coolant pipe. you loosen the 3 pulley triple square bolts until the last thread or two, and just pry the pulley and coolant pipe away from thermostat as far is it goes. its a real tight fit, but with a little wiggling, it comes right out. loosening the bolts til the last couple threads gives it just enough space to pull the thermostat out. havent broken a coolant pipe yet.
    I had all 5 front crossover bolts removed! Thermostat unbolted and two of us couldn't get it out. Breaking the coolant pipe wasn't worth the risk.

    Flat rate is not an excuse for half rate!

    If you don't remove the crossover pipe how do you change the orings?
    This car had the thermostat replaced on recall in at 11,000 miles. Probably explains the nick on the supercharger intake sealing surface and the missing bolt on the vertical cooling pipes and loose screw on the thermostat where it's hard to reach. Oh yea and the punched PCV oring.

    Audi spends a lot of money to research and write repair manuals. To bad most people don't follow them. Makes you think now I know why most troubleshooting is done by Germany with car hooked up to the factory computer.

    Sorry for ranting but there is a good reason why I do my own maintenance. I don't cut corners to increase speed.
    IE Twin Scroll EFR 6758 Stage 3+, AquaMist WMI, Wagner Intercooler, 42DD 3" Cat_Back, APR HPFP, UM DSG stage 3, Race Hadlex, 034 Catch Can, MSS springs, Nuespeed ARB front rear, 034 Rear ARB links, 034 Rear Trailing arm bushings, 034 dogbone and mtrmts, Tyrosports deadbolt, OZ Racing Wheels, Michelin PS3, P3, Schroth Quick Fit Pro harness, Stoptech Rotors and SS Brakelines, Tyrolsport Caliper Guides and Hawk Racing pads.

  29. #29
    Quote Originally Posted by brad281 View Post
    Replace your thermostat while doing it. You're 70% there already.
    I have a 2010. 99% sure it was already done. But will do some more research to find out.


    Sent from my iPhone using Tapatalk

  30. #30
    Veteran Member Three Rings
    Join Date
    Jul 29 2014
    AZ Member #
    269083
    My Garage
    2016 Audi A3 2.0T
    Location
    Clearwater/Florida

    Quote Originally Posted by derek.kritz View Post
    I have a 2010. 99% sure it was already done. But will do some more research to find out.


    Sent from my iPhone using Tapatalk
    The car in question was done under recall at 11k miles and it went bad again at 45k. Just a good idea while you have it apart. The parts are cheap by comparison.

  31. #31
    Established Member Two Rings
    Join Date
    Mar 05 2013
    AZ Member #
    110733
    My Garage
    18 TTRS, 09 Audi TTS, S5 Stage2, TT Mk1 Roadster
    Location
    Lakeland, FL

    Quote Originally Posted by brad281 View Post
    The car in question was done under recall at 11k miles and it went bad again at 45k. Just a good idea while you have it apart. The parts are cheap by comparison.
    +1
    IE Twin Scroll EFR 6758 Stage 3+, AquaMist WMI, Wagner Intercooler, 42DD 3" Cat_Back, APR HPFP, UM DSG stage 3, Race Hadlex, 034 Catch Can, MSS springs, Nuespeed ARB front rear, 034 Rear ARB links, 034 Rear Trailing arm bushings, 034 dogbone and mtrmts, Tyrosports deadbolt, OZ Racing Wheels, Michelin PS3, P3, Schroth Quick Fit Pro harness, Stoptech Rotors and SS Brakelines, Tyrolsport Caliper Guides and Hawk Racing pads.

  32. #32
    Veteran Member Three Rings
    Join Date
    Jul 29 2014
    AZ Member #
    269083
    My Garage
    2016 Audi A3 2.0T
    Location
    Clearwater/Florida

    Quote Originally Posted by Brd.Prey View Post
    I had all 5 front crossover bolts removed! Thermostat unbolted and two of us couldn't get it out. Breaking the coolant pipe wasn't worth the risk.

    Flat rate is not an excuse for half rate!

    If you don't remove the crossover pipe how do you change the orings?
    This car had the thermostat replaced on recall in at 11,000 miles. Probably explains the nick on the supercharger intake sealing surface and the missing bolt on the vertical cooling pipes and loose screw on the thermostat where it's hard to reach. Oh yea and the punched PCV oring.

    Audi spends a lot of money to research and write repair manuals. To bad most people don't follow them. Makes you think now I know why most troubleshooting is done by Germany with car hooked up to the factory computer.

    Sorry for ranting but there is a good reason why I do my own maintenance. I don't cut corners to increase speed.
    +2

  33. #33
    Veteran Member Three Rings tanklee's Avatar
    Join Date
    Dec 31 2004
    AZ Member #
    4674
    Location
    NJ / Miami

    Quote Originally Posted by Brd.Prey View Post
    I had all 5 front crossover bolts removed! Thermostat unbolted and two of us couldn't get it out. Breaking the coolant pipe wasn't worth the risk.

    Flat rate is not an excuse for half rate!

    If you don't remove the crossover pipe how do you change the orings?
    This car had the thermostat replaced on recall in at 11,000 miles. Probably explains the nick on the supercharger intake sealing surface and the missing bolt on the vertical cooling pipes and loose screw on the thermostat where it's hard to reach. Oh yea and the punched PCV oring.

    Audi spends a lot of money to research and write repair manuals. To bad most people don't follow them. Makes you think now I know why most troubleshooting is done by Germany with car hooked up to the factory computer.

    Sorry for ranting but there is a good reason why I do my own maintenance. I don't cut corners to increase speed.
    haha fair enough. i am also the only one to touch my car, and who knows about the guy that replaced it before. you can slip in the o-rings without taking the pipe off. it might take some getting used to though. after doing it so many times, it becomes easier and you learn small tricks along the way.
    Last edited by tanklee; 03-16-2015 at 05:51 PM.
    2000 B5 A4 Quattro
    2000 B5 S4 6spd Stage 3
    2014 B8.5 S4 DSG
    2005 B6 A4 Quattro USP

  34. #34
    Veteran Member Four Rings drob23's Avatar
    Join Date
    Feb 25 2013
    AZ Member #
    110222
    Location
    MI

    Wow great thread OP!
    2013 S4 Monsoon Gray - S-Tronic - ADS
    Alu Kreuz - EC USS - H&R OE - Roc Euro - Milltek Resonated - JHM Test Pipes - SPC UCA - Apikol - 034 Mounts - Forgestar CF5V - ST-60 355mm BBK - JHM LW Rotors - AMS CPS - APR Stg 2/TCU

  35. #35
    Established Member Two Rings
    Join Date
    Mar 05 2013
    AZ Member #
    110733
    My Garage
    18 TTRS, 09 Audi TTS, S5 Stage2, TT Mk1 Roadster
    Location
    Lakeland, FL

    Thanks to everyone for all the props. I write my DIY as I want to find them. I usually post in the TT mk2 section of fourtitude. I found there 3.0t section lacking. I found the most useful info here so that is why I posted it here. The car is actually an 2011 S5 cab. Since the cab got the 3.0 in 2010 but the coupe didn't get it till 2013 the S5 section has very little people. The S4 crowd is more active.
    I have a DSG fluid filter DIY I can repost here if someone things they could use it.
    Ed
    IE Twin Scroll EFR 6758 Stage 3+, AquaMist WMI, Wagner Intercooler, 42DD 3" Cat_Back, APR HPFP, UM DSG stage 3, Race Hadlex, 034 Catch Can, MSS springs, Nuespeed ARB front rear, 034 Rear ARB links, 034 Rear Trailing arm bushings, 034 dogbone and mtrmts, Tyrosports deadbolt, OZ Racing Wheels, Michelin PS3, P3, Schroth Quick Fit Pro harness, Stoptech Rotors and SS Brakelines, Tyrolsport Caliper Guides and Hawk Racing pads.

  36. #36
    Senior Member Three Rings Sukks2bu's Avatar
    Join Date
    Mar 12 2013
    AZ Member #
    111232
    Location
    Milton Ontario

    Thanks op, this is what the AZ is all about.
    Sticky please
    2010 AUDI S4 DSG DRIVE SELECT UNITRONIC STAGE 2+

  37. #37
    Veteran Member Three Rings gringoloco2000's Avatar
    Join Date
    Oct 08 2011
    AZ Member #
    82254
    Location
    Orlando, FL

    1. Thank you man. Awesome DIY that I will need sooner or later.
    2. Audi, WTF on plastic thermostats?
    3. The first thermostat I changed was on a '77 Nova and it too me 20 minutes. Those where the days.

  38. #38
    Quote Originally Posted by brad281 View Post
    The car in question was done under recall at 11k miles and it went bad again at 45k. Just a good idea while you have it apart. The parts are cheap by comparison.
    Well then, yes will do then when apart. Good lookin.


    Sent from my iPhone using Tapatalk

  39. #39
    Veteran Member Four Rings Boris's Avatar
    Join Date
    Dec 20 2005
    AZ Member #
    9310
    Location
    District 7

    Quote Originally Posted by tanklee View Post
    good write up.

    it takes me about 2hrs to do a thermostat. and i dont take the front coolant pipe, water pump pulley, belt, or vacuum pump off.
    +1, although i couldnt do it in 2, but still this is not a write up for a DIY, this is crazy. no one takes the whole front off like this, just go in from the top.

    You're not saving any money doing it this way unless you make $10/hr , I dont think most could even do the job this way in 8 hours.

    to familiarize yourself with the car, or for fun, sure go for it, but it's clear this method goes through all this trouble, but you are STILL wriggling out the thermostat in a tight condition if your just loosening the coolant pipe and not take it clear off. your adding 5-7 hours for one part that is just tough.

    totally uneccessary, and I would urge any DIY'er to not follow this method as unless you are a very experienced tech you are in for a world of hurt doing it the full monty this way.
    I know because I dropped a screw and needed to then take off the whole front. totally uneccesary. ymmv

    AXA
    Turbo Villains

  40. #40
    Veteran Member Four Rings stereojorge's Avatar
    Join Date
    Oct 15 2013
    AZ Member #
    124988
    My Garage
    2014 Audi S4 P+ DSG, 2015 Audi SQ5 Prestige
    Location
    Tampa, Florida

    Quote Originally Posted by Boris View Post
    +1, although i couldnt do it in 2, but still this is not a write up for a DIY, this is crazy. no one takes the whole front off like this, just go in from the top.

    You're not saving any money doing it this way unless you make $10/hr , I dont think most could even do the job this way in 8 hours.

    to familiarize yourself with the car, or for fun, sure go for it, but it's clear this method goes through all this trouble, but you are STILL wriggling out the thermostat in a tight condition if your just loosening the coolant pipe and not take it clear off. your adding 5-7 hours for one part that is just tough.

    totally uneccessary, and I would urge any DIY'er to not follow this method as unless you are a very experienced tech you are in for a world of hurt doing it the full monty this way.
    I know because I dropped a screw and needed to then take off the whole front. totally uneccesary. ymmv
    So wait, are you saying the OPs elaborate and informative DIY is crazy, or the gentleman who said 2 hours is?


    Sent from my iPhone using Tapatalk
    '14 Misano Red S4/APR Stage II+ DP ECU+TCU & UC/187mm Crank & AWE 57.55mm SC Pulleys/CMD Charge Chamber Intake/KW V1 Coilovers/EuroCode Sway Bars & AluKreuz/CR-15/034 Trans Mount/Apikol Rear Diff Mount/ECS Rear Diff Carrier Mounts/CMD Test Pipes/AWE Reso.Downpipes/AWE Track Exhaust 102mm Tips/Vossen HF-3 19" x 9.5"/Michelin PS4S'/StopTech Drilled Rotors/Akebono Euro Ceramic Pads/StopTech SS Lines

    Also: 2015 SQ5 Prestige | 2003 A4 Avant Quattro 6MT

    Previous: 2010 S4 P+ | 2008 A4 S-Line

Bookmarks

Posting Permissions

  • You may not post new threads
  • You may not post replies
  • You may not post attachments
  • You may not edit your posts
  •  


    © 2001-2025 Audizine, Audizine.com, and Driverzines.com
    Audizine is an independently owned and operated automotive enthusiast community and news website.
    Audi and the Audi logo(s) are copyright/trademark Audi AG. Audizine is not endorsed by or affiliated with Audi AG.