Audizine - An Automotive Enthusiast Community

Results 1 to 22 of 22
  1. #1
    Registered User Four Rings Hugh@EuropaParts's Avatar
    Join Date
    Aug 22 2010
    AZ Member #
    63043
    Location
    Piscataway, NJ

    :: EuropaParts.com :: B7 2.0T Vacuum Pump Failure / Issues

    Guest-only advertisement. Register or Log In now!
    The B7 finally had the vacuum pump go so it was only right that we wrote a short blog article about it.


    Audi VW 2.0T FSI Vacuum Pump Failure


    VACUUM PUMP (2.0T)
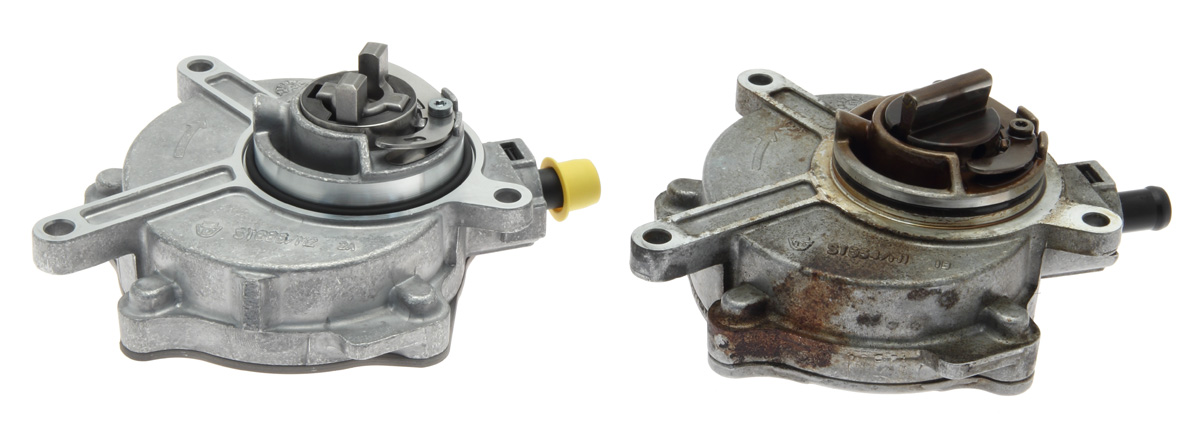


    VACUUM HOSE (A4 B7 2.0T)

    Last edited by Hugh@EuropaParts; 01-29-2015 at 09:28 AM.

  2. #2
    Registered User Four Rings Hugh@EuropaParts's Avatar
    Join Date
    Aug 22 2010
    AZ Member #
    63043
    Location
    Piscataway, NJ

    H2Oi Beach pic...


  3. #3
    Veteran Member Four Rings Audibot's Avatar
    Join Date
    May 20 2010
    AZ Member #
    59252
    Location
    Maryland

    Thanks for the informative post, Hugh. Are the parts interchangeable between 6MT and Tiptronic vehicles?

  4. #4
    Registered User Four Rings Hugh@EuropaParts's Avatar
    Join Date
    Aug 22 2010
    AZ Member #
    63043
    Location
    Piscataway, NJ

    Quote Originally Posted by Audibot View Post
    Thanks for the informative post, Hugh. Are the parts interchangeable between 6MT and Tiptronic vehicles?
    Yes, the transmission has nothing to do with the pump. Same exact part for both.

  5. #5
    Veteran Member Four Rings Audibot's Avatar
    Join Date
    May 20 2010
    AZ Member #
    59252
    Location
    Maryland

    Excellent to know. I tried the JB Weld fix for that part going into the pump and noticed no change. And my car always have the revs flop around when switching between neutral and gear. Never really attributed it to anything specifically.

  6. #6
    Registered User Four Rings Hugh@EuropaParts's Avatar
    Join Date
    Aug 22 2010
    AZ Member #
    63043
    Location
    Piscataway, NJ

    Quote Originally Posted by Audibot View Post
    Excellent to know. I tried the JB Weld fix for that part going into the pump and noticed no change. And my car always have the revs flop around when switching between neutral and gear. Never really attributed it to anything specifically.
    I noticed that the elbow fit much better on the new pump as well...

  7. #7
    Veteran Member Four Rings Audibot's Avatar
    Join Date
    May 20 2010
    AZ Member #
    59252
    Location
    Maryland

    Nice. I should get this when I'm not broke... oh, wait, I don't know when that's gonna be

  8. #8
    Veteran Member Four Rings jsandor91's Avatar
    Join Date
    Jun 10 2011
    AZ Member #
    76682
    My Garage
    dead hookers
    Location
    South Jersey

    This hits close to home for Hugh....
    Quartz Grey B7 A4 Quattro 6MT
    Maestro + Epy Tuned / GTX2867r / S3's / Spintech Non-Resonated 3 Inch Exhaust / Cold Side Synapse DV / TR18 + 2.5" Piping / Hpfp S1 Pump
    Bi-Xenon retrofit + Fly's leds / ST Coils + Rsb / 18x9.5 Miro 111's
    Dat Der Build Thread
    Coming Soon: Boost Manager +, Drakes Performance Stage V Clutch

  9. #9
    Registered User Four Rings Hugh@EuropaParts's Avatar
    Join Date
    Aug 22 2010
    AZ Member #
    63043
    Location
    Piscataway, NJ

    Quote Originally Posted by jsandor91 View Post
    This hits close to home for Hugh....
    Jim... do you see where mine was leaking from?

  10. #10
    Veteran Member Four Rings fly300kts's Avatar
    Join Date
    Oct 16 2008
    AZ Member #
    34255
    My Garage
    03 Golf GTI - 03 Golf 2.0l - 04 Golf 2.0L
    Location
    South Florida - Ft Lauderdale

    Hugh

    DO you know if the fitting design making noise has been upgraded?

    Phil

  11. #11
    Registered User Four Rings Hugh@EuropaParts's Avatar
    Join Date
    Aug 22 2010
    AZ Member #
    63043
    Location
    Piscataway, NJ

    Quote Originally Posted by fly300kts View Post
    Hugh

    DO you know if the fitting design making noise has been upgraded?

    Phil
    The are exactly the same but it felt like it fit a lot more snug. I also used a regular clamp on it which tightened things up.

  12. #12
    Senior Member Three Rings typeslone's Avatar
    Join Date
    May 09 2011
    AZ Member #
    75222
    My Garage
    06 A4Q 2.0T, 91 GTI VR6 Drag car
    Location
    North Jersey

    Quote Originally Posted by fly300kts View Post
    Hugh

    DO you know if the fitting design making noise has been upgraded?

    Phil
    I've installed a few updated vacuum pumps on these cars and I have not noticed the noise that yours used to make before you resealed that fitting. My daily drive has the updated pump and doesn't make any noise at all.
    91 GTI VR6 - all motor madness 12.62@106mph and dropping.....
    06 A4Q 2.0T - Revo Stg2/APR HPFP/034 HFC/TT Downpipe/EuropaParts Exhaust/Eibach Springs/Bilstein Sport dampers/RS4 Rear Swaybar/Fluidampr/RS4 engine mounts
    10 WRX hatchback - Torqued performance Stg1/Perrin/Whiteline/Enkei BR7/The wifes daily is faster than mine!

    Caste Systems Performance
    Lugtronic

  13. #13
    Senior Member Three Rings typeslone's Avatar
    Join Date
    May 09 2011
    AZ Member #
    75222
    My Garage
    06 A4Q 2.0T, 91 GTI VR6 Drag car
    Location
    North Jersey

    9 out 10 B7's most likely have a leaky pump, it is a very easy part to change. With the correct tools you should be in and out in 30 minutes, the B7 forum needs to stop being intimidated when working on the back of the 2.0T engine. You need a small 1/4" ratcheting bit driver with a T30 torx bit, a small 1\4" ratchet with a 1" extension and a T30 bit, a shop towel and some brakekleen, I prefer wurth brand because its free at my job. I have a snap-on/blue point bit driver but the $9 1/4" bit driver kit from the lowes/home depot that comes with the bits will also work fine.

    I have no pictures but this is the process. Remove the brake booster hose that connects to the plastic fitting on the side of the vac pump and put off to the side. Unclip the wiring harness and connectors (N205 valve, HPFP and fuel pressure sensor) in the area and swing them away to give you more room. There are 3 T30 bolts holding on the pump. The top bolt requires the ratchet and extension to remove. The bolt closer to the fuel pump side of the motor and the one on the bottom requires the bit driver. Remove those 3 bolts, keep in mind the bolt on the bottom is different than the others (it was on my motor) and also holds on a wiring ground bracket. Swing that bracket to the side, you should be able to pull the pump back enough to clear the motor and then wiggle it up and out from the firewall area. Take your shop rag and brakekleen and clean up and oil that spilled, as well as clean up behind the motor where the old pump was leaking. Then take the new pump, clock the tabs on it so it will slide into the opening on your intake camshaft. Once the tabs fit into the intake cam, the pump will slide right in. Spin the pump so the 3 bolt holes line up, then tighten everything up, remembering to attach the ground wiring bracket. Reattach the wiring you disconnected, reconnect the booster hose and voila you are finished.
    91 GTI VR6 - all motor madness 12.62@106mph and dropping.....
    06 A4Q 2.0T - Revo Stg2/APR HPFP/034 HFC/TT Downpipe/EuropaParts Exhaust/Eibach Springs/Bilstein Sport dampers/RS4 Rear Swaybar/Fluidampr/RS4 engine mounts
    10 WRX hatchback - Torqued performance Stg1/Perrin/Whiteline/Enkei BR7/The wifes daily is faster than mine!

    Caste Systems Performance
    Lugtronic

  14. #14
    Veteran Member Four Rings billyhoyle's Avatar
    Join Date
    Jul 29 2010
    AZ Member #
    62011
    My Garage
    2007 GSXR-600, 1977 GS750, mice
    Location
    Calgary, Alberta

    Hugh, I was just looking at the vacuum pump on your site and noticed there are two seals listed. One is 53mm and the other is 56mm. Which one is correct?? One seal says it's for pump with P/N ending in E, and the other one is for pumps with P/N ending in F and G, but the latest revision is H...I'm guessing the F/G seal (56mm) is the correct one for the H pump, but would like to verify.

    http://www.europaparts.com/vacuum-pump-06d145100h.html
    2005 B7 A4 2.0T | Brilliant Red | 6MT

  15. #15
    Registered User Four Rings Hugh@EuropaParts's Avatar
    Join Date
    Aug 22 2010
    AZ Member #
    63043
    Location
    Piscataway, NJ

    Quote Originally Posted by billyhoyle View Post
    Hugh, I was just looking at the vacuum pump on your site and noticed there are two seals listed. One is 53mm and the other is 56mm. Which one is correct?? One seal says it's for pump with P/N ending in E, and the other one is for pumps with P/N ending in F and G, but the latest revision is H...I'm guessing the F/G seal (56mm) is the correct one for the H pump, but would like to verify.

    http://www.europaparts.com/vacuum-pump-06d145100h.html
    The pump comes with the seal if I'm not mistaken... those are there as related products.

  16. #16
    Veteran Member Four Rings billyhoyle's Avatar
    Join Date
    Jul 29 2010
    AZ Member #
    62011
    My Garage
    2007 GSXR-600, 1977 GS750, mice
    Location
    Calgary, Alberta

    Ah, well that's easy then. Thanks.
    2005 B7 A4 2.0T | Brilliant Red | 6MT

  17. #17
    Established Member Two Rings
    Join Date
    Jul 13 2014
    AZ Member #
    263806
    My Garage
    2013 Jeep Wrangler unlimited
    Location
    New Tecumseth, Ontario Canada

    Quote Originally Posted by typeslone View Post
    9 out 10 B7's most likely have a leaky pump, it is a very easy part to change. With the correct tools you should be in and out in 30 minutes, the B7 forum needs to stop being intimidated when working on the back of the 2.0T engine. You need a small 1/4" ratcheting bit driver with a T30 torx bit, a small 1\4" ratchet with a 1" extension and a T30 bit, a shop towel and some brakekleen, I prefer wurth brand because its free at my job. I have a snap-on/blue point bit driver but the $9 1/4" bit driver kit from the lowes/home depot that comes with the bits will also work fine.

    I have no pictures but this is the process. Remove the brake booster hose that connects to the plastic fitting on the side of the vac pump and put off to the side. Unclip the wiring harness and connectors (N205 valve, HPFP and fuel pressure sensor) in the area and swing them away to give you more room. There are 3 T30 bolts holding on the pump. The top bolt requires the ratchet and extension to remove. The bolt closer to the fuel pump side of the motor and the one on the bottom requires the bit driver. Remove those 3 bolts, keep in mind the bolt on the bottom is different than the others (it was on my motor) and also holds on a wiring ground bracket. Swing that bracket to the side, you should be able to pull the pump back enough to clear the motor and then wiggle it up and out from the firewall area. Take your shop rag and brakekleen and clean up and oil that spilled, as well as clean up behind the motor where the old pump was leaking. Then take the new pump, clock the tabs on it so it will slide into the opening on your intake camshaft. Once the tabs fit into the intake cam, the pump will slide right in. Spin the pump so the 3 bolt holes line up, then tighten everything up, remembering to attach the ground wiring bracket. Reattach the wiring you disconnected, reconnect the booster hose and voila you are finished.

    The third bottom screw appears to be an Allan key screw. Number 4 wouldn't work and number 5 was too big. Couldn't get it off. Pissed me off.

    Everyone is saying there's 3 T30 screws. Am I missing something ?


    Sent from my iPhone using Tapatalk

  18. #18
    Registered User Four Rings Hugh@EuropaParts's Avatar
    Join Date
    Aug 22 2010
    AZ Member #
    63043
    Location
    Piscataway, NJ

    Quote Originally Posted by new_era_inc View Post
    The third bottom screw appears to be an Allan key screw. Number 4 wouldn't work and number 5 was too big. Couldn't get it off. Pissed me off.

    Everyone is saying there's 3 T30 screws. Am I missing something ?


    Sent from my iPhone using Tapatalk
    Mine was pretty straight forward and I know all of the hardware was exactly the same.

  19. #19
    Established Member Two Rings
    Join Date
    Jul 13 2014
    AZ Member #
    263806
    My Garage
    2013 Jeep Wrangler unlimited
    Location
    New Tecumseth, Ontario Canada

    Quote Originally Posted by Hugh@EuropaParts View Post
    Mine was pretty straight forward and I know all of the hardware was exactly the same.
    The 2 top screws were T30 the bottom one attached to a bracket was T27. After that it was pretty straight forward. Hopefully this will stop the leak.


    Sent from my iPhone using Tapatalk

  20. #20
    Established Member Two Rings
    Join Date
    Oct 18 2011
    AZ Member #
    82720
    My Garage
    2005 B6 A4 3.0 CVT, 2009 B6 A4 3.0 CVT
    Location
    Memphis

    Getting prepared to do this also. On the original post, it said to be really careful with the plastic nipple of the booster line or it would break, but no tip to keep from breaking it. Is there anything special to look out for, or to not do? The original post made it sound like there was a second nipple that you couldn't see, which would break.

    Thanks,

  21. #21
    Registered User Four Rings Hugh@EuropaParts's Avatar
    Join Date
    Aug 22 2010
    AZ Member #
    63043
    Location
    Piscataway, NJ

    Quote Originally Posted by wesalexleft View Post
    Getting prepared to do this also. On the original post, it said to be really careful with the plastic nipple of the booster line or it would break, but no tip to keep from breaking it. Is there anything special to look out for, or to not do? The original post made it sound like there was a second nipple that you couldn't see, which would break.

    Thanks,
    Yes, there is a nipple on the inside of the hose.

  22. #22
    Active Member One Ring
    Join Date
    Nov 06 2014
    AZ Member #
    293419
    Location
    Tyler, TX

    I replaced my vacuum pump probably 3 years ago. (While fishing for a piece of the cam follower. 🙄) Today my brake pedal won’t move when my engine is on or off. I’m trying to find the problem. I removed the line coming from the vacuum pump and there is no suction coming from the pump. Shouldn’t there be suction at all times?

Bookmarks

Posting Permissions

  • You may not post new threads
  • You may not post replies
  • You may not post attachments
  • You may not edit your posts
  •  


    © 2001-2025 Audizine, Audizine.com, and Driverzines.com
    Audizine is an independently owned and operated automotive enthusiast community and news website.
    Audi and the Audi logo(s) are copyright/trademark Audi AG. Audizine is not endorsed by or affiliated with Audi AG.