Audizine - An Automotive Enthusiast Community

Results 1 to 33 of 33
  1. #1
    Veteran Member Four Rings
    Join Date
    Aug 19 2013
    AZ Member #
    121375
    Location
    minnesota

    Rear Differential removal diy guide?

    Guest-only advertisement. Register or Log In now!
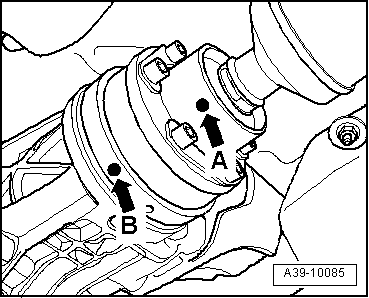
    Any one have a link to a write up for the rear diff removal? All I can see is 2 bolts to a bracket from under the car, the axles and the drive shaft.

  2. #2
    Veteran Member Four Rings old guy's Avatar
    Join Date
    Dec 28 2006
    AZ Member #
    14483
    My Garage
    '13 A5, '24 Tiguan SEL R-Line
    Location
    Western Maryland

    I don't have any DIY links but it is really pretty straight forward. The one thing that is very important is to mark the drive-shaft's relative position to the differential flange. Otherwise you may cause an imbalance that will cause you a lot of grief.

  3. #3
    Veteran Member Four Rings Spike00513's Avatar
    Join Date
    Mar 05 2013
    AZ Member #
    110766
    Location
    CA

    Workshop-manuals.com

    Bentley Service Manuals

    ELSAwin/ERwin

    ------------------

    Factory procedure is to clean out the flange threads when you remove it, by using a matching size thread tap. This is to clean out the old red loc-tite.

    Bolts are one-time use, but I've re-used them without problems.

    Be careful with the 3 bolts that attach the carrier/bushing piece to the diff itself. You may want to support the diff a little from underneath with a jack, while working on those bolts. The weight of the diff can mess up their angle, resulting in stripped threads on the diff. That is not fun, because repairing this damage entails diff removal and Time-Sert repair kit work.

    Also, note the orientation of the rubber vent on top. Don't stand the differential straight up or upside down, because fluid will come out of that vent and make a mess on your floor. Set it down on the floor in the same orientation that its in when installed.

  4. #4
    Veteran Member Four Rings
    Join Date
    Aug 19 2013
    AZ Member #
    121375
    Location
    minnesota

    Quote Originally Posted by old guy View Post
    I don't have any DIY links but it is really pretty straight forward. The one thing that is very important is to mark the drive-shaft's relative position to the differential flange. Otherwise you may cause an imbalance that will cause you a lot of grief.
    I assumed it was balanced in all directions. I did not mark the axle position when I did the clutch and I haven't had a vibration. But this is a good suggestion, I'll do that. I see the diff has a bracket of sorts, a large triangular shaped piece that has 2 bolts either side attaching it to the body, other than that I see the axle bolts, and the drive shaft bolts. Kind of thought there should be more than that. But hey, if that is how it is then so be it, looks like tomorrow I'll be taking the job on. I'll remove the diff, clean it off since it has some thick greasy puss on it. Pop the flanges off and replace the seals, I bought all the seals for it a while back... Just never got around to doing it. I refilled a half liter of motul 300 in it and didn't notice a massive difference. I wonder.... If some one over filled it previously would that cause it to leak? I'd say with the half liter I added perhaps as much as a 3rd of that leaked out while trying to fill it at that awkward angle. I'm a nut and the fact that it is dirty is enough for me to want to clean it.

  5. #5
    Veteran Member Four Rings Spike00513's Avatar
    Join Date
    Mar 05 2013
    AZ Member #
    110766
    Location
    CA

    ^I cleaned mine by masking off sensitive parts such as axle flanges (I duct taped plastic bags over them). I used Castrol Super Clean + old toothbrush, then hosed/rinsed it off.

    As for the seals, I hope you are using all the necessary parts. I believe you're also supposed to use some sort of grey grease to keep moisture from getting in, which Audi deems necessary maintenance for when the old stock stuff dries out. In other words, if you remove the diff, you will see on the front driveshaft flange, there's a bunch of grey goo. That's what I'm talking about. If you somehow remove it, I'm guessing you need to replace the grease. This is one reason I mask the flanges off with duct tape and plastic bags - so that I don't end up washing off the grease.

  6. #6
    Veteran Member Four Rings diagnosticator's Avatar
    Join Date
    Aug 26 2005
    AZ Member #
    7741
    Location
    Seattle, WA

    Quote Originally Posted by Spike00513 View Post
    ^I cleaned mine by masking off sensitive parts such as axle flanges (I duct taped plastic bags over them). I used Castrol Super Clean + old toothbrush, then hosed/rinsed it off.

    As for the seals, I hope you are using all the necessary parts. I believe you're also supposed to use some sort of grey grease to keep moisture from getting in, which Audi deems necessary maintenance for when the old stock stuff dries out. In other words, if you remove the diff, you will see on the front driveshaft flange, there's a bunch of grey goo. That's what I'm talking about. If you somehow remove it, I'm guessing you need to replace the grease. This is one reason I mask the flanges off with duct tape and plastic bags - so that I don't end up washing off the grease.
    Spike, it is amazing how much you have learned since you first start participating here on the forum. :>)
    Last edited by diagnosticator; 10-31-2014 at 11:00 PM. Reason: typo
    Vorsprung durch Technik

  7. #7
    Veteran Member Four Rings old guy's Avatar
    Join Date
    Dec 28 2006
    AZ Member #
    14483
    My Garage
    '13 A5, '24 Tiguan SEL R-Line
    Location
    Western Maryland

    Quote Originally Posted by jacobsen View Post
    I assumed it was balanced in all directions. I did not mark the axle position when I did the clutch and I haven't had a vibration. But this is a good suggestion, I'll do that.
    If you look closely there should be paint marks from the factory that indicate the original alignment. There will be two dots of paint that should be aligned.

    Last edited by old guy; 11-01-2014 at 05:42 AM.

  8. #8
    Veteran Member Four Rings
    Join Date
    Aug 19 2013
    AZ Member #
    121375
    Location
    minnesota

    Alright I'll check on this grey grease? It must be a waterproof grease maybe similar to boat grease to repel water, I don't plan to remove any of the grease, I know when I did the clutch I packed some cold temp grease around the axle where it met the flange just to be sure. Got a part # or any thing more specific? I'm not sure if I have a tap for that... hmm... I'll get some red locktite, check. How did you hold the flanges in place to unscrew the bolts? I have a transmission jack I got when I did the clutch, the transmission must weigh 150 pounds. Wonder what the diff weighs? I'll try not to let the carrier bushing bend. And thanks for the heads up oldguy. Wish I could run ETKA on my windows 8 craptop. I'm going to try a virtual machine to see if I can get it to run...

  9. #9
    Veteran Member Four Rings Spike00513's Avatar
    Join Date
    Mar 05 2013
    AZ Member #
    110766
    Location
    CA

    I'd guess the diff is 40 pounds. I can carry it by hand. But to remove it, because you're under a car and would rather not carry it, a regular hydraulic jack works well. I use a hockey puck for a jack pad.

    You don't need ETKA. Google "parts cats" and click the first link that days something about "teilekatalog".

    New bolts come with red loctite on them, so if you ordered new ones, you won't need them. Bentley says that not cleaning out the threads with a thread tap can result in the bolt locking in there too tight, and breaking next time you remove it.

    You can break the axle flange bolts loose in many ways, such as by having a helper hold down the brake while you break a few loose, then let off while you spin it (in neutral) to gain access to the other bolts. Then brake again. Or have it in gear and e-brake on, I think.

    Part number for grease is G 052 128 A1

  10. #10
    Veteran Member Four Rings
    Join Date
    Aug 19 2013
    AZ Member #
    121375
    Location
    minnesota

    Well I tried every vw and audi dealer around here and no one has this g052128a1 ...They have some a couple of them had some old tubes that were opened for shop use and would sell them to me for half off but.. Eh... They said they were water separated and I'm not sure it sounds critical? Could any grease do? It's blue in color and is for sealing the radial shaft, wonder if silicone grease would be alright?

  11. #11
    Veteran Member Four Rings
    Join Date
    Aug 19 2013
    AZ Member #
    121375
    Location
    minnesota

    One of the techs said he saw a diagram with a Loctite 5970 on it next to the seal. Is that what I'm looking for?

    That's probably to cure the actual flange plate/cover thing to the diff housing? Not this special grease...
    Last edited by jacobsen; 11-01-2014 at 01:14 PM.

  12. #12
    Veteran Member Four Rings
    Join Date
    Aug 19 2013
    AZ Member #
    121375
    Location
    minnesota

    I was not able to remove the drive shaft from the differential. So the diff is just hanging from the CV joint... :| It took forever to remove the diff from the car and it's still not disconnected from the drive shaft. My advice is if you have a small leak, just clean it once and a while. This is a nightmare, I wish I hadn't taken this job on. Now I'm worried that I may have messed up or bent my CV joint bearing cage because while I was attempting to remove the diff from the car it bound up and hung in the air for several seconds a few times while I tried to work the cv to a pint where it would flex enough to let the rear of the diff rest on the ground. I replaced the leaking seal, I plan on doing the other one since it's easy to do, there was no red loctite on the flange bolt and it came loose pretty easily. I did break the dust shield when I pried the old seal out, I'll have to get a couple of those. It took a hammer claw to pry the old seal out. It's getting cold up here... wanna get this done asap, my next window is this weekend. Hopefully all goes smooth.

  13. #13
    Senior Member Two Rings
    Join Date
    Feb 23 2019
    AZ Member #
    456471
    Location
    Central Connecticut, USA

    Quote Originally Posted by old guy View Post
    If you look closely there should be paint marks from the factory that indicate the original alignment. There will be two dots of paint that should be aligned.

    Mega old bump.

    Oldguy, do you know if this will be on both the differential, and transmission?

  14. #14
    Veteran Member Four Rings old guy's Avatar
    Join Date
    Dec 28 2006
    AZ Member #
    14483
    My Garage
    '13 A5, '24 Tiguan SEL R-Line
    Location
    Western Maryland

    Differential only.
    '03 A4 5-MT Motoza tuned Frankenturbo F21L With full supporting mods. Sold (and missed dearly).
    '13 A5 6-MT Needs more Fun Stuff: Neuspeed PM / 3.0 TDI Intercooler / H&R OE Sport Springs / Bilstein B8 Shocks / TyrolSport Brake Stiffeners / ECS Short Shifter / S5 Side Skirts / RS Grille

  15. #15
    Senior Member Two Rings
    Join Date
    Feb 23 2019
    AZ Member #
    456471
    Location
    Central Connecticut, USA

    Think this might be my issue. Didn’t find paint, but I found a mark I believe is an alignment mark on the diff. I thought the driveshaft was balanced though. Why would it matter if it wasn’t lined up?

  16. #16
    Veteran Member Four Rings old guy's Avatar
    Join Date
    Dec 28 2006
    AZ Member #
    14483
    My Garage
    '13 A5, '24 Tiguan SEL R-Line
    Location
    Western Maryland

    Quote Originally Posted by onlyjuancannoli View Post
    Think this might be my issue. Didn’t find paint, but I found a mark I believe is an alignment mark on the diff. I thought the driveshaft was balanced though. Why would it matter if it wasn’t lined up?
    I assume Audi had a reason to mark the alignment. Otherwise why bother?
    '03 A4 5-MT Motoza tuned Frankenturbo F21L With full supporting mods. Sold (and missed dearly).
    '13 A5 6-MT Needs more Fun Stuff: Neuspeed PM / 3.0 TDI Intercooler / H&R OE Sport Springs / Bilstein B8 Shocks / TyrolSport Brake Stiffeners / ECS Short Shifter / S5 Side Skirts / RS Grille

  17. #17
    Veteran Member Four Rings Spike00513's Avatar
    Join Date
    Mar 05 2013
    AZ Member #
    110766
    Location
    CA

    Quote Originally Posted by onlyjuancannoli View Post
    Think this might be my issue. Didn’t find paint, but I found a mark I believe is an alignment mark on the diff. I thought the driveshaft was balanced though. Why would it matter if it wasn’t lined up?
    you can make alignment marks with a Forney paint marker from Amazon or Ace Hardware any time you remove a propshaft

  18. #18
    Senior Member Two Rings
    Join Date
    Feb 23 2019
    AZ Member #
    456471
    Location
    Central Connecticut, USA

    Quote Originally Posted by Spike00513 View Post
    you can make alignment marks with a Forney paint marker from Amazon or Ace Hardware any time you remove a propshaft
    Yeah, I did for some stuff but this is loooooooong past that point haha. I've been trying to diagnose a vibration since September.

  19. #19
    Veteran Member Four Rings
    Join Date
    Mar 13 2009
    AZ Member #
    39820
    My Garage
    MK3 VR6
    Location
    Houston, TX

    Quote Originally Posted by old guy View Post
    I assume Audi had a reason to mark the alignment. Otherwise why bother?
    Hmm..I just installed an aftermarket driveshaft and am noticing a bit of vibration around 45-50mph. Feels more up front in the steering or wheels though. I'm going to swap wheels and see if it changes. Don't recall the new driveshaft having any marks, but I didn't look for any either. How about the center support? Has oval holes that let you mount the bracket either direction .5" or so. That shouldn't cause any extra wear on the center bearing if not in the same spot as oem would it?
    B6 USP Avant

    USP CLUB MEMBER #242


    AMB + GSX28RS

  20. #20
    Senior Member Three Rings
    Join Date
    Aug 13 2015
    AZ Member #
    348679
    Location
    LA


    Searched all over for a DIY guide to remove the rear differential. Youtube wasn’t helpful.

    I have the thump slam of the rear differential when my RPMs go below 2000 and I slow down past 40 MPH in regular mode (Sport mode is at a higher gear when I slow down around 40 and doesn’t thump.) I can tap the accelerator to bring up the revs a little to soften the thump. Happens around 65MPH also.

    I’d like to replace it, but I can’t access the top Hex bolt because it’s blocked by the subframe.

    I can’t access the larger bolts above because of the sway bar.

    Any tips on removal? I’d appreciate it.

  21. #21
    Veteran Member Three Rings Dr.B6Banter's Avatar
    Join Date
    Sep 26 2017
    AZ Member #
    407514
    My Garage
    B6 A4 1.8T, B8.5 SQ5
    Location
    NB, Canada

    Quote Originally Posted by cleoo View Post

    Searched all over for a DIY guide to remove the rear differential. Youtube wasn’t helpful.

    I have the thump slam of the rear differential when my RPMs go below 2000 and I slow down past 40 MPH in regular mode (Sport mode is at a higher gear when I slow down around 40 and doesn’t thump.) I can tap the accelerator to bring up the revs a little to soften the thump. Happens around 65MPH also.

    I’d like to replace it, but I can’t access the top Hex bolt because it’s blocked by the subframe.

    I can’t access the larger bolts above because of the sway bar.

    Any tips on removal? I’d appreciate it.
    I'd remove the diff mount with the diff. That's how I did it after encountering the same problem you faced. Unless you have a low profile Allen key that's strong enough to not bend, you'd be hard-pressed to get that last bolt out.

    I've highlighted in red where the differential mount bolts into the subframe. It's a long bolt and nut (18mm maybe). It's tight to get at the bolts since it's right by the swaybar but definitely doable as I did it with basic tools. I didn't have a flared 18mm wrench to access the recessed bolts so I just got by with an 18mm socket while holding the other end with a normal wrench.

    Capture.jpg
    Last edited by Dr.B6Banter; 02-07-2021 at 07:45 AM.
    B6 A4 1.8T Nottro 02X 6spd Conversion | GTRS | IE Forged Rods | Suspension/ Subframe Poly Bushings | 18z BBK Front & Back
    B8.5 SQ5 3.0t | JHM 207mm Crank Pulley | IE Dual Pulley Tune & ZF8 TCU Tune | CTS Test Pipes, Downpipes & HX | AWE Touring Exhaust

  22. #22
    Veteran Member Four Rings Gosser's Avatar
    Join Date
    Jun 05 2013
    AZ Member #
    116640
    My Garage
    2005 A4 1.8QMT, 2006 3.2 Sedan and Wagon auto, 2004 S4, 1990 300zx TTRHD, 1988 Buick Lesabre T-Type
    Location
    Ottawa

    Quote Originally Posted by cleoo View Post

    Searched all over for a DIY guide to remove the rear differential. Youtube wasn’t helpful.

    I have the thump slam of the rear differential when my RPMs go below 2000 and I slow down past 40 MPH in regular mode (Sport mode is at a higher gear when I slow down around 40 and doesn’t thump.) I can tap the accelerator to bring up the revs a little to soften the thump. Happens around 65MPH also.

    I’d like to replace it, but I can’t access the top Hex bolt because it’s blocked by the subframe.

    I can’t access the larger bolts above because of the sway bar.

    Any tips on removal? I’d appreciate it.
    I dont think your rear diff is the problem, sounds like for of a mount that a diff. These diffs arent known to go bad. But to remove the diff, just remove the sway bar bracket and swing it down, then you'll have all the access. An off set box wrench helps to hold those recessed bolts. I prefer to take the diff our with the large bracket. Or drop the rear subframe bolts by an inch and you can get the top allen, but they can be a bit of a pain to realign.
    2007 RS4 Avant
    2006 A4 2.7 MT Avant
    2007 A4 2.0 AT Avant
    2013 Q5 3.0 AT - Wifes

  23. #23
    Veteran Member Three Rings Dr.B6Banter's Avatar
    Join Date
    Sep 26 2017
    AZ Member #
    407514
    My Garage
    B6 A4 1.8T, B8.5 SQ5
    Location
    NB, Canada

    Quote Originally Posted by Gosser View Post
    I dont think your rear diff is the problem, sounds like for of a mount that a diff. These diffs arent known to go bad. But to remove the diff, just remove the sway bar bracket and swing it down, then you'll have all the access. An off set box wrench helps to hold those recessed bolts. I prefer to take the diff our with the large bracket. Or drop the rear subframe bolts by an inch and you can get the top allen, but they can be a bit of a pain to realign.
    Yeah aligning up the diff and bracket back into the subframe is far easier than trying to line up the diff to the bracket.

    That's also a good point about the diff likely not being the issue. I didn't read the post entirely but now that I have it seems like more of a mount issue.

    The fron the of the diff is mounted to the subframe with 3 bolts, and if those back out or of the bushing in the mount is worn then you would hear loud thumps from the rear end during on/off throttle transitions. I didn't use Loctite on those bolts during my auto to manual swap and after a month of driving, they backed out and I started hearing very loud thumps/ slams from the rear end only to see the front of the diff hanging down an inch lower than normal. A worn bushing would likely cause the same symptoms.

    Capture.jpgCapture2.jpg
    B6 A4 1.8T Nottro 02X 6spd Conversion | GTRS | IE Forged Rods | Suspension/ Subframe Poly Bushings | 18z BBK Front & Back
    B8.5 SQ5 3.0t | JHM 207mm Crank Pulley | IE Dual Pulley Tune & ZF8 TCU Tune | CTS Test Pipes, Downpipes & HX | AWE Touring Exhaust

  24. #24
    Senior Member Three Rings
    Join Date
    Aug 13 2015
    AZ Member #
    348679
    Location
    LA

    I’ve been reading about the diff mount being a source of the problem, but when I checked the side diff mount it was securely mounted and didn’t appear to have cracks in the bushing.

    However, there was quite of play on the differential when I rotated the shaft left and right, probably 3-5 degrees. I compared it to a differential I was going to replace it with and very little play, maybe 1 degree.

    From a cold start, when I put it in either Drive or Reverse, I feel the thump—the whole car shakes.

  25. #25
    Senior Member Three Rings
    Join Date
    Aug 13 2015
    AZ Member #
    348679
    Location
    LA

    I also bought a side diff mount to replace the old one but that’s not as easy to pull out either. The large single bolt mounted to the frame is difficult to get to. Tips to get to that?

    Looks like the bottom hex bolts are fairly easy but the differential will kinda hang from the rear mount which seems like a lot of weight for those rear bushings.

  26. #26
    Veteran Member Three Rings Dr.B6Banter's Avatar
    Join Date
    Sep 26 2017
    AZ Member #
    407514
    My Garage
    B6 A4 1.8T, B8.5 SQ5
    Location
    NB, Canada

    Quote Originally Posted by cleoo View Post
    I also bought a side diff mount to replace the old one but that’s not as easy to pull out either. The large single bolt mounted to the frame is difficult to get to. Tips to get to that?

    Looks like the bottom hex bolts are fairly easy but the differential will kinda hang from the rear mount which seems like a lot of weight for those rear bushings.
    Yeah, I'd suggest supporting the diff with a jack or something, then undo the 3 hex bolts on the front of the diff, then move back to undo the 2 large bolts holding the diff carrier to the subframe. Then once the diff is out (assuming you've already unbolted the driveshaft carrier bearing and front of the driveshaft), you should have room to get at the bolt holding the front diff mount to the chassis.
    B6 A4 1.8T Nottro 02X 6spd Conversion | GTRS | IE Forged Rods | Suspension/ Subframe Poly Bushings | 18z BBK Front & Back
    B8.5 SQ5 3.0t | JHM 207mm Crank Pulley | IE Dual Pulley Tune & ZF8 TCU Tune | CTS Test Pipes, Downpipes & HX | AWE Touring Exhaust

  27. #27
    Senior Member Three Rings
    Join Date
    Aug 13 2015
    AZ Member #
    348679
    Location
    LA

    Oh, wow. If I'm going that far with removing the differential, I might as well replace the diff if it's that involved. Is there a simpler method than doing all that? Like just the 3 hex bolts and the top bolt (if I can somehow get to it). Or is this the only way? Well, I guess I wouldn't have to remove the axle bolts in this scenario.

    I appreciate the helpfulness you and Gosser have shown.

  28. #28
    Veteran Member Three Rings Dr.B6Banter's Avatar
    Join Date
    Sep 26 2017
    AZ Member #
    407514
    My Garage
    B6 A4 1.8T, B8.5 SQ5
    Location
    NB, Canada

    Quote Originally Posted by cleoo View Post
    Oh, wow. If I'm going that far with removing the differential, I might as well replace the diff if it's that involved. Is there a simpler method than doing all that? Like just the 3 hex bolts and the top bolt (if I can somehow get to it). Or is this the only way? Well, I guess I wouldn't have to remove the axle bolts in this scenario.

    I appreciate the helpfulness you and Gosser have shown.
    Only way I can think of getting to the front mount's chassis bolt with the diff still in the car would be to just undo the 3 hex bolts on the front of the diff and let it hang down. That may give you enough room to reach around the driveshaft and get a socket or bit on the last bolt for the mount.
    B6 A4 1.8T Nottro 02X 6spd Conversion | GTRS | IE Forged Rods | Suspension/ Subframe Poly Bushings | 18z BBK Front & Back
    B8.5 SQ5 3.0t | JHM 207mm Crank Pulley | IE Dual Pulley Tune & ZF8 TCU Tune | CTS Test Pipes, Downpipes & HX | AWE Touring Exhaust

  29. #29
    Senior Member Three Rings
    Join Date
    Aug 13 2015
    AZ Member #
    348679
    Location
    LA

    Thanks, I’ll give it a try after I get some offset wrenches.

  30. #30
    Established Member Two Rings
    Join Date
    May 06 2023
    AZ Member #
    926180
    Location
    EU

    Quote Originally Posted by old guy View Post
    I assume Audi had a reason to mark the alignment. Otherwise why bother?
    IN reality some are marked and some aren't and it is VW states in manual :

    check whether there is a marking (paint dot) on flexible cou‐
    pling and on flange for propshaft on rear final drive -arrows-.

    If there is no marking, mark position of flexible coupling relative
    to flange for propshaft on rear final drive.

  31. #31
    Established Member Two Rings lowlife89's Avatar
    Join Date
    Jun 01 2013
    AZ Member #
    116317
    Location
    EU

    What happens when you fit a propshaft that the breakers removed without marking?

  32. #32
    Veteran Member Three Rings Dr.B6Banter's Avatar
    Join Date
    Sep 26 2017
    AZ Member #
    407514
    My Garage
    B6 A4 1.8T, B8.5 SQ5
    Location
    NB, Canada

    Assuming you're refering to unbalanced driveshaft leading to vibrations? I'm not sure how much if an issue that is as I've had the trans in and out several times without marking the driveshaft clocking and don't notice any issues. Ensuring the flanges are fully seated into the cups and center carrier bushing not being worn seems to have more impact than driveshaft clocking, at least for me.
    B6 A4 1.8T Nottro 02X 6spd Conversion | GTRS | IE Forged Rods | Suspension/ Subframe Poly Bushings | 18z BBK Front & Back
    B8.5 SQ5 3.0t | JHM 207mm Crank Pulley | IE Dual Pulley Tune & ZF8 TCU Tune | CTS Test Pipes, Downpipes & HX | AWE Touring Exhaust

  33. #33
    Established Member Two Rings lowlife89's Avatar
    Join Date
    Jun 01 2013
    AZ Member #
    116317
    Location
    EU

    I'm replacing mine with one from the breakers. Hopefully without any vibrations. Thanks!

Bookmarks

Posting Permissions

  • You may not post new threads
  • You may not post replies
  • You may not post attachments
  • You may not edit your posts
  •  


    © 2001-2025 Audizine, Audizine.com, and Driverzines.com
    Audizine is an independently owned and operated automotive enthusiast community and news website.
    Audi and the Audi logo(s) are copyright/trademark Audi AG. Audizine is not endorsed by or affiliated with Audi AG.