Audizine - An Automotive Enthusiast Community

Page 1 of 4 123 ... LastLast
Results 1 to 40 of 149
  1. #1
    Established Member Two Rings #Avantbuild's Avatar
    Join Date
    Apr 08 2014
    AZ Member #
    179196
    Location
    Walla Walla, Washington

    Thumbs up Audi B7 A4 Avant Build - Senior Project - Accuair Air Ride

    Guest-only advertisement. Register or Log In now!
    *********BEWARE - PHOTO HEAVY***********


    Hello Audizine,

    First post here, and not planning on being the last. I'm excited to share with you what I've been dreaming of for over a year. Let me give you a little background before we jump into the build thread.

    I'm a 23 year old full-time student at Walla Walla University studying Automotive Management which is a 4-year B.S. Degree. My first car was a 2000 VW GTI 2.0l 8V. I loved that car. It didn't stay stock for long, as I added an R32 bodykit, meganracing exhaust, R32 replica wheels, and a few other things. I eventually built my own custom turbo kit and brought the dog of a 95whp 2.0l to 175whp with the help of a C2 chip from DJM in Portland, OR. Ever since then I've been excited about cars, speed, society, the euro family, etc. In 2009 I sold my gti and bought a Mk4 R32 with 72,000 on the OD. I miss that car every day, I had so much fun with it. It stayed stock for awhile, but I eventually added Koni coils, Keskin KT-1 staggered wheels, HID HL, Double Din HU, Custom exhaust, and a few other things.

    In 2011-2012 I attended Hallmark Institute of Photographer, in Massachusetts, where I trained in their rigorous program to be a "Professional" photographer. I don't think you can technically call yourself a professional unless you're living off the income you're getting from that venture, so I wouldn't say I am a professional... but more of a very experienced amateur. Anyways, I discovered after returning from the East Coast (I bought a 2000 Audi S4 in Maine and drove that while I was over there - loved it) I found out my R32 just wasn't practical in my business. I have super heavy equipment that I carry around all the time, long light stands, backdrops, etc. The trunk in the R32 didn't even fit my guitar, so the gear necessary for a full production photo shoot didn't even have a chance. It also was expensive to maintain, and not kind to my wallet for fuel or insurance. So, I parted with my beloved .:R and, in my opinion, stepped up the game a bit, and bought myself a 2006 A4 Avant, 6-speed, Quattro, non-sline.

    I bought the Avant with 97,000 miles on it from a doctors family up in Seattle where it has been serviced at Barrier since it rolled off the truck when the original owners bought it. You couldn't find a cleaner car with 100k on it. So, naturally, when I bought it I promised the previous owners while signing the title that I would take care of it and make them proud. Hehehehe, little did they know I had big plans for their beloved wagon....

    I'm graduating college on June 15th, 2014, and part of the automotive program is to have a senior project, where we demonstrate to our department some of the skills we've learned in the last four years. I decided to go a little beyond the requirements and do a full suspension build.

    So, here we are. This is my build thread. Lets get into the good stuff.

    Check out my instagram hashtag to follow my build! #Avantbuild
    OR, follow me @kurtislamberton

    THE PLAN....

    I wanted to have a stanced wagon, but hated not being able to get into driveways with my R32, so I decided to do air ride. Accuair is the name of the game, so after talking with them at SEMA in 2012 and 2013 I decided they were my top choice. I didn't want to sacrifice the trunk for the air ride components, because that would defeat the purpose of buying a car with a bigger trunk for all my photo gear... so, later on in the build I'll show you what I came up with.
    I'll try to explain some of the process with pictures, but I won't go into extreme details as to torque specs of bolts.. or what mm that bolt was etc. If anyone has questions please PM me and I'd be more than happy to share what I know. I've made a lot of mistakes and learned a lot of lessons, so I'd love to help you NOT repeat those. lol

    List:
    Accuair B8 Sport Kit - retrofit
    B8 A4 S-Line Front bumper retrofit
    RNS-E install
    RS6 MFSW with paddles
    MRR GF6 wheels
    Custom trunk for components


    Here's my A4 Avant the day I picked her up.


    I started planning my build back in September of 2013, and by November I started ordering parts. I didn't start the build until January of 2014. I talked to Accuair at SEMA last November and bugged them about my build idea, and I entertained Derek about an idea I had about making the E-Level ride heights change with the paddle shifters. He told me that at this point they've never seen it done and weren't sure it was possible, so I decided to take the challenge to do something that hasn't been done before, and take this build to the next level.

    Here's my RS6 steering wheel with paddles for the air ride control. I got it brand new on eBay for $800 shipped. I also wanted the OEM RNS-E Navi so and picked that up used on eBay for $400, which I was super stoked about.


    Dorbritz Designs, based in Texas, hooked me up with my parts for the air ride build. Huge shoutout to Drew for answering a lot of questions and making sure some of my custom order parts were done properly and shipped quickly. Thanks homie!
    Got my dual Viar 444c compressors and Accuair tank mounts and VU-4 controller mount.


    This is Nikkor, posing with my new car parts.


    Here I got my shipment of Accuair parts! I looked at Airlift struts and a few other options, but really liked the Accuair B8 Sport Kit they developed as a bolt on the B8 platform. They use their own bag design that has a progressive spring rate you can change and is designed to use the stock struts. Accuair said they were developing a kit for the B7 soon...... that was supposed to be ready for launch in November, but by January it still wasn't ready, so I decided, how hard could it be to retrofit the B8 Sport kit to the B7... lol


    Next I started doing some measurements for the wheels. At this point I didn't know what wheels I wanted, but I wanted to go flush. Here I'm using string and weight to measure how much room I have from the lip of my stock 18x8 et 40 to the fender. Using that measurement I could then do some calculations to determine exactly what width and offset I would need to flush with the fenders and still clear the stocks.


    Last edited by #Avantbuild; 05-09-2014 at 11:47 PM.

  2. #2
    Established Member Two Rings #Avantbuild's Avatar
    Join Date
    Apr 08 2014
    AZ Member #
    179196
    Location
    Walla Walla, Washington

    STEERING WHEEL:

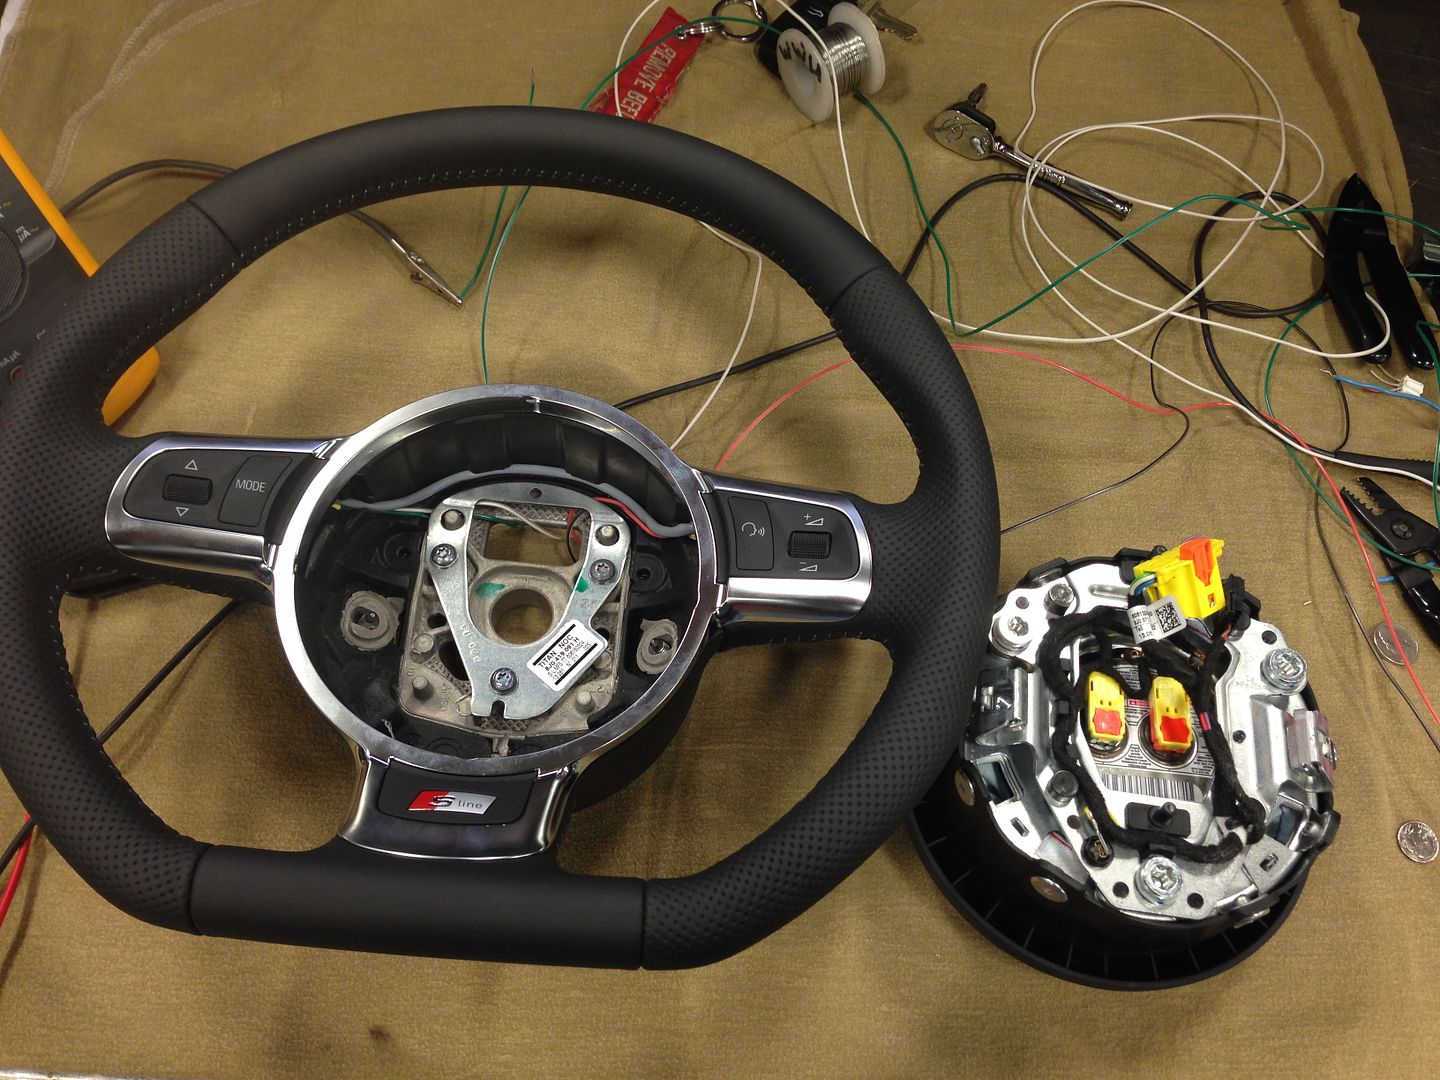
    Here's the wheel before I took it apart. There's a lot of build threads of disassembly of these wheels so I won't waste time with details, but I will tell you that the chrome ring literally just needs to be pulled off. Careful though, its finish can be messed up easily, even if you use a small screwdriver, so take your time, work the edges and pry it off.


    Here's the ring coming off.


    If your wheel is a MFSW then look out for these white clips located on both sides of the wheel spoke underneath the airbag cover.


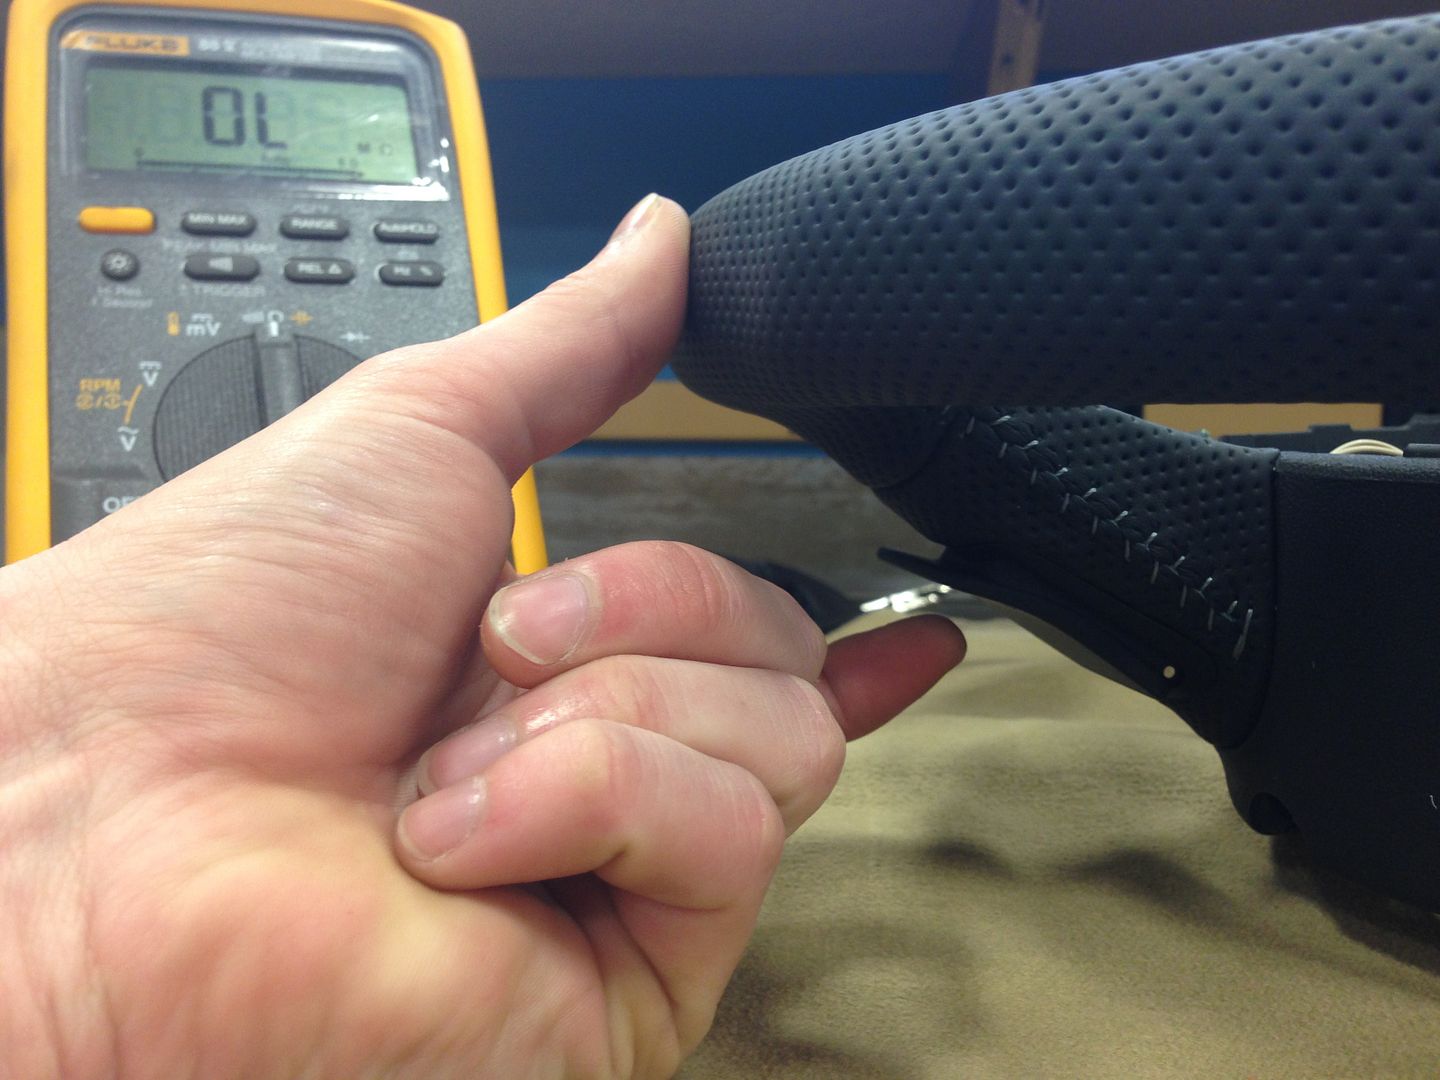
    I then started my analysis of the paddle shifter system and used my DVM to test the resistance of the wires to figure out what wires I need to run through the clock spring.


    Here my DVM is showing Overload, because at the moment I'm sending a very small voltage through a series of wires but there is no connection between them. Theoretically, when I push the paddle shifter, the circuit would be complete and you should see a small ohm reading showing you an electrical connection and what kind of resistance you have between those two circuits.


    Here I'm completing the circuit, and my digital voltmeter is showing a reading of 0.3 ohms resistance. This is good. Now we know that the two wires I'm connected too complete a circuit and can be extended through the clock spring and eventually wired to control the air ride ride height levels.


    Next I soldered the wires and put heat-shrink wrap over them to keep them from short-circuiting each other.


    Using a Torx I tightened the airbag back into position.


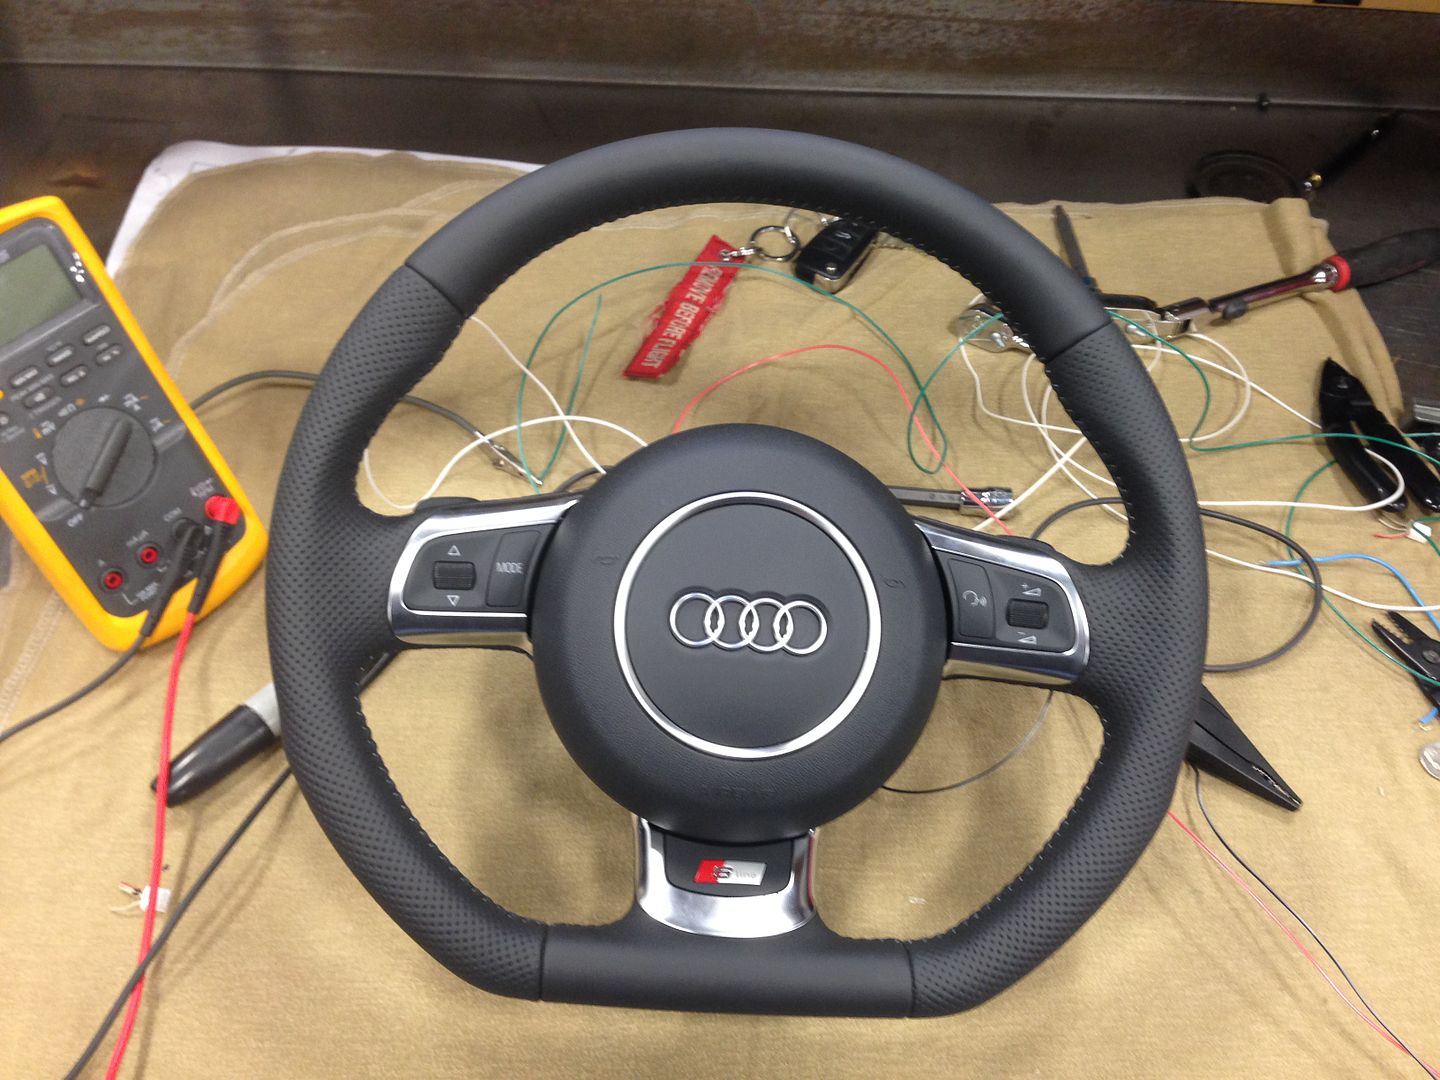
    Here's the wheel re-assembled and ready to put in the car...... or is it?....


    I went to install the wheels and it turns out that the airbag wiring harness is slightly different than the harness on my OEM harness.. As you can see in this picture.


    ***DISCLAIMER***
    What I did here I did at my own risk and fault. I am not responsible for what you might do to your own vehicle. This is solely a guide to my own experience and what worked for me, please do your own research and testing before blindly following someone else's steps.


    Okay, so when working with airbags you have to be very careful. The green and orange plugs on the back are the actuators that when receiving a voltage, even a small one, will deploy the airbag. You can deploy your airbag by using a voltmeter, that's how sensitive they are. So when I tested this harness the first thing I did was to unplug the green and orange plugs, that way there was not way I could generate a voltage, even a small on that would come in contact with those deploy circuits.

    In the picture above, with the pink harness, is the one that fits the clock spring in my car. Doing some online research, most MFSW conversions people buy a new clock spring that is compatible with their wheel and airbag. I was ignorant at the time of purchase and didn't realize I needed that, so I decided to try my own route and retrofit my own harness.


    After testing the wire leads on both harnesses I discovered that the airbag wires were in the exact same places on each harness connector. Furthermore, the green and orange connections to the deploy circuit on my OEM harness FIT the new airbag. Looking a little more I discovered that the only difference between the harnesses was the ground locations! Piece of cake. So here I'm modifying both harnesses by slicing and dicing each one to create one super harness that fits my old clock spring, but plugs into the new RS6 MFSW and airbag.

    Here I cut the ground off the RS6 connector and soldered it in place of the smaller ground on the A4 one.


    Here's the finished product, of soldering the three large grounds on the OEM harness. (OEM one had two small grounds originally)

    Last edited by #Avantbuild; 05-09-2014 at 10:20 PM.

  3. #3
    Established Member Two Rings #Avantbuild's Avatar
    Join Date
    Apr 08 2014
    AZ Member #
    179196
    Location
    Walla Walla, Washington

    STEERING WHEEL: Part 2

    What I did next was try to find a way to run the wires I extended out of the back of steering wheel (the ones I soldered to the paddle shifter circuits) to go through the clock spring, that way when I turn the wheel opposite lock the wires are crimped and cut. Fortunately, taking a closer look at the OEM airbag harness there were 3 wires unused. I needed 4, because two go from each paddle shifter. So I stole one more wire terminal from the RS6 harness I've been stealing everything else from and then I had 4 empty slots to solder my paddle shifter wire extensions too, which will now run seamlessly through the clock spring like it was supposed to be there in the first place.

    Here I'm pulling one of the terminals out of the RS6 connector.


    Here I've plugged it into the OEM connector (Red wire)


    Audi/VW is weird in their wiring where they never put wiring sequences in numerical order.. so the 3 wires that were vacant on the other end of the connector, here at the clock spring harness connection were not even next to each other.. lol I tested this a triple check everything with my DVM before I cut any wires.


    Here I've soldered the 3, now 4, empty wires to the paddle shifters.


    At this point it was ready to be installed in the car. I wish I had a picture of me doing this, but I was very nervous about hooking up the battery and starting the car for the first time. Since I modified the original harness, I didn't know if the deploy sensors were so sensitive that a slight difference in resistance due to solder or some other reason would cause an airbag fault, or God forbid a full deploy in my face. So I was laying across the passenger seat staying as low as possible for fear of a deploytation while a friend was laying on the ground on the driver side pushing in the clutch while I started the car. It was a very tense and dramatic few moments.. but to much surprise nothing happened that wasn't normal. AND, there wasn't even an airbag fault light. BOOYAH!

    Unfortunately the functions on the steering wheel didn't work on their own.. but I was pretty sure it was just a coding issue.


    Next I hooked up using Ross Tech's VAG Com cable and went to work. I had several faults, none were on the airbag side, that circuit was 100% good to go, but the faults were in the steering wheel controls, and functions. Also, my horn didn't work. This didn't make any sense to me cause it's a mechanical connection through the clock spring to activate. So I pulled it back out, and found that I accidentally swapped the grounds during the install. With that figured out the horn worked perfectly. I then went into vag com and recoded my ecu to the new mfsw and the functions I desired.


    Here's the finished product! All functions work like it came from the factory, plus I have the paddle shifters ready to hook up to the air ride!

    Last edited by #Avantbuild; 05-09-2014 at 10:28 PM.

  4. #4
    Established Member Two Rings #Avantbuild's Avatar
    Join Date
    Apr 08 2014
    AZ Member #
    179196
    Location
    Walla Walla, Washington

    TRUNK: Part 1

    Browsing over different social media I've seen some really cool air ride builds. I love a good trunk setup with hard lines, hard wood floor, etc. However, the purpose of this vehicle was to have a daily driver that had space for my photography gear. I lay my seats down often, so even flushing a 5 gallon tank up against the back row wasn't really something I wanted to do. So, since I am retrofitting the Accurair B8 Sport Kit, which has most of the components designed to fit in the spare wheel well I got an idea. Why don't I put everything underneath the floor. Problem was, the spare wheel well wasn't big enough, its an awkward shape the isn't even symmetrical, plus is has a huge cone sticking up from the bottom side holding the EVAP system.. So I thought maybe I can make a false floor, putting a circular tank into the wheel well and then hiding the compressors under neath a raised floor. This still defeated the purpose of keeping the entire trunk space accessible.

    This is why I decided the best way to do this was to cut out my spare wheel well and build my own custom box.


    Here's what the trunk looks like empty.


    Here's the awkward shape I was talking about, which houses the EVAP canister underneath.


    This is looking up from underneath the car, showing the EVAP canister housed under the spare wheel well.


    The first order of business was to re-route that canister. EVAP is important, so I didn't want to delete it. Yes, I could code it out with Vag-com so I wouldn't get a CEL but it plays an important function in our vehicles routine, so I decided to relocate it. Thankfully, Audi decided that they would put an empty space right underneath the ABS module on the driver-side rear trunk area, behind the interior trim that fit the EVAP canister perfectly. So I cut out the steel tubing and ran new hoses through a grommet in the frame to the new location of the canister. Can't even smell fuel inside the car so I think it was a success. No CEL either!


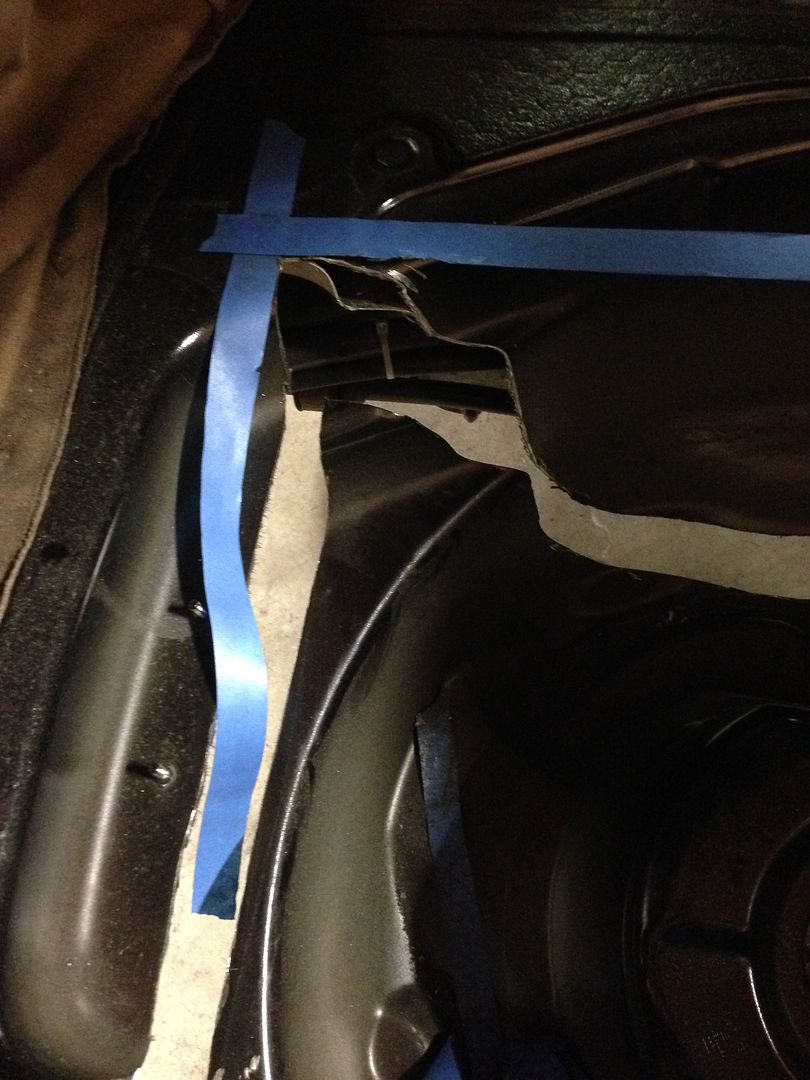
    Next I proceded to mark out where I actually wanted to cut. Looking underneath the car I made sure not to mess with structural integrity areas like the frame, so I stayed clear of that and cut just inside of the frame rails, leaving me a nice area to weld in the new box I was going to build.


    Here I'm using a laser level to help guide my cut.


    Here I've completed my cut.


    So scary!! There's no going back now!


    Next I started marking out my cut and bend lines on the new sheet metal I picked up to form the box. I got 11 ga. mild steel. (For future reference, 11 ga was probably a little overkill. I jumped up and down inside the box afterwards and it didn't even think about budging. If it's just holding air ride components you could probably get away with 13 ga, maybe even 15 ga for light purposes.


    I used a plasma cutter to cut the 4x8' sheet to size.


    Here I'm using a press break to bend the sheet into the shape of a box. Unfortunately we could only get two side to 90 degrees and the other two to 45, so we had to bend the rest by hand.


    Here it is after bending the rest by hand.


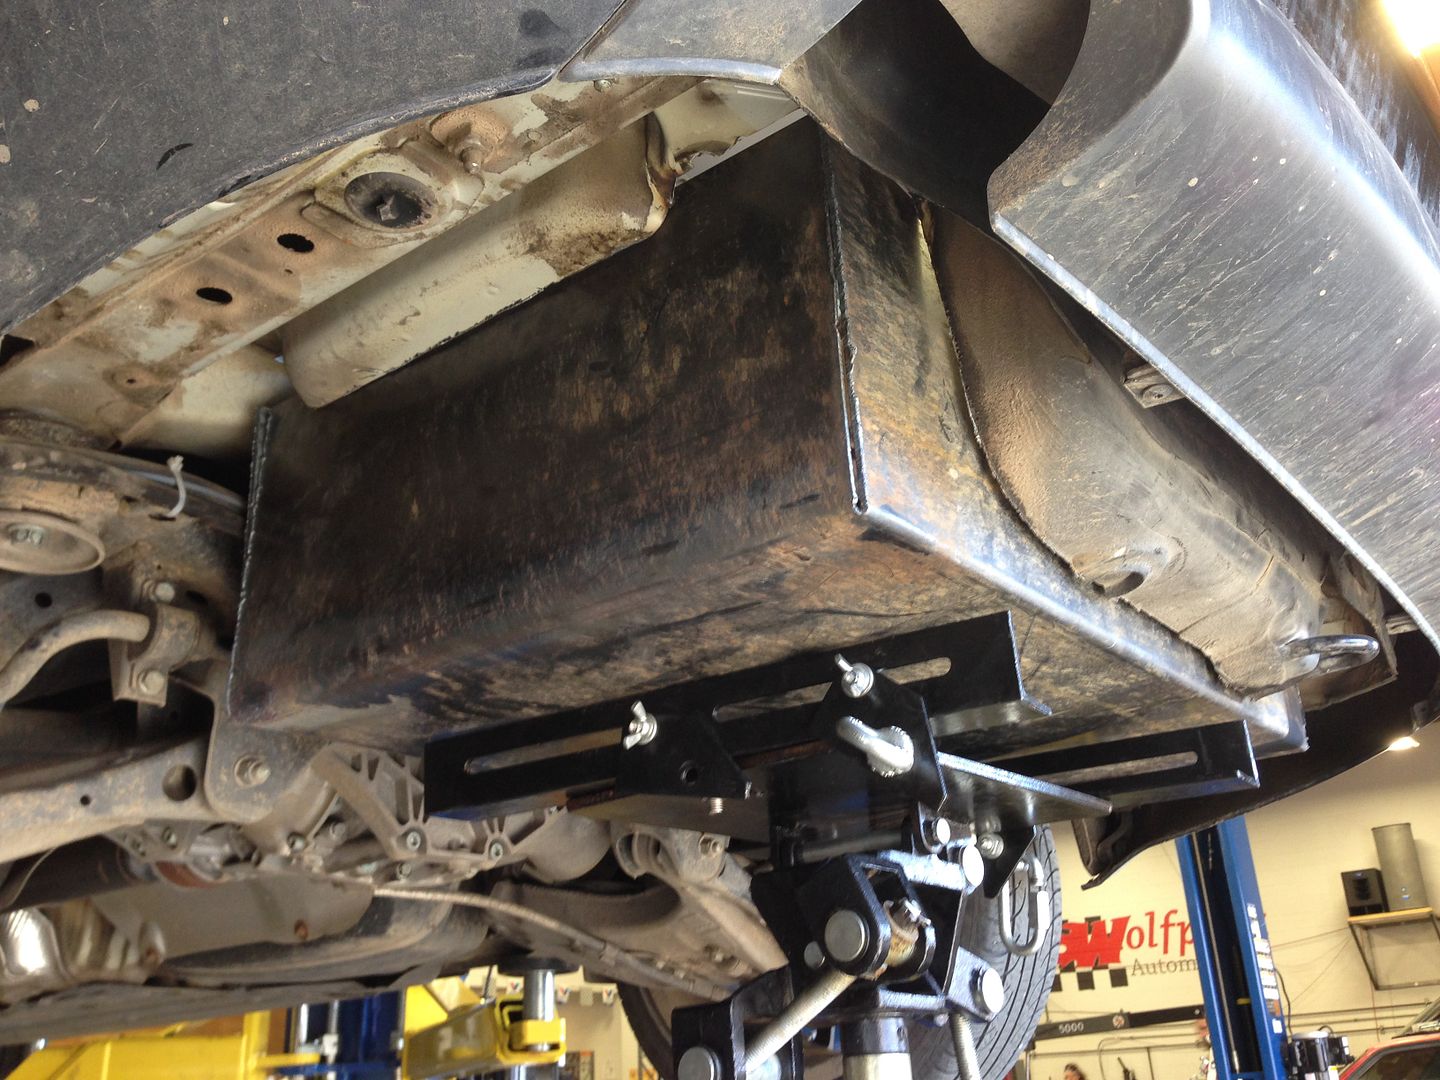
    Next it was time to put the box back in place and weld her in!


    As I lifted it in place the first time I realized that I didn't take into account the fuel filler neck.. so I made a design adjustment and cut out a section.


    Here it is sitting in place before I tacked it up.


    Tacking the sides


    All welded up!


    Last edited by #Avantbuild; 05-09-2014 at 11:42 PM.

  5. #5
    Established Member Two Rings #Avantbuild's Avatar
    Join Date
    Apr 08 2014
    AZ Member #
    179196
    Location
    Walla Walla, Washington

    TRUNK: Part 2

    Next I filled the gaps inside the car (the areas that held the tool kit for the spare wheel) with expanding foam.


    Shaved the foam after it dried.


    I also sprayed a rubberized coating on the bottom of the box to keep any of the welds from rusting but also to weather-proof it even more (just in case there were any small holes in my welds).


    Still retained the stock tow hook.


    I coated the inside as well. Now it's starting to look like we're getting somewhere!


    I then lay'd in some sound deadening material, so reduce not only road noise but to try and help absorb some of the compressor rattle when filling the tanks. I got this from www.b-quiet.com and am super impressed with it. Extremely affordable too! I was easy to lay in, cut with a razor blade, and malleable over trunk lines.


    At this point I started to build the platform for which I would mount the air ride components. Tanks, compressors, VU-4 controller, etc. I thought about just bolting everything to the floor, but having bolts sticking out through my nicely made box didn't sound appealing to me. Plus, I knew that bolting two compressors to a metal base would be a perfect case of the rattles, so I decided against that. I took this into account when I fabricated the box depth. I know that if I used a 5/8" board and fastened that to the bottom of the box I would have enough clearance for all the components I had chosen.

    So I got a small sheet of 5/8" MDF at my local Home Depot. (There was a time in this project where I was going to Home Depot every single day for almost three weeks!!! Pathetic. lol


    I also glued in some rails that will be my base mounts for the new floor going in. I know it looks really raised up, but there is actually a lot of wasted space under the A4 Avant floor and my new floor will sit at exactly the same level as the OEM one.


    Here I've cut the base board to size.


    For a little side project while the glue was drying I grabbed my brand new shiny chrome compressors and threw them in the bead-blaster. I'm not a chrome guy, and wanted a more subdued look.


    To this point I still didn't know the orientation of how I would install the tanks and compressors. I had a vague idea, inspired by Accuair's 2012 SEMA build, that didn't actually end up working out, but at the moment I was at square one for layout. Pretty stupid since I cut my box and welded it in.. permanently.. so I was really frustrated when I started messing with my parts that it didn't fit.


    In this picture you can see the Accuair EXO tank mounts and compressor mounts. Clearly, this setup would not work.


    My mood was quickly changed however when I unwrapped my (2) 3-gallon tanks I got through Dorbritz Designs sourced from Specialty Suspension. They had just come out with their brand new D.O.T. approved seamless air tanks, and I had to have them. I also had them hydro-dipped in a wood grain.


    I decided to built a template of the trunk box to start fitting parts to try to find a solution.


    Last edited by #Avantbuild; 05-10-2014 at 08:53 AM.

  6. #6
    Established Member Two Rings #Avantbuild's Avatar
    Join Date
    Apr 08 2014
    AZ Member #
    179196
    Location
    Walla Walla, Washington

    TRUNK: Part 3

    After much frustration I thought I had been defeated and was devastated to go to plan B. Which would not be good because it meant selling my beautiful tanks (I actually had them up for sale on Audizine for a day) and buy a single 4-gallon tank instead. However, after doing some preliminary measurements I discovered that the 4-gal tank was literally 3/4" too wide to fit in the box.. so I was hosed. So I was pretty bummed one night, but the next day I had an idea and went into the shop to test it out.


    Here I found the orientation of the tanks and compressors that I liked.


    The culprit to my frustration was this VU-4 Controller mount. So I bend it to a 90 degree instead of the 45 it comes at.


    I also used a 1/2" spacer on the tank closest to the tail of the car and that gave me enough clearance for the controller.


    Here's progress on the compressors.


    Much better.


    I also didn't know what I wanted to use for the finish of the box. At first I thought I'd just use heavy duty carpet, or maybe even fiberglass something, but in the back of my head I knew I always wanted to have hard wood somewhere in my car. So, the search began. I ordered some samples online but quickly discovered it's really hard to find a nice hardwood supplier that will sell you 25 sq/ft. lol Lucky for me, my automotive professor, Rob Hom, who btw is one of the greatest men to walk this earth and a huge inspiration and role model for me, had some extra bamboo left after his house build. Perfect. I'm sure its been done before, but I've never seen bamboo in a car before, so I figured it was the perfect material. It also has such a light finish that it contrasts the wood-grain tanks very nicely.

    So I started laying out the pieces.


    The cool thing about this is that all the pieces match. I cut them so the grains follow each other starting for the back of the trunk to the floor and then up the other side.


    After cutting my pieces I brought them out and glued them to a thin piece of birch-ply.


    We use weights to simulate human occupants while we do alignments so I borrowed those for a night to keep my floor boards nice and flat.


    Here it is sitting in the car.


    Test fitting the components!


    Progress on the wood sides


    Starting the drill holes and bolt the tanks and compressors down! I left tape on the top to help protect the finish while I worked.


    I used these cool threaded sink nuts that will allow me to thread in bolts from the top and have a flush bottom.


    Used grommets to protect the power and ground wires from the compressors, but also to hide the wiring underneath.

    Last edited by #Avantbuild; 05-10-2014 at 09:41 AM.

  7. #7
    Established Member Two Rings #Avantbuild's Avatar
    Join Date
    Apr 08 2014
    AZ Member #
    179196
    Location
    Walla Walla, Washington

    TRUNK: Part 4

    Test fitting.


    The disaster of a work station.


    I got some Accuair stuff in to rep while I worked.


    I also decided to tuck the VU-4 wiring harness since there are 12 wires, and I didn't want those to be just sitting around the nice box, so I measured out the length I'd need to extend the wiring harness and soldered an additional 6' of cable. Most installs put the E-level controller in the main compartment where the VU-4 controller is, which is why the harness is so short, and I had to extend mine.


    Here's the completed extended harness.


    Now that I have the harness ready I could run the wires through the bamboo floor.


    I used heat-shrink wrap to clean up the harness.


    Here's the underside of the floor.


    Test fitting in the box.


    Finishing touches


    All of this is hidden underneath.


    About to be glued in for the last time!


    Using weights to help keep it in place overnight.

    Last edited by #Avantbuild; 05-10-2014 at 09:41 AM.

  8. #8
    Established Member Two Rings #Avantbuild's Avatar
    Join Date
    Apr 08 2014
    AZ Member #
    179196
    Location
    Walla Walla, Washington

    TRUNK: Part 5

    Now that it's glued in I needed to finish the wood siding.


    Angles


    Finished!


    Now for some carpet to cover up the wires and sound deadening material.


    E-LEVEL:

    Since I re-located the E-level controller I had to run all the wires to the new location. Remember that spot where I re-located the EVAP canister? Well, turns out that there's a perfect gap above that but underneath the ABS controller to mount it. So here is a few pictures of the new mounting location and all the wires involved.

    Here's the list of components I installed:

    (1) E-level controller
    (2) Harness to VU-4 Controller
    (3) Pressure sensor switch to the tanks
    (4) iLevel wifi controller
    (5) Key Fob antenna
    (6) Rocker switch for ride height selection


    Next I ran the wiring harness for the rocker switch through the interior and up into the dash. Sorry I didn't take any pictures of the tuck under the carpet.. but I basically ran it under the door sill all the way to the dead pedal and then up underneath the dash and into the Head Unit area.


    Using radio keys (DO NOT try to pull your radio without these... please.... you'll mess it up. lol)


    This little plastic tray is a pain in the arse to get out, but using small screw drivers you pop the tabs down from the top and it slides right out.


    Using my dremel to shape the plastic tray to accept its newest component.


    BAM!


    Reno Heon, Co-Founder of Accuair informed me that you can pop out the windows and replace the arrows to a different orientation, that way you can have the switch laying horizontal like I do but have the arrows point up and down. I have done this yet, but it is possible.


    \


    RNS-E

    I also took the time to install the RNS-E I purchased on eBay. Unfortunately the previous owner did not supply the radio code with the unit, and you can't pull it from Vag-com, so after installation I drove to VW/Audi Overturf dealership in the Tri Cities. They should've been able to use their factory scan tool to pull the radio code, but they told me that I did something wrong, and their machine wouldn't communicate with it and there was nothing they could do, and that this conversion wasn't even possible to their knowledge. Well, I knew it was possible, and also knew that I had installed it correctly, so 3 hours later and after paying my $100 diagnosing fee I called Audi of America directly. Gave them my RNS-E S/N# and my vehicles VIN and after a 4-minute conversation I had a perfectly working RNS-E HU. Not trying to bag on a local dealership, but I probably won't be returning for any kind of service or diagnosis anytime soon.

    Here it is installed.


    BOOM: installed correctly and coded.


    I did have to go into Vag-Com to code my ecu to recognize the different head unit and assure it that the Nav was there and whatnot, but now it's a completely functional unit that works with 100% functionality.
    Last edited by #Avantbuild; 05-10-2014 at 10:36 AM.

  9. #9
    Established Member Two Rings #Avantbuild's Avatar
    Join Date
    Apr 08 2014
    AZ Member #
    179196
    Location
    Walla Walla, Washington

    EXHAUST

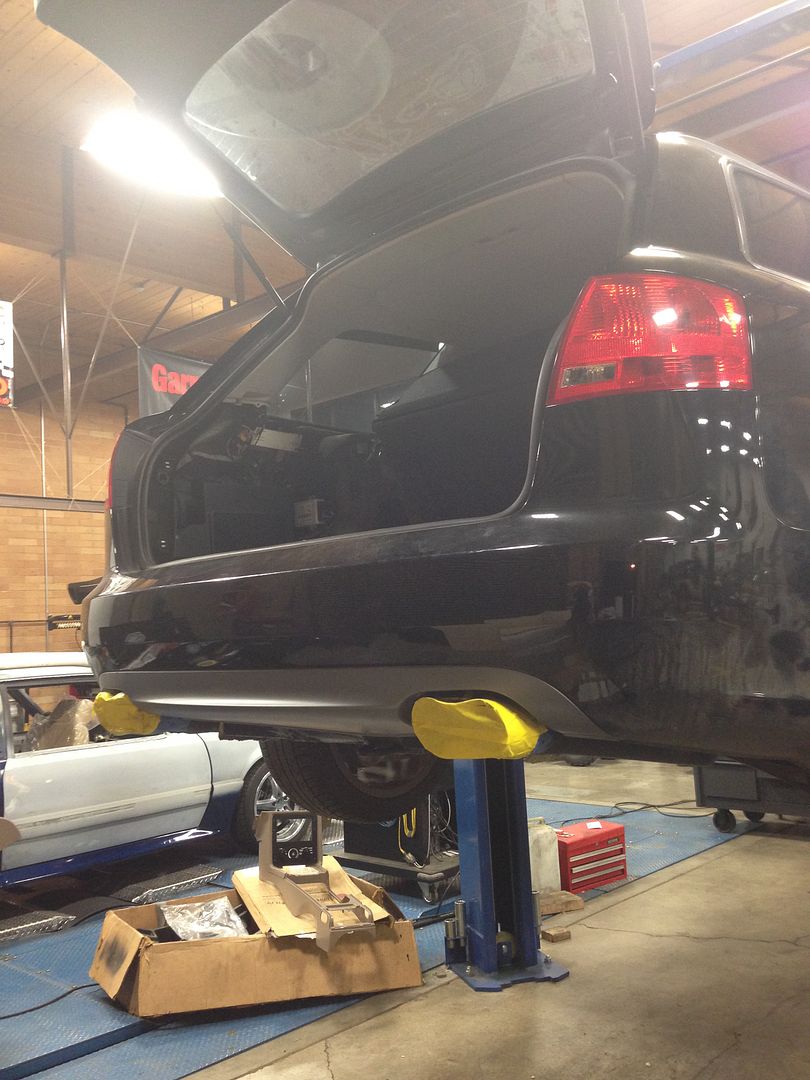
    So remember how I cut out the spare wheel well and replaced it with a rectangular box? Well, when I did that I made sure I measured for the stock exhaust mufflers to fit. After I welded in the box I test fitted the mufflers.. and they did technically fit, within a 1/4" on each side.. but that was a little too close for my comfort. I don't like rattles and knowing that when I go around a tight corner that my muffler is going to slam into my box wasn't something I was really looking forward too. So, I decided to cut my losses (which in my mind there really weren't too many - but let me explain). I had a 98 Db exhaust on my R32 which I loved. It purred like a kitten around town but roared like a lion when I got on it, and in College Place, I'd have people texting me from their homes 2+ miles away asking if I was driving around. That was fun, but it didn't make me very popular with the CPPD. Well, not the popularity I enjoyed rather. I bought my Avant in June of 2013 and have really really enjoyed the quiet ride and even more so the lack of police attention. That being said, I think the A4 could be a little more throaty, and removing the mufflers would reduce the size of the resonating chambers, giving me a little more sound. So, that's the first . The second is that each muffler weighs almost 30 pounds!! That's just stupid. So, cutting the mufflers out, adding a straight pipe section to each side and welding on my own tips were what I chose to do. I think kit exhaust systems are great. They fit, they've been researched to sound good, but they're expensive. I didn't have the cash flow to drop $700-$1200 on a bolt on exhaust.. so I didn't. I cut the mufflers, used coat hangers to replicate the bends I needed and had a local shop mandrel bend two pipes for me. I then measured the spacing of the quad tip rear valence to get the maximum size tips without rubbing a purchased those. In the end I spent $150 on mandrel bended pipe and the quad tips.

    Here I am dropping the stock system.


    Here I've cut out the mufflers and tacked in the bended straight pipes. I only added approximately 2.5-3' of pipe on each side.


    When I cut out the spare wheel well I had to cut through where the stock exhaust hangers were. So I had to reposition them. I chose a spot a little further back and welded in some bolts that I could thread the oem hanger on, then used the oem bung and welded that to the new piping.


    I bought these tips from Red Tail Performance. Here's the link: http://www.redtailperformance.com/ex...dth-rtp-037lr/

    I got them 4 days later and was very impressed. Theses are solidly built and professionally packaged. Big shoutout to Red Tail Performance for these.


    Here I've taped the tips to keep them nice while I position them to tack them in place.


    I'm really REALLY happy with how these turned out. They sounds great! Cold idle is really throaty but when the secondary air turns off and it drops down to normal idle rpm it's as quiet as stock. It doesn't resonate in the car until 3,300-3,500 rpm and stops around 4,200 under WOT, so it's not awful. I haven't really done any freeway miles since I've put it on, so I can't tell you how loud the cabin will be at 70 mph, but I'll keep that in mind when I do and let ya'll know. In my opinion (and please allow me to do so) this is a great alternative for those of you who are on a budget but want the look of the S4 quad tips and a slightly more throaty sound without spending a grand. There, I said it. Sorry APR lol. That said - obviously this isn't to their quality standard, nor any scientific testing/R&D, but it works, it looks super good, and doesn't rattle. For me, this was a success.
    Last edited by #Avantbuild; 05-10-2014 at 06:37 PM.

  10. #10
    Veteran Member Four Rings Audi_509's Avatar
    Join Date
    May 20 2010
    AZ Member #
    59269
    My Garage
    2008 A4-sold. 2019 A5-sold,: '23 S5
    Location
    WA

    This should be interesting. Great start by the way.

    Wally World!

  11. #11
    Established Member Two Rings #Avantbuild's Avatar
    Join Date
    Apr 08 2014
    AZ Member #
    179196
    Location
    Walla Walla, Washington

    Quote Originally Posted by Audi_509 View Post
    This should be interesting. Great start by the way.

    Wally World!
    Thanks! I'm excited to share my progress.

  12. #12
    Established Member Two Rings #Avantbuild's Avatar
    Join Date
    Apr 08 2014
    AZ Member #
    179196
    Location
    Walla Walla, Washington

    TRUNK: Part 6

    After the exhaust was taken care of, the E-level controller mounted (I'll post more pictures of the actual mounting location later) and the wires run, the glue had completely set in my box and I could start the process of installing the tanks and hard lines. I did a lot of research, and when I mean research I actually mean searching, to find information on hard lines paired with PTC (push-to-connect) fittings and what metal types are compatible with these fittings. There are a lot of opinions online regrading hard lines with PTC vs flared fittings but not a lot of facts, that I could find. There's a lot of pictures of show cars with immaculate hardline setups, most seemingly with stainless steel lines, but there's not a lot of report on whether these setups are working as designed, if the owners have trouble with leaks, etc. So, after doing some research that never really brought me to a solution, I decided to step out in faith and go with a hardline setup using copper and PTC fittings.

    After inspecting the PTC fittings up close (I bought the SMC ones from www.bagriders.com) I discovered that there are small teeth that extend from inside and "grab hold" of the O.D. of whatever material you stick inside. Obviously, these are designed for the nylon airline. However, are some trial and error, I have gotten some great results using memory cloth around the O.D. of the copper end, (also making absolute sure that it's completely round and cut square), that these ends are a good combination with the PTC fittings. If you pull the copper end out of the fitting you will see marks from the teeth imprinting on the surface of the soft metal. That being said, I would fear to use a ferrous metal (Stainless steel, Mild Steel, etc). I don't think that these "teeth" in the PTC fittings would be able to grab hold enough of the line and unless there is tension from the route of the bends these would be prone to shift in position, which could easily stem a small leak.

    Surprisingly, (2) of my SMC PTC 3/8" straights were defective, so I called up Bagriders.com and asked them if this was something that happened often, but they assured me that this was an extremely special case that and they had never had issues with these PTC fittings before. So, BagRiders was nice enough to send me some replacement fittings and then I was good to go, so a huge shoutout to www.bagriders.com for hooking me up with fantastic customer service, quick shipping, and supplying the parts I needed.

    SO! Here we are, test fitting the VU-4 controller on the tanks in the box.


    Starting the copper bending. I had a good idea of routing I wanted to take with the lines already (thank you slightly slow History class at 8:00 am) so I got right into the bending.

    **NOTE**

    I wasted about 6' of copper because I put it right in my hand bender and crimped. If you're like me, and are not wanting to have major crimp marks in your hard lines, then you can't just put the piping in the bender and expect the O.D. to remain the same across the bend. Copper is an extremely soft metal, you can easily bend it with your hands, and the O.D. is easily manipulated but extremely difficult to "bring back" so to speak. So, I talked with a friend who is a machinist and he suggested that I fill the copper with something, thus helping keep the original outside diameter when bending. So I went to home depot and bought a bag of playground sand for $5. They only come in 50lb sacks... Oh, btw I bought all my copper from Home Depot too. It's extremely expensive to buy copper straights (which is what we all want to start with for our bends) so I decided to make my own. I actually bought a 3/8" copper straightener from the UK that developed this product using kickstarter. I could not find any other viable solution from the US market, which really surprised me, but this device is genius, and relatively affordable, and creates extremely straight bends out of your coil of copper - which is what I bought from home depot (I just got the 3/8" O.D. 20' coils of copper used for refrigeration or compressed air - $1.50/ft I believe).

    So, after sliding these sections of coils through the straightener, I plugged one end of the straight and filled it with sand, tapped the ends to keep filled air gaps inside, and really shoved as much sand inside my tubing as possible. (If there are any air gaps inside then it completely defeats the purpose of putting anything in there because as soon as you start your bend the sand shifts to the low pressure area and you still get your crimped O.D. marks. So, I filled them with sand to the brim and then some and capped both ends when done. Then I would put it in my hand bender and it made dramatic changes in my bending results. It's not a perfect system, but it's a lot closer to what I wanted. Stainless Steel lines seem to be used for perfect looking O.D. bends, but SS is extremely expensive and much harder to work with.

    This is the straightener device I used. It's such a simple machine its brilliant. Just 16 bearings at 90 degree offsets to each other that keep the O.D. of the pipe when shoved through.
    It's called a Kwix, from the company http://www.kwixuk.com and I got the 3/8" O.D. tool. Shipped price was $80 I think? I was very pleased, to say the least. A huge shoutout to KwixUK for making a brilliant product.


    Just shove the end through like this.


    Bam, a straight pipe.


    So here I've started the first line.


    Marking the lines for a 90 turn. (Note, this image shows the first set of lines I make WITHOUT using sand, so you can see bend marks near the inserts on the VU-4.


    Here I'm marking out where the bulkheads will go. Somehow you need to get the compressed air out from your VU-4 controller to your bags, and doing so means passing to the outside of the vehicle at some point. I REALLY wanted a box in the trunk that was rectangular in shape and uniform.. but the fuel filler neck kept me from doing that and gave me that 45 angle on the upper right hand side.. So I figured that I might as well use that not a design flaw, but with purpose. So I'm going to put the bulkheads along that 45 to pass the lines to the outside, where they will switch material to nylon lines.

    Here I am using the bulkhead threads to help visualize where the lines would be situated on the 45.


    Here I've marked where the holes are going to be.


    Using a unibit I started drilling.....


    And then disaster struck.......
    The unibit wasn't quite large enough to drill the O.D. for the bulkhead, so I started using a dremel to help enlarge that diameter just a tiny bit and my hand slipped and my bit went straight through the filler cap to the gas tank.. Gas started dripping everywhere, and I knew it was over. So I started researching what I'd need to do to correct the problem, and book time to drop the tank is just over 7 hours.. Not to mention, the filler neck and gas tank is a one-piece unit, costing over $1,100.... I said, no way. I wasn't going to drop the tank unless I really had too, so I a really close look at the hole I made and it wasn't on the underside of the neck, more on the side of it, so I thought I'd give J.B. Weld's Waterweld a shot:
    http://www.amazon.com/J-B-Weld-8277-.../dp/B000BRQ0TW
    I'd heard good results from another mechanic that he uses this all the time for fuel tank fixes under 1/2" in diameter, and my hole was maybe 3/16" so I thought, why not. It's cheap and can't hurt to try. So I plugged the hole and waiting a day and it seemed to work!! YES. But, I thought it'd be a good idea to test me EVAP system to make sure it's all sealed up, so I went into VAG-com and did a complete fuel-tank and EVAP system check and this is what I got. Hallelujah.

    Last edited by #Avantbuild; 05-12-2014 at 09:26 AM.

  13. #13
    Established Member Two Rings #Avantbuild's Avatar
    Join Date
    Apr 08 2014
    AZ Member #
    179196
    Location
    Walla Walla, Washington

    TRUNK: Part 7

    After fixing the hole I kept drilling, much more careful now..


    Tank sitting in there, oooooh so pretty.


    I wasn't sure I would like the wood grain tanks with the copper lines, but now I'm kinda digging it. However, the brass fittings on the bulkheads were too much. Also, the hex head shape didn't cover the drill hole O.D. so I had a friend of mine help me machine and thread some new nuts. Thank you Tosh, you're the man.
    I then plasti-dipped them flatblack and threaded them on the bulkheads and was much happier with the finish than the brass hex nuts.


    I made sure to use the recommended loctite for the PTC's.


    Pulled the lines out to clean the box from saw dust and other particles.


    Here's all the lines installed and the Mead mufflers plugged into the VU-4.


    I finished the lines around 4:30 am on Sunday, April 27, just in time to roll it out for the Walla Walla University Alumni Car show. The University's Auto Club has a food booth and all of us students bring out rides out to show what we got in comparison to the brand new Corvettes and wide-body Austin Mini's that the alumni brings to show. lol
    I popped the trunk and displayed the front struts along with some Accuair brochures to help educate the public haha. I only got asked if the tanks were for NOS once, which I was really surprised about. Ha!

    Here I am representing my new MRR Wheels GF6 19/9.5 et +15 with Accuair gear.

    Last edited by #Avantbuild; 05-12-2014 at 09:41 AM.

  14. #14
    Established Member Two Rings #Avantbuild's Avatar
    Join Date
    Apr 08 2014
    AZ Member #
    179196
    Location
    Walla Walla, Washington

    WHEELS & FITMENT

    So, back in 2013 I was trying to find a set of wheels that would really change the characteristics of this wagon into a stance'd beast. I went to SEMA 2013 and looked very hard for a pattern I that I thought would be perfect. Unfortunately, most of their builds are featuring Adv.1 which are 8-12k for a set. Not even remotely a possibility for me. I really wanted a set of Rotiform IND's, but couldn't afford the 3-piece set either. I started searching for wheel manufactures that are "up and coming" that I could afford, and I found MRR Wheels. I contacted them directly about my senior project for school and asked if they would be interested in doing a part sponsor for my project by helping me get a set of wheels, and they very kindly replied almost immediately that they would love to do that, but I should really apply for their scholarship contest they were having. Scholarship? Well, in Oct-Nov they held a scholarship giveaway of $5,000 for five students in the automotive industry. I wrote an essay and submitted my application for approval and it was shared on their instagram and FB page for our friends and families to support each applicant, and at the end of November I got the notification that I had been chosen to represent MRR with their $1,000 scholarship! So I put the check on my school bill and that gave me the freedom to buy a set of wheels from them, and shipped I paid just over $1,100 for a set of 19x9.5 et+25 front and et+15 rear deep concave MRR GF6's. So, huge shoutout to MRR Wheels for catering such a fanatic scholarship program for Automotive students, and hooking me up with an amazing set of wheels that are going to give me the aggressive look I want so badly. Thank you!!!

    That said, lets get into the fitment process a little bit.

    Unboxing the new wheels.


    I did a lot of calculations to figure out my offset. I didn't want to use spacers, so by using basic math and accurately measuring my stock wheels I was able to calculate the measurements needed to get the stance I wanted.
    This fitment was done back in January, so I hadn't done the exhaust yet or even cut the trunk out, but I removed the front and rear springs to test fitment.


    Taking apart the front upper control arms were a pain because there was a lot of sand and gunk sitting in where the bolt slides through the receiver on the top of the steering knuckle that holds the two pins connected to the control arm.


    Using a prybar I was able to get the pins out hitting them with a rubber mallet at the same time.


    Gross


    Problem. My stock shocks don't go low enough.. I ended up buying the Koni yellow struts that are designed for lowered vehicles. Costed me another $250 shipped from ECS for the front two struts. According to Accuair, their B8 Sport Kit is designed to utilize the OEM B8 struts and they are capable of going low enough already, but I guess they're a slightly different design than the B7 ones, so I needed to replace them.


    Here's the front passenger strut bottomed out with still 1.5" to drop still..


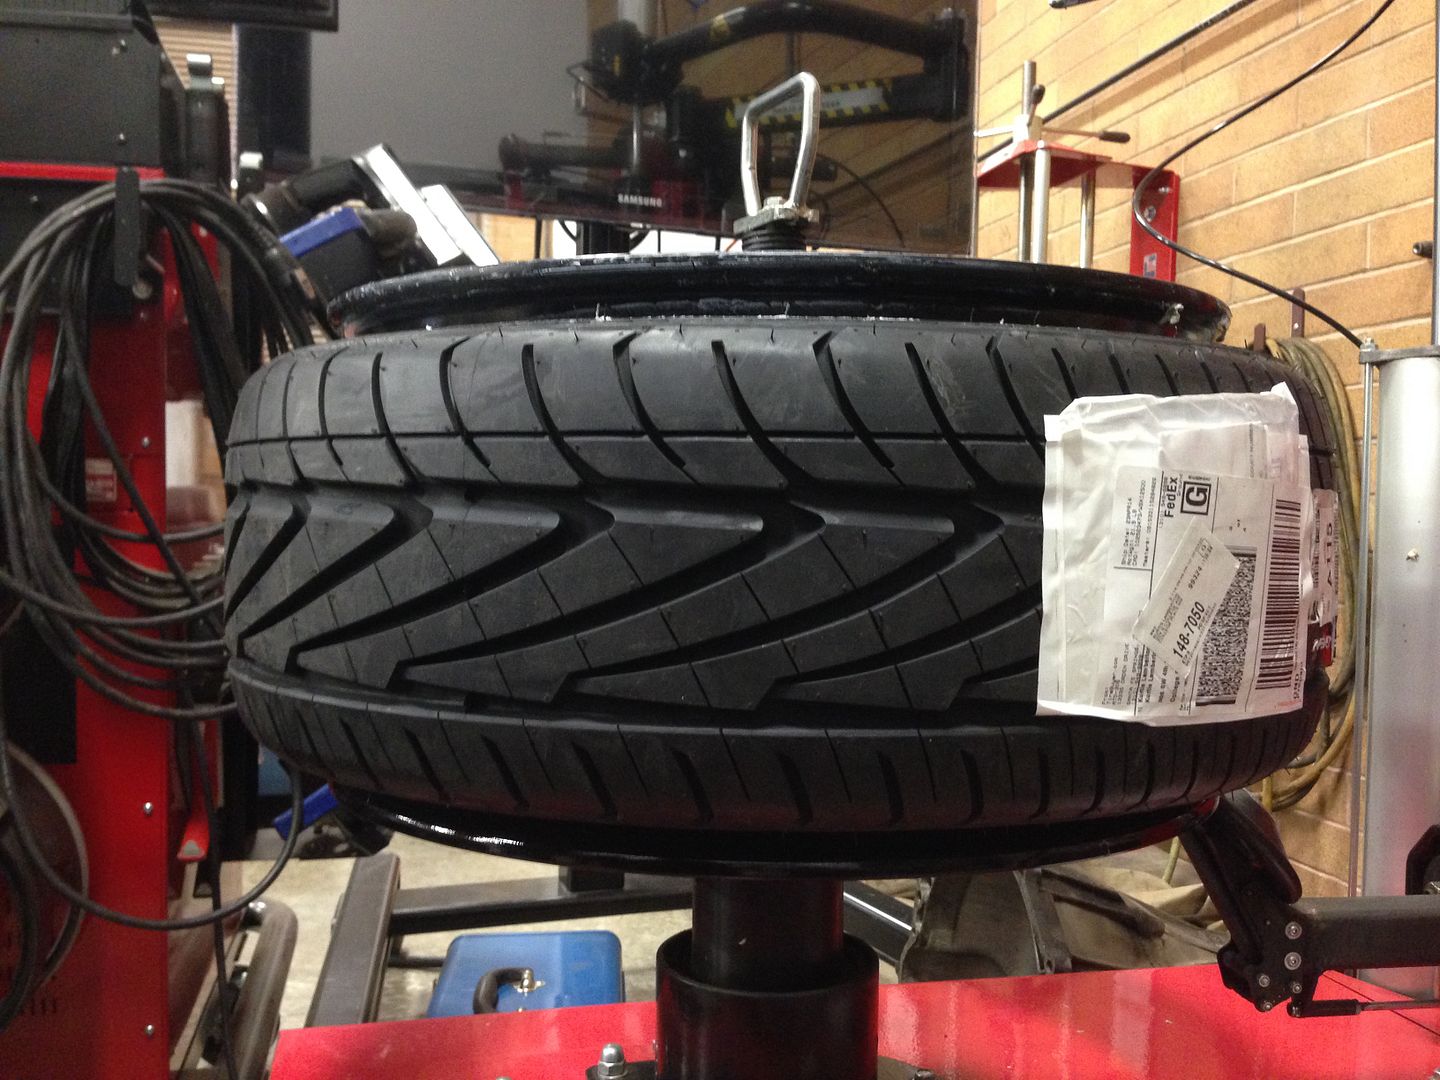
    Mounting the 1st set of tires, lol, using our Hunter tire mounting machine.


    I got a set of Nitto Neo Gen 215/35-19 to get the stretch I wanted to sit the fender right between the tire and wheel lip, but the sidewalls were stiff enough that they would not mount on the rim in a way I was comfortable running. I tried blasting air to set the bead, I tried a dyno strap in the middle, I even did the dreaded start fluid tire stretching method. No dice. So I sent them back and got a set of Nitto NT555 225/23-19's and they mounted perfectly.

    Here's the Neo Gen's


    Here's the NT555's mounted and test fitted in the front.


    I'm going to pull the fenders just a bit to give me clearance to drop when I park.

    Last edited by #Avantbuild; 05-12-2014 at 12:14 PM.

  15. #15
    Veteran Member Four Rings Audi_509's Avatar
    Join Date
    May 20 2010
    AZ Member #
    59269
    My Garage
    2008 A4-sold. 2019 A5-sold,: '23 S5
    Location
    WA

    I can't believe I haven't seen you driving around. Do you happen to live in College Place instead of Walla Walla?

  16. #16
    Veteran Member Four Rings mec's Avatar
    Join Date
    Jul 25 2010
    AZ Member #
    61858
    My Garage
    Spare engines!
    Location
    Denver, Colorado

    My hat off to you sir, what an idea, looks like it will be fantastic.

    One bit of personal advice. Guys who do air ride make their controls far too easy to bump into, nudge, hit, press, you name it. The paddle shifter idea is fantastic, buttttttt....what happens when someone else drives your car and presses one of those and bottoms out the car destroying your wheels and oil pan and undercarriage? Or what happens when you are cleaning your car and accidently bump the switch, it sticks and you air out on startup, etc. Various scenarios where you destroy your car because the switches are too accessible. So why not install a killswitch so that the the paddle shifters only work once the primary switch is turned on?

    Easy insurance.

  17. #17
    Established Member Two Rings #Avantbuild's Avatar
    Join Date
    Apr 08 2014
    AZ Member #
    179196
    Location
    Walla Walla, Washington

    Quote Originally Posted by Audi_509 View Post
    I can't believe I haven't seen you driving around. Do you happen to live in College Place instead of Walla Walla?
    Seriously?? Yea I live in College Place lol. You haven't seen it cause it's not quite finished yet. I drove it for the first time today on bags around the block cause I don't have the height sensors in yet..

  18. #18
    Established Member Two Rings #Avantbuild's Avatar
    Join Date
    Apr 08 2014
    AZ Member #
    179196
    Location
    Walla Walla, Washington

    Quote Originally Posted by mec View Post
    My hat off to you sir, what an idea, looks like it will be fantastic.

    One bit of personal advice. Guys who do air ride make their controls far too easy to bump into, nudge, hit, press, you name it. The paddle shifter idea is fantastic, buttttttt....what happens when someone else drives your car and presses one of those and bottoms out the car destroying your wheels and oil pan and undercarriage? Or what happens when you are cleaning your car and accidently bump the switch, it sticks and you air out on startup, etc. Various scenarios where you destroy your car because the switches are too accessible. So why not install a killswitch so that the the paddle shifters only work once the primary switch is turned on?

    Easy insurance.
    Cheers homie.
    It's a very valid concern! The cool thing about Accuair is that the "aired out" (parked) is not accessible while rolling. You have access to your 3 pre-saved ride heights, which technically should be at safe driving levels. The shifters will switch between the heights, and not a variable control. Does that make sense? Essentially, you could be cruising in (2) and click the right paddle shifter and it'll raise up to (3), then after the train tracks you click the left shifter and it'll lower back to (2). However, I love the idea of a kill-switch. Super easy to install, and that way it'll disable an accidental use by another occupant. Thanks for that, I appreciate it!

  19. #19
    Veteran Member Four Rings mec's Avatar
    Join Date
    Jul 25 2010
    AZ Member #
    61858
    My Garage
    Spare engines!
    Location
    Denver, Colorado

    genius!

  20. #20
    Veteran Member Four Rings fly300kts's Avatar
    Join Date
    Oct 16 2008
    AZ Member #
    34255
    My Garage
    03 Golf GTI - 03 Golf 2.0l - 04 Golf 2.0L
    Location
    South Florida - Ft Lauderdale

    Congrats, really impressed

    Phil

  21. #21
    Veteran Member Four Rings geebus's Avatar
    Join Date
    Nov 13 2011
    AZ Member #
    83873
    My Garage
    b7 s4 avant
    Location
    Maryland

    very cool stuff going on here! Makes me want to go to automotive school lol. And photography school. Looking forward to seeing the updates
    I drive a truck now.

    #R.I.P. -Brilliant Red B7 S4 avant 6mt | VMR V801'S 19X9.5 ET34 Anthracite Gray | Hankook 235 35 | Airlift Bags & V2 | Fast intentions non-resonated cat-back | JHM catted :( longtube headers | JHM tuned
    Light silver metallic B7 A4 sedan tip | sold

  22. #22
    Veteran Member Three Rings leftovers's Avatar
    Join Date
    Apr 14 2009
    AZ Member #
    41178
    Location
    ottawa, il

    Cool build. I'm looking forward to the rest of the updates. You are very brave for cutting up the trunk like that. I don't think I would have done it. I would have found a way to work around it...I'm not sure how...I'm sure it would have been a compromise though.
    2004 A4 Ultrasport, 1.8T, 6MT
    Instagram: audi_ute_build

  23. #23
    Veteran Member Four Rings PNW Avant's Avatar
    Join Date
    Dec 22 2009
    AZ Member #
    52390
    My Garage
    2008 A4 Avant
    Location
    Bellevue, WA

    Great thread. The only disappointment is that it was a great story with no ending! Looking forward to seeing the progress.
    Mine: 2008 Ibis White Titanium Pkg S-line A4 Avant 2.0T
    Hers: 2018 Ink Blue Metallic Q7 Prestige

  24. #24
    Established Member Two Rings #Avantbuild's Avatar
    Join Date
    Apr 08 2014
    AZ Member #
    179196
    Location
    Walla Walla, Washington

    Quote Originally Posted by fly300kts View Post
    Congrats, really impressed

    Phil
    Thanks Phil! I'll be updating more in the next bit here.

  25. #25
    Established Member Two Rings #Avantbuild's Avatar
    Join Date
    Apr 08 2014
    AZ Member #
    179196
    Location
    Walla Walla, Washington

    Quote Originally Posted by geebus View Post
    very cool stuff going on here! Makes me want to go to automotive school lol. And photography school. Looking forward to seeing the updates
    Thanks man!! More updates coming soon. Thanks for checking it out!

  26. #26
    Established Member Two Rings #Avantbuild's Avatar
    Join Date
    Apr 08 2014
    AZ Member #
    179196
    Location
    Walla Walla, Washington

    Quote Originally Posted by leftovers View Post
    Cool build. I'm looking forward to the rest of the updates. You are very brave for cutting up the trunk like that. I don't think I would have done it. I would have found a way to work around it...I'm not sure how...I'm sure it would have been a compromise though.
    Haha, I don't blame you one bit. I'd say I agree with you 100% except I've seen the results now that I'm mostly finished with the trunk and it was worth it. I definitely second and triple guessed myself while I was doing it though...

  27. #27
    Established Member Two Rings #Avantbuild's Avatar
    Join Date
    Apr 08 2014
    AZ Member #
    179196
    Location
    Walla Walla, Washington

    Quote Originally Posted by PNW Avant View Post
    Great thread. The only disappointment is that it was a great story with no ending! Looking forward to seeing the progress.
    Thank you! Sorry about that haha, I'm posting some new material very soon!

  28. #28
    Veteran Member Four Rings
    Join Date
    Feb 17 2013
    AZ Member #
    109689
    My Garage
    Q7 . A3 3.2 Quattro and way too many cars in the garage.
    Location
    Burlingame

    Very nice , love the idea of the wheel.

  29. #29
    Senior Member Two Rings jnm's Avatar
    Join Date
    Nov 30 2013
    AZ Member #
    132684
    My Garage
    B7 A4 Avant
    Location
    Marin, CA

    Looking great so far!
    ---
    Jonathan
    --
    BB 08 2.0 A4 Avant: GIAC, Hawk HPS, SS Lines, Zimm Rotors, Koni Coilovers, 034 UCA, 18x8.5 810VMR

  30. #30
    Established Member Two Rings #Avantbuild's Avatar
    Join Date
    Apr 08 2014
    AZ Member #
    179196
    Location
    Walla Walla, Washington

    Quote Originally Posted by CLEANA3 View Post
    Very nice , love the idea of the wheel.
    Cheers sir!

  31. #31
    Established Member Two Rings #Avantbuild's Avatar
    Join Date
    Apr 08 2014
    AZ Member #
    179196
    Location
    Walla Walla, Washington

    Quote Originally Posted by jnm View Post
    Looking great so far!
    Thank you! There's more stuff happening all the time, so stick around.

  32. #32
    Veteran Member Three Rings volcomic's Avatar
    Join Date
    May 10 2008
    AZ Member #
    28613
    My Garage
    B9 A4
    Location
    Kirkland, WA

    I'm excited to see the rest of this! Hopefully I'll get the chance to see this in person at some point on the LW cruise or Audi expo? I'm starting to think mine will end up on bags at some point as I get bored with it, but I can't say I'll have the balls to cut her up and make a custom setup like that. Nice work
    ◊ 20x10 Avant Garde M590's - Brushed Clear ◊ 255/30-20 Hankook V12's ◊ H&R VTF Suspension ◊ APR Tune ◊ ECS Luft-Technik Intake ◊ ECS Carbon Fiber Front Lip Spoiler ◊ ECS Carbon Fiber Grille Accents ◊ Color Matched Reflectors ◊ 15% Tint ◊ 2 JL Audio 12w6V2's ◊ JL Audio 1000/1 Amp ◊

  33. #33
    Established Member Two Rings CassiesandraLee's Avatar
    Join Date
    Jan 10 2014
    AZ Member #
    138646
    My Garage
    No garage, just single apartment life!
    Location
    Abilene, TX

    You're making me miss the 509! As well as the Walla Walla valley wine :)

    Looks so great, wish I had your abilities!
    2006 A4 2.0T quattro

  34. #34
    Established Member Two Rings CassiesandraLee's Avatar
    Join Date
    Jan 10 2014
    AZ Member #
    138646
    My Garage
    No garage, just single apartment life!
    Location
    Abilene, TX

    Also, I went to many a swim meet at Walla Walla U back in high school, one of the best racing pools in Washington.
    2006 A4 2.0T quattro

  35. #35
    Veteran Member Four Rings RAudiB7A4's Avatar
    Join Date
    Nov 08 2010
    AZ Member #
    66724
    My Garage
    2015 Hyundai Santa Fe Sport AWD
    Location
    Rochester/MN/Mid West

    Nice work, nice build. Excited to watch it progress and see the finished product!
    DTM_B7_S4

    Previous car: APR_Stage_II+_B7_A4

  36. #36
    Veteran Member Four Rings AKO's Avatar
    Join Date
    Oct 31 2011
    AZ Member #
    83253
    My Garage
    B8.5 S4, B9.5 SQ5, MK4 Jetta
    Location
    Redmond, WA

    Awesome stuff. Really love the quality being put in! Bring it to Leavenworth if you finish up by then
    "if I wanted magic phallus shaped objects that didn't make me go any faster, I would just hit the gay club downtown, no need to spend $400." - Mec

    S4 Build

  37. #37
    Established Member Two Rings #Avantbuild's Avatar
    Join Date
    Apr 08 2014
    AZ Member #
    179196
    Location
    Walla Walla, Washington

    Quote Originally Posted by volcomic View Post
    I'm excited to see the rest of this! Hopefully I'll get the chance to see this in person at some point on the LW cruise or Audi expo? I'm starting to think mine will end up on bags at some point as I get bored with it, but I can't say I'll have the balls to cut her up and make a custom setup like that. Nice work
    Haha! Thanks man, I appreciate it. It was definitely tough to cut up a perfectly good vehicle. I am not sure I'll make it to LW because I'm graduating college the next day.. when and where is the Audi expo?

  38. #38
    Established Member Two Rings #Avantbuild's Avatar
    Join Date
    Apr 08 2014
    AZ Member #
    179196
    Location
    Walla Walla, Washington

    Quote Originally Posted by CassiesandraLee View Post
    You're making me miss the 509! As well as the Walla Walla valley wine :)

    Looks so great, wish I had your abilities!
    Yeahhhh 509 whattup! Thanks for the props, I appreciate it very much.

  39. #39
    Established Member Two Rings #Avantbuild's Avatar
    Join Date
    Apr 08 2014
    AZ Member #
    179196
    Location
    Walla Walla, Washington

    Quote Originally Posted by RAudiB7A4 View Post
    Nice work, nice build. Excited to watch it progress and see the finished product!
    Cheers sir, I can't wait to share the rest!

  40. #40
    Established Member Two Rings #Avantbuild's Avatar
    Join Date
    Apr 08 2014
    AZ Member #
    179196
    Location
    Walla Walla, Washington

    Quote Originally Posted by AKOeuro View Post
    Awesome stuff. Really love the quality being put in! Bring it to Leavenworth if you finish up by then
    Thanks man! I wish I could go, but it doesn't look like my schedule will allow it. Where's a good way to find out about the Euro meets in the PNW?

Bookmarks

Posting Permissions

  • You may not post new threads
  • You may not post replies
  • You may not post attachments
  • You may not edit your posts
  •  


    © 2001-2025 Audizine, Audizine.com, and Driverzines.com
    Audizine is an independently owned and operated automotive enthusiast community and news website.
    Audi and the Audi logo(s) are copyright/trademark Audi AG. Audizine is not endorsed by or affiliated with Audi AG.