Audizine - An Automotive Enthusiast Community

Results 1 to 22 of 22
  1. #1
    Established Member Two Rings xbriansg36x's Avatar
    Join Date
    Nov 10 2013
    AZ Member #
    129327
    Location
    Wilkes Barre

    How to remove and replace glovebox door?

    Guest-only advertisement. Register or Log In now!
    I need a new glove box door but before I buy it I was wondering if anyone has any experience removing the glove box door? Does the whole glove box need to be removed or is there another way?

    Sent from my HTC One using Tapatalk
    Unitronic 1+ l Stasis DP Back l Techtonics Downpipe l DIY Intake l DTM Front Bumper l RS Grill l Debadge l

    Coming Soon: Stage 2+ l HPFP l FMIC l Test Pipe l JOM Coils l Carbon Fiber Wrap l JBL Sound Upgrade l More! l

  2. #2
    Established Member Two Rings Sipset's Avatar
    Join Date
    Aug 07 2010
    AZ Member #
    62400
    Location
    Charlotte, NC

    It's a lot easier if you remove the entire glovebox in my opinion. A lot more room to work with. I removed mine when I fixed the broken hinges on the GB door.
    2004 S4

  3. #3
    Established Member Two Rings xbriansg36x's Avatar
    Join Date
    Nov 10 2013
    AZ Member #
    129327
    Location
    Wilkes Barre

    Makes sense, do I have to remove any of the dash to do the repair or no

    Sent from my HTC One using Tapatalk
    Unitronic 1+ l Stasis DP Back l Techtonics Downpipe l DIY Intake l DTM Front Bumper l RS Grill l Debadge l

    Coming Soon: Stage 2+ l HPFP l FMIC l Test Pipe l JOM Coils l Carbon Fiber Wrap l JBL Sound Upgrade l More! l

  4. #4
    Veteran Member Four Rings
    Join Date
    Dec 23 2011
    AZ Member #
    85651
    Location
    USA

    You don't need to touch the dash to remove the glove box. There was a similar thread started yesterday, check that one out for more details

  5. #5
    Established Member Two Rings xbriansg36x's Avatar
    Join Date
    Nov 10 2013
    AZ Member #
    129327
    Location
    Wilkes Barre

    Okay awesome thanks a lot.


    Sent from my HTC One using Tapatalk
    Unitronic 1+ l Stasis DP Back l Techtonics Downpipe l DIY Intake l DTM Front Bumper l RS Grill l Debadge l

    Coming Soon: Stage 2+ l HPFP l FMIC l Test Pipe l JOM Coils l Carbon Fiber Wrap l JBL Sound Upgrade l More! l

  6. #6
    Established Member Two Rings Sipset's Avatar
    Join Date
    Aug 07 2010
    AZ Member #
    62400
    Location
    Charlotte, NC

    Not sure if its the same on the B6 as the B7, but it can't be much different.

    Copied from Old Baldy @ EuroAddiction
    Seven of the nine screws are inside the glove box itself. The other two are underneath, on each side. Unscrew those bottom screws first.
    Then, open the lid (which is presumably broken, so carefully hold the lid while unscrewing the seven screws inside the glove box. Ignore the little rubber bump stops...just unscrew the 7 screws inside the box.
    Note: Two of the screws are almost hidden from sight, near the front, upper side. Get down and look up inside the glove box and you will see these two screws.

    Once all nine screws are removed, simply pull the whole glove box module out from the dash. Note that there is a large, light-brown electrical connector that supplies the power to the glove box light and the footwell lights. See below...
    2004 S4

  7. #7
    Veteran Member Three Rings Acme's Avatar
    Join Date
    Mar 28 2012
    AZ Member #
    90791
    My Garage
    Aprilia Tuono V4
    Location
    Québec

    2013 Daytona Gray A4 Premium S-Line Quattro 6MT - NAV - bi-xenon - adaptive dampers - Alcantara - Eron's rear view cam
    SOLD! 2008 A4 2.0T Quattro 6MT Unitronic stage 2

  8. #8
    Veteran Member Four Rings wildcat333's Avatar
    Join Date
    Feb 25 2011
    AZ Member #
    71493
    My Garage
    2016 Ford F-150; 2018 Honda Grom
    Location
    Seacoast NH

    ^ poor form acme! gotta use a short link next time for full effect
    2008 Audi A4 2.0T Quattro | Light Silver | S-Line | Automatic-Tiptronic | GIAC Stage 1+ | Autotech HPFP | 135 bar PRV | 35% Tint | KW V1 Coilovers | RS4 RSB | 034 Snub Mount | Evolution Thor Skid Plate | Osram CBI 5000K D1S | Clear-Cornered | 6000K LED City Lights | LED DRLs | Paint-Matched Sidemarkers | Hoen Endurance Fogs | Interior LEDs | Plate LEDs | Upgraded Brakes | 18" RS4 Wheels | Sirius Satellite Radio Tuner | Aux-In | Hardwired Passport 8500 X50 | Hella Super Tone Horns

  9. #9
    Established Member Two Rings xbriansg36x's Avatar
    Join Date
    Nov 10 2013
    AZ Member #
    129327
    Location
    Wilkes Barre

    Awesome I really appreciate it guys I'll check it out and order the part Monday

    Sent from my HTC One using Tapatalk
    Unitronic 1+ l Stasis DP Back l Techtonics Downpipe l DIY Intake l DTM Front Bumper l RS Grill l Debadge l

    Coming Soon: Stage 2+ l HPFP l FMIC l Test Pipe l JOM Coils l Carbon Fiber Wrap l JBL Sound Upgrade l More! l

  10. #10
    Veteran Member Three Rings Acme's Avatar
    Join Date
    Mar 28 2012
    AZ Member #
    90791
    My Garage
    Aprilia Tuono V4
    Location
    Québec

    Quote Originally Posted by wildcat333 View Post
    ^ poor form acme! gotta use a short link next time for full effect
    Yeah, I forgot... Sorry!
    2013 Daytona Gray A4 Premium S-Line Quattro 6MT - NAV - bi-xenon - adaptive dampers - Alcantara - Eron's rear view cam
    SOLD! 2008 A4 2.0T Quattro 6MT Unitronic stage 2

  11. #11
    Senior Member Two Rings jnm's Avatar
    Join Date
    Nov 30 2013
    AZ Member #
    132684
    My Garage
    B7 A4 Avant
    Location
    Marin, CA

    ugh.. I need to do this at some point. My damn hinge us all f'ed up too.
    ---
    Jonathan
    --
    BB 08 2.0 A4 Avant: GIAC, Hawk HPS, SS Lines, Zimm Rotors, Koni Coilovers, 034 UCA, 18x8.5 810VMR

  12. #12
    Established Member Two Rings xbriansg36x's Avatar
    Join Date
    Nov 10 2013
    AZ Member #
    129327
    Location
    Wilkes Barre

    Such a silly repair, seems common on this car

    Sent from my HTC One using Tapatalk
    Unitronic 1+ l Stasis DP Back l Techtonics Downpipe l DIY Intake l DTM Front Bumper l RS Grill l Debadge l

    Coming Soon: Stage 2+ l HPFP l FMIC l Test Pipe l JOM Coils l Carbon Fiber Wrap l JBL Sound Upgrade l More! l

  13. #13
    Active Member Four Rings waiapasi2006's Avatar
    Join Date
    Feb 01 2011
    AZ Member #
    70314
    My Garage
    Suzuki Alstare RIP
    Location
    SFL

    Quote Originally Posted by xbriansg36x View Post
    I need a new glove box door but before I buy it I was wondering if anyone has any experience removing the glove box door? Does the whole glove box need to be removed or is there another way?

    Sent from my HTC One using Tapatalk
    Here you go op

    http://www.a4mods.com/index.php?page...boxrattle.html
    Waiapasi2006

  14. #14
    Veteran Member Three Rings Luis_Heineken's Avatar
    Join Date
    May 28 2012
    AZ Member #
    94243
    Location
    Bayamon, Puerto Rico (USA)

    Quote Originally Posted by jnm View Post
    ugh.. I need to do this at some point. My damn hinge us all f'ed up too.
    For less than $5 you can repair the glovebox. Some 90* degrees angulars plus some screws. Time consuming but easy to do

  15. #15
    Veteran Member Four Rings ericw.'s Avatar
    Join Date
    Apr 23 2011
    AZ Member #
    74496
    My Garage
    C7 S7 4.0TT, Jeep JKU, MB GLB
    Location
    Sac Area, CA

    There's a youtube video on this if you google it with the word "youtube".
    IG @lolzhax
    //AGILITYDRIVES.US
    C7 S7 4.0tt faster than kaploww and passed smog | LX7U | JHM STG3 ECU+TCU | JHM DP + CATBACK + Oil Screen Relocation + LW Crank Pulley + Heat Exchanger | SRM +4MM Turbos | S-FloV2 | EUROCODE SWAYS | CETE ASC | RFX7 | PS4S | RS7 FR+R | PD700R Splitter | Maxton Skirt+Spoiler Extensions | Indicator Delete | Hardwired
    b7 a4 2.0t | Stage 2+ | DTM Body [sold]

  16. #16
    Established Member Two Rings
    Join Date
    Nov 01 2012
    AZ Member #
    103322
    Location
    Blue Springs

    Quote Originally Posted by Luis_Heineken View Post
    For less than $5 you can repair the glovebox. Some 90* degrees angulars plus some screws. Time consuming but easy to do
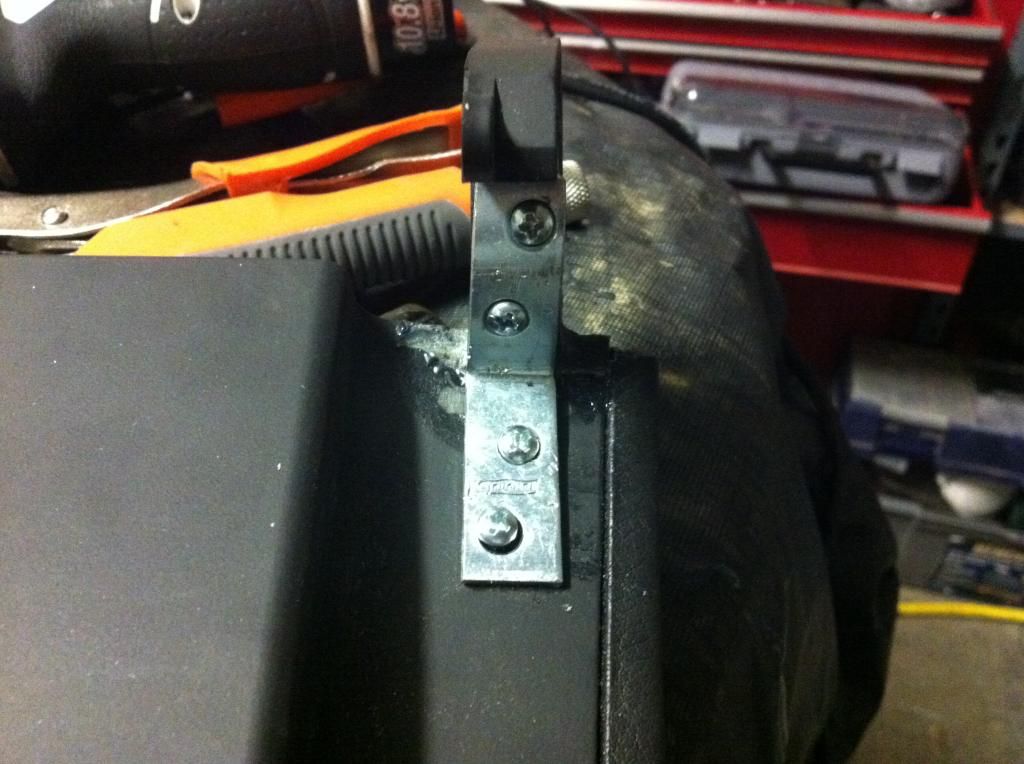
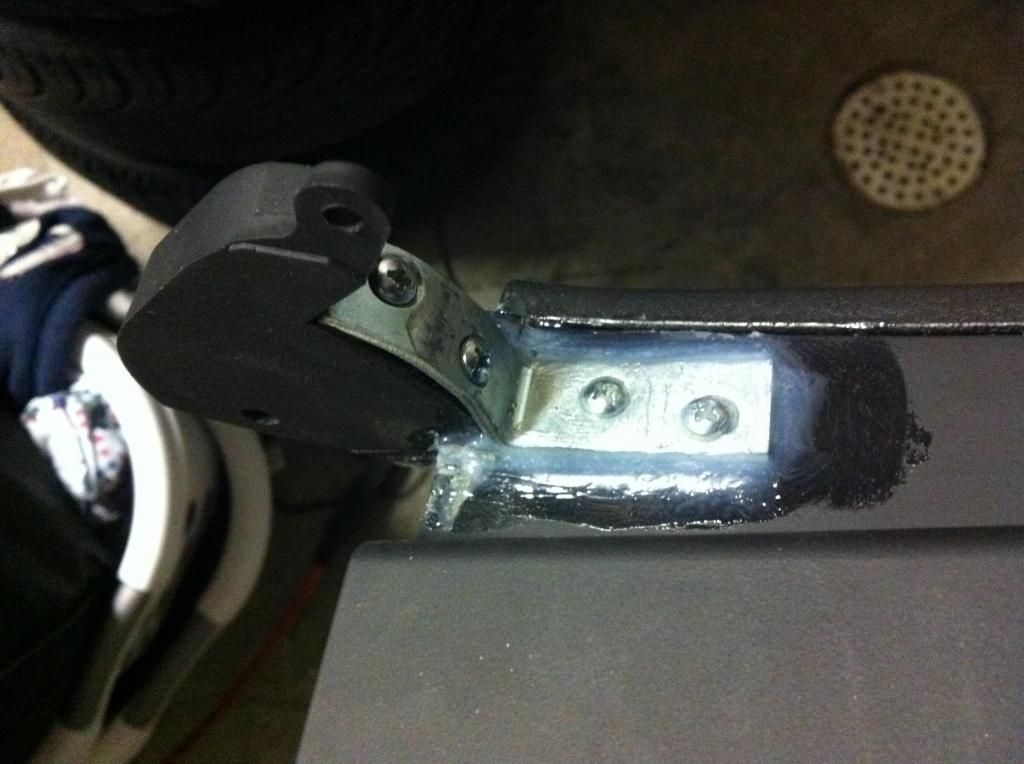
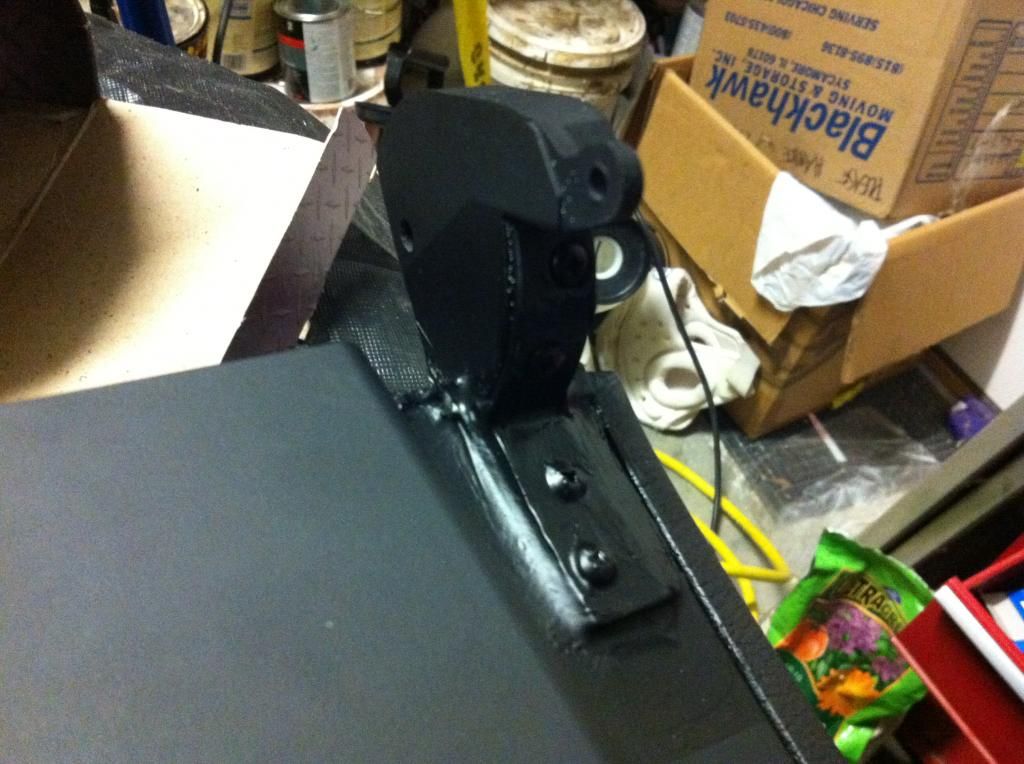
    I did mine like Luis suggested above but with additional reinforcement. This is to create steel skeleton structure inside the flimsy plastic hinge.

    1. Drill two 3/16" holes thru the hinge and glove box
    2. Insert 90 deg steel pin (1/8" dia)
    3. Filled around the pin it with 5 min epoxy
    4. Tape in place and let it set for at least 12 hours
    5. Hammer formed 90 degree bracket to follow the shape of the hinge bracket


    6. Drill holes then mount the bracket using countersunk screws. Fit it up to your car to make sure everything clears. You may need to grind away some of the bracket depends on how well your hammer formed it.


    7. Apply epoxy or etc to smooth out the joints


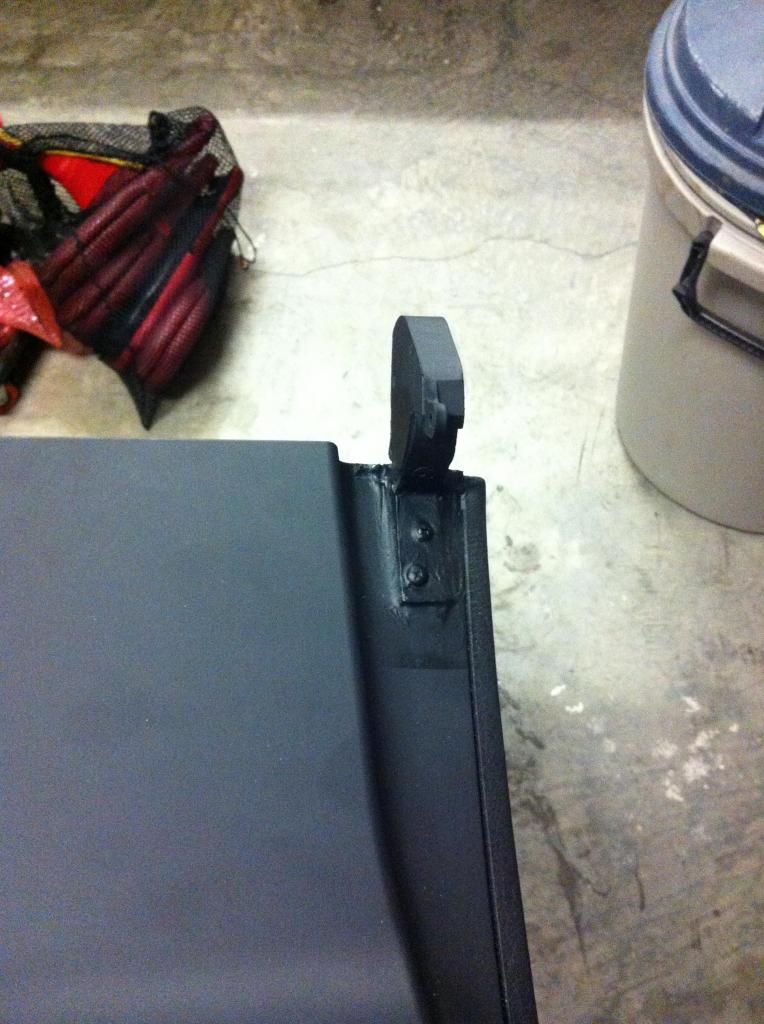
    8. Paint to match (flat black)


    9. Install it back onto your car

  17. #17
    Established Member Two Rings xbriansg36x's Avatar
    Join Date
    Nov 10 2013
    AZ Member #
    129327
    Location
    Wilkes Barre

    So I get the little 10$ kit then came back to reference this... Didn't occur until now but if the hinges are actually broken (like in half, f the guy that owned this before me) I need the whole door replacement then I can't just put a bracket on right?
    Unitronic 1+ l Stasis DP Back l Techtonics Downpipe l DIY Intake l DTM Front Bumper l RS Grill l Debadge l

    Coming Soon: Stage 2+ l HPFP l FMIC l Test Pipe l JOM Coils l Carbon Fiber Wrap l JBL Sound Upgrade l More! l

  18. #18
    Established Member Two Rings
    Join Date
    Nov 01 2012
    AZ Member #
    103322
    Location
    Blue Springs

    Quote Originally Posted by xbriansg36x View Post
    So I get the little 10$ kit then came back to reference this... Didn't occur until now but if the hinges are actually broken (like in half, f the guy that owned this before me) I need the whole door replacement then I can't just put a bracket on right?
    Yes, you can do this on hinges that are completely broken off. Infact, it is easier if it is completely off. I actually did another glove box with both hinges completely broken off. It works so give it a shot. Good luck!

  19. #19
    Established Member Two Rings xbriansg36x's Avatar
    Join Date
    Nov 10 2013
    AZ Member #
    129327
    Location
    Wilkes Barre

    Good to know! Next not freezing day I'll go do that lol
    Unitronic 1+ l Stasis DP Back l Techtonics Downpipe l DIY Intake l DTM Front Bumper l RS Grill l Debadge l

    Coming Soon: Stage 2+ l HPFP l FMIC l Test Pipe l JOM Coils l Carbon Fiber Wrap l JBL Sound Upgrade l More! l

  20. #20
    Active Member One Ring
    Join Date
    Oct 12 2014
    AZ Member #
    288443
    Location
    Whitby

    My glove box door latch has broken with the door closed. Anyone know how to get it open?
    My hinge is not broken.

  21. #21
    Veteran Member Four Rings IKE20VA4's Avatar
    Join Date
    Apr 08 2005
    AZ Member #
    6040
    Location
    Portland, OR

    Quote Originally Posted by Radar View Post
    My glove box door latch has broken with the door closed. Anyone know how to get it open?
    My hinge is not broken.
    Sounds like you are in need of a broken hinge to deal with your broken latch.

  22. #22
    Senior Member Three Rings
    Join Date
    Aug 14 2014
    AZ Member #
    274783
    My Garage
    1987 Alfa Romeo Quadrifoglio, Jeep 2.0 Wrangler Sport, 1979 P200E Vespa , 2005 Triumph Bonneville
    Location
    NYC

    Quote Originally Posted by KC-Iceman View Post
    Yes, you can do this on hinges that are completely broken off. Infact, it is easier if it is completely off. I actually did another glove box with both hinges completely broken off. It works so give it a shot. Good luck!
    Thanks KC-Iceman for the DIY! Just had the same thing break on me, ironically it was the same day I finally got in a new armrest lid! Was wondering what to do with this glove box

Bookmarks

Posting Permissions

  • You may not post new threads
  • You may not post replies
  • You may not post attachments
  • You may not edit your posts
  •  


    © 2001-2025 Audizine, Audizine.com, and Driverzines.com
    Audizine is an independently owned and operated automotive enthusiast community and news website.
    Audi and the Audi logo(s) are copyright/trademark Audi AG. Audizine is not endorsed by or affiliated with Audi AG.