Audizine - An Automotive Enthusiast Community

Page 1 of 3 123 LastLast
Results 1 to 40 of 95
  1. #1
    Senior Member Two Rings Dan_Q's Avatar
    Join Date
    May 18 2011
    AZ Member #
    75696
    My Garage
    2011 BMW 335i, 392 whp
    Location
    Colorado Front Range

    B8 A4 2.0 TFSI: DIY Water Pump Replacement

    Guest-only advertisement. Register or Log In now!
    Parts Needed: Water pump/housing/thermostat (06H121026CF), Cooler Pipe (06H121131C), Gasket (N90365302), at least 1 gallon of coolant.


    Other Stuff Needed: Big pan/pans for catching coolant, towels, normal sockets/extensions/swivels. M9 triple square bit. L handle T30 torx wrench.

    My water pump was leaking a very small amount and since I am getting ready to sell the car, I didn’t want to pass this problem onto the next owner.

    As far as I know there is no elegant way of draining coolant. Accept the fact that you are going to make a mess of your garage floor. I have two XL sized disposable aluminum turkey baking pans that I use for any work requiring coolant draining. I just get a couple of old towels and lay them out below the engine then put the pans on top of those and hope for the best. This usually catches the majority of what comes out.

    Step 1: Jack up the front of the car and remove the following:
    • Rear undertray
    • Front undertray
    • Intake manifold (my carbon cleaning DIY explains how to do this)

    Step 2: Disconnect the two T30 bolts holding the cover over the water pump belt. The longer one goes into the block. Shorter one goes into the water pump.
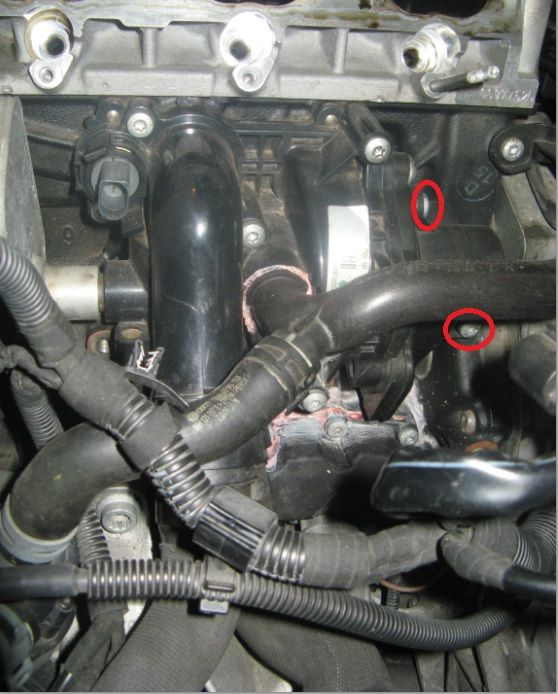


    Step 3: Detach the two T30 bolts holding this coolant line in place. One goes into the block and one goes into the water pump housing. This actually seemed to be the location where my pump was leaking but I went ahead and replaced the whole pump because apparently the housing commonly leaks from multiple places and I didn’t want to fix this location just to have a new leak form in 6 months. Once disconnected, you will need to pull the coolant line out of the water pump housing slightly so that the belt cover can be slid out of the way. The deluge of coolant can now begin.
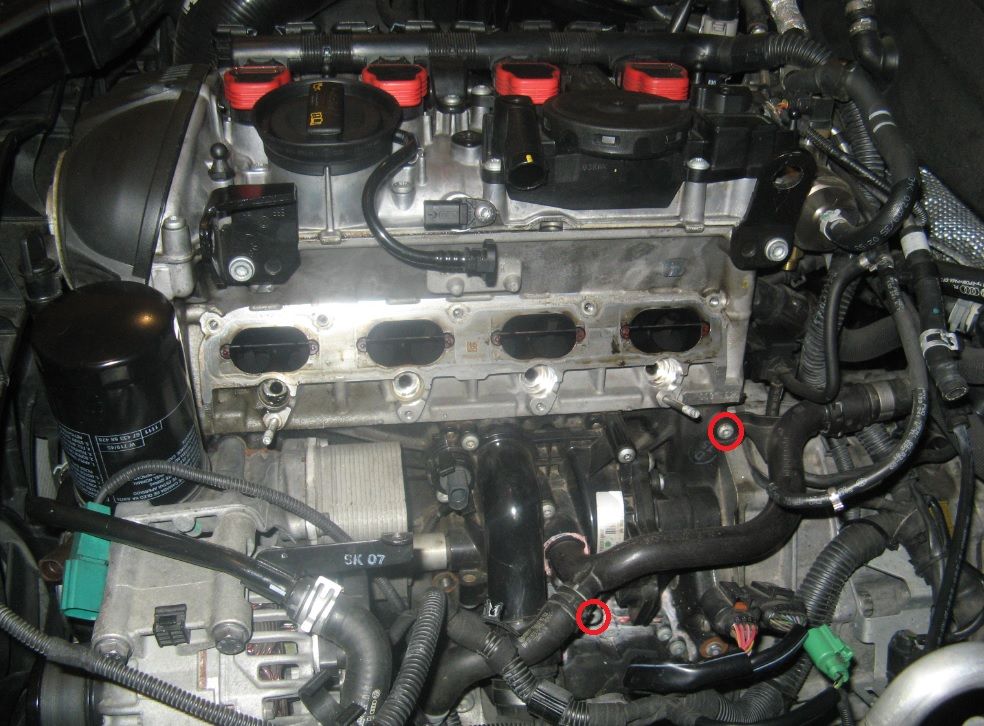


    Step 4: Slide the metal clips open on the main connections for the coolant lines coming from the expansion tank and the radiator. Pull both hoses off the water pump housing and let the rain of coolant continue.

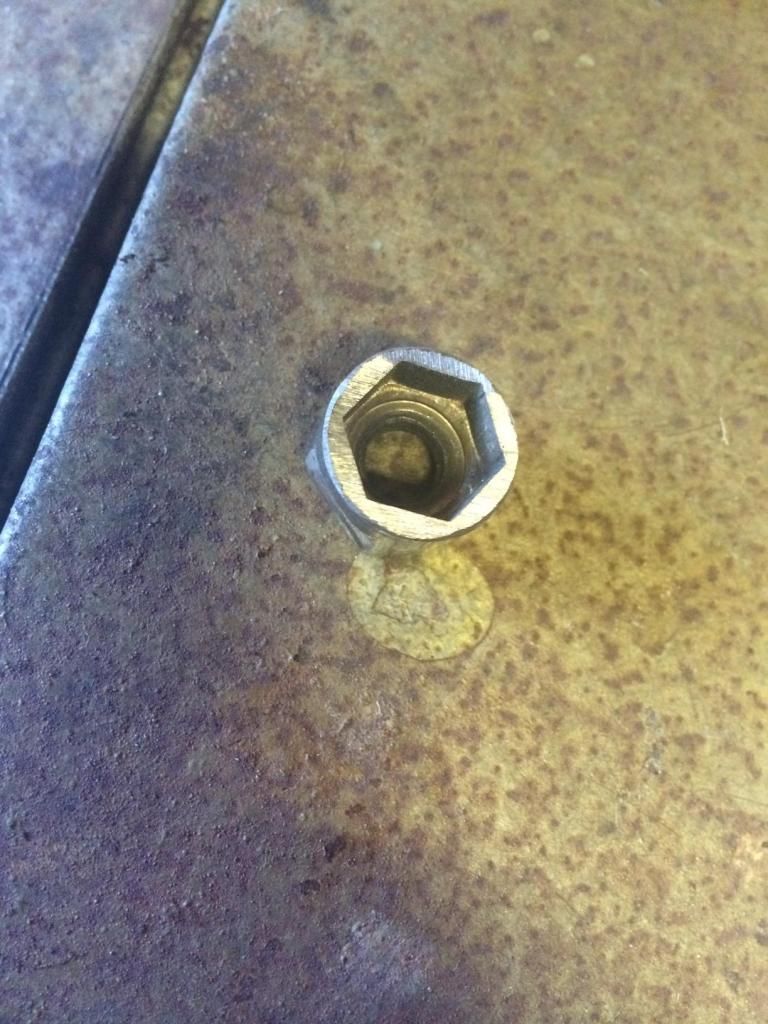
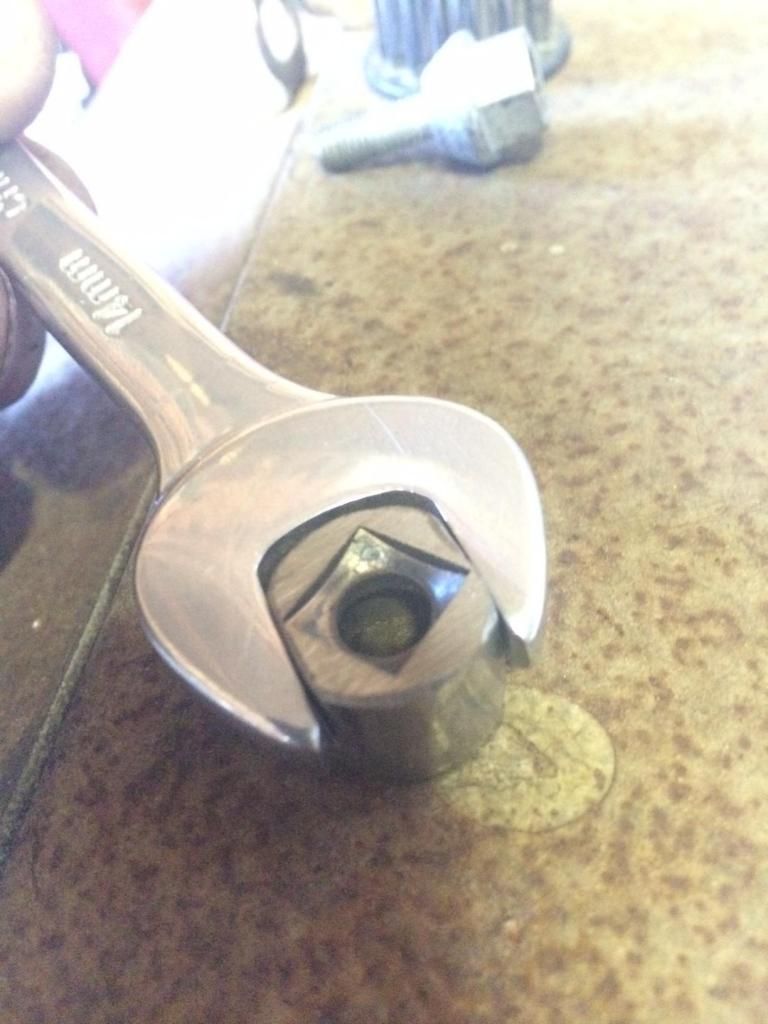
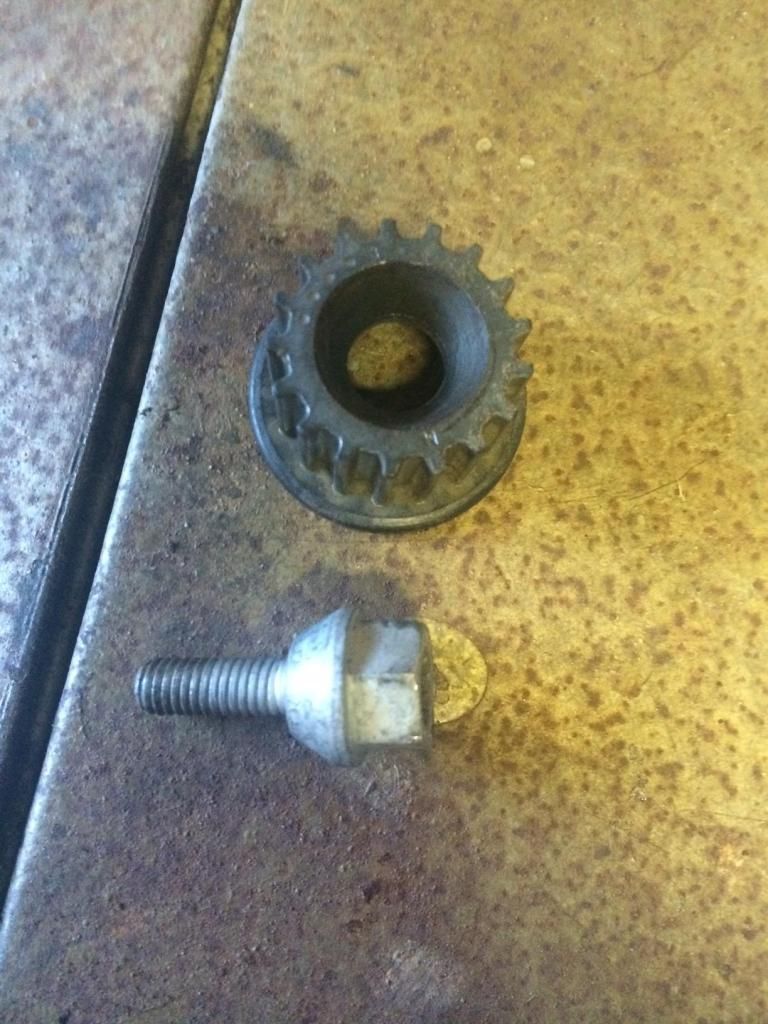
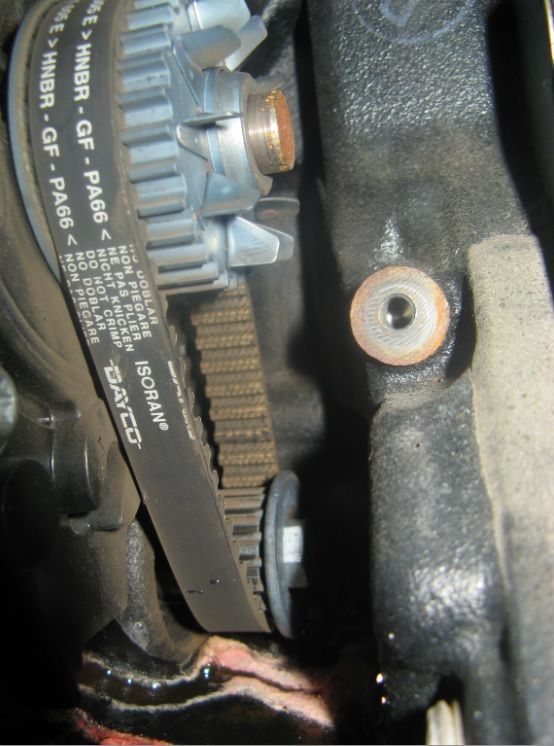
    Step 5: You are going to need to detach the water pump belt from the water pump in order to get it off. I believe this is most easily done by removing the bolt holding the spur gear onto the block. This bolt is LEFT HAND thread. Unfortunately the head on it is very stubby and it seemed to be an 11.5 mm bolt head???? An 11 mm wouldn’t fit on it and a 12 mm was fairly loose. I tried using a crescent wrench to grab it incredibly tight in conjunction with wedging a screwdriver behind it to hold the wrench on the short bolt head. After applying what felt like enough force to break it loose, I gave up and went to Plan B. If this bolt had stripped or snapped then I’d have been F’d. I show a pic of the spur gear and bolt below.


    Plan B was to actually unbolt the water pump from the water pump housing. This approach would allow you to slide the water pump out of the housing which gives enough slack in the belt to remove the housing followed by the water pump. There are five T30 bolts holding the water pump onto the housing and you will need an L handle torx (i.e. like an allen wrench) to fit in there. The locations are shown in the first photo. Access was tight but not horrible. The second photo shows the water pump detached in situ. Two of the bolt locations are highlighted. The downside to this approach is that the belt will not have enough clearance to come off the spur gear so you will need to reuse the old belt. I specifically asked the parts place where I ordered everything what was required to do this job and they did not include the belt in their list of recommend parts. So apparently at least genuineaudiparts.com did not think it was required. Fortunately my belt looked great anyway so I had no heartache in re-using it.
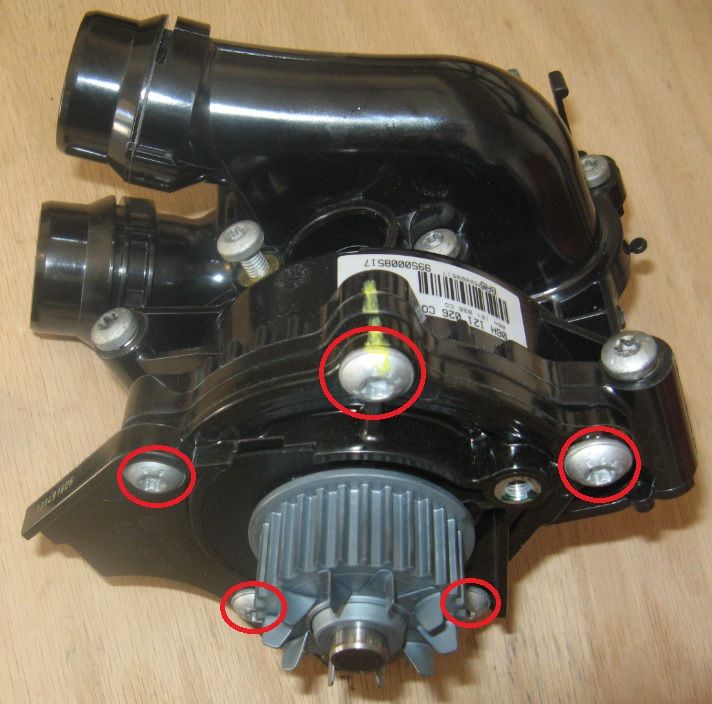
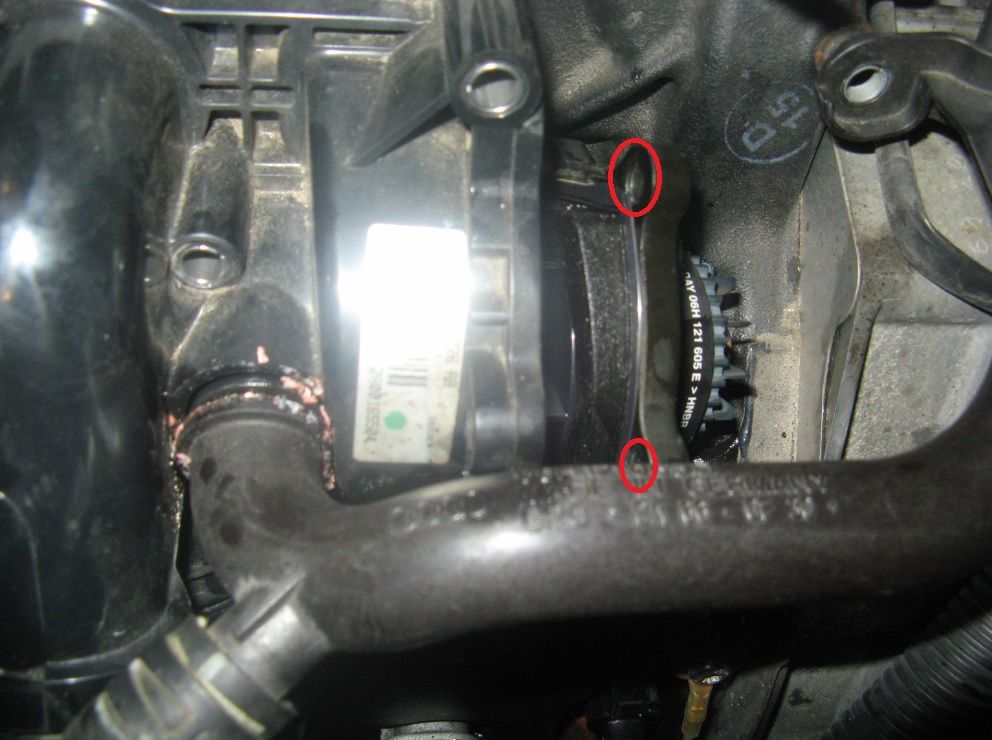


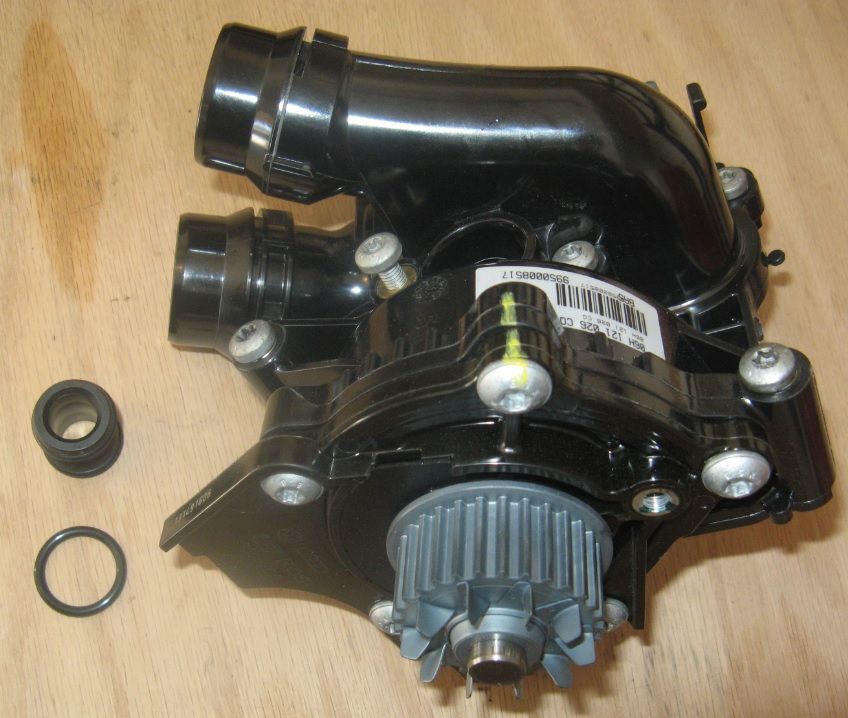
    Step 6: Unbolt the water pump housing from the block. There are five T30 torx bolts holding it on with different lengths. Their locations will be obvious from looking at the new water pump. I just put each bolt into its corresponding spot in the new water pump in order to keep track of where each one went.

    Step 7: The water pump housing should be free to remove at this point. The remaining coolant will spill out. Pull the cooler pipe out of the cooler if it doesn’t come with the housing.
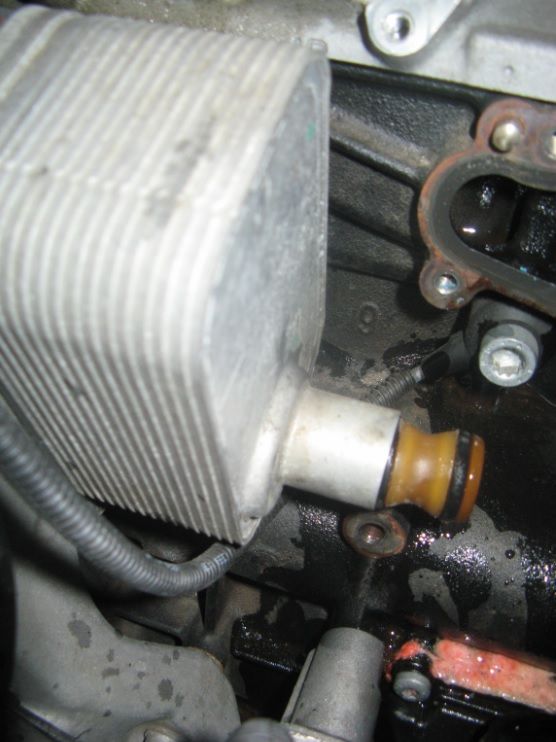


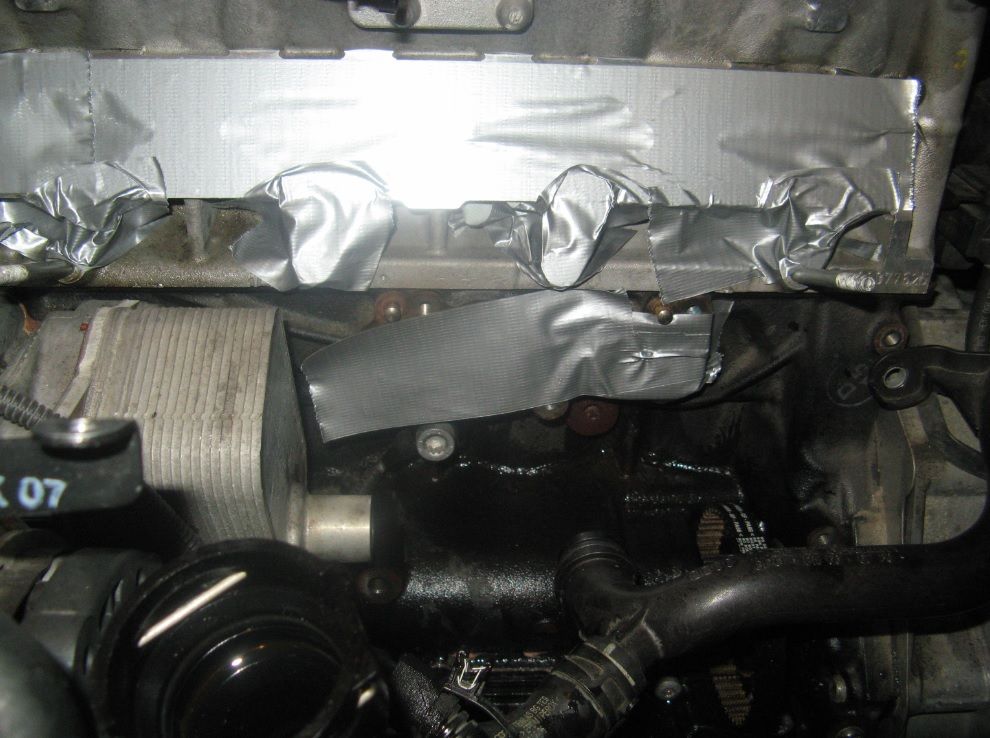
    Step 8: I cleaned off all mating surfaces on the block and covered them with duct tape so that I could clean off all the trapped coolant. I used some hot water in the teapot to strategically dump water/scrub anywhere where there was coolant or coolant residue left. I wanted all of it out of there so that when I was done with the repair I could confirm that there were no leaks. When I was done I blew everything off with the air compressor and let it dry.


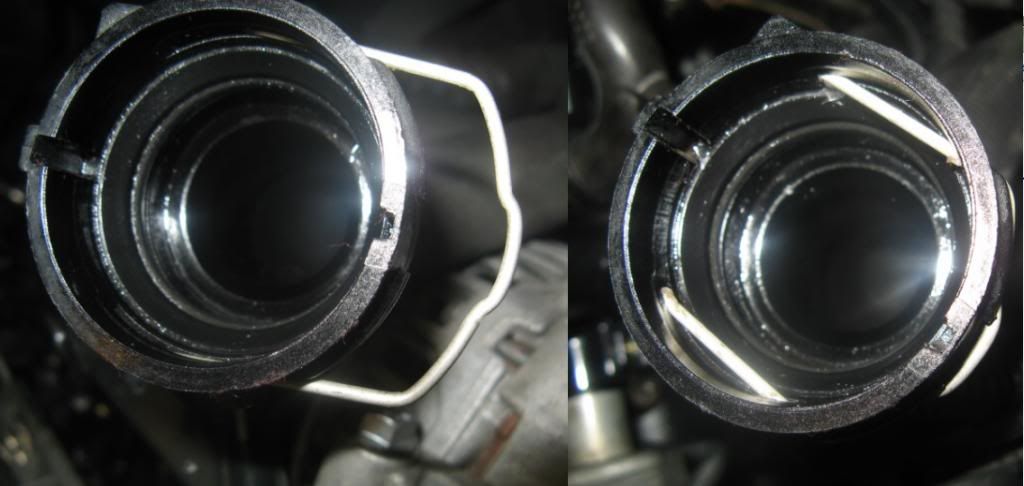
    Reinstallation: The new O-ring ordered replaces the old one on the rigid pipe removed in step 3. Lubricate all of the rubber sealing rings with Vaseline while reinstalling them. This includes the cooler pipe, mating surface of the water pump housing with the block and hoses coming from the expansion tank and radiator. When reattaching the hoses, slide the metal clips back in place (see first pic) before installing them to the water pump housing. This way you will hear them click when they are fully in place. Bolt everything back up and it will look minty fresh again.
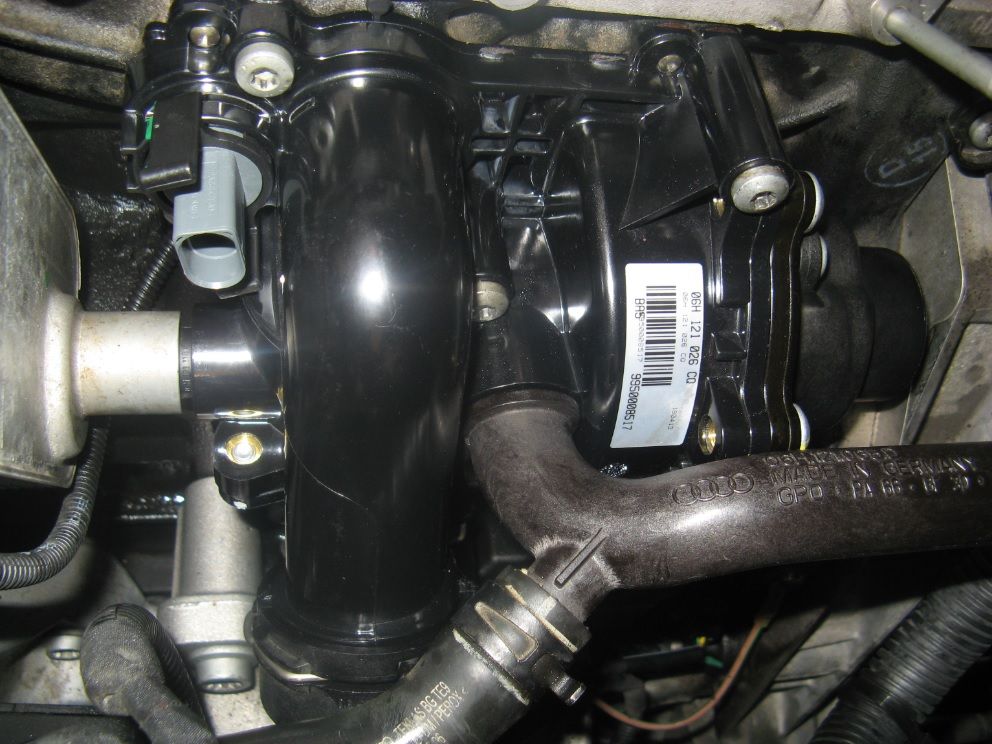


    Refill Coolant: After reattaching the intake manifold I simply refilled the expansion tank with coolant. It bubbled as it refilled the water pump housing and then eventually stabilized. I started the car up on while still on the jack stands and let the coolant temp heat up. I also turned the heater all the way up to burp any air from the heater core. The coolant level in the expansion tank went down but not by too much. I topped off the coolant, reinstalled the undertrays and took the car back down from the jack stands. After a day or so of driving the smell of coolant will go away.

  2. #2
    Veteran Member Three Rings A4B8ueg's Avatar
    Join Date
    Aug 13 2012
    AZ Member #
    98614
    Location
    Honolulu, Hawaii

    Awesome write up. Thanks for the DIY. Subscribed for future use.


    Sent from my iPhone using Tapatalk
    Debadged A4 Quattro | Aruba Blue Pearl Effect

    STaSIS | EuroCode | Apikol | H&R | 034 | AWE | GFB DV+ | K&N | Sprint Booster | ECS Rotors | S5 Brakes | SS Lines | RS4 Grille | Honeycomb Fog Grilles | CF Front Splitter | Replica R8 19" Wheels | RS6 FBSW | S-Tronic Knob | oCarbon | RS5 Pedals | FCA Rear Valence | VAGCOM

  3. #3
    Established Member Two Rings AOW162435's Avatar
    Join Date
    Jul 15 2013
    AZ Member #
    118956
    Location
    Ellicott City, MD

    Excellent write-up.


    Andreas
    2014 Audi A4, Monsoon Gray / Black
    2002 Toyota 4Runner, Dorado Gold
    2001 Toyota 4Runner, Dorado Gold, 575,XXX 1-owner miles :)
    1998 Toyota 4Runner, Oxidized, 5-speed
    1995 Porsche 993, Polar Silver

  4. #4
    Senior Member Two Rings simplicity's Avatar
    Join Date
    Aug 24 2011
    AZ Member #
    80260
    Location
    SF Bay Area

    As always, AZ thank you for your services Dan!

    Great write up and subscribed in case I ever need to do this.
    2011 Brilliant Black A4 Sedan Quattro | 8 speed tiptronic | P+ | Sports Package
    APR Stage 1, EuroCode Alu Kreuz, Hotchkis F&R Sway Bar, Blesk license plate LED, Hoen Endurance fogs, Reiger Style Trunk Spoiler, RS4 Replica Grill, Podi Boost Gauge

  5. #5
    Veteran Member Four Rings k9lovr's Avatar
    Join Date
    Aug 30 2009
    AZ Member #
    47084
    My Garage
    14 ML350 Bluetec, 17 MKVII
    Location
    Fredericksburg, VA

    You are the man!!
    [B]Current: Shopping now....

  6. #6
    Veteran Member Four Rings A4 Centaur's Avatar
    Join Date
    Jun 05 2009
    AZ Member #
    43360
    My Garage
    2020 Ducati Panigale V4S
    Location
    Scottsdale Arizona

    Dan, Thank you very much! What are you going to pick up when you sell your ride?

    Whoever gets your car is getting a pampered beauty!
    2023 S4 Prestige Mythos Black. Brembo GT BBK, APR FMIC, 034 Stg 1
    2012 B8 A4 Avant, Phantom Black S-Line Prestige, 2014 CPMB Engine, 8 speed, JHM K04-R, Eurocode HFC, APR FMIC, 034 Alu Kreuz, Vogtland Coilovers, Stoptech 380mm BB Kit, H&R Swaybar, ECU with IE K04 Tune, Rev. "d" DV, R8 Coils, Folding Mirrors, S5 Rear Brakes, 034/Apikol mounts, OEM Facelift LED Brake lights ]

  7. #7
    Veteran Member Three Rings mr_milo's Avatar
    Join Date
    Oct 18 2013
    AZ Member #
    125213
    Location
    SF Bay Area, CA

    Great write-up! Thanks!
    2014 A4 P+ 2.0TQMS
    2011 BMW 328i Convertible 6 Spd Manual - SOLD
    1999.5 A4 1.8TQMS - SOLD
    1986 4000CS Quattro 5 Spd Manual - SOLD

    Save the Manuals!

  8. #8
    Senior Member Two Rings
    Join Date
    Sep 12 2009
    AZ Member #
    47663
    Location
    Torrance, CA

    I'm not sure if it would of helped in your situation, but aluminum foil wrapped around the end of an Allen key will take the slop out and help get the screw off.
    Current: 2022 e-tron: Navarra Blue P+

    Previous: 2011 A4 Quartz Grey Metallic P+ 6MT Sport Package

  9. #9
    Senior Member Three Rings
    Join Date
    Sep 25 2011
    AZ Member #
    81712
    My Garage
    GT3 Rs/LX 570
    Location
    Cocaine Capital, Fl

    Where was this 3 months ago when i needed it lol. Amazing write up!

  10. #10
    Veteran Member Four Rings TCHUN003's Avatar
    Join Date
    Sep 14 2006
    AZ Member #
    11290
    My Garage
    2015 Golf Sportwagen TDI, Honda Ruckus
    Location
    SoCal

    Beautiful. Bookmarked. Hope your wheel bearings go bad before you sell the car...or maybe you can just do a DIY for the heck of it haha
    -Thomas
    Current: /S3
    Previous: B6 A4/B8A4 Avant

  11. #11
    Junior Member Two Rings
    Join Date
    Jun 15 2008
    AZ Member #
    29961
    My Garage
    2015 S3, 2015 A3, 2009 TTS
    Location
    Paradise Valley AZ

    Has anybody had any success in removing the water pump drive pulley from the balance shaft extension? The bolt is left hand thread with a shallow 12-mm head. The bolt has to be removed in order to slip off the belt.

    See Step 5 in Dan's excellent DIY.

  12. #12
    Active Member One Ring
    Join Date
    Aug 26 2014
    AZ Member #
    277761
    Location
    Norway

    Hi!

    Just a tip on how to get the gear and the belt off:

    I modified a socket (it is 12mm!) Use a socket with 6 edges and it will not feel that loose. Grind the socket down so it will fit and grind a slut for a wrench. The head on the bolt goes a long way in to the gear and with this socket you get a good grip on it.


  13. #13
    Active Member Two Rings
    Join Date
    Dec 23 2009
    AZ Member #
    52443
    Location
    Bucharest / ROMANIA

    Great DIY !
    How did you find the small leak? My coolant level is slowly going down but I can not find the leak, checked underneath and there are no signs of coolant. I has to put in about 0.2L in 4000km.

    Thanks

  14. #14
    Veteran Member Three Rings
    Join Date
    May 07 2014
    AZ Member #
    211993
    Location
    Toronto

    Wonderful writeup as usual! This community owes you much!

  15. #15
    Established Member Two Rings
    Join Date
    Aug 04 2014
    AZ Member #
    270837
    Location
    Orlando FL

    Awesome! Will be doing this today. Thank you.

  16. #16
    Veteran Member Three Rings
    Join Date
    May 24 2007
    AZ Member #
    18290
    Location
    PA

    How would this change if I only needed to change the thermostat? Please tell me I don't need to take the manifold off.

  17. #17
    Established Member Two Rings
    Join Date
    May 09 2015
    AZ Member #
    331841
    Location
    usa

    I did the swap over the weekend and thought I would chime in with a few comments from my experience:

    First, a BIG thank you to Dan for his write ups on this and the intake manifold. I can't imagine how much time they saved me.

    I pulled the alternator, in hopes that I could avoid pulling the intake manifold and access the pump that way. Bad idea, as I ended up needing to pull the intake manifold after all, so pulling the alternator was just added work.

    I drained my coolant from below first. Also probably just added work, but it kept things cleaner.

    I did everything with the car up on ramps. It's a pretty long reach to get at some of the water pump stuff, so I spent a lot of time on a stool as well. Having the car on ramps isn't necessary.

    A couple of the connectors were a real pain to get to release. It was the 2 that get complained about in the intake manifold thread, plus one other similar one. I ended up using a hook tool and poking it in at the gap between the connector and socket, to lift the lock tab. Dan's picture with the connector off helped me see which direction to pry.

    Get some long, thin magnetic screwdriver bit extensions to get at some of the intake manifold screws. I had a 3" and a 6" on hand and used them both, but I never needed to combine them. A magnetic bit driver worked great for the two nuts on the intake to keep the nuts from falling into the engine bay. Have a magnetic pick-up tool on hand as well. I used mine to feed the lower 2 intake screws back into position.

    Don't drop anything into the engine bay unless you have a lot of extra time on your hands.

    When I pulled my intake, all 4 injectors stayed in the block. This added a step of removing 4 additional connectors, but it was pretty obvious. I opted to leave them in the block, rather than transfer them to the intake. That was possibly a bad idea because it increased the likelihood of getting dirt in the injectors and/or damaging an injector or o-ring while wrenching on something nearby (especially the water pump drive pulley bolt, as the reverse-thread put injector #4 directly in the path of if the bolt let loose unexpectedly).

    I bought an extra belt for the water pump, so when getting at the water pump pully bolt proved difficult with the water pump still in place I just cut the old belt off. It turns out you still need to remove the pulley, because there is not enough clearance around the lip of the pully to slide a new belt on from the side. I used the cut belt to protect the teeth of the pully when gripping it.

    That little bolt was a royal pain. If you decide to modify a socket to make a removal tool take extra care to get as much engagement on the bolt as possible, and as much engagement on the wrench as possible with the flats you grind. I only had roughly 13mm of clearance to slide the tool into position, so when grinding the socket I used an open-end wrench as a guage to get the overall length perfect. I have seen a picture of a specific tool, just for this bolt, in another thread, but there was no link to buy it. In hindsight I would spend several hours searching for this tool, rather than several hours modifying 4 different sockets making my own tool. Anybody know what this tool is called and where I can buy one to keep on hand?

    I'm not sure if the OP's car was a manual transmission, but with my 6 speed auto, even with the parking brake on, trying to get the pully to stop rotating so that I could get enough torque to break the bolt free was useless. I probably would have destroyed the original belt gripping it with channel locks to keep the pulley from spinning. I don't know if it is possible to loosen the whole water pump assembly and slide the belt off without removing the lower drive pulley, but if there is it should be posted. It seems like there is almost enough slack to just slide the belt off the upper pulley. Because of the locating pins and the little union piece I don't know if you can loosen the pump assembly (not just the pump) to get the extra slack.

    I went ahead and cleaned the intake valves while I had everything opened up. Mine weren't too bad after almost 110k miles, but I am the second owner and have no way of knowing if they had been cleaned before. My car has had the stage 2 oil consumption fix and the oil gauge never moves between oil changes, so maybe I'm lucky. What residue I did have didn't dissolve with Seafoam, and barely got touched by carb cleaner. Needless to say I didn't get them squeaky clean. Just getting them as clean as I did added a couple hours to the time frame.

    If you remove the belly pan to test for leaks, either zip tie the front edge of the rear belly pan or keep your speeds under 35mph. When that lower pan gets flapping in the wind it makes a heck of a racket, and not a comforting one after you've just spent a full day wrenching.

    Other than the lower pulley everything was pretty straightforward and easy. I would do it again, but I would have the special pulley tool on hand, as well as another belt, and possibly a replacement lower pulley, depending on how aggressive you need to get with the channel-locks to keep the pulley from spinning when you loosen the bolt.

  18. #18
    Registered Member One Ring
    Join Date
    Oct 30 2015
    AZ Member #
    363779
    Location
    LA

    This was a very useful post and I accomplished a water pump change on my 2013 A4 using it. This was my experience with it.

    I did remove the intake hose and manifold and had enough room to complete the swap without pulling the injectors from the block.

    The drive pulley bolt was a PIA and I recommend replacing the bolt when you remove it as mine broke off in the balance shaft when I was tightening it! Luckily I was able to remove it after a lot of double stick tape on the old bolt and quite a few miller lites. A ratcheting 12mm wrench worked really good to remove the bolt and tighten it if you have someone else holding back on the drive pulley. The old belt will not come off and the new belt will not go on without removing this pulley.

    Looks like my old pump was leaking around the seal on the plastic plate and pulley. New pump from ECS had a metal plate and seemed to be more sturdy for sure.

    The temp sensor on the new pump was different and the bolts ECS supplied with the pump kit were shorter due to the difference.

    Highly recommend a magnetic bit or magnetic wand to stop the bolts from falling into the engine bay.

    Hope this helps anyone trying to complete this as the cost of doing it yourself is less than half of what the dealer charges. Thanks to ECS Tuning for a good replacement kit but they need to add that drive pulley bolt to the kit in my opinion.

    Good Luck to anyone trying this!

    Samrow

  19. #19
    Registered Member One Ring
    Join Date
    Feb 10 2011
    AZ Member #
    70748
    Location
    DK

    This is a nice DIY guide, but I think it's misleading. There's no need for removing the intake manifold to replace the water pump. Just remove the intercooler hose, the throttle body and the support bracket to the intake manifold (and all the electrical connectors) then there's plenty of space to do the replacement of the pump. Also, it's not a big deal with the pulley bolt. Just use an ordinary 12 mm ring spanner. The spanner shouldn't be too angled and it shouldn't be straight either).

  20. #20
    Veteran Member Four Rings A4 Centaur's Avatar
    Join Date
    Jun 05 2009
    AZ Member #
    43360
    My Garage
    2020 Ducati Panigale V4S
    Location
    Scottsdale Arizona

    ^Thanks are you gonna post up some pics?
    2023 S4 Prestige Mythos Black. Brembo GT BBK, APR FMIC, 034 Stg 1
    2012 B8 A4 Avant, Phantom Black S-Line Prestige, 2014 CPMB Engine, 8 speed, JHM K04-R, Eurocode HFC, APR FMIC, 034 Alu Kreuz, Vogtland Coilovers, Stoptech 380mm BB Kit, H&R Swaybar, ECU with IE K04 Tune, Rev. "d" DV, R8 Coils, Folding Mirrors, S5 Rear Brakes, 034/Apikol mounts, OEM Facelift LED Brake lights ]

  21. #21
    Senior Member Two Rings A4BGP's Avatar
    Join Date
    Oct 18 2005
    AZ Member #
    8405
    My Garage
    Dirt and Street bikes, '09 A4Q
    Location
    Moncton, NB

    As mentioned above, that 12mm will come off with a box wrench. Just remember it's a Left Hand thread and the key is to hold the crank! It's a 27mm hex head bolt. It's a quick easy job and there is no need to remove the intake. Also, G12 (now G13) is relatively cheap at the dealership. [26cdn for a gallon of concentrate?! Must be free in the states...]

  22. #22
    Veteran Member Four Rings Militant-Grunt's Avatar
    Join Date
    Oct 30 2006
    AZ Member #
    12999
    My Garage
    B8 A4 Avant 6spd
    Location
    NYC

    Just a FYI, you guys don't have to take off the intake manifold. You also don't have to take the counter balance shaft gear off, you can slide the pump onto the belt. It takes a little finesse but its easily possible.
    -MilitantGrunt- Certified Audi Dealership Technician / Parts Manager
    -18 718 GTS
    -10 B8 A4 Avant - 6spd swapped / built motor / Pag Parts EFR 7163 Turbo Setup.

  23. #23
    Veteran Member Four Rings Spawne32's Avatar
    Join Date
    Nov 20 2016
    AZ Member #
    386232
    Location
    NJ

    got mine back today from the dealer, 978 billed under warranty, 650 in labor. Has the new pump with the metal housing.


  24. #24
    Veteran Member Four Rings jfo's Avatar
    Join Date
    Nov 17 2010
    AZ Member #
    67149
    Location
    Courtenay, BC, Canada

    Quote Originally Posted by Militant-Grunt View Post
    Just a FYI, you guys don't have to take off the intake manifold. You also don't have to take the counter balance shaft gear off, you can slide the pump onto the belt. It takes a little finesse but its easily possible.
    Spawne32's dealer charged about 4.5 hrs for his replacement. Would that be with leaving the intake in place?
    2011 A4 Avant

  25. #25
    Veteran Member Four Rings A4 Centaur's Avatar
    Join Date
    Jun 05 2009
    AZ Member #
    43360
    My Garage
    2020 Ducati Panigale V4S
    Location
    Scottsdale Arizona

    ^Shees! That is expensive! guess I'll be doing my own at home.
    2023 S4 Prestige Mythos Black. Brembo GT BBK, APR FMIC, 034 Stg 1
    2012 B8 A4 Avant, Phantom Black S-Line Prestige, 2014 CPMB Engine, 8 speed, JHM K04-R, Eurocode HFC, APR FMIC, 034 Alu Kreuz, Vogtland Coilovers, Stoptech 380mm BB Kit, H&R Swaybar, ECU with IE K04 Tune, Rev. "d" DV, R8 Coils, Folding Mirrors, S5 Rear Brakes, 034/Apikol mounts, OEM Facelift LED Brake lights ]

  26. #26
    Established Member Two Rings
    Join Date
    Mar 07 2015
    AZ Member #
    319154
    Location
    NY

    Just sharing my experience as I followed this thread to perform the repair.
    I only removed the coolant reservoir and the throttle body to gain access. I can't imagine any need to remove the intake. I was able to slide the belt off with though any extra steps. Reinstalling the belt took about 3 mins. In total the job took less than 2 hours. An air ratchet will save lots of time. Regarding the OP I don't know what the 9mm triple square was used for. Only t30 torx are needed. I purchased the pump from Amazon and the orings for the coolant pipe and the union from Audi.


    Sent from my iPhone using Tapatalk

  27. #27
    Established Member Two Rings
    Join Date
    May 02 2011
    AZ Member #
    74905
    My Garage
    '15 A6 3.0t, '14 GMC Denali Duramax, '12 F150 EcoBeast
    Location
    Casper, Wyoming

    For those of you wondering what the actual Audi tools are for removing the "coolant pump drive gear bolt" here's what the service manual says:

    "Remove the bolt on the coolant pump drive gear -1- using a V.A.G 1331 and T10360 while counter holding
    the vibration damper"

    The VAG 1331 is a specialty torque wrench: https://vw.snapon.com/specialtoolsde...temid=23430003

    The T10360 is a special head FOR that torque wrench: https://vw.snapon.com/specialtoolsde...temid=19280003

    Now y'all know. :)

  28. #28
    Veteran Member Four Rings Audi 4 Life's Avatar
    Join Date
    Jan 16 2011
    AZ Member #
    69575
    My Garage
    06 D3 A8 Black/peanut with alcantara
    Location
    Earth

    Is it possible to replace the water pump without removing the intake manifold?

    Because I am looking at these pictures and don't see how it's possible. My dealer just replaced my water pump and I asked them for a quote to carbon clean since the IM would be off and one of the service reps said the manifold didn't need to be removed so I was like wtf?

    If someone could clarify this would appreciate it.
    TIA

    Sent from my SM-G935T using Tapatalk
    RIP - JHM B6 3.0 6MTQ USP Denim Blue/Black w/ Nappa Silver
    Current- B8 A4 2.0t S-Line Stasis Challenge Extreme Edition, Alcantara Headliner, ALA/ACC and 3g+ swap
    D3 A8 4.2 Black/Peanut (Daily)

  29. #29
    Veteran Member Four Rings jfo's Avatar
    Join Date
    Nov 17 2010
    AZ Member #
    67149
    Location
    Courtenay, BC, Canada

    Quote Originally Posted by A4QuattroV6 View Post
    Is it possible to replace the water pump without removing the intake manifold?

    Because I am looking at these pictures and don't see how it's possible. My dealer just replaced my water pump and I asked them for a quote to carbon clean since the IM would be off and one of the service reps said the manifold didn't need to be removed so I was like wtf?

    If someone could clarify this would appreciate it.
    TIA

    Sent from my SM-G935T using Tapatalk
    Other have done it by moving the coolant tank and throttle body and leaving the IM in place.
    2011 A4 Avant

  30. #30
    Established Member Two Rings
    Join Date
    Dec 16 2010
    AZ Member #
    68320
    Location
    Near the overboost

    Interesting way to do it...

    I did removing the intake. This way you can clean it and do two things at the same time.

  31. #31
    Active Member One Ring
    Join Date
    Aug 01 2011
    AZ Member #
    79128
    Location
    Edmonds, WA

    Does anyone know how to prevent the crank from turning when trying to loosen the pulley bolt - without getting a second person to assist holding the 27MM crank hex? Is there a pin or something that can be placed into the engine?

    BTW, my box spanner kept slipping off the end of the pulley bolt so I got the low clearance torque wrench and 12mm socket. Hoping that will take care of it once and good.

  32. #32
    Established Member Two Rings
    Join Date
    Mar 07 2015
    AZ Member #
    319154
    Location
    NY

    did you try to slide the belt off first?

  33. #33
    Active Member One Ring
    Join Date
    Aug 01 2011
    AZ Member #
    79128
    Location
    Edmonds, WA

    Yes, I did and wasn't successful. My water pump replacement kit came with a belt so I decided to cut the original belt and that let me remove the pump. Now I need to get the bolt off and am waiting for my partner to get off of work to give me an assist.

  34. #34
    Veteran Member Three Rings Spm58's Avatar
    Join Date
    Nov 03 2014
    AZ Member #
    292702
    Location
    Long beach, ny

    Anyone happen to know the p/n for the 4 bolts that hold the throttle body in?
    2015 sepang blue s4• Ecs luft-technik carbon Intake

  35. #35
    Senior Member Two Rings
    Join Date
    Jul 15 2017
    AZ Member #
    402941
    My Garage
    B5 A4 2.8
    Location
    Fl

    The part # I see for those bolts are N 106 261 01. M6x45 torx screw mounting the valve body to manifold

  36. #36
    Veteran Member Three Rings Spm58's Avatar
    Join Date
    Nov 03 2014
    AZ Member #
    292702
    Location
    Long beach, ny

    Why thank you good sir
    2015 sepang blue s4• Ecs luft-technik carbon Intake

  37. #37
    Established Member Two Rings
    Join Date
    Aug 27 2017
    AZ Member #
    405800
    Location
    Europe

    Quote Originally Posted by Dan_Q View Post
    Parts Needed: Water pump/housing/thermostat (06H121026CF), Cooler Pipe (06H121131C), Gasket (N90365302), at least 1 gallon of coolant.


    Other Stuff Needed: Big pan/pans for catching coolant, towels, normal sockets/extensions/swivels. M9 triple square bit. L handle T30 torx wrench.

    My water pump was leaking a very small amount and since I am getting ready to sell the car, I didn’t want to pass this problem onto the next owner.

    As far as I know there is no elegant way of draining coolant. Accept the fact that you are going to make a mess of your garage floor. I have two XL sized disposable aluminum turkey baking pans that I use for any work requiring coolant draining. I just get a couple of old towels and lay them out below the engine then put the pans on top of those and hope for the best. This usually catches the majority of what comes out.

    Step 1: Jack up the front of the car and remove the following:
    • Rear undertray
    • Front undertray
    • Intake manifold (my carbon cleaning DIY explains how to do this)

    Step 2: Disconnect the two T30 bolts holding the cover over the water pump belt. The longer one goes into the block. Shorter one goes into the water pump.


    Step 3: Detach the two T30 bolts holding this coolant line in place. One goes into the block and one goes into the water pump housing. This actually seemed to be the location where my pump was leaking but I went ahead and replaced the whole pump because apparently the housing commonly leaks from multiple places and I didn’t want to fix this location just to have a new leak form in 6 months. Once disconnected, you will need to pull the coolant line out of the water pump housing slightly so that the belt cover can be slid out of the way. The deluge of coolant can now begin.


    Step 4: Slide the metal clips open on the main connections for the coolant lines coming from the expansion tank and the radiator. Pull both hoses off the water pump housing and let the rain of coolant continue.

    Step 5: You are going to need to detach the water pump belt from the water pump in order to get it off. I believe this is most easily done by removing the bolt holding the spur gear onto the block. This bolt is LEFT HAND thread. Unfortunately the head on it is very stubby and it seemed to be an 11.5 mm bolt head???? An 11 mm wouldn’t fit on it and a 12 mm was fairly loose. I tried using a crescent wrench to grab it incredibly tight in conjunction with wedging a screwdriver behind it to hold the wrench on the short bolt head. After applying what felt like enough force to break it loose, I gave up and went to Plan B. If this bolt had stripped or snapped then I’d have been F’d. I show a pic of the spur gear and bolt below.


    Plan B was to actually unbolt the water pump from the water pump housing. This approach would allow you to slide the water pump out of the housing which gives enough slack in the belt to remove the housing followed by the water pump. There are five T30 bolts holding the water pump onto the housing and you will need an L handle torx (i.e. like an allen wrench) to fit in there. The locations are shown in the first photo. Access was tight but not horrible. The second photo shows the water pump detached in situ. Two of the bolt locations are highlighted. The downside to this approach is that the belt will not have enough clearance to come off the spur gear so you will need to reuse the old belt. I specifically asked the parts place where I ordered everything what was required to do this job and they did not include the belt in their list of recommend parts. So apparently at least genuineaudiparts.com did not think it was required. Fortunately my belt looked great anyway so I had no heartache in re-using it.


    Step 6: Unbolt the water pump housing from the block. There are five T30 torx bolts holding it on with different lengths. Their locations will be obvious from looking at the new water pump. I just put each bolt into its corresponding spot in the new water pump in order to keep track of where each one went.

    Step 7: The water pump housing should be free to remove at this point. The remaining coolant will spill out. Pull the cooler pipe out of the cooler if it doesn’t come with the housing.


    Step 8: I cleaned off all mating surfaces on the block and covered them with duct tape so that I could clean off all the trapped coolant. I used some hot water in the teapot to strategically dump water/scrub anywhere where there was coolant or coolant residue left. I wanted all of it out of there so that when I was done with the repair I could confirm that there were no leaks. When I was done I blew everything off with the air compressor and let it dry.


    Reinstallation: The new O-ring ordered replaces the old one on the rigid pipe removed in step 3. Lubricate all of the rubber sealing rings with Vaseline while reinstalling them. This includes the cooler pipe, mating surface of the water pump housing with the block and hoses coming from the expansion tank and radiator. When reattaching the hoses, slide the metal clips back in place (see first pic) before installing them to the water pump housing. This way you will hear them click when they are fully in place. Bolt everything back up and it will look minty fresh again.


    Refill Coolant: After reattaching the intake manifold I simply refilled the expansion tank with coolant. It bubbled as it refilled the water pump housing and then eventually stabilized. I started the car up on while still on the jack stands and let the coolant temp heat up. I also turned the heater all the way up to burp any air from the heater core. The coolant level in the expansion tank went down but not by too much. I topped off the coolant, reinstalled the undertrays and took the car back down from the jack stands. After a day or so of driving the smell of coolant will go away.
    What do you need M9 Triple square bit for? Can we use another socket or torx instead?

  38. #38
    Veteran Member Four Rings
    Join Date
    Nov 23 2009
    AZ Member #
    51117
    Location
    NYC, US

    The part numbers are current for updated water pump with a metal impeller?

    Any antifreeze leaking issue with the new water pump?

  39. #39
    Veteran Member Four Rings A4 Centaur's Avatar
    Join Date
    Jun 05 2009
    AZ Member #
    43360
    My Garage
    2020 Ducati Panigale V4S
    Location
    Scottsdale Arizona

    Dan_Q moved on to BMW, but hopefully will be back since he has some of the better write-ups
    2023 S4 Prestige Mythos Black. Brembo GT BBK, APR FMIC, 034 Stg 1
    2012 B8 A4 Avant, Phantom Black S-Line Prestige, 2014 CPMB Engine, 8 speed, JHM K04-R, Eurocode HFC, APR FMIC, 034 Alu Kreuz, Vogtland Coilovers, Stoptech 380mm BB Kit, H&R Swaybar, ECU with IE K04 Tune, Rev. "d" DV, R8 Coils, Folding Mirrors, S5 Rear Brakes, 034/Apikol mounts, OEM Facelift LED Brake lights ]

  40. #40
    Senior Member Two Rings unmarkedA4's Avatar
    Join Date
    Jun 11 2017
    AZ Member #
    400950
    Location
    Bonney Lake/ Wa

    Super fun job! I was able to slide the belt off then back on. Really easy job


    Sent from my iPhone using Audizine

Bookmarks

Posting Permissions

  • You may not post new threads
  • You may not post replies
  • You may not post attachments
  • You may not edit your posts
  •  


    © 2001-2025 Audizine, Audizine.com, and Driverzines.com
    Audizine is an independently owned and operated automotive enthusiast community and news website.
    Audi and the Audi logo(s) are copyright/trademark Audi AG. Audizine is not endorsed by or affiliated with Audi AG.