Audizine - An Automotive Enthusiast Community

Page 1 of 5 123 ... LastLast
Results 1 to 40 of 189
  1. #1
    Veteran Member Four Rings shiro1745's Avatar
    Join Date
    Jul 26 2009
    AZ Member #
    45522
    Location
    DMV Area

    SHIRO - PCV system explained

    Guest-only advertisement. Register or Log In now!
    Why another PCV thread?

    Because I see that even after the subject has been discussed a lot of times many people still don’t understand how the system works. There’s really good info out there, but too much misleading information too which confuses a lot of people. With this thread I’m hoping to make everything as clear as possible, PCV system is a bit complicated especially since you don’t know how the parts involved work. I’m not attesting I’m an expert nor a technician, but after spending way too many hours during the past couple years trying to understand it, I finally decided to put all this together.

    Warning and disclaimer

    Warning: The most important thing to remember is that’s there’s always pressure build up into the crankcase created by the blow-by gasses. In order not to blow seals and gaskets the positive pressure has to be released so whatever you do, make sure you let gasses escape!!!
    Disclaimer: This info here is only informative. Whatever you do, you do it on your own risk!!! I’m not responsible for anything you mess up!

    How does it work?

    I'd like to first mention one thing before you go ahead and read this. The PCV system is not very complicated but you need to take your time to process all this information and make sense of everything in your head. And if you think it's too complicated... it's not! you just need to read it again and bit more careful this time.

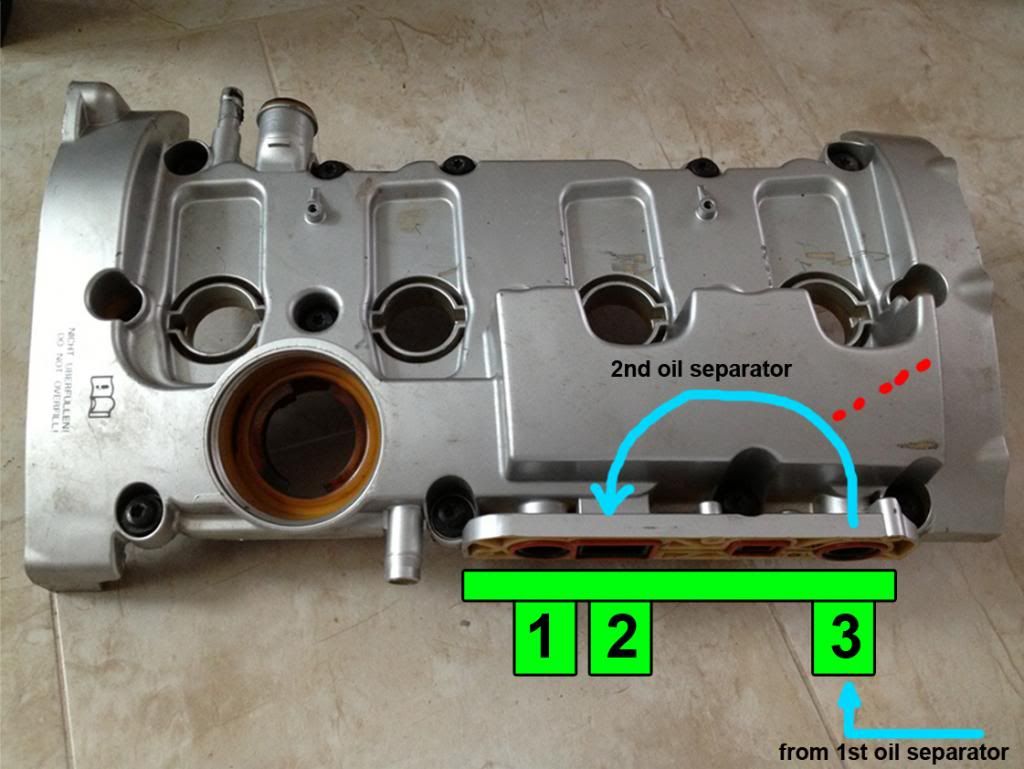
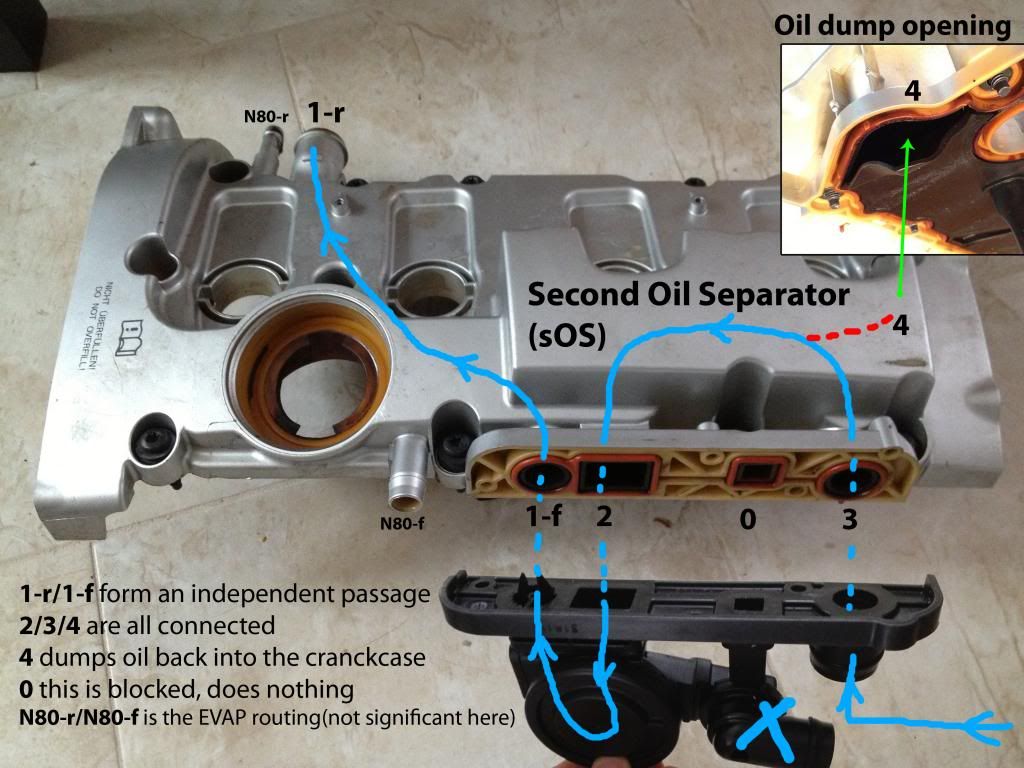
    I had one extra valve cover which I gave to Shane and decided to look at it a bit more careful before I shipped it out. I found the following: looking at the (Pic.1) you can see there are three different passages built into the Valve Cover (VC):
    - N80 passage (N80-r-----N80-f)
    - Rear PCV passage (1-r-----1-f)
    - Oil separator passage (2-----3-----4)
    I used "f" and "r" to make it easier to relate the ports to front of engine/intake side("f") and rear of engine/exhaust side("r")

    Number “0” on VC is actually blocked, goes nowhere.

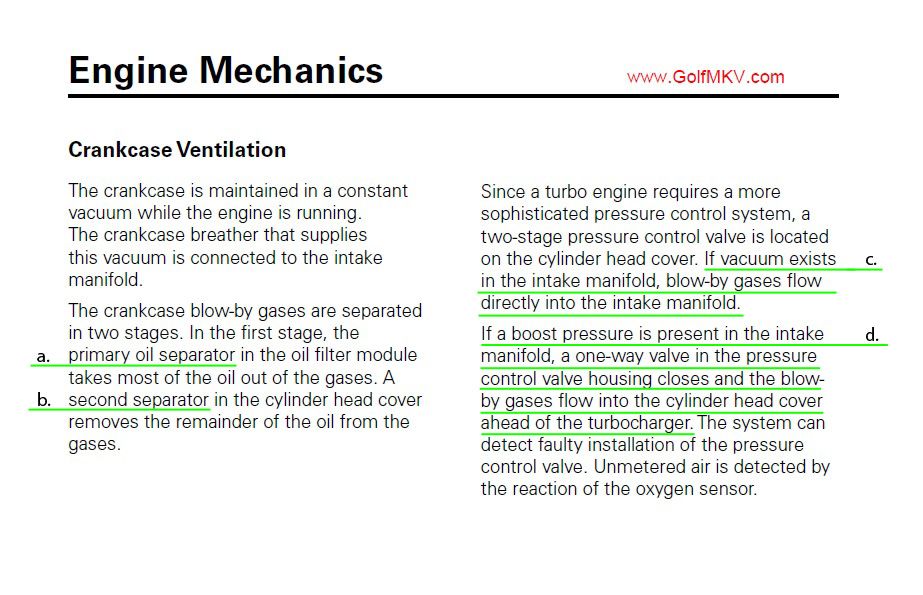
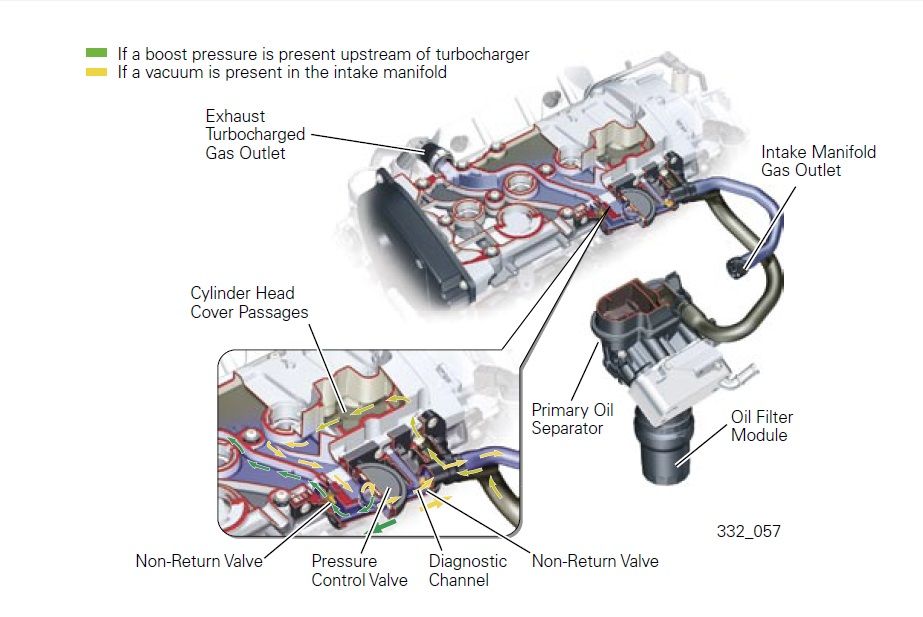
    Basically the crankcase is always under vacuum which means there is always air drawn from the crankcase through port number 3 this is where the breather hose from the primary oil separator (a. in Pic.4) connects. From here, the vapors pass through the Second Oil Separator (b. in Pic.4) where some more oil is separated and dumped back into the crankcase through port no.4 (Pic.1). The air then gets into the PCV valve which directs it to one of the two paths, straight into the intake manifold or through the VC to the intake right before the turbo.

    The one thing I want to mention again and was never mentioned before it’s opening no.4 in Pic.1. That’s where the Second Oil Separator dumps oil back into the crankcase. There’s no valve, nothing there, it’s just an opening which makes the Second Oil Separator (2-----3-----4) one with the crankcase.

    Pic.1


    1. Straight into the intake manifold - If under Vacuum (c. in Pic.4)

    The port 1-f of the PCV valve is closed so all the air is directed into the intake manifold (see yellow line in Pic.2)

    Pic.2


    2. Through the VC to the rear PCV breather hose and into the air intake ahead of the turbo – if under Boost (d. in Pic.4)

    The intake manifold port of the PCV valve (the one marked with blue X, not numbered) is closed so all the air is directed through the VC to the rear PCV breather hose and into the air intake ahead of the turbo (see blue line in Pic.3)
    Pic.3

    Pic.4

    Pic.5
    Last edited by shiro1745; 11-08-2013 at 04:24 AM.
    - Chip

    K0R-GT -- S3 injectors -- Maestro tune -- IE Drop-in rods

    "It took 4 bad crankshaft seals and lots of cursing to build my avatar"

  2. #2
    Veteran Member Four Rings shiro1745's Avatar
    Join Date
    Jul 26 2009
    AZ Member #
    45522
    Location
    DMV Area

    PCV solution variations

    First of all I want to mention that I would never add one of those small filters and let gasses out in the engine bay. There’s nothing to keep gasses from going into the cabin, you drive an Audi, but you intoxicate yourself on purpose with emission gasses? That doesn’t make sense to me, but to each his own.
    I drew this block –off plate with three outlets to explain all different variation of the PCV solutions. I drew the blue line here to remind again we always have air/vapors going from port 3 to port 2 under both boost and vacuum states, this is important.

    Pic.6

    1. Catch can

    There are a few things that change when you add a catch can:

    - Basically you add a third oil separator to the system
    - You remove the PCV valve
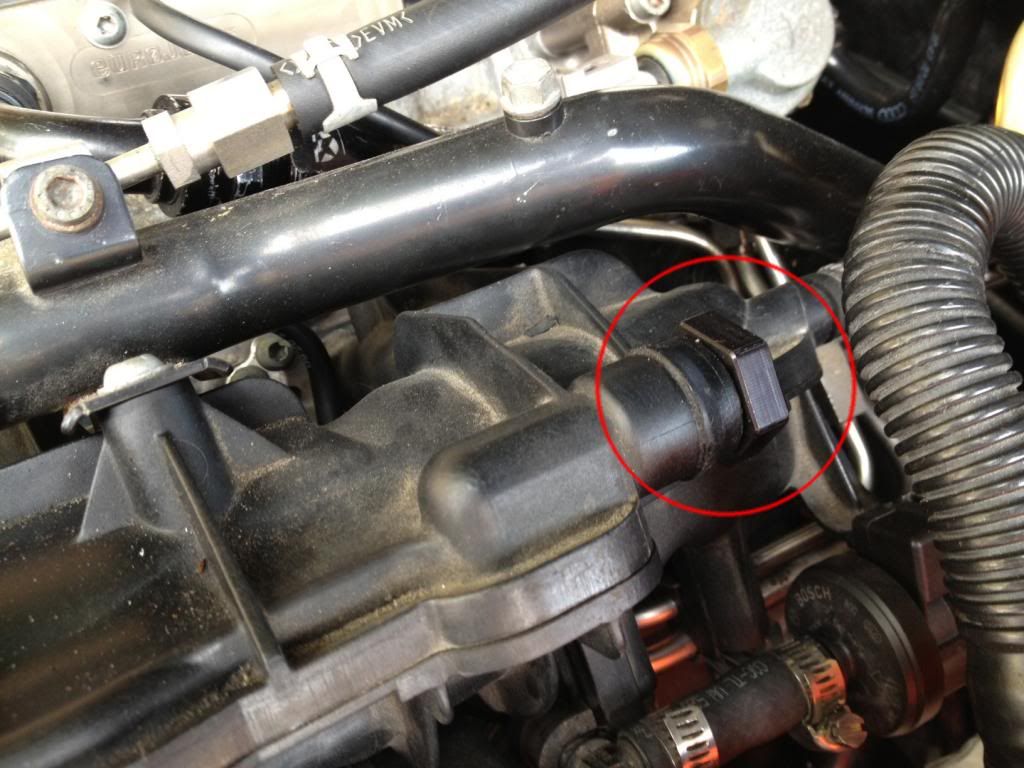
    - You block the intake manifold port getting rid of the oil vapors going into the engine that way; remember, there’s still vapors going into engine, the ones that go out from the catch can through the VC and around through the intercooler back into the intake manifold. How much of that is making back into the engine? we don’t know, we can only assume much less than before, we have the new catch can in the way, then we have the intercooler fins which I’m sure stop a lot of the oil if there’s any reaching there. So a guess would be, even if the catch can doesn’t do a perfect job, I think the intercooler stops a lot of oil too.
    - All the vapors that get back into the engine are going only one way now:

    1st oil separator (by the oil filter housing) --> second oil separator (in the valve cover) --> 3rd oil separator (your new catch can) --> through the valve cover to the rear breather hose and into the intake ahead of the turbo --> intercooler --> intake manifold.

    There’re a few choices of catch cans out there and the different designs makes some better than others. I don’t recall anybody doing a comparison, so I can only assume they all help.


    Non-vented Catch Can vs. Vented Catch Can

    A very important thing to mention here is that a vented catch can creates air leak allowing unmetered air to get in or out of the system. I would suggest using a vented catch can only if you block off the rear PCV, this way there’s no air leak.
    Side note: you can add as many catch cans as you want, one after another, if you can make them fit, theoretically the more the better, but the question is “is it worth it?” I wouldn’t do it and I don’t recall anybody doing this, even though some people think a second catch cat for the rear PCV would help. Theoretically it doesn’t really matter where you install a second catch can as long as the Rear PCV Passage (1f-----1r) in the valve cover is not leaking. It would be no point to have a second catch can on the exhaust side because of too much heat when you can have a second one on the intake side. But again, I don’t think a second catch can would make a big difference.

    I think as long as we have the PCV system connected to the air intake one way or another we’ll always have some carbon deposits on the intake valves.

    2. Venting to air

    Warning: this will alter the emissions on your car and might not be able to pass the inspection in your state.

    When venting to air you have to separate the crankcase ventilation from the air intake. This has to be done so you don’t create a vacuum leak.

    - block the intake manifold port just like you do for a catch can setup

    Pic.7


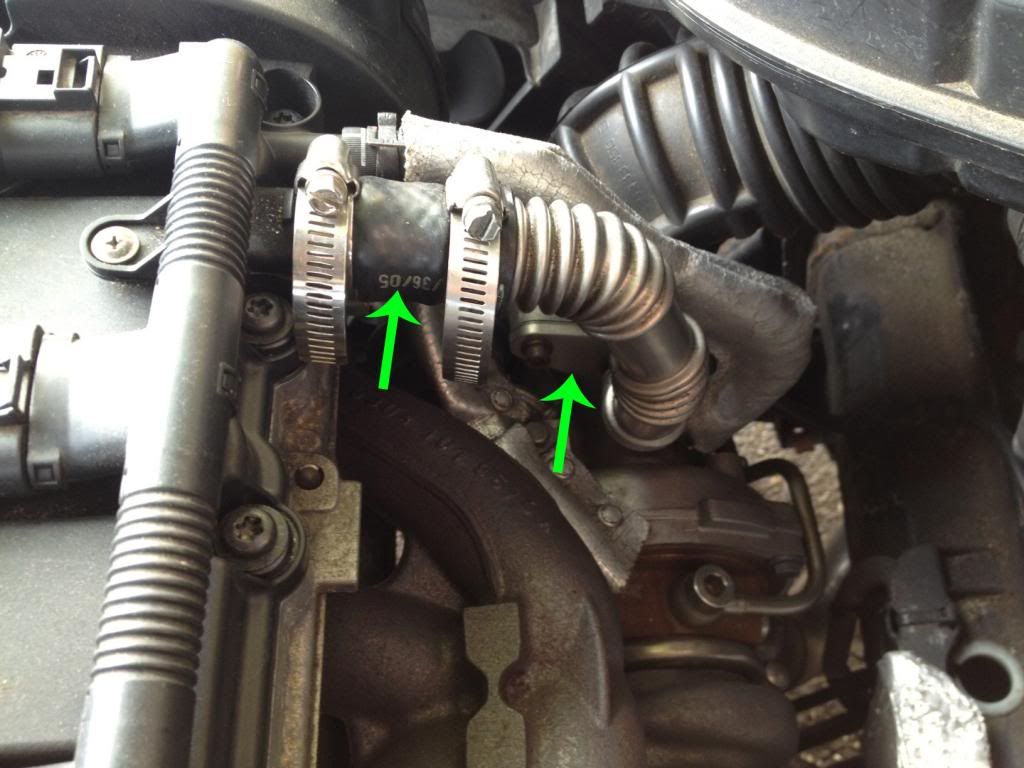
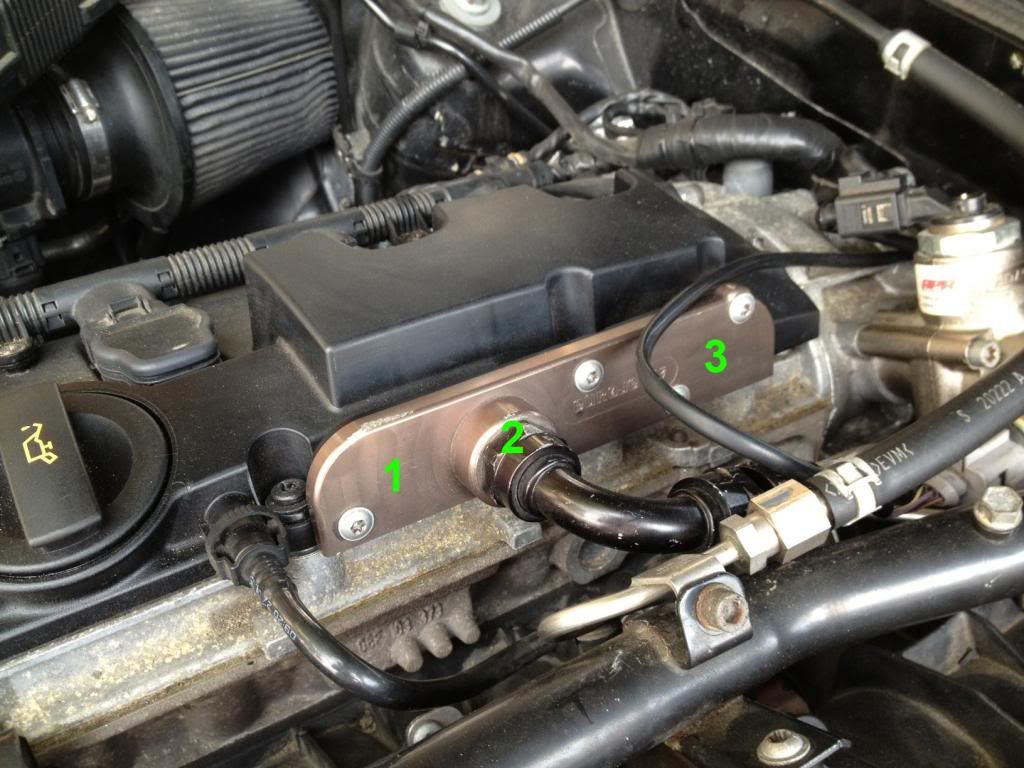
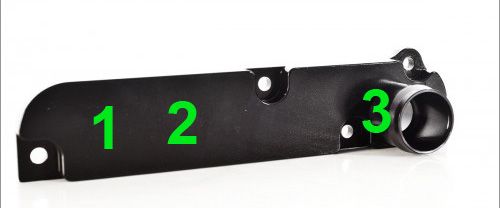
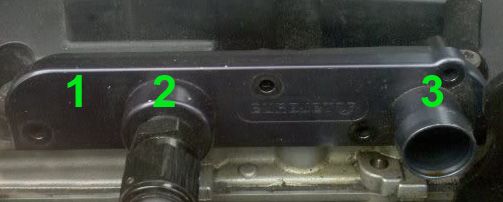
    - block the rear PCV too so no air is getting into the air intake after the MAF sensor. You can do this by blocking at the rubber hose (left arrow in Pic.8), by creating a metal plate and blocking down by the turbo (right arrow in Pic.8) or by using a PCV block off plate for the front with port one blocked (see Pic.9 and Pic.10). Any of this choices have the same result, so if you’re basically blocking port 1 (Pic.9), then you don’t need block the rear PCV breather tube (Pic.8) and vice versa.

    Pic.8


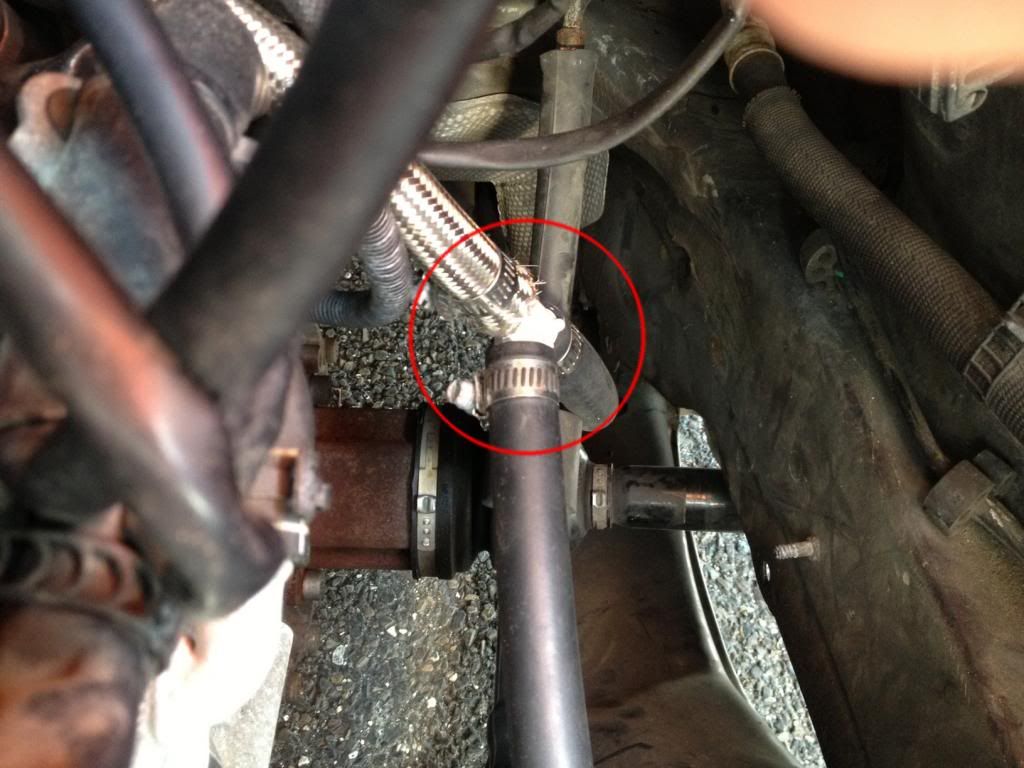
    - If you have a single port PCV block-off plate, this could be port 2 or 3 (see Pic.9 and Pic.10) join the hose going from the plate with the oil separator tube using a T-fitting and run a third hose under the car (Pic.11). It’s a good idea to run a long heater hose under the car to the back so you don’t get the gasses back into the car.

    Pic.9

    Pic.10

    Pic.11


    - If you have PCV block off plate with 2 ports no.2 and no.3 (see Pic.12) then just plug the 1st oil separator tube into port 3 and run the hose going from port 2 under the car. The connection here is made into the valve cover by 2nd oil separator since port 2 and 3 are connected. Theoretically this is the best choice for venting to air without a catch can because you get the benefit of the 2nd oil separator too and don’t spill too much oil out of the engine.

    Pic.12


    - If you have a PCV block-off plate with 3 ports then you can block port 1 and use the 2nd and 3rd ports as suggested above.

    It has been discussed that vacuum in the crankcase is benefic so basically when you vent to air, you lose that. I didn't document this so I cannot provide more details but an option would be to add a vacuum pump.

    3. Vent to exhaust

    I didn’t document this option but there’s a great write up on vortex I thought it’s worth mentioning.

    http://forums.vwvortex.com/showthrea...on-(DIY)-(long
    Last edited by shiro1745; 09-22-2013 at 09:10 PM.
    - Chip

    K0R-GT -- S3 injectors -- Maestro tune -- IE Drop-in rods

    "It took 4 bad crankshaft seals and lots of cursing to build my avatar"

  3. #3
    Veteran Member Four Rings shiro1745's Avatar
    Join Date
    Jul 26 2009
    AZ Member #
    45522
    Location
    DMV Area

    Troubleshooting

    Valve Cover troubleshooting

    I was going to take an extra VC I had apart, but I gave it to Shane. Anyway, there’s no point for doing that cause all you need to know if the passages are holding air properly. You can check this pretty easy while having the VC on the car, disconnect all the hoses + PCV valve from the VC and take each passage separately, hold your hand on one end and blow air into the other. It only makes sense to check the first two passages N80 passage and Rear PCV passage, not the Oil Separator passage because this is one with the crankcase.

    If N80 passage is leaking then I’m sure you’d get a fault code, but I haven’t heard anybody having this problem yet.

    Now if the Rear PCV passage (1f-----1r in Pic.13) is leaking air that means it becomes one with the crankcase which is a bit of a problem under boost. Looking at the blue line in Pic.14 we see the air that goes out to port 1-r is already separated from oil in an ideal situation. If the Rear PCV passage is leaking, it means that under boost there’s oil vapors drawn into that passage without passing through the oil separator anymore. This might be one, but not only reason why some people have a lot of oil into the turbo side IC pipe. I don’t see a leak in the Rear PCV passage making a difference under vacuum since that passage is blocked anyway.

    Pic.13

    Pic.14


    PCV Valve troubleshooting

    It’s already a known fact that you check a PCV valve by blowing air into the intake manifold port, if it leaks air it means the valve is bad.

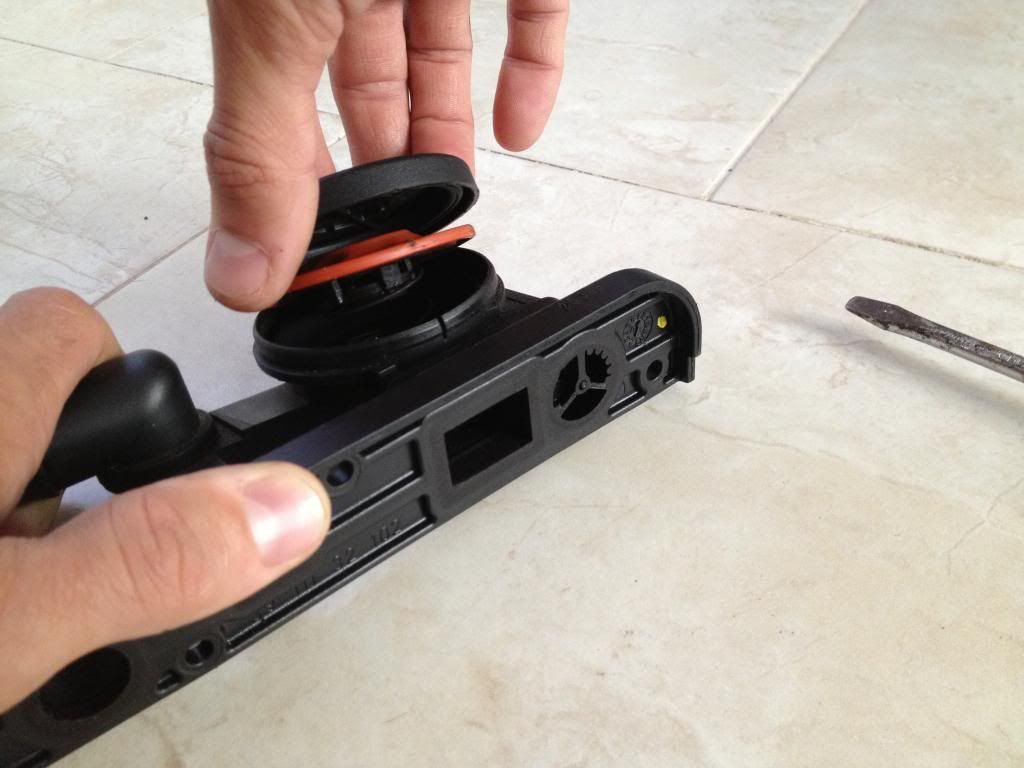
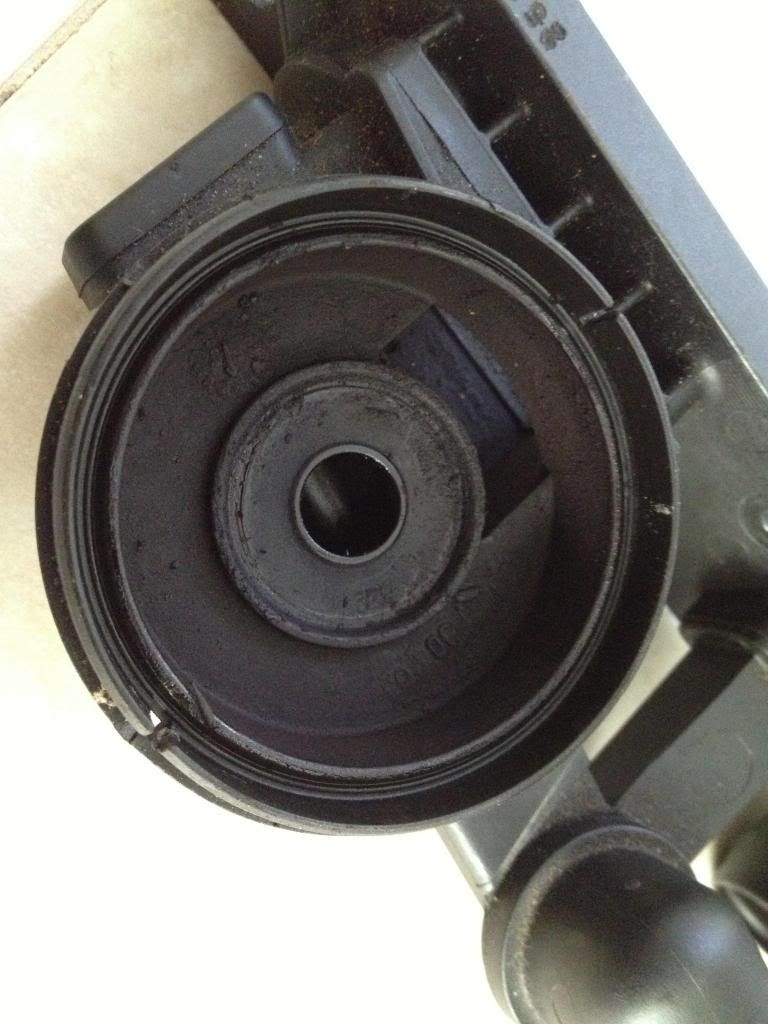
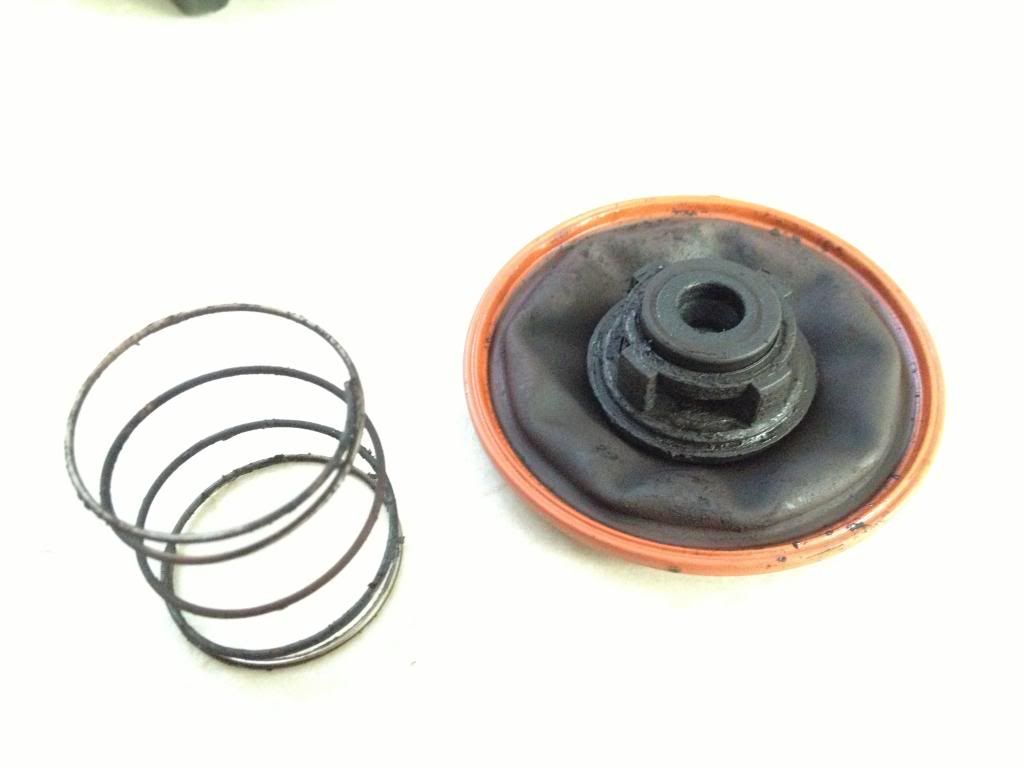
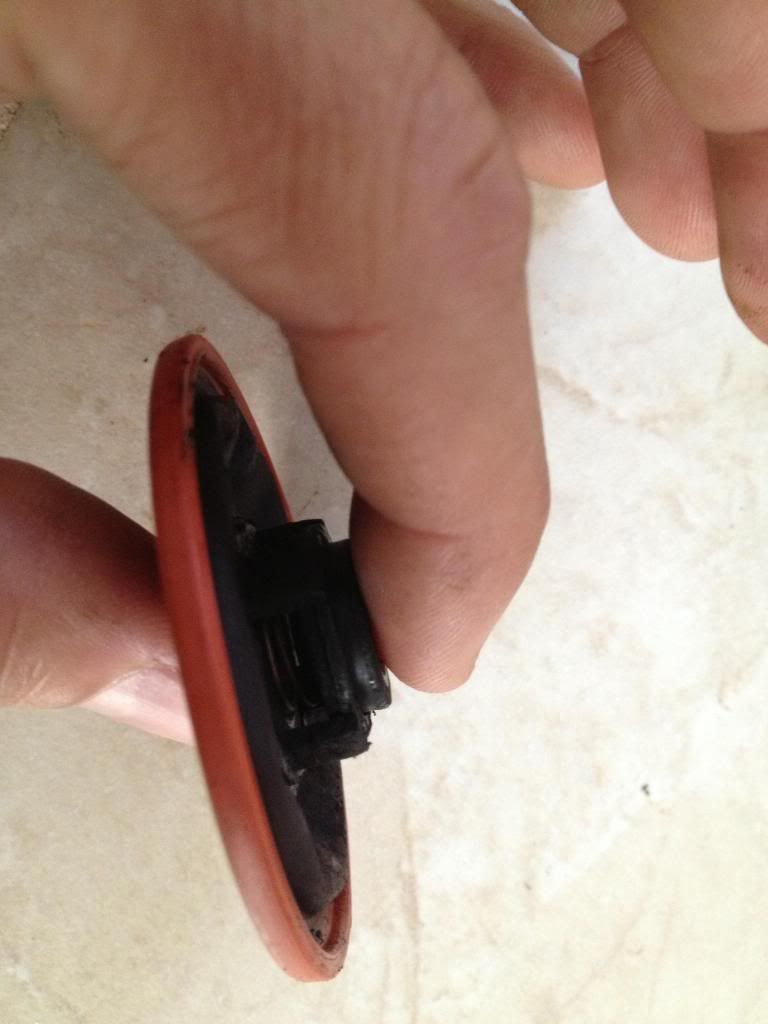
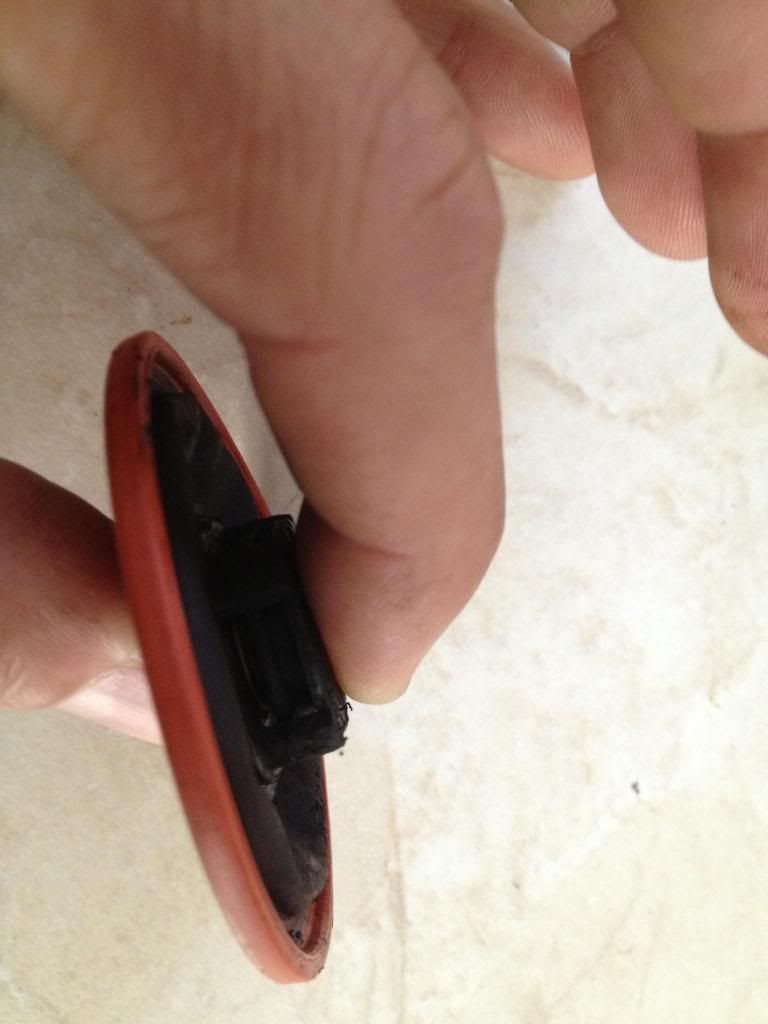
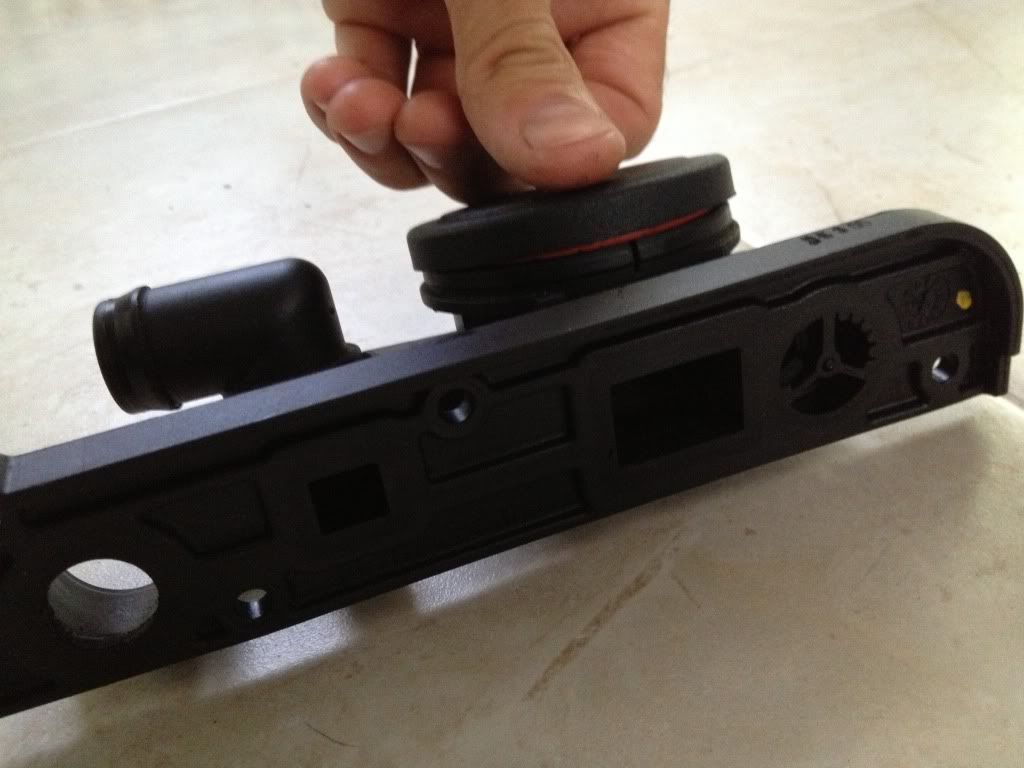
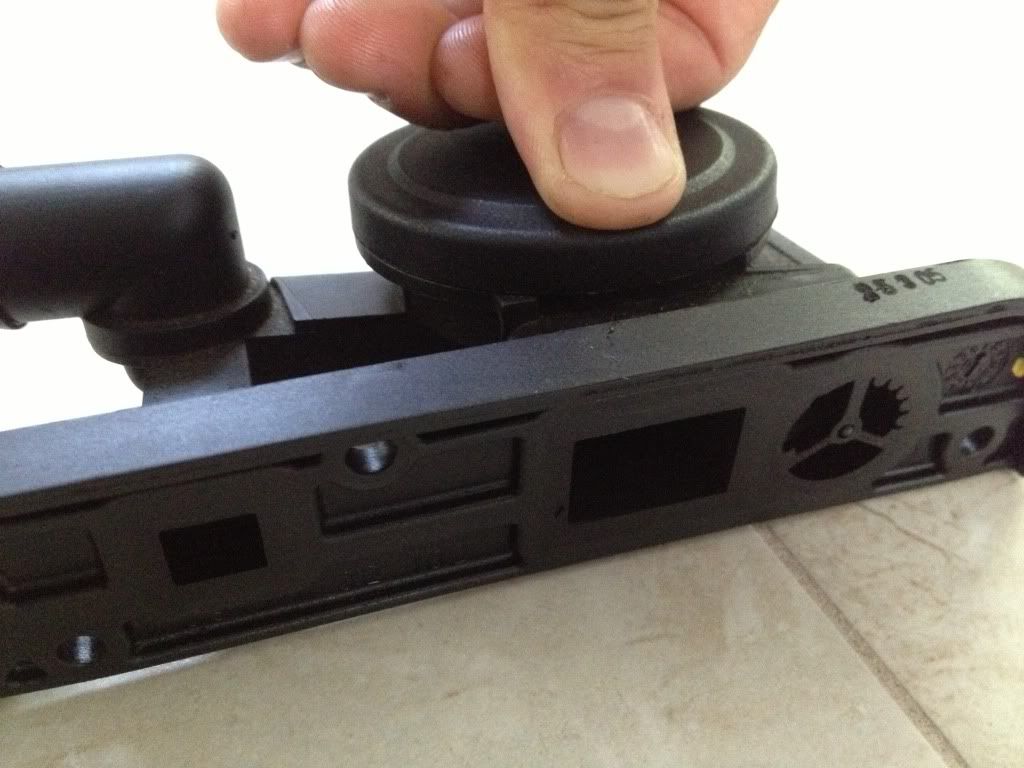
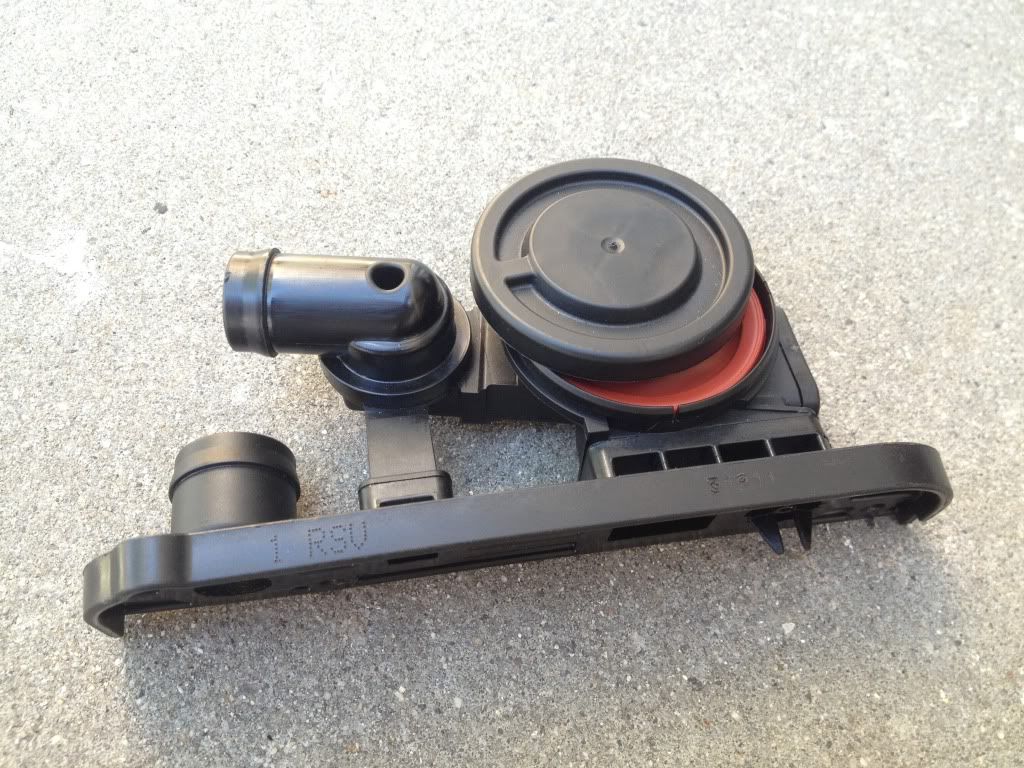
    Since I’m on this subject I want to share the discovery I just made. I opened a PCV Valve to take pictures and realized that the round plastic cap it’s not glued, you can remove it and snap it back without doing any damage to the PCV valve. Now I’m not sure if all the revisions are like this, but the one I opened is 06F129101C. I can only think Audi designed it like this in case the one way check valve fails they would rather have the cap popping and releasing the pressure that way instead of having VC gasket or camshaft/crankshaft seals blow, this is smart. This is most likely how many here ended-up with oil spilled everywhere under the hood when their PCV valve failed.


    I tried to cover everything so we have all the information in one thread and hopefully there’s no more confusion. From here it’s only your choice which way you go.
    If any of you think I missed anything or made mistakes or you have more suggestions, please let me know and I won’t hesitate to add info, but please have your suggestions documented.

    EDIT 9/21/13

    I can confirm that the last PCV valve revision as of now HAS A POP-OFF CAP as well, this is part # 06F129101P


    Chip
    Last edited by shiro1745; 09-21-2013 at 07:42 AM.
    - Chip

    K0R-GT -- S3 injectors -- Maestro tune -- IE Drop-in rods

    "It took 4 bad crankshaft seals and lots of cursing to build my avatar"

  4. #4
    Veteran Member Four Rings LoKisSpYdR's Avatar
    Join Date
    Jun 26 2012
    AZ Member #
    95867
    My Garage
    Brilliant Red B7 A4 2.0T Titanium quattro Tip - 2015 Q7 PP
    Location
    Reading, PA Area

    Very nice writeup.

    No one should say that they don't understand how it works after reading this (edit) or what fixes are out there.
    Last edited by LoKisSpYdR; 09-06-2013 at 09:40 AM. Reason: Jumping the gun.
    B6 A4 1.8T Dolphin Gray qM
    4L Q7 3.0T Glacier White PP

  5. #5
    Veteran Member Four Rings shiro1745's Avatar
    Join Date
    Jul 26 2009
    AZ Member #
    45522
    Location
    DMV Area

    Quote Originally Posted by LoKisSpYdR View Post
    Very nice writeup.

    No one should say that they don't understand how it works after this.

    Though, many will still want to know what a permanent fix is.
    there's still info to come... I need a few more minutes
    - Chip

    K0R-GT -- S3 injectors -- Maestro tune -- IE Drop-in rods

    "It took 4 bad crankshaft seals and lots of cursing to build my avatar"

  6. #6
    Veteran Member Four Rings aluthman's Avatar
    Join Date
    Mar 24 2013
    AZ Member #
    111961
    Location
    Oakdale, CT

    I'm doing a vent to exhaust setup on my car and removing my catch can. When it's done, I'll post pictures and a description. I'll also be running EPY's EGR delete in my Maestro file. Hopefully this takes care of all carbon buildup.
    -Adam

    '07 DTM A4 2.0T|6MT|EFR 7163 Twin Scroll|DoTuning|Built Motor|Meth and other go fast stuff…
    '06 A4 2.0T Quattro - RIP (Best ¼ mile pass 13.634 @ 103.30)

  7. #7
    Veteran Member Four Rings Audibot's Avatar
    Join Date
    May 20 2010
    AZ Member #
    59252
    Location
    Maryland

    Can we have this stickied?!

    Shiro, I think you posted a lot of good information most folks aren't aware of. Plus your diagrams are easy to understand.

  8. #8
    Veteran Member Four Rings Audibot's Avatar
    Join Date
    May 20 2010
    AZ Member #
    59252
    Location
    Maryland

    Quote Originally Posted by aluthman View Post
    I'm doing a vent to exhaust setup on my car and removing my catch can. When it's done, I'll post pictures and a description. I'll also be running EPY's EGR delete in my Maestro file. Hopefully this takes care of all carbon buildup.
    Are you going to clean your valves when do you this? I would say that would be the definitive BEFORE picture, and then take a look at them at the next oil change or after x-thousand miles--would give the biggest warm and fuzzy if there were no buildup at all.

  9. #9
    Veteran Member Four Rings shiro1745's Avatar
    Join Date
    Jul 26 2009
    AZ Member #
    45522
    Location
    DMV Area

    All info is now posted, I hope I covered everything, I've been working on this for while.
    - Chip

    K0R-GT -- S3 injectors -- Maestro tune -- IE Drop-in rods

    "It took 4 bad crankshaft seals and lots of cursing to build my avatar"

  10. #10
    Veteran Member Four Rings aluthman's Avatar
    Join Date
    Mar 24 2013
    AZ Member #
    111961
    Location
    Oakdale, CT

    Quote Originally Posted by Audibot View Post
    Are you going to clean your valves when do you this? I would say that would be the definitive BEFORE picture, and then take a look at them at the next oil change or after x-thousand miles--would give the biggest warm and fuzzy if there were no buildup at all.
    I'm having my engine built as I type this. I'm having new Ferrea valves installed, and all carbon will be blasted out of the head before it is put back together.
    -Adam

    '07 DTM A4 2.0T|6MT|EFR 7163 Twin Scroll|DoTuning|Built Motor|Meth and other go fast stuff…
    '06 A4 2.0T Quattro - RIP (Best ¼ mile pass 13.634 @ 103.30)

  11. #11
    Veteran Member Four Rings mcpcartier's Avatar
    Join Date
    Oct 14 2011
    AZ Member #
    82586
    My Garage
    12 Taco, 13 Ex, 16 Civic EX, 15 JKUR
    Location
    SoCal

    nice contribution to the community.....well done!
    2007 2.0T Q 6MT, S-Line, Ti Package, BB
    Revo Stage 2 | JHM Stage 1 Clutch | K&N Drop in | APR HPFP | 034 HFC | AWE Catback | 034 SD Tranny & Motor Mounts | Neuspeed Snub | H&R Sport Springs | Bilsteins | Moog ACA | B5 Perches (removed) | RS4 RSB | ABT Drilled n Slotted Rotors | Redstuff Front & Akebono Rear | Podi Stepper Boost Gauge | Recaro's | H&R Spacers 15f/20r | Clear Corners w/Blackout | Smoked Frt Markers | Cupra R Lip | 20% Tint

  12. #12
    Veteran Member Four Rings Audibot's Avatar
    Join Date
    May 20 2010
    AZ Member #
    59252
    Location
    Maryland

    Fantastic! Look forward to it!

  13. #13
    Veteran Member Four Rings
    Join Date
    Dec 23 2011
    AZ Member #
    85651
    Location
    USA

    Shiro, seriously thank you for doing this. All the info here is important to know and its finally condensed into one thread that is short but to the point and still detailed. A+

  14. #14
    Veteran Member Four Rings shiro1745's Avatar
    Join Date
    Jul 26 2009
    AZ Member #
    45522
    Location
    DMV Area

    Quote Originally Posted by LoKisSpYdR View Post
    Very nice writeup.

    No one should say that they don't understand how it works after reading this (edit) or what fixes are out there.
    Quote Originally Posted by Audibot View Post
    Can we have this stickied?!

    Shiro, I think you posted a lot of good information most folks aren't aware of. Plus your diagrams are easy to understand.
    Quote Originally Posted by mcpcartier View Post
    nice contribution to the community.....well done!
    Quote Originally Posted by p0isin View Post
    Shiro, seriously thank you for doing this. All the info here is important to know and its finally condensed into one thread that is short but to the point and still detailed. A+
    Thank you, I redid it a few times trying to make it as short and organized as possible. I've been working on this for the past two weeks between my job and other things I had on my checklist.

    Chip
    - Chip

    K0R-GT -- S3 injectors -- Maestro tune -- IE Drop-in rods

    "It took 4 bad crankshaft seals and lots of cursing to build my avatar"

  15. #15
    Veteran Member Four Rings Charles.waite's Avatar
    Join Date
    Jun 27 2011
    AZ Member #
    77478
    Location
    Seattle, WA

    Shiro, this is awesome stuff! I finally had this figured out in my head and you go and post exactly what I'd finally figured out, haha.

    The newer revision PCV assemblies, don't have a pop=off cap as far as I know. The cap itself there is redesigned as well. Its similar to the old SJP in the 1.8t, the failure mode where the cap pops off might be beneficial to a person who knows what to look for, but the side effect of creating a HUGE vacuum leak and possibly causing the car to not start I believe outweighed that in Audi's mind and thus they went to a fully sealed cap rather than a removeable one.

    Great writeup though. I'd posted up a few really terrible handdrawn diagrams, but your pictures are 1000x clearer with the colors and the various ports labeled. Very clear, very concise and spot on.

    Edit: pics of the old vs new PCV:
    OLD:


    NEW:


    Keep in mind, the old revisions and the new revisions look identical for the early 2.0t engines as well as the late 2.0t revisions. IE the old revision of the early engine looks the same as the old revision of the new engine. And the new revision of the old engine looks the same as the new revision of the new engine. Clear as mud? haha. I just find it HIGHLY annoying they stamped the part number on the bottom, meaning you have to remove it to figure out the damn part revision. So stupid...
    -CP
    2008 2.0t S-Line Ti 6MT Avant
    2017 Q7 3.0t
    SOLD -- 2012 Q5 2.0t - Stock Mommy Missile with new timing chains
    Former USP CLUB MEMBER #136
    2004 A4 1.8TQ 6MT USP - APR Stage 1+ - FSI Coils - BKR7EIX-11 - B6S4 Front + B7A4 Rear Brakes - 034 Street Trans Mount
    SOLD -- 2006 A4 2.0TQ Avant Tiptronic

  16. #16
    Veteran Member Four Rings kaz02a4's Avatar
    Join Date
    Jul 04 2012
    AZ Member #
    96260
    My Garage
    2012 A4Q 6M
    Location
    Rochester, NY

    Excellent write up Chip. Sticky for sure. Glad to see all of the info floated around these past few months is all in one place
    RIP B7: Stg. 1 UM, RS4 rear sway, Apikol snub mount, trip computer retrofit, OEM bi-xenons retrofit, RS4 seats retrofit, B7 S4 Ti wheels, BSH CC, 034 SD mounts, restitched steering wheel by my own hand

    Hello B8: P+ Quattro, 6 Speed, Sport. Stg. 1 APR, CR-15, Fly Designs steering wheel, Euro Impulse shift knob, Macan BBK, Alu Kreuz, 034 RSB + endlinks, SPC control arms...

  17. #17
    Veteran Member Four Rings Charles.waite's Avatar
    Join Date
    Jun 27 2011
    AZ Member #
    77478
    Location
    Seattle, WA

    SHIRO - PCV system explained

    Also wanted to add a bit more, if I may, Shiro.

    Another alternative to a standard catchcan is a Mann Provent system. The Provent 200 in particular seems perfectly sized to ko3 and k04 applications as it is rated up to 335hp. PDF HERE. The Provent 400 is rated up to 600+hp so it would be a better option for people running a BT setup.

    It has a built in pressure regulator, so it retains the OEM pressure regulation of the factory system while still providing a 3rd-level oil separation stage like normal catch cans.

    There is a writeup on Vortex HERE that is interesting, though I wouldn't vent into the engine bay like that guy did for the reasons Shiro outlined above.

    Anyway, the ProVent is a solid OEM+ type of setup that eliminates the cheap, weak OEM PCV while retaining its basic regulation functions. Its really not that much more expensive than an aftermarket catch can either. I'm very much considering going with a provent and a IE breather plate and fabbing up my own lines in the future, in which case I'll definitely do a writeup...

    Edit: fixed link.
    Last edited by Charles.waite; 09-06-2013 at 11:22 PM.
    -CP
    2008 2.0t S-Line Ti 6MT Avant
    2017 Q7 3.0t
    SOLD -- 2012 Q5 2.0t - Stock Mommy Missile with new timing chains
    Former USP CLUB MEMBER #136
    2004 A4 1.8TQ 6MT USP - APR Stage 1+ - FSI Coils - BKR7EIX-11 - B6S4 Front + B7A4 Rear Brakes - 034 Street Trans Mount
    SOLD -- 2006 A4 2.0TQ Avant Tiptronic

  18. #18
    Veteran Member Four Rings A4 Effort's Avatar
    Join Date
    May 28 2007
    AZ Member #
    18371
    My Garage
    '99 A4 2.8 / '07 A4 S-Line Avant / '09 A4 S-Line 2.0
    Location
    Mt. Airy, MD

    If i could rep you, i would. Nice write-up
    | 2007 Ibis Ti S-Line Avant | APR Stage 2+ | APR HPFP | 034 HFC | Forge DV | Stasis Exhaust | KW V1 Coilovers | SPC Adjustable Control Arms | 19" MRR GF6s | 034 TIP | 034 Sway Bar & End-Links | K&N Drop-In | Deval CF Front Splitter | Relak CF Sideskirts | S4 Recaros | TT-Sline MFSW | P3 Vent Gauge | RS4 Grille | RS4 Fog Grille Mod | RS4 Pedals | RS6 Shift Knob | OEM+

  19. #19
    Veteran Member Four Rings Mister W's Avatar
    Join Date
    Jan 29 2011
    AZ Member #
    70154
    My Garage
    2017 Mitsubishi Outlander GT
    Location
    Otterburn Park, QC

    Great thread, good work.
    Owning an Audi is like having a hot girlfriend that's mentally unstable
    2013 Allroad sport pkg, 19" gold Radi8 r8s5, B8 Sline suspension, AEM air filter, more to come...

  20. #20
    Established Member Two Rings seco007's Avatar
    Join Date
    Jan 06 2013
    AZ Member #
    107011
    Location
    Omaha, Nebraska

    Quote Originally Posted by A4 Effort View Post
    If i could rep you, i would. Nice write-up
    yes, 1000% agree , nice effort

  21. #21
    Established Member Two Rings Mr. Lahey's Avatar
    Join Date
    Dec 06 2012
    AZ Member #
    105401
    My Garage
    To much junk
    Location
    Sunnyvale Trailer Park

    Dude, this is an AMAZING write up. I never fully understood and didnt feel like asking and getting raped. Thanks a lot makes sense now
    "Randy the Shit pool is getting full, we better strain it before it overflows and causes a shit slide that will overflow and cover this entire community"
    -Jim Lahey

  22. #22
    Veteran Member Four Rings shiro1745's Avatar
    Join Date
    Jul 26 2009
    AZ Member #
    45522
    Location
    DMV Area

    Quote Originally Posted by Charles.waite View Post
    Shiro, this is awesome stuff!
    Quote Originally Posted by kaz02a4 View Post
    Excellent write up Chip. Sticky for sure. Glad to see all of the info floated around these past few months is all in one place
    Quote Originally Posted by A4 Effort View Post
    If i could rep you, i would. Nice write-up
    Quote Originally Posted by Mister W View Post
    Great thread, good work.
    Quote Originally Posted by seco007 View Post
    yes, 1000% agree , nice effort
    Thanks again guys, this means a lot to me!
    - Chip

    K0R-GT -- S3 injectors -- Maestro tune -- IE Drop-in rods

    "It took 4 bad crankshaft seals and lots of cursing to build my avatar"

  23. #23
    Established Member Two Rings djp2's Avatar
    Join Date
    Jun 03 2008
    AZ Member #
    29510
    My Garage
    1979 Hilux
    Location
    charlotte

    Yes, after countless texts with shane and now this, its all clear!!!!

    Quote Originally Posted by Mr. Lahey View Post
    Dude, this is an AMAZING write up. I never fully understood and didnt feel like asking and getting raped. Thanks a lot makes sense now
    Audio Build on the way
    AudioMasters my website

  24. #24
    Veteran Member Four Rings shiro1745's Avatar
    Join Date
    Jul 26 2009
    AZ Member #
    45522
    Location
    DMV Area

    Quote Originally Posted by Charles.waite View Post
    I finally had this figured out in my head and you go and post exactly what I'd finally figured out, haha.

    Great writeup though. I'd posted up a few really terrible handdrawn diagrams, but your pictures are 1000x clearer with the colors and the various ports labeled. Very clear, very concise and spot on.

    Keep in mind, the old revisions and the new revisions look identical for the early 2.0t engines as well as the late 2.0t revisions. IE the old revision of the early engine looks the same as the old revision of the new engine. And the new revision of the old engine looks the same as the new revision of the new engine. Clear as mud? haha. I just find it HIGHLY annoying they stamped the part number on the bottom, meaning you have to remove it to figure out the damn part revision. So stupid...
    I know you are one of the guys here that understood how the system works, we both posted lots of comments in different threads on this.
    And your explanation ... I LOL'ed when first read it, funny the way you put it, but I get the idea. I should have a newer revision of my old engine which according to you looks the same as the newer revision of the new engine and I'll try to pop that cap off and see what happens.

    Quote Originally Posted by Charles.waite View Post
    Also wanted to add a bit more, if I may, Shiro.

    Another alternative to a standard catchcan is a Mann Provent system. The Provent 200 in particular seems perfectly sized to ko3 and k04 applications as it is rated up to 335hp. PDF HERE. The Provent 400 is rated up to 600+hp so it would be a better option for people running a BT setup.

    It has a built in pressure regulator, so it retains the OEM pressure regulation of the factory system while still providing a 3rd-level oil separation stage like normal catch cans.

    There is a writeup on Vortex HERE that is interesting, though I wouldn't vent into the engine bay like that guy did for the reasons Shiro outlined above.

    Anyway, the ProVent is a solid OEM+ type of setup that eliminates the cheap, weak OEM PCV while retaining its basic regulation functions. Its really not that much more expensive than an aftermarket catch can either. I'm very much considering going with a provent and a IE breather plate and fabbing up my own lines in the future, in which case I'll definitely do a writeup...
    Can you repost the link to the thread on vortex? you pasted the same link for the pdf file twice. I'm interested to read more info on that.
    - Chip

    K0R-GT -- S3 injectors -- Maestro tune -- IE Drop-in rods

    "It took 4 bad crankshaft seals and lots of cursing to build my avatar"

  25. #25
    Veteran Member Four Rings Charles.waite's Avatar
    Join Date
    Jun 27 2011
    AZ Member #
    77478
    Location
    Seattle, WA

    SHIRO - PCV system explained

    Quote Originally Posted by shiro1745 View Post
    I know you are one of the guys here that understood how the system works, we both posted lots of comments in different threads on this.
    And your explanation ... I LOL'ed when first read it, funny the way you put it, but I get the idea. I should have a newer revision of my old engine which according to you looks the same as the newer revision of the new engine and I'll try to pop that cap off and see what happens.


    Can you repost the link to the thread on vortex? you pasted the same link for the pdf file twice. I'm interested to read more info on that.
    Aww crap. Here is the proper link: http://forums.vwvortex.com/showthread.php?4346800

    I'll fix it in my first post.
    -CP
    2008 2.0t S-Line Ti 6MT Avant
    2017 Q7 3.0t
    SOLD -- 2012 Q5 2.0t - Stock Mommy Missile with new timing chains
    Former USP CLUB MEMBER #136
    2004 A4 1.8TQ 6MT USP - APR Stage 1+ - FSI Coils - BKR7EIX-11 - B6S4 Front + B7A4 Rear Brakes - 034 Street Trans Mount
    SOLD -- 2006 A4 2.0TQ Avant Tiptronic

  26. #26
    Veteran Member Four Rings shiro1745's Avatar
    Join Date
    Jul 26 2009
    AZ Member #
    45522
    Location
    DMV Area

    Quote Originally Posted by Charles.waite View Post
    Aww crap. Here is the proper link: http://forums.vwvortex.com/showthread.php?4346800

    I'll fix it in my first post.
    that seem like a nice option, pricey though. I think I'm going to stick with my vent to air solution, I would like to get the crankcase under vacuum though. The two choices we have at this point if completely disconnect the PCV from intake are vacuum pump or exhaust bung. Iv'e seen a few stating that venting to exhaust crates a bit of vacuum, I think I'd like to try a vacuum pump though, I'll start looking into the options available.
    - Chip

    K0R-GT -- S3 injectors -- Maestro tune -- IE Drop-in rods

    "It took 4 bad crankshaft seals and lots of cursing to build my avatar"

  27. #27
    Veteran Member Four Rings mec's Avatar
    Join Date
    Jul 25 2010
    AZ Member #
    61858
    My Garage
    Spare engines!
    Location
    Denver, Colorado

    Shiro youuuuuu daaaa maaannnnnnnnn!!!!!

    I haven't seen a explanation this good ever. Very detailed and very well documented.


  28. #28
    Veteran Member Four Rings shiro1745's Avatar
    Join Date
    Jul 26 2009
    AZ Member #
    45522
    Location
    DMV Area

    Quote Originally Posted by mec View Post
    Shiro youuuuuu daaaa maaannnnnnnnn!!!!!

    I haven't seen a explanation this good ever. Very detailed and very well documented.

    Thank you!
    - Chip

    K0R-GT -- S3 injectors -- Maestro tune -- IE Drop-in rods

    "It took 4 bad crankshaft seals and lots of cursing to build my avatar"

  29. #29
    Veteran Member Four Rings jsandor91's Avatar
    Join Date
    Jun 10 2011
    AZ Member #
    76682
    My Garage
    dead hookers
    Location
    South Jersey

    great explanation! looks like for my gtx setup i want to

    block rear pcv
    leave n80 alone?
    block pcv plate hole #1
    run #2 to the ground
    leave number 3 as is
    and plug the intake manifold

    a thousand internet high fives for anyone that can confirm this for me.
    shiro if your ever in my neck of the woods i owe you a beer
    Quartz Grey B7 A4 Quattro 6MT
    Maestro + Epy Tuned / GTX2867r / S3's / Spintech Non-Resonated 3 Inch Exhaust / Cold Side Synapse DV / TR18 + 2.5" Piping / Hpfp S1 Pump
    Bi-Xenon retrofit + Fly's leds / ST Coils + Rsb / 18x9.5 Miro 111's
    Dat Der Build Thread
    Coming Soon: Boost Manager +, Drakes Performance Stage V Clutch

  30. #30
    Veteran Member Four Rings shiro1745's Avatar
    Join Date
    Jul 26 2009
    AZ Member #
    45522
    Location
    DMV Area

    Quote Originally Posted by jsandor91 View Post
    great explanation! looks like for my gtx setup i want to

    block rear pcv
    leave n80 alone?
    block pcv plate hole #1
    run #2 to the ground
    leave number 3 as is
    and plug the intake manifold

    a thousand internet high fives for anyone that can confirm this for me.
    shiro if your ever in my neck of the woods i owe you a beer
    Test your rear PCV passage through the valve cover to see if it holds pressure. If it does there's no need to block the rear, it's enough to block port 1 on the PCV plate, blocking the rear it's like blocking the same passage in two places. There's no point to do extra work for nothing.

    What exactly do you mean by leaving port 3 as is? Will you have the breather hose from the primary oil separator connected there? If so you're good.

    Where in south jersey are you? I'm all the way down in cape may exit 0 on parkway.
    Last edited by shiro1745; 09-08-2013 at 03:12 PM.
    - Chip

    K0R-GT -- S3 injectors -- Maestro tune -- IE Drop-in rods

    "It took 4 bad crankshaft seals and lots of cursing to build my avatar"

  31. #31
    Veteran Member Four Rings jsandor91's Avatar
    Join Date
    Jun 10 2011
    AZ Member #
    76682
    My Garage
    dead hookers
    Location
    South Jersey

    im in the burlington area which isn't real south jersey but it isn't north jersey either lol.

    i have this


    + a black valvecover joel sent me from the karma thread.

    block port 1 vent port 2 to the ground and port 3 connected to the primary oil separator. plug the intake manifold .

    whats the best way to test the rear pcv to see if it holds pressure?
    Quartz Grey B7 A4 Quattro 6MT
    Maestro + Epy Tuned / GTX2867r / S3's / Spintech Non-Resonated 3 Inch Exhaust / Cold Side Synapse DV / TR18 + 2.5" Piping / Hpfp S1 Pump
    Bi-Xenon retrofit + Fly's leds / ST Coils + Rsb / 18x9.5 Miro 111's
    Dat Der Build Thread
    Coming Soon: Boost Manager +, Drakes Performance Stage V Clutch

  32. #32
    Veteran Member Four Rings shiro1745's Avatar
    Join Date
    Jul 26 2009
    AZ Member #
    45522
    Location
    DMV Area

    Quote Originally Posted by jsandor91 View Post
    im in the burlington area which isn't real south jersey but it isn't north jersey either lol.

    i have this


    + a black valvecover joel sent me from the karma thread.

    block port 1 vent port 2 to the ground and port 3 connected to the primary oil separator. plug the intake manifold .

    whats the best way to test the rear pcv to see if it holds pressure?
    That plate is perfect.

    Just hold your hand on one end of the VC(passage 1f-----1r) and blow air into the the other end. There won't be pressure in there, it will actually be vacuum created by the turbo, so if it hold air while you're blowing you should be good.
    - Chip

    K0R-GT -- S3 injectors -- Maestro tune -- IE Drop-in rods

    "It took 4 bad crankshaft seals and lots of cursing to build my avatar"

  33. #33
    Veteran Member Four Rings shiro1745's Avatar
    Join Date
    Jul 26 2009
    AZ Member #
    45522
    Location
    DMV Area

    Quote Originally Posted by Charles.waite View Post
    Shiro, this is awesome stuff! I finally had this figured out in my head and you go and post exactly what I'd finally figured out, haha.

    The newer revision PCV assemblies, don't have a pop=off cap as far as I know. The cap itself there is redesigned as well. Its similar to the old SJP in the 1.8t, the failure mode where the cap pops off might be beneficial to a person who knows what to look for, but the side effect of creating a HUGE vacuum leak and possibly causing the car to not start I believe outweighed that in Audi's mind and thus they went to a fully sealed cap rather than a removeable one.

    Great writeup though. I'd posted up a few really terrible handdrawn diagrams, but your pictures are 1000x clearer with the colors and the various ports labeled. Very clear, very concise and spot on.

    Edit: pics of the old vs new PCV:
    OLD:


    NEW:


    Keep in mind, the old revisions and the new revisions look identical for the early 2.0t engines as well as the late 2.0t revisions. IE the old revision of the early engine looks the same as the old revision of the new engine. And the new revision of the old engine looks the same as the new revision of the new engine. Clear as mud? haha. I just find it HIGHLY annoying they stamped the part number on the bottom, meaning you have to remove it to figure out the damn part revision. So stupid...
    Apparently the second PCV valve I have is the last revision part # 06F129101P and IT HAS A POP-OFF CAP.
    The old one you posted is actually aftermarket as you can see on ECStuning website, I was a bit surprised when I saw that picture cause I have not seen anything like that before

    http://www.ecstuning.com/Audi-B7_A4-...Emissions/PCV/

    more precisely this http://www.ecstuning.com/Audi-B7_A4-...PCV/ES2643210/


    And here is my above mentioned one with the cap off. I also updated the original post with this new info.


    - Chip

    K0R-GT -- S3 injectors -- Maestro tune -- IE Drop-in rods

    "It took 4 bad crankshaft seals and lots of cursing to build my avatar"

  34. #34
    Senior Member Two Rings bryonm's Avatar
    Join Date
    Jun 02 2013
    AZ Member #
    116403
    Location
    Mililani, Hawaii

    wow, this takes learning something new every day to another level. great informational thread.

  35. #35
    Veteran Member Four Rings Charles.waite's Avatar
    Join Date
    Jun 27 2011
    AZ Member #
    77478
    Location
    Seattle, WA

    Quote Originally Posted by shiro1745 View Post
    Apparently the second PCV valve I have is the last revision part # 06F129101P and IT HAS A POP-OFF CAP.
    The old one you posted is actually aftermarket as you can see on ECStuning website, I was a bit surprised when I saw that picture cause I have not seen anything like that before

    http://www.ecstuning.com/Audi-B7_A4-...Emissions/PCV/

    more precisely this http://www.ecstuning.com/Audi-B7_A4-...PCV/ES2643210/


    And here is my above mentioned one with the cap off. I also updated the original post with this new info.


    Oh damn. That's interesting. Ecs's pictures aren't always 100% accurate though, since I had the old revision then had that replaced under warranty by the dealer in my old b7, I know the pictures I posted are visually correct, it's just Ecs's pictures that don't line up properly with the various revisions. Which is fine, I'm sure it's hard to keep them all straight.
    -CP
    2008 2.0t S-Line Ti 6MT Avant
    2017 Q7 3.0t
    SOLD -- 2012 Q5 2.0t - Stock Mommy Missile with new timing chains
    Former USP CLUB MEMBER #136
    2004 A4 1.8TQ 6MT USP - APR Stage 1+ - FSI Coils - BKR7EIX-11 - B6S4 Front + B7A4 Rear Brakes - 034 Street Trans Mount
    SOLD -- 2006 A4 2.0TQ Avant Tiptronic

  36. #36
    Veteran Member Four Rings CorneliusRox's Avatar
    Join Date
    Jul 19 2011
    AZ Member #
    78443
    My Garage
    2003CBR600rr, 1997 12VCummins4X4
    Location
    Northern Minneapolis, MN

    Very clean write up Shiro! Great work!

  37. #37
    Veteran Member Four Rings eyesolution's Avatar
    Join Date
    Sep 23 2012
    AZ Member #
    101007
    Location
    Atlanta

    Ahh! Why haven't I read this thread before! I have a very small oil leak from the rear Pcv.. I've been looking for it for a while and finally found out where it was coming from. What do you guys use to block that off ?


    Sent from my Throne using Crapatalk.

  38. #38
    Veteran Member Four Rings shiro1745's Avatar
    Join Date
    Jul 26 2009
    AZ Member #
    45522
    Location
    DMV Area

    Quote Originally Posted by bryonm View Post
    wow, this takes learning something new every day to another level. great informational thread.
    Quote Originally Posted by CorneliusRox View Post
    Very clean write up Shiro! Great work!
    Thank you!

    Quote Originally Posted by Charles.waite View Post
    Oh damn. That's interesting. Ecs's pictures aren't always 100% accurate though, since I had the old revision then had that replaced under warranty by the dealer in my old b7, I know the pictures I posted are visually correct, it's just Ecs's pictures that don't line up properly with the various revisions. Which is fine, I'm sure it's hard to keep them all straight.
    Yes, sometimes pictures are not the right ones. Anyway my car is an 05.5 so not sure if the late VINs are the same. You might be right at least for the late VINs.

    Quote Originally Posted by eyesolution View Post
    Ahh! Why haven't I read this thread before! I have a very small oil leak from the rear Pcv.. I've been looking for it for a while and finally found out where it was coming from. What do you guys use to block that off ?


    Sent from my Throne using Crapatalk.

    SO where is the leak coming from and what exactly you want to block off?
    - Chip

    K0R-GT -- S3 injectors -- Maestro tune -- IE Drop-in rods

    "It took 4 bad crankshaft seals and lots of cursing to build my avatar"

  39. #39
    Veteran Member Four Rings eyesolution's Avatar
    Join Date
    Sep 23 2012
    AZ Member #
    101007
    Location
    Atlanta

    Quote Originally Posted by shiro1745 View Post
    SO where is the leak coming from and what exactly you want to block off?

    From the rear Pcv. I can see a spray pattern coming from the valve cover port. Spraying my heatshield. (1-r is the culprit) I need to plug that and a block off plate for the turbo


    Sent from my Throne using Crapatalk.

  40. #40
    Veteran Member Four Rings shiro1745's Avatar
    Join Date
    Jul 26 2009
    AZ Member #
    45522
    Location
    DMV Area

    Quote Originally Posted by eyesolution View Post
    From the rear Pcv. I can see a spray pattern coming from the valve cover port. Spraying my heatshield. (1-r is the culprit) I need to plug that and a block off plate for the turbo


    Sent from my Throne using Crapatalk.
    Is your PCV system stock? if so why would you want to block the rear PCV instead of just fixing the leak? Probably just a bad clamp or a cracked rubber hose?
    - Chip

    K0R-GT -- S3 injectors -- Maestro tune -- IE Drop-in rods

    "It took 4 bad crankshaft seals and lots of cursing to build my avatar"

Page 1 of 5 123 ... LastLast


Tags for this Thread

Bookmarks

Posting Permissions

  • You may not post new threads
  • You may not post replies
  • You may not post attachments
  • You may not edit your posts
  •  


    © 2001-2025 Audizine, Audizine.com, and Driverzines.com
    Audizine is an independently owned and operated automotive enthusiast community and news website.
    Audi and the Audi logo(s) are copyright/trademark Audi AG. Audizine is not endorsed by or affiliated with Audi AG.