Audizine - An Automotive Enthusiast Community

Results 1 to 25 of 25
  1. #1
    Veteran Member Four Rings Yuppie's Avatar
    Join Date
    Feb 14 2005
    AZ Member #
    5283
    Location
    Houston, TX/ Richmond, VA

    diy for heater core replacement? best place to buy parts for?

    Guest-only advertisement. Register or Log In now!
    As the title states, can someone link me to a diy for heater core replacement and what is the best place to buy the parts? I don't want to attempt or have a shop do this so I don't want to put cheap parts in there.

    TIA
    2001.5 S4 Sil Avant Stage 3 IE Rods, CNC 2.8 heads, BW RS6 Turbos-Current
    2001.5 S4 Casa Sedan Built Motor TiAL 770-Current
    2000 S4 Nogaro Sedan Stage 3 WMS-Current
    2001 S4 Sil Sedan ASP Stage 3-SOLD
    2002 S4 Pearl White Avant Stock-SOLD
    2000 S4 Nogaro Sedan EPL Stage III-SOLD
    2000 S4 Brilliant Black Sedan MTM Stage III-SOLD
    2001.5 Nogaro Sedan JFonz Tune Franken F21s-SOLD
    2001.5 Nogaro Sedan AWE Stage III-SOLD (x2)
    2001 Brilliant Black Sedan S4-K04/Rs6 Hybrid custom tuned Vast-SOLD

  2. #2
    Veteran Member Four Rings infinkc's Avatar
    Join Date
    Feb 13 2004
    AZ Member #
    465
    Location
    S Ã C, CÃ*

    here is one.
    http://audi-diy.blogspot.com/2007/10...core-swap.html

    i cant remember the one i used when i did mine. I bought the core from ECS http://www.ecstuning.com/ES1942/
    There are 10 kinds of people in this world, those who know binary and those who don't.

  3. #3
    Veteran Member Four Rings Yuppie's Avatar
    Join Date
    Feb 14 2005
    AZ Member #
    5283
    Location
    Houston, TX/ Richmond, VA

    Thanks Kris. Do they supply the hoses too or do I have to buy that separately?

    TIA
    2001.5 S4 Sil Avant Stage 3 IE Rods, CNC 2.8 heads, BW RS6 Turbos-Current
    2001.5 S4 Casa Sedan Built Motor TiAL 770-Current
    2000 S4 Nogaro Sedan Stage 3 WMS-Current
    2001 S4 Sil Sedan ASP Stage 3-SOLD
    2002 S4 Pearl White Avant Stock-SOLD
    2000 S4 Nogaro Sedan EPL Stage III-SOLD
    2000 S4 Brilliant Black Sedan MTM Stage III-SOLD
    2001.5 Nogaro Sedan JFonz Tune Franken F21s-SOLD
    2001.5 Nogaro Sedan AWE Stage III-SOLD (x2)
    2001 Brilliant Black Sedan S4-K04/Rs6 Hybrid custom tuned Vast-SOLD

  4. #4
    Veteran Member Four Rings Yuppie's Avatar
    Join Date
    Feb 14 2005
    AZ Member #
    5283
    Location
    Houston, TX/ Richmond, VA

    Also anything different/additional process for an s4 since the write up is for an a4?
    2001.5 S4 Sil Avant Stage 3 IE Rods, CNC 2.8 heads, BW RS6 Turbos-Current
    2001.5 S4 Casa Sedan Built Motor TiAL 770-Current
    2000 S4 Nogaro Sedan Stage 3 WMS-Current
    2001 S4 Sil Sedan ASP Stage 3-SOLD
    2002 S4 Pearl White Avant Stock-SOLD
    2000 S4 Nogaro Sedan EPL Stage III-SOLD
    2000 S4 Brilliant Black Sedan MTM Stage III-SOLD
    2001.5 Nogaro Sedan JFonz Tune Franken F21s-SOLD
    2001.5 Nogaro Sedan AWE Stage III-SOLD (x2)
    2001 Brilliant Black Sedan S4-K04/Rs6 Hybrid custom tuned Vast-SOLD

  5. #5
    Veteran Member Three Rings dubzackvr6's Avatar
    Join Date
    Oct 18 2010
    AZ Member #
    65863
    My Garage
    Stage 2 C7 A6, Tahoe for the kiddos
    Location
    SLC, UT

    they're the same. Basically everything you see from the center console forward comes out. It's really not bad, it's just time consuming. As far as the coolant hoses go, you'll have to buy those separately.

    The one bolt that annoyed me was for the AL dash frame, located in the raintray near the wiper motor. Don't forget about that one.

  6. #6
    Veteran Member Three Rings
    Join Date
    Sep 29 2007
    AZ Member #
    21448
    My Garage
    02 S4 /07 S4 / 11 Q5 / 16 S3
    Location
    Clarkston, MI

    Is it leaking or just not blowing heat? Mine stopped heating and i tried flushing it a bunch of times with water without much luck, finally i tried some muriatic acid and in a few mins it was like new! Not much crap came out but it went from no heat at all to perfect, worth a try if thats your problem because the swap is a nightmare.

  7. #7
    Veteran Member Four Rings Shhmaudi's Avatar
    Join Date
    Nov 16 2009
    AZ Member #
    50819
    My Garage
    Ducati 1299 panigale, Raptor, Tesla Y, MK2 TTRS
    Location
    Sandy eggo

    Quote Originally Posted by tekkie View Post
    Is it leaking or just not blowing heat? Mine stopped heating and i tried flushing it a bunch of times with water without much luck, finally i tried some muriatic acid and in a few mins it was like new! Not much crap came out but it went from no heat at all to perfect, worth a try if thats your problem because the swap is a nightmare.
    you put muriatic acid in your cooling system?
    Old: 1.8T Stg 3, Noggy stg 3, Silvaro tag 3 B5 |JHM Trans W/Carbon Syncros 4:1 diff|Tial 770|I.E Rods|Built 2.8 Heads W/ supertech RS4 intake, Y pipe, manifold etc...
    Current: 2013 TTRS Nimbus grey| HRE FF01| 034 RSB w/endlinks| 034 CF intake| 034 dogbone mount & CNC shifter bushings| Miltek DP custom 3in exhaust| Autotech HPFP| AEM 3-1 gauge|Schroth racing belts| S3 shifter| Revised injectors| Ceramic coated/ PPF

  8. #8
    Veteran Member Three Rings
    Join Date
    Sep 29 2007
    AZ Member #
    21448
    My Garage
    02 S4 /07 S4 / 11 Q5 / 16 S3
    Location
    Clarkston, MI

    You just flush a small amount through the heater core, nothing goes in the engine

  9. #9
    Veteran Member Three Rings dubzackvr6's Avatar
    Join Date
    Oct 18 2010
    AZ Member #
    65863
    My Garage
    Stage 2 C7 A6, Tahoe for the kiddos
    Location
    SLC, UT

    I've done that as well, good temporary fix, it'll buy you a few months. The real fix however is to just replace it.

  10. #10
    Veteran Member Three Rings
    Join Date
    Sep 29 2007
    AZ Member #
    21448
    My Garage
    02 S4 /07 S4 / 11 Q5 / 16 S3
    Location
    Clarkston, MI

    Even i you did it every 6 months for 10 years it would be the same amount of time as replacing it lol

    I agree the long term solution is to replace it, i did this flush nearly 2 years ago and its still working :) so until it stops I am not swapping it

  11. #11
    Veteran Member Four Rings infinkc's Avatar
    Join Date
    Feb 13 2004
    AZ Member #
    465
    Location
    S Ã C, CÃ*

    Quote Originally Posted by dubzackvr6 View Post
    they're the same. Basically everything you see from the center console forward comes out. It's really not bad, it's just time consuming. As far as the coolant hoses go, you'll have to buy those separately.

    The one bolt that annoyed me was for the AL dash frame, located in the raintray near the wiper motor. Don't forget about that one.
    Yea this one got me also. Also when you get the car, i suggest soaking it in water, there is a lot of oil on the fins, I didnt soak it and it was burning off for days smelling up the car.
    There are 10 kinds of people in this world, those who know binary and those who don't.

  12. #12
    Senior Member Three Rings ezfour's Avatar
    Join Date
    Apr 17 2010
    AZ Member #
    57755
    Location
    Nevada

    ^^That write up is pretty great minus a few things you will figure out along the way. I have been meaning to make an addendum to the above with pictures but am lazy and have much more important stuff going on lately.

    I got the Febi core from here http://www.pelicanparts.com/catalog/..._pg1.htm#item3

    Main points are: Take out old heater core, put new one in. Done!

    Pictures are your friend.

    Put your seats bottoms all the way down and sloping forward. You will be upside down under the dash and don't want your seat bottoms digging into your back.

    There are two sizes of bolts through most of the dash so you can just pile those up. 8mm and 10mm I believe

    Take off both wiper arms, cowls, and entire ecu box.

    After removing the pedal cluster bolt its a good idea to mark the interior of that bolt hole against the upper aluminum frame. This will help for re-alignment later.

    You don't need to remove all the electrical connectors on the steering column. There are only 2 small torx screws that hold the column cover onto the dash from the inside of the column cover. You can get to them if you can feel where they are, pointing forward on either side of the steering column. I don't remember the torx size though! It is fairly easy to break the bottom column cover and the plastic wiring loom retainer the routes the wiring around the upper steering column.

    If not removing the connectors, get a box or something to rest the steering column on as the wiring isn't long enough for the column to reach the ground.

    Group your wiring connectors for the center stack. I wrapped all radio connectors together, etc. It isn't hard to remember where they go but this way you wont be tangling them up in knots.

    Mark the aluminum frame bolt positions as I didn't and centered the frame between the bolts only to find things weren't lining up and had to redo it all. The frame is offset towards the driver's side. This is why pictures are your friend.

    Once you get down to the aluminum frame and the center stack frame you can choose to remove the black center stack frame at that point or take them out together. It was kind of a bitch to maneuver with them connected but can be done.

    As Kris said, dip the core in water or soapy water as there is oil on it to keep it from rusting and it will smell weird for a while while it burns off. A girl I know said it smelled like dead mice. Not sexy.

    Reinstall is reverse of removal. :) Good luck.
    Last edited by ezfour; 08-19-2013 at 08:28 PM. Reason: grammar

  13. #13
    Active Member One Ring
    Join Date
    Oct 07 2013
    AZ Member #
    124535
    Location
    Bay Area, California

    Just to relaunch this old thread - though it's not that old.

    I'm looking at replacing my heater core at the moment. What else should I plan to do while I'm in there? It's a lot of time to take the dash apart, so I want to make sure that I only need to do it once.
    Any additional insulation you'd put in? Replace the blower motor (there doesn't seem to be a problem, but 12 years and 200k miles)?
    I'm not feeling like I wand to change the air-con evaporator, unless it's really necessary, as that would require degassing and regassing, and the air-con is working really well.

    Any further tips?

    Best wishes,
    Anthony

  14. #14
    Veteran Member Four Rings Yuppie's Avatar
    Join Date
    Feb 14 2005
    AZ Member #
    5283
    Location
    Houston, TX/ Richmond, VA

    Depending how long your heater core has been acting up you may want to replace the hoses too.
    2001.5 S4 Sil Avant Stage 3 IE Rods, CNC 2.8 heads, BW RS6 Turbos-Current
    2001.5 S4 Casa Sedan Built Motor TiAL 770-Current
    2000 S4 Nogaro Sedan Stage 3 WMS-Current
    2001 S4 Sil Sedan ASP Stage 3-SOLD
    2002 S4 Pearl White Avant Stock-SOLD
    2000 S4 Nogaro Sedan EPL Stage III-SOLD
    2000 S4 Brilliant Black Sedan MTM Stage III-SOLD
    2001.5 Nogaro Sedan JFonz Tune Franken F21s-SOLD
    2001.5 Nogaro Sedan AWE Stage III-SOLD (x2)
    2001 Brilliant Black Sedan S4-K04/Rs6 Hybrid custom tuned Vast-SOLD

  15. #15
    Senior Member Three Rings ezfour's Avatar
    Join Date
    Apr 17 2010
    AZ Member #
    57755
    Location
    Nevada

    There is no way to do it without disconnecting the AC. Theres not too much do to in there, I cleaned up the cobwebs and lubed the airflap actuator arm joints. You could use this time to wire after market gauges more neatly or remove the beltline trim. The blower motor comes out real easy with the dash in, just remove the glovebox which is only 4 bolts. Feel free to PM me if you have any other questions

  16. #16
    Active Member One Ring
    Join Date
    Oct 07 2013
    AZ Member #
    124535
    Location
    Bay Area, California

    @yuppie - My heater core was bypassed by a previous owner, so no idea how long. Yes, I shall replace the hoses as well.

    @ezfour - so I need to de-gas the AC in advance, and re-gas once I'm done? And how difficult/likely to be seized/stuck are the AC hoses? Sorry, I'm still waiting for my bentley manual to arrive, I'm sure at least some of this is covered in there.

    A

  17. #17
    Veteran Member Four Rings zillarob's Avatar
    Join Date
    Nov 16 2010
    AZ Member #
    67118
    My Garage
    2kS4, 84gli, 84caddy dsl
    Location
    WetSide, WA

    Quote Originally Posted by ezfour View Post
    ^^That write up is pretty great minus a few things you will figure out along the way. I have been meaning to make an addendum to the above with pictures but am lazy and have much more important stuff going on lately.

    I got the Febi core from here http://www.pelicanparts.com/catalog/..._pg1.htm#item3

    Main points are: Take out old heater core, put new one in. Done!

    Pictures are your friend.

    Put your seats bottoms all the way down and sloping forward. You will be upside down under the dash and don't want your seat bottoms digging into your back.

    There are two sizes of bolts through most of the dash so you can just pile those up. 8mm and 10mm I believe

    Take off both wiper arms, cowls, and entire ecu box.

    After removing the pedal cluster bolt its a good idea to mark the interior of that bolt hole against the upper aluminum frame. This will help for re-alignment later.

    You don't need to remove all the electrical connectors on the steering column. There are only 2 small torx screws that hold the column cover onto the dash from the inside of the column cover. You can get to them if you can feel where they are, pointing forward on either side of the steering column. I don't remember the torx size though! It is fairly easy to break the bottom column cover and the plastic wiring loom retainer the routes the wiring around the upper steering column.

    If not removing the connectors, get a box or something to rest the steering column on as the wiring isn't long enough for the column to reach the ground.

    Group your wiring connectors for the center stack. I wrapped all radio connectors together, etc. It isn't hard to remember where they go but this way you wont be tangling them up in knots.

    Mark the aluminum frame bolt positions as I didn't and centered the frame between the bolts only to find things weren't lining up and had to redo it all. The frame is offset towards the driver's side. This is why pictures are your friend.

    Once you get down to the aluminum frame and the center stack frame you can choose to remove the black center stack frame at that point or take them out together. It was kind of a bitch to maneuver with them connected but can be done.

    As Kris said, dip the core in water or soapy water as there is oil on it to keep it from rusting and it will smell weird for a while while it burns off. A girl I know said it smelled like dead mice. Not sexy.

    Reinstall is reverse of removal. :) Good luck.

    I would prob just put this in my car before I went through all that nonsense. PITA!
    If an avant, plenty of room for a sweet chiminea in the back for heat.

    There are only 2 things needed to make an Audi work properly - Duct tape and WD40. If it moves and it shouldn't - Duct tape. If it doesn’t move and it should - WD40.
  18. #18
    Senior Member Three Rings ezfour's Avatar
    Join Date
    Apr 17 2010
    AZ Member #
    57755
    Location
    Nevada

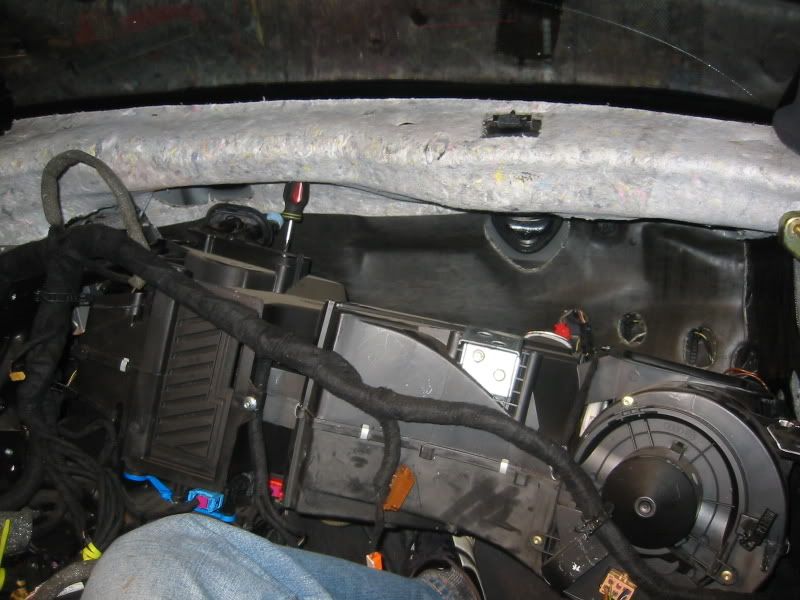
    @nthony: Yes the evaporator is in the HVAC box along with the heater core and the whole box will need to be moved to remove the core. The lines just come off at the firewall junction under the interior air filter housing. Theres only one allen bolt and the lines pull right out. You could take this time to replace the o-rings if they are damaged or you are really anal about it.

    You can see the hole in the firewall behind the HVAC box where the evaporator connects with the lines from the engine bay


    Rob, it aint so hard, but I think a chimnea or BBQ in the trunk would have been a better idea :), livin in Tahoe= free wood.
    Reminds me of this

    Last edited by ezfour; 10-14-2013 at 10:20 PM.

  19. #19
    Veteran Member Four Rings getslideways's Avatar
    Join Date
    May 16 2008
    AZ Member #
    28851
    Location
    WA

    just saw this in my "recommended videos" section on youtube today:


  20. #20
    Veteran Member Four Rings jballou's Avatar
    Join Date
    Mar 19 2005
    AZ Member #
    5756
    Location
    Corona, SOCAL

    2000 Audi S4 Stage 3,000 Million +
    Some crap just thrown together, puzzlingly making more power....

    YouTube Channel: http://www.youtube.com/user/jsballou

  21. #21
    Senior Member Three Rings ezfour's Avatar
    Join Date
    Apr 17 2010
    AZ Member #
    57755
    Location
    Nevada

    Wow, got it done in under 2.5 minutes. Impressive!

  22. #22
    Veteran Member Four Rings jballou's Avatar
    Join Date
    Mar 19 2005
    AZ Member #
    5756
    Location
    Corona, SOCAL

    Quote Originally Posted by ezfour View Post
    Wow, got it done in under 2.5 minutes. Impressive!
    Add 20 hrs. to that..
    2000 Audi S4 Stage 3,000 Million +
    Some crap just thrown together, puzzlingly making more power....

    YouTube Channel: http://www.youtube.com/user/jsballou

  23. #23
    Veteran Member Four Rings DiscoPotato's Avatar
    Join Date
    Sep 16 2009
    AZ Member #
    47873
    Location
    Delray Beach, FL

    Disassemble car.

    Replace heater core.

    Rebuild car around heater core.
    1996 A4 - Rolled into the woods
    2001.5 S4 - Stolen
    2001 STG3+ S4 - Sold
    2011 M3 - Blown up
    2017 S3 [11.990 @ 112.38mph] - Current

  24. #24
    Veteran Member Four Rings
    Join Date
    Apr 18 2007
    AZ Member #
    17386
    Location
    ny

    Quote Originally Posted by DiscoPotato View Post
    Disassemble car.

    Replace heater core.

    Rebuild car around heater core.
    lol so true
    6 Speed--EPL--034--SPEC--ER--AquaMist--Forge--RS4--RS6--K04 --RNS-E--DTS--PSS9's
    SOLD

    Greg
    C5UNION

  25. #25
    Veteran Member Four Rings jballou's Avatar
    Join Date
    Mar 19 2005
    AZ Member #
    5756
    Location
    Corona, SOCAL

    Funny..
    2000 Audi S4 Stage 3,000 Million +
    Some crap just thrown together, puzzlingly making more power....

    YouTube Channel: http://www.youtube.com/user/jsballou

Bookmarks

Posting Permissions

  • You may not post new threads
  • You may not post replies
  • You may not post attachments
  • You may not edit your posts
  •  


    © 2001-2025 Audizine, Audizine.com, and Driverzines.com
    Audizine is an independently owned and operated automotive enthusiast community and news website.
    Audi and the Audi logo(s) are copyright/trademark Audi AG. Audizine is not endorsed by or affiliated with Audi AG.