After reading the Ticking While Coasting thread I realized I should recheck my wastegate flapper to see is the wastegate could be adjusted. Here is a little DIY that will allow for an easy diagnosis and repair routes available. I bought my car used and it was just out of warrenty when I bought it, I had APR software loaded in the same week. So I didn't have a baseline to what a new car felt like.
Ticking while coasting thread
http://www.audizine.com/forum/showth...ighlight=p0299
Symptoms: Low RPM throttle response sluggish. ticking noise while coasting (wastegate chatter), P0299 code (mine was very intermitted, maybe 4 times a year and usually only with suspect gas).
Results after fix: Improved throttle response, fewer transmission shifts on hills, 2nd gear starts and slow roll offs (auto) are much improved. Turbo spool improved/back to spec. Overall more torque available.
Procedure shown is with a HFC installed, stock cat may differ in clearance available. Procedure done while on car ramps.
First step is to verify the problem with the least amount of disassembly. Remove MAF connector and airbox hoses. Pull airbox straight up and out of the way. This will allow visual inspection of the wastegate actuator rod. You can actually get you hand on it without pulling the airbox if you know where to feel. Rod is highlighted. If rod has any play your wastegate is not seating and you are losing boost. If you are under warranty and no TD1 its time to visit the dealer for a free turbo. If rod has no play and you have P0299 code; likely your N75 valve has failed or you may need a new turbo. Pulling the cat back for a visual inspection would verify if the wastegate is the problem. Shady fix for around 2 dollars.
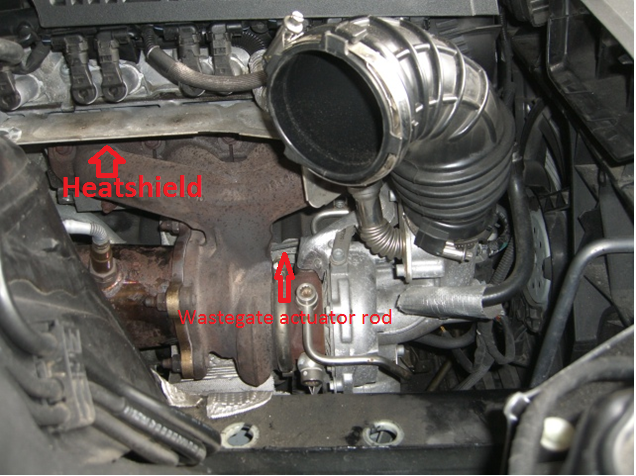
Remove front O2 sensor. The rearmost O2 ensure you have enough wire slack to slide the cat about 8 inches back and down. Remove 4 nuts from the cat to turbo flange. On the bottom side of the car remove the main splash guard. remove 2 nuts on the exhaust coupling in behind the resonator. You may want to have 2 spare bolts and nuts as these often need to be cut off or will shear in half, 1/4"x20tpi x1" should work (M8x25mm). I left the HFC attached to the downpipe as those bolts are no fun. Remove the bolt securing the HFC to the transmission (auto). I did the bottom bolt on the bracket so I wouldn't have to fight the one with the spring on it. Sorry no photos of this.
Alternately- (Credit to Tom_A4) Instead of taking the exhaust apart at the resonator you can simply go to the rear of the car at the muffler and slip the exhaust hanger out of the rubber mount. This allows you to move the whole exhaust system back enough to access the backside of the turbo without worry of breaking the exhaust bolts.
Below you can see the wastegate. This one is floating on the arm and sits off the exhaust port by about 3/32". The wastegate actuator should have spring tension against it. There is no adjustment available on the actuator rod as there were on previous K03's
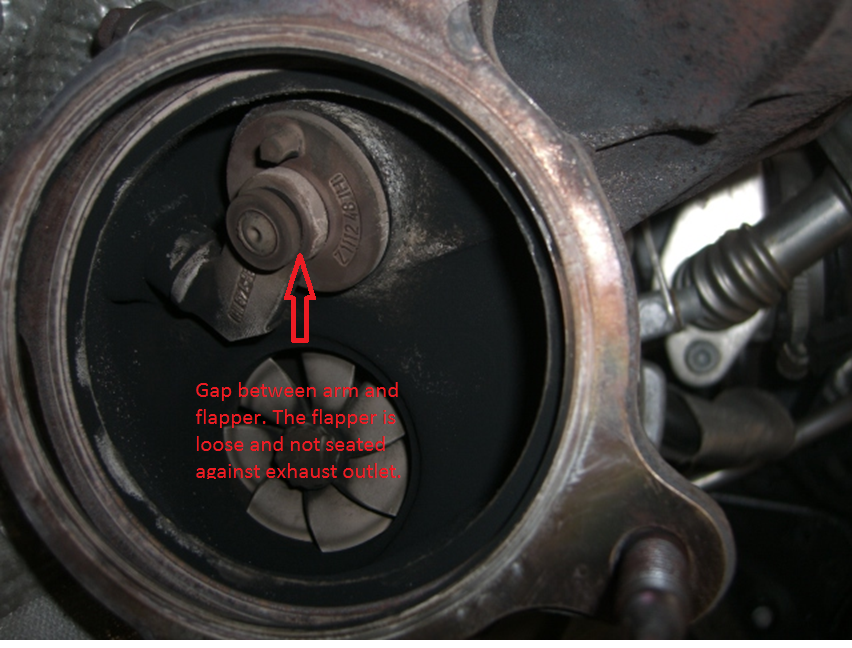
This write-up originally had the flapper temp fixed using Mig wire to shim the flapper. I wanted to see if this was actually causing my problems before I started to actually modify anything. This is why you may see references in following threads. Alex1188 found that Forge makes a replacement actuator, and that the actuator can be removed without pulling off the turbo. I decided to first modify my actuator as the low cost fix, but I may go with Forge in the future as its a quality part and possible power gains. Forge part number is FMACVAG08.
From the first photo remove the heatshield above the exhaust manifold. It is held in place by 2 M10 triple square bolts and a 6MM allen bolt. Remove the air inlet hose to the turbo (7mm hex bolts or common screwdriver). Next remove 2 5mm bolts from the crankcase breather hose on the turbo inlet. The hose is flexible enough to be moved out of the way and doesn't need to be completely removed. Remove the fabric heatshield from the turbo coolant line (4 snaps). Remove the hose from the N75 valve going to the actuator. Its on the very front of the turbo.

The coolant line causes most of the issues in changing out the actuator as it limits room to access the screws. It didn't look that easy to remove the line as it has bad access as well. I chose to work with it in place. There are 2 5mm allen bolts that secure the actuator. I used a cut down 5mm allen and a allen bit with a wrench to remove them.
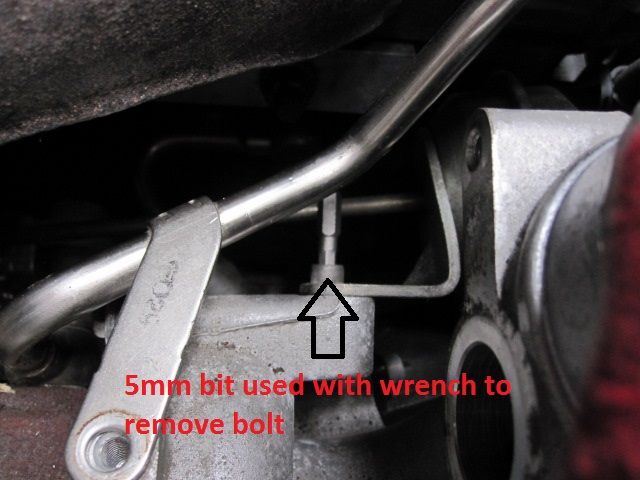
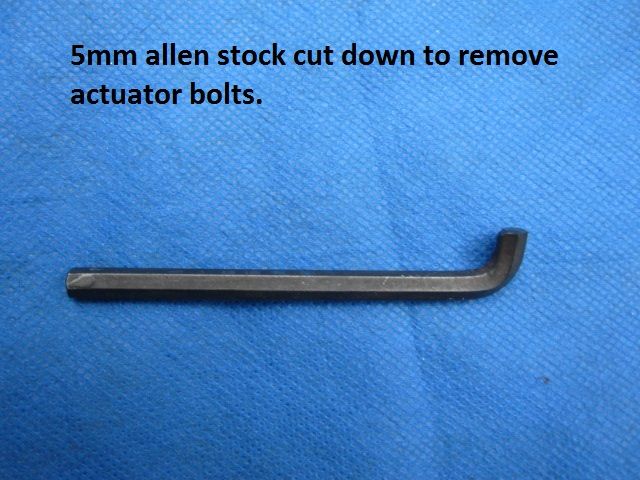
Remove the e clip from the rod end. Having the cat out of the way makes this much easier.
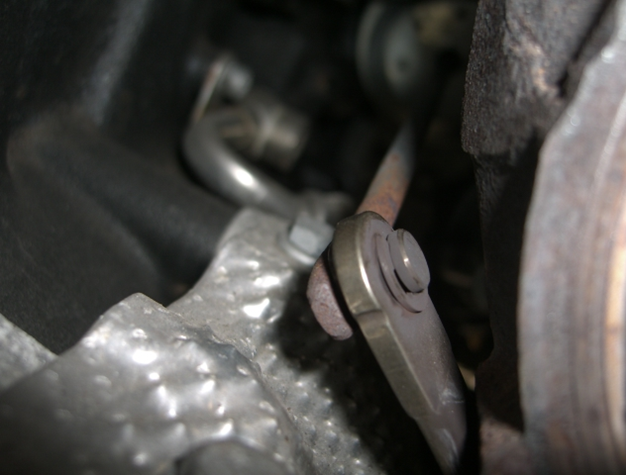
Slide the actuate fwd and down to remove from the car.
I chose to modify my actuator. I figured if I messed up at least there is now a viable replacement option. I also thought by staying stock spring rate I may have less adjustments to do later to prevent overboosting. Best of all its easy. I cut the actuator rod about an inch past where the bracket ends. Secure the rod with a vice or vicegrips to prevent possible internal wastegate damage from the shaft spinning while threading. I then removed 1/4" of rod length. I threaded both ends 1/4"-20tpi. Recoupled the rod using a thread union from Lowes. I would have preferred the infinite adjustment of a turnbuckle setup vs using a union but I down have a left handed die.
Photo should say "Rod was cut and 1/4" removed."
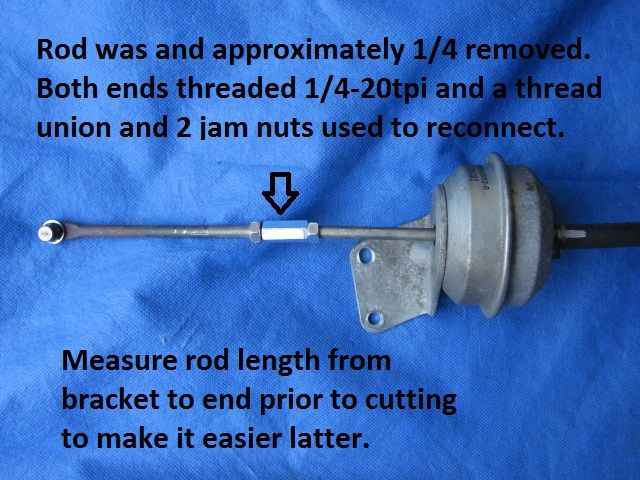
Because its a union fitting and not a turnbuckle you have to turn the rod end in 1 full turn increments to adjust the length. I put actuator end into the flapper arm and then looked at the actuator mounting holes. I adjusted the end 1 full turn at a time until the mount holes required me to slightly pull on the actuator to put the bolts in. Before I installed the bolts slide the actuator to the rear and install the e clip on the flapper arm. Install the 2 actuator bolts. Alternately you could bolt the actuator down first. Then spin the rod end until its just won't go into the actuator arm. Using an air compressor set to 10 psi pressurize the actuator (the rod will extend) and install the e clip. I like to air cycle it a few times to make sure the exhaust flapper is seating. The stock actuator should start movement at 4psi and be fully open at 10psi. You can also tinker here if you wish and adjust the rod shorter and increase spring preload. Doing this you should really do data logs of requested and actual boost. I don't have a vagcom cable, so I kept a conservative setting of the wastegate just closing with very little preload.
Photos moved to Google Drive https://drive.google.com/open?id=0B_...U5jYm52NUx1REk


 Reply With Quote


Bookmarks