


Version 1 was a "quick and dirty" concept model. it worked very well, but was always intended to be temporary until i could think of a better design. After all, making something out of wood for this car just seemed... ghetto. But here is what it looks like:
The bottom sheet metal attaches to the bare pedal by folding the tabs around. The pedal pad attaches to the top sheet metal.

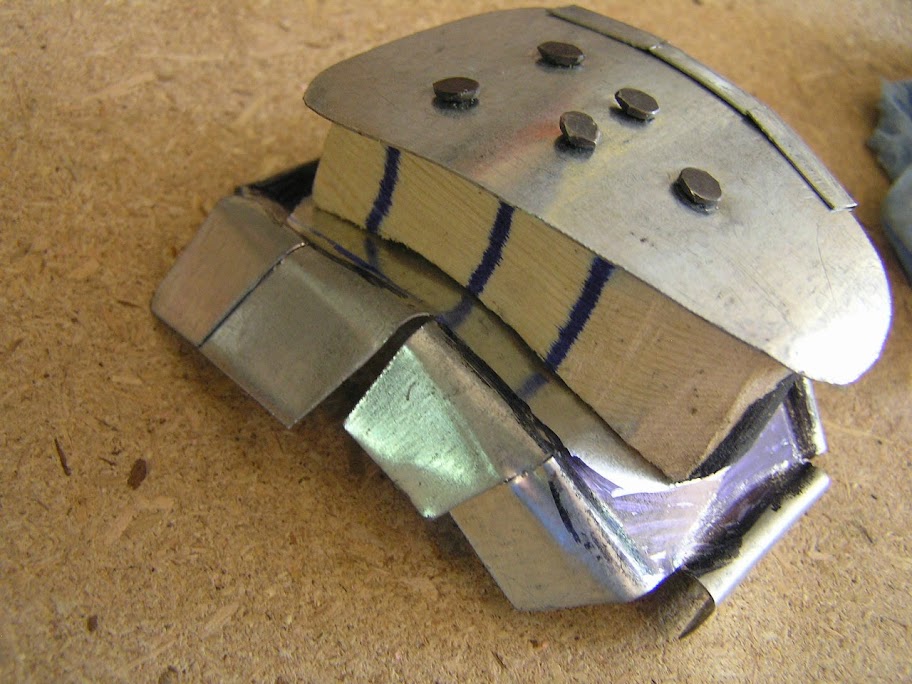
you can see that there's a curvature there, that made carving the piece of wood tricky. Took a couple shots. i drilled holes in both the metal and wood, then nailed everything together with carpet nails (only thing i could find small enough that had any strength to it along with a big enough head to latch on to the metal). i did this from both ends

so the new one i took a similar approach with the sheet metal, but instead of wood, i used self latching standoffs along with screw/nuts. here's the finished product on the car. The black tape is e-tape, just on there as a protective barrier since the metal is sharp, and i don't want to destroy my dress shoes if i accidentally brush against it. Plus it covers the shiny metal from normal view.


Forgot to take pictures during most of the actual work, so this will be somewhat bare of in-process pics. What you'll need:
- a pair of good work gloves that can stand up to sharp sheet metal
- 1 piece of at least 1'x1' sheet metal. i used this 28 gauge from HD as anything thicker would have been really hard to work with. But if you have a good metal cutting band saw or something, it may be better to get a thicker gauge ($11). also, aluminum seemed too flimsy, so i'd stay away from that.
- Metal cutting sheers or saw
- 11 Self clinching blind standoffs. Preferably 1" tall, but when i bought them, all i could find was .5" ones so my procedure ended up being more difficult. I purchased these on ebay. in case the link is dead when reading this, this is what they look like

and are "0.212X0.5000(L)/ #6-32 Blind Clinching". i highly recommend getting ones that are hex head, not round, as round ones will make it more difficult to tighten everything up. ($15 shipped) - 11 pan head screws and nuts to fit the standoffs. In my case, they were #6-32, 1" in tall ($2.36 at HD)
- either 22 #8 washers, or 11 #8 (for the standoffs) and 11 #6 (for the screws) ($1.16 at HD)
- small 9/32 open ended wrench
- Double sided tape
- 1/4 hex socket for the standoffs (if you get different standoffs, you'll needs one to fit yours)
- drill
- pliers and/or vice or something to be able to bend the initial tabs for the bottom sheet metal piece
i started by cutting out a piece of sheet metal for the top layer. I drilled 4 rows of holes. 3 rows of 3, and a fourth (bottom) row of 2, total of 11. This pic shows the first hole in the bottom row.

Now, there is no real good way to measure the size of this top piece, especially since it needs to be curved, so what i did was take a piece of paper and put it over the bare pedal, then fold down the edges around it. Then i traced the folds with marker and cut out the what became my template. i then took the template, placed it over the bare sheet metal, traced around the edges with a marker, and that's where i cut.
Then i cut out the bottom piece. Foir this, basically, i placed the template on the bare sheet metal and marked off about 1 cm beyond the edges and cut there. Then made 3 slits, somewhat equally spaced down the vertical sides, so as to allow the piece to be bent into a curved form. Then cut out the edges at the top and bottom for the tabs that will bend around the top and bottom of the bare pedal.

next, after all 11 holes were drilled into top piece, i put the #6 screws into the holes one by one (along with a washer), where the screw was going from top to bottom, and secured them from the bottom with a nut. You can use nylon locking nuts, or i just used regular nuts and some loctite. For tightening the nuts, it was helpful to use the small 9/32" open ended wrench while holding the screws in place with a screw driver. You want the nuts tight.
So, the next step is to bend the top piece into the curved form of the pedal pad. You should have this off the car by now, and you can line up the top sheet metal along the pad to get an idea of how much curvature you want to put. crease the sheet a bit if needed in order for it to retain its shape. This step i don't have a pic of. But it's important to do this BEFORE drilling any holes in the bottom piece. Why? because if you mark and drill the holes while both pieces are flat, they will NOT line up once you bend them. I learned this the hard way.
Now you will take the bottom sheet metal piece, and bend it the same way. Once you do that, you'll need to mark the holes for each screw. Place the top portion on top of the bottom portion where you'll want to secure it (see bottom of post for additional positioning tip). hold it in place as well as you can, and mark the hole locations on the bottom piece with a marker. Then drill the holes in the bottom piece. You'll want to use a drill bit that's barely bigger than the standoffs. you don't want too much wiggle room.
Ok, now you take the self clinching standoffs, insert them from under the bottom sheet metal along with a washer (if you use standoffs that have a larger lipped base, washers aren't necessary IMO, but the ones i used were kind of small so i put washers to be extra safe), and screw them into the screws. The ones i got were a 1/4" hex, so i used a socket to tighten them up. This step is kind of annoying because as you're working the bottom sheet metal keeps want to ride up, so you have to keep making sure it stays down against the bottom of the stand offs. if you let it ride up into the screws' area, getting the standoffs back through the holes is hard, and annoying. You'll see what i'm talking about.
anyway, once you do that, the pad extension is fairly complete. you'll notice though that if you jiggle the thing around, the washers on the bottom piece jiggle around too. and yes, they make noise when pressing the clutch if you install the thing as is (i tried it). So i used some 3M double sided tape, placed it between the standoffs covering the washers so as to hold them in place. While i was at it, it took a couple strips of the double sided tape and put it onto the bare clutch pedal to add some extra stability so it doesn't move around.
Next step was to put the pedal pad on top of the top piece of metal. This proved to be difficult. You'll probably need to cut part of the left pad wall an inch or so down because it's in the way. The arrows in the below pic are showing where i cut it, and how it sits on top of the bottom sheet metal.

Also, If you're having trouble getting the pad on, just make sure you didn't make the top sheet metal piece to big.
Next, you'll want to bend the top tab of the bottom sheet metal piece. not just at 90 degrees, but into a U like it is in this pic
once you do that, to install the whole assembly, fit that top U shaped tab over the top part of the bare pedal, then fold the bottom tab and secure the bottom portion of the assembly. Then just fold all the side tabs, add any e-tape as you wish, and you're done!
a couple of extra tips:
- after cutting the sheet metal, use a file to smoothen out the edges a bit. everywhere.
- when determining where exactly the top sheet metal portion will fit in respect to the bottom portion, i recommend having it somewhat lower biased. in the image below, you see the top portion (pad) on the left sits lower than the top portion (pad) on the right. (The yellow lines are essentially 90 degrees from the bottom sheet metal.) if you have it totally centered over the bottom piece, the pad ends up sticking up higher, as opposed to just closer to you, which makes you have to have your foot higher, and to me, is not as comfortable. I noticed this problem with the first model, which is why in the second version i placed it lower.

anyway, hopefully this will help some people out. and if others come up with better alternatives, please share!

 Reply With Quote
 Ibis P+ / DSG / Silk Napa / B&O / Sport Diff. / ADS lite / MMI & Nav / APR Stage 2+ & TCU Tuned / Ultra Charger / 184mm KI LIL BITCH / ECS Kohlefaser Luft-Technik Intake / AMS Alpha Cooler / ECS 2-Piece Rotors / Akebono Pads / VMR 803 19x9.5 ET45 265-35-19 PSS / ECS Drivetrain Bushing Inserts / CR-15
 THEN
THEN  THEN
THEN  THEN Rinse & Repeat!


Bookmarks