Audizine - An Automotive Enthusiast Community

Page 3 of 3 FirstFirst 123
Results 81 to 109 of 109
  1. #81
    Established Member Two Rings
    Join Date
    Oct 01 2007
    AZ Member #
    21508
    Location
    S. Florida

    Guest-only advertisement. Register or Log In now!
    Thanks for this guide, it was very helpful. Although I didn't change the gap, I just installed them as they were. Car has 40K miles, and it feels smooth and quicker now. In my B7 plugs never made that much difference in the seat of the pants meter.

  2. #82
    Established Member Two Rings
    Join Date
    Oct 01 2007
    AZ Member #
    21508
    Location
    S. Florida

    Quote Originally Posted by kaki View Post
    Hi Guys, for the life of me I can't seem to get this screw loose, the one that holds down the harness. Has anyone run into this issue before? I even went out and bought a new set of Torx bits but still no luck. Seems, I can't loosen any of the Silver Metal Torx screws but I have no problems with the black ones.

    Any help is greatly appreciated!


    Thanks,
    Sonny
    I just replaced the plugs this morning, it's a T-27 torx/star screw. I keep a bottle of PB Blaster to help with seized bolts, but mine was easy to remove without even using the socket wrench, I just used the screw driver.

  3. #83
    Established Member Two Rings
    Join Date
    Oct 01 2007
    AZ Member #
    21508
    Location
    S. Florida

    Quote Originally Posted by zokissima View Post
    ANy updates on which torx screw to use?
    T-27.

  4. #84
    Junior Member Two Rings
    Join Date
    Jan 26 2016
    AZ Member #
    367834
    Location
    Auburn hills, MI

    Quote Originally Posted by alancaster View Post
    I'm now running NGK Iridium Ix Spark Plug (BKR5EIX). I pulled them after about 500 miles no fouling or blistering. They seem to be running great. The BKR7EIX are the factory replacement Iridium plug.
    I plan to go with BKR7EIX but what about the stock number? does that have anything to do with fitment? NGK's website says something about locating stock, but i'm still unsure.

    Here is an example, stock number 2667:
    http://www.ebay.com/itm/NGK-Qty-4-Ir...dTWX-O&vxp=mtr

  5. #85
    Veteran Member Four Rings JBAeroEngineer's Avatar
    Join Date
    Sep 19 2012
    AZ Member #
    100756
    Location
    Capitol Area

    Just a heads up that the 06E905115F replaced the E version as of February 2017

  6. #86
    Veteran Member Four Rings JBAeroEngineer's Avatar
    Join Date
    Sep 19 2012
    AZ Member #
    100756
    Location
    Capitol Area

    my spark plugs are not budging with 40-45 Nm of torque to get them out. Sweating my ass off here.

  7. #87
    Established Member Two Rings D21burggraf's Avatar
    Join Date
    Oct 15 2011
    AZ Member #
    82608
    My Garage
    03 Dodge Ram
    Location
    KS

    Quote Originally Posted by JBAeroEngineer View Post
    Just a heads up that the 06E905115F replaced the E version as of February 2017
    Any idea why the replacement? I have had the "E" version R8 coils for a couple of years now. No problems with them AT ALL, but should or could I benefit from changing to the updated "F" version??

  8. #88
    Veteran Member Four Rings JBAeroEngineer's Avatar
    Join Date
    Sep 19 2012
    AZ Member #
    100756
    Location
    Capitol Area

    Quote Originally Posted by D21burggraf View Post
    Any idea why the replacement? I have had the "E" version R8 coils for a couple of years now. No problems with them AT ALL, but should or could I benefit from changing to the updated "F" version??
    Didn't mention a reason.
    2018 A4 | Mythos | Prestige | S

  9. #89
    Registered Member One Ring
    Join Date
    Feb 11 2018
    AZ Member #
    413830
    Location
    New Jersey

    Quote Originally Posted by Huevo View Post
    Does anyone know what the 2 plugs on the other side of each coil pack connector on the harness are called? There are 2 per coil, one yellow, one gray as I recall. I was replacing my spark plugs this morning and as I was disconnecting these 8 plugs (2 per coil) one of the pieces on the harness side of the plug just fell out. I looked and couldn't find it but I'm pretty sure it was the gray side. Most of the plug was still there, looking at it I could see that it had broken off inside the plug. I finished replacing the spark plugs and put everything back together. Started up the car and it ran fine. I didn't have a chance to go very far, it being Mother's day and all, but If anyone has any idea what these are called I'd like to see if it can be replaced. The pieces I'm referring to are in step 4 in the above DIY. Any help would be appreciated. Thanks.
    I'm in the same boat. Did you find what these small grey and yellow plugs called? I was changing coil packs in b8 and one broke off. I put the broken piece back in and tightened it with duct tape and drove for 20 miles with no issues but dont want to get in trouble later.

    Anyone knows what they are called and what are they used for? Appreciate your help

  10. #90
    Veteran Member Four Rings jfo's Avatar
    Join Date
    Nov 17 2010
    AZ Member #
    67149
    Location
    Courtenay, BC, Canada

    Quote Originally Posted by emjain View Post
    I'm in the same boat. Did you find what these small grey and yellow plugs called? I was changing coil packs in b8 and one broke off. I put the broken piece back in and tightened it with duct tape and drove for 20 miles with no issues but dont want to get in trouble later.

    Anyone knows what they are called and what are they used for? Appreciate your help
    Those are connectors for the camshaft adjustment actuators, part of Audi's valve lift system. Look closely and you will see a part number on the connector. I don't know what's involved in replacing it.
    Last edited by jfo; 02-11-2018 at 01:42 PM.
    2011 A4 Avant

  11. #91
    Established Member Two Rings charlie2981's Avatar
    Join Date
    Apr 30 2013
    AZ Member #
    114379
    Location
    Pittsburgh, PA

    I’m currently at Step 4 trying to pop the clips behind each coil pack connector. I was able to get 4 of them easily by inserting a screwdriver at the bottom of the clip underneath to pop the clip and lift. How are you getting the other 4 that you can’t pop the clip from underneath? Thanks.


    Quote Originally Posted by Highlander1010 View Post
    Hi All,

    Below is my attempt at a spark plug replacement DIY that I ran this weekend.

    I based this off of the DIY for the B7 spark plugs found here: http://www.audizine.com/forum/showth...te-for-B7-A4-s

    Required tools/components:
    • Torx Screw driver/bit - getting size
    • Flathead (wide) screw driver or Swiss Army knife (short throw is best for short lever arm - minimizes force)
    • Socket wrench
    • 5/8" spark plug socket head
    • 10" socket wrench extension
    • Torque wrench (will add size/type)
    • Gap measurement tool (see far left in picture below)
    • 4 spark plugs


    As far as the plugs go, there have been 2 recommendations from APR:
    • NGK PFR7S8EG @ 0.028 - APR recommended for those at Stage 1/2
    • NGK PFR7B @ 0.028 - APR recommended for those at K04


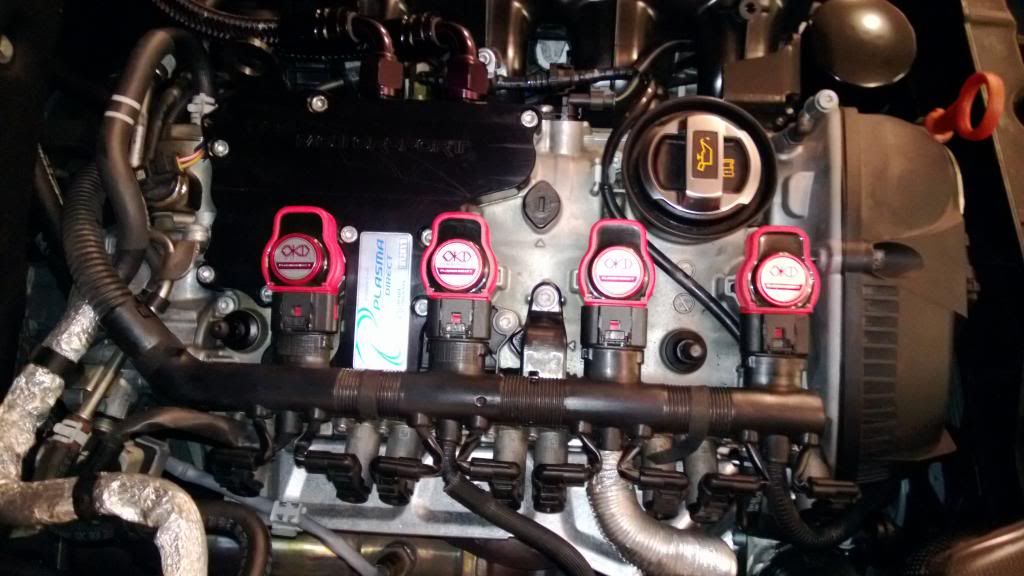
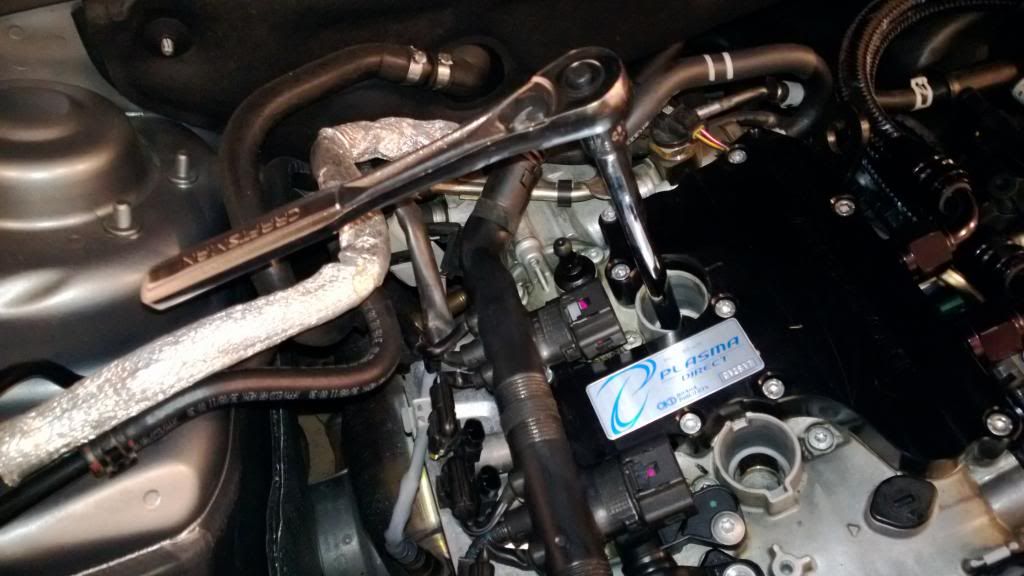
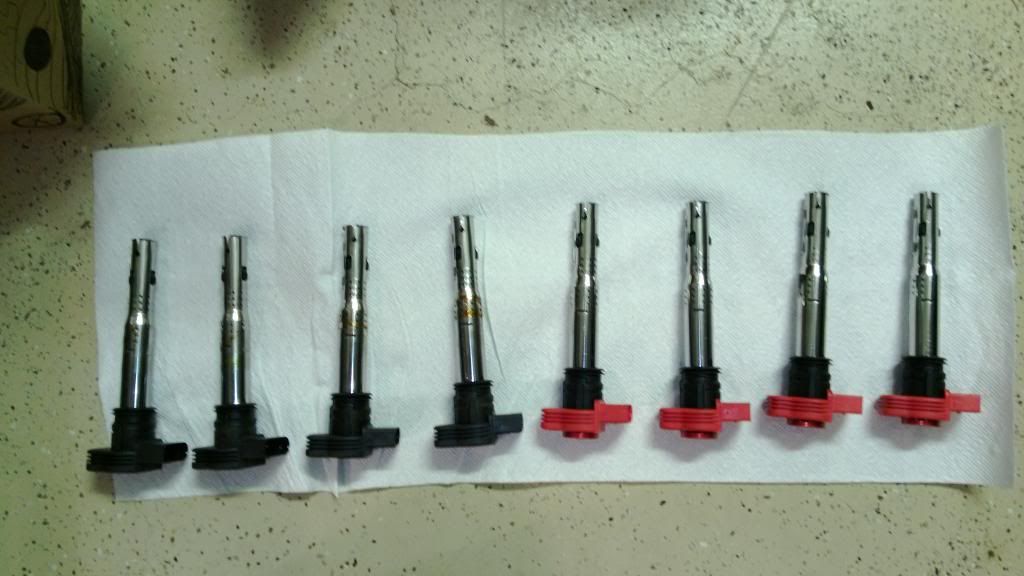
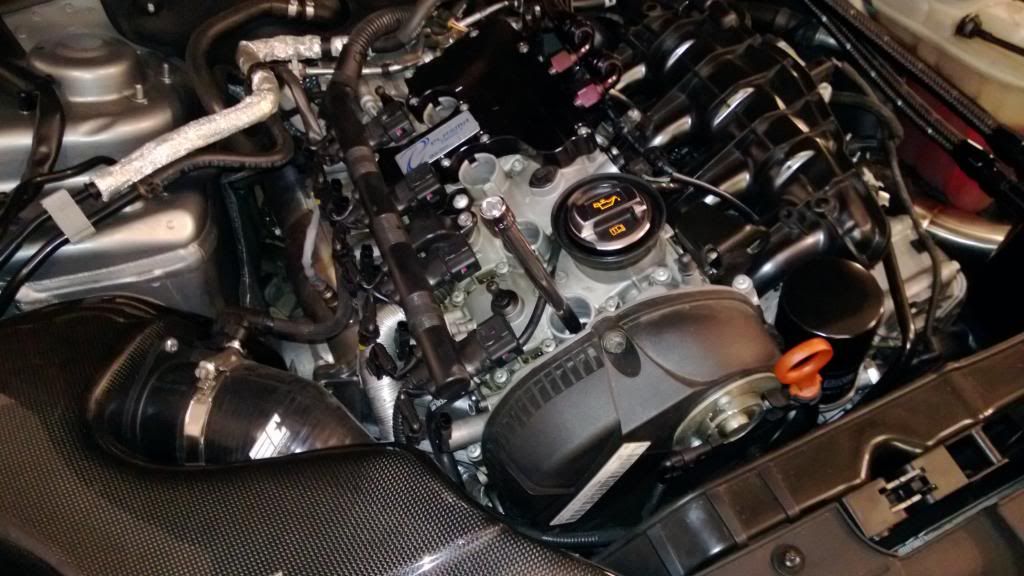
    Step 1: Remove engine cover and locate your coil packs. OEM are black. Mine are aftermarket Okada red plugs. There are 4 in the 2.0T engine.


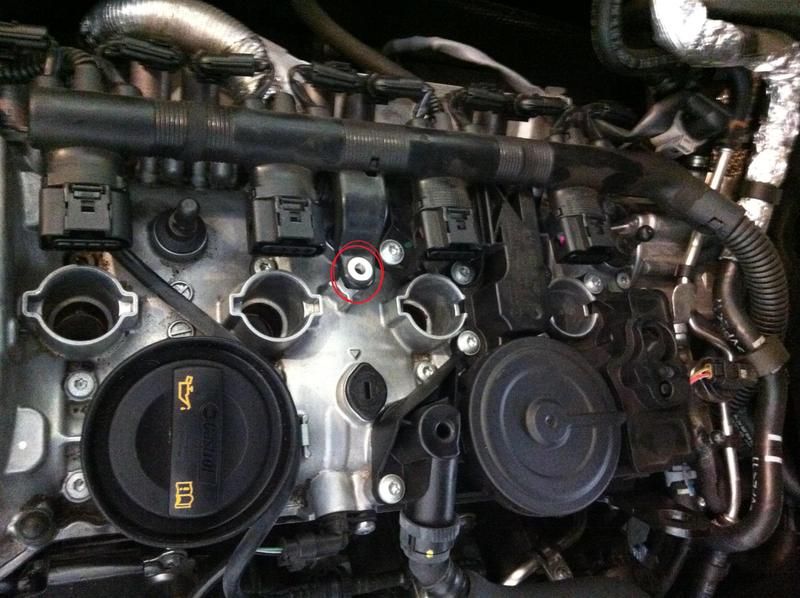
    Step 2: Unscrew the 1 screw in the picture with your torx screwdriver or bit. I recommend doing this only with hand strength (no drills, etc.) so as not to strip the head.
    (Please ignore the fact that the plugs are already out in this picture - LOL late shot)


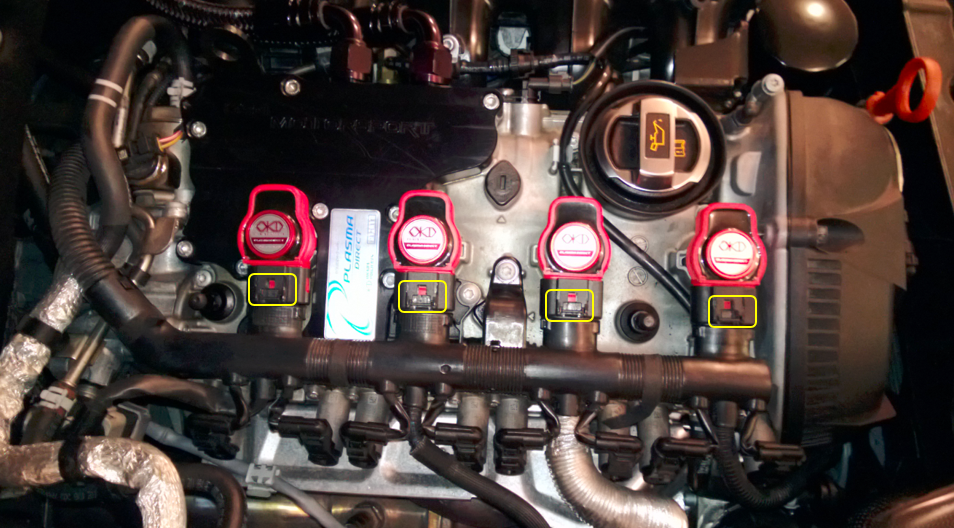
    Step 3: Using a wide flathead screwdriver (or the wide flathead bit in a Swiss Arm knife) insert above the clips in yellow and gently pull towards the turbo. You will hear a tiny pop/click. Stop immediately.
    If you pull too hard, far or fast you will break the plastic. Heating the parts up a touch with a blow dryer will also make them a bit less brittle, but is not necessary.


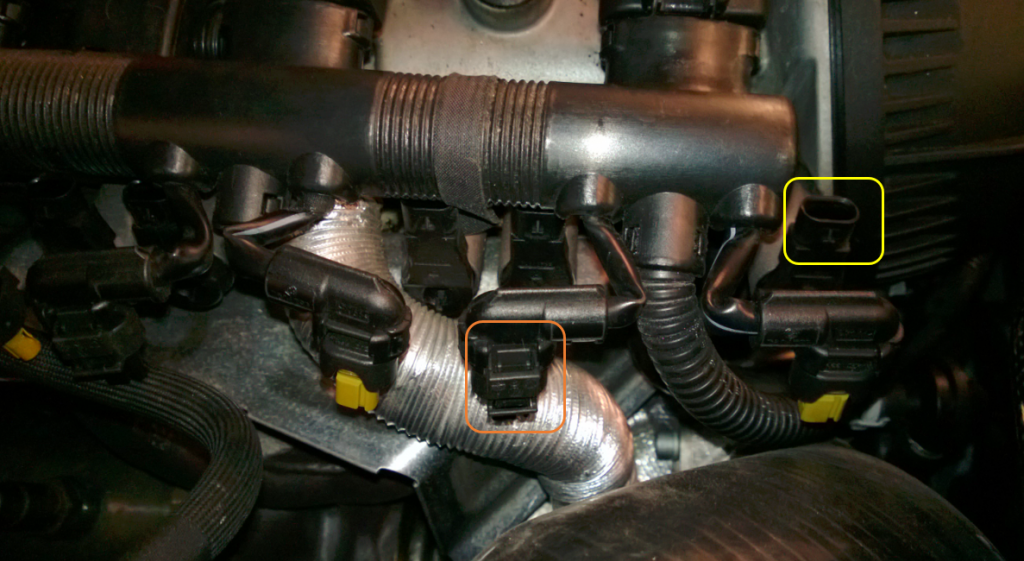
    Step 4: Uninstall the 2 plugs behind each coil pack connector. They are relatively small with a retention clip midway down from the top of the head, but you can slightly depress with a screwdriver and pull up gently.
    They come out with very little force. Try wiggling lightly while pulling up.


    Step 5: Gently pull back the entire harness knowing it will pivot from deepest into the engine bay (I think Cylinder 4) just enough to get to off the Coil Pack plug socket. Pull out the housing sockets from each plug gently while doing this.

    Step 6: Pull coil packs vertically up and out. Try to grab directly around the head, avoiding pulling on the actual plug connector as the plastic walls are thinner there and could warp/crack. Pull normal to the plug (meaning you'll be pulling up and out at the same angle as the plug is pointing and not straight up to the sky). This will take some force. Wiggling as you go gently also helps. When they do release, they come out with a pop, so try not to go flying backwards or letting go and sending them flying.

    Step 7: Take a peek in the holes. You should now see your spark plugs. Ok - gratuitous pic with my Windows Phone 8 Nokia 920. Amazing camera!


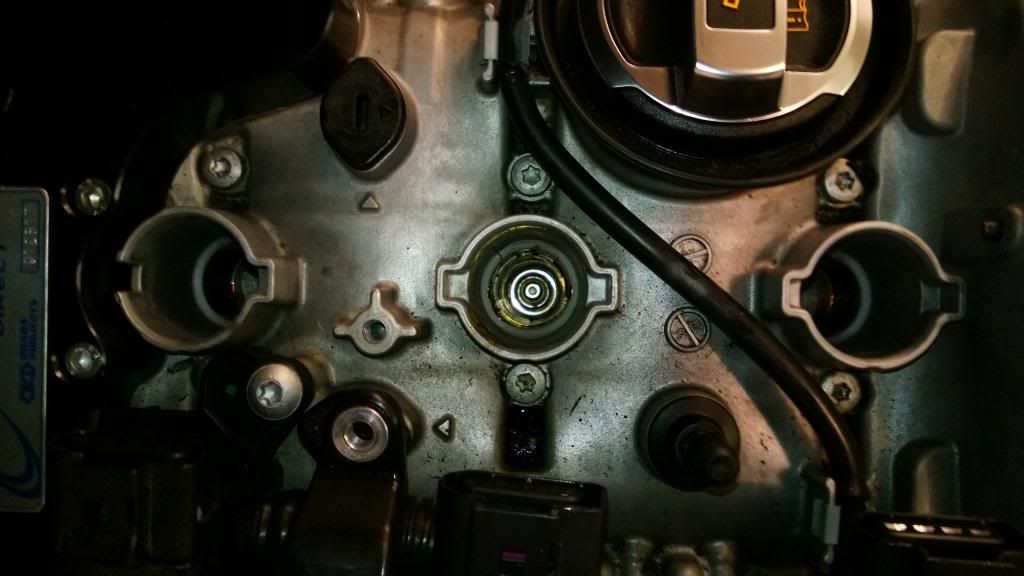
    Step 8: Attach the 10" arm and 5/8" spark plug socket head to your socket wrench and insert gently down into the plug cavity. Place the head around the 5/8" mating surface of the plug and rotate gently until firmly in place. Begin twisting counter-clockwise to loosen the plug.

    Note - you may feel no resistance or little. If so, lift up slightly and reseat the socket. Eventually you'll feel significant resistance. Go slow when loosening and take your time.


    Step 9: Remove each plug one by one and match with the coil packs as they came out. (Obviously you'll throw away your old plugs later or keep them (I am) to compare change over change).


    Step 10: Once the plugs are removed, double check the gaps on your new plugs to ensure 0.028. You can use the feeler gage/gap tool to measure this. If the gap is too small, open with the gapping tool (pic above). If too wide, gently tap the head on a clean surface to close. (Not very scientific).

    Step 11: Load the new plug into the 5/8" spark plug socket on the end of the 10" extension. Do not use the socket arm. You want to finger tighten the plugs first to make sure you don't cross-thread or bind. When inserting back into the plug socket, go slowly and ensure you aren't banging the walls on the way down. Insert/align gently at the bottom where the threads meet and finger tighten until firm. If you feel it is angled, cross-threading, etc., stop, pull the plug up and reseat.


    Step 12: Finish installing all the plugs, then attach a Torque Wrench to the top of your 10" extension + 5/8" spark plug socket and set the wrench to 15-18 ft./lb. of torque. Rotate to tighten until the torque wrench clicks. Repeat on the 3 other plugs.

    Step 13: Now perform the final torque by setting the wrench to 22.1 ft./lb. of torque and tightening until the click. DO NOT tighten any further than the first click.

    Step 14: Reinstall each of your coil packs in the same cylinders they came out of. Make sure they install all the way flush to the housing and are aligned properly. There are small plastic alignment features on the plug to help you see/feel this. Press in firmly.

    Step 15: Reinstall the 4 coil pack plugs on the OEM wire harness to the coil packs until they click in firmly.

    Step 16: Reinstall the 8 connectors (2 per coil pack location) on the opposite side of the OEM wire harness until each clicks in firmly.

    Step 17: Reinstall the 1 torx bit screw back into the engine block to pin down the OEM wire harness.

    Step 18: Pat yourself on the back, cross your fingers and start-up your engine. If any thing sounds weird, you may have missed a connection or have a bad plug. Shutdown immediately and verify.

    Step 19: Enjoy a BEvERage of your choice. You just saved $50-$75 at your dealer at least.


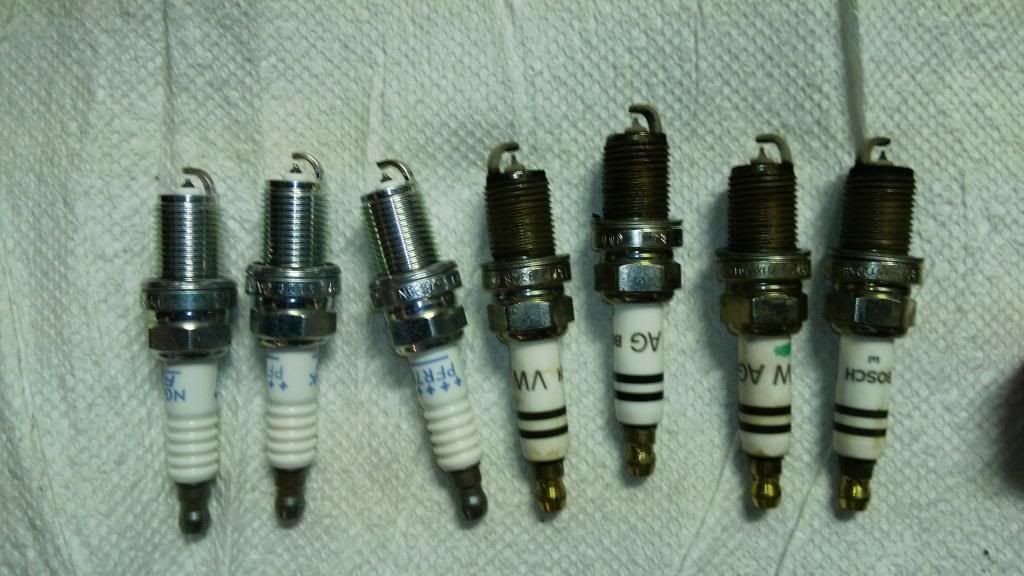
    Here are my OEM Bosch plugs at 31K miles. I forgot to measure how they were gapped, but OEM is supposed to be 0.032:


    New ones (NGK PRF7B @ 0.028):

  12. #92
    Veteran Member Four Rings jfo's Avatar
    Join Date
    Nov 17 2010
    AZ Member #
    67149
    Location
    Courtenay, BC, Canada

    Quote Originally Posted by charlie2981 View Post
    I’m currently at Step 4 trying to pop the clips behind each coil pack connector. I was able to get 4 of them easily by inserting a screwdriver at the bottom of the clip underneath to pop the clip and lift. How are you getting the other 4 that you can’t pop the clip from underneath? Thanks.
    They are quite easy to remove. Lift the small locking tab upward with your fingernails or gently with a small screwdriver. Then gently squeeze the locking tab against the connector with your fingers as you lift the connector off.
    2011 A4 Avant

  13. #93
    Veteran Member Four Rings JBAeroEngineer's Avatar
    Join Date
    Sep 19 2012
    AZ Member #
    100756
    Location
    Capitol Area

    you only need to remove the 4. you should be able to slide the harness pack out of the way.

  14. #94
    Veteran Member Four Rings jfo's Avatar
    Join Date
    Nov 17 2010
    AZ Member #
    67149
    Location
    Courtenay, BC, Canada

    Quote Originally Posted by JBAeroEngineer View Post
    you only need to remove the 4. you should be able to slide the harness pack out of the way.
    I think he means the camshaft actuator connectors in step 4.
    2011 A4 Avant

  15. #95
    Veteran Member Four Rings JBAeroEngineer's Avatar
    Join Date
    Sep 19 2012
    AZ Member #
    100756
    Location
    Capitol Area

    Quote Originally Posted by jfo View Post
    I think he means the camshaft actuator connectors in step 4.
    right, you don't need to do that. just for the 4 connectors to the plug and the associated screws form before. you'll have enough clearance to wiggle the harness off and pop the coil packs.

  16. #96
    Established Member Two Rings charlie2981's Avatar
    Join Date
    Apr 30 2013
    AZ Member #
    114379
    Location
    Pittsburgh, PA

    Quote Originally Posted by JBAeroEngineer View Post
    right, you don't need to do that. just for the 4 connectors to the plug and the associated screws form before. you'll have enough clearance to wiggle the harness off and pop the coil packs.
    You’re correct, the 4 were enough. Just finished, thanks guys!

  17. #97
    Established Member Two Rings sparkster's Avatar
    Join Date
    Mar 26 2010
    AZ Member #
    56676
    My Garage
    Traxxas Mini E-Revo (MERV) VXL ; HPI Racing Savage 4.6 Nitro
    Location
    Central/NJ

    Quote Originally Posted by JBAeroEngineer View Post
    right, you don't need to do that. just for the 4 connectors to the plug and the associated screws form before. you'll have enough clearance to wiggle the harness off and pop the coil packs.
    Yes... should update these steps... when i did the first round following this, i broke one of those. Second time around, didn't remove and made replacing a lot easier!!
    99.5 A4 1.8TQMS|"All SHOW and NO GO"|GIAC1.5,AWE/BORLA|Southbend Clutch|UUC.SS|KAMEIGrill AutometerBoost/Air& Fuel|Sparco|Milltek HF CAT|H&R C/O|S4 Liner|Greddy TTimer|ForgeDV|Neuspeed Sway Bar|Oettinger RE18-Summer|Stock Winter|14.7sec1/4mile - 180K miles DONATED but not forgotten
    2010 A5 2.0T 6MT Prestige S-Line|APR SII+|APR Exhaust|EuroCode Goodies-SS a must for 6MT|ST Coilovers|FS F14 19x10 ET25 |AWE Gauge||VCDS|Love the VAG 4Bangers unless it eats oil|EurotechMS

  18. #98
    Registered Member One Ring
    Join Date
    Feb 23 2017
    AZ Member #
    393948
    Location
    Tucson

    I cannot see the photos

  19. #99
    Veteran Member Four Rings JeriQo's Avatar
    Join Date
    Jul 08 2015
    AZ Member #
    341165
    Location
    Seattle

    im about to hit 35k so just ordered these.

    https://www.ecstuning.com/b-ngk-part...r/bkr7eix4cly/
    2012 BB A4 P+ S-line Exterior |FBSW RS Paddles/Pedals|CR-15|AFE Filter|ECS inlet|S4 Dual Exhaust|Ace Convex 19x8.5|ECS 10mm rear|Solowerks S1

  20. #100
    Veteran Member Three Rings Steelerhater37's Avatar
    Join Date
    May 29 2017
    AZ Member #
    400253
    My Garage
    BMW E36(98)M3 convertible//VW B6(07)Passat
    Location
    Bel Air Maryland USA

    Ty


    Sent from my iPhone using Audizine

  21. #101
    Established Member Two Rings J.james's Avatar
    Join Date
    Apr 05 2016
    AZ Member #
    371362
    Location
    Los angeles

    Nice write up!!


    Sent from my iPhone using Audizine

  22. #102
    Veteran Member Four Rings JeriQo's Avatar
    Join Date
    Jul 08 2015
    AZ Member #
    341165
    Location
    Seattle

    alight so i followed what was stated on this thread and gapped it to .032
    i measured the oem plugs and it was at .024

    so what now?? lol
    regap or leave it?
    2012 BB A4 P+ S-line Exterior |FBSW RS Paddles/Pedals|CR-15|AFE Filter|ECS inlet|S4 Dual Exhaust|Ace Convex 19x8.5|ECS 10mm rear|Solowerks S1

  23. #103
    Veteran Member Four Rings JBAeroEngineer's Avatar
    Join Date
    Sep 19 2012
    AZ Member #
    100756
    Location
    Capitol Area

    Quote Originally Posted by JeriQo View Post
    alight so i followed what was stated on this thread and gapped it to .032
    i measured the oem plugs and it was at .024

    so what now?? lol
    regap or leave it?
    .024 isn't going to act well without stage 2
    2018 A4 | Mythos | Prestige | S

  24. #104
    Veteran Member Four Rings
    Join Date
    Jul 16 2018
    AZ Member #
    422473
    Location
    Atlanta

    .6 mm (.024") is what APR recommends when you put their K04 kit on it, but it seems a bit small for stock.
    It's curious that ETKA and ECS Tuning show a Bosch spark plug for the B8 CAEB, but when you go to boschautoparts.com, no spark plugs come up for a B8 A4 2.0T.
    Checking the Bosch plugs ECS sells, the gap on those is .7 (.028").
    Checking NGK's site, the main plugs for our car come up as PFR7S8EG, which has a .8 gap (.032"). These are what I have in my car. I didn't modify the gap any; they were all .8 as they arrived.
    So is it .7 or .8 stock? No idea. I find it curious that it seems to not be documented in any of the Audi maintenance or repair or tech docs.
    2009 A4 Avant 2.0T quattro Prestige, 275k miles

  25. #105
    Veteran Member Four Rings JeriQo's Avatar
    Join Date
    Jul 08 2015
    AZ Member #
    341165
    Location
    Seattle

    Quote Originally Posted by JBAeroEngineer View Post
    .024 isn't going to act well without stage 2
    that what the old ones (the oems i threw away) measured.
    2012 BB A4 P+ S-line Exterior |FBSW RS Paddles/Pedals|CR-15|AFE Filter|ECS inlet|S4 Dual Exhaust|Ace Convex 19x8.5|ECS 10mm rear|Solowerks S1

  26. #106
    Veteran Member Four Rings JBAeroEngineer's Avatar
    Join Date
    Sep 19 2012
    AZ Member #
    100756
    Location
    Capitol Area

    Quote Originally Posted by JeriQo View Post
    that what the old ones (the oems i threw away) measured.
    Plugs shouldn't have a smaller gap as they age
    2018 A4 | Mythos | Prestige | S

  27. #107
    Established Member Two Rings K__bz's Avatar
    Join Date
    Aug 21 2018
    AZ Member #
    424998
    Location
    Toronto

    Awesome! I used this ;)

  28. #108
    Veteran Member Three Rings
    Join Date
    Jan 19 2016
    AZ Member #
    367433
    My Garage
    1997 BMW M3 w/ CES Stage IV Turbo, 1999 BMW M3 vert
    Location
    Orlando, FL

    I'm going to upload IE stage II tune. I run BKR7e in my turbo M3, and looks like I have enough new ones laying around that I will just run those in the A4. I'm looking for recommended gap size and I know this is inline with favorite oil weights, experience, etc. I think I'll start at .028 and see how idle and under load feel. If I get any misfires, I'll remove them and clamp it down to .026. Any reason I should start with a .032 gap?
    1997 BMW M3
    CES Stage IV (651rwhp/615rwtq @ 24 psi)
    2020 S6
    Premium Plus, Black optic, performance exhaust
    2013 Audi A4 (sold)
    Prestige package, S-Line, 6-speed |IE Stage 2 | IE Performance Downpipe | S4 exhaust swap | ECS Luft-Technik intake | ECS Luft-Technik FMIC | RS4 grille | ECS SSK | ECS Trans/Diff Inserts |

  29. #109
    Veteran Member Three Rings BrewDude's Avatar
    Join Date
    Mar 13 2009
    AZ Member #
    39823
    My Garage
    04 R32 FT450
    Location
    KLAS

    Quote Originally Posted by BMWManiac View Post
    I'm going to upload IE stage II tune. I run BKR7e in my turbo M3, and looks like I have enough new ones laying around that I will just run those in the A4. I'm looking for recommended gap size and I know this is inline with favorite oil weights, experience, etc. I think I'll start at .028 and see how idle and under load feel. If I get any misfires, I'll remove them and clamp it down to .026. Any reason I should start with a .032 gap?
    You should be fine with a .026 gap. That's what I run with my APR st2+.

Bookmarks

Posting Permissions

  • You may not post new threads
  • You may not post replies
  • You may not post attachments
  • You may not edit your posts
  •  


    © 2001-2025 Audizine, Audizine.com, and Driverzines.com
    Audizine is an independently owned and operated automotive enthusiast community and news website.
    Audi and the Audi logo(s) are copyright/trademark Audi AG. Audizine is not endorsed by or affiliated with Audi AG.