Audizine - An Automotive Enthusiast Community

Page 1 of 3 123 LastLast
Results 1 to 40 of 109
  1. #1
    Veteran Member Four Rings Highlander1010's Avatar
    Join Date
    Apr 05 2011
    AZ Member #
    73491
    Location
    Pacific Northwest

    DIY - B8 A4 Spark Plug Replacement

    Guest-only advertisement. Register or Log In now!
    Hi All,

    Below is my attempt at a spark plug replacement DIY that I ran this weekend.

    I based this off of the DIY for the B7 spark plugs found here: http://www.audizine.com/forum/showth...te-for-B7-A4-s

    Required tools/components:
    • Torx Screw driver/bit - getting size
    • Flathead (wide) screw driver or Swiss Army knife (short throw is best for short lever arm - minimizes force)
    • Socket wrench
    • 5/8" spark plug socket head
    • 10" socket wrench extension
    • Torque wrench (will add size/type)
    • Gap measurement tool (see far left in picture below)
    • 4 spark plugs


    As far as the plugs go, there have been 2 recommendations from APR:
    • NGK PFR7S8EG @ 0.028 - APR recommended for those at Stage 1/2
    • NGK PFR7B @ 0.028 - APR recommended for those at K04


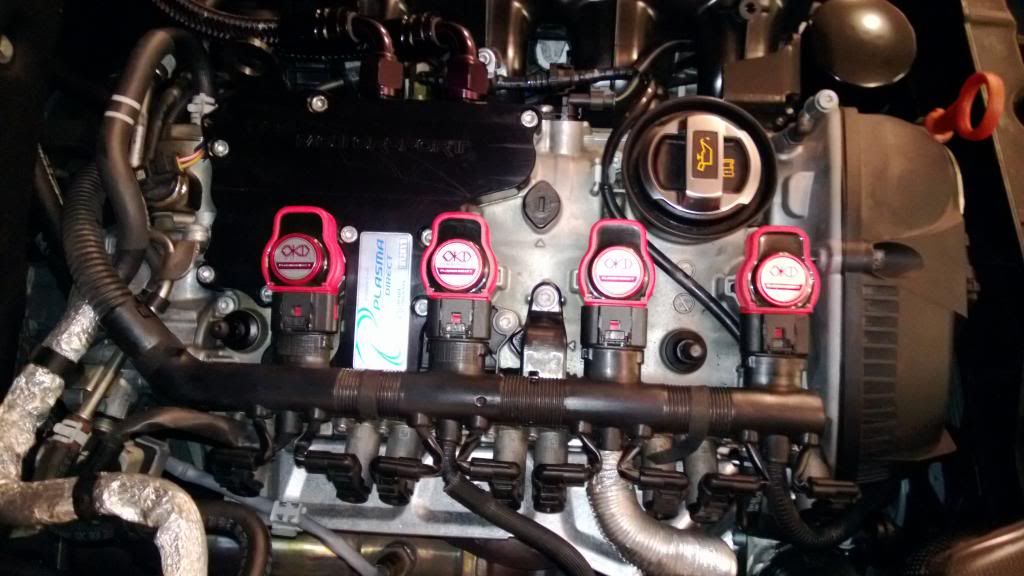
    Step 1: Remove engine cover and locate your coil packs. OEM are black. Mine are aftermarket Okada red plugs. There are 4 in the 2.0T engine.

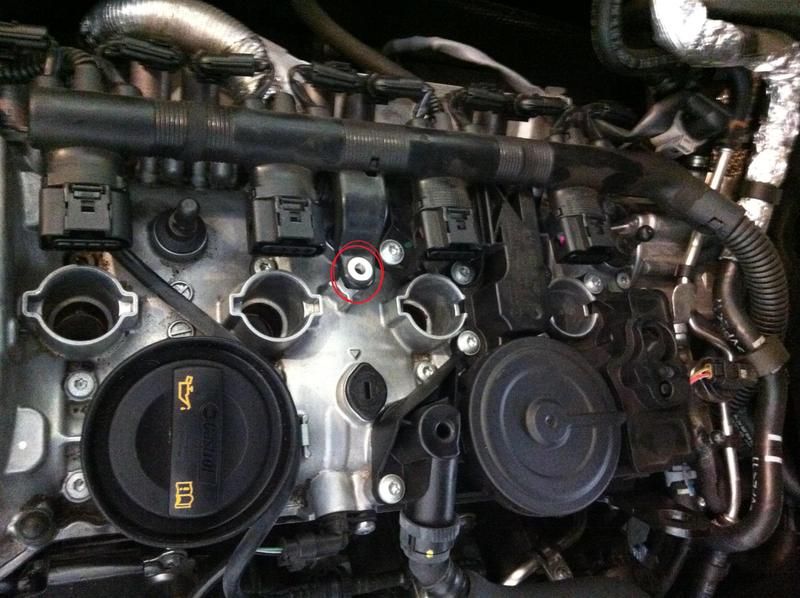
    Step 2: Unscrew the 1 screw in the picture with your torx screwdriver or bit. I recommend doing this only with hand strength (no drills, etc.) so as not to strip the head.
    (Please ignore the fact that the plugs are already out in this picture - LOL late shot)

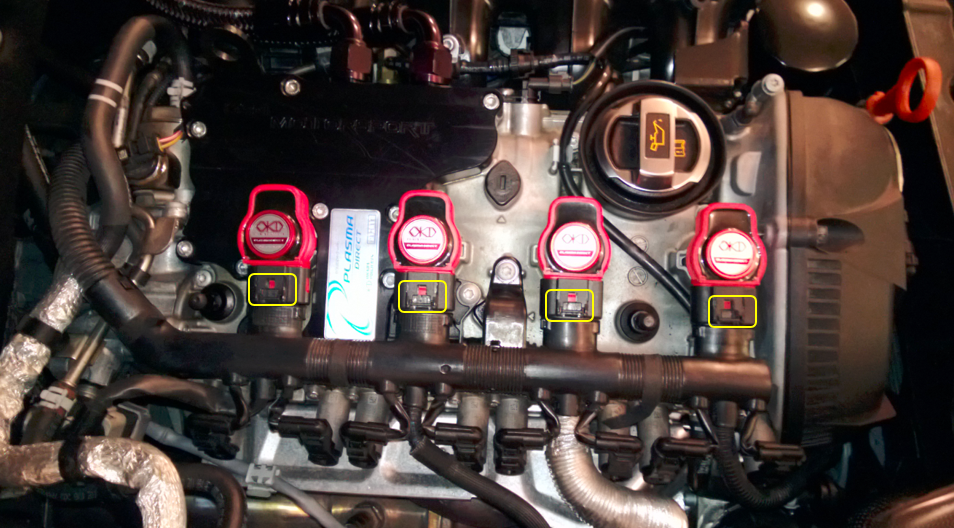
    Step 3: Using a wide flathead screwdriver (or the wide flathead bit in a Swiss Arm knife) insert above the clips in yellow and gently pull towards the turbo. You will hear a tiny pop/click. Stop immediately.
    If you pull too hard, far or fast you will break the plastic. Heating the parts up a touch with a blow dryer will also make them a bit less brittle, but is not necessary.

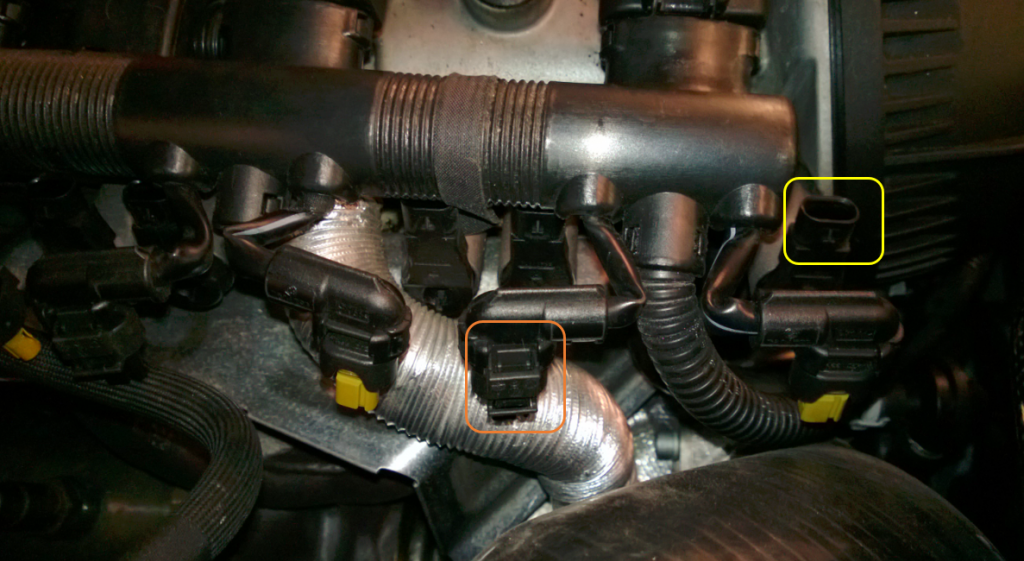
    Step 4: Uninstall the 2 plugs behind each coil pack connector. They are relatively small with a retention clip midway down from the top of the head, but you can slightly depress with a screwdriver and pull up gently.
    They come out with very little force. Try wiggling lightly while pulling up.

    Step 5: Gently pull back the entire harness knowing it will pivot from deepest into the engine bay (I think Cylinder 4) just enough to get to off the Coil Pack plug socket. Pull out the housing sockets from each plug gently while doing this.

    Step 6: Pull coil packs vertically up and out. Try to grab directly around the head, avoiding pulling on the actual plug connector as the plastic walls are thinner there and could warp/crack. Pull normal to the plug (meaning you'll be pulling up and out at the same angle as the plug is pointing and not straight up to the sky). This will take some force. Wiggling as you go gently also helps. When they do release, they come out with a pop, so try not to go flying backwards or letting go and sending them flying.

    Step 7: Take a peek in the holes. You should now see your spark plugs. Ok - gratuitous pic with my Windows Phone 8 Nokia 920. Amazing camera!
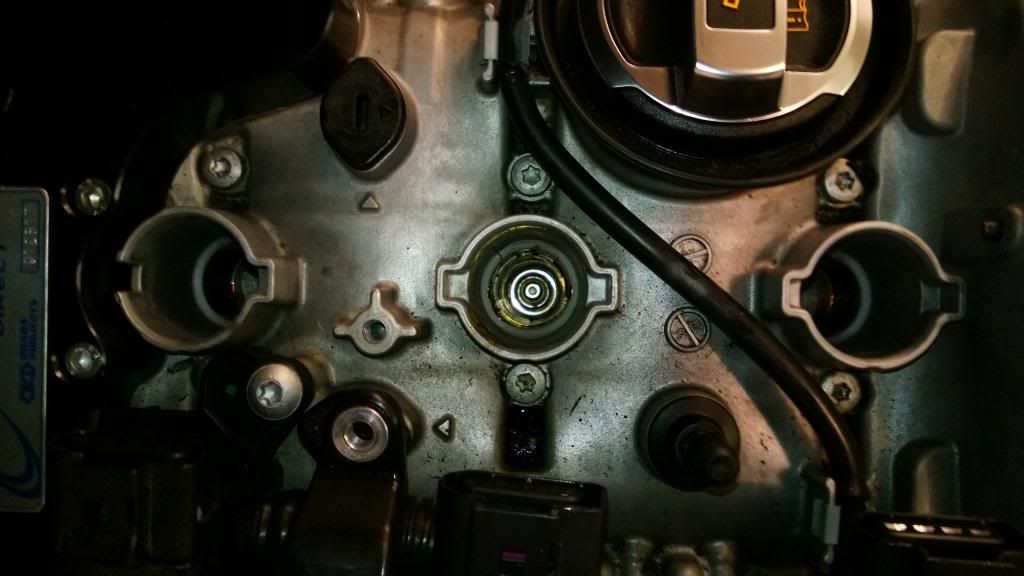

    Step 8: Attach the 10" arm and 5/8" spark plug socket head to your socket wrench and insert gently down into the plug cavity. Place the head around the 5/8" mating surface of the plug and rotate gently until firmly in place. Begin twisting counter-clockwise to loosen the plug.

    Note - you may feel no resistance or little. If so, lift up slightly and reseat the socket. Eventually you'll feel significant resistance. Go slow when loosening and take your time.
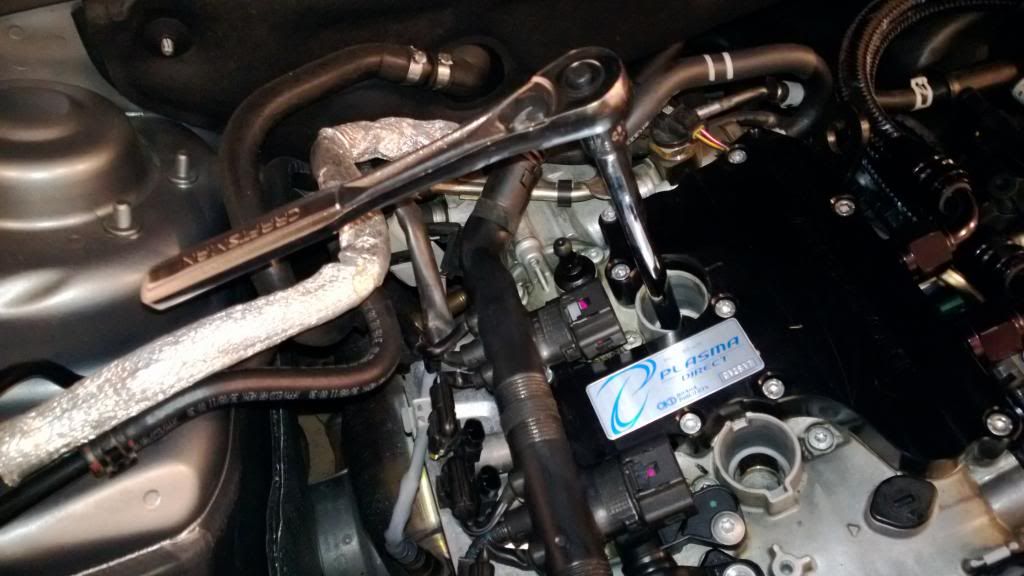

    Step 9: Remove each plug one by one and match with the coil packs as they came out. (Obviously you'll throw away your old plugs later or keep them (I am) to compare change over change).
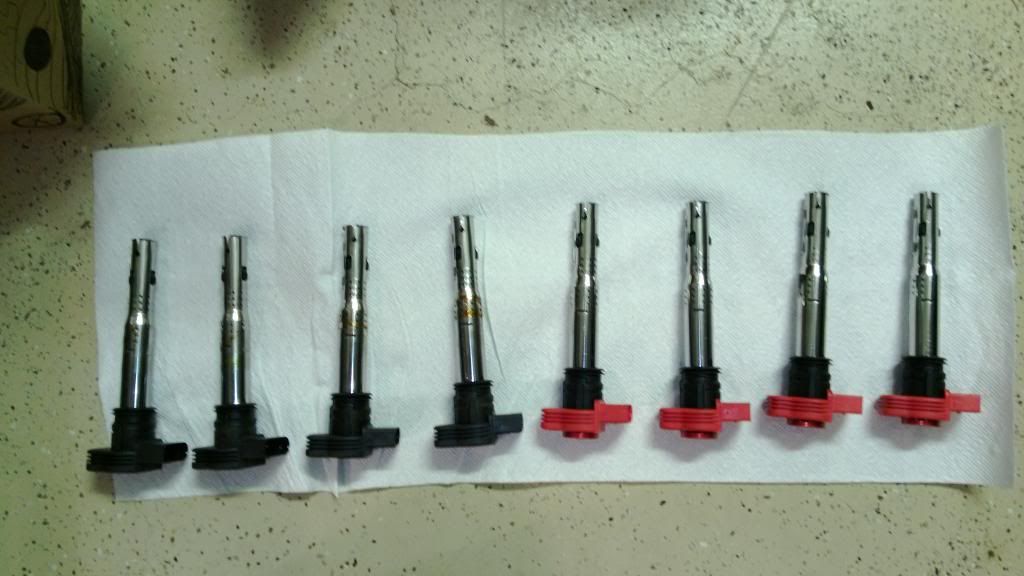
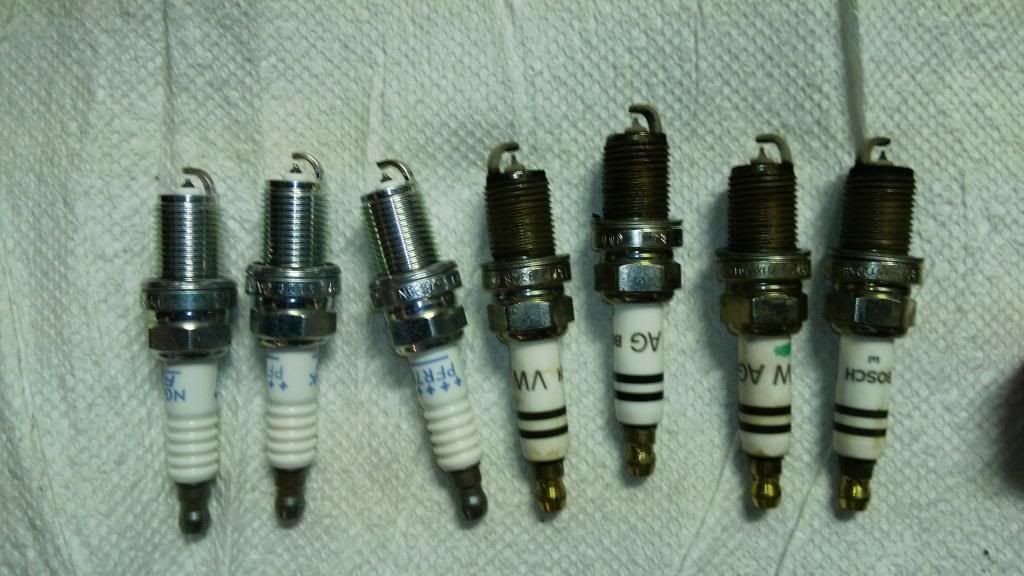

    Step 10: Once the plugs are removed, double check the gaps on your new plugs to ensure 0.028. You can use the feeler gage/gap tool to measure this. If the gap is too small, open with the gapping tool (pic above). If too wide, gently tap the head on a clean surface to close. (Not very scientific).

    Step 11: Load the new plug into the 5/8" spark plug socket on the end of the 10" extension. Do not use the socket arm. You want to finger tighten the plugs first to make sure you don't cross-thread or bind. When inserting back into the plug socket, go slowly and ensure you aren't banging the walls on the way down. Insert/align gently at the bottom where the threads meet and finger tighten until firm. If you feel it is angled, cross-threading, etc., stop, pull the plug up and reseat.
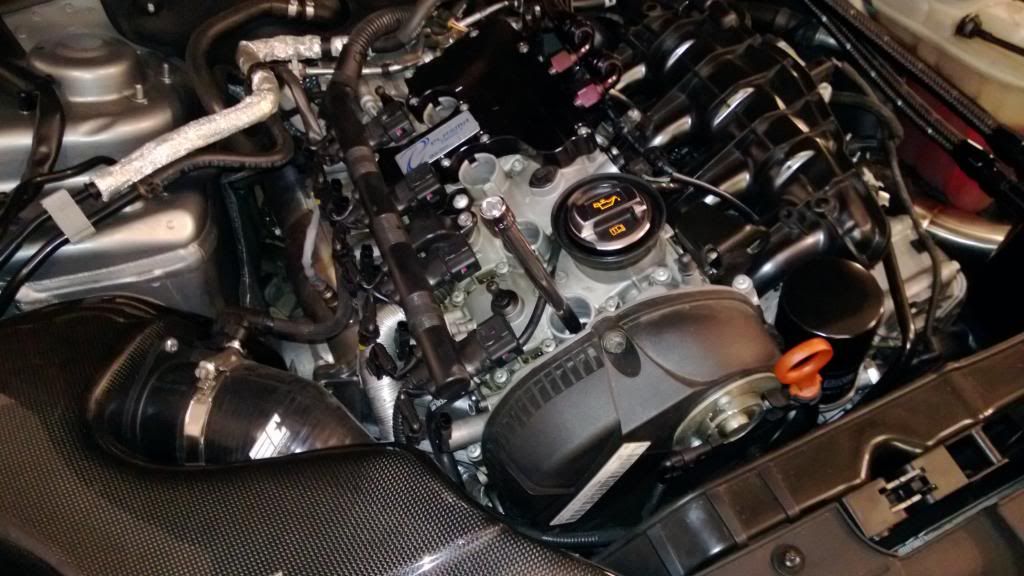

    Step 12: Finish installing all the plugs, then attach a Torque Wrench to the top of your 10" extension + 5/8" spark plug socket and set the wrench to 15-18 ft./lb. of torque. Rotate to tighten until the torque wrench clicks. Repeat on the 3 other plugs.

    Step 13: Now perform the final torque by setting the wrench to 22.1 ft./lb. of torque and tightening until the click. DO NOT tighten any further than the first click.

    Step 14: Reinstall each of your coil packs in the same cylinders they came out of. Make sure they install all the way flush to the housing and are aligned properly. There are small plastic alignment features on the plug to help you see/feel this. Press in firmly.

    Step 15: Reinstall the 4 coil pack plugs on the OEM wire harness to the coil packs until they click in firmly.

    Step 16: Reinstall the 8 connectors (2 per coil pack location) on the opposite side of the OEM wire harness until each clicks in firmly.

    Step 17: Reinstall the 1 torx bit screw back into the engine block to pin down the OEM wire harness.

    Step 18: Pat yourself on the back, cross your fingers and start-up your engine. If any thing sounds weird, you may have missed a connection or have a bad plug. Shutdown immediately and verify.

    Step 19: Enjoy a BEvERage of your choice. You just saved $50-$75 at your dealer at least.


    Here are my OEM Bosch plugs at 31K miles. I forgot to measure how they were gapped, but OEM is supposed to be 0.032:
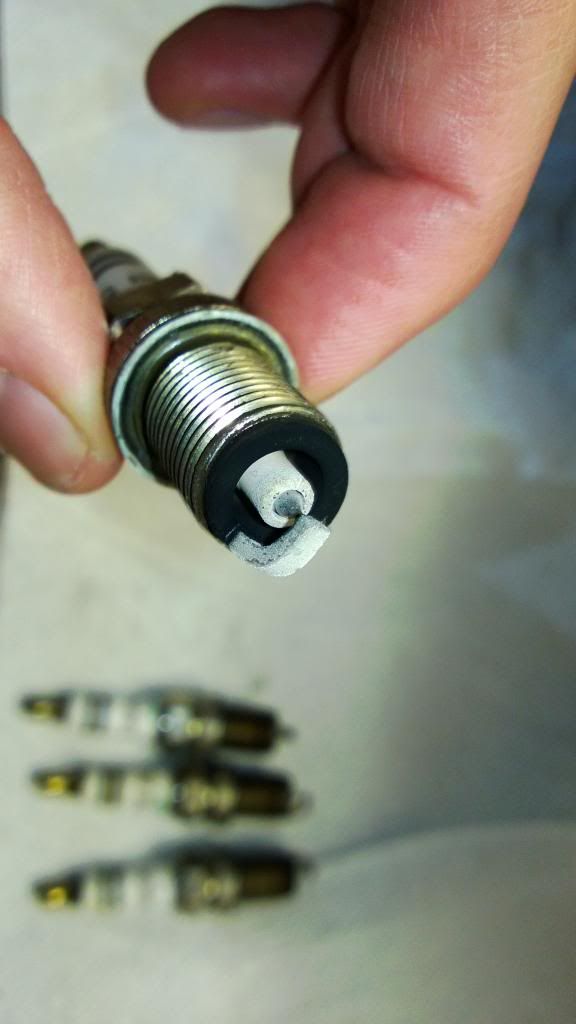


    New ones (NGK PRF7B @ 0.028):
    Last edited by Highlander1010; 06-01-2014 at 05:14 PM.

    FORMER CAR - 2009 A4 2.0T Tiptronic Quattro Prestige
    Highlander's Build Thread

  2. #2
    Veteran Member Four Rings auditd0rk's Avatar
    Join Date
    Feb 02 2012
    AZ Member #
    87597
    Location
    Colorado Springs

    Great write-up... and definitely a good DIY to save a few bucks.
    2012 A4 Quattro, Monsoon Grey | CTS K04, HFC | APR K04 v3 Tune | AWE Exhaust | Eurocode FMIC, Alu Kreuz, Sway Bars | Bilstein PSS10 | SPC UCAs | Apikol Rear Diff Mount | 034 Transmission Mount Insert, End-links | StopTech ST-60 BBK | S4 rear brakes | CR-15 brace

  3. #3
    Veteran Member Four Rings jbradle7's Avatar
    Join Date
    Jan 09 2010
    AZ Member #
    53157
    My Garage
    GX460; MK7.5 GTI; WK2 Grand Cherokee; 73 Triumph TR5T
    Location
    St. Louis

    Very nice!

    One quick note, anti seize is not recommended for our application.
    http://www.ngksparkplugs.com/pdf/tb-...1antisieze.pdf

  4. #4
    Veteran Member Four Rings Highlander1010's Avatar
    Join Date
    Apr 05 2011
    AZ Member #
    73491
    Location
    Pacific Northwest

    Quote Originally Posted by jbradle7 View Post
    Very nice!

    One quick note, anti seize is not recommended for our application.
    http://www.ngksparkplugs.com/pdf/tb-...1antisieze.pdf
    Oh! Good info. Ok - no Anti-Seize then. I'll just live with the fact that it is on and I used a torque wrench. I assume they're more worried about folks not using a torque wrench to properly tighten.

    FORMER CAR - 2009 A4 2.0T Tiptronic Quattro Prestige
    Highlander's Build Thread

  5. #5
    Veteran Member Four Rings jbradle7's Avatar
    Join Date
    Jan 09 2010
    AZ Member #
    53157
    My Garage
    GX460; MK7.5 GTI; WK2 Grand Cherokee; 73 Triumph TR5T
    Location
    St. Louis

    I believe the issue that could arise is that the anti-seize acts like a lubricant allowing more torque than set/indicated to be applied. Not sure how much more torque though, probably not a big deal.

    Thanks for the great B8 specific DIY!

  6. #6
    Registered Member One Ring
    Join Date
    Dec 03 2011
    AZ Member #
    84741
    Location
    Waverley

    Great post, many thanks. Estimated time for this DIY, even for us slowcoasters from Cananda, 20 minutes. Recommend to always pull out the shopvac and give the plug chute a haul. Cheers!

  7. #7
    Senior Member Three Rings neptunesfinest's Avatar
    Join Date
    Jun 03 2010
    AZ Member #
    59854
    Location
    New Jersey

    Thanks for the write up! I was able to change mine in about 30 min. Like others said, the connectors are tricky but I was expecting worse. I was having pretty bad hesitation under hard acceleration. One of the old plugs was all gunked up all the way up the threading so it seems it wasn't sealed well. New plugs are a night and day difference. Glad to have my car back to normal and especially happy it wasn't a transmission problem like I had feared.

  8. #8
    Established Member Two Rings AOW162435's Avatar
    Join Date
    Jul 15 2013
    AZ Member #
    118956
    Location
    Ellicott City, MD

    Excellent write-up. When installing plugs, I always rotate the extension counterclockwise a few turns and feel for the plug thread 'skipping'. This pretty much eliminates cross threading, and allows you to start threading the plug in properly (as you indicated).


    Andreas
    2014 Audi A4, Monsoon Gray / Black
    2002 Toyota 4Runner, Dorado Gold
    2001 Toyota 4Runner, Dorado Gold, 575,XXX 1-owner miles :)
    1998 Toyota 4Runner, Oxidized, 5-speed
    1995 Porsche 993, Polar Silver

  9. #9
    Established Member Two Rings ScoGold's Avatar
    Join Date
    Dec 05 2010
    AZ Member #
    67866
    Location
    Boston, MA

    Just curious where you buy these from. Is going to AutoZone or PepBoys okay or should I order it online?

    Is there any major difference (gap wise) for my B8 3.2 vs 2.0T mentioned here other than the number of plugs. Looking to do this myself and I've never tried it before.

    Thanks for the n00b help!

  10. #10
    Established Member Two Rings ScoGold's Avatar
    Join Date
    Dec 05 2010
    AZ Member #
    67866
    Location
    Boston, MA

    Also what brands do you recommend?

  11. #11
    Established Member Two Rings Gts*Jason's Avatar
    Join Date
    Sep 15 2013
    AZ Member #
    123194
    My Garage
    2004 Toyota MR2-S
    Location
    Destrehan, LA

    Quote Originally Posted by jbradle7 View Post
    Very nice!

    One quick note, anti seize is not recommended for our application.
    http://www.ngksparkplugs.com/pdf/tb-...1antisieze.pdf
    Is the head on the Audi steel or is there a steel thread installed in the head?

    Sent from my XT907 using Tapatalk 2 BC Oldman wants to know

  12. #12
    Established Member Two Rings Gts*Jason's Avatar
    Join Date
    Sep 15 2013
    AZ Member #
    123194
    My Garage
    2004 Toyota MR2-S
    Location
    Destrehan, LA

    Quote Originally Posted by jbradle7 View Post
    I believe the issue that could arise is that the anti-seize acts like a lubricant allowing more torque than set/indicated to be applied. Not sure how much more torque though, probably not a big deal.

    Thanks for the great B8 specific DIY!
    I doubt that, the spark plugs are gasket type so you should be torqueing just enough to crush that gasket so anti seize acting like a lubricant shouldn't be an issue.

    Sent from my XT907 using Tapatalk 2 BC Oldman wants to know

  13. #13
    Veteran Member Four Rings duffman1101's Avatar
    Join Date
    Feb 11 2004
    AZ Member #
    31
    Location
    San Francisco, CA

    Just did this tonight- thanks for the write-up!
    CURRENT: 2013 Subaru Outback... while I debate my next move. 2020 OB XT 2.4T? Used S6 4.0TT? Who knows...
    PREVIOUS
    - 2010 Ibis White A4 2.0T Quattro Premium+ Sport 6MT
    - 2000 BMW 540i, 4.4L V8, 18x8.5 and 18x9.5 BMW M-Sport Type 37 Wheels
    - 2005 Subaru Legacy GT Limited 5MT, Stage 2 + Moar
    - 1998.5 Audi A4 1.8TQ, tip, Stage 2... RIP

  14. #14
    Senior Member Two Rings
    Join Date
    Mar 15 2009
    AZ Member #
    39936
    Location
    USA

    Thanks for the post. The only thing that seems to be missing is ... Carefully inspect your coil packs for signs of corrosion or oil residue. If you find that the coils are covered in oil you will need to change the valve cover gasket before continuing.
    2009 A4 Black 6MT STaSIS Touring #130
    -STaSIS ECU, cat-back Exhaust, STaSIS rear-sway bar (22mm), STaSIS lowering springs, STaSIS braided brake lines, STaSIS / Carbontech AX6 brake pads (front), STaSIS Monolite wheel (19x9)
    -AWE Tuning Sport Pedal Covers (silver)
    -Black Gloss Grille and Black Gloss US License Panel
    -A4L fog surrounds

  15. #15
    Active Member Two Rings
    Join Date
    Nov 12 2013
    AZ Member #
    129700
    Location
    Fort Worth, Texas

    Hi I'm new to the Audi world, just got my 2011 B8. I also have the B8 would changing my own spark plugs void my CPO?

    Sent from my unknown using Tapatalk

  16. #16
    Active Member One Ring H16H SP33D's Avatar
    Join Date
    Apr 22 2012
    AZ Member #
    92308
    My Garage
    2008 Suzuki Boulevard M50
    Location
    Arizona

    Quote Originally Posted by AU06 View Post
    Hi I'm new to the Audi world, just got my 2011 B8. I also have the B8 would changing my own spark plugs void my CPO?

    Sent from my unknown using Tapatalk
    If anyone does not know, the Magnuson-Moss Warranty Act makes it a federal law that a warranty cannot be voided by you completing your own service.

    See here: https://www.consumer.ftc.gov/article...ne-maintenance

  17. #17
    Senior Member Three Rings Alpha Ice's Avatar
    Join Date
    Oct 24 2011
    AZ Member #
    82972
    Location
    Rochester, MN

    I just got mine installed tonight! It sounded a bit weird on startup, but I also had my hood open and engine cover off, after a minute or 2 it went back to normal. I can smell the new plugs and coil packs. I'm hoping it's a good thing lol. It didn't throw a cel so that's a good sign

    Sent from my HTC6500LVW using Tapatalk
    2011 Audi A4 6MT Prestige S-Line Sport | Apikol Rear Diff | AFE | EC Alu Kreuz | EC Inlet pipe | EC FMIC | EC USS Sway Bars | EC End Links | Deval Front Lip | Deval Rear CF Valance| GFB DV+ | AWE Quad Tip | AWE Downpipe | 034 HFC | APR Stage 2 | JHM Rotors | S4 Calipers | ATE TYP 200 | VMR V710 255.35.19 ET45 |

  18. #18
    Senior Member Three Rings Alpha Ice's Avatar
    Join Date
    Oct 24 2011
    AZ Member #
    82972
    Location
    Rochester, MN

    Here's my plugs after 26k miles

    I got to drive it a bit more and it was much smoother and had a bit more acceleration which was awesome!

    Sent from my HTC6500LVW using Tapatalk
    2011 Audi A4 6MT Prestige S-Line Sport | Apikol Rear Diff | AFE | EC Alu Kreuz | EC Inlet pipe | EC FMIC | EC USS Sway Bars | EC End Links | Deval Front Lip | Deval Rear CF Valance| GFB DV+ | AWE Quad Tip | AWE Downpipe | 034 HFC | APR Stage 2 | JHM Rotors | S4 Calipers | ATE TYP 200 | VMR V710 255.35.19 ET45 |

  19. #19
    Senior Member Three Rings
    Join Date
    Jan 16 2014
    AZ Member #
    139111
    Location
    United States

    Will be trying this soon

    Sent from my SM-N900V using Tapatalk

  20. #20
    Established Member Two Rings notazombie's Avatar
    Join Date
    Jan 13 2014
    AZ Member #
    138833
    Location
    Bucks County, PA

    Just did this today. Took a grand total of 10 minutes. I was happy as hell I had a gap gauge. Plugs I ordered came 4.5 and the factory gap for my plugs was 3.5. No CEL or any other errors, put some dielectric grease on the non-spark areas for good measure.

    My A4 is really peppy right now. It just wants to go. It's like a brand new car.
    2010 Audi A4 Quattro 2.0L Premium package
    Installed: Volant Cold Air Intake, Powerstop Slotted/Drilled Rotors with Akebono pads
    Wish List: 1. Stage 2 APR 2. Test pipe/HFC 3. Sway bars 4. R8-style lights 5. LED tails 6. Light tint on windows/tails
    Just for looks wish list: 1. Plasti-dipped wheels 2. RS4 Grille

  21. #21
    Veteran Member Four Rings kwbdc's Avatar
    Join Date
    Mar 29 2012
    AZ Member #
    90872
    My Garage
    2006 Mazdaspeed6 RIP
    Location
    Seattle/WA/United States

    Thanks for the write up Highlander. Picked up the NGK from Amazon prime.
    2012 Audi A4 Premium +MT, Quattro, Xpel bra, SLine BBS CI-R 20x8.5 ET 32

    Mods: APR HFC/DP, APR K04, Bilstein PSS10 Coilovers, Okada Coilpacks, AWE Boost Gauge, Eurocode SSK, OSIR CF Spoiler, APR Carbonio Intake, AWE Exhaust, OSIR CF valence, ÜSS Adjustable Stabilizer set, Alu Kreuz, RS4 grille, Fluidampr,Apikol differential, folding mirrors,Brembo GT BBK, Deval CF splitter,ECS skid plate, RS4 rear brakes, Snow performance Stage3

  22. #22
    Active Member Two Rings
    Join Date
    Feb 06 2013
    AZ Member #
    109025
    Location
    Orlando

    Wish this thread still had the pics :/

  23. #23
    Senior Member Three Rings
    Join Date
    Jan 16 2014
    AZ Member #
    139111
    Location
    United States

    Quote Originally Posted by half_duplex View Post
    Wish this thread still had the pics :/
    Pics of what?? In the first post he has a few pic with steps to get this job done..Also it is pretty easy

    Sent from my SM-N900V using Tapatalk

  24. #24
    Established Member Two Rings notazombie's Avatar
    Join Date
    Jan 13 2014
    AZ Member #
    138833
    Location
    Bucks County, PA

    Quote Originally Posted by half_duplex View Post
    Wish this thread still had the pics :/


    Simple as that. Get some dielectric grease to rub carefully on the plugs near the threads for the screws and on the part that goes up along with some anti-seize grease and you're golden.

    Also remember to make sure you have the correct spark plug socket and an extension for your wrench. You're going to need 5/8. It's a very easy job, just take your time and everything will work out. Try to get a gap gauge so you can make sure the gap on the replacements is the same as the originals. Mine was 1.0 off. The originals should read 3.5
    2010 Audi A4 Quattro 2.0L Premium package
    Installed: Volant Cold Air Intake, Powerstop Slotted/Drilled Rotors with Akebono pads
    Wish List: 1. Stage 2 APR 2. Test pipe/HFC 3. Sway bars 4. R8-style lights 5. LED tails 6. Light tint on windows/tails
    Just for looks wish list: 1. Plasti-dipped wheels 2. RS4 Grille

  25. #25
    Senior Member Three Rings Alpha Ice's Avatar
    Join Date
    Oct 24 2011
    AZ Member #
    82972
    Location
    Rochester, MN

    NGK Specifically states DO NOT!!!!!!!!!!!! use anti seize on the spark plugs.....so flat out, don't use anti seize on the plugs
    2011 Audi A4 6MT Prestige S-Line Sport | Apikol Rear Diff | AFE | EC Alu Kreuz | EC Inlet pipe | EC FMIC | EC USS Sway Bars | EC End Links | Deval Front Lip | Deval Rear CF Valance| GFB DV+ | AWE Quad Tip | AWE Downpipe | 034 HFC | APR Stage 2 | JHM Rotors | S4 Calipers | ATE TYP 200 | VMR V710 255.35.19 ET45 |

  26. #26
    Senior Member Three Rings Alpha Ice's Avatar
    Join Date
    Oct 24 2011
    AZ Member #
    82972
    Location
    Rochester, MN

    First point in this info sheet states to specifically not use anti seize. If you aren't aware of something, please do not post for others to create problems....
    http://www.ngksparkplugs.com/pdf/dyk_5points.pdf
    2011 Audi A4 6MT Prestige S-Line Sport | Apikol Rear Diff | AFE | EC Alu Kreuz | EC Inlet pipe | EC FMIC | EC USS Sway Bars | EC End Links | Deval Front Lip | Deval Rear CF Valance| GFB DV+ | AWE Quad Tip | AWE Downpipe | 034 HFC | APR Stage 2 | JHM Rotors | S4 Calipers | ATE TYP 200 | VMR V710 255.35.19 ET45 |

  27. #27
    Established Member Two Rings notazombie's Avatar
    Join Date
    Jan 13 2014
    AZ Member #
    138833
    Location
    Bucks County, PA

    Quote Originally Posted by Alpha Ice View Post
    First point in this info sheet states to specifically not use anti seize. If you aren't aware of something, please do not post for others to create problems....
    http://www.ngksparkplugs.com/pdf/dyk_5points.pdf
    Spare me the hysterics. NGK says not to use anti-seize because their plugs are supposedly manufactured so the threads won't corrode and therefore don't need it. The problem is over-tightening which is a completely different issue. It has nothing at all to do with the anti-seize. It has to do with some moron with a socket wrench yanking like a gorilla until the screw strips and NGK taking the easiest way out of liability. Professional installs always use dielectric grease and anti-seize.

    And NGK is not the only sparkplug manufacturer. Mine were Denso and their take on it is even less shrill.

    If a thread lubricant such as grease is coated on the thread, tightening to the recommended torque is tightening too much;
    this has been linked to seal leakage.
    Do not use a thread lubricant.

    Caution Tightening more than the tightening angles and torques shown on the right could result in damage to the engine and furthermore could result in the plug coming off at the thread.
    As a further note, the anti-seize and dielectric grease isn't just for the plugs. It's also for the nodes. Just because there's an anti-corrosive coating on your plugs, it doesn't mean your heads won't start to go. Audi heads are aluminum. Due to electrolysis they seize to all metallic surfaces. Anti-seize prevents that.

    So it gives me great pleasure to repeat your turn of phrase,
    Quote Originally Posted by Alpha Ice View Post
    If you aren't aware of something, please do not post for others to create problems....
    2010 Audi A4 Quattro 2.0L Premium package
    Installed: Volant Cold Air Intake, Powerstop Slotted/Drilled Rotors with Akebono pads
    Wish List: 1. Stage 2 APR 2. Test pipe/HFC 3. Sway bars 4. R8-style lights 5. LED tails 6. Light tint on windows/tails
    Just for looks wish list: 1. Plasti-dipped wheels 2. RS4 Grille

  28. #28
    Senior Member Three Rings Alpha Ice's Avatar
    Join Date
    Oct 24 2011
    AZ Member #
    82972
    Location
    Rochester, MN

    Quote Originally Posted by notazombie View Post
    Spare me the hysterics. NGK says not to use anti-seize because their plugs are supposedly manufactured so the threads won't corrode and therefore don't need it. The problem is over-tightening which is a completely different issue. It has nothing at all to do with the anti-seize. It has to do with some moron with a socket wrench yanking like a gorilla until the screw strips and NGK taking the easiest way out of liability. Professional installs always use dielectric grease and anti-seize.

    And NGK is not the only sparkplug manufacturer. Mine were Denso and their take on it is even less shrill.


    As a further note, the anti-seize and dielectric grease isn't just for the plugs. It's also for the nodes. Just because there's an anti-corrosive coating on your plugs, it doesn't mean your heads won't start to go. Audi heads are aluminum. Due to electrolysis they seize to all metallic surfaces. Anti-seize prevents that.

    So it gives me great pleasure to repeat your turn of phrase,
    ooooook, if you say so
    2011 Audi A4 6MT Prestige S-Line Sport | Apikol Rear Diff | AFE | EC Alu Kreuz | EC Inlet pipe | EC FMIC | EC USS Sway Bars | EC End Links | Deval Front Lip | Deval Rear CF Valance| GFB DV+ | AWE Quad Tip | AWE Downpipe | 034 HFC | APR Stage 2 | JHM Rotors | S4 Calipers | ATE TYP 200 | VMR V710 255.35.19 ET45 |

  29. #29
    Veteran Member Four Rings jbradle7's Avatar
    Join Date
    Jan 09 2010
    AZ Member #
    53157
    My Garage
    GX460; MK7.5 GTI; WK2 Grand Cherokee; 73 Triumph TR5T
    Location
    St. Louis

    Not to feed this argument, but the plugs from Audi do not come installed with anti-seize. Use it, don't use it, I don't care... probably not a big deal either way.

  30. #30
    Senior Member Three Rings neptunesfinest's Avatar
    Join Date
    Jun 03 2010
    AZ Member #
    59854
    Location
    New Jersey

    Seems simple to me...The lubricant reduces friction so the torque spec no longer applies. Shouldn't affect functionality at all if properly installed. That said, I skipped it when I installed my replacement plugs.

  31. #31
    Established Member Two Rings notazombie's Avatar
    Join Date
    Jan 13 2014
    AZ Member #
    138833
    Location
    Bucks County, PA

    I use dielectric grease with a decent coat carefully avoiding the gap. The point of a lubricant, especially one that blocks electrolysis, is not in maintaining the spark plugs necessarily, but caring for the head and keeping it from bonding. Aluminum is a notoriously easy bonder due to its natural characteristics and tendency to alloy. Every time you remove a spark plug, you're taking more from the head. A lack of anti-seize or dielectric grease exacerbates the process. It's something that you notice long-term and in especially wet environments and conditions. Will it be noticeable at 75k miles? Probably not. 150k? Depending on where you are located, it's a possibility. Cylinder heads are pretty expensive. Dielectric grease, anti-freeze, and not over-tightening are pretty cheap and pretty easy.
    2010 Audi A4 Quattro 2.0L Premium package
    Installed: Volant Cold Air Intake, Powerstop Slotted/Drilled Rotors with Akebono pads
    Wish List: 1. Stage 2 APR 2. Test pipe/HFC 3. Sway bars 4. R8-style lights 5. LED tails 6. Light tint on windows/tails
    Just for looks wish list: 1. Plasti-dipped wheels 2. RS4 Grille

  32. #32
    Veteran Member Four Rings
    Join Date
    Apr 22 2014
    AZ Member #
    191804
    My Garage
    2018 Q5, 2018 X1
    Location
    Sacramento

    With a stage 1 tune, would you recommend changing over to the plugs that APR suggested? Plugs are dealer installed from the last service, I bought the car as a CPO a few months ago. So I'm assuming from all provided documents, that they were the last to change the plugs out.
    2018 Q5 Tech Premium Plus
    2011 A4 JHM K04-R : JH MOTORSPORTS TUNED : CTS : 034 : ECS TUNING : SNOW PERFORMANCE

  33. #33
    Veteran Member Four Rings kwbdc's Avatar
    Join Date
    Mar 29 2012
    AZ Member #
    90872
    My Garage
    2006 Mazdaspeed6 RIP
    Location
    Seattle/WA/United States

    Did the plugs this weekend, Highlander's instructions spot on, took all of 20 minutes and I didn't use anti-seize following NGK's recommendations.
    2012 Audi A4 Premium +MT, Quattro, Xpel bra, SLine BBS CI-R 20x8.5 ET 32

    Mods: APR HFC/DP, APR K04, Bilstein PSS10 Coilovers, Okada Coilpacks, AWE Boost Gauge, Eurocode SSK, OSIR CF Spoiler, APR Carbonio Intake, AWE Exhaust, OSIR CF valence, ÜSS Adjustable Stabilizer set, Alu Kreuz, RS4 grille, Fluidampr,Apikol differential, folding mirrors,Brembo GT BBK, Deval CF splitter,ECS skid plate, RS4 rear brakes, Snow performance Stage3

  34. #34
    Active Member Two Rings
    Join Date
    Feb 06 2013
    AZ Member #
    109025
    Location
    Orlando

    Quote Originally Posted by notazombie View Post
    I use dielectric grease with a decent coat carefully avoiding the gap. The point of a lubricant, especially one that blocks electrolysis, is not in maintaining the spark plugs necessarily, but caring for the head and keeping it from bonding. Aluminum is a notoriously easy bonder due to its natural characteristics and tendency to alloy. Every time you remove a spark plug, you're taking more from the head. A lack of anti-seize or dielectric grease exacerbates the process. It's something that you notice long-term and in especially wet environments and conditions. Will it be noticeable at 75k miles? Probably not. 150k? Depending on where you are located, it's a possibility. Cylinder heads are pretty expensive. Dielectric grease, anti-freeze, and not over-tightening are pretty cheap and pretty easy.
    I'm planning to do this WITHOUT a torque wrench so what is your advice there? I've read that it's pretty easy to feel the washer crush down. Anti-seize or no anti-seize? I will be using the dielectric grease on the terminals but havn't decided yet on the anti-seize. (certain brand?).

  35. #35
    Senior Member Two Rings Jmstrag's Avatar
    Join Date
    Aug 15 2010
    AZ Member #
    62753
    Location
    Canada

    Quote Originally Posted by half_duplex View Post
    I'm planning to do this WITHOUT a torque wrench so what is your advice there? I've read that it's pretty easy to feel the washer crush down. Anti-seize or no anti-seize? I will be using the dielectric grease on the terminals but havn't decided yet on the anti-seize. (certain brand?).
    why not just invest in a torque wrench? even a cheap one is better than no torque wrench at all. It will get tons of use if you plan to do various little jobs on your car.

  36. #36
    Active Member Two Rings
    Join Date
    Feb 06 2013
    AZ Member #
    109025
    Location
    Orlando

    Quote Originally Posted by Jmstrag View Post
    why not just invest in a torque wrench? even a cheap one is better than no torque wrench at all. It will get tons of use if you plan to do various little jobs on your car.
    From what I've read the cheap torque wrenches can be a little off so for something 20# like these plugs, it's basically a wash and I've just read that it's pretty easy to feel the washers collapse. I don't really have a problem getting a wrench, but I don't really have an idea when I'd use it again. If it's a must, I'd most likely take it to my Euro shop.

  37. #37
    Veteran Member Four Rings
    Join Date
    Jun 12 2013
    AZ Member #
    117051
    My Garage
    1999 Pontiac Grand Prix GTX
    Location
    LaSalle, Ontario, Canada

    Hi Highlander - thanks for the writeup. Its nice to check out what I was getting into prior to just figuring it out on my own (granted I could, but I'm sure visualizing what was getting into saved me 5-10mins). Got them all done within 20 minutes.

    I will feed into the argument about anti-sieze though , for those that have changed your plugs, once you broke the clamping load, while unthreading, did you "feel" it somewhat sticking? That's because dissimilar metals DO NOT mix (like what others posted here). That is a sign that the threads, within the head, are starting to break down because of the dissimilar metals. You prevent and fight that by using just a little bit of anti-sieze. You do not need much and you have got to use high-high heat stuff too.

    For those that state it interferes with torqueing them down [clamping load], that is incorrect. Adding proper additives to threads DOES NOT change, adjust or affect clamping load. It will affect prevailing on torque (which is the amount of force to 'thread' the application) but we don't care about that. Those that don't believe me, let's just say don't drive your car then because majority of bolts are tested, QA'd, and certified this way. My source? My father 'runs' a heat treat and metal bolt manufacturing industry that supplies the major automotive chains. My profession is in IT; as a side job I built their quality application for them; I even know what gets tested

    To note, my Bosch plugs state to torque to 28nm which is ~20 ft. lbs. - that's what I did.

    One last thing, changing my plugs and a I also went to R8 coils, really smoothed out acceleration and seemed to have resolved a really random misfire from a cold start (like the car was sitting overnight). Car feels smoother now.

  38. #38
    Veteran Member Four Rings wxsgt's Avatar
    Join Date
    Jul 16 2012
    AZ Member #
    96939
    My Garage
    2021 Audi A4 45
    Location
    Haverhill, Ma

    What is the gap supposed to be? Some are saying .028 others saying .032. I dont know what mine are at, but i am about to replace them and just want the info before the job.
    2010 Ibis White Audi A4 P+ l Upgrades: RS4 grill, Akebono Brakes, Debadged, Solo Werks S1 Coilovers, Targa Trophy Stickers(guaranteed 10+ HP) l
    2009 Ibis White Audi S5 Coupe | Upgrades: RS Grille |

  39. #39
    Established Member Two Rings RainReign's Avatar
    Join Date
    Dec 12 2011
    AZ Member #
    85181
    Location
    North Dakota

    Quote Originally Posted by wxsgt View Post
    What is the gap supposed to be? Some are saying .028 others saying .032. I dont know what mine are at, but i am about to replace them and just want the info before the job.
    .028 if you're tuned. .032 if you're stock.
    2023 Audi RS3 | Turbo Blue

    Gone: 2020 Audi S4 P+ | Glacier white
    2012 Audi A4 P+ Quattro | Ibis white | Nav w/ backup camera | Sport Package
    CTS Turbo K04 | APR K04 v2 Tune | CTS Turbo Catch Can | CTS Turbo FMIC
    GFB DV+ | AWE Cat-back | 034 Transmission insert | EuroCode Alu Kreuz| H&R Coilovers | VMR V713
    LEDs | VAG-COM | P3Cars gauge | oCarbon | Deval | aFe

  40. #40
    Veteran Member Four Rings wxsgt's Avatar
    Join Date
    Jul 16 2012
    AZ Member #
    96939
    My Garage
    2021 Audi A4 45
    Location
    Haverhill, Ma

    Cool thanks
    2010 Ibis White Audi A4 P+ l Upgrades: RS4 grill, Akebono Brakes, Debadged, Solo Werks S1 Coilovers, Targa Trophy Stickers(guaranteed 10+ HP) l
    2009 Ibis White Audi S5 Coupe | Upgrades: RS Grille |

Bookmarks

Posting Permissions

  • You may not post new threads
  • You may not post replies
  • You may not post attachments
  • You may not edit your posts
  •  


    © 2001-2025 Audizine, Audizine.com, and Driverzines.com
    Audizine is an independently owned and operated automotive enthusiast community and news website.
    Audi and the Audi logo(s) are copyright/trademark Audi AG. Audizine is not endorsed by or affiliated with Audi AG.