


While this is not a common retrofit, I wanted to do it to compare the 2.0t oil pressure to the 1.8t oil system pressure as well as be able to monitor my oil pressure, to prevent any damage that may happen to my built engine.
Tools:
M12 triple square ( also called xzn, cheesehead etc, it looks like three squares overlapped, 12 pt)
Small 3/8th extension
3/8 socket wrench
19mm 3/8th socket
16mm 3/8th socket
17mm open end wrench
8mm 3/8th socket
10mm 3/8th socket
Small flathead screwdriver
T30 torx socket bit
Soldering iron
Electric wire stripper pliers.
Oil tray to catch oil.
Dremmel (if you want to make a custom mount)
Materials:
Oil pressure gauge kit which should include a gauge, and an oil pressure sender at the minimum. I bought this one - http://www.oreillyauto.com/site/c/de...&ppt=C0134
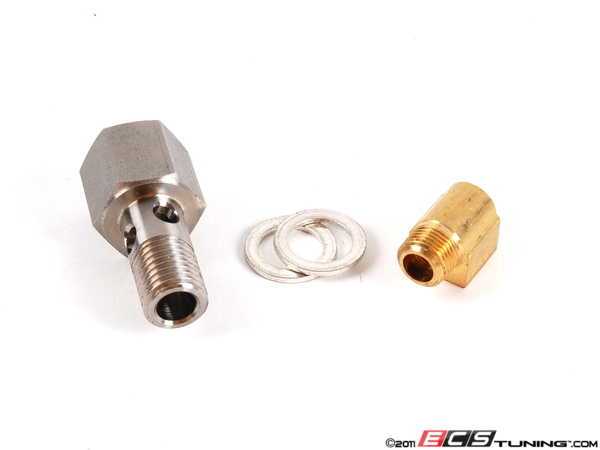
Oil pressure tap kit. The 2.0t unfortunately has limited spots to tap for oil pressure since the oil filter bracket is plastic. I bought this one - http://www.ecstuning.com/Volkswagen-...ssure/ES11178/
12 ft of 18 gauge blue wire.
5 ft of 18 gauge black wire.
5 ft 18 gauge red wire.
Solder
Electrical tape.
Optional:
Dremmel
Spray paint
JBweld
painters tape.
Step 1: Assemble your 3/8ths socket wrench with a 10mm socket and disconnect the negative terminal on the battery, push it out of the way so you know you are safe to work on the car.
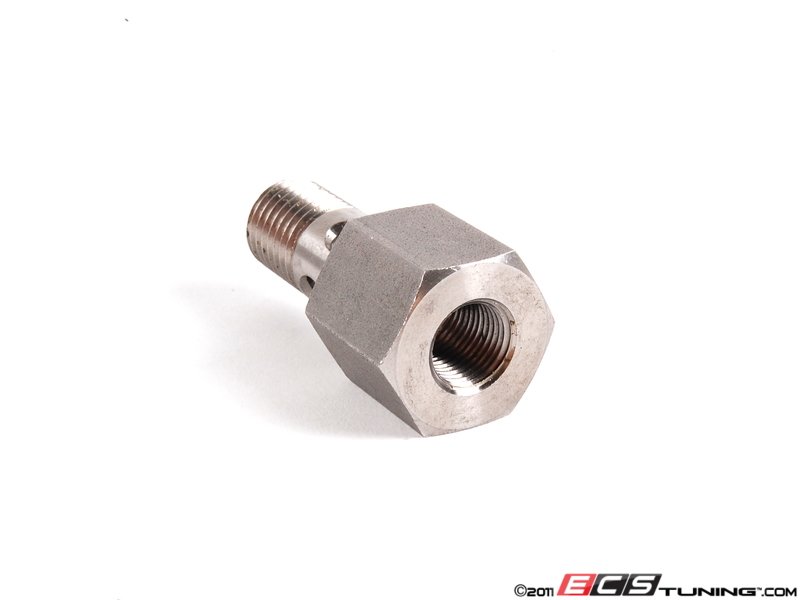
Step 2: Get under the car with the oil tray, the M12 triple square and the 3/8th socket wrench. Since the 2.0t has a plastic oil filter bracket, we can't tap into it like we can on the 1.8t. For the 2.0t you need a banjo port. A banjo port is a banjo bolt with an open head. A banjo bolt by definition is a hollow bolt that allows fluid to pass through it. Similar to what we have on our HPFP's, however, this one has one more hole in it to allow for an oil pressure sender.
From the front.
So what we are going to do is remove the OEM banjo bolt that is attached to the exhaust manifold side of the engine that feeds oil to the turbo. We will replace this banjo bolt with a banjo port bolt which allows the oil pressure sender to be installed on the end. Get under the car and observe the lines that run from the block to the turbo.
This is an angle of the two banjo bolts for oil feed and drain on the turbo. You can see the serpentine belt in the top part of the picture, and the snub bracket in the right side. The correct banjo bolt to remove is the one with the steel braided line.

You will notice that two of them, one on top and one on bottom of the turbo, run back to the block. The thicker one is your oil drain, the thinner one is the oil feed, you know it's the oil feed because it is partially braided steel, and partial hard line. To confirm, the turbo oil feed line on the block is the lower of the two oil lines that go from the top and bottom of the turbo to the block. Ok go ahead and use your M12 to remove that banjo bolt, and make sure you have that drip tray under the bolt or you will spill oil. A bit of oil will fall out, but most of the oil is in the oil pan if you have let the car sit for a while. Once you have done that, remove the OEM banjo bolt and the two crush washers before and after the banjo line that feeds oil to the turbo. Use the new crush washers that came with your banjo port bolt and install the banjo port bolt. Remember the order block - crush washer - banjo line - crush washer - banjo port. Torque this bolt to 30NM.
You can see here the banjo bolt has been removed and the banjo port installed.

Step 3: Once your banjo port has been torqued you can go ahead and install the oil pressure sender. Do not use teflon tape, the sender needs to be ground so it must make metal to metal contact with the banjo port. Use a 17mm open end wrench to tighten the sender onto the banjo port. Your sender should have a minimum of one wire to attach to it. Mine had two wire connections. 1. was for the oil pressure signal that will be connected directly to the gauge. 2. was for either grounding the sender, or hooking up to a warning light incase pressure drops too low or exceeds a specified amount. I chose to ground it since our cars already have an oil pressure warning integrated into the cluster. This means that we still have to move one wire for oil pressure signal from the engine bay into the cabin. I looked around the engine bay, but yet again, the ECU box seems to be like the best option.
My gauge kit had small red fittings for the electrical connections,no big deal if yours doesnt.


Test fit the connectors on the backside of the gauge. Black is ground, red power and blue is the oil pressure signal. The other white and black wires are for the gauge backlight, we will get to that later

Step 4: Go over to the driver's side windshield wiper, use the flathead screwdriver to pop the black cap off from the pivot of the wiper arm.


Underneath there is a 16mm nut. Place tape down where your wiper is right now so you can position it correctly later. Remove the 16mm nut and the wiper arm consecutively.

Underneath the wiper arm is a black plastic box with 5 t30 screws securing it. Go ahead and remove those 5 screws( 3 in the front, 2 in the rear in each corner).

Once that is done you can pull the cover off and you will see your ECU. What a beauty. Back to work.
Don't worry if you don't have the yellow wires and the blue hose, that's something I installed.

Open the driver's door, and go to the fuse box panel between the steering wheel and the driver's door.

Pry off the fuse box cover using a flathead screwdriver.

Behind the fuse box cover there is a small 8mm bolt, remove it. There are two more 8mm screws that hold the driver's kick panel in place. One right next to the OBD sensor

and one in the corner between the center console and the kick panel.

Remove them both. Now you can pull the kick panel toward the driver's seat and down.


Unplug the two connections on the inside of the kick panel. The white connector is removed by spreading the legs and pulling back. The OBD connector is removed by pushing in all three tabs. Remove your kick panel and place it on a soft surface. Now we are ready to start the wiring.

Step 5: Use a knife to make a small incision in the rubber "boot" that links the engine bay wiring to the ECU box.

Take your 12ft long 18 gauge blue wire and run one end of it from the engine bay side through the rubber "boot" and into the ecu box. You may want to use a lead such as a metal coat hanger or a screwdriver to make it easier to move the single wire.
Remember that I already had that blue hose there, unrelated to this install.

Once you have it in the ECU box side, pull it through enough so that you have 2 ft of wire on the ECU side of the wire. Tie a heavy object such as the 16mm socket you used earlier onto the end and drop the wire and socket into the rear part of the ECU box that connects with the driver's footwell.


If you lowered it properly you should be able to see it in the driver's footwell, if not pull it up and try to maneuver it again. If that's done then now you can proceed to plug in the engine bay side of the blue wire to the oil pressure sender. In the engine bay there is weatherstripping to prevent heat from escaping the engine bay. Pull the top weather stripping which is located between the battery and the engine itself, and runs from the driv'ers side to the passengers side. Install the blue cable into the ridge in the weather stripping and reinstall the weatherstripping, this will keep your engine bay tidy. Now you will have to drop the wire into the engine bay eventually, find a good are that works for you, it must be close to the airbox location, and must be at least 6 inches away from the exhaust manifold. Route it down and into the connection on the oil pressure sender. If you have a ground wire connector on your sender now is a good time to take some black wire, strip the ends, attach one end to your oil pressure sender, and the other to a point that makes metal to metal contact with the chassis, the block would be fine, or most any area so long as the wire makes contact with actual metal and the surface is not powdercoated.
Step 6: Now you're realizing that the engine bay work is done, you have an oil pressure signal, but you need power and ground on your oil pressure gauge. There are two excellent spots to tap in the driver's foot well.XXXX*X*X**X*X*X*X*X*X
Step 7: By now you've put it a load of hard work, you're probably thinking I need to put this gauge in a location that will be stealthy yet conventional. Glovebox? Over the steering column? I decided to put mine in the front ashtray. I don't smoke so I will not miss it. In order to install the gauge in there, it has to either be very small, or you better get your dremmel ready. But you won't dremmel in your car since you don't want melted plastic bits scattering in your interior so lets remove it. If you are a manual, push in on both sides of the chrome surround piece on your shifter and pull up. THis will separate the shifter from the trim. Then you can simply lift the trim out and slide it over the shifter. If you are automatic, you should be able to open the ashtray and pull the shifter trim out from the top. To remove the ashtray you need to remove the two 8mm bolts in each corner. Once you do that you will have to spend a minute or two finicking with the ashtray to find a way to pull it out. It takes some time, but it will come out. Disconnect both connectors attached to the ashtray and it will come out for you to dremmel.
Step 8: Pull out your dremmel set it to 10k, and put in a grinding stone as your attachment. Dremmel out a hole large enough so you can fit your gauge in, and still close the ashtray. This will take you some time as it is highly "trial and error". But once you have the perfect angle where the gauge fits, and the ashtray closes, then you are going to want to JB weld or superglue it into place. JBweld is a bit stronger so I would definitely go that route. I made sure when I installed my gauge to retain the ashtray parts, and to not damage the ashtray compartment, that way If I decide to uninstall teh gauge, the hole I dremmeled for the gauge can be filled with the ashtray. Let it sit overnight, and harden. Since JBweld is grey, You're going to want to pick up some tape, and some spray can's that match your interior. Once the JBweld is hardened, tape up everything except the JBweld, and use the spray paint to paint the grey to match your interior. For me this was black.
Step 9: You will want to move three wires into the ashtray area. 1.oil pressure signal. 2. power 3. ground. You can do this by XXXXX*X*X*X*X*X
Will Finish tomorrow AZ, install took much longer than expected. Pics to come.

 Reply With Quote


Bookmarks