Audizine - An Automotive Enthusiast Community

Page 1 of 6 123 ... LastLast
Results 1 to 40 of 218
  1. #1
    Veteran Member Four Rings SlickFix's Avatar
    Join Date
    Nov 11 2010
    AZ Member #
    66868
    Location
    Rochester, MN

    DIY: B6 A4 3.0 Complete Vacuum Line replacement

    Guest-only advertisement. Register or Log In now!
    Alright, alright.

    Let's have some fun and replace all of those crumbling original vacuum lines and in the process eliminate the chance of a vacuum leak. Win/win, all around. All pics in this DIY are mine, unless otherwise noted.

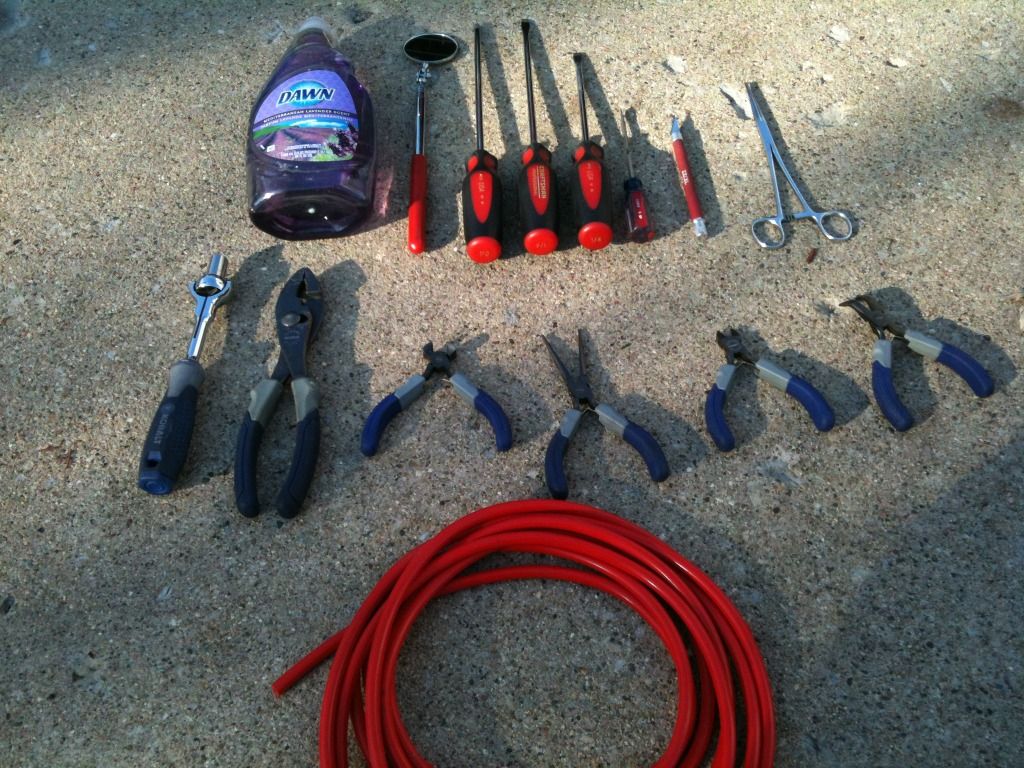
    The tools you'll need for this job are the following:

    1/4" ratchet
    10mm 1/4" socket
    Assortment of pliers
    Assortment of small wire cutters
    Assortment of screwdrivers: flathead, phillips and T30 torx(to remove the drivers side headlamp assembly).
    Small forceps(VERY important and helpful for this job. It allows you to lock the forceps onto the new silicone hose to use for leverage when installing onto a nipple in tight quarters).
    Exacto hobby knife
    Telescoping mirror
    LED Headlamp or small bright flashlight
    Dish soap(Fragrance of your choice).
    ~20 ft. of 3.5 mm silicone vacuum line(I bought mine from verociousmotorsports)


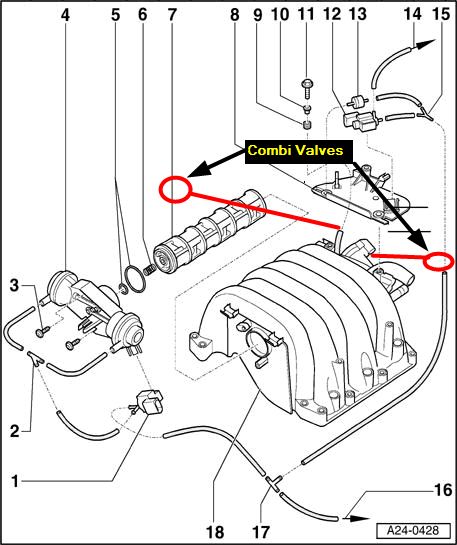
    First, we start with a diagram of the 3.0 engine, showing most of the vacuum lines. This diagram omits the lines leading to the combi-valves, one on each side, so I drew them in myself.


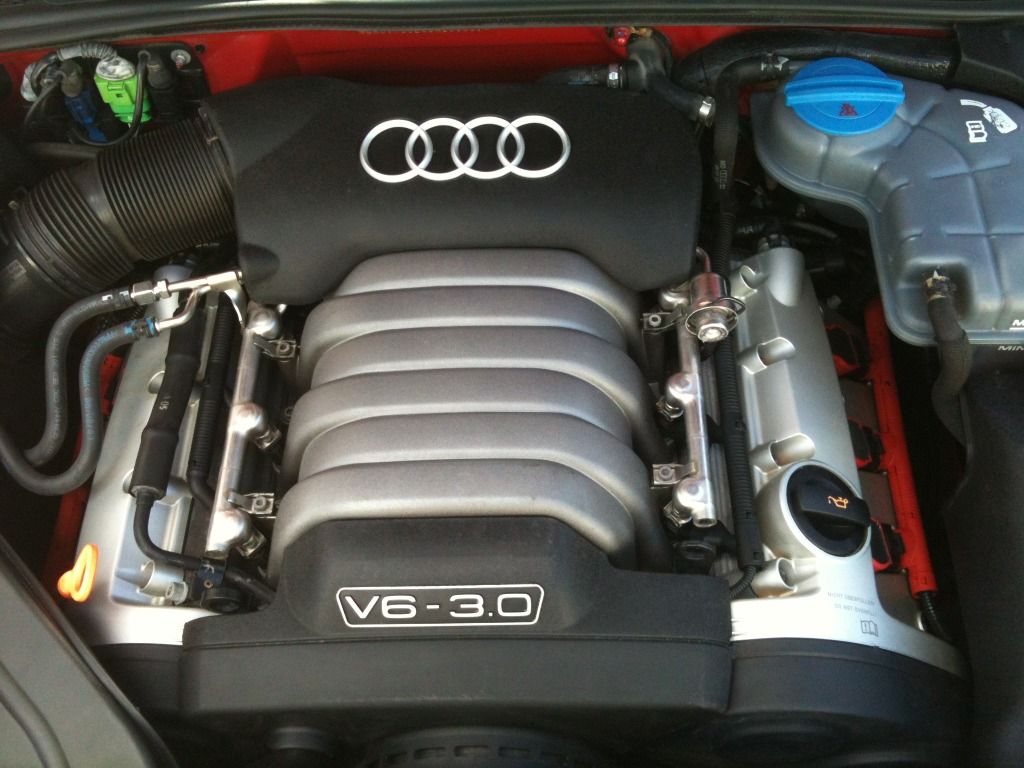
    Here we have a shot of our sexy looking 3.0 engine, covered in plastic. Let's take all of these plastic covers off to expose the vacuum lines.


    I cannot stress this enough: REPLACE ONE HOSE AT A TIME. DO NOT DISCONNECT MULTIPLE LINES AT THE SAME TIME. It's easy to get confused as to where this hose goes, or where that hose goes, so if you do it one hose at a time, you will be alright.

    The technique I used for removing the old vacuum lines is simple, and prevented damage to the fragile plastic nipples which the new silicone hoses must be attached to:

    1) Using the Exacto hobby knife, slice the old vacuum line length wise where it connects to the plastic nipple. You only need to make a slice about an inch long to ensure easy removal.
    2) With the tip of the knife, peel off the old hose after it's been cut.


    To install the new hose:
    1)Hold the old hose up to the new silicone hose and cut a section of the new silicone hose to match. I actually made my new hoses about an extra 1/4" longer, to give me a little bit of flexibility when handling the hoses.

    2) apply a very small amount of dish soap onto the end of the new silicone hose that is going to connect to the nipple. This will help the hose slide onto the tee connector nipple quite easily.
    3) Slide the new hose onto the tee connector nipple as far as you can. When working in tight confines, like when you have to connect the combi-valve lines, use the locking feature of the forceps so that you can grab the new silicone hose and lock the forceps. This will give you leverage as you attempt to slide the hose onto the nipple. I found the forceps to be an invaluable tool when doing this job.


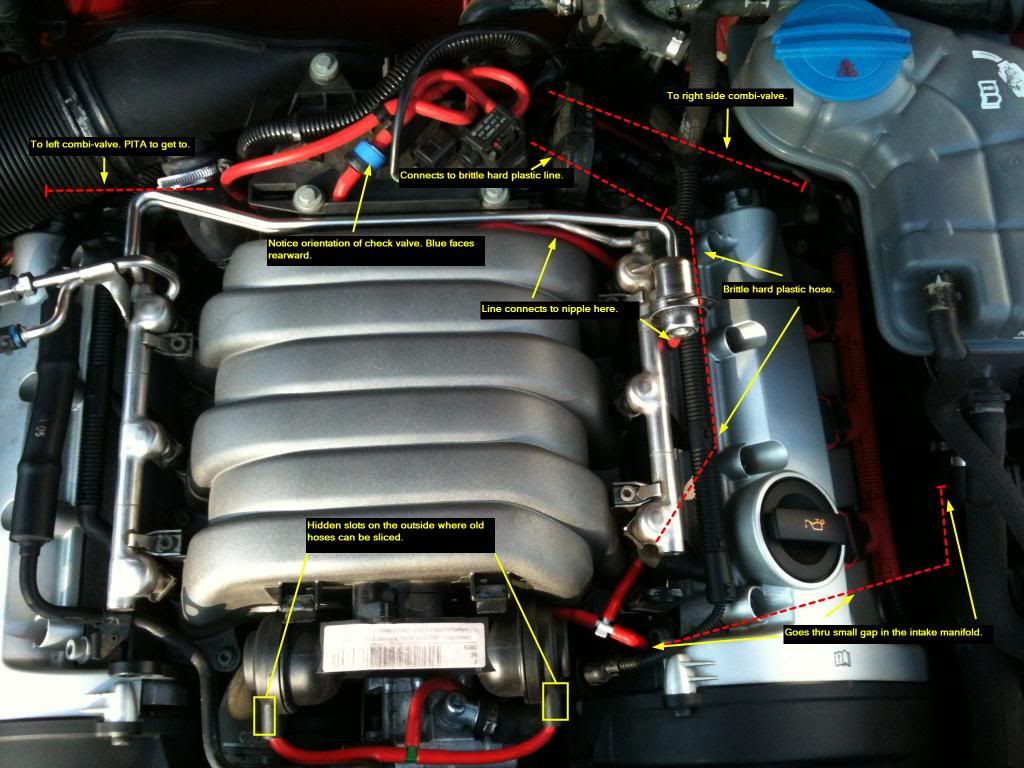
    Alright, it's easier to see where all the vacuum lines go if I show you an "after" shot, since the red silicone hose is much easier to see than the old black braided lines. This pic shows every vacuum line you'll need to replace. The red-dotted lines represent hidden lines that are running underneath something.

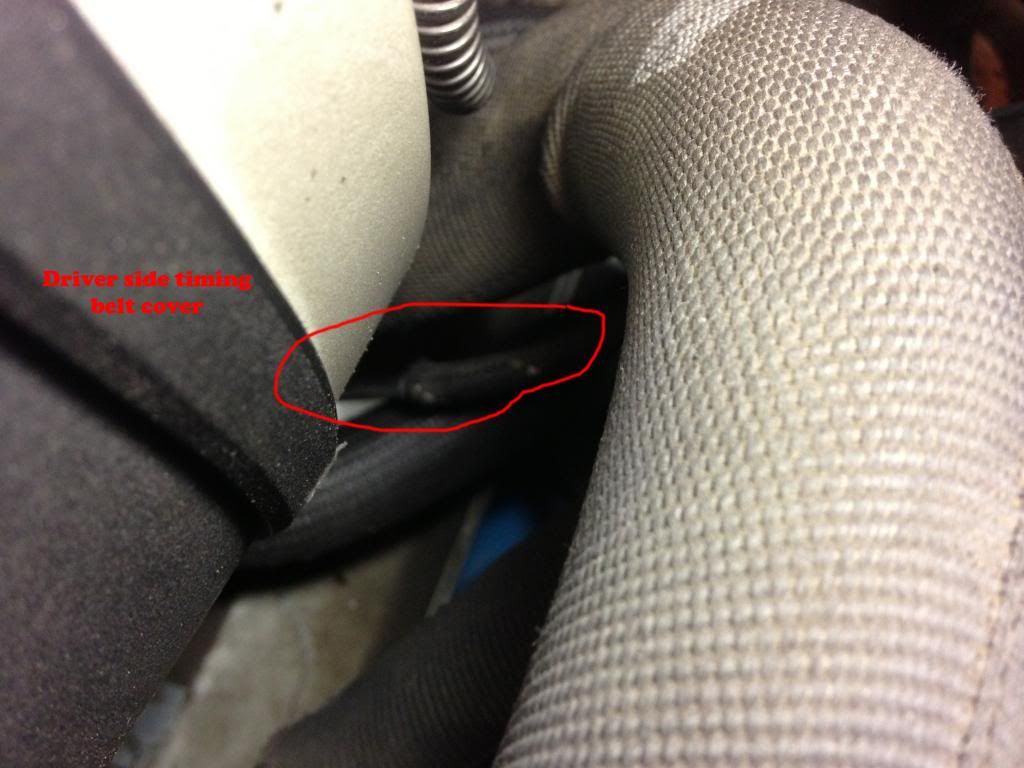
    I want to point out two special PITA lines, which will take up the majority of your time during this job. The first is the brittle hard plastic line on the driver's side front of the engine, that runs between a small gap in the intake manifold. If you're able to replace the two small braided hoses that connect to this without breaking the plastic line, then you're lucky. If your experience is like mine, however, this plastic line will snap while you're attempting to slide the new silicone hose on. In this case, you will need to thread a long piece of silicone hose through that small gap in the intake manifold. It is a major league PITA, but is doable with use of the telescoping mirror and flashlight, so that you can see the hose coming as you snake it down.

    In order to give yourself more room with which to turn your arm into a pretzel and allow you to grab the silicone hose when it finally gets snaked all the way through the intake manifold, take your T30 torx screwdriver or bit and remove the driver's side headlamp assembly. That really helps create more room.

    The other major pain in the arse is going to be the line that runs out to the passenger side combi-valve. We'll get to that in a moment, and look at it in more detail.


    Here's a nice angle of the front vacuum lines, showing them after the replacement has been completed. There's nothing especially difficult about replacing these, just be sure to go slow and replace one line at a time.


    Moving to the back, this picture of my vacuum lines before replacement demonstrates why we don't remove all the hoses at once and then hope to remember where they all plug into. In this pic, you can also see the three 10mm bolts that need to be removed in order to be able to flip the plate up to allow for easy access. Go ahead and remove those now.


    After you remove those bolts and lift up on the plate, you'll see this large tee that you just pulled out of it's hose by lifting up on the plate. If it didn't come out, you'll have to pull on it a bit. At any rate, take special note of this tee, and make sure that when you put the plate back on, that this tee gets plugged back into its hose. I didn't replace the hose that this tee connects to, since it was much larger than my 3.5mm hose.


    And here's a better pic of the tee. Notice the orientation of that blue and black check valve. Make sure that the blue side faces away from you and is pointing towards the firewall.


    This is my special "hold the plate up with a small screwdriver" trick. I snapped this pic while in the process of changing out the lines that run under the plate. Notice how tight that hose fits between the manifold cover and the fuel rail. It's tight, and you'll need to wedge it in there.


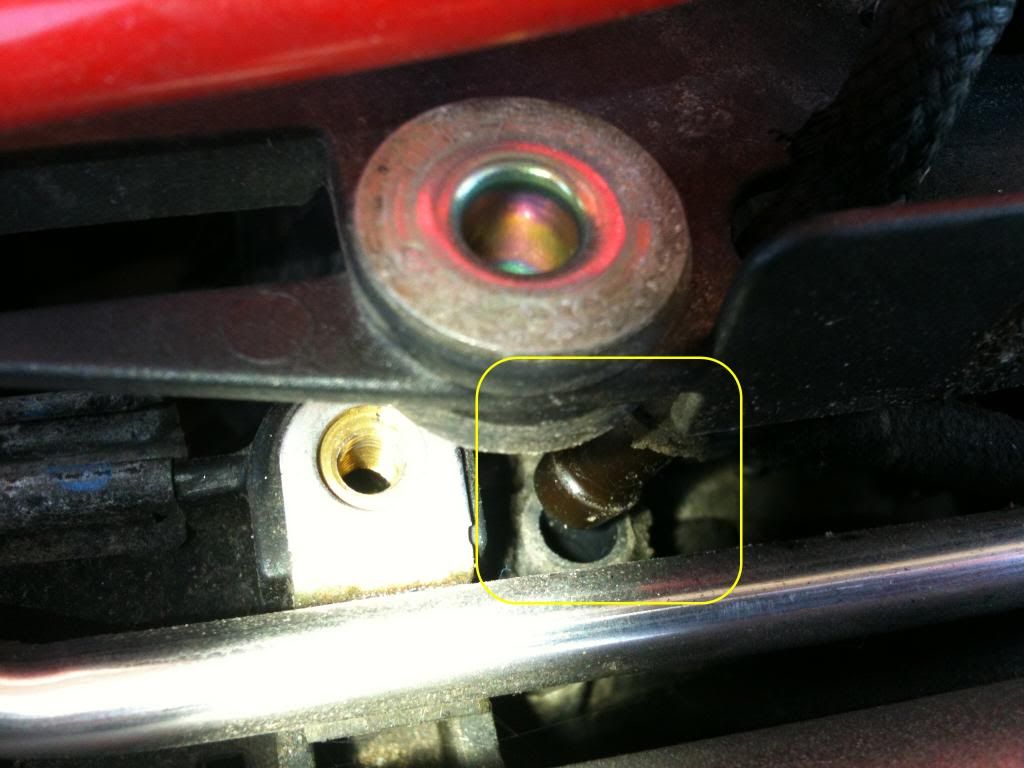
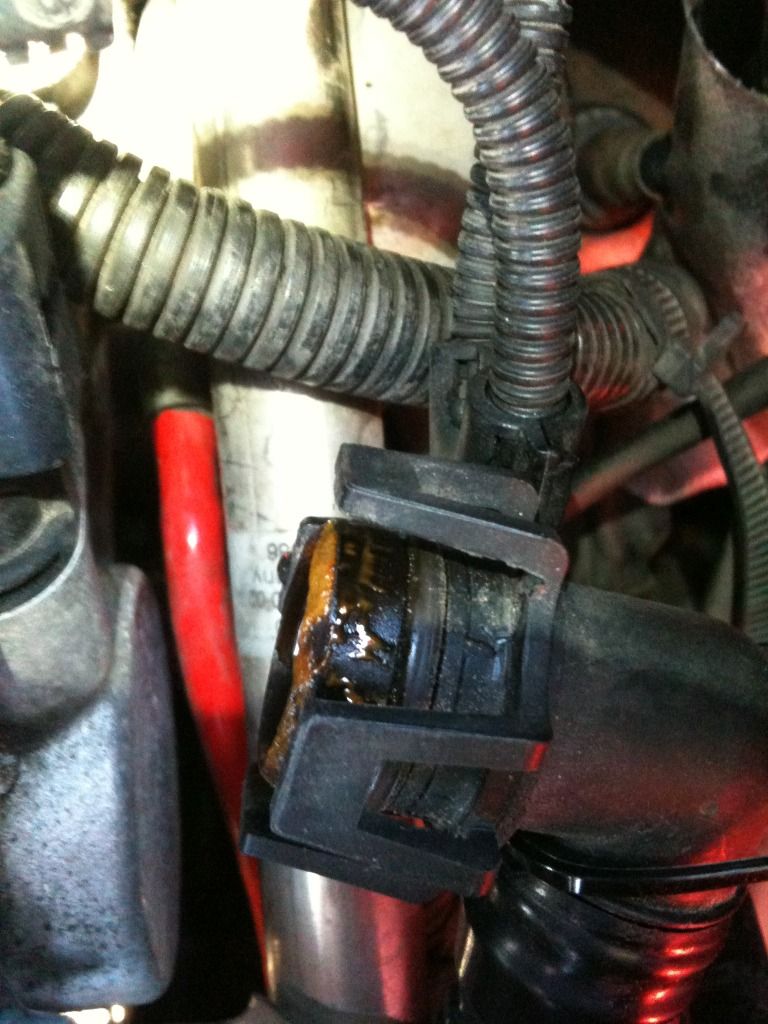
    Let's move on to the driver's side combi-valve hose. It will be difficult to see, but using your flashlight and mirror, you'll be able to find it. The combi-valves have a rubber hose that attaches to them and runs about 4 inches to a plastic connector. On the other side of this connector is the braided vacuum line. There's no need to replace the rubber hose leading to the combi-valve. Just remove the braided vacuum line. Once you've removed the braided line, you'll see what the rubber hose and the nipple that it's connected to look like:


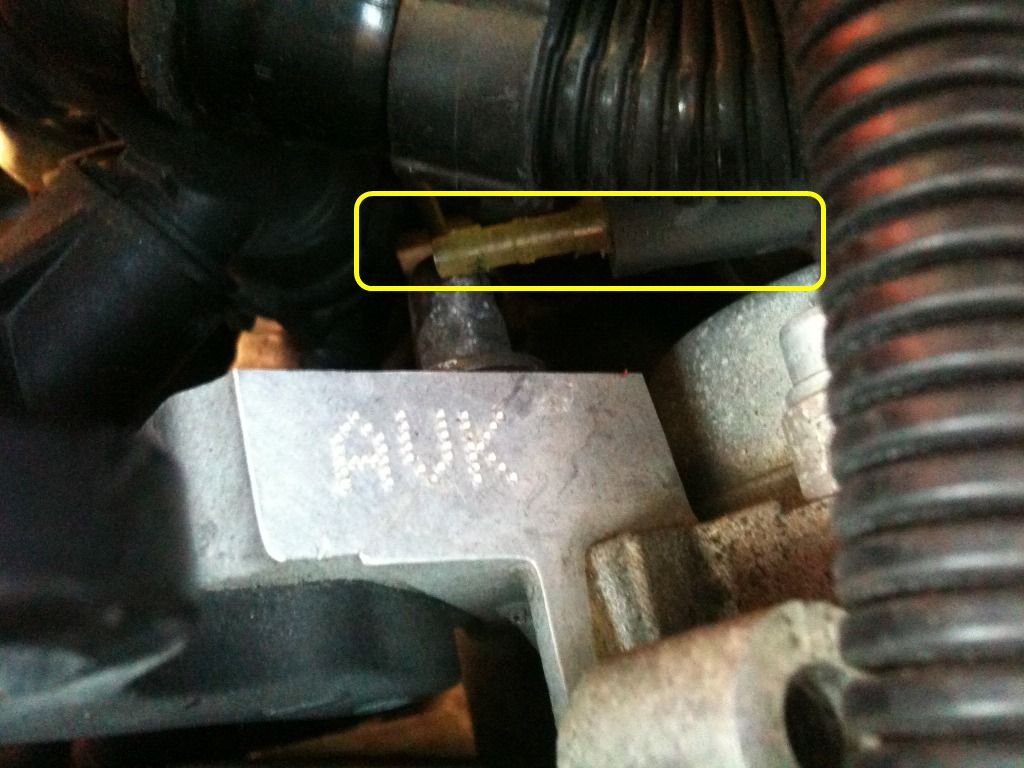
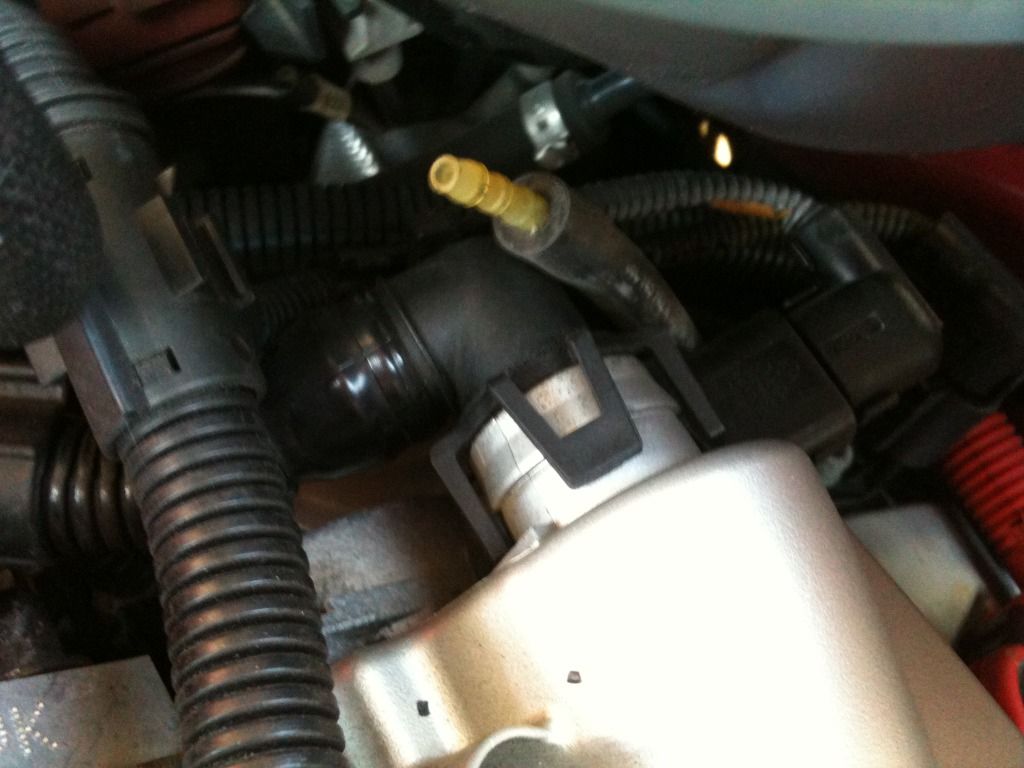
    You could try to connect the new silicone hose to the nipple from here, but there's not much room to work with. It's easier if you push the rubber hose from the combi-valve back toward the right, and bring it up so that the nipple it pointing towards you, as shown below. It's very easy to install the silicone hose from this angle.


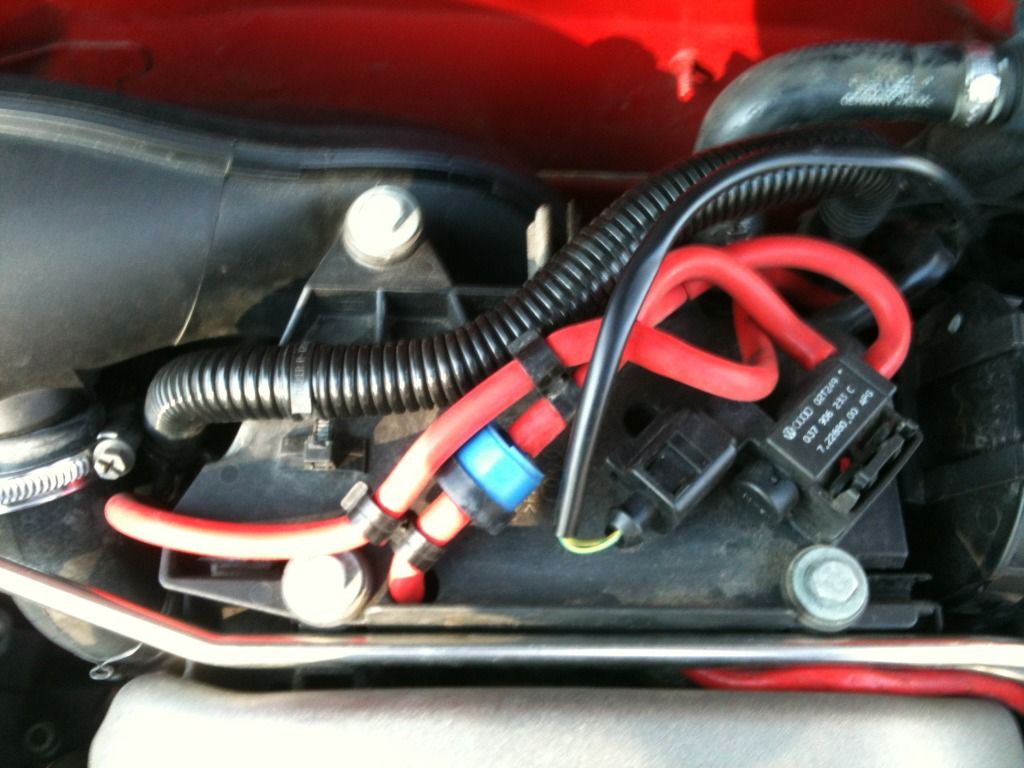
    Here's the after shot of the silicone lines in the back. Very nice!


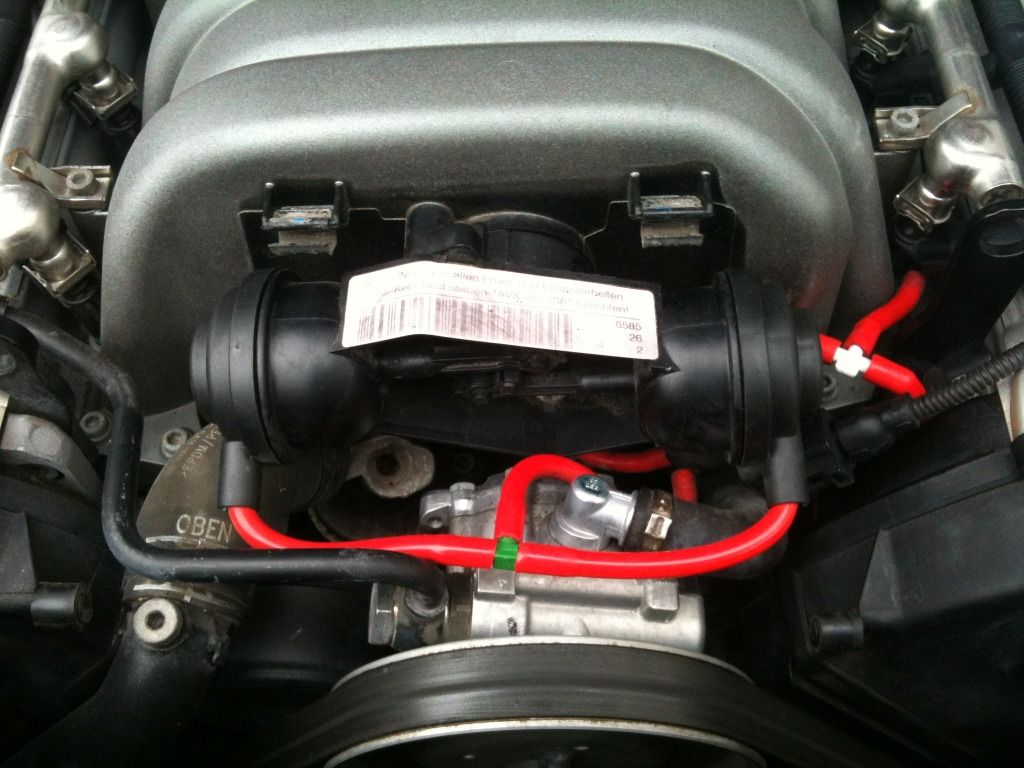
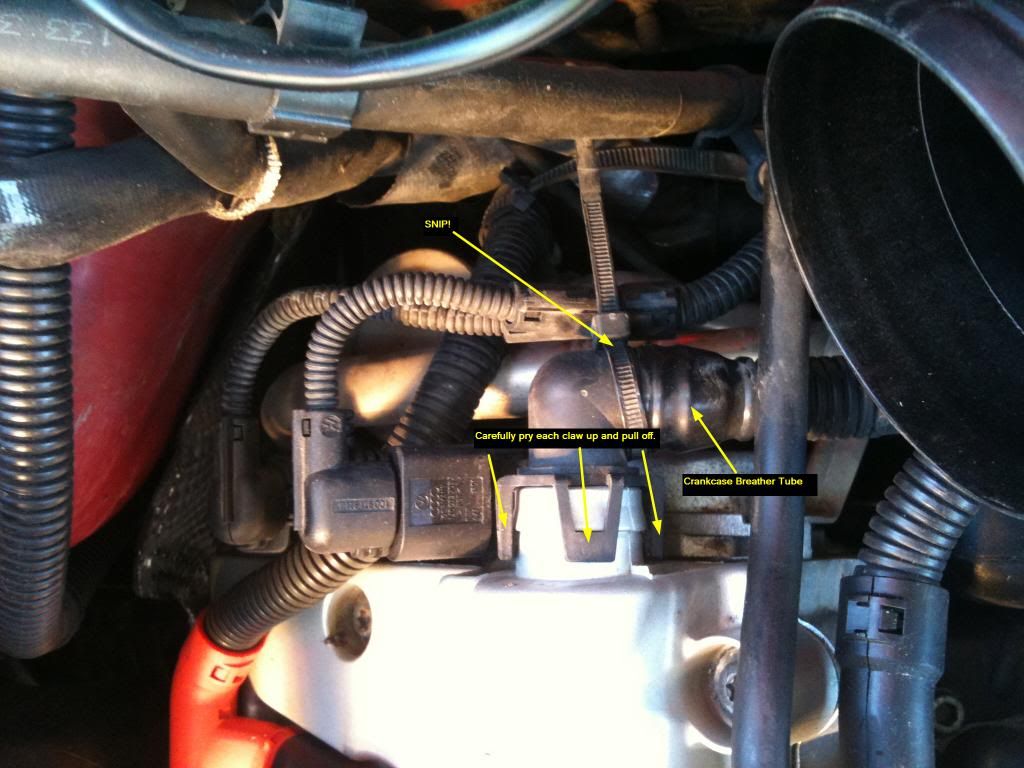
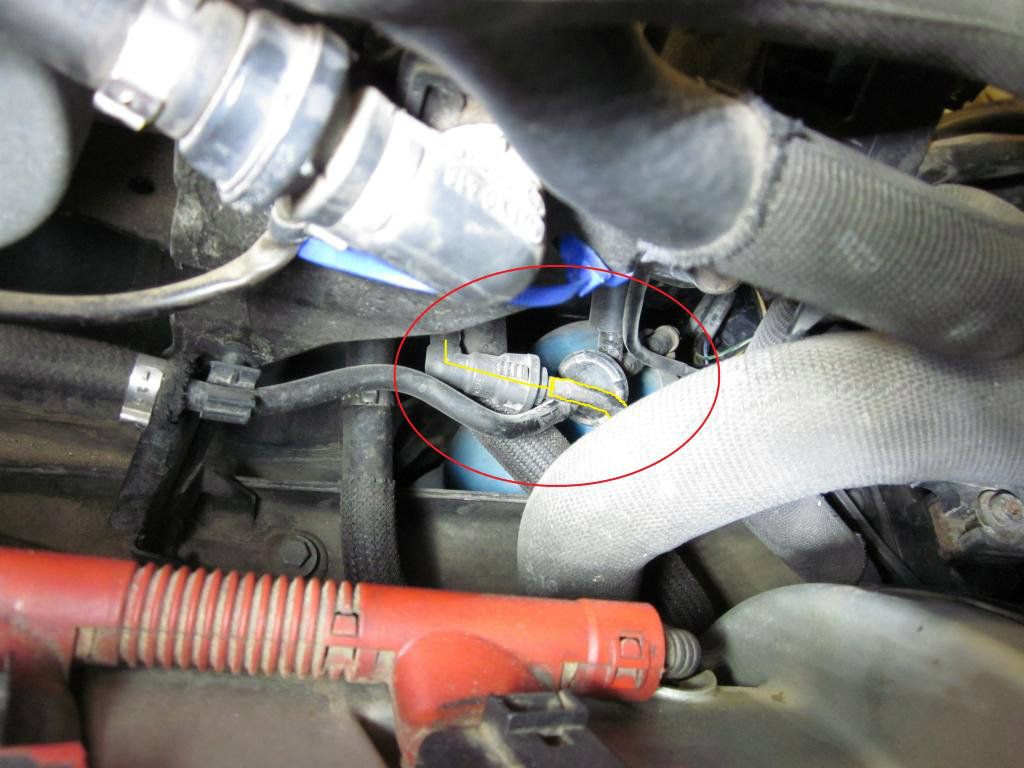
    Oh boy, now the real fun begins. I saved the vacuum line leading to the passenger side combi-valve for last, because it's the most technically difficult. We need to remove the MAF assembly so that we have as much room as possible in which to operate. So, pinch together the two clamps surrounded in yellow and move them onto the flexible hose, so that you can pry off the hose with a flat head screw driver. Next, remove the two clips that hold the MAF assembly together. One of them is surrounded in cyan in the pic below. The other one is behind the MAF, but is accessible with a screwdriver.


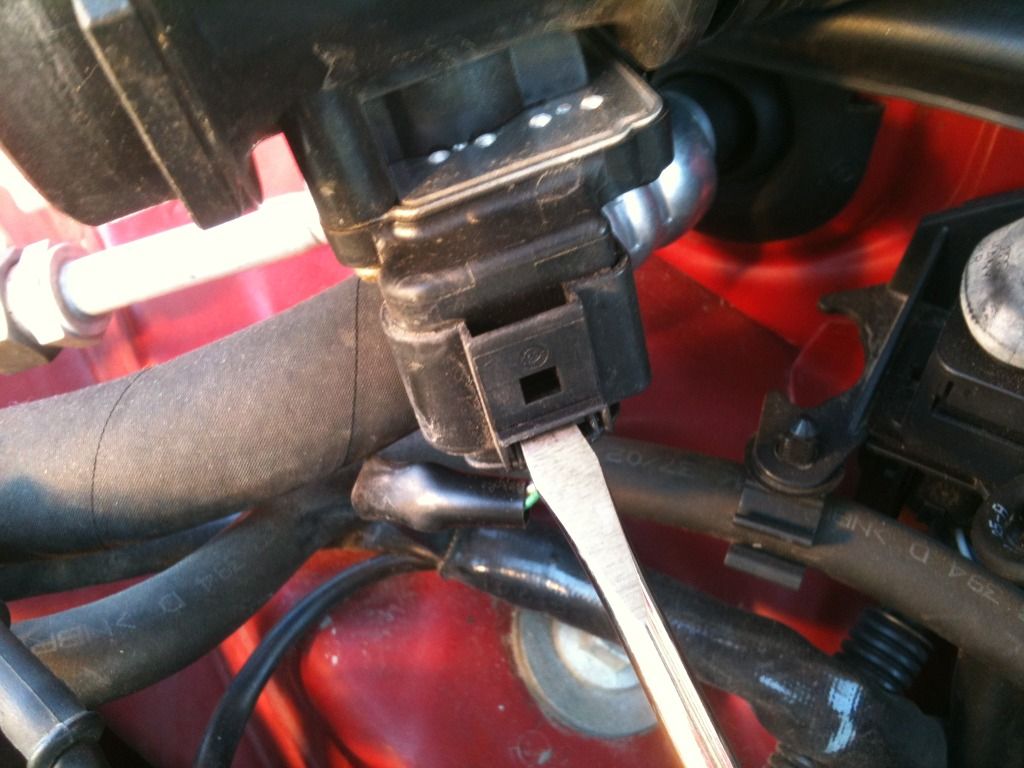
    Next, carefully insert the flat blade of your screwdriver into the MAF sensor clip, and twist it to "unlock it". It should give a little "click" when it unlocks. You may then pull up on the sensor until it's free. When this is accomplished, remove the whole MAF assembly to a safe place.


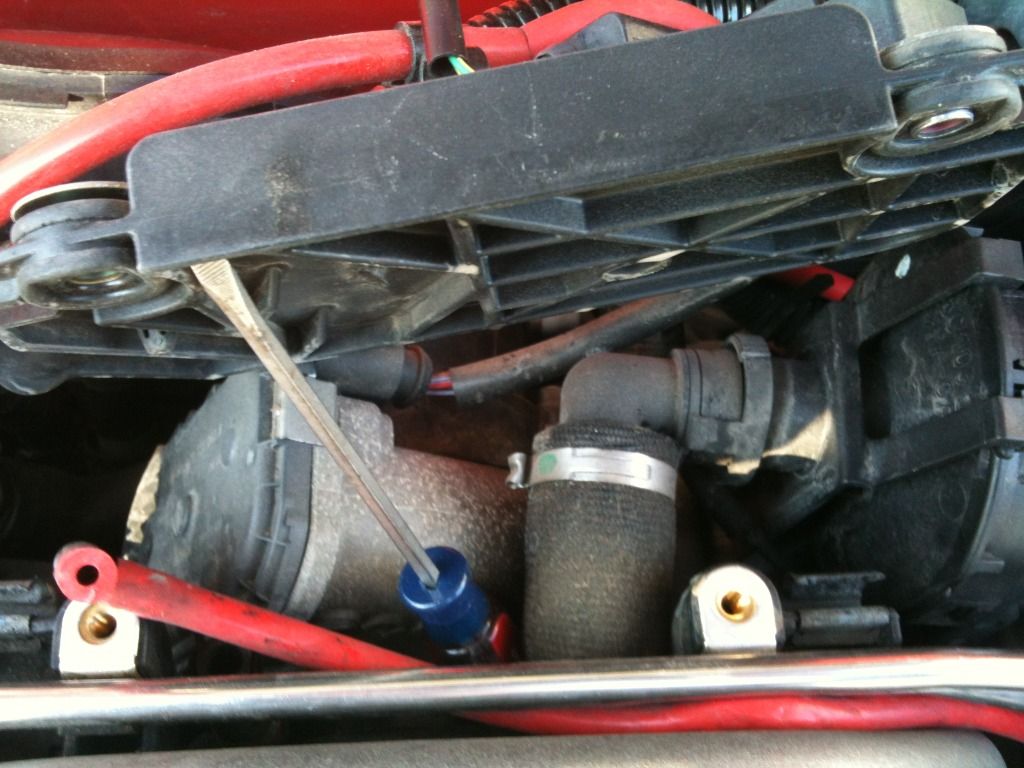
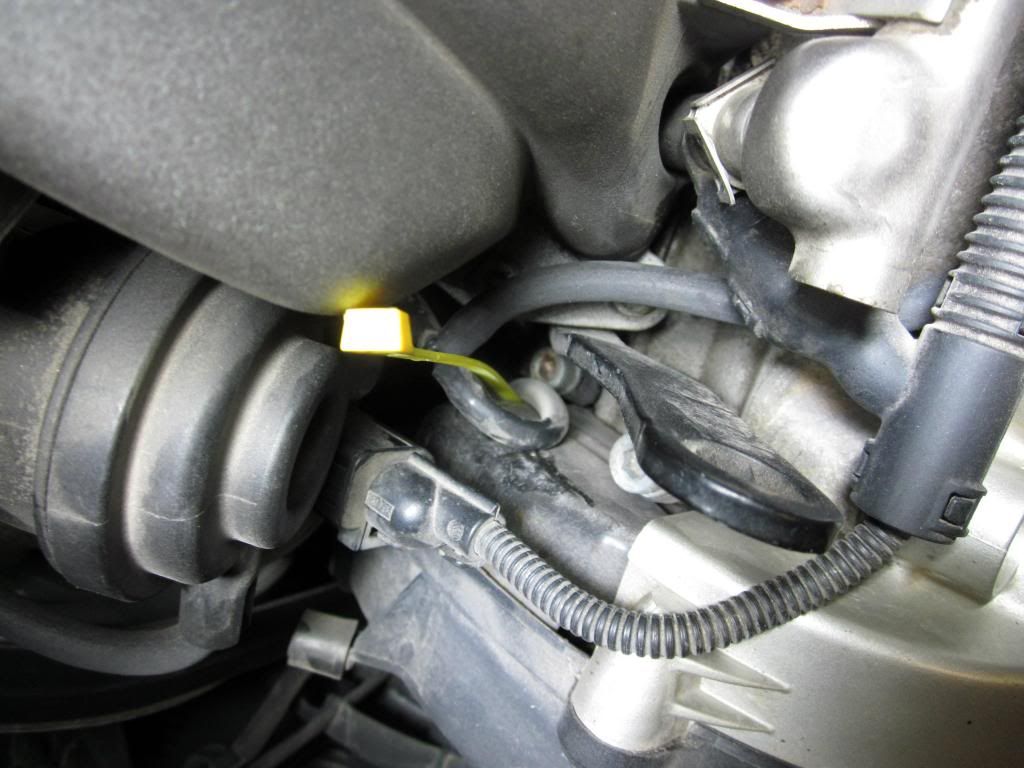
    Next, snip the zip tie where that arrow is pointing. This allows you to move those cables away from the crankcase breather tube. Speaking of that tube, pry up on each claw that is holding it onto the intake manifold. There are 4 of them. Carefully pry them up and off the lip until you can pull the tube away from the manifold.


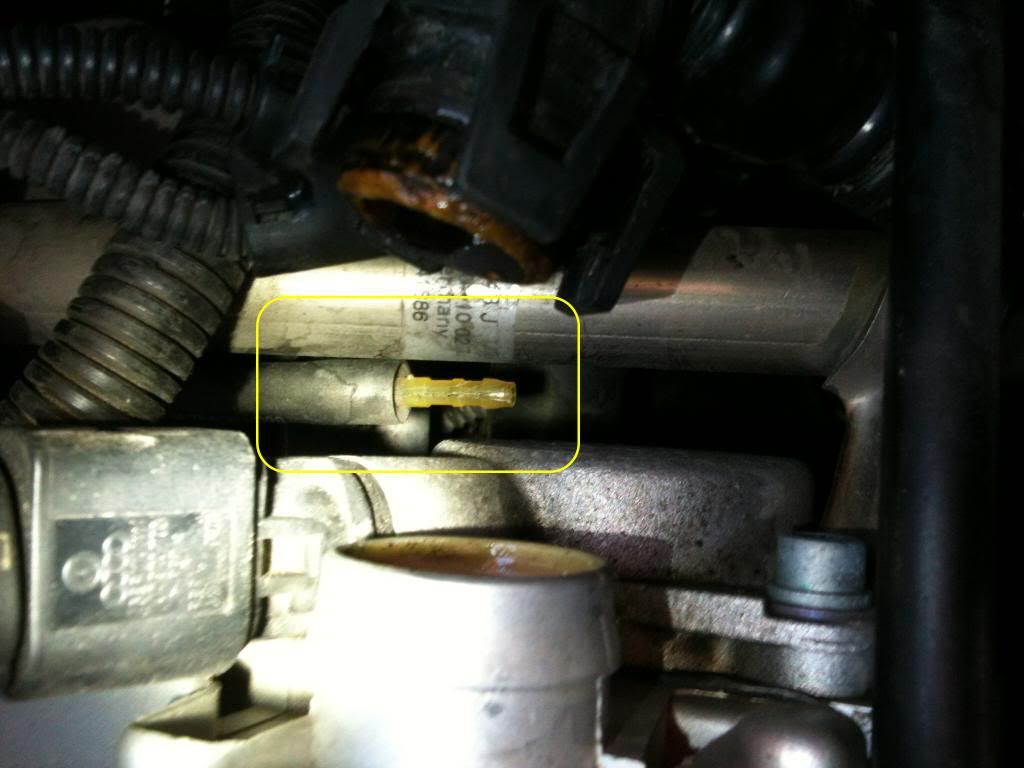
    Finally, in this pic we see the results of our labor so far. I've pulled the crankcase breather tube from the manifold, and then zip tied it to another hose to keep it moved out of the way. Lo and behold, here is the left side combi-valve rubber hose and nipple. Repeating the procedure on this side may be much more difficult than the driver's side. If you can, try to move it back to the left and get the nipple to face up like you did on the driver's side. If that doesn't work, then it's time to make good use of the forceps and grab that silicone hose and lock it into place. Holding the combi-valve rubber hose with a long needle-nosed pliers, you can slide the silicone hose onto the nipple. For me this was a bastard of a job, but I finally managed it.


    Success! Look at how little room there is down there.


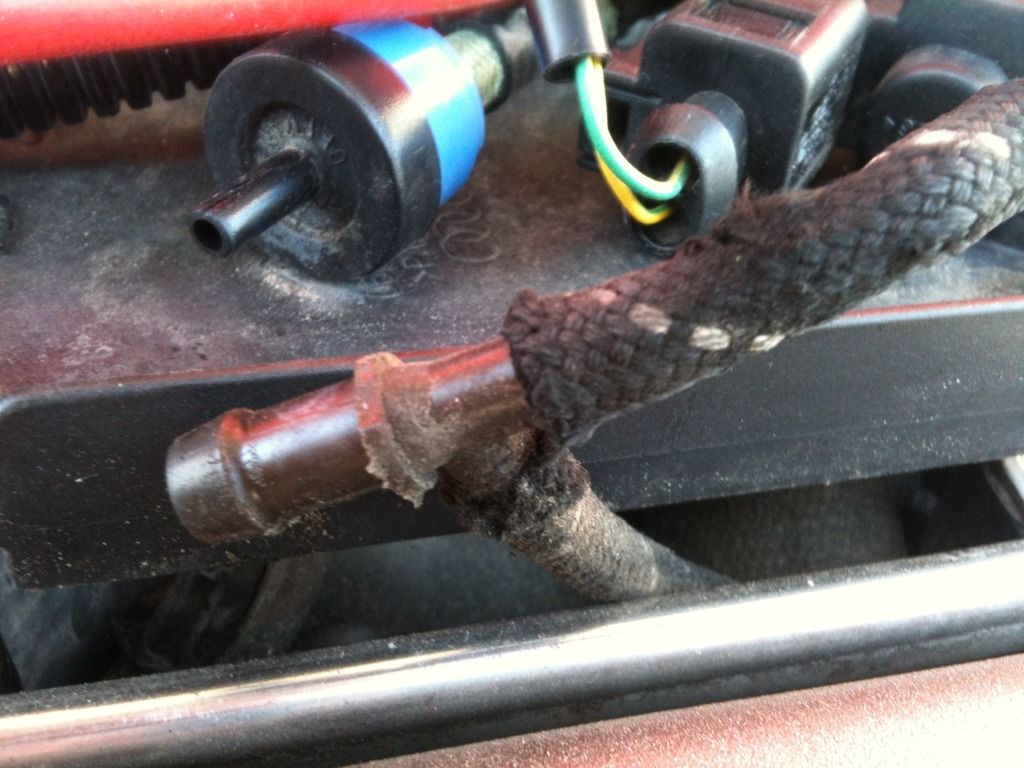
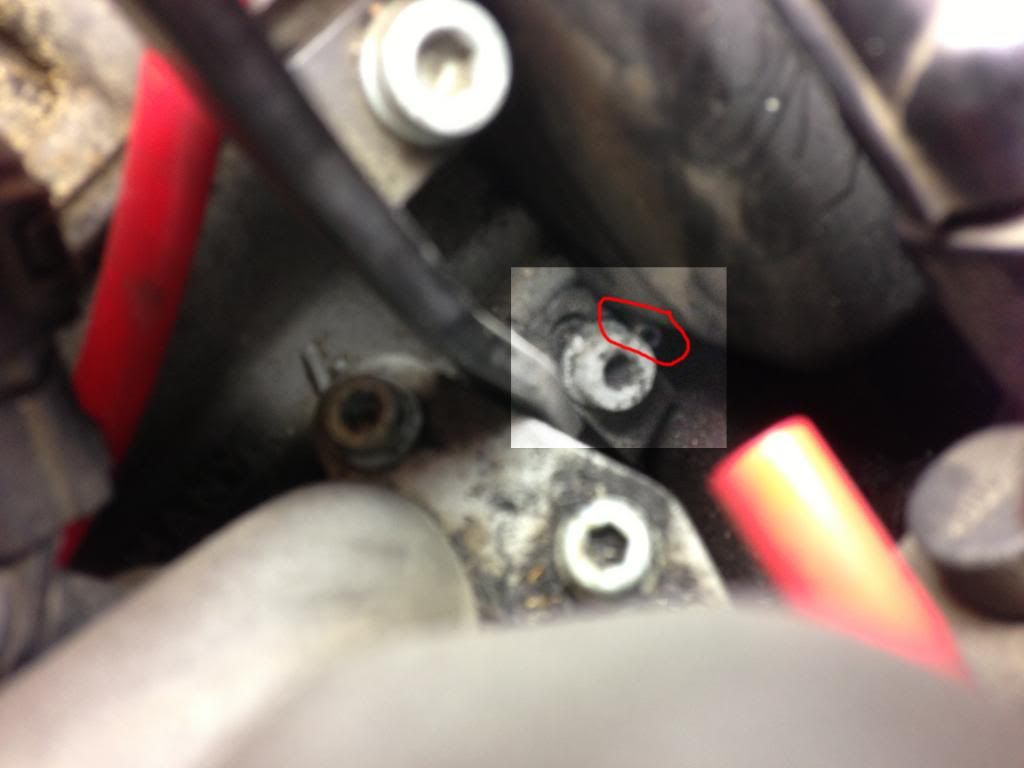
    Clean up the tip of your crankcase breather tube if it looks like mine did, then reassemble everything, making sure to not have any spare pieces laying around.

    You're all done, congrats! You just saved yourself many headaches down the road, and multiple hundreds of dollars in labor that you didn't have to pay to the dealership.

    Last edited by SlickFix; 11-28-2012 at 11:58 AM.
    His: 2012 Moonlight Blue Metallic S5 Prestige
    Hers: 2014 Lava Gray Metallic Q5 2.0T
    Son's: 2005.5 Imola Yellow B7 S4 4.2 Sedan
    19" B8 S5 Peelers

  2. #2
    Veteran Member Four Rings Charles.waite's Avatar
    Join Date
    Jun 27 2011
    AZ Member #
    77478
    Location
    Seattle, WA

    This is awesome. Were you having boost leaks or something??


    I keed...
    -CP
    2008 2.0t S-Line Ti 6MT Avant
    2017 Q7 3.0t
    SOLD -- 2012 Q5 2.0t - Stock Mommy Missile with new timing chains
    Former USP CLUB MEMBER #136
    2004 A4 1.8TQ 6MT USP - APR Stage 1+ - FSI Coils - BKR7EIX-11 - B6S4 Front + B7A4 Rear Brakes - 034 Street Trans Mount
    SOLD -- 2006 A4 2.0TQ Avant Tiptronic

  3. #3
    Senior Member Three Rings Zingo_310's Avatar
    Join Date
    Oct 18 2010
    AZ Member #
    65886
    Location
    Florida

    This is great, could have used this a few months ago!

    Great right up, it's so good I might just do it again and add some color! Heh heh
    JHM Tuned ECU + TCU, Intake Spacers
    - USP Lower - Magnaflow 14851's - S4 H&R Sports - B5 S4 Brakes - USP SS - LED tails - 18" Q5 Prem - Modded air-box - K&N - DTH Skirts - ABT Pedals - Cupra R - EBC Redstuff -

  4. #4
    Veteran Member Four Rings GOODBYNAAIR's Avatar
    Join Date
    Nov 17 2011
    AZ Member #
    84082
    My Garage
    1973 MG Midget, 1995 F150 302 v8, 2007 A4 Avant 3.2 v6, 2014 Odyssey EX-L
    Location
    Fredneck Maryland

    Great write up I was just looking for his a few weeks ago now I can put fresh lines in.
    SOLD the GOINHAM A4 ---> GT2860 Project

  5. #5
    Veteran Member Four Rings 87supraman's Avatar
    Join Date
    Mar 14 2010
    AZ Member #
    56062
    My Garage
    Q7 3.0T & 911 C4S
    Location
    Wyoming

    Re: DIY: B6 A4 3.0 Complete Vacuum Line replacement

    Nice!!! I just did this the other day too. But now I'm headed to the garage to double check my work.

    Thanks for posting this!


    *** and thanks to this thread I corrected a mix up I had!

    Sent from my iPhone 6 using Tapatalk 2
    Daniel J
    @gtg_drives

  6. #6
    Established Member Two Rings Darwood's Avatar
    Join Date
    Sep 12 2009
    AZ Member #
    47651
    My Garage
    2003 A4 3.0 quattro
    Location
    Pennsylvania

    Nice writeup, thanks a bunch for this.

  7. #7
    Veteran Member Four Rings SlickFix's Avatar
    Join Date
    Nov 11 2010
    AZ Member #
    66868
    Location
    Rochester, MN

    Quote Originally Posted by 87supraman View Post
    Nice!!! I just did this the other day too. But now I'm headed to the garage to double check my work.

    Thanks for posting this!


    *** and thanks to this thread I corrected a mix up I had!


    Sent from my iPhone 6 using Tapatalk 2
    You're welcome! So what was the mixup? Did you have the check valve going in the opposite direction?
    His: 2012 Moonlight Blue Metallic S5 Prestige
    Hers: 2014 Lava Gray Metallic Q5 2.0T
    Son's: 2005.5 Imola Yellow B7 S4 4.2 Sedan
    19" B8 S5 Peelers

  8. #8
    Veteran Member Four Rings 87supraman's Avatar
    Join Date
    Mar 14 2010
    AZ Member #
    56062
    My Garage
    Q7 3.0T & 911 C4S
    Location
    Wyoming

    Re: DIY: B6 A4 3.0 Complete Vacuum Line replacement

    I had #14 and #15 switched around. It did not cause a cel or anything. But I feel better with it corrected.
    Daniel J
    @gtg_drives

  9. #9
    Veteran Member Four Rings Audi 4 Life's Avatar
    Join Date
    Jan 16 2011
    AZ Member #
    69575
    My Garage
    06 D3 A8 Black/peanut with alcantara
    Location
    Earth

    Props. Well done.

  10. #10
    Registered Member One Ring
    Join Date
    Nov 22 2012
    AZ Member #
    104513
    Location
    New York

    Thanks for this information.
    youraudi.com

  11. #11
    Veteran Member Four Rings SlickFix's Avatar
    Join Date
    Nov 11 2010
    AZ Member #
    66868
    Location
    Rochester, MN

    A little update: After I did this job, I cleared my P0321 and P0421 codes and the CEL went off. Yay, thought I had it fixed, since the hose leading to the left combi-valve had been disconnected from it when I did my vacuum line investigation. Unfortunately, the CEL came back on a day later, with the same codes. I cleared them again, and the CEL hasn't come back on since. It's been about two weeks now, so I'm calling it a success.

    Apparently my cats are fine(for now).
    His: 2012 Moonlight Blue Metallic S5 Prestige
    Hers: 2014 Lava Gray Metallic Q5 2.0T
    Son's: 2005.5 Imola Yellow B7 S4 4.2 Sedan
    19" B8 S5 Peelers

  12. #12
    Veteran Member Three Rings john_gonzo's Avatar
    Join Date
    Feb 03 2009
    AZ Member #
    38267
    Location
    Florida

    Hey SF, nice pics and good detail in the text in this write up. Couple comments:

    First, LEFT and RIGHT labels are reversed from standard driver’s seat point-of-view. No biggie – pics are clear.

    Second, that orange/yellow gunk in the crankcase breather tube is a WARNING that the PCV system is not functioning correctly. Your PCV lines look like the stock plastic tubing which is prone to cracking from brittleness. Cracks leaking mean less PCV, more moisture/gunk build-up around valve train and valve cover baffles, worn cams and cam followers, high$ repairs. And that sucks. (The whole time I was replacing my cam and follower, I was alternately cursing Audi for the plastic tubing over cats and myself for not being more diligent in finding the source of the yellow spew.)

    Anyway, that is just a side note. Your DIY is great.

  13. #13
    Veteran Member Four Rings SlickFix's Avatar
    Join Date
    Nov 11 2010
    AZ Member #
    66868
    Location
    Rochester, MN

    Quote Originally Posted by john_gonzo View Post

    First, LEFT and RIGHT labels are reversed from standard driver’s seat point-of-view. No biggie – pics are clear.

    Second, that orange/yellow gunk in the crankcase breather tube is a WARNING that the PCV system is not functioning correctly.
    Thank you, sir, for pointing that out. While I was writing the DIY I decided to change the wording from "left" and "right" to "driver's side" and "passenger side" for precisely that reason. I obviously missed those two instances. Fixed!

    Regarding the orange gunk in the breather tubes...I inspected those and didn't notice any cracks, although since I've got 94k miles on the clock, it's probably time to change them out regardless. Yet another thing to add to the list!
    His: 2012 Moonlight Blue Metallic S5 Prestige
    Hers: 2014 Lava Gray Metallic Q5 2.0T
    Son's: 2005.5 Imola Yellow B7 S4 4.2 Sedan
    19" B8 S5 Peelers

  14. #14
    Senior Member Three Rings blackfc3s's Avatar
    Join Date
    Oct 15 2010
    AZ Member #
    65739
    My Garage
    Custom build 29er Mountain Bike
    Location
    Nebraska

    Solid work.

  15. #15
    Veteran Member Four Rings imnuts's Avatar
    Join Date
    Aug 12 2009
    AZ Member #
    46297
    My Garage
    '21 F-150 Powerboost Lariat & '14 Acura RDX
    Location
    Dirty Jerz

    Subscribed so I can come back to this later. I know that some of my vacuum lines have been replaced, but I'm sure that there are some that are still original. Also need to go through and do the PCV stuff. So much to do, so little money Ah, the life of owning an Audi.

  16. #16
    Active Member Two Rings
    Join Date
    Nov 27 2012
    AZ Member #
    104828
    Location
    NC

    Thanks so much for this guide; I manipulated the front vacuum lines a couple of days ago and heard a hissing sound. Got online and bam.....exactly what I needed with great quality pictures! I especially like the pro tip of cutting the old lines off and using some lube to put the new ones on. Who knows what aged parts I would have broken without doing it this way...
    2003 A4 3.0L Quattro 6-Speed Manual

  17. #17
    Senior Member Two Rings
    Join Date
    Dec 31 2011
    AZ Member #
    85977
    Location
    Cedar Rapids

    Great write up, will do this asap. Did you use the entire 20 ft on this job?

  18. #18
    Veteran Member Four Rings old guy's Avatar
    Join Date
    Dec 28 2006
    AZ Member #
    14483
    My Garage
    '13 A5, '24 Tiguan SEL R-Line
    Location
    Western Maryland

    Outstanding job on the DIY
    '03 A4 5-MT Motoza tuned Frankenturbo F21L With full supporting mods. Sold (and missed dearly).
    '13 A5 6-MT Needs more Fun Stuff: Neuspeed PM / 3.0 TDI Intercooler / H&R OE Sport Springs / Bilstein B8 Shocks / TyrolSport Brake Stiffeners / ECS Short Shifter / S5 Side Skirts / RS Grille

  19. #19
    Veteran Member Four Rings SlickFix's Avatar
    Join Date
    Nov 11 2010
    AZ Member #
    66868
    Location
    Rochester, MN

    Quote Originally Posted by big_c View Post
    Did you use the entire 20 ft on this job?
    No, I think in total I probably used maybe 10-12 feet. But at a buck a foot, I figured I'd rather have extra left over than not enough during the job.

    Btw, the CEL came back on while wifey was driving it the other night. Apparently this car won't be happy until I replace the cats!
    His: 2012 Moonlight Blue Metallic S5 Prestige
    Hers: 2014 Lava Gray Metallic Q5 2.0T
    Son's: 2005.5 Imola Yellow B7 S4 4.2 Sedan
    19" B8 S5 Peelers

  20. #20
    Veteran Member Four Rings 87supraman's Avatar
    Join Date
    Mar 14 2010
    AZ Member #
    56062
    My Garage
    Q7 3.0T & 911 C4S
    Location
    Wyoming

    My cel just came back too. 3 times in one day, P0491. Before the vac line replacement I was getting P0441. I bought 4 meters of 4mm. Slides on much easier in those tricky spots and is still secure enough hold just fine imo. I found it for less than a buck per foot.
    Daniel J
    @gtg_drives

  21. #21
    Active Member Two Rings
    Join Date
    Nov 27 2012
    AZ Member #
    104828
    Location
    NC

    Well, things didn't go quite as well as planned. The hard plastic sections around the T junction were so brittle they just snapped in half with very gentle manipulation (as well as the T itself). The one on the driver's side that runs by the intake manifold I just replaced with tubing....however, I think I might be screwed on the second. It's the one marked 16 in the diagram, and it runs BEHIND the timing belt cover. I have no idea where it goes; even the diagram you found doesn't show it. Do you have the Bentley manual? I ask because the index sucks- it's literally the worst I've ever seen; can't find anything about the vacuum lines! Any knowledge is appreciated....

    The crank breather hose was also so brittle it literally broke in half just pushing it out of the way, looks like I can replace that with heater tubing and clamps though, so not a huge deal.


    This one for perspective...
    Last edited by kypdurron5; 12-03-2012 at 07:28 PM.
    2003 A4 3.0L Quattro 6-Speed Manual

  22. #22
    Veteran Member Four Rings 87supraman's Avatar
    Join Date
    Mar 14 2010
    AZ Member #
    56062
    My Garage
    Q7 3.0T & 911 C4S
    Location
    Wyoming

    Re: DIY: B6 A4 3.0 Complete Vacuum Line replacement

    Give me just a second and I will try and get a picture of where the other end of that goes. Mine did exactly the same thing. Crumbled. I bought the mixed box of vac fittings at autozone for around $10. I used a male/male connector, stuck one in the new line and used that to connect to the old one. Then pulled up and through.

    Sent from my iPhone 6 using Tapatalk 2
    Daniel J
    @gtg_drives

  23. #23
    Active Member Two Rings
    Join Date
    Nov 27 2012
    AZ Member #
    104828
    Location
    NC

    I may have found it, but I want to make sure before I go playing around with another brittle line...and I certainly don't want to hook a vacuum line where it's not supposed to go. At first I was thinking it dives down, now I think the hard plastic is in a U shape and comes out more lateral on the driver's side. This picture doesn't show the termination, but rather (I think) where the hard plastic meets more braided vac line. Am I correct about this? I see a place where I can fix things just to the right of this....

    2003 A4 3.0L Quattro 6-Speed Manual

  24. #24
    Veteran Member Four Rings 87supraman's Avatar
    Join Date
    Mar 14 2010
    AZ Member #
    56062
    My Garage
    Q7 3.0T & 911 C4S
    Location
    Wyoming

    That is probably the right one. This is what I got with a quick look. It connects to a quick disconnect. SUPER brittle feeling hard lines, even though mine did not break. The yellow painted vac line is the one that connects to that T up top. Access requires pulling the drivers side headlight, unless you have magic hands and great luck. Unrelated to the vacuum lines, you may want to replace that one time clip on the top hose going into the power steering pump with a regular hose clamp. Looks a little gunky, and will make a much nicer seal to help prolong keeping unwanted air out of the system.


    yellow ziptie is just to show the route of the line that goes to that disconnect piece. Would have continued to use the ziptie for demonstration, but said ziptie now lives between my skidplate and oil pan.
    Last edited by 87supraman; 12-03-2012 at 08:46 PM.
    Daniel J
    @gtg_drives

  25. #25
    Veteran Member Four Rings SlickFix's Avatar
    Join Date
    Nov 11 2010
    AZ Member #
    66868
    Location
    Rochester, MN

    Yes, this is the brittle hard plastic lines that broke on me, too. It was one of the two PITA lines mentioned in my original instructions.

    You can either shove the replacement silicone line through that gap in the pic above(see yellow zip tie) from the top or bottom. I went top to bottom, using the telescoping mirror and shining a flashlight on that to monitor my progress.

    Removing the driver's side headlamp assembly will help tremendously, by allowing you to get your arm up there to fish for the hose as it finally gets through the gap. Indeed, it's a major PITA, but you can do it.
    His: 2012 Moonlight Blue Metallic S5 Prestige
    Hers: 2014 Lava Gray Metallic Q5 2.0T
    Son's: 2005.5 Imola Yellow B7 S4 4.2 Sedan
    19" B8 S5 Peelers

  26. #26
    Active Member Two Rings
    Join Date
    Nov 27 2012
    AZ Member #
    104828
    Location
    NC

    Got it done, thanks for the help! Also replaced the clamp on my power steering pump- thanks for the tip. I was concerned about that area, but I've never been able to see a leak and fluid levels have been fine; hopefully it was just slowly leaking around the clamp and it's now resolved vs. a failing pump (I've heard this is a common item to fail in these models). No CEL yet, but we'll see in the coming weeks. I did notice the secondary air injection system ran for a far shorter time than normal when I first started it.

    My guess is that they used the hard plastic lines because those come in direct contact with the engine. No idea how the silicone tubing will hold up over time under those conditions, but I can always fix it again later. Hopefully not in the lifetime of the car.
    2003 A4 3.0L Quattro 6-Speed Manual

  27. #27
    Senior Member Two Rings
    Join Date
    Dec 31 2011
    AZ Member #
    85977
    Location
    Cedar Rapids

    Just finished this upgrade. Some comments:

    Like the others, my brittle plastic lines broke upon eye contact. I routed a long line around the back of the engine , I couldnt get the hose to slip through that gap behind the rihgt timing belt cover.

    Be very, very careful when removing the oem lines. I damaged that black valve that connects to the intake manifold...pressed to hard when slicing the wires through that hidden slow. The thin plastic port snapped right off. I used a vinyl tube between the red tube and the inside of that valve to get it to connect. It seems to be secure so far, using this repair.

  28. #28
    Senior Member Three Rings CRAIG1MACK's Avatar
    Join Date
    Mar 10 2009
    AZ Member #
    39698
    My Garage
    2002 Audi A4 Quattro 3.0L 6mt
    Location
    Huntsville, AL

    Thanks for the write up!
    Current: 2002 VW EuroVan GLS, 2002 Audi A4 Quattro Previously owned:1992 Mustang Police Interceptor edition, 1995 Honda Civic Ex, 1994 Porsche 968,1984 Porsche 944,1996 Honda Passport,1995 VW GTi VR6,1993 Nissan 240SX,1992 Nissan NX2000,1991 Mitsubishi Eclipse GST,1987 Nissan 300ZX Turbo,1981 Ford F100,1973 Fiat X1/9,1971 Triumph TR6, 2004 Kawasaki ZX6-R 636, 1995 Triumph Thunderbird (900cc), 1990 Nissan 300ZX Twin Turbo, 2006 Mitsubishi Evolution MR

  29. #29
    Senior Member Three Rings brady.'s Avatar
    Join Date
    Sep 25 2012
    AZ Member #
    101138
    Location
    green bay, wi

    could have used this 2 months ago.. still love you :)

  30. #30
    Veteran Member Four Rings JEENYUS's Avatar
    Join Date
    Jul 28 2009
    AZ Member #
    45627
    My Garage
    2003 A4 3.0 V6
    Location
    SL,UT

    siliconeintakes.com only offers the vacuum hose @ 4mm. would this still work or should i use the link you provided at exactly 3.5mm?
    Asses are where it's at. even fat chicks can have nice boobs. -MmmBoost

  31. #31
    Veteran Member Four Rings SlickFix's Avatar
    Join Date
    Nov 11 2010
    AZ Member #
    66868
    Location
    Rochester, MN

    ^^ 4mm would work, but in my experience the 4mm hose is a little too big for that thing in front of the intake manifold.

    This is where I got my hose. Great stuff.
    His: 2012 Moonlight Blue Metallic S5 Prestige
    Hers: 2014 Lava Gray Metallic Q5 2.0T
    Son's: 2005.5 Imola Yellow B7 S4 4.2 Sedan
    19" B8 S5 Peelers

  32. #32
    Veteran Member Four Rings JEENYUS's Avatar
    Join Date
    Jul 28 2009
    AZ Member #
    45627
    My Garage
    2003 A4 3.0 V6
    Location
    SL,UT

    it looks like you also replaced some of the t-fittings. did you get them on the same website? what size?
    Asses are where it's at. even fat chicks can have nice boobs. -MmmBoost

  33. #33
    Veteran Member Four Rings xdewaynex's Avatar
    Join Date
    May 24 2009
    AZ Member #
    42854
    My Garage
    98.5 A4 1.8TQM
    Location
    Danville, KY

    Im looking at this and trying to fully figure out where the lines will run when deleting the sai and combi valves.
    1998.5 A4 1.8TQM My Build

  34. #34
    Veteran Member Four Rings imnuts's Avatar
    Join Date
    Aug 12 2009
    AZ Member #
    46297
    My Garage
    '21 F-150 Powerboost Lariat & '14 Acura RDX
    Location
    Dirty Jerz

    Quote Originally Posted by JEENYUS View Post
    it looks like you also replaced some of the t-fittings. did you get them on the same website? what size?
    If anyone has a source for the T-fittings, I'd love to know. I couldn't find anything that wasn't unreasonably expensive for what I was using it for.

  35. #35
    Veteran Member Four Rings 87supraman's Avatar
    Join Date
    Mar 14 2010
    AZ Member #
    56062
    My Garage
    Q7 3.0T & 911 C4S
    Location
    Wyoming

    Re: DIY: B6 A4 3.0 Complete Vacuum Line replacement

    I bought the $9 assortment box of fittings at O'Reillys. Has worked great so far and I have a bunch of spares.
    Daniel J
    @gtg_drives

  36. #36
    Veteran Member Four Rings SlickFix's Avatar
    Join Date
    Nov 11 2010
    AZ Member #
    66868
    Location
    Rochester, MN

    Quote Originally Posted by JEENYUS View Post
    it looks like you also replaced some of the t-fittings. did you get them on the same website? what size?
    Like Supraman, I bought a $6 box of one hundred assorted tees from my local Fleet Farm store. I originally called the dealer to get a replacement, but declined after they quoted me $6 for one tee.
    His: 2012 Moonlight Blue Metallic S5 Prestige
    Hers: 2014 Lava Gray Metallic Q5 2.0T
    Son's: 2005.5 Imola Yellow B7 S4 4.2 Sedan
    19" B8 S5 Peelers

  37. #37
    Account Terminated Four Rings
    Join Date
    Oct 26 2009
    AZ Member #
    49779
    Location
    Beaver Creek, CO

    I saw Fleet Farm and knew someone was from the Midwest.

    Subscribing to do this in the near future.

  38. #38
    Active Member One Ring
    Join Date
    Jan 15 2009
    AZ Member #
    37468
    Location
    Boston

    Awesome! thank you very much. I just used this and it was very helpful.

  39. #39
    Registered Member One Ring
    Join Date
    Aug 07 2013
    AZ Member #
    120504
    Location
    San Francisco

    great write-up. so, after being quote $600 to have my vacuum leak resolved (can't even get smog checked till then), i'm diving back into minor car repairs (i haven't worked on a car in 10+ yrs, and that was a japanese import). how long might this job take, and i also found this site for cheaper vacuum hoses http://www.siliconehose.com/0-1375-3...e-vacuum-hose/

  40. #40
    Senior Member Two Rings junxing's Avatar
    Join Date
    May 12 2010
    AZ Member #
    58920
    Location
    Chesapeake, VA

    Great DIY, thanks a lot Slick! this took me about 3-4 hours just because I have a tendency to clean random bits of the engine compartment whenever I'm in there. As I was replacing the vacuum hoses I found that the plastic brittle line that runs to the fuel pressure regulator was broken, and now I've replaced it the car idle without shaking, the clutch and brake pedal are not as mushy, and my butt dyno tells me the car has more power. Is that because I no longer have a massive vacuum leak and fuel pressure is regulated across the rpm range? what was fuel pressure doing then when the line was broken?

Page 1 of 6 123 ... LastLast


Bookmarks

Posting Permissions

  • You may not post new threads
  • You may not post replies
  • You may not post attachments
  • You may not edit your posts
  •  


    © 2001-2025 Audizine, Audizine.com, and Driverzines.com
    Audizine is an independently owned and operated automotive enthusiast community and news website.
    Audi and the Audi logo(s) are copyright/trademark Audi AG. Audizine is not endorsed by or affiliated with Audi AG.