Audizine - An Automotive Enthusiast Community

Page 1 of 8 123 ... LastLast
Results 1 to 40 of 308
  1. #1
    Senior Member Two Rings Dan_Q's Avatar
    Join Date
    May 18 2011
    AZ Member #
    75696
    My Garage
    2011 BMW 335i, 392 whp
    Location
    Colorado Front Range

    B8 A4 DIY: Catalytic Converter Removal & HFC or Test Pipe Install

    Guest-only advertisement. Register or Log In now!
    This is really a pretty easy task if you have the right tools. I had read that it is a real PITA but I thought it was actually pretty simple. I ran into one problem requiring some cutting and drilling but had that not happened, I think I could do this in about 3 hours. From what I could tell, the process is virtually identical to what you do with the B6/B7 cars. You will need a helper for about 10 min which will make it 50 times easier than if you are trying to do it solo. They don’t have to get under the car or anything. It will help if they don’t have massive hands and forearms.

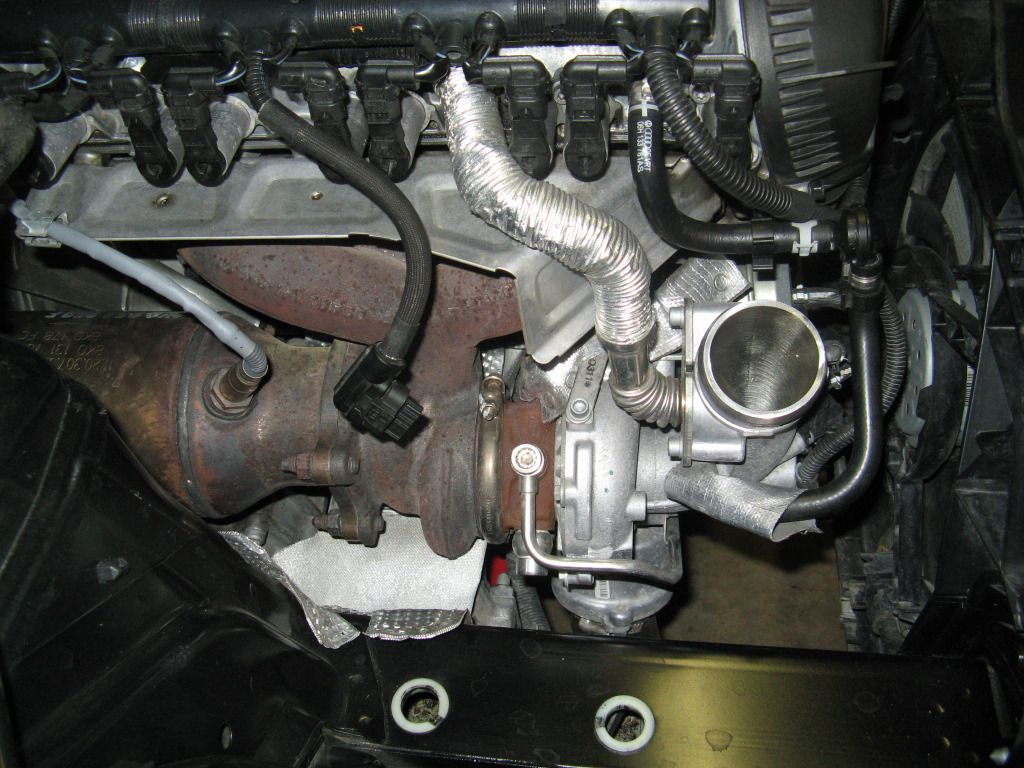
    Step 1: Remove the auxiliary cooling fan shroud. Remove the airbox. Remove the turbo inlet hose. This is what you’re left with.


    Step 2: Disconnect both O2 sensors. The primary sensor wiring goes through a small clip on the exhaust manifold heat shield then the connector mates on a plastic bracket on the ignition coil harness assembly. The bracket and mating connector are shown below.
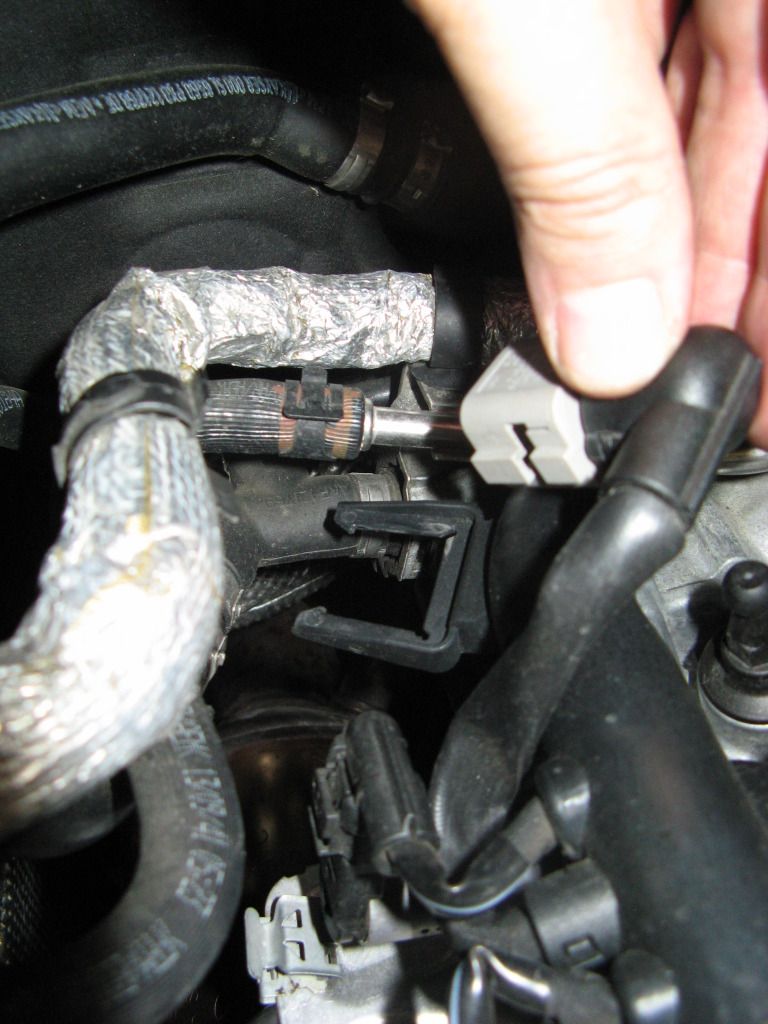


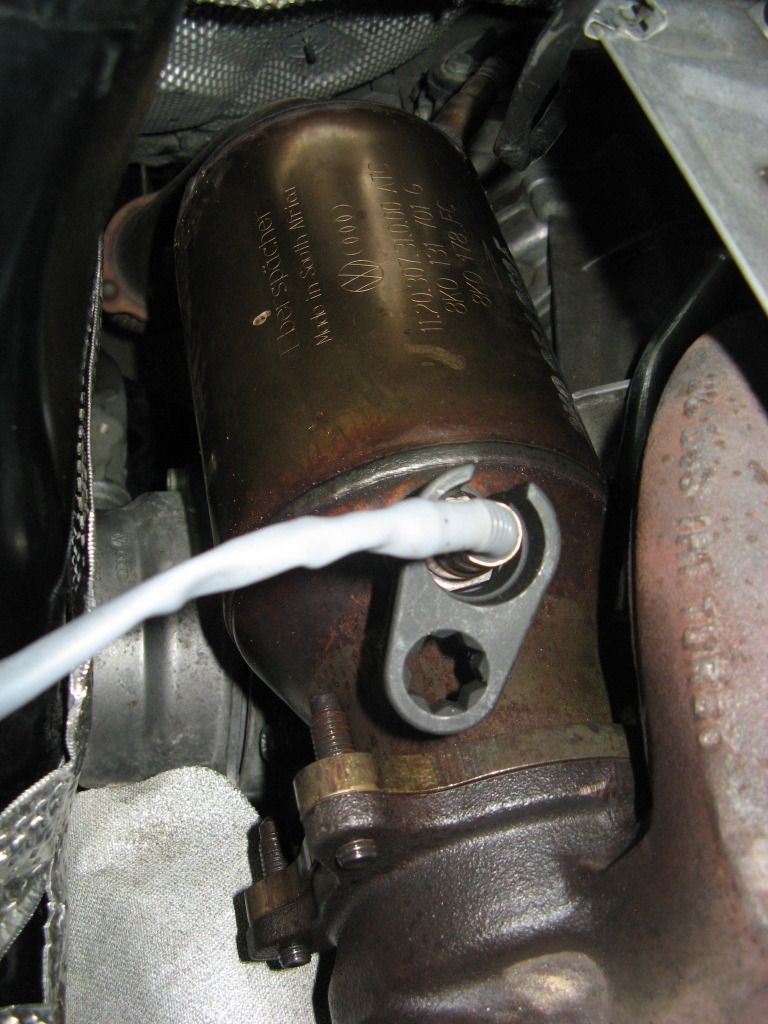
    You can then remove the primary sensor using an O2 sensor tool.


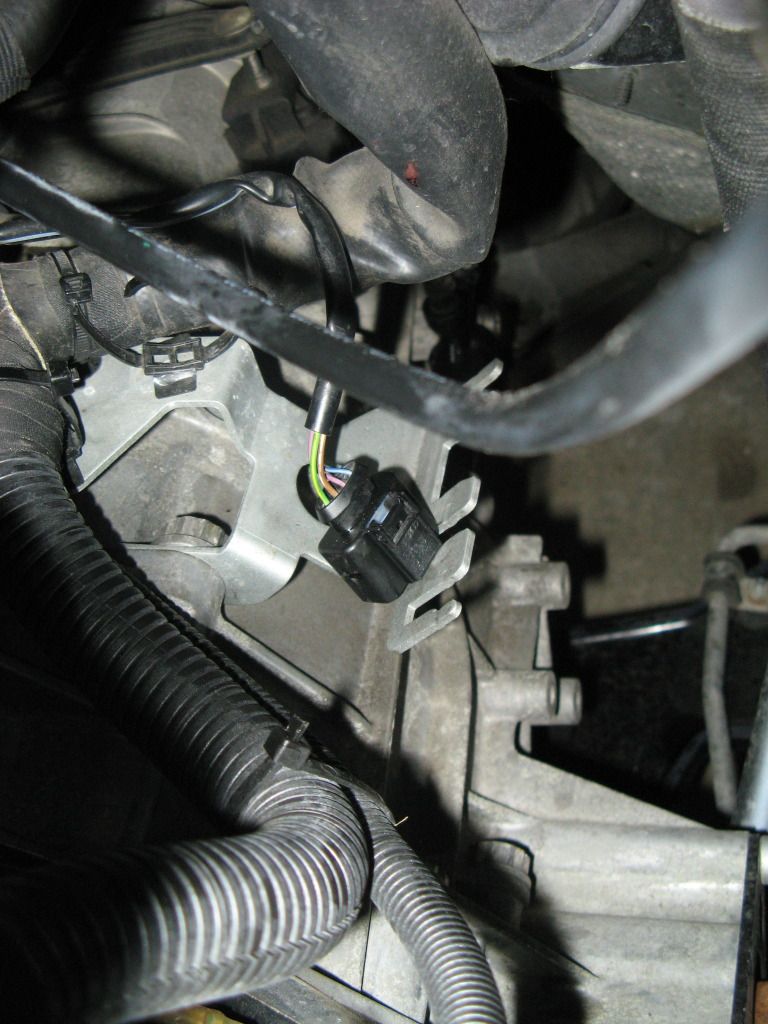
    The secondary O2 sensor is routed between the aft of the engine and the firewall. The connector mate is done on a bracket installed to the driver’s side of the transmission. The picture below shows after I de-mated the connection. I had to spray a little WD-40 on the bracket in order to slide the connectors out of the bracket since it was a tight fit. It’s easier to safely de-mate the connectors after you have them off the bracket. There are two zip ties you will have to cut that tie the sensor wire down onto other wiring harnesses. After you disconnect it all you can route the sensor wire back to the cat in preparation for removing it.


    Step 3: Remove the three nuts you can get to that connect the cat to the turbo using a 15 mm wrench. Spray them all down with PB Blaster. The two on the passenger side are easy to reach. I was able to get the upper driver’s side bolt using a normal 15mm craftsman combination wrench by alternating using the box end and open end in different orientations. None of the nuts were very tight but perhaps that is because my car only has 36k miles on it. In another 5 years perhaps they will be a lot tougher. You can see the 3 that I was able to remove in the picture below.


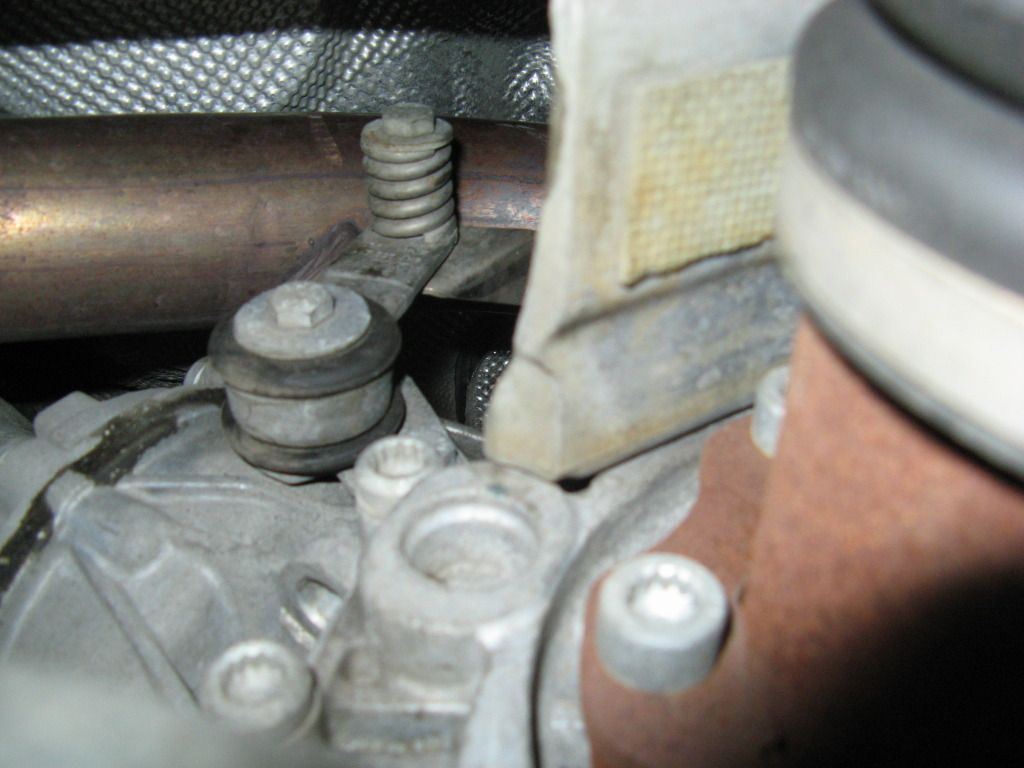
    Step 4: Remove the shock absorbing link assembly that connects the lower portion of the cat pipe to the engine. The lower bolt between the link and the engine will require a 12 mm combination wrench. The upper bolt (where the spring is) will require a 13 mm combination wrench from below to loosen the bolt and a 13 mm combination wrench from the top to hold the nut. You will need a helper from above to hold the nut because the way it is oriented you can't reach both sides and turning the bolt will just cause the nut to spin. When you reinstall this later you won't need a helper because the pipe is smaller and the bracket it mounts to is different so you will be able to reach both sides. Perhaps you can get the cat out with this link installed but the stock cat is a tight fit so I went ahead and removed it. You’ll need to remove it anyway once off the car because it will get installed to the new cat.


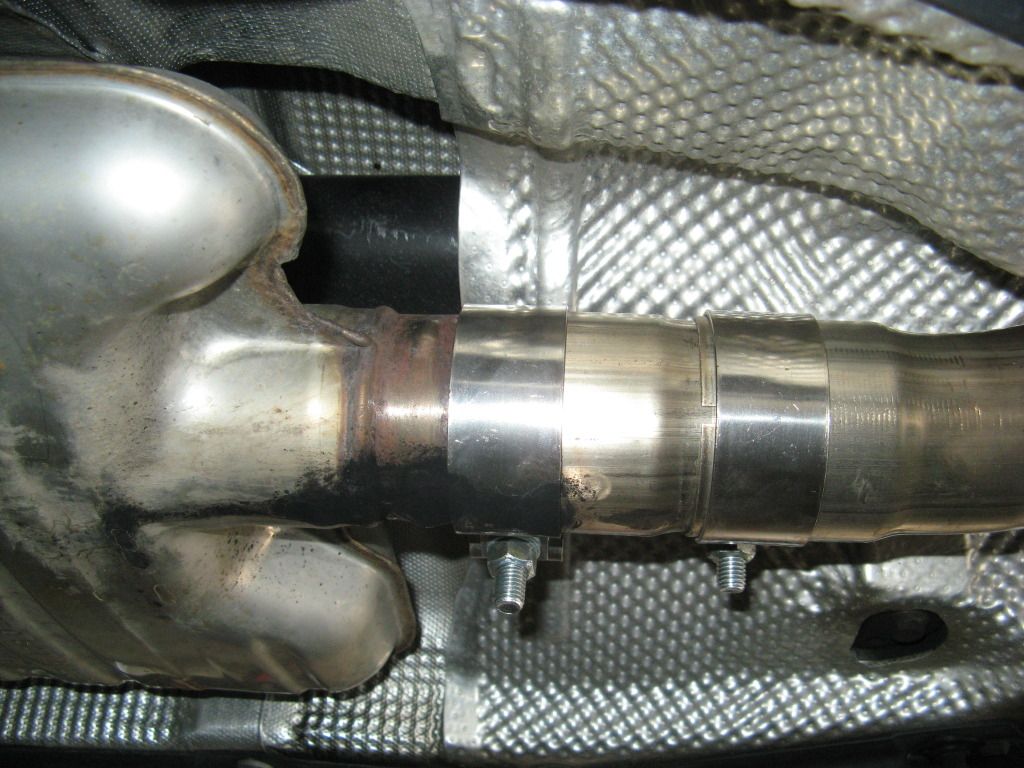
    Step 5: Disconnect the downpipe from the midpipe. You can see my connection below. Midpipe is to the right, downpipe is to the left. I had just installed a new exhaust (aft of downpipe) two weeks earlier. I didn’t use exhaust paste at this joint because I knew I’d be taking it apart in a week or two to do this project. That is why you can see the black marks indicating some exhaust had been escaping at this joint. Both clamp bolts on mine were 15 mm. I can’t recall if the bolts from the stock exhaust were 15mm or not. You’ll need a deep well socket to get over the bolts and onto the nuts. Once the connection is loosened you’ll need to slide the downpipe forward (it isn’t going to move much) and the midpipe backward to get the slip fit connection apart. I couldn’t get enough space so I had to remove the muffler hanger bracket so that the exhaust could be slid back farther. You'll probably have to do the same thing. Spray the connection down with some WD-40 to get the two sliding a little easier against each other.


    Step 6: Now you’ve got to get out the final nut holding the cat to the turbo. I rigged up the combination of sockets you see below and had a helper above help with getting the socket onto the bolt. The sequence was: 15mm deep well socket – swivel - 10” extension – swivel - 18” extension - 6” extension - ratchet. It would be damn near impossible to do this yourself. I suppose if you were stranded on a desert island and had a couple weeks to do this then you could probably do it yourself with only a 50:50 chance of hopelessly stripping the bolt. It took us a half dozen tries to get it on the nut securely but once it was on, the nut came right off.


    Step 7: Now you can pull the downpipe rearward so that the connection between it and the cat can be reached. Hopefully you’ve been spraying copious amounts of PB Blaster on these three nuts ever since you started the install because the nuts are cheap and they will be completely seized in place. I only got one of the three to come off. I think they are 12 mm. The other two got completely stripped. I broke out the dremel and cut the two bolts off. The problem I then realized is that the bolts are pressed into the downpipe flange and tack welded in place. So I couldn’t just hammer them out. I had to cut them flush with the flange and then drill them out. Then get replacement hardware. It wasn’t too bad because you have easy access to the spot but it was still a pain. Hopefully you have better luck than me and hopefully your cat comes with new nuts so you don’t have to put these three crappy ones back on, thereby virtually eliminating any hope of ever de-mating this connection in the future.


    Step 8: Now you should be able to wedge the cat out the top of the engine. It is a very tight fit with that secondary O2 sensor still installed, but it is so buried that you have no hope of getting it out with the cat in the engine bay. Just pull hard and get things oriented correctly and it will come out. Remove the secondary O2 sensor once you have it out of the engine bay.
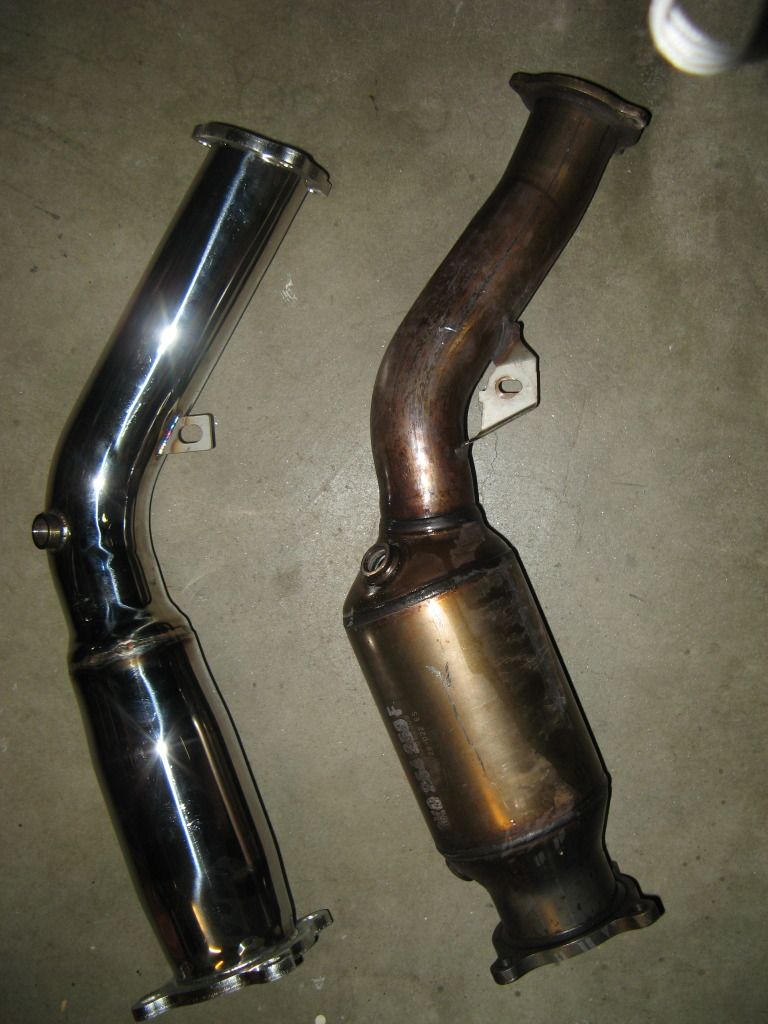


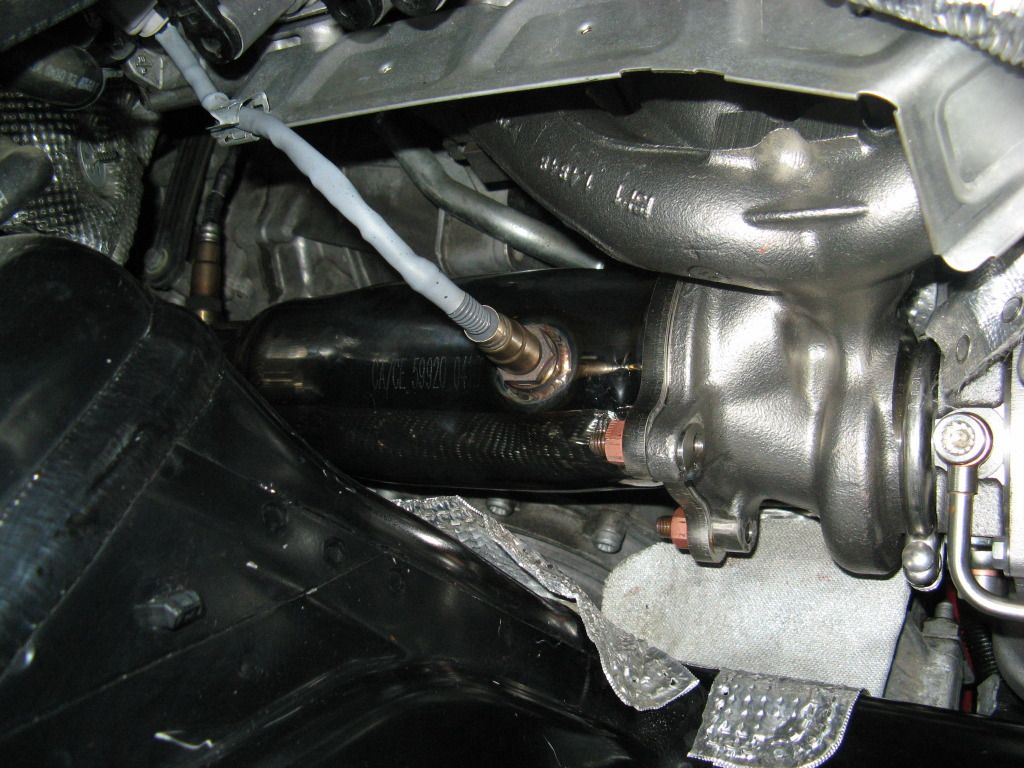
    Transfer the secondary O2 sensor and the shock absorbing link over to the new cat. Installation is the reverse of removal, except that you’ll have more space to work with because your new high flow cat or test pipe is way smaller in diameter than the stock cat. I think if you are installing a test pipe that you can actually get all four of the TP to turbo nuts on from the top of the car. You should have gotten two new gaskets for either end of the cat and those will go in during the reinstall. Here is what your finished product is going to look like. Now go get a tune and start taking solace in the fact that your car is no longer slower than a V6 Toyota Camry.
    Last edited by Dan_Q; 09-01-2012 at 05:16 AM. Reason: Clarified a couple of steps

  2. #2
    Veteran Member Four Rings TCHUN003's Avatar
    Join Date
    Sep 14 2006
    AZ Member #
    11290
    My Garage
    2015 Golf Sportwagen TDI, Honda Ruckus
    Location
    SoCal

    Awesome writeup. For step number 6, I made the EXACT same extension/swivel combo, but I wasn't able to do it. Instead, I ended up climbing on top of the engine and accessing that bolt from the top with a 10 inch extension/deep 15mm socket. Of course, I also needed someone to guide the socket/extension onto the bolt, but when we got it into place, it was quick! I agree that it wasn't very difficult to do.
    -Thomas
    Current: /S3
    Previous: B6 A4/B8A4 Avant

  3. #3
    Veteran Member Four Rings Ryan_T's Avatar
    Join Date
    May 11 2009
    AZ Member #
    42370
    My Garage
    09 A4 2.0T
    Location
    T.O - Canada

    Excellent write-up.

    Taking the bolts off seem like a complete pain.
    Ryan - flickr

  4. #4
    Active Member Two Rings AlexDD's Avatar
    Join Date
    Jun 28 2012
    AZ Member #
    95965
    Location
    Atlanta GA

    Awesome! thank you!
    On the step 6 I got my nut stripped. so I am running on stock cat on 3 bolts. the only thing I think I can do, is remove the turbo and get the bolt drilled out. Instead of doing the same labor as K04 install, I think I'll wait another 4-6 months until I go for an upgrade.
    Or if you have an idea or suggestion how I might be able to get that f***in bolt out, please share that idea with me.
    2015 Sepang blue

  5. #5
    Senior Member Two Rings Dan_Q's Avatar
    Join Date
    May 18 2011
    AZ Member #
    75696
    My Garage
    2011 BMW 335i, 392 whp
    Location
    Colorado Front Range

    Quote Originally Posted by AlexDD View Post
    Awesome! thank you!
    On the step 6 I got my nut stripped. so I am running on stock cat on 3 bolts. the only thing I think I can do, is remove the turbo and get the bolt drilled out. Instead of doing the same labor as K04 install, I think I'll wait another 4-6 months until I go for an upgrade.
    Or if you have an idea or suggestion how I might be able to get that f***in bolt out, please share that idea with me.
    Nut stripped or bolt stripped? The only way you're going to get the nut off is by cutting it off, and for that the turbo needs to come off the car. The "bolt" it is attached to is actually a stud that is screwed into the turbocharger assy. The cat flange then goes over the opposite end of the stud and then the nut goes on to connect the two. So cutting through the bolt to get the nut off will by default, disconnect the cat from the turbo. Then you should be able to use an easy out to get the stud out of the turbo flange. Of course if you're replacing the turbo anyway, then you can just throw the whole mess in the corner of your garage and shout obsenities at it.

    If it is the stud that is stripped then you're good to go. Remove the cat and you'll have plenty of room to work on getting that stud out of the turbocharger. Maybe just grind flats on either side of it so that you can get a wrench on it and then back it out after applying plenty of PB Blaster.

    If you wanted to pull out the turbo just to fix this problem then it is probably around 6 hours of work. If you are paying for labor then it isn't going to be worth it. If you are doing it yourself then it's one Saturday of work. I guess it is up to you if that is worth it. If I was replacing the turbo in 4-6 months anyway then I'd just do it all at the same time.

  6. #6
    Veteran Member Three Rings jordancl's Avatar
    Join Date
    Jun 29 2010
    AZ Member #
    60842
    Location
    MA 01230

    Dan based on your writeup it sounds like this was the same PITA for you that it was for me, except you have a better attitude lol

  7. #7
    Senior Member Two Rings simplicity's Avatar
    Join Date
    Aug 24 2011
    AZ Member #
    80260
    Location
    SF Bay Area

    Is it necessary to remove the airbox? Can I just remove the O2 sensor on top and then remove the 3 bolts then crawl underneath and remove the midpipe and remove the secondary O2 sensor then the "PITA" bolt?

    How did you jack up the car and place on 4 jackstands? AFAIK there isn't a front or rear jackpoint on the vehicle....only the sides along the rails and there isnt enough space for my lift AND a jackstand.

    Thanks, greaty DIY
    2011 Brilliant Black A4 Sedan Quattro | 8 speed tiptronic | P+ | Sports Package
    APR Stage 1, EuroCode Alu Kreuz, Hotchkis F&R Sway Bar, Blesk license plate LED, Hoen Endurance fogs, Reiger Style Trunk Spoiler, RS4 Replica Grill, Podi Boost Gauge

  8. #8
    Veteran Member Four Rings TCHUN003's Avatar
    Join Date
    Sep 14 2006
    AZ Member #
    11290
    My Garage
    2015 Golf Sportwagen TDI, Honda Ruckus
    Location
    SoCal

    I just jacked the front end and held it up at the side rails with stands. Removing the airbox isn't NECESSARY, but it makes it A LOT easier, especially since removing the airbox only takes 2 minutes. There's only one bolt holding it on.
    -Thomas
    Current: /S3
    Previous: B6 A4/B8A4 Avant

  9. #9
    Senior Member Two Rings simplicity's Avatar
    Join Date
    Aug 24 2011
    AZ Member #
    80260
    Location
    SF Bay Area

    Thanks, definitely the more space the better and in this case removing the airbox is simple enough to create more space. I was just planning to drive the fronts up my ramps but noticed Dan_Q's pic had the car in the air on 4 jackstands and it made me curious - kinda off topic.
    2011 Brilliant Black A4 Sedan Quattro | 8 speed tiptronic | P+ | Sports Package
    APR Stage 1, EuroCode Alu Kreuz, Hotchkis F&R Sway Bar, Blesk license plate LED, Hoen Endurance fogs, Reiger Style Trunk Spoiler, RS4 Replica Grill, Podi Boost Gauge

  10. #10
    Veteran Member Three Rings jordancl's Avatar
    Join Date
    Jun 29 2010
    AZ Member #
    60842
    Location
    MA 01230

    I'm able to get a jack and jackstands on the rails side by side its just really tight. You need to start with the jack as far to one side on the rail as possible.

  11. #11
    Active Member Two Rings AlexDD's Avatar
    Join Date
    Jun 28 2012
    AZ Member #
    95965
    Location
    Atlanta GA

    Quote Originally Posted by Dan_Q View Post
    Nut stripped or bolt stripped? The only way you're going to get the nut off is by cutting it off, and for that the turbo needs to come off the car. The "bolt" it is attached to is actually a stud that is screwed into the turbocharger assy. The cat flange then goes over the opposite end of the stud and then the nut goes on to connect the two. So cutting through the bolt to get the nut off will by default, disconnect the cat from the turbo. Then you should be able to use an easy out to get the stud out of the turbo flange. Of course if you're replacing the turbo anyway, then you can just throw the whole mess in the corner of your garage and shout obsenities at it.

    If it is the stud that is stripped then you're good to go. Remove the cat and you'll have plenty of room to work on getting that stud out of the turbocharger. Maybe just grind flats on either side of it so that you can get a wrench on it and then back it out after applying plenty of PB Blaster.

    If you wanted to pull out the turbo just to fix this problem then it is probably around 6 hours of work. If you are paying for labor then it isn't going to be worth it. If you are doing it yourself then it's one Saturday of work. I guess it is up to you if that is worth it. If I was replacing the turbo in 4-6 months anyway then I'd just do it all at the same time.
    As I see it, and as the mechanic told me, the only way to fix that, is get the turbo off the car... so I decided to wait until the upgrade. the problem is, I can't wait! ;)
    2015 Sepang blue

  12. #12
    Senior Member Two Rings simplicity's Avatar
    Join Date
    Aug 24 2011
    AZ Member #
    80260
    Location
    SF Bay Area

    Are there any torque settings for these bolts and the O2 sensors?
    2011 Brilliant Black A4 Sedan Quattro | 8 speed tiptronic | P+ | Sports Package
    APR Stage 1, EuroCode Alu Kreuz, Hotchkis F&R Sway Bar, Blesk license plate LED, Hoen Endurance fogs, Reiger Style Trunk Spoiler, RS4 Replica Grill, Podi Boost Gauge

  13. #13
    Active Member One Ring
    Join Date
    Feb 16 2012
    AZ Member #
    88319
    My Garage
    Hyundai i30
    Location
    Bergen

    B8 A4 DIY: Catalytic Converter Removal & HFC or Test Pipe Install

    Thanks for a great write-up! Did this last night, and your guide helped me out good :) Did not have a helper, so had to screw aroud a bit to get the last bolt on the turbo off, but did it with a single 15mm wrench :) Standing on top of the engine to get enough force to loosen it :)
    And it was way easier to get the new cat in from under the car, somehow it would not enter from top, where I took out the old one. Might be worth a try to take the old one out underneatg also. It was a pretty tight fit to get it out from the top!

    Quote Originally Posted by simplicity View Post
    Are there any torque settings for these bolts and the O2 sensors?
    55 nm for the O2 sensors, 40 nm for the 4 nuts connecting the cat to the turbo, 25 nm for the 3 nuts connecting front silencer and cat and 23 nm for the pipe clamp.

  14. #14
    Active Member One Ring
    Join Date
    May 31 2013
    AZ Member #
    116288
    Location
    Durham NC

    Hello Everyone I've been reading Audizine forums for a long time. I can't even begin to say how much I appreciate all the great posts. I wanted to thank Dan Q for the great DIY. This saved me a bunch of time and headaches installing the 034 HFC. I also used TCHUN003's method of removing the last bolt on the turbo and the rest was very straight forward.

  15. #15
    Senior Member Three Rings DJ_AudiA4's Avatar
    Join Date
    Oct 01 2012
    AZ Member #
    101491
    My Garage
    2005 Kawasaki ZX6R
    Location
    Temple City, CA

    Do you have to take off the nuts and the studs? Or does the cat just slide off after the four
    nuts are off?

  16. #16
    Veteran Member Three Rings
    Join Date
    Jun 26 2009
    AZ Member #
    44247
    Location
    Bremerton WA

    Cat just slides off the 4 studs.
    VMR 710's, APR software, Eurocode HFC

  17. #17
    Senior Member Three Rings DJ_AudiA4's Avatar
    Join Date
    Oct 01 2012
    AZ Member #
    101491
    My Garage
    2005 Kawasaki ZX6R
    Location
    Temple City, CA

    Quote Originally Posted by van462 View Post
    Cat just slides off the 4 studs.
    cool, Thanks!

  18. #18
    Established Member Two Rings B8on19s's Avatar
    Join Date
    Apr 29 2010
    AZ Member #
    58321
    Location
    South Africa

    Nice write-up...

    BTW, interesting to see that even ur CAT is "Made in South Africa" ....
    2009 2.0T 155kw Multi |B&O|Sunroof|RearPDC|19" Matt Black HRE reps|Gloss Black theme

    http://img.photobucket.com/albums/v5...ps392c6fe2.jpg

  19. #19
    Veteran Member Four Rings jbradle7's Avatar
    Join Date
    Jan 09 2010
    AZ Member #
    53157
    My Garage
    GX460; MK7.5 GTI; WK2 Grand Cherokee; 73 Triumph TR5T
    Location
    St. Louis

    Quote Originally Posted by Dan_Q View Post
    Thanks for the great write-up! The painted exhaust manifold looks very nice; what sort of prep did you do, what paint did you use?

  20. #20
    Senior Member Two Rings Dan_Q's Avatar
    Join Date
    May 18 2011
    AZ Member #
    75696
    My Garage
    2011 BMW 335i, 392 whp
    Location
    Colorado Front Range

    Quote Originally Posted by jbradle7 View Post
    Thanks for the great write-up! The painted exhaust manifold looks very nice; what sort of prep did you do, what paint did you use?
    I didn't paint it, I put in a new turbo/manifold at the same time.

  21. #21
    Senior Member Three Rings Alpha Ice's Avatar
    Join Date
    Oct 24 2011
    AZ Member #
    82972
    Location
    Rochester, MN

    Which HFC did you install? It looks like the SPM one
    2011 Audi A4 6MT Prestige S-Line Sport | Apikol Rear Diff | AFE | EC Alu Kreuz | EC Inlet pipe | EC FMIC | EC USS Sway Bars | EC End Links | Deval Front Lip | Deval Rear CF Valance| GFB DV+ | AWE Quad Tip | AWE Downpipe | 034 HFC | APR Stage 2 | JHM Rotors | S4 Calipers | ATE TYP 200 | VMR V710 255.35.19 ET45 |

  22. #22
    Veteran Member Three Rings DoItAllGarage's Avatar
    Join Date
    Oct 29 2013
    AZ Member #
    127509
    Location
    WA to ID

    I was wondering the same thing, which hfc?

    Sent from my SCH-I545 using Tapatalk

  23. #23
    Senior Member Two Rings Dan_Q's Avatar
    Join Date
    May 18 2011
    AZ Member #
    75696
    My Garage
    2011 BMW 335i, 392 whp
    Location
    Colorado Front Range

    Quote Originally Posted by Alpha Ice View Post
    Which HFC did you install? It looks like the SPM one
    Eurocode

  24. #24
    Senior Member Three Rings Alpha Ice's Avatar
    Join Date
    Oct 24 2011
    AZ Member #
    82972
    Location
    Rochester, MN

    Nice! I'm glad to hear that, I'm looking to go that route and the AWE DP come springtime

    Sent from my HTC6500LVW using Tapatalk
    2011 Audi A4 6MT Prestige S-Line Sport | Apikol Rear Diff | AFE | EC Alu Kreuz | EC Inlet pipe | EC FMIC | EC USS Sway Bars | EC End Links | Deval Front Lip | Deval Rear CF Valance| GFB DV+ | AWE Quad Tip | AWE Downpipe | 034 HFC | APR Stage 2 | JHM Rotors | S4 Calipers | ATE TYP 200 | VMR V710 255.35.19 ET45 |

  25. #25
    Established Member Two Rings
    Join Date
    Jun 05 2013
    AZ Member #
    116610
    My Garage
    GF drives 6MT GTI MK6
    Location
    Naples FL

    I just installed a 034 HFC yesterday, this writeup helped ALOT! Thank you Dan_Q
    2013 A4
    Options: 6MT - Monsoon Gray Metallic - Quattro - Push Button Start - Sport Pkg - B&O Sound System - MMI Navi
    Mods: JHM ShortShifter - H&R Coilovers - Carbonio Intake - APR Tune - 034Motorsports HFC - Avant Garde M590s

  26. #26
    Senior Member Three Rings
    Join Date
    Feb 19 2014
    AZ Member #
    147386
    Location
    RVA

    Doing this next week, great writeup! I didnt have the O2 sensor or some of the longer 3/8 extenders so glad to get them and not be screwed when i do the job.

  27. #27
    Veteran Member Four Rings Frinkferta's Avatar
    Join Date
    Aug 27 2012
    AZ Member #
    99399
    Location
    Earth

    Good luck! Spray those turbo bolts goooood!...with PB blaster that is.

  28. #28
    Senior Member Three Rings
    Join Date
    Feb 19 2014
    AZ Member #
    147386
    Location
    RVA

    ill have my torch handy just in case :)

  29. #29
    Senior Member Three Rings
    Join Date
    Feb 19 2014
    AZ Member #
    147386
    Location
    RVA

    For the secondary cat.... You can get it out with the O2 sensor tool, a flex joint, a long entension and rubber mallet.

    Fit the sensor tool to the O2 with the square pointing to the driver side. Put the wratchet joint in with the long the long extension attached. The end not the extension will now be sticking out of the top of the engine. Hammer the top of the extension with the rubber mallet until the o2 sensor brakes loose. Remove the tool and you should be able to unscrew by hand. Boom!

    I'm mid install. Everything went well so far. My 15mm deep socket wandered off so I'm trying to track one down for the last nut. I used a max access set/ combo wrench for the others with no issues.

  30. #30
    Veteran Member Four Rings b6Hate4's Avatar
    Join Date
    Oct 27 2010
    AZ Member #
    66253
    My Garage
    Sepang S3, Arctic S4.
    Location
    Norwood, MA.

    I just did this on Friday.

    Holy shit that sucked! Had a lift, oxy acetelene torch, a helping hand and it still was not fun, and I'm no stranger to wrenching on cars, its just 1 bolt to the turbo and 1 bolt to the downpipe that snagged me up.

    But I also used a roc-euro o2 spacer. 100+ miles later still no cel.
    2016 S3

    2004 S4- 2.7t, Shaved bay, wire tucked, PTE5858 single turbo full build.

    Instagram- @Thisisastickup

  31. #31
    Veteran Member Four Rings A4 Centaur's Avatar
    Join Date
    Jun 05 2009
    AZ Member #
    43360
    My Garage
    2020 Ducati Panigale V4S
    Location
    Scottsdale Arizona

    Dan you are still the best!
    2023 S4 Prestige Mythos Black. Brembo GT BBK, APR FMIC, 034 Stg 1
    2012 B8 A4 Avant, Phantom Black S-Line Prestige, 2014 CPMB Engine, 8 speed, JHM K04-R, Eurocode HFC, APR FMIC, 034 Alu Kreuz, Vogtland Coilovers, Stoptech 380mm BB Kit, H&R Swaybar, ECU with IE K04 Tune, Rev. "d" DV, R8 Coils, Folding Mirrors, S5 Rear Brakes, 034/Apikol mounts, OEM Facelift LED Brake lights ]

  32. #32
    Senior Member Three Rings
    Join Date
    Feb 19 2014
    AZ Member #
    147386
    Location
    RVA

    QUOTE=b6Hate4;9591597]I just did this on Friday.

    Holy shit that sucked! Had a lift, oxy acetelene torch, a helping hand and it still was not fun, and I'm no stranger to wrenching on cars, its just 1 bolt to the turbo and 1 bolt to the downpipe that snagged me up.

    But I also used a roc-euro o2 spacer. 100+ miles later still no cel.[/QUOTE]

    I got close with just a long extension and a wratchet. The missing deep socked was the issue. I got the socket on easy without a joint or wratchet attached. I'm thinking get get the socket on then the wratchet then blamo. I'll post an update later today after I give it a go.

  33. #33
    Veteran Member Four Rings b6Hate4's Avatar
    Join Date
    Oct 27 2010
    AZ Member #
    66253
    My Garage
    Sepang S3, Arctic S4.
    Location
    Norwood, MA.

    Getting the socket on is not the issue. Its getting the nut off without being able to put heat on the nut and being 100% sure your not stripping anything.

    also the custom exhaust shop that did my exhaust welded the downpipe to the rest of the exhaust, so that made it alot more fun because there was no way to unclamp it.


    And lastly, I put the Euro code on my car, and if you already have a cat-back, prepare for it to get throaty! My exhaust sounds amazing now.
    2016 S3

    2004 S4- 2.7t, Shaved bay, wire tucked, PTE5858 single turbo full build.

    Instagram- @Thisisastickup

  34. #34
    Established Member Two Rings
    Join Date
    Apr 16 2010
    AZ Member #
    57717
    Location
    Leesburg, VA

    I am doing this install this weekend and I only saw one mention of torque settings. Did anyone else bother to properly torque these bolts?
    2012 A4 2.0T P+ | 6MT | Quattro | Sport Package | Apikol | APR Stage II | EC HFC | EC Meisterwerk STS | VAG-COM | 35% Tint

  35. #35
    Senior Member Three Rings
    Join Date
    Feb 19 2014
    AZ Member #
    147386
    Location
    RVA

    Quote Originally Posted by simek3ru View Post
    I am doing this install this weekend and I only saw one mention of torque settings. Did anyone else bother to properly torque these bolts?
    Nope, I don't bother with exhaust. Esp when you have 0 chance of getting a torque wrench on most of the bolts.

  36. #36
    Established Member Two Rings
    Join Date
    Apr 16 2010
    AZ Member #
    57717
    Location
    Leesburg, VA

    Thanks for the awesome DIY! What a pain that last nut on the turbo was. Ended up breaking it free with a 15mm combination wrench and another combination wrench for leverage.

    Put in a 42 draft designs spacer but still have a CEL. If anyone else has this spacer, where are you pointing it?

    Sent from my HTC6525LVW using Tapatalk
    2012 A4 2.0T P+ | 6MT | Quattro | Sport Package | Apikol | APR Stage II | EC HFC | EC Meisterwerk STS | VAG-COM | 35% Tint

  37. #37
    Senior Member Three Rings BenA4B7's Avatar
    Join Date
    Mar 26 2012
    AZ Member #
    90670
    Location
    Montreal,Canada

    Quote Originally Posted by simek3ru View Post
    Thanks for the awesome DIY! What a pain that last nut on the turbo was. Ended up breaking it free with a 15mm combination wrench and another combination wrench for leverage.

    Put in a 42 draft designs spacer but still have a CEL. If anyone else has this spacer, where are you pointing it?

    Sent from my HTC6525LVW using Tapatalk
    Shit!
    I was planning on installing the eurocode test pipe with the spacer.... So it's going to take à tune with that for the CEL!

  38. #38
    Established Member Two Rings
    Join Date
    Apr 16 2010
    AZ Member #
    57717
    Location
    Leesburg, VA

    Quote Originally Posted by BenA4B7 View Post
    Shit!
    I was planning on installing the eurocode test pipe with the spacer.... So it's going to take à tune with that for the CEL!
    Here's an update for you. I started the car up this morning to head to work and no CEL.
    2012 A4 2.0T P+ | 6MT | Quattro | Sport Package | Apikol | APR Stage II | EC HFC | EC Meisterwerk STS | VAG-COM | 35% Tint

  39. #39
    Veteran Member Four Rings
    Join Date
    Oct 10 2012
    AZ Member #
    102006
    Location
    Zionsville and Saint John IN

    Quote Originally Posted by TCHUN003 View Post
    Awesome writeup. For step number 6, I made the EXACT same extension/swivel combo, but I wasn't able to do it. Instead, I ended up climbing on top of the engine and accessing that bolt from the top with a 10 inch extension/deep 15mm socket. Of course, I also needed someone to guide the socket/extension onto the bolt, but when we got it into place, it was quick! I agree that it wasn't very difficult to do.
    You didn't use a swivel with that 10" extension? Doing install in the morning with a 6 pack of Three Floyds haha.

    Thanks op for Diy

  40. #40
    Veteran Member Three Rings spzavertnik's Avatar
    Join Date
    Sep 17 2012
    AZ Member #
    100626
    Location
    Northern Virginia

    The two times I have done this install, I was able to get around to the back bolt with a straight extension and use the space behind the engine to get it off. I reached under the cat and was able to guide the socket on with fingertips. I think I used a breaker pipe to initially pop the bolt loose without breaking my hand. Also, both times it took me probably 30 minutes of trying to get the cat out of the bottom instead of the top. The second time was just embarrasing once I realized what I did.

    I have the angled roceuro spacer with the catalyst in it, and got a code on my first trip out of the neighborhood. I have since backed the spacer out a bit, so we will see if the CEL comes back once I get it cleared.
    ~Z~
    2011 A3 2.0T Quattro| Scuba Blue Metallic | Premium Plus, Sport, Black Optics, S-Line
    APR | K&N | R8 Coils | VAGCOM


    Previous - 2014 A4 2.0T Quattro Manual | Scuba Blue Metallic | Premium Plus, Sport, Black Optics

Bookmarks

Posting Permissions

  • You may not post new threads
  • You may not post replies
  • You may not post attachments
  • You may not edit your posts
  •  


    © 2001-2025 Audizine, Audizine.com, and Driverzines.com
    Audizine is an independently owned and operated automotive enthusiast community and news website.
    Audi and the Audi logo(s) are copyright/trademark Audi AG. Audizine is not endorsed by or affiliated with Audi AG.