Audizine - An Automotive Enthusiast Community

Results 1 to 36 of 36
  1. #1
    Veteran Member Four Rings wildcat333's Avatar
    Join Date
    Feb 25 2011
    AZ Member #
    71493
    My Garage
    2016 Ford F-150; 2018 Honda Grom
    Location
    Seacoast NH

    Post Hardwire Escort Passport 8500 X50 Radar Detector

    Guest-only advertisement. Register or Log In now!
    DIY: Hardwire Escort Passport 8500 X50 Radar Detector in B7 A4

    Hey guys. I do realize this has been covered more than a few times, but the reason I am making this DIY is because I think some of the pics and video might help a few people down the road in their install. This install process can probably be used for other radar detectors as well, but obviously check on that before attempting anything.

    First off, thanks to those that helped me troubleshoot some of my issues. See this thread, and all of the linked threads within it for other ways and idea to do a similar install: http://www.audizine.com/forum/showth...need-fuse-help

    Tools and items needed:
    -Radar detector.
    -Radar detector smart cord with mute button.
    -Velcro (I recommend Velcro-brand squares that you can buy at most hardware stores).
    -Electrical tape.
    -Add-a-fuse (bought at a chain auto store; there are 2 different sizes of fuses in our cars - for my version of this install, I chose to go with the smaller fuse - so if you follow my DIY, you will want the smaller of the 2 add-a-fuses that will be available at your auto parts store).
    -Extra 10 Amp fuse (bought at auto parts store).
    -Insulated butt connectors (bought at Radio Shack)
    -Pliers.
    -Wire cutters/splicers.
    -Wrench - I used 5/16 wrench, but I believe there is technically a specific metric wrench that can be used as well.
    -Plastic zip ties.
    -Bone tool (bought at crafts store in the "paper-folding" or "scrap-booking" section).
    -Sand paper, or a wire brillo-style pad


    Difficulty:
    The most difficult part of this for me was trying to figure out what was a good fuse to "tap" into using my add-a-fuse. More on that later. I think this took me maybe 2 hours total. But I really took my time trying to not make any errors. If I were to do this again, it would maybe take me 1 hour or less. Not that hard assuming you have all of the tools needed.

    How-to guide with pics:

    The Escort brand smart cord (with mute button) costs approx $20, and is available from various stores online. Here is a pic of what were are talking about:


    Coming out of the mute button are two wires. Wire #1 is a phone-jack style wire, which will plug into the radar detector unit. Wire #2 actually will break off towards the end and become two wires. We will call these wires #2A and #2B.

    Wire 2A= The black wire that has a metal loop at the end of it. This is the ground wire. We leaving this wire as is.

    Wire 2B = The wire already came with a flat-style plug on the end of it.


    For wire 2B, cut off that flat metal plug on the end. Use wire strippers, and leave approx one inch of bare wire. Fold that wire over onto itself, so it is technically twice as thick as it was before. This folded-over bare wire will be crimped into the blue butt connector, and connected with the add-a-fuse.

    Depending on your add-a-fuse that you bought at the auto parts store, it may or may not already have a blue butt connector clamped onto it. If it is already there, great. If not, strip down some wire and with pliers crimp the blue butt connector over the bare wire. Now wire 2B should be connected securely with the add-a-fuse wire (red wire in pic).


    The ground wire (wire 2A) with the loop needs to be connected to bare metal. Take sand paper and scrape off the black paint. With wrench, remove bolt. Put bolt through the wire 2A loop, and secure with wrench.


    Take the add-a-fuse which is now secured to wire 2B with the blue butt connector. You need to be sure to have one extra 10A (10 Amp) fuse for this. I also bought these at an auto parts store. The add-a-fuse has 2 empty female slots ready for fuses to be added into it. Add the extra 10A fuse into the empty add-a-fuse.

    Now, for the next part there are apparently multiple fuses that can be used. The purpose of this is to tap into a fuse that will power on/off with the ignition of the car. This way you will not have to plug/unplug anything related to your radar detector when you enter/leave your car. I tried a few different ones without success.

    On the inside of our fuse panel, there is a nice detailed list of the fuses, and what "number position" they are on the grid of all of the fuses.


    The one that I used was fuse position #7. This is a 10A fuse. This corresponds with the ESP (Electronic Stability Program).


    ***TEST that your radar detector works here before messing with mounting or anything else. Make sure it powers on/off with the ignition of the car. If this is working fine, continue with install***


    I decided to mount my radar detector on the passenger side of the rearview mirror. This was a personal decision, mostly because I refused to lose the full motion of my driver's side sun visor. It will only partially block the passenger's visor abilities. It can still go down perpendicular to the ground, enough to block the sun if needed for the passenger. And the radar detector is still in sight for me, so I can see if it is K-band or KA-band, etc.


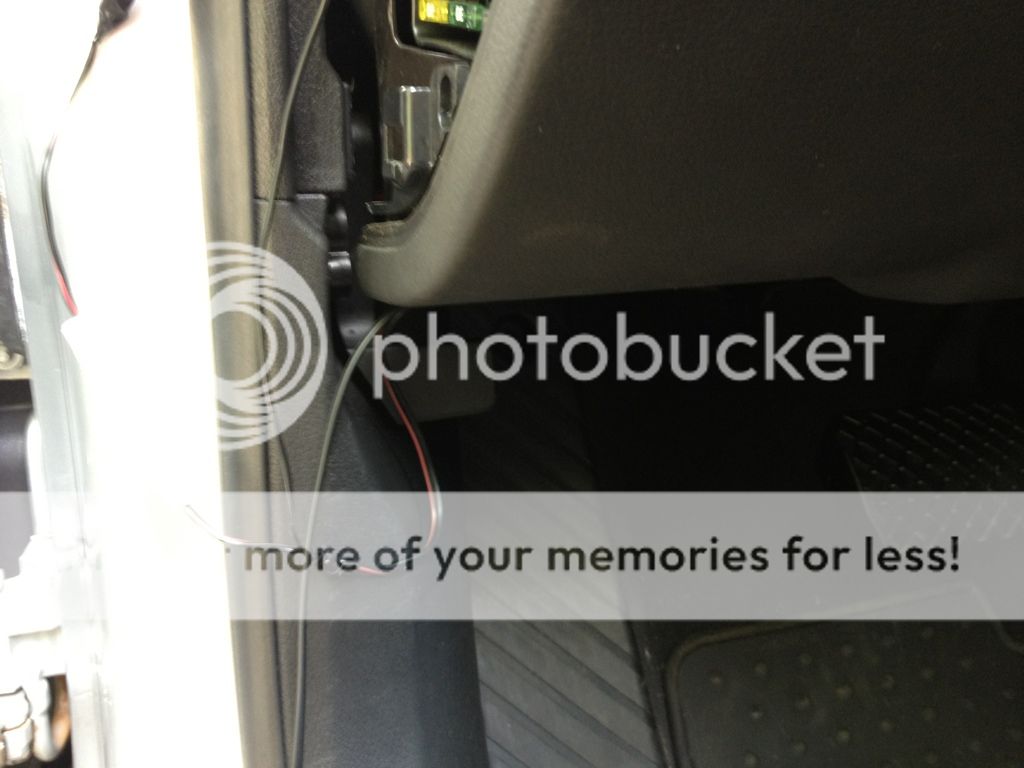
    Always start with the detector end, because this will allow you to have the slack at the end, and slack will go into the fuse box. Use the bone tool to help you route the phone cord flat under the headliner, and then down the A-pillar. I thought the rear-view mirror would be difficult and get in the way, but the headliner actually can bend upwards a bit, and you can route the wire over the mirror area. Continue with the bone tool. Make sure to give tuck it in really far into the top of the A-pillar, so it doesn't "pop" out and fall down. Tucking it down the side of the A-pilar was difficult for me. I used the side of the bone tool and patiently kept at this for probably 20 minutes. Be careful not to puncture the wire with your tool here. Then tuck this wire down and into the fuse box area.


    I used plastic zip ties to make it look clean. Use electrical tape around anything that might have the possibility of having a wire become exposed. That would lead to short circuits, etc.


    Now to discuss the mute button. I was aware of the "funk" button for Audi cars, but that is an expensive part, and the extra wiring/soldering seemed slightly above my expertise here. I used the mute button that came with my smart cord. I found a nice spot for it to the right of the steering wheel, and to the left of the radio console. I used Velcro with adhesive backing to secure the mute button to the side of the console. I like this spot because it is within an arm's reach, my passenger cannot see it, and people standing next to the car cannot easily see it (see: police). I routed the wires into the space where the two pieces of plastic come together. This bone tool really served its purpose, and I would not have been able to complete this particular install without it. I then used this tool to tuck the wire into a really tight crack underneath the steering wheel, and directly underneath the owner's manual storage compartment. The wires will then pop up from underneath and into the fuse box area.


    Make sure your radar detector is LEVEL to the ground. You do not want it tilted up or down too much at all. I had to mess with my suction cups for a few minutes until I was happy with this.


    Also, just for shits I made a quick video in case people want a quick version of what I did:


    Hope this helps a couple people. Feel free to post here for questions if needed, and I'll try to help. Cheers.
    Last edited by wildcat333; 02-24-2013 at 02:48 PM.
    2008 Audi A4 2.0T Quattro | Light Silver | S-Line | Automatic-Tiptronic | GIAC Stage 1+ | Autotech HPFP | 135 bar PRV | 35% Tint | KW V1 Coilovers | RS4 RSB | 034 Snub Mount | Evolution Thor Skid Plate | Osram CBI 5000K D1S | Clear-Cornered | 6000K LED City Lights | LED DRLs | Paint-Matched Sidemarkers | Hoen Endurance Fogs | Interior LEDs | Plate LEDs | Upgraded Brakes | 18" RS4 Wheels | Sirius Satellite Radio Tuner | Aux-In | Hardwired Passport 8500 X50 | Hella Super Tone Horns

  2. #2
    Active Member One Ring PerkisizeMe's Avatar
    Join Date
    Jun 06 2012
    AZ Member #
    94742
    My Garage
    '08 B7 A4 2.0T Avant Titanium 6MT, '86 Porsche 944T
    Location
    CT

    Thanks for the DIY tutorial wildcat, this is awesome! I have been considering doing this for my V1 for sometime.
    B7 A4 Avant Titanium 6MT: EPL Custom Tune, Stratmosphere Hypershift Short Shifter, H&R Wheel Spacers, S4 Rear Valance (Unpainted), AWE Catback Exhaust w/Quad Black Tips, De-badged Rear A4/2.0T Emblems, H&R Rear Adjustable Sway Bar

  3. #3
    Veteran Member Four Rings yungcotter's Avatar
    Join Date
    Jun 09 2010
    AZ Member #
    60091
    Location
    Queens

    looks good my 9500 is wired up the same way. But you should move in down an inch or 2 where you have it now the rear laser sensor is blocked.
    -Theo
    2018 S4,Florett Silver, Magma

    2014 Q5, Phantom Black Pearl, Chestnut, 2.0T,Moms Ride

    2015 S4, Daytona Gray, DSG,Gone

    06 A4 2.0 T, Quartz Gray, Quattro, Tiptronic.

  4. #4
    Active Member Four Rings drumnjuny's Avatar
    Join Date
    Jul 12 2010
    AZ Member #
    61335
    My Garage
    848 Corse, SQ5
    Location
    washington dc area

    Awesome DIY!!!

    couple things i will add:
    (1) if you get your own RJ11 cable, make sure that the wires inside are of high enough gauge each. otherwise you won't have enough voltage (happened to me)
    (2) if you take off your sunshade, the cable will slide in the corner and down the a-pillar with ease (and you don't have to worry about puncturing it)


    also i agree, if you place it below the mirror it will have much better visibility from the rear

  5. #5
    Veteran Member Four Rings wildcat333's Avatar
    Join Date
    Feb 25 2011
    AZ Member #
    71493
    My Garage
    2016 Ford F-150; 2018 Honda Grom
    Location
    Seacoast NH

    Hey guys. Glad you liked the write up. I basically am conceding any rear laser detection with my setup like you said. I am fine with that. I still have rear radar detection though. Also, laser is very rare where I live. Plus, they say that laser detection is basically a "ticket identifier," anyways - because once you get hit with it, the police already have your speed.

    I do not want it too low on the windshield, because it becomes more obvious from the front that I have a detector - for police reasons; and for theft reasons. I certainly did not want it BELOW the mirror, or using one of those mirror mounts that are for sale, because that would block some of my field of vision of the road, which is not acceptable to me.

    Another reason that I like it where I have it, is that the top of the radar detector is physically touching my headliner, so this helps prevent it from bouncing when I go over bumps, etc.

    Good points you bring up though for anyone reading this to consider though!
    2008 Audi A4 2.0T Quattro | Light Silver | S-Line | Automatic-Tiptronic | GIAC Stage 1+ | Autotech HPFP | 135 bar PRV | 35% Tint | KW V1 Coilovers | RS4 RSB | 034 Snub Mount | Evolution Thor Skid Plate | Osram CBI 5000K D1S | Clear-Cornered | 6000K LED City Lights | LED DRLs | Paint-Matched Sidemarkers | Hoen Endurance Fogs | Interior LEDs | Plate LEDs | Upgraded Brakes | 18" RS4 Wheels | Sirius Satellite Radio Tuner | Aux-In | Hardwired Passport 8500 X50 | Hella Super Tone Horns

  6. #6
    Site Moderator Four Rings kristokes's Avatar
    Join Date
    Jan 03 2007
    AZ Member #
    14586
    My Garage
    VW/Audi/Ducati
    Location
    Houston

    Thanks for the write up
    Stokes - Site Moderator, Audizine

    B8.5 Audi SQ5 | APR Stage 1
    8v Audi RS3 | Unitronic Stage 2
    8s Audi TTRS | Unitronic Stage 4

  7. #7
    Active Member Four Rings drumnjuny's Avatar
    Join Date
    Jul 12 2010
    AZ Member #
    61335
    My Garage
    848 Corse, SQ5
    Location
    washington dc area

    hmmm wildcat i may have to put mine up top and see how i like it, haha. for now it is basically right behind my mirror on the far side. i have a picture somewhere.

    as for laser detection, you're right... but at the same time i like to know so that i at least slow down haha

    i wanted to buy the hardwire kit but ended up getting my own cable because the hardwire kit doesn't come with a lead for the mute button. correct me if i'm wrong?

  8. #8
    Veteran Member Four Rings wildcat333's Avatar
    Join Date
    Feb 25 2011
    AZ Member #
    71493
    My Garage
    2016 Ford F-150; 2018 Honda Grom
    Location
    Seacoast NH

    Quote Originally Posted by drumnjuny View Post
    i wanted to buy the hardwire kit but ended up getting my own cable because the hardwire kit doesn't come with a lead for the mute button. correct me if i'm wrong?
    I am not totally sure what you are asking. If I recall correctly, you did a custom mute button via a funk button in your dash; and if that is correct, then I'm really not sure how to answer your question. Basically, all of the wires I posted above with pics. From the mute button here, one telephone style cable comes out of it for what I called Wire #1. Then another wire comes out of that, which I called wire #2. Wire #2 then breaks off into 2 wires, wire 2A which is the ground wire, and wire 2B which is the wire that connects to the add-a-fuse that connects into the fuse box.
    2008 Audi A4 2.0T Quattro | Light Silver | S-Line | Automatic-Tiptronic | GIAC Stage 1+ | Autotech HPFP | 135 bar PRV | 35% Tint | KW V1 Coilovers | RS4 RSB | 034 Snub Mount | Evolution Thor Skid Plate | Osram CBI 5000K D1S | Clear-Cornered | 6000K LED City Lights | LED DRLs | Paint-Matched Sidemarkers | Hoen Endurance Fogs | Interior LEDs | Plate LEDs | Upgraded Brakes | 18" RS4 Wheels | Sirius Satellite Radio Tuner | Aux-In | Hardwired Passport 8500 X50 | Hella Super Tone Horns

  9. #9
    Active Member Four Rings drumnjuny's Avatar
    Join Date
    Jul 12 2010
    AZ Member #
    61335
    My Garage
    848 Corse, SQ5
    Location
    washington dc area

    my mistake. yes i didn't want to use their module which is why i wasn't able to use the hardwire kit. i do remember now my bad.

  10. #10
    Veteran Member Four Rings wildcat333's Avatar
    Join Date
    Feb 25 2011
    AZ Member #
    71493
    My Garage
    2016 Ford F-150; 2018 Honda Grom
    Location
    Seacoast NH

    Quote Originally Posted by drumnjuny View Post
    my mistake. yes i didn't want to use their module which is why i wasn't able to use the hardwire kit. i do remember now my bad.
    no worries dude. if I ever decide to do the funk button I'll hit you up for more info!
    2008 Audi A4 2.0T Quattro | Light Silver | S-Line | Automatic-Tiptronic | GIAC Stage 1+ | Autotech HPFP | 135 bar PRV | 35% Tint | KW V1 Coilovers | RS4 RSB | 034 Snub Mount | Evolution Thor Skid Plate | Osram CBI 5000K D1S | Clear-Cornered | 6000K LED City Lights | LED DRLs | Paint-Matched Sidemarkers | Hoen Endurance Fogs | Interior LEDs | Plate LEDs | Upgraded Brakes | 18" RS4 Wheels | Sirius Satellite Radio Tuner | Aux-In | Hardwired Passport 8500 X50 | Hella Super Tone Horns

  11. #11
    Active Member Four Rings drumnjuny's Avatar
    Join Date
    Jul 12 2010
    AZ Member #
    61335
    My Garage
    848 Corse, SQ5
    Location
    washington dc area

    definitely! its actually very very simple. once my bigger car issues are taken care of i'm going to rewire it... when i do i can probably add a picture or two to this DIY for people who want to use the funk button.

  12. #12
    Veteran Member Four Rings wildcat333's Avatar
    Join Date
    Feb 25 2011
    AZ Member #
    71493
    My Garage
    2016 Ford F-150; 2018 Honda Grom
    Location
    Seacoast NH

    Quote Originally Posted by drumnjuny View Post
    definitely! its actually very very simple. once my bigger car issues are taken care of i'm going to rewire it... when i do i can probably add a picture or two to this DIY for people who want to use the funk button.
    ya! if you do re-wire it, try to make a totally new DIY with a million pics and diagrams, because eventually I want to do that, but I just couldn't justify spending $50 before shipping currently, and then trying to figure out how to solder wires and stuff.
    2008 Audi A4 2.0T Quattro | Light Silver | S-Line | Automatic-Tiptronic | GIAC Stage 1+ | Autotech HPFP | 135 bar PRV | 35% Tint | KW V1 Coilovers | RS4 RSB | 034 Snub Mount | Evolution Thor Skid Plate | Osram CBI 5000K D1S | Clear-Cornered | 6000K LED City Lights | LED DRLs | Paint-Matched Sidemarkers | Hoen Endurance Fogs | Interior LEDs | Plate LEDs | Upgraded Brakes | 18" RS4 Wheels | Sirius Satellite Radio Tuner | Aux-In | Hardwired Passport 8500 X50 | Hella Super Tone Horns

  13. #13
    Active Member Four Rings drumnjuny's Avatar
    Join Date
    Jul 12 2010
    AZ Member #
    61335
    My Garage
    848 Corse, SQ5
    Location
    washington dc area

    oh i didn't solder anything!! its actually a lot simpler than you'd think. but yes i will eventually make a DIY haha.

  14. #14
    Veteran Member Four Rings wildcat333's Avatar
    Join Date
    Feb 25 2011
    AZ Member #
    71493
    My Garage
    2016 Ford F-150; 2018 Honda Grom
    Location
    Seacoast NH

    Quote Originally Posted by drumnjuny View Post
    oh i didn't solder anything!! its actually a lot simpler than you'd think. but yes i will eventually make a DIY haha.
    haha, goddamn funk button. ok lemme know.
    2008 Audi A4 2.0T Quattro | Light Silver | S-Line | Automatic-Tiptronic | GIAC Stage 1+ | Autotech HPFP | 135 bar PRV | 35% Tint | KW V1 Coilovers | RS4 RSB | 034 Snub Mount | Evolution Thor Skid Plate | Osram CBI 5000K D1S | Clear-Cornered | 6000K LED City Lights | LED DRLs | Paint-Matched Sidemarkers | Hoen Endurance Fogs | Interior LEDs | Plate LEDs | Upgraded Brakes | 18" RS4 Wheels | Sirius Satellite Radio Tuner | Aux-In | Hardwired Passport 8500 X50 | Hella Super Tone Horns

  15. #15
    Active Member Four Rings drumnjuny's Avatar
    Join Date
    Jul 12 2010
    AZ Member #
    61335
    My Garage
    848 Corse, SQ5
    Location
    washington dc area

    right but mine does not work too well right now haha. couple different issues, once i figure em out i will post a DIY

  16. #16
    Senior Member Three Rings igjoe1989's Avatar
    Join Date
    Jan 02 2011
    AZ Member #
    68927
    My Garage
    Beer Fridge
    Location
    Huntsville, AL

    "Better to be a warrior in a garden, than a gardener in a war."--Bruce Lee

  17. #17
    Active Member Four Rings drumnjuny's Avatar
    Join Date
    Jul 12 2010
    AZ Member #
    61335
    My Garage
    848 Corse, SQ5
    Location
    washington dc area

    most of those pictures don't work anymore for some reason? lame... but yeah that thread has some info in it that might help.

  18. #18
    Veteran Member Four Rings Der Konig's Avatar
    Join Date
    Jul 09 2009
    AZ Member #
    44777
    My Garage
    '06 a4 2.0T 6MTQ, S3 '01.5 s4 avant 6speed, '12 KO4 Audi Q5
    Location
    Cleveland OH Area

    followed this write up and just did mine, worked great! I do have one question though, I am having issues with getting the velcro to stick to the interior. Did you use the one that came with the kit or something else? I went and picked up black command strips thinking they would stick better but am still having issues. It may just be how cold it is here, but if you did use the original velcro do you have any other suggestions?

    '04 Corvette Z06 track car
    '15 F350 Platinum 6.7
    '06 APR S2+ A4 2.0T 6 Speed DD - current
    '12 Q5 2.0T P+ Built engine/CTS K04/IE tune - current
    '05 Ford F250 XLT 4x4 BP'd 6.0 - current
    '01.5 APR S3 S4 Avant 6 Speed - sold '04 Goodwood S4 6 Speed - sold '91 Jetta GL 1.8 8v manual swap - sold '99 SVT Cobra 08whp/308wtq - sold '01 Mustang GT - sold '88 Mustang LX 5.0 - sold '95 Jeep Cherokee Country - sold

  19. #19
    Veteran Member Four Rings wildcat333's Avatar
    Join Date
    Feb 25 2011
    AZ Member #
    71493
    My Garage
    2016 Ford F-150; 2018 Honda Grom
    Location
    Seacoast NH

    Quote Originally Posted by Der König View Post
    followed this write up and just did mine, worked great! I do have one question though, I am having issues with getting the velcro to stick to the interior. Did you use the one that came with the kit or something else? I went and picked up black command strips thinking they would stick better but am still having issues. It may just be how cold it is here, but if you did use the original velcro do you have any other suggestions?
    Glad it mostly worked for you!

    I installed mine in July, so I am almost positive that is why you are having issues with the Velcro and cold interior plastics. I did *NOT* use the velcro that came with the kit (mute button and wires). I went to Home Depot and got some nice and thick Velcro-brand squares. I then cut it to fit the weird shape of the mute button, and stuck the sharp (hooks) side onto the mute button, and put the soft (loop) side onto the car with the adhesive backing removed. Try to get some of that product, and even if it is not warm outside, I would put a hair-dryer to the interior dash plastic (carefully) to get it up to 70-80 degrees or what a nice summer day would feel like. That should help with the adhesion. I also pushed the mute button with it stuck onto the interior trim piece for the first time VERY hard and held it there for probably 1-2 minutes to try to get a good adhesion.

    Also, since I posted this DIY, I have flipped over my mute button, and now have the actual button on the bottom of the mute button piece (versus the top like in my pic above). I found it easier for my hand to blindly find and push it in. Just something to think about if you have to re-do this again anyway. And I just used some Goo-Gone adhesive remover to undo the Velcro piece off the mute button.

    Hope this helps. Reply back if you have any other questions.
    2008 Audi A4 2.0T Quattro | Light Silver | S-Line | Automatic-Tiptronic | GIAC Stage 1+ | Autotech HPFP | 135 bar PRV | 35% Tint | KW V1 Coilovers | RS4 RSB | 034 Snub Mount | Evolution Thor Skid Plate | Osram CBI 5000K D1S | Clear-Cornered | 6000K LED City Lights | LED DRLs | Paint-Matched Sidemarkers | Hoen Endurance Fogs | Interior LEDs | Plate LEDs | Upgraded Brakes | 18" RS4 Wheels | Sirius Satellite Radio Tuner | Aux-In | Hardwired Passport 8500 X50 | Hella Super Tone Horns

  20. #20
    Active Member Four Rings drumnjuny's Avatar
    Join Date
    Jul 12 2010
    AZ Member #
    61335
    My Garage
    848 Corse, SQ5
    Location
    washington dc area

    best mod i have in my car, lol!!!

    i opted out of using their controls, instead used the funk button. totally worth it IMO

  21. #21
    Veteran Member Four Rings wildcat333's Avatar
    Join Date
    Feb 25 2011
    AZ Member #
    71493
    My Garage
    2016 Ford F-150; 2018 Honda Grom
    Location
    Seacoast NH

    Hardwire Escort Passport 8500 X50 Radar Detector

    Quote Originally Posted by drumnjuny View Post
    best mod i have in my car, lol!!!

    i opted out of using their controls, instead used the funk button. totally worth it IMO
    I remember you had issues with the phone cord at first. Can you post what spec or gauge or wire you used? Did you use a DIY to wire the funk button? Like what like go where and stuff.
    2008 Audi A4 2.0T Quattro | Light Silver | S-Line | Automatic-Tiptronic | GIAC Stage 1+ | Autotech HPFP | 135 bar PRV | 35% Tint | KW V1 Coilovers | RS4 RSB | 034 Snub Mount | Evolution Thor Skid Plate | Osram CBI 5000K D1S | Clear-Cornered | 6000K LED City Lights | LED DRLs | Paint-Matched Sidemarkers | Hoen Endurance Fogs | Interior LEDs | Plate LEDs | Upgraded Brakes | 18" RS4 Wheels | Sirius Satellite Radio Tuner | Aux-In | Hardwired Passport 8500 X50 | Hella Super Tone Horns

  22. #22
    Veteran Member Four Rings
    Join Date
    Apr 15 2007
    AZ Member #
    17294
    Location
    WNC

    Ordered a 9500ix and hopefully the right stuff to do this. Hope its not hard! Would love to have radar on all the time in a non-obvious place.
    2013 RS5, 2014 Q7

  23. #23
    Veteran Member Four Rings wildcat333's Avatar
    Join Date
    Feb 25 2011
    AZ Member #
    71493
    My Garage
    2016 Ford F-150; 2018 Honda Grom
    Location
    Seacoast NH

    Ya it's not too difficult. Post questions here and I can help if you have questions.
    2008 Audi A4 2.0T Quattro | Light Silver | S-Line | Automatic-Tiptronic | GIAC Stage 1+ | Autotech HPFP | 135 bar PRV | 35% Tint | KW V1 Coilovers | RS4 RSB | 034 Snub Mount | Evolution Thor Skid Plate | Osram CBI 5000K D1S | Clear-Cornered | 6000K LED City Lights | LED DRLs | Paint-Matched Sidemarkers | Hoen Endurance Fogs | Interior LEDs | Plate LEDs | Upgraded Brakes | 18" RS4 Wheels | Sirius Satellite Radio Tuner | Aux-In | Hardwired Passport 8500 X50 | Hella Super Tone Horns

  24. #24
    Veteran Member Four Rings
    Join Date
    Apr 15 2007
    AZ Member #
    17294
    Location
    WNC

    Hrm. So I did the install basically as above minus stripping paint off the ground because I wanted to see if it would work and it was fine yesterday. But today I got a low voltage prompt? I havent opened up my fuse box to see if something moved btu thought that was odd. Anyone have that happen before?
    2013 RS5, 2014 Q7

  25. #25
    Veteran Member Four Rings wildcat333's Avatar
    Join Date
    Feb 25 2011
    AZ Member #
    71493
    My Garage
    2016 Ford F-150; 2018 Honda Grom
    Location
    Seacoast NH

    Hmm. Not sure honestly. Try to scrape that paint off like I did. It's hidden so didn't bother me that it wasn't clean looking. Let us know if that helps.
    2008 Audi A4 2.0T Quattro | Light Silver | S-Line | Automatic-Tiptronic | GIAC Stage 1+ | Autotech HPFP | 135 bar PRV | 35% Tint | KW V1 Coilovers | RS4 RSB | 034 Snub Mount | Evolution Thor Skid Plate | Osram CBI 5000K D1S | Clear-Cornered | 6000K LED City Lights | LED DRLs | Paint-Matched Sidemarkers | Hoen Endurance Fogs | Interior LEDs | Plate LEDs | Upgraded Brakes | 18" RS4 Wheels | Sirius Satellite Radio Tuner | Aux-In | Hardwired Passport 8500 X50 | Hella Super Tone Horns

  26. #26
    Veteran Member Four Rings
    Join Date
    Apr 15 2007
    AZ Member #
    17294
    Location
    WNC

    Anyone else? Yeah I'll see what happens.
    2013 RS5, 2014 Q7

  27. #27
    Veteran Member Four Rings
    Join Date
    Apr 15 2007
    AZ Member #
    17294
    Location
    WNC

    God damnit. I had sent in my v1 to get updated so I received it back and it came with a different hardwire kit. Went ahead and tried to use that kit and use the same ESP fuse and no luck. And of course, now I have a new problem. I put the fuse back in just as it was before and now the car's ESP light wont turn off. FML. I reseated the damn fuse a few times and no luck. Any Ideas?
    2013 RS5, 2014 Q7

  28. #28
    Veteran Member Four Rings wildcat333's Avatar
    Join Date
    Feb 25 2011
    AZ Member #
    71493
    My Garage
    2016 Ford F-150; 2018 Honda Grom
    Location
    Seacoast NH

    Quote Originally Posted by rnp614 View Post
    God damnit. I had sent in my v1 to get updated so I received it back and it came with a different hardwire kit. Went ahead and tried to use that kit and use the same ESP fuse and no luck. And of course, now I have a new problem. I put the fuse back in just as it was before and now the car's ESP light wont turn off. FML. I reseated the damn fuse a few times and no luck. Any Ideas?
    I would get a fuse tester to make sure that the ESP fuse itself didn't blow somehow. I have something like this: http://www.amazon.com/Bussmann-BP-FT...ds=fuse+tester


    If the ESP fuse is blown, replace it. If not, it's difficult for me to say because you're using a different hardwire kit and different detector than my Passport. You could also try to post in the gps/radar threads from the main forum page if no one else here chimes in.
    2008 Audi A4 2.0T Quattro | Light Silver | S-Line | Automatic-Tiptronic | GIAC Stage 1+ | Autotech HPFP | 135 bar PRV | 35% Tint | KW V1 Coilovers | RS4 RSB | 034 Snub Mount | Evolution Thor Skid Plate | Osram CBI 5000K D1S | Clear-Cornered | 6000K LED City Lights | LED DRLs | Paint-Matched Sidemarkers | Hoen Endurance Fogs | Interior LEDs | Plate LEDs | Upgraded Brakes | 18" RS4 Wheels | Sirius Satellite Radio Tuner | Aux-In | Hardwired Passport 8500 X50 | Hella Super Tone Horns

  29. #29
    Established Member Two Rings
    Join Date
    Oct 04 2011
    AZ Member #
    82096
    Location
    Rochester, NY

    Quote Originally Posted by rnp614 View Post
    God damnit. I had sent in my v1 to get updated so I received it back and it came with a different hardwire kit. Went ahead and tried to use that kit and use the same ESP fuse and no luck. And of course, now I have a new problem. I put the fuse back in just as it was before and now the car's ESP light wont turn off. FML. I reseated the damn fuse a few times and no luck. Any Ideas?

    I am having a similar issue with my hardwire. When placing the add-a-fuse in the ESP location, my ABS light comes on and brake light flashes. I replaced the fuse, checked again and everything is ok. So I tried the #5 location (something with maintenance light) and my oil pressure light comes on. replaced fuse, everything back to normal.

    I tried using the tire pressure light location, but no go.

    Not sure what is going on. At this rate I might just use the type of tube fuse that comes with the Escort Smart Cord and tap into a switched power supply.

  30. #30
    Veteran Member Four Rings
    Join Date
    Apr 15 2007
    AZ Member #
    17294
    Location
    WNC

    Yeah I'm going to just have my garage figure something out and have them tap something. I dont have the escort thing, I have Valentine stuff but i'm sure they'll figure something out. Too bad the add a fuse shiz doesnt work for us.

    Out of curiosity what year is your car? Mine is a 2007.
    2013 RS5, 2014 Q7

  31. #31
    Established Member Two Rings
    Join Date
    Oct 04 2011
    AZ Member #
    82096
    Location
    Rochester, NY

    I have an 06. I am doing custom wiring, not using the escort cable, because Im hooking up the Funk button.
    Everything works, just not that add-a-fuse. button works fine, even lights up.
    Just need to figure out another switched power supply and tap into headlight switch to control button lighting

  32. #32
    Established Member Two Rings
    Join Date
    Oct 04 2011
    AZ Member #
    82096
    Location
    Rochester, NY

    well I figured out why the add-a-fuse wouldn't work... it has 2 spots for fuses. A spot for each circuit. I only had 1 fuse in there, so the radar would work but the ESP circuit would be open. Put in 2 fuses, and works like a charm.

    Now just to figure out how to take the pins out of the headlight switch connector, want to solder a wire right to the pin of the wire, so the button is lit at night

  33. #33
    Veteran Member Four Rings
    Join Date
    Apr 15 2007
    AZ Member #
    17294
    Location
    WNC

    Odd. I put in 2 fuses and it still doesnt work for my Valentine....wtf. You put in 2 10 amp fuses?
    2013 RS5, 2014 Q7

  34. #34
    Established Member Two Rings
    Join Date
    Oct 04 2011
    AZ Member #
    82096
    Location
    Rochester, NY

    Quote Originally Posted by rnp614 View Post
    Odd. I put in 2 fuses and it still doesnt work for my Valentine....wtf. You put in 2 10 amp fuses?
    yes 2 10amp fuses. Have you tried flipping it around? the back of the package said something about swapping polarity...

  35. #35
    Veteran Member Four Rings nananana4k's Avatar
    Join Date
    Sep 10 2005
    AZ Member #
    7912
    My Garage
    A4 B6 3.0, Q5 B8 3.2
    Location
    NYC

    Awesome. I've been siting on my smartwire for years. New project this weekend. Cheers!

  36. #36
    Veteran Member Four Rings wildcat333's Avatar
    Join Date
    Feb 25 2011
    AZ Member #
    71493
    My Garage
    2016 Ford F-150; 2018 Honda Grom
    Location
    Seacoast NH

    Quote Originally Posted by nananana4k View Post
    Awesome. I've been siting on my smartwire for years. New project this weekend. Cheers!
    Nice!
    2008 Audi A4 2.0T Quattro | Light Silver | S-Line | Automatic-Tiptronic | GIAC Stage 1+ | Autotech HPFP | 135 bar PRV | 35% Tint | KW V1 Coilovers | RS4 RSB | 034 Snub Mount | Evolution Thor Skid Plate | Osram CBI 5000K D1S | Clear-Cornered | 6000K LED City Lights | LED DRLs | Paint-Matched Sidemarkers | Hoen Endurance Fogs | Interior LEDs | Plate LEDs | Upgraded Brakes | 18" RS4 Wheels | Sirius Satellite Radio Tuner | Aux-In | Hardwired Passport 8500 X50 | Hella Super Tone Horns

Tags for this Thread

Bookmarks

Posting Permissions

  • You may not post new threads
  • You may not post replies
  • You may not post attachments
  • You may not edit your posts
  •  


    © 2001-2025 Audizine, Audizine.com, and Driverzines.com
    Audizine is an independently owned and operated automotive enthusiast community and news website.
    Audi and the Audi logo(s) are copyright/trademark Audi AG. Audizine is not endorsed by or affiliated with Audi AG.