Audizine - An Automotive Enthusiast Community

Results 1 to 29 of 29
  1. #1
    Active Member Four Rings B6JoeS4's Avatar
    Join Date
    Sep 13 2008
    AZ Member #
    32998
    Location
    Western Chicago Burbs

    DIY: Eliminating the brake pad warning light - a more direct solution

    Guest-only advertisement. Register or Log In now!
    This guide is for those of you that want a more permanent, issue-free way of eliminating the brake pad sensor light. The light can either be triggered by the installation of aftermarket brake pads that don't have wear sensors, or from worn brake pads tripping the light. The light comes on a little premature, so this can be seen as a way to get rid of the light without taking off the front wheels, cutting the wire, and connecting the leads together.

    For me, the light would no go away no matter how good I soldered or crimped the wires. What this way does, is ground the wire inside the car, way farther down the line than up by the brakes. The wire we are grounding is actually the wire that goes into the cluster.

    For those of you wondering, the light and/or waring sensor system can NOT be disabled on any 8E chassis car with VAGCOM. Believe me, I tried and failed.

    Step 1: Removal of the driver's side kick panel
    1a. remove the fuse access panel with either your flip key, or a flat head screwdriver. There is a little recess on the bottom side of it.
    1b. remove the kick panel by first removing the 12x1" trim piece that sits between the a-pillar, and the kick panel. This is the one that directly to the left of the dash. The bottom clip on this little piece holds on the top of the kick panel, so it has to come off first.
    1c. remove the kick panel by fist pulling it out.

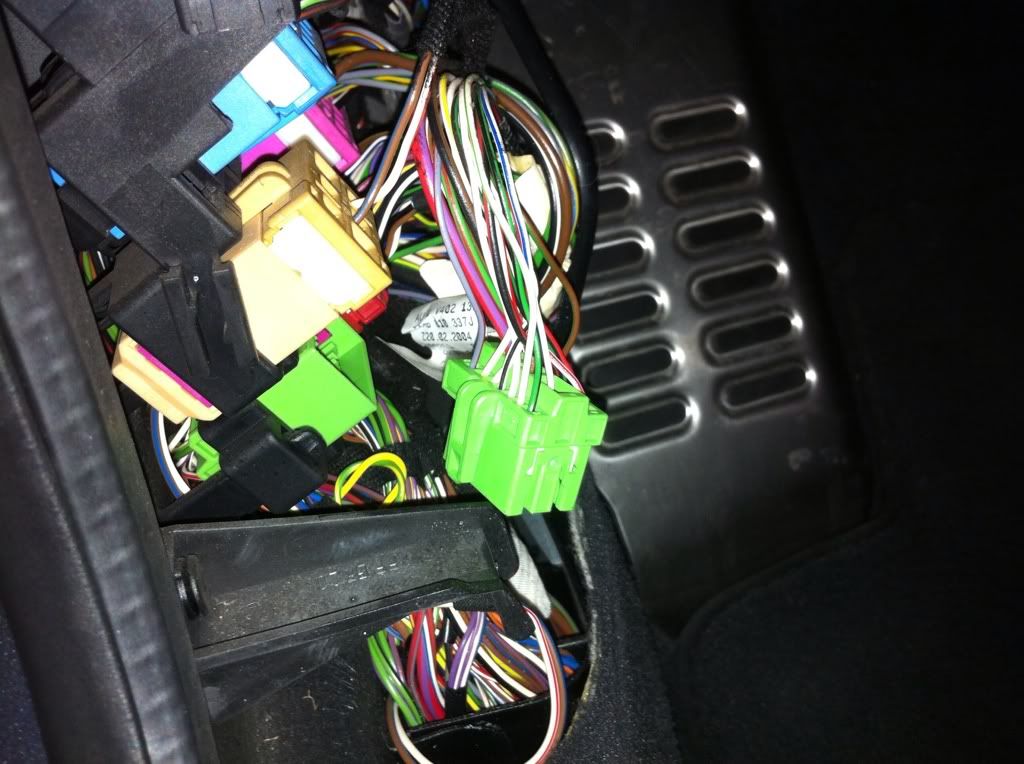
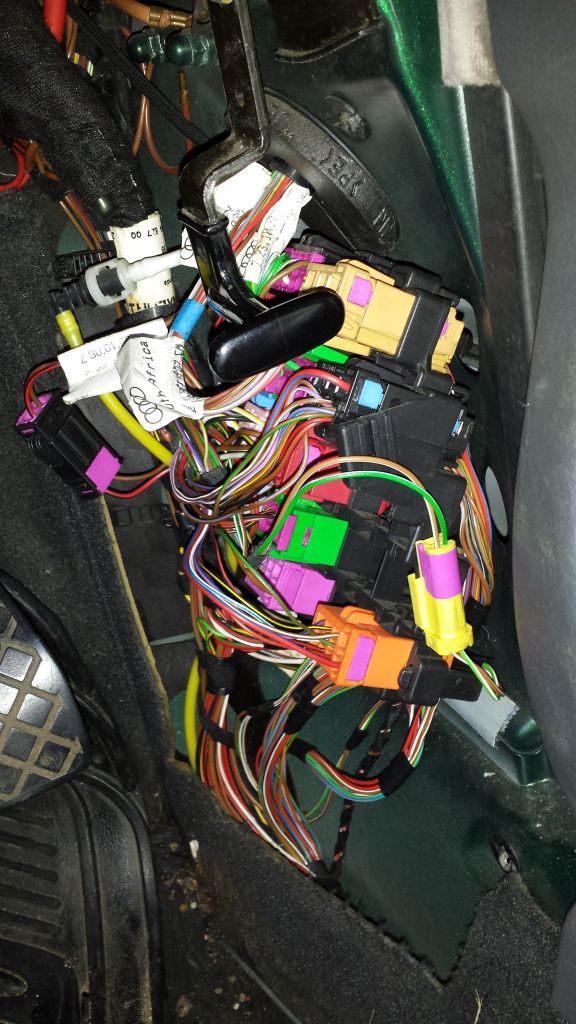
    Step 2: Locate this green plug and remove it. There are 2 clips on either side that need to be pried up at the same time. Don't pull on the wires!


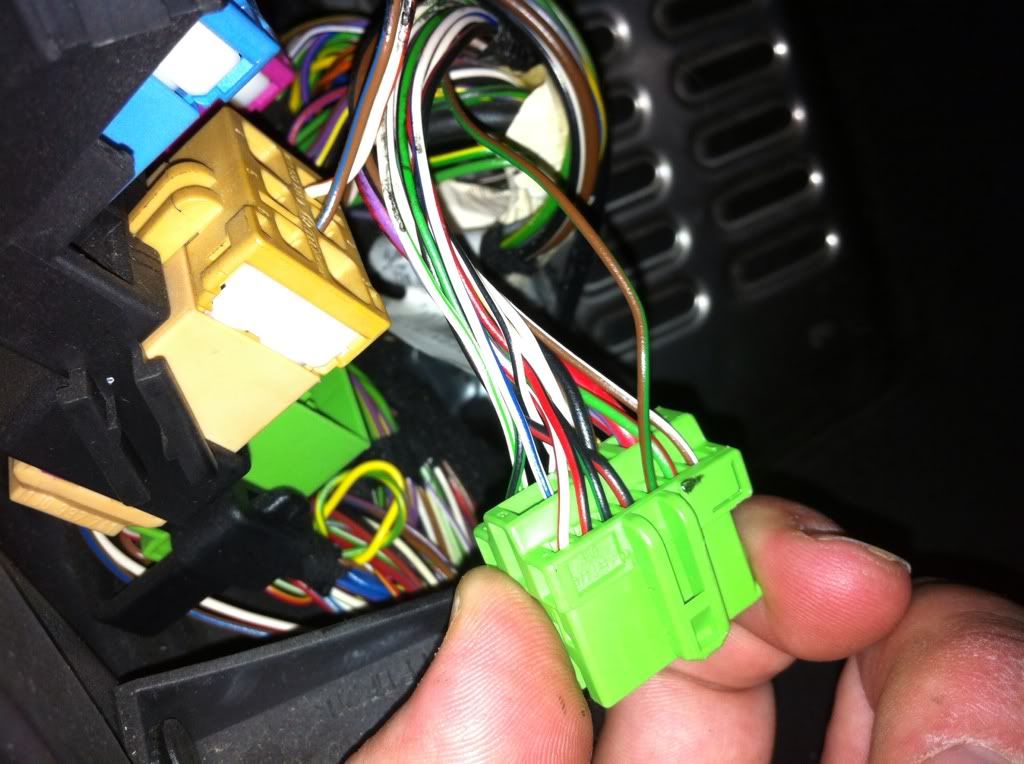
    Step 3: Look at the connector and locate the wire that we will be cutting and stripping. It is brown with a green stripe


    Step 4: Fabricate a jumper wire like this. I used 8" of 18ga. wire, an eye terminal, and some heat shrink to make it purdy. Ignore the white cap


    Step 5: Cut the green/brown wire somewhere near the connector. I cut way too close to the connector so I suggest butting about 3" away from it. Strip about 1/2" from both ends of the brown/green wire. Strip 1/2" from your jumper wire. insert the wires into the connector and crimp tightly. You can also solder it if you like, but I was nervous about doing that given how cramped it is, and that tiny wire will probably heat up and melt the insulation off of the nearby insulation.


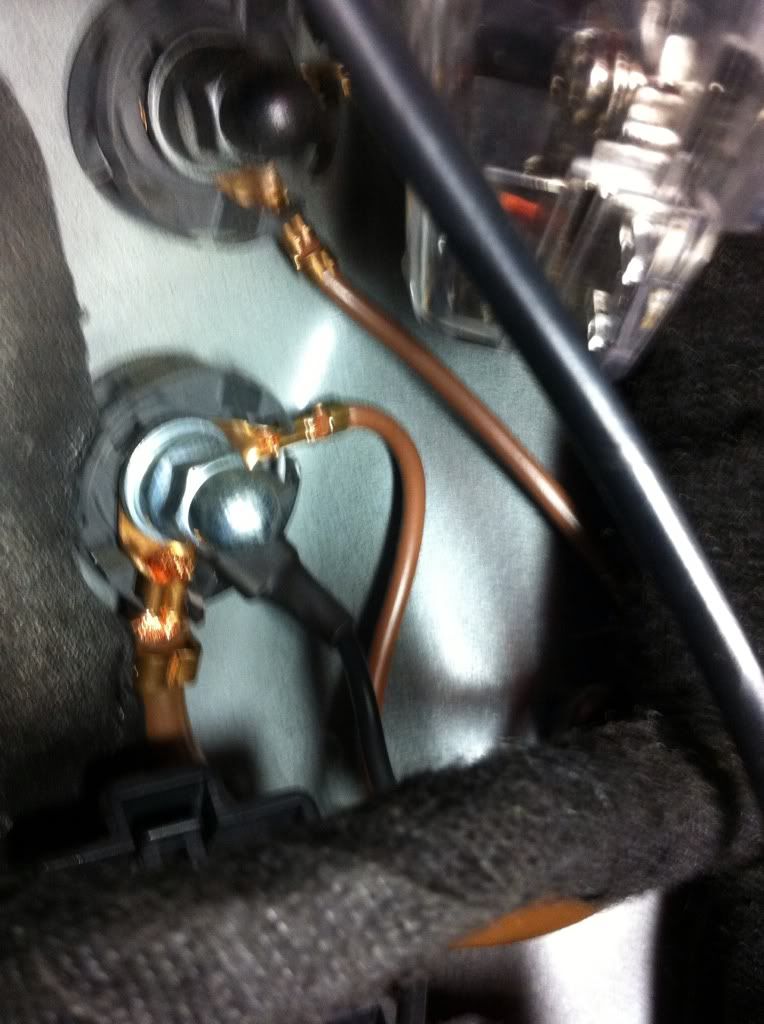
    Step 6: Now we need to connect the jumper wire to a nice solid ground. I chose to use one of the existing ground terminals on the car. This terminal is above the tip right corner of the wire junction. Remove the 10mm bolt, slide your terminal on, and put tighten the bolt nice and tight


    Turn the car on, and the light should be gone!

  2. #2
    Veteran Member Four Rings Black_Pearl_B6's Avatar
    Join Date
    Aug 11 2010
    AZ Member #
    62577
    Location
    Agawam Ma

    this is a great alternative to the "paper clip" mod or where you cut the wires from your pads and crimp them, mine have been exposed to the elements and the light has been coming on. this is a great diy I will be doing this in the morning
    09 Prestige Package

  3. #3
    Active Member Four Rings BenSti's Avatar
    Join Date
    Nov 03 2010
    AZ Member #
    66535
    Location
    Cupertino, CA

    Great work! Very useful for people who run pads without sensors! Thanks!
    2008 Audi RS4 Ibis White w/ Ti Package | 18x10.5 TCIII w/ 275/35 NT01 | PSI Raceline Ohlins | Stoptech Trophy Brakes F/R | Raybestos ST47 | OSGiken 1.5Way Rear LSD | Wavetrac Front LSD | Apikol Diff Mount | 034 Billet Subframe Bushings | 034 Motor Mounts | 034 Aluminum Trans Mount | 034 Spherical UCA | 034 Front Endlinks | JHM LWFW&Stage 4 Clutch | JHM Shifter+Linkage | Custom CAI | Custom Splitter | Hotchkis Sways F&R | Status Ring GT Seats + Half Cage | 034 Rear Endlinks | EBW LW Battery

  4. #4
    Veteran Member Four Rings SurferD's Avatar
    Join Date
    Apr 30 2007
    AZ Member #
    17686
    My Garage
    18Forester XT touring, 03-F150 XLT, 71-240Z
    Location
    Orange, CT

    Great write up but thats a lot of work involved.
    I just cut the connector off the pads, shorted the wires, RTV'd it so it's protected and secured the wire with tie wraps.

    If I ever want to go back to stock brake pads I just disconnect and go.
    Currently: 2017 Q7 Prestige 3.0 with APR tune.
    Formerly: 2007 S4 Avant 6MT; 2002 S4

  5. #5
    Veteran Member Four Rings Black3.2's Avatar
    Join Date
    Jun 02 2009
    AZ Member #
    43214
    My Garage
    2017%20S6%2C%202019%20Q7
    Location
    Atlanta

    i just cut the wire, spliced them together wrapped it in electrical tape and off i go, took about 4 minutes total. I did look at the fuse box prior to doing what i did to try and figure it out that way. Now i know. Thanks for posting this.

  6. #6
    Veteran Member Four Rings dparm's Avatar
    Join Date
    Apr 24 2009
    AZ Member #
    41628
    Location
    Frisco, TX

    My Ferodos don't have the sensor, so we just used the paper clip, then wrapped it in electrical tape and put the heat-shrink tubing over that. No problems in over a year.

    Still, this is a good write-up.
    now: 2021 Mercedes AMG C63 S, 2017 Chevrolet Corvette Grand Sport
    past: 2005 Audi S4, 2011 Audi S4

  7. #7
    Registered Member One Ring
    Join Date
    Oct 29 2013
    AZ Member #
    127475
    Location
    United Kingdom


    I found this post as I've been trying to sort out my own brake wear idiot light, I've tried all the usual methods. .solder, twist, crimp etc so I'm trying this method just one problem my harness (see pic) has different colours from the original pic at the top. I'm hoping that someone will help me identify the brake pad wear sensor wire so I can ground it like in the original instructions on this post. And hopefully it will help anyone else who has wiring like mine. I have a 2000 Audi A4. Cheers

  8. #8
    Veteran Member Four Rings MacFady's Avatar
    Join Date
    Aug 10 2011
    AZ Member #
    79540
    My Garage
    330i ZHP
    Location
    Prince Edward Island

    I know this is an old thread, but Audibob, you removed the wrong kick panel, you want the one by the dead pedal.

  9. #9
    Veteran Member Four Rings JimmyBones's Avatar
    Join Date
    Apr 03 2010
    AZ Member #
    57098
    Location
    Northern Virginia

    He is from the UK and that looks like the hood/bonnet release so I am guessing that the car is RHD.

  10. #10
    Senior Member Two Rings Fritz_S4's Avatar
    Join Date
    Aug 06 2013
    AZ Member #
    120435
    Location
    Snowy heaven

    Quote Originally Posted by JimmyBones View Post
    He is from the UK and that looks like the hood/bonnet release so I am guessing that the car is RHD.
    Right on the money JimmyBones, Also he has a B5 A4 and the wiring is different. Reason why his fuse panel is different. Audibob should check the B5 forum for answers to this question or alternatively find a wiring diagram.

  11. #11
    Veteran Member Three Rings Schrubbe8210's Avatar
    Join Date
    Jun 16 2012
    AZ Member #
    95341
    My Garage
    1997 B5 A4 track car, 2017 Q7 Prem Plus
    Location
    Elm Grove, WI

    just did this. I have a B6 S4 cabrio. my light wasnt on right now, but goes on when it rains outside. the connector was the same, and had the exact same wiring setup. because I have a cabrio, there were a lot less plugs, but overall, it appeared to be the same. Just adding to the info pool here. Ill keep yall posted if I have the light come on. Thanks OP for the info!

  12. #12
    Veteran Member Three Rings Schrubbe8210's Avatar
    Join Date
    Jun 16 2012
    AZ Member #
    95341
    My Garage
    1997 B5 A4 track car, 2017 Q7 Prem Plus
    Location
    Elm Grove, WI

    I also used one of those quick splice connectors so I didnt have to cut the wire. makes it easily reversible, to an extent.

  13. #13
    Deactivated One Ring delauren667's Avatar
    Join Date
    Feb 11 2014
    AZ Member #
    144777
    Location
    Canada

    What is the green connector called? I removed the kick panel from a 2001 Audi A6 2.7t and did not see a green 'cube' connector? Anybody did this mode for a C5 Audi A6?

  14. #14
    Veteran Member Four Rings Andrew149's Avatar
    Join Date
    Apr 19 2009
    AZ Member #
    41417
    Location
    Modesto/CA

    Just did this mod and it worked great!!!! SWEET
    2012 Audi A6 3.0t
    2019 GTi 2.0t 6 speed
    2013 Touareg VR6

  15. #15
    Senior Member Two Rings audi1.8tFTW's Avatar
    Join Date
    Aug 04 2010
    AZ Member #
    62277
    Location
    Québec, Ste-Foy, Canada

    Really good tips !! thx for getting rid of my damn light :P
    Denim Blue A4 B6.................................3" custom down pipe
    Frankenturbo...........................................Organic clutch stage 3 (by clutchmaster)
    Custom aluminium airbox..........................3" double vibrant resonator
    440cc bosch injector................................Coilover ECS
    Uni stage 2+ chip, +2psi for franken.........Rs4 rear sway bar

  16. #16
    Senior Member Three Rings IndoReef's Avatar
    Join Date
    May 20 2015
    AZ Member #
    333395
    My Garage
    2018 VW GTI Autobahn
    Location
    Ontario/Canada

    Just finished this Mod, Works perfectly. Thanks!!!!
    Winter: 02 B6 1.8T quattro 01A Brilliant Black, Gutted Stock Cat, 2.5" stainless custom exhaust to 4 inch tips,DSMIC's
    USP Front lower Valance, REVO Stage 1, Solo Werks S1 Coilovers,B6 S4 Front Brakes, Forge Hybrid Diverter Valve, SAI & AC Delete
    Summer:2018 MK7.5 GTI AutoBahn

  17. #17
    Veteran Member Three Rings jmcS4's Avatar
    Join Date
    Nov 16 2013
    AZ Member #
    130459
    My Garage
    q7 tdi+, b5 s4, r56 mcs
    Location
    Lower NH

    Curious but is this such an issue for people that this mod is necessary?
    >04' S4, Nitrous
    >01.5' S4 dps, tune
    >12' Q7 TDI S-Line Plus
    >R56 Mini S w/jcw aero kit

  18. #18
    Veteran Member Four Rings FulhamFTW's Avatar
    Join Date
    Jul 10 2010
    AZ Member #
    61283
    Location
    STL, MO

    For people with pads that don't have sensors, ie. BBK's, yes, it is. I did this mod and it's worked like a charm for the last 30k or so.

  19. #19
    Veteran Member Three Rings sitting proper's Avatar
    Join Date
    Jan 22 2013
    AZ Member #
    108043
    Location
    Pittsburgh

    I did this today, and I didn't splice any wires. Just use a clip connector that cuts through the wire coatings. It'll still make the current go through both wires to the ground. Less work, and it's fully reversible.
    Past - '07 S4 Imola Yellow Avant, '06 S4 25quattro Avus Silver

  20. #20
    Registered Member One Ring
    Join Date
    Jul 29 2015
    AZ Member #
    345777
    Location
    Vancouver

    Quote Originally Posted by Black3.2 View Post
    i just cut the wire, spliced them together wrapped it in electrical tape and off i go, took about 4 minutes total. I did look at the fuse box prior to doing what i did to try and figure it out that way. Now i know. Thanks for posting this.
    Which wire exactly did you cut? If so I'm doing this right away. This beeping is killing me!!! Also with the led lights I put in the extra beeping is not pleasant. Anything to help!

  21. #21
    Registered Member One Ring
    Join Date
    Jul 29 2015
    AZ Member #
    345777
    Location
    Vancouver

    Quote Originally Posted by sitting proper View Post
    I did this today, and I didn't splice any wires. Just use a clip connector that cuts through the wire coatings. It'll still make the current go through both wires to the ground. Less work, and it's fully reversible.
    Where can I get a hold of one of these clip connectors? And to be clear, in putting this into the brown and white wire?

  22. #22
    Veteran Member Three Rings sitting proper's Avatar
    Join Date
    Jan 22 2013
    AZ Member #
    108043
    Location
    Pittsburgh

    You can buy them at any auto parts store or even hardware stores. Green and Brown wire is the one you're tapping into.

    Past - '07 S4 Imola Yellow Avant, '06 S4 25quattro Avus Silver

  23. #23
    Registered Member One Ring
    Join Date
    Jul 29 2015
    AZ Member #
    345777
    Location
    Vancouver

    Thanks! Going to run through it today

  24. #24
    Veteran Member Four Rings boy412's Avatar
    Join Date
    Jul 15 2007
    AZ Member #
    19553
    My Garage
    2015 Golf Sportwagen TDI, 1988 Alpineweiß 325iC
    Location
    Mount Rainier, MD

    Necro bump. I did this today and was happy to find this thread. After 10+ years of running aftermarket pads I decided this was worthwhile. I had the warning indicator lit and no amount of cleaning the connectors made it go away. This mod was pretty straightforward. Hardest part was getting that kickpanel out (which I had never taken off in 13+ years of ownership).

    The wires coming off the plug are 22AWG so if you DO decide to use a wire tap (which I did, so I could easily reverse this mod if desired) then be sure to get a tap that will work with that gauge. The ring terminal connector you will need is a 1/4" ring terminal. Here is a pic of the hardware I used:

    ~Eric
    SOLD: '03 Ming Blue A4 Avant 1.8TQM | GTRS | MTM cat/exhaust | Maestro | Spec Stage III+ | Vogtlant GT's | JHM trio | STE PPD | OEM+

  25. #25
    Established Member Two Rings
    Join Date
    Sep 20 2010
    AZ Member #
    64553
    Location
    beloeil, quebec canada

    what happens if you don't connect the other wire? (not the wire connected to the connector, the other one)

  26. #26
    Registered Member One Ring
    Join Date
    Mar 02 2008
    AZ Member #
    25934
    Location
    Land of Rushmore

    I'm about to perform this mod but because of the op's dead images it's a half blind attempt. I'm planning to use the tap, but before I proceed on any of this can you offer any details on your particular steps. The red connector, I can't quite make out what style and not sure where this would go. Maybe it's straight forward... Trying my luck here.

  27. #27
    Senior Member Three Rings Kylet21's Avatar
    Join Date
    Dec 19 2016
    AZ Member #
    388690
    My Garage
    2012 TT RS
    Location
    Milwaukee, WI

    Just want to say thanks to everyone who posted on here. This was a very simple solution that saved me a major headache.


    Sent from my iPhone using Audizine

  28. #28
    Active Member One Ring
    Join Date
    May 20 2013
    AZ Member #
    115505
    Location
    uk

    This warning light has been doing my head in looking for a way to turn it off. Will this work on my 2013 A5 sline rhd or will there be any differences. I REALLY need a fix for this for my own sanity.

  29. #29
    Active Member One Ring
    Join Date
    Mar 17 2022
    AZ Member #
    681737
    Location
    United Kingdom

    Another necrobump just to say that this has worked perfectly for my right hand drive B7 RS4 Avant. Note that the wiring is still on the left side of the car for RHD. Thanks Joe.

Bookmarks

Posting Permissions

  • You may not post new threads
  • You may not post replies
  • You may not post attachments
  • You may not edit your posts
  •  


    © 2001-2025 Audizine, Audizine.com, and Driverzines.com
    Audizine is an independently owned and operated automotive enthusiast community and news website.
    Audi and the Audi logo(s) are copyright/trademark Audi AG. Audizine is not endorsed by or affiliated with Audi AG.