Audizine - An Automotive Enthusiast Community

Results 1 to 26 of 26
  1. #1
    Active Member One Ring a4ridin's Avatar
    Join Date
    Mar 20 2012
    AZ Member #
    90278
    Location
    boston

    DIY power steering pump replacement b6 3.0 quattro with pics

    Guest-only advertisement. Register or Log In now!
    B6 3.0 Quattro 2002 *view full size photos in audizine photo gallery* a4ridin

    Things u will need
    A replacement pump go with new or remanufactured, which ever has the best warranty
    6mm hex head socket with 3/8 drive
    3/8 drive flexible head
    19 mm wrench
    2 6 inch 3/8 drive ratchet extension
    needlenose pliers
    new clamps for hose connections
    channel locks
    22mm socket that can attach to a 3/8 drive
    3/8 drive ratchet
    2 liters of vw audi power steering fluid or pentosin chf 11s (2 liters should be enough for topping off reservoir post installation and do a lil bit of flushing of the system)
    a jack that can get both front wheels off the ground
    a friend on hand to assist for some of the diy u can do most by yourself
    I highly recommend doing a power steering flush post installation and replacing all clamps and any bad hoses upon pump transfer
    if u have already replaced ur pump dont forget to check to see if u have a manufacturers warranty i sent back both pumps i had replaced at a shop. and didnt pay a penny for my replacements other than shipping on one i ordered off the net now i have an xtra pump lol.

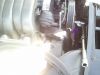
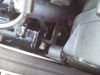
    1. start by removing the cover over the power steering pump. Pull the rubber stripping off for a lil more space as shown in pic.Take your 6mm allen head(hex head) socket and attatch it to your 3/8 flexible attachment. Not to the ratchet for space is restricted. Then connect your six inch 3/8 extension so u should have a 3/8 extension with a flexible head with your 6mm allen head socket attached to the flexible head. Now loosen the three bolts connecting the p/s pump to its pulley with your homemade tool. You may have to turn over the engine for a second to get the last bolt to land in a place where u can loosen it , once again space is restricted.


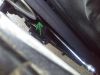
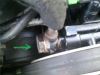
    2.Once u have removed the bolts for the pulley take your 19 mm wrench and press on the tensioner to release the tension on the drive belt . You will see a piece if you look to the right of your tensioner pulley,that is where the wrench goes.

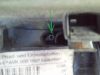
    3. Remove drive belt and pulley. Once belt and pulley are removed you can now start unbolting the pump bracket. You cannot remove the pump wthout removing the bracket with it. The bolt in the back of the pump is impossible to reach. All bolts are the same size as the pulley 6mm allen key head socket that hold the pump and bracket in. There are 6 bolts in all, 3 bolts holding the pump to the bracket, 2 in front, and the one in back of the pump. The other 3 hold the bracket to the car , 2 in front, and one in back. For the back bracket bolt stand over the pump and look down behind the pump and you will see the last bracket bolt. use your 2 6" 3/8 extensions connected to make a 12 inch extension and unbolt the last bolt holding the bracket in place using your 3/8 ratchet . The last bolt holding the pump to the bracket will come out after the pump and bracket are out.

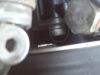
    4.Then with your 22mm socket connect it to the banjo bolt and with a channel lock hold the bolt behind the banjo while you use while you use your 22mm to a 3/8 ratchet to loosen the banjo bolt. Have rags on deck and a pan under your car. Im assuming you have your skid plates removed . Catch old fluid from under the car and wipe excess fluid away.
    Last edited by a4ridin; 04-05-2012 at 10:29 AM.

  2. #2
    Active Member One Ring a4ridin's Avatar
    Join Date
    Mar 20 2012
    AZ Member #
    90278
    Location
    boston

    DIY power steering pump replacement b6 3.0 quattro with pics

    4. There is a bolt next to the oil dipstick to give the banjo line some slack, follow the banjo line to find it and loosen it to slack the line.

    5. Then remove the inlet hose from the pump (small rubber hose on pump). Have new clamps on hand to fit the hose because this hose uses one time clamps. Use needle nose pliers to remove one time clamps.

    6. Now that the pump is free wiggle the old pump and and bracket out of the car wipe any excess p/s fluid up have a pan under the car prior to removal to catch old fluid. Once the pump and bracket are out you can now remove the last bolt holding the pump to the bracket that i mentioned at the end of step three. Seperate pump from bracket. I chose to spray the bracket with brake cleaner and clean it up a bit, completely optional.

    7. Bolt your replacement pump to the bracket before re installation and pour some OE power steering fluid in the inlet hose side of the pump . Or Pentosin in the green can not the white can. I believe it is CHF-11S i will double check though. Turn the triangle on the pump that bolts to the pulley a few times to work some fluid into the new pump. In other words prime the pump before install.

    8. Install in reverse order starting with the bracket bolt in the back. I did not completely tighten all bolts until all 3 bracket bolts were in place and semi tightened. Place new washers on the banjo bolt and replace any o-rings u find. Some replacement pumps may have them in the box. If not hit your local parts store. Put new clamps on inlet hose top and bottom connection. Tighten all bolts to specified torque and put your pulley back on and tighten bolts.

    9. Put your belt back on. 10x easier if you have a buddy to assist. I had my bro press on the tensioner with the 19mm wrench while i routed the belt and then went underneath the front bumper and pulled the belt over the alternator. With everything back together top off p/s reservoir make sure all your inlet hose clamps are on properly its usually the first thing to suck air into the system. and everything is nice and tight. Start your engine and quickly shut it off. Do this a few times to circulate the fluids. Have jumper pack or cables ready as this can drain your battery. Then run the car for two or three min top off fluid if needed, do not let the reservoir run dry. Have a buddy watch the p/s reservoir. Jack the front of the car up till the wheels are off the ground. With the car turned off turn the wheel from lock to lock . Do not hold in the lock position and have your assistant watch the bubbles come out of the reservoir. Basically you are manually burping the system of air. My steering slowly returned after repeating this process several times until no more or very few bubbles come up . Lower your car back down start car let car run for a few minutes. I held my rpm at about 2000 for about 10 seconds to get the p s fluid circulating. You should see your res circulating the fluids and and any air bubbles start to discipate and the pump should go quiet. Do not turn the wheel on the ground until all of the air is out. Once all is complete and the pump is operating how it should follow up with a ps flush provided by koolade9 worked great by the way. Also has an excerpt from the bentley service manual, flush is very helpful .http://www.audizine.com/forum/showth...luid-flush-DIY

    My pump is quieter and operating better than ever if anyone wants to correct or add to this thread please feel free to do so. I give the job a 2.5 out 5 difficulty , being that its a small area to work in . I am not a professional mechanic so use this information at your own discretion. I hope it helps any power steering woes out there and pics will be coming soon. Please rate and comment on this thread . It worked for me hope it works for u as well. Happy trails
    Last edited by a4ridin; 04-05-2012 at 10:42 AM.

  3. #3
    Active Member Two Rings
    Join Date
    Mar 20 2011
    AZ Member #
    72662
    Location
    Cliffside Park, NJ

    Nice write up. Definitely have to tackle this soon. Do you have bigger pictures for reference? I'm very interested in what your homemade tool looks like. I can kind of picture it in my head but a visual will be a thousand times better.

    My mechanic keeps on screwing me over with crappy refurb pumps that fail after a week. Also, he doesn't flush or prime the pump.

    BTW, What are you doing with your extra pump? (Read: Wanna sell it to me?)

  4. #4
    Active Member Two Rings
    Join Date
    Mar 20 2011
    AZ Member #
    72662
    Location
    Cliffside Park, NJ

    Quote Originally Posted by DannYook View Post
    Do you have bigger pictures for reference? I'm very interested in what your homemade tool looks like. I can kind of picture it in my head but a visual will be a thousand times better.
    Never mind. I went to your photo gallery and they were all there.

  5. #5
    Veteran Member Four Rings JEENYUS's Avatar
    Join Date
    Jul 28 2009
    AZ Member #
    45627
    My Garage
    2003 A4 3.0 V6
    Location
    SL,UT

    a couple of things on this...

    one, don't take off the rubber lining around the outside of your hood. you will cut the shit out of your arms and hands. two, better pictures would be appropriate. I was going to take some to go along with the write-up, but my camera was dead and I didn't feel like waiting. three, you need to put in more information about the belt tensioner. that thing is the BIGGEST PITA ever! I am still fuckin' around with it at this point. All-in-all the DIY is fairly straight forward. Thank you for the information to help me through the install!
    Asses are where it's at. even fat chicks can have nice boobs. -MmmBoost

  6. #6
    Established Member Two Rings Young SS's Avatar
    Join Date
    Jul 10 2009
    AZ Member #
    44822
    My Garage
    95 Impala SS, Blk 04 A4 6speed
    Location
    Chicago, IL 60616

    10 mins away from starting this DIY. I hope I can get through it in 2 hours!!
    ST Coilovers, JHM Stage 3 Clutch & LWFW, JHM Short Shifter, S4 brakes (front), Joey mod, H.I.D. Fogs, S4 spoiler, Led Tails, Tinted Tails, (SUMMER) 19x8.5/19x9.5 TSW Snetterton, (WINTER) 17x7.5 BBS RC's,USP front Bumper

  7. #7
    Active Member Two Rings
    Join Date
    Sep 22 2012
    AZ Member #
    100931
    Location
    Canada

    I have done it too. Took me 30 minutes in total to replace the pump. My tensioner was aftermarket and was missing the stripe with holes in the middle. I just pressed on it with a 19mm and then let it go back, it didnt go back a lot. I didnt have to insert any pins at all. Finished replacing the pump and pressed on the tensioner to put the belt on. Piece of cake. Didnt have to remove the front of the car either.
    the only problem i had was screws and little bits falling under the intake manifold. Nothing major. My life is heaven now with a soft steering. :D

  8. #8
    Registered Member One Ring
    Join Date
    Aug 27 2013
    AZ Member #
    121883
    Location
    Oregon

    Going to do this sunday. Hopefully it doesn't take too long!

  9. #9
    Registered Member One Ring
    Join Date
    Aug 27 2013
    AZ Member #
    121883
    Location
    Oregon

    I did this the other day and it turned out that it was just a faulty hose. So now I have a brand new PS pump. Bought it off Europaparts for $260. if anyone is going to do this you can buy mine! email [email protected]

  10. #10
    Veteran Member Three Rings Lornnn's Avatar
    Join Date
    May 01 2011
    AZ Member #
    74868
    Location
    Pe

    Quote Originally Posted by jkellsz View Post
    I did this the other day and it turned out that it was just a faulty hose. So now I have a brand new PS pump. Bought it off Europaparts for $260. if anyone is going to do this you can buy mine! email [email protected]
    Which hose was bad? How was it faulty?

  11. #11
    Registered Member One Ring
    Join Date
    Aug 27 2013
    AZ Member #
    121883
    Location
    Oregon

    The elbow hose on the right side of the pump was almost cut it half. I'm blaming the shop that had replaced my timing belt and all that... My problem still isn't fixed though. Fixed the hose and flushed the system and my power steering still won't come back.

  12. #12
    Veteran Member Three Rings Lornnn's Avatar
    Join Date
    May 01 2011
    AZ Member #
    74868
    Location
    Pe

    To anyone who reads this and the posts above saying it was easy:

    Neither my hands or arms were small enough to work with the tools on the belt tensioner and it was a real pain in the ass to deal with the belt as well. Took me two days in the end. Ridiculous.

    I'd recommend you do yourself a favor and take the extra 30 minutes to put it in the service position. You will have so much more room to work comfortably in an already cramped engine bay and you'll be able to do it in 15 mins the next time you'll undoubtedly need to. Of course your mileage may vary, but all you need to do is:

    1 Unscrew and pull the headlights out, you don't even need to disconnect them, to reach 6 nuts that hold the sides of the bumper on.
    There are three in a row on each side, just look down along the inside fender, all of them are 10mm.

    2 Take out the fog light grilles. It's just a quick tug or a bit of wiggling to set them free. Under there you'll find an allen bolt on each side... maybe an 8. Remove them. They are long.

    3 Give your bumper a firm tug and a bit of wiggling up and towards you to get it loose. There is no need to rip the valence off or anything. Keep in mind that there are hoses and connectors attached so expect to tuck it under the front end while you work.

    4 Remove the bumper stops. They stick out and were the housings for those last allen bolts you took out. They each have 3 T40 torx bolts and a 10mm nut.

    5 Slide them out and then thread a bolt back into one of the holes a bit so the carrier can rest on it. I put it in maybe 5 threads. Just the tip to see how it feels.

    6 Remove the weather strip. The one in the first picture above.

    7 Take out 4 bolts that hold the carrier to the fenders, two on each side, just above where the headlights screw in. It is the same torx bit as the headlight bolts.

    8 Slide and/or wiggle the carrier forward. Do not expect to remove it. The long bolts you threaded earlier will keep it from falling out or off.

    Beer Congratulations. Now you don't need magical fairy hands or tools to get this job done.
    Last edited by Lornnn; 12-27-2013 at 09:23 AM.

  13. #13
    Veteran Member Four Rings SlickFix's Avatar
    Join Date
    Nov 11 2010
    AZ Member #
    66868
    Location
    Rochester, MN

    ^^ Nice explanation, Lornnn. It's much easier to put the car into service position than it seems at first glance. Just want to point out a couple of things:

    1. There is a T25 screw on the inside of each fender liner that need to be removed before you try to pull off the bumper.

    2. The bolts on the bumper stops are T40, not T35.
    His: 2012 Moonlight Blue Metallic S5 Prestige
    Hers: 2014 Lava Gray Metallic Q5 2.0T
    Son's: 2005.5 Imola Yellow B7 S4 4.2 Sedan
    19" B8 S5 Peelers

  14. #14
    Veteran Member Four Rings SJorge3442's Avatar
    Join Date
    Aug 27 2013
    AZ Member #
    121842
    Location
    Philly

    Quote Originally Posted by SlickFix View Post
    ^^ Nice explanation, Lornnn. It's much easier to put the car into service position than it seems at first glance. Just want to point out a couple of things:

    1. There is a T25 screw on the inside of each fender liner that need to be removed before you try to pull off the bumper.

    2. The bolts on the bumper stops are T40, not T35.
    Why is it that Slick and myself are the only ones who prefer to put the car in service position to work on it? It literally takes 30 minutes max to slide the carrier forward. Hell, if my radiator drain hose would actually drain, I'd probably pull the carrier off since its literally just the hood release and the radiator hoses that remain.
    2017 A4 6 Speed - Sport Plus - Mythos Black
    2018 Q5 - Prestige - Manhattan Grey

  15. #15
    Veteran Member Three Rings Lornnn's Avatar
    Join Date
    May 01 2011
    AZ Member #
    74868
    Location
    Pe

    Quote Originally Posted by SlickFix View Post
    ^^ Nice explanation, Lornnn. It's much easier to put the car into service position than it seems at first glance. Just want to point out a couple of things:

    1. There is a T25 screw on the inside of each fender liner that need to be removed before you try to pull off the bumper.

    2. The bolts on the bumper stops are T40, not T35.
    Thanks, Slick. You can just call me Lorn, haha... the n's are a long dumb story.

    Strangely enough I don't have the T25s in the fender liner. Is it accessible from the same headlight area or elsewhere like the wheel well?

    I'm sure there's a visual explanation somewhere else but I figured I'd put something up here as well.

  16. #16
    Veteran Member Four Rings SJorge3442's Avatar
    Join Date
    Aug 27 2013
    AZ Member #
    121842
    Location
    Philly

    its right behind the splash guard. Its the bolt that bolts the lower bumper to the frame.
    2017 A4 6 Speed - Sport Plus - Mythos Black
    2018 Q5 - Prestige - Manhattan Grey

  17. #17
    Veteran Member Four Rings JEENYUS's Avatar
    Join Date
    Jul 28 2009
    AZ Member #
    45627
    My Garage
    2003 A4 3.0 V6
    Location
    SL,UT

    It really is an easy installation if you put the car in service position. I bet it would only take about 15 min after you put the car in service position. Looking back on it I would have benefited from putting my car in the service position to do this install. Either way still an easy installation.
    Asses are where it's at. even fat chicks can have nice boobs. -MmmBoost

  18. #18
    Veteran Member Four Rings walky_talky20's Avatar
    Join Date
    Jun 30 2008
    AZ Member #
    30427
    Location
    Erie, Pennsylvania

    Quote Originally Posted by SJorge3442 View Post
    Why is it that Slick and myself are the only ones who prefer to put the car in service position to work on it? It literally takes 30 minutes max to slide the carrier forward. Hell, if my radiator drain hose would actually drain, I'd probably pull the carrier off since its literally just the hood release and the radiator hoses that remain.
    At our shop we will sometimes avoid going into service position for other reasons. Like customer complaints about headlight aiming, fitment, etc. If you can do it without touching that stuff you might dodge a bullet.

    Case in point, we had an A6 come in with a bumper that was seriously hacked up and jerry-rigged to the car behind the scenes. We opted to do the entire t-belt and water pump job without going to service position. Guess who called back just 1 week later saying the entire front bumper fell off her car? And how we should fix it for free because "you were the last ones to remove it". Sorry lady, we didn't even *touch* your bumper.
    ^Don't listen to this guy, he's not even a mechanic.
    2001 Laser Red A4 1.8TQM, 5-Speed Swapped, 4.11 Final Drive, APR 93, 2.5" Exhaust, ST Coilovers, 034 RSB, A8 Brakes Front & Rear
    2006 Passion Red Volvo V50 T5 AWD 6MT
    2000 Satin Silver Passat 1.8T FWD Wagon, Slippy Tiptronic, 15" Hubcaps
    2001 Aluminum Silver Metallic A4 Avant 1.8TQM (winter sled)

  19. #19
    Veteran Member Three Rings cschuster's Avatar
    Join Date
    Jun 05 2013
    AZ Member #
    116637
    Location
    Lexington, KY

    Did you have to order your new pump? I can't find it anywhere locally, this really blows. Mine is rattling big time, don't want to drive it too much more in case the bearing decides to seize and throw the belt.

  20. #20
    Registered Member One Ring Wirewheels's Avatar
    Join Date
    May 20 2015
    AZ Member #
    333412
    Location
    Oregon City, OR

    Hey a4Riding, why did you replace the pump? Noise, loss of steering, or ???

    The reason I ask is this - my PS was working fine, then suddenly I lost power. Really exhilarating when in city traffic! Fluid level was OK, but I added a little to get to the top of the "M" and this helped a bit. Then I replaced the reservoir and flushed. Again, helped a bit bit still not 100%. I'm thinking the next thing is to replace the pump. It's not making any noise, but did when I bought the car a few years ago. DPO used regular PS fluid. I flushed and filled with proper fluid and all was good. This was 2 years ago. The dealer wants $150 to diagnose the issue and then guess & replace. They quoted me $1500 for the pump, close to $3k for the pump and rack. "Replace them both and you won't have the issue anymore".... yeah, replace the car and I won't have the issue either! But I love this thing, especially with the top down on a warm evening.

    Anyway, hoping you're pump replacement was due, in part, to lack of or notchy power....
    Brian
    2004 A4 Quattro Cab 3.0

    CEO, Classic Automotive Innovations
    http://www.classicautoinnovations.com

    (too many classic come and go, so I've given up listing them...)

  21. #21
    Registered Member One Ring Wirewheels's Avatar
    Join Date
    May 20 2015
    AZ Member #
    333412
    Location
    Oregon City, OR

    Follow up from replacing the PS pump:

    I bought this pump from FCP Euro - https://www.fcpeuro.com/products/aud...a4-8e0145155fx and put it in this afternoon. Working in a cramped shop with little space around the car, basic hand tools, the Bentley manual, and a4Ridin's excellent instructions, I finished this job in a few hours... OK, maybe 4 tops. I did not put the car into service position as I found I had plenty of room to everything. I did not need a helper, even with the serp belt.

    Bottom line, this cured my steering issues. I'll try to remember to report back after a few weeks and let you know if all is still well, but generally no news is good news! I hope this feedback helps others.

    And a huge shout out to a4Ridin!! It would have taken me 2x the time (at least!) and saved much frustration of "how did they put that together?" time. Thank you so much!
    Brian
    2004 A4 Quattro Cab 3.0

    CEO, Classic Automotive Innovations
    http://www.classicautoinnovations.com

    (too many classic come and go, so I've given up listing them...)

  22. #22
    Veteran Member Three Rings
    Join Date
    Jun 12 2014
    AZ Member #
    253428
    My Garage
    2002 Audi A4Q (B6) 3.0 6MT; 1999 Mustang Cobra; 2003 G35 Coupe 5AT
    Location
    Tampa FL

    This is a good write up, but ultimately I found it easier to get the car in the service position.

    I went through two pumps until I found that the rack was leaking and putting air into the system.
    Another well know leak area is the suction hose and/or clamps that attach to the pump itself.

    I think this is why Audi wanted to replace the rack.
    I got a B7 rack and new pump suction hose with oetiker clamps.

    Removing the nose from the audi takes about 30 minutes or less.

    I hope it works out for you.
    Great follow up.

  23. #23
    Veteran Member Four Rings SJorge3442's Avatar
    Join Date
    Aug 27 2013
    AZ Member #
    121842
    Location
    Philly

    Just adding some pictures and context to this great DIY.

    First, just put the car in service position. Even in service position it was tight to get to the front mounts and serp tensioner. I'd rather spend the 20-30min to slide into service position over cutting my hands/arms up.

    Second, I have NO IDEA how you got the rear bracket to motor mouting bolt out without removing the intake actuator. I had to remove mine 1) because I could get a clear shot at the 6mm allen otherwise and 2) my bolt was so rusted/rotted that the 6mm allen was about .5mm too small to fit the bolt. I ended up needing to use the next size bit and I hammered it down nice and tight before loosening. It was totally a one shot, one opportunity situation for me.

    Third, why the hell did the engineers not make the pump removable from the mount without needing to remove the two parts as one. So silly.

    Sent from my HD1905 using Tapatalk
    2017 A4 6 Speed - Sport Plus - Mythos Black
    2018 Q5 - Prestige - Manhattan Grey

  24. #24
    Established Member Two Rings
    Join Date
    Jul 30 2012
    AZ Member #
    97767
    My Garage
    2004 A4 6M Avant, 2013 S4 6M, 2016 GMC Acadia
    Location
    Monmouth County NJ

    Hey Im thinking about tackling this project. Does anyone know the banjo bolt sealing washer part numbers?

    Also is taking the actuator off a big rats nest or pretty straight forward?
    2013 S4 6MT P+ Black 165K.
    2018 VW Golf Sportwagon 1.8T 5MT 77K.
    2016 GMC Acadia 145K
    2004 A4 3.0 6MT Avant Atlas Grey 285K - SOLD.

  25. #25
    Veteran Member Four Rings
    Join Date
    Nov 03 2010
    AZ Member #
    66528
    My Garage
    2019 Audi A5 Sportback, 1986 MB 560SL
    Location
    Fallbrook, CA

    I never even replaced my copper washers, but did this: sand or file very flat and smooth both sides, until no trace of previous use is visible. Then, place washers on a brick or similar heat-resistant surface. Use a Propane torch to heat until the copper turns a brownish-red. They will now be annealed and soft for reuse.

    The hard-to-reach rear bolt: My bracket bolts are triple-square, and the tool I had wasn't long enough to reach it. So, I had a guy weld a regular bolt to it's end so a socket could be used.

    Serp belt: Once I learned to place a long 19mm box-end wrench on the 19mm lug provided by the tensioner, then use the end of a hammer handle to force it down, it has been fairly easy.

  26. #26
    Established Member Two Rings
    Join Date
    Jul 30 2012
    AZ Member #
    97767
    My Garage
    2004 A4 6M Avant, 2013 S4 6M, 2016 GMC Acadia
    Location
    Monmouth County NJ

    I just did my pump on a 2004 3.0. I didn't find it that hard. I do recommend the service position which adds an hour to the job - 30 minutes off and 30 minutes to put it back together. But everything is so much easier. You save that time in messing around with exact tools and serp belt madness etc. For the back hex bolt - I used a standard 3/8" socket down between the air actuator. It fit fine. The others were easy with the car in service position. I would recommend one big thing - clean all the hex head holes with a spike and brake cleaner to make sure the 6mm wrench gets deep in those holes and prevent stripping. I did this for the top hole cuz it was caked with old mineral oil and just collected a bunch of dirt etc. I almost stripped the lower left one and that would have been a disaster. But I was able to get it out. Long story but I started in NOT service position and the almost stripped bolt forced me to put the car in service position and I wish I did it from the start. So much easier. See photos of working in normal postion with a new wrench and a pipe for leverage. That worked fine if you gunna leave the car in normal mode. Oh also I recommend a long race grabber tool to get the back bolt out of the hole once it loosened. It has to come out kind of sideways over top of the pump rather than straight up cuz the washer does clear then air actuator.

    I did buy two new washers for the banjo bolt. $10 at the dealer. Part # N-013-848-7.

    All good now after a few hundred miles driving around.

    https://www.dropbox.com/t/NCkAiro3pqt1n9x2
    Last edited by Charlie B; 10-24-2023 at 09:04 AM. Reason: Want to insert photos
    2013 S4 6MT P+ Black 165K.
    2018 VW Golf Sportwagon 1.8T 5MT 77K.
    2016 GMC Acadia 145K
    2004 A4 3.0 6MT Avant Atlas Grey 285K - SOLD.

Bookmarks

Posting Permissions

  • You may not post new threads
  • You may not post replies
  • You may not post attachments
  • You may not edit your posts
  •  


    © 2001-2025 Audizine, Audizine.com, and Driverzines.com
    Audizine is an independently owned and operated automotive enthusiast community and news website.
    Audi and the Audi logo(s) are copyright/trademark Audi AG. Audizine is not endorsed by or affiliated with Audi AG.