Audizine - An Automotive Enthusiast Community

Results 1 to 20 of 20
  1. #1
    Veteran Member Three Rings G0to60's Avatar
    Join Date
    Oct 25 2011
    AZ Member #
    83022
    My Garage
    90 Corrado, 02 allroad
    Location
    Milwaukie, OR

    DIY: Fix a broken cargo cover

    Guest-only advertisement. Register or Log In now!
    I'm not sure if this happens a lot but I took a couple pictures of how I fixed mine. I was given a broken cargo cover by Matrix Integrated. It wouldn't wind itself up anymore and it was fully extended all the time. Here's what I did to fix it and the tools I used.

    Tools needed:
    Strong glue (I used a plastic epoxy)
    Tooth pick or similar
    #10 torx bit
    extra hands (I did it by myself but another person would help a lot)

    Parts Description:
    End Cap - Black end cap held on by two silver #10 torx screws
    Plasitc Retainer - Black plastic retainer that holds the SPRING ROD onto the END CAP. It is held on by two black #10 torx screws
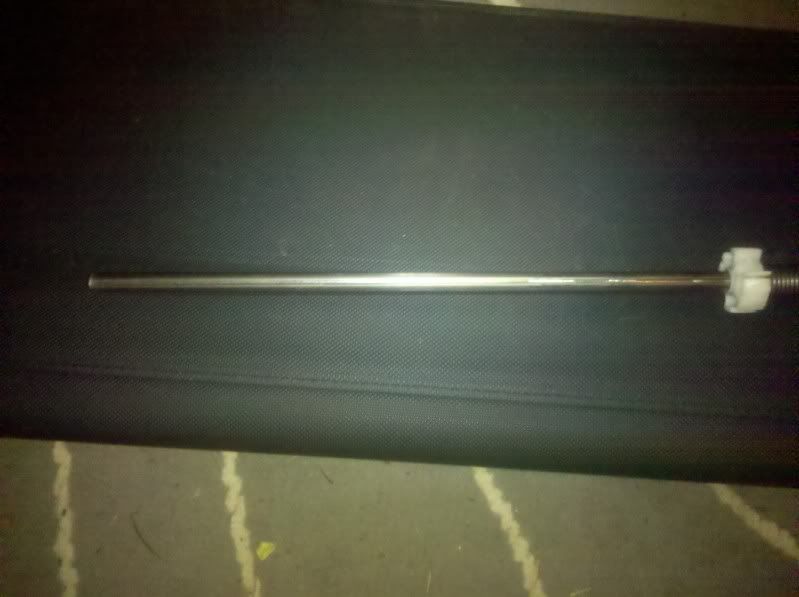
    Spring Rod - Long silver rod with a spring around it. There are also two white SUPPORT CLIPS on this rod.
    Support Clip - White rod clip that goes inside the SUPPORT ROD.
    Support Rod - Silver rod that the fabric cover attaches too and rolls up onto.
    Aluminum Extrusion - This is what the end caps screw onto and the fabric rolls up into.

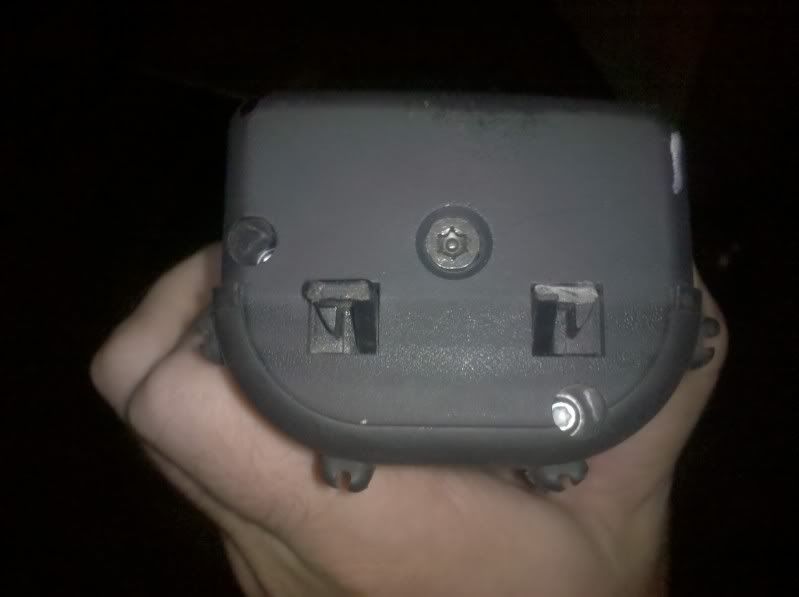
    Step #1 - Remove end cap
    You only need to remove one of the caps. It's the side that doesn't have the button to remove it from the car. There are two small #10 torx screws that are recessed pretty deep. I had to buy a small screw driver set that had a thin torx bit. My regular 1/4" bits wouldn't fit. You don't need to remove the center screw.


    Once the cap is unscrewed from the aluminum extrusion you can pull out the cap, spring and support rod. Here is the rod and the white support clips that go inside the fabric support tube.


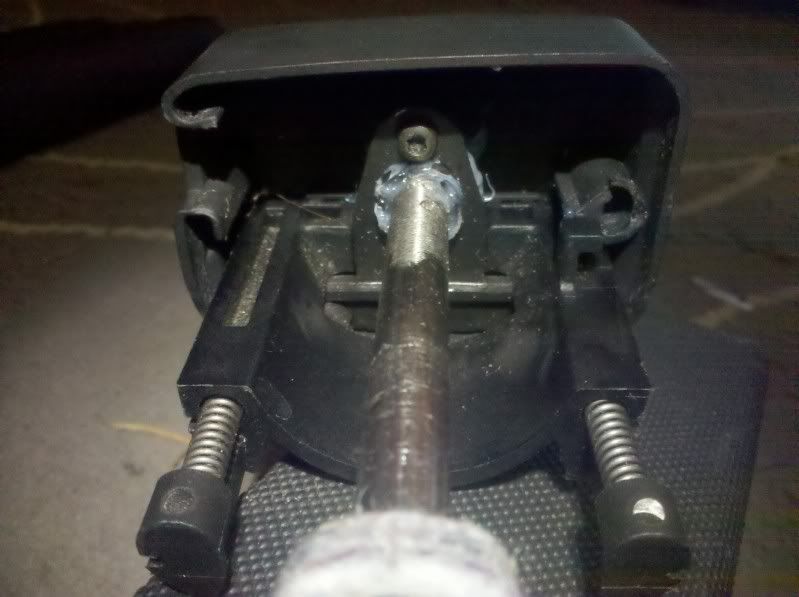
    Step #2 - Remove spring rod retainer

    There is a small plastic retainer that is held on by two black #10 torx screws. It's kind of tight but you can get the torx bit in there. Once the screws are out just slide the black plastic retainer out of the way. (This is a picture after things have been glued but it shows the retainer)


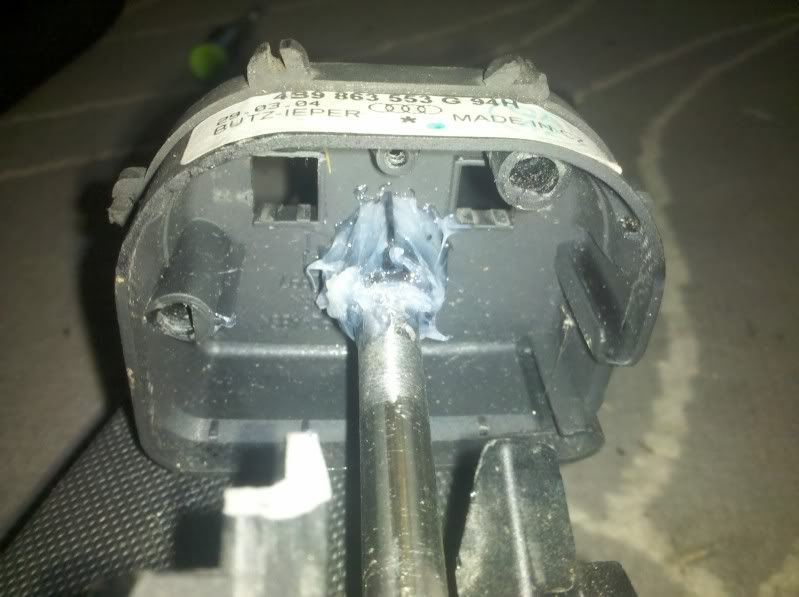
    Step #3 - Find what's broken

    The reason why the cover wouldn't retract anymore was that there is a plastic connector inside the cap that can break. This makes it so the spring tension isn't held anymore so there's nothing to pull the cover back in. You need to anchor the spring rod to the cap again. This is where the epoxy comes in. I glued the spring rod back to the cracked plastic connector. Mix up the epoxy (I used a 5 min set time) and use a tooth pick to spread it in between the rod and the spring retainer.


    Before the glue hardens all the way you need to put the plastic retainer back on with the two black torx screws. This will sandwich the spring rod onto the connector. Now just wait for the glue to harden.


    Step #4 - Reassembly/Tensioning

    Now unlike most reassembly proceedures this isn't "Assemble in Reverse Order". It is difficult to show this step with pictures so I will try to explain as best I can. First, insert the spring rod into the support rod that holds the cargo fabric. With the spring rod about half way into the support rod you need to start spinning the cap counter-clockwise. You should resistance from the spring as you do this. If you don't feel resistance then the glue didn't hold or the spring rod is spinning still.

    You will need to spin the cap until the fabric starts to retract. It helps to have another person hold the other end of the entire thing so the fabric hangs down towards the ground. Keep spinning the end cap even after the fabric has been fully retracted. I gave it another ten turns before I stopped.

    Step #5 - Reassembly/End Cap

    Now you need to screw the cap back on. DO NOT LET GO OF THE END CAP!! You will loose all the spring tension and the cap will spin wildly. If this happens go back to #4.

    While still holding the cap slide it back into the extruded aluminum piece. It can only go on one way but it's still a little funky as there's spring tension trying to spin the cap out of your hand. Once the cap is back onto the aluminum piece you can let go and screw the two silver torx screws back in.

    You are now complete and test out the cover. I hope that I explained everything all right and that this helps out anyone has this problem.

  2. #2
    Senior Member Three Rings A4_n00b's Avatar
    Join Date
    May 27 2007
    AZ Member #
    18353
    Location
    Pittsburgh, Pa.

    I'm bumping this because it's a fairly simple DIY and a huge money saver... the only thing I'll add is that the plastic epoxy didn't work that well in my first attempt (maybe I didn't use enough?) and it gave way on the retraction/spring retentioning... the second time around plain old school JB Weld was used instead... the only thing with the JB Weld is that if it breaks again you probably won't get another chance after that and the shade is a goner... anyhow, big thumbs up and thanks again for posting this fix!
    Current:
    2022 Audi S3, 2023 Audi SQ5
    Retired:
    2003 Audi A4 3.0, 2004 Audi allroad 4.2, 2004 VW Jetta, 2008 VW Jetta Wolfsburg, 2010 Audi S4, 2012 VW GTI, 2014 Audi S4, 2015 VW GTI PP, 2016 VW Tiguan R-Line 4MO, 2018 Audi S3, 2018 Audi SQ5

  3. #3
    Veteran Member Four Rings m_haiser's Avatar
    Join Date
    Apr 24 2011
    AZ Member #
    74529
    My Garage
    2012 A6 Prestige, 1998 Jeep Cherokee XJ
    Location
    Central Willamette Valley

    Does anyone know where to find the pass. Side endcap? Mine was missing when I bought it ant replacement cover is out of the question

  4. #4
    Veteran Member Three Rings G0to60's Avatar
    Join Date
    Oct 25 2011
    AZ Member #
    83022
    My Garage
    90 Corrado, 02 allroad
    Location
    Milwaukie, OR

    Yeah, I had to go back in after a couple months with some stronger epoxy and did a better job of cleaning up around the contact area. I was shocked at how much these things are so a nearly free fix is worth a try.

    I'm not sure where you can get just the end cap. Maybe if someone is parting out a wagon and they have a broken cover you could find one.

  5. #5
    Veteran Member Four Rings awdjunkies's Avatar
    Join Date
    Dec 18 2005
    AZ Member #
    9274
    My Garage
    sedan, avant, truck/suv
    Location
    nevada

    Yeah, possibly, I always try to bring up Bryan and his efficient Audis4parts.com staff as much as possible when looking for slightly used parts.

  6. #6
    Registered Member One Ring
    Join Date
    Jun 30 2013
    AZ Member #
    118095
    Location
    United Kingdom

    Great work. I would have been completely stuck without this as the tiny pieces of plastic that fell out when i disassembled it were not, lets say, self-evident. I actually made a small locking lug for the spindle and mounted it on the retainer, slid the spindle onto the lug and done. Your point on the pretensioning was also helpful. We stand on the shoulders...
    Another interesting example of using plastics inappropriately and/or giving non-critical parts to the junior designer.

  7. #7
    Senior Member Two Rings JustMtnB44's Avatar
    Join Date
    Nov 22 2009
    AZ Member #
    51091
    Location
    Pittsburgh, PA

    I'm not a fan of gluing the rod into the end cap. The first time mine broke, the center section that holds the rod had cracked so I glued it back together with some epoxy. That held up for probably 2 years or so, but a few weeks ago it broke again. This time the center section tabs had totally broken off so there was nothing to hold the rod anymore, plus many more cracks. I decided to cut the center boss out with a dremel and 3d print a new piece which I glued in with epoxy. So far it has been fine, hopefully it lasts a while.


    Current: 2016 Golf R
    Past: 2004 allroad 4.2, Ebony Pearl Effect FBP, H-sport sway bars, Phatbox MP3 player, stock 18" wheels with Continental DWS tires, stock 17" wheels with Yokohama Geolandar tires, custom tow hitch

  8. #8
    Veteran Member Three Rings G0to60's Avatar
    Join Date
    Oct 25 2011
    AZ Member #
    83022
    My Garage
    90 Corrado, 02 allroad
    Location
    Milwaukie, OR

    I might be interested in one of those if you are able to make some more. My cover is still working but it's kind of hitchy on retraction. I think I need to re-orient all the internals again and I would like to have a more permanent fix then my "put a bunch of glue and hope it holds" approach. I has worked thus far and was free but is not the ideal solution.

  9. #9
    Senior Member Two Rings JustMtnB44's Avatar
    Join Date
    Nov 22 2009
    AZ Member #
    51091
    Location
    Pittsburgh, PA

    I posted it on shapeways.com so anyone can buy one. As noted in the description, you have to cut out the existing center post with a Dremel or something but leave 1mm of material left inside the cap. Then glue this part on with epoxy.

    Also my process for rewinding the spring is to roll up the cover first. Then with the end cap on the steel rod, turn it 15 full rotations counter clockwise to wind up the spring. I found that number somewhere else before and it seems to work well. Then put cap in place to keep spring tension.

    The center screw is a T25 Torx with hole.
    Current: 2016 Golf R
    Past: 2004 allroad 4.2, Ebony Pearl Effect FBP, H-sport sway bars, Phatbox MP3 player, stock 18" wheels with Continental DWS tires, stock 17" wheels with Yokohama Geolandar tires, custom tow hitch

  10. #10
    Registered Member One Ring
    Join Date
    Jul 04 2014
    AZ Member #
    261715
    Location
    Belgium

    Thank you for this thread, it helped me to repair mine out of a 2002 A6 avant.

    I fixed mine with a piece of metal wire, no glue required. I don't know how long it will last, though.

    I did not unscrew the inner torx screws but only the big one at the outside which allowed me to disconnect the rod from the corner piece.

    I used a small metal drill to clean the plastic out of the two holes in the spring rod and put a piece of wire through it.


  11. #11
    Registered Member One Ring
    Join Date
    Jan 15 2013
    AZ Member #
    107566
    Location
    Canberra

    The plastic centre boss and spring latch bracket posts on my LHS end cap were too badly broken for the "glue in boss" or "wired shaft" fix, which are both quite clever. I resorted to using fibreglass cloth and Araldite epoxy to hold the broken boss and posts together. That solution lasted for almost 2 years.
    My latest fix involves the use of an aluminium block to replace the central boss and spring latch bracket posts. It sounds like a lot of work and it is, but what choice do we have when you cannot buy the LHS cap as a spare part.
    For those that are interested (really desperate) the fix involves to following:
    1. Use a Dremel or similar to grind away the central boss and spring latch bracket posts.
    2. Drill through the centre of the spring latch bracket posts with a 2mm drill
    3. Cut some scrap aluminium into a 19x14x43mm block. 19mm is the gap between the spring latch legs
    4. Position the block between the square latch leg holes in the end cap and mark the position of the drilled 2mm spring latch bracket holes on the aluminium block,
    5. Drill 2mm holes through the block, preferably with a bench press drill, and use suitable self-tapping screws to secure the block on the end cap. Re-drill the holes through the end cap to 3mm. Use a couple of drops machine oil on the drill and screws to stop them galling (binding) on the aluminium. Go slowly. Breaking a steel self-tapper in aluminium is really annoying.
    6. With the block secured in the end cap, mark the centre of the shaft hole on the block. Remove the block from the end cap, drill a pilot hole in the block and then drill an 8mm hole for the centre shaft, with a bench press drill if possible.
    7. Drill a 2mm hole in the side of the block in line with the centre of the 8mm hole and 4mm above the base of the block. Find a suitable steel rod (nail) to drift into the hole to engage the slot in the end of the roller blind shaft. Punch the filed-off nail about 1.5mm into the 8mm shaft hole.
    8. Use suitable self-tapping screws to secure the spring latch assembly to the block. Use a couple of drops machine oil on the screws to stop them galling (binding) on the aluminium. Go slowly. As stated earlier, breaking a steel self-tapper in aluminium is really annoying.
    9. Refit the end cap as per the earlier posts, taking care to align one of the shaft slots with the alignment pin from Step 7, above.

    Good Luck!

    https://www.dropbox.com/s/nacw8l4tjdx7fds/Allroad%20Cargo%20Cover%20LHS%20Cap.jpg?dl=0[/IMG]

  12. #12
    Active Member One Ring
    Join Date
    May 03 2012
    AZ Member #
    92995
    Location
    New Mexico

    When I bought my used 2001 2.7 allroad 6 speed, it was in this condition. I found this thread, but for some reason just didn't pursue it. This was three years ago, when the first post had been made.

    Now that I'm feeling serious about wanting to fix it again, I revisited the post, and, lo and behold, you guys have evolved the hell out of it! Thank you! Thank you! Every once in awhile, I'm shown specific advantages to waiting—call it procrastination, if you will, but this happens to me quite a bit. And I just laugh and shake my head.

    Thanks again, industrious souls! I'll post again, if I stumble upon a contribution to make to the evolution.

  13. #13
    Veteran Member Four Rings rollerton's Avatar
    Join Date
    Sep 16 2010
    AZ Member #
    64156
    Location
    Central Wash

    FWIW Audi used to sell a repair kit for the ends of the cargo cover- maybe they still do? Last time I checked (it's been a couple years) I could only find ONE side available in the US, but it was the side I needed, and about $30. It was the entire cap, brand new. Remove broken cap, install new.
    It'd take a little searching to find it...
    foley803 : What does an electrical surge sound like? Barking dogs? Watermelons?

  14. #14
    Active Member One Ring
    Join Date
    May 03 2012
    AZ Member #
    92995
    Location
    New Mexico

    Quote Originally Posted by rollerton View Post
    FWIW Audi used to sell a repair kit for the ends of the cargo cover- maybe they still do? Last time I checked (it's been a couple years) I could only find ONE side available in the US, but it was the side I needed, and about $30. It was the entire cap, brand new. Remove broken cap, install new.
    Thanks, rollerton. Your post may be what saves me. Because of course, my situation appears to be quite different than anything above. As you suggested, only one cap is available from Audi (passenger side, with push button). And that's good, because on disassembly, it spilled half a dozen broken pieces. The world being what it is, however, the cost of a new one is now $77, as quoted by Albuquerque's local dealer. The other end seems to be intact, and functioning.

    Until now, I haven't looked inside this thing, but here's what I found when I removed everything, and I'm a bit confused.. This image (looking toward the tailgate end of the cargo cover) has all the parts laid out on top of the housing, as they came out. Incidentally, both end caps were somewhat secured by round head phillips screws, not #10 Torx.


    As you can see there is a disturbing emptiness between the spring rod and the passenger side end cap (photo left)—at least it's disturbing to me. There are no parts connecting the two, other than the hollow tube attached to the cover, itself (still inside the housing). Is this the way it's supposed to be?

    Here's a closer look at that unexpected emptiness.


    The unattached end of the spring rod and the plastic cylinder coming out of the end cap, aiming somewhat askew toward the rod, are the same diameter, and they both are hollow, but I see no evidence that they were ever joined together by anything.

    Here's the lonely and battered passenger side end cap.


    Is this really how this thing works? If I spend $77 on a new end cap, will it be as simple as rollerton suggests: "Remove broken cap, install new."? Or will I come to find there is a mysterious part missing, and I'm screwed?

    Anyone?

    Thanks, in advance!
    Last edited by NMallroad; 04-23-2015 at 10:11 AM.

  15. #15
    Registered Member One Ring
    Join Date
    Jul 23 2015
    AZ Member #
    344528
    Location
    Bellingham, WA

    Quote Originally Posted by NMallroad View Post
    Thanks, rollerton. Your post may be what saves me. Because of course, my situation appears to be quite different than anything above. As you suggested, only one cap is available from Audi (passenger side, with push button). And that's good, because on disassembly, it spilled half a dozen broken pieces. The world being what it is, however, the cost of a new one is now $77, as quoted by Albuquerque's local dealer. The other end seems to be intact, and functioning.

    Until now, I haven't looked inside this thing, but here's what I found when I removed everything, and I'm a bit confused.. This image (looking toward the tailgate end of the cargo cover) has all the parts laid out on top of the housing, as they came out. Incidentally, both end caps were somewhat secured by round head phillips screws, not #10 Torx.


    As you can see there is a disturbing emptiness between the spring rod and the passenger side end cap (photo left)—at least it's disturbing to me. There are no parts connecting the two, other than the hollow tube attached to the cover, itself (still inside the housing). Is this the way it's supposed to be?

    Here's a closer look at that unexpected emptiness.


    The unattached end of the spring rod and the plastic cylinder coming out of the end cap, aiming somewhat askew toward the rod, are the same diameter, and they both are hollow, but I see no evidence that they were ever joined together by anything.

    Here's the lonely and battered passenger side end cap.


    Is this really how this thing works? If I spend $77 on a new end cap, will it be as simple as rollerton suggests: "Remove broken cap, install new."? Or will I come to find there is a mysterious part missing, and I'm screwed?

    Anyone?

    Thanks, in advance!
    Three months have gone by since you posted, so you probably have figured out your own answers by now, but if it's still of interest... No, you don't have any "mysterious part" missing. The spring rod only needs to be long enough to support the spring. Its right end (left side of your photo) rides on the white nylon spacer inside the roller tube and it doesn't (need to) extend all the way through to the right end cap.

    As to whether a replacement RH end cap will fix your problem, that very much depends on whether the locking tabs in the LH cap are unbroken and the spring rod is still locking in place. That's where the tension is held and that's where the failures all seem to occur. The RH cap's job internally is simply to provide a plain bearing for the roller tube to rotate on. I'm not sure what symptoms you're experiencing, but if they involve a failure of the cover to retract, then your problem is much more likely to be a broken boss in the LH end cap.

    BTW, the RH cap can be bought online for less then $77. For example, genuineaudiparts currently has it at around $52 plus shipping. Ditto for other online suppliers. P/n 4B9863498B4PK. Unfortunately, as others have noted, the LH cap is not available as a separate part from Audi. Hence the various DIY fixes outlined by the brilliant minds above. Good luck!

  16. #16
    Active Member One Ring
    Join Date
    May 03 2012
    AZ Member #
    92995
    Location
    New Mexico

    Thanks, DJay.

    Quote Originally Posted by DJay49 View Post
    BTW, the RH cap can be bought online for less then $77. For example, genuineaudiparts currently has it at around $52 plus shipping. Ditto for other online suppliers. P/n 4B9863498B4PK. Unfortunately, as others have noted, the LH cap is not available as a separate part from Audi. Hence the various DIY fixes outlined by the brilliant minds above. Good luck!
    I appreciate your thorough reply, DJay. The job is not complete, but I'm back into the fray. I especially appreciate the p/n and information on the RH cap, since now that I've completed repairing the left end, I realize the right end is dilapidated enough that it must be replaced for the cover to function. You'll notice in the last photo of my 4/22/15 post, the right hand cap definitely looks in need of some Viagra. Does this ever end?

    But I'm getting ahead of myself. Back in April, when I made my last post, I bought one of JustMtnB44's 3D printed pieces (thanks, man!) to glue into the LH cap, and a Torx25 security bit to remove the cap from the rod. Just a few days ago I started the project again, only to discover that the screw connecting the cap to the rod is not a T25, as suggested. It's quite a bit smaller, but I couldn't say how much. Fortunately another forum taught me I could remove the screw using a small flathead screwdriver wedged between the center peg and the Torx star points. Worked very nicely.

    Not having a Dremel, I started whittling with my Oeteker crimper, which reminded me of some very sharp bonsai tools, and they trimmed the old cylinder off, probably more quickly and smoothly than a Dremel! The cap was pretty badly cracked, so I chose JB Weld to glue everything together. Well cured by this morning, I assembled the whole thing and expectantly installed it in the car. When I tried to extract the cover, it was clear the RH cap wasn't going to let me do that without further damage.

    Thus, a new RH cap. All this for a cargo cover on a fourteen year old car. Sheesh.

    Thanks again to everyone who has contributed to this drawn out saga, and a presumably happy ending.

  17. #17
    Active Member Two Rings
    Join Date
    Mar 04 2013
    AZ Member #
    110703
    Location
    chicago

    some good ideas here to repair what is basically a bad LH cap design. as mentioned above you can't buy the spring rod end cap (the one on the driver side). All you can do is try to repair it so it's stronger.

    the LH cap design relies on some plastic ribs in the cap to keep the spring rod from spinning, and the screwed in piece that goes around the round hollow post in that cap seems to be an attempt to keep the hollow post from cracking. once the plastic tabs inside that hollow post crack the rod spins and the spring loses tension.

    In my case I used a simple flat self-locking nut (some people call it a speed nut). It's made out of spring steel and available at any hardware store. It has a slight curve to it, and if you cut it in half the height is just about perfect for the slot in the rod. The curve is important as it's needed so the screw that goes into the rod can still fit.
    something like this

    if you look closely at the part that center boss has some gussets on the outside of it to keep it from breaking off. you can cut a small slot right next to those gussets and slide the spring nut into them. the rod slot goes over the spring nut when you reassemble it. you then add the flat part with 2 screws and the hole in it, and after that you jbweld the whole thing.


    This is stronger than relying on epoxy or a plastic piece with notches alone.
    NOTE: make sure you know which way the spring is coiled, and put the steel part so that it presses into the gussets under tension. I may have drawn it on the wrong side in the graphic so beware :-)
    Last edited by bradnic; 07-18-2016 at 04:32 PM.
    04 allroad with rnse and 17Z brakes
    91 e30 convertible
    88 e30 325ix
    03 m3 smg (sold)
    06 mini jcw (sold)

  18. #18
    Active Member One Ring
    Join Date
    May 29 2017
    AZ Member #
    400236
    Location
    Lisboa

    Hi,

    This saved my cover. This is awsome.
    I did both solutions of getting a piece of hard metal to serve as a lock and glued the whole thing up!!!
    The pic does not show the end result yet :-)

    THANKS


  19. #19
    Registered Member One Ring
    Join Date
    Mar 13 2015
    AZ Member #
    320188
    Location
    New Jersey

    Thanks!

    Quote Originally Posted by JustMtnB44 View Post
    I posted it on shapeways.com so anyone can buy one. As noted in the description, you have to cut out the existing center post with a Dremel or something but leave 1mm of material left inside the cap. Then glue this part on with epoxy.

    Also my process for rewinding the spring is to roll up the cover first. Then with the end cap on the steel rod, turn it 15 full rotations counter clockwise to wind up the spring. I found that number somewhere else before and it seems to work well. Then put cap in place to keep spring tension.

    The center screw is a T25 Torx with hole.
    This makes it way too easy - thanks so much!!

  20. #20
    Junior Member One Ring DirkOz's Avatar
    Join Date
    Dec 18 2016
    AZ Member #
    388618
    My Garage
    2000 A4 B5 1.8T Quattro Sedan, 1999 A3 1.8T 2 Door
    Location
    Canberra/ACT

    Found a 3D Print File for the Cargo Blind End Parts for the B5 A4 Avant. There are good pictures of the modelling.
    AUDI A4 B5 (S4 B5) AVANT REPAIR KIT FOR HAT RACK CARGO COVER/TRUNK COVER (8D9863553)
    3D MODEL DESCRIPTION
    Repair kit for trunk cover/cargo cover/parcel shelf AUDI A4B5/S4B5 Avant (8D9863553)
Original parts were used for modelling this repair kit.
    Not damaged original parts can be used with printed one. Printed elements created to replace broken, and not for repairing these elements by glue or soldering.
    NOT FOR SALE! FOR PERSONAL USE ONLY!
    I purchased a pair of ends here:- Audi A4 B5 Cargo cover repair kit
    Quality was excellent.
    Shipping from Spain to Australia took longer than expected.
    Ordered 12th Feb 2024 Arrived 25th March 2024.
    Last edited by DirkOz; 03-25-2024 at 11:17 PM.

Bookmarks

Posting Permissions

  • You may not post new threads
  • You may not post replies
  • You may not post attachments
  • You may not edit your posts
  •  


    © 2001-2025 Audizine, Audizine.com, and Driverzines.com
    Audizine is an independently owned and operated automotive enthusiast community and news website.
    Audi and the Audi logo(s) are copyright/trademark Audi AG. Audizine is not endorsed by or affiliated with Audi AG.