Audizine - An Automotive Enthusiast Community

Results 1 to 25 of 25
  1. #1
    Active Member Four Rings B6JoeS4's Avatar
    Join Date
    Sep 13 2008
    AZ Member #
    32998
    Location
    Western Chicago Burbs

    DIY: Window switch and handle shell replacement

    Guest-only advertisement. Register or Log In now!
    One of the biggest issues on every 8E chassis Audi is the rubberized finish on everything your greasy hands touch. My window switches and my driver's side handle shell were starting to peel and look gross, so I decided it was time for a replacement.

    Parts:
    Driver's side handle shell: 8E1 867 171 C 7PE $33 from GenuineAudiParts
    Passenger side handle shell: 8E1 867 162 A 7PE $36 from GenuineAudiParts
    Driver's side window switches: eBay seller: autoleague $1+28 shipping (OEM Part # 8Z0 959 851 F 5PR)
    Passenger side window switch: eBay seller: autoleague $1+10 shipping (OEM Part # 8Z0 959 855 C 5PR)
    Mirror Adjustment Switch (cars with folding): 8E0 959 565 A - you have to email GAP to get this part

    Tools:
    Philips #2 screw driver
    Flathead screwdriver
    Torx 25 screw driver

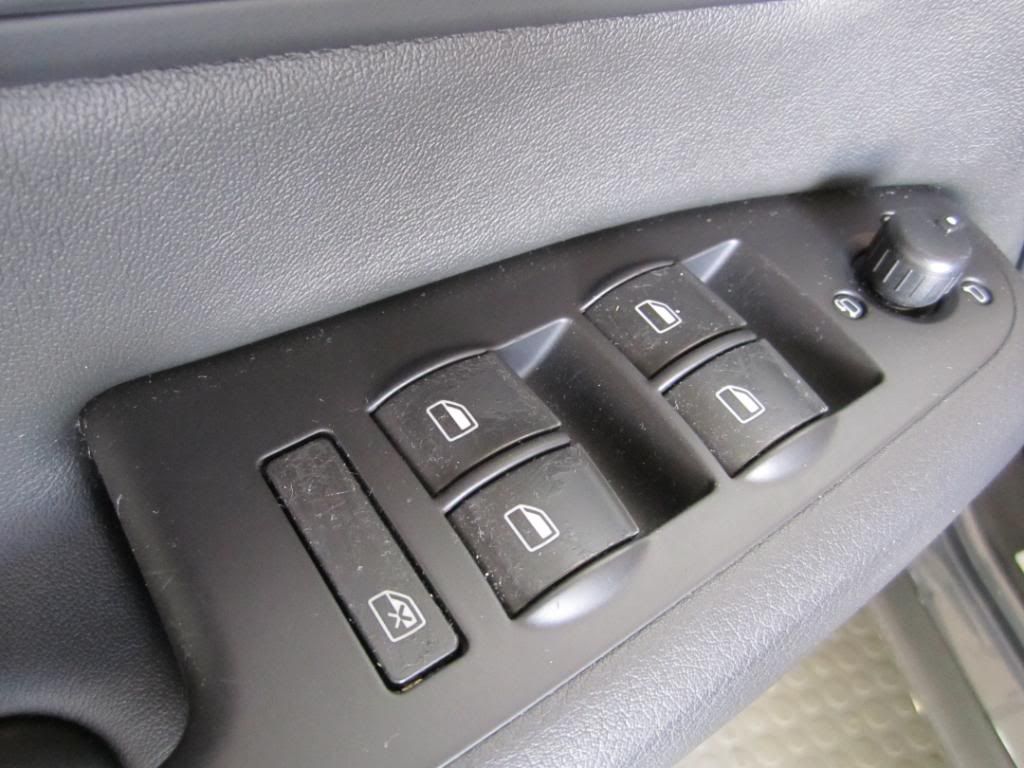
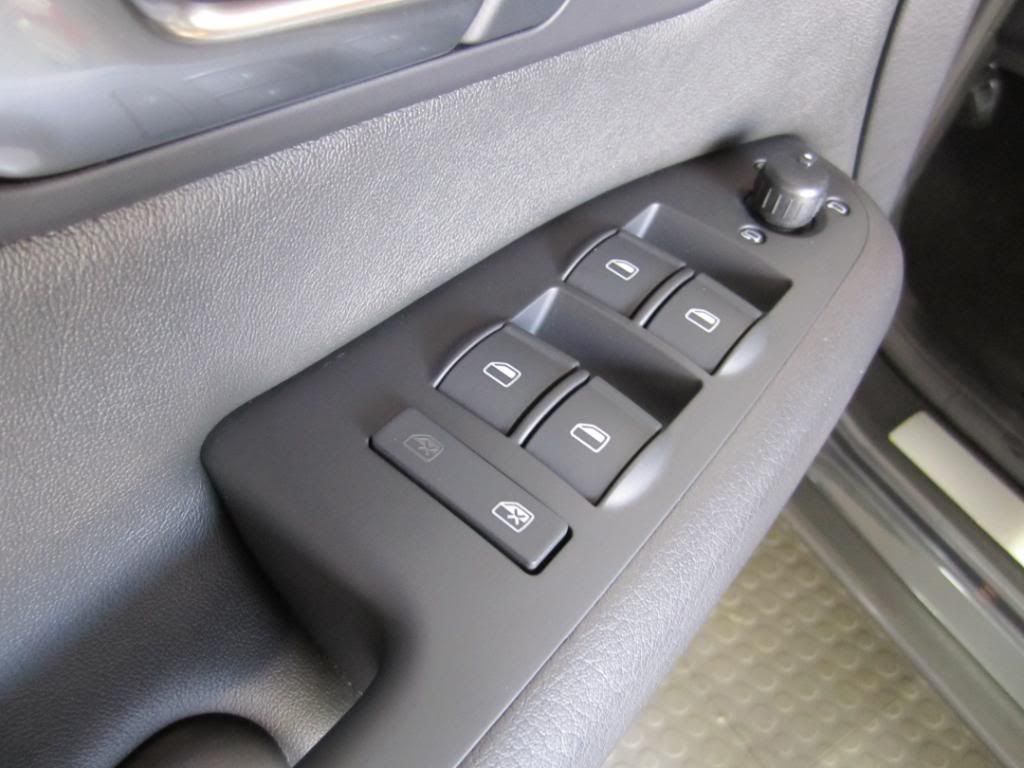
    Here is what I am starting with. All nasty looking and sticky


    Phase 1: Door-card removal

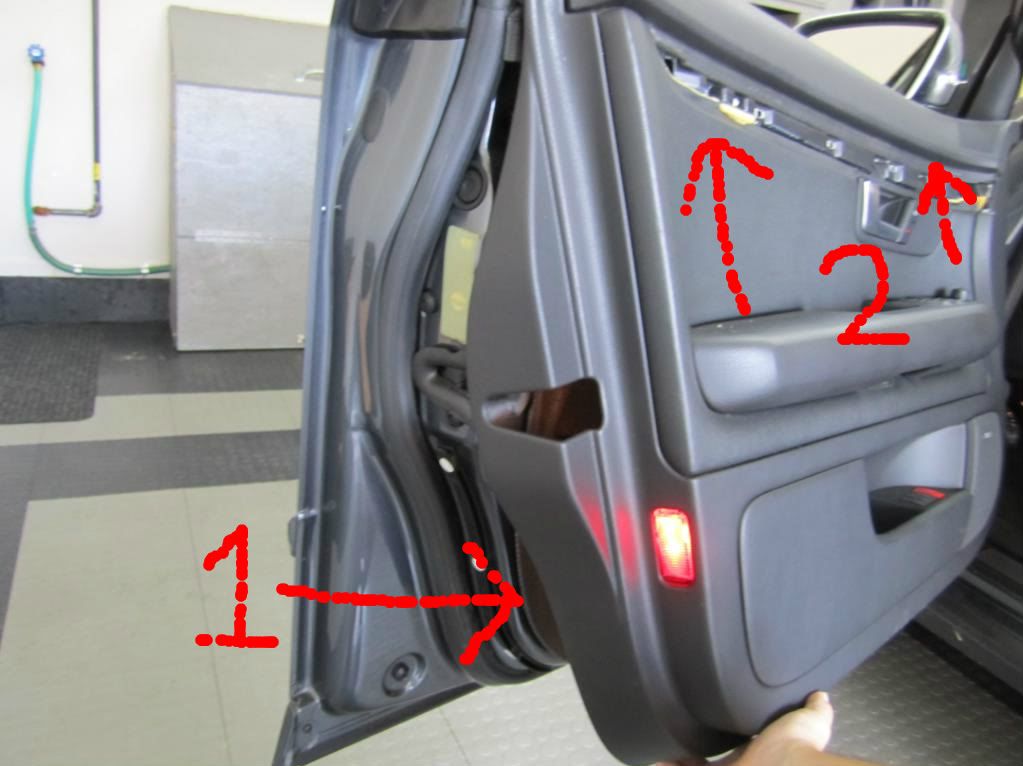
    Step 1: Remove the trim by pulling on the side closest to the inside of the car; it should just pop right off. Then, remove the four Philips head screws


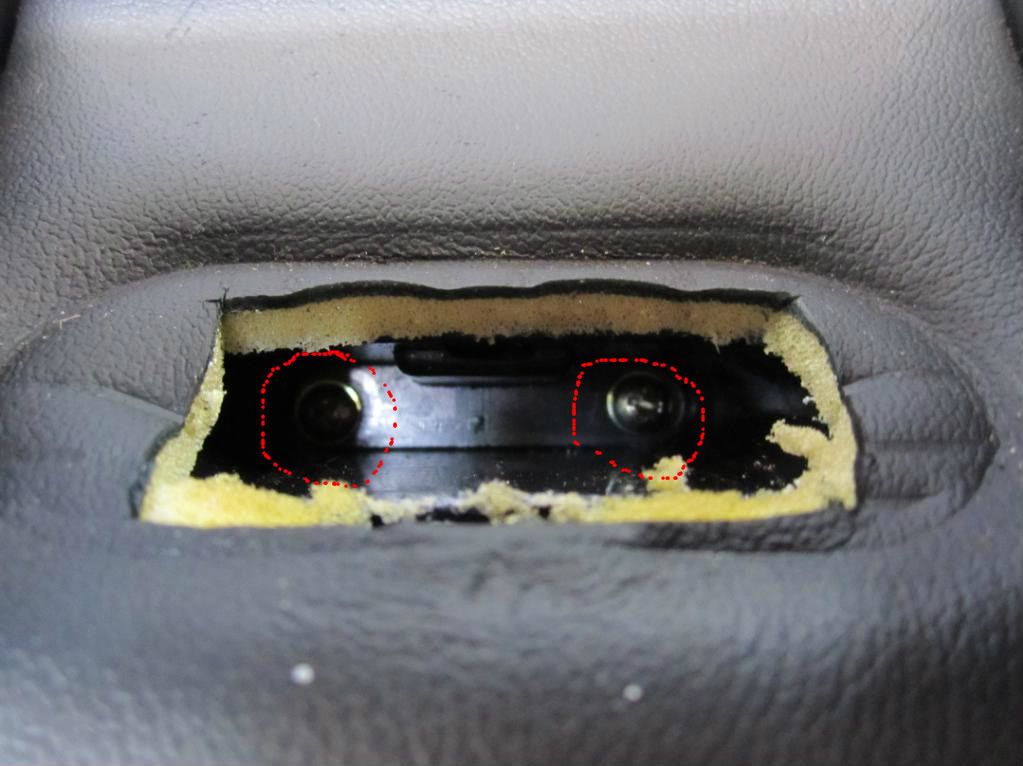
    Step 2: Locate the oval shaped plastic cover located right behind the grab handle. Pop off the front of the cover first with a flathead. Then, remove the two Philips screws.


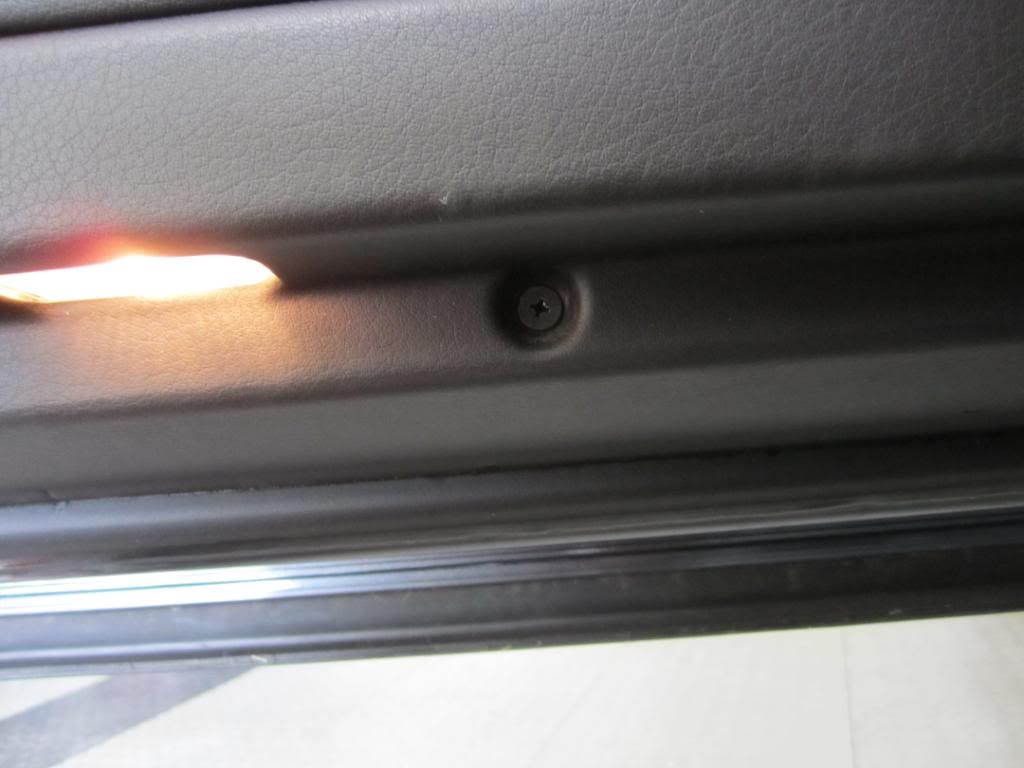
    Step 3: Next you have to remove this cheap piece of shit screw on the bottom of the door. Make sure your screw driver fits it snugly and press hard while backing the screw out. It is in there very tight for some reason the head is very soft making it easy to strip out. The screw is very long; about 2.5"


    Step 4: Now that all of the hardware is removed, the door-card will come off. It is still held on by several nylon clips which will most likely all snap(They aren't necessary anyways). Get your paws between the door-card and the edge of the door near the bottom and pull, it will start to pop off. Once all the clips are released, you have to lift it up off the lip at the top


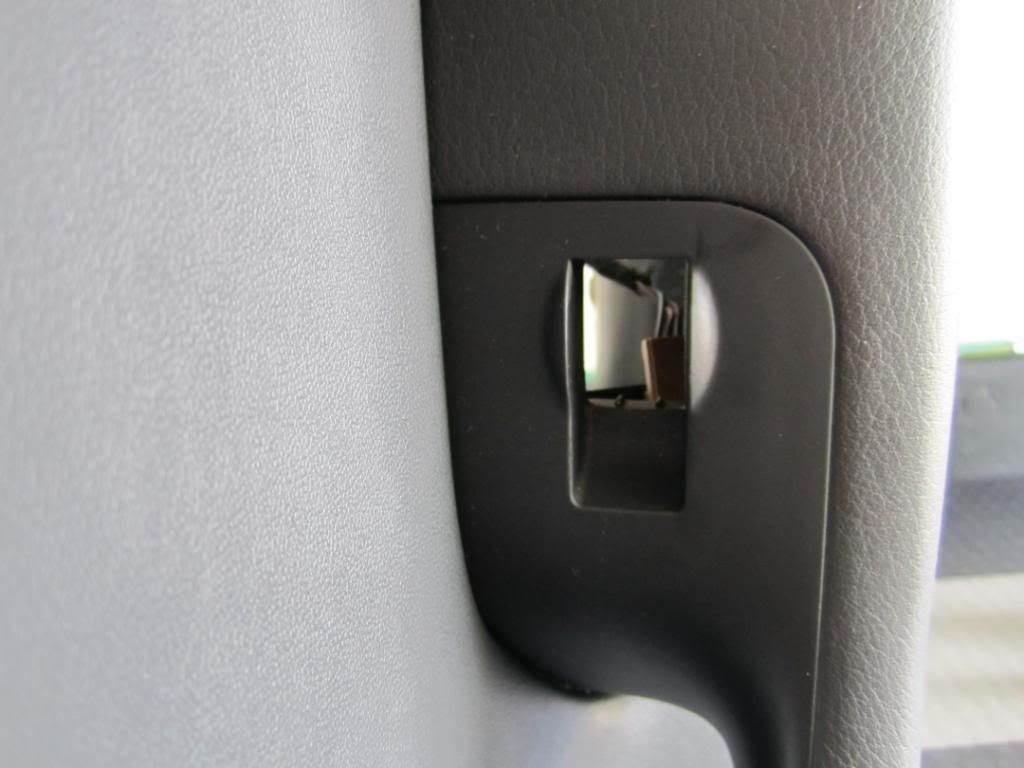
    Step 5: There are still a few things that need to be disconnected before the panel is free. The first thing to remove is the cable for the latch. Release the white part from the clip and then just unhook it.


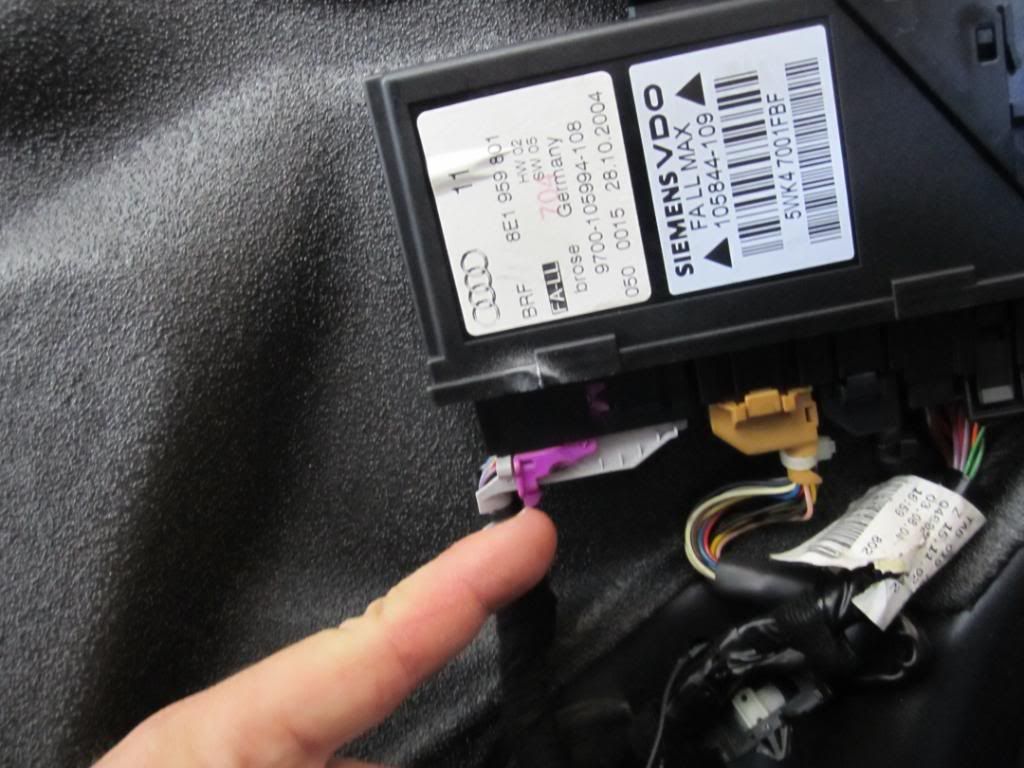
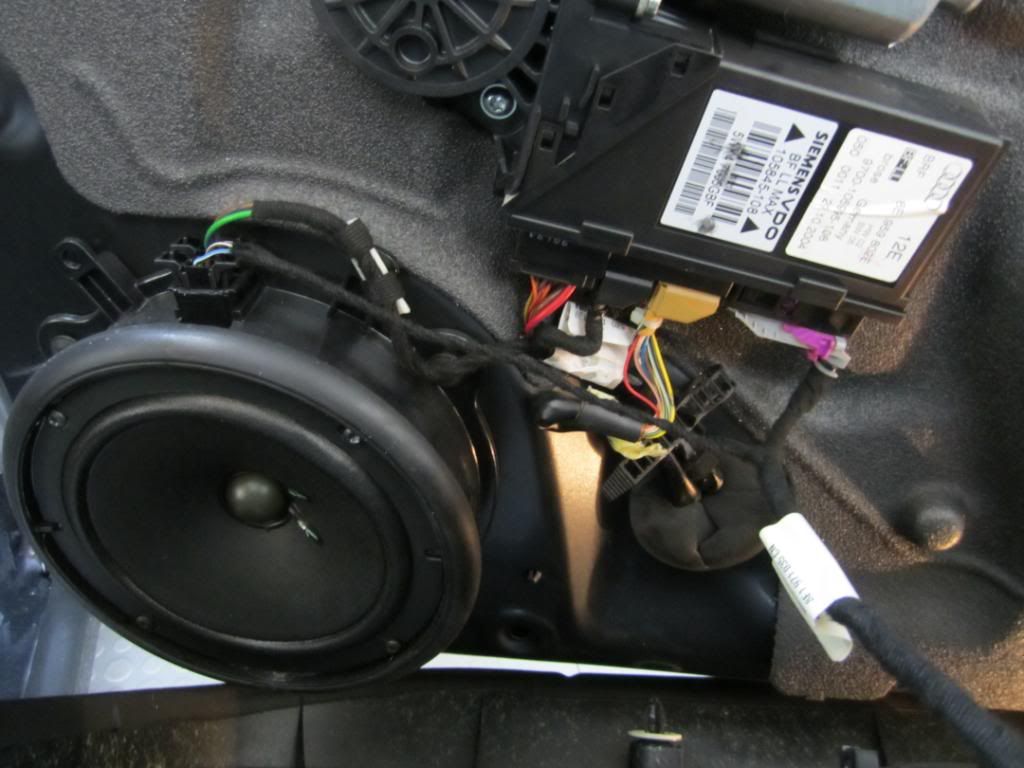
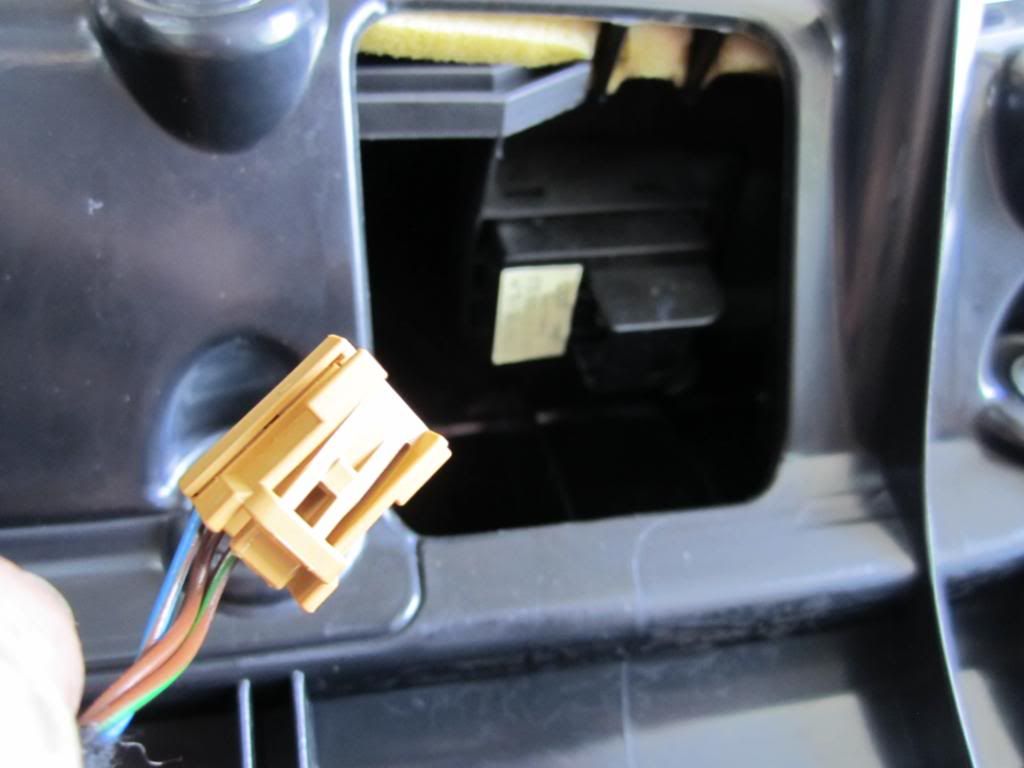
    Step 6: The only things left now are two wiring harness'. First, remove the front-most plug on the speaker that feeds the tweeter. Then move onto the large gray harness that goes to the window motor. To remove this plug, just pull down on the purple clip and wing it to the other side of the gray plug. You do not need to pull on the plug while doing this; the purple clip will push the plug out of the connector


    ************************************************** ************************************************** **********************************************
    Phase 2: Replacement of the window switch and handle shell

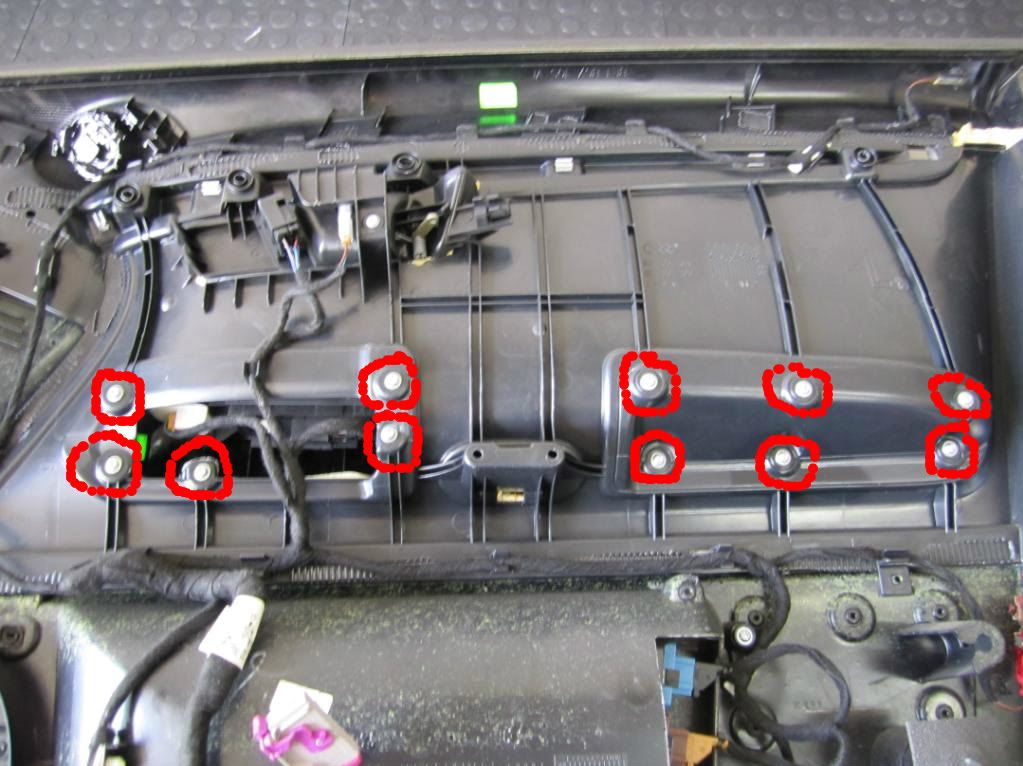
    Step 1: Lay a towel down on the floor and lay the door-card down on it's face. Locate the 11 Torx 25 screws holding on the handle and remove them


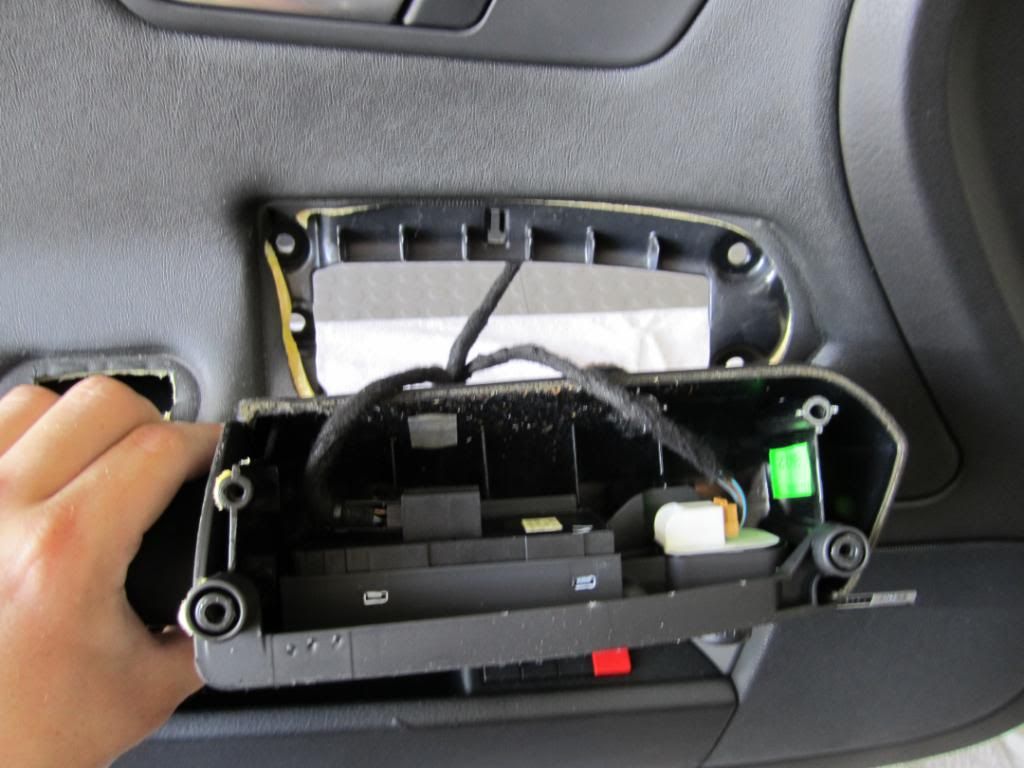
    Step 2: Stand the door-card up and pull off the handle assembly. There will probably be some funk from the previous owner holding it on. You will see the two harness' going into the handle. One is for the windows and one is for the power mirrors. The window switch one is a pain because the clip that you have to press is on the other side of the harness that you can't see.....thanks Audi. The mirror adjustment is and easy one to release


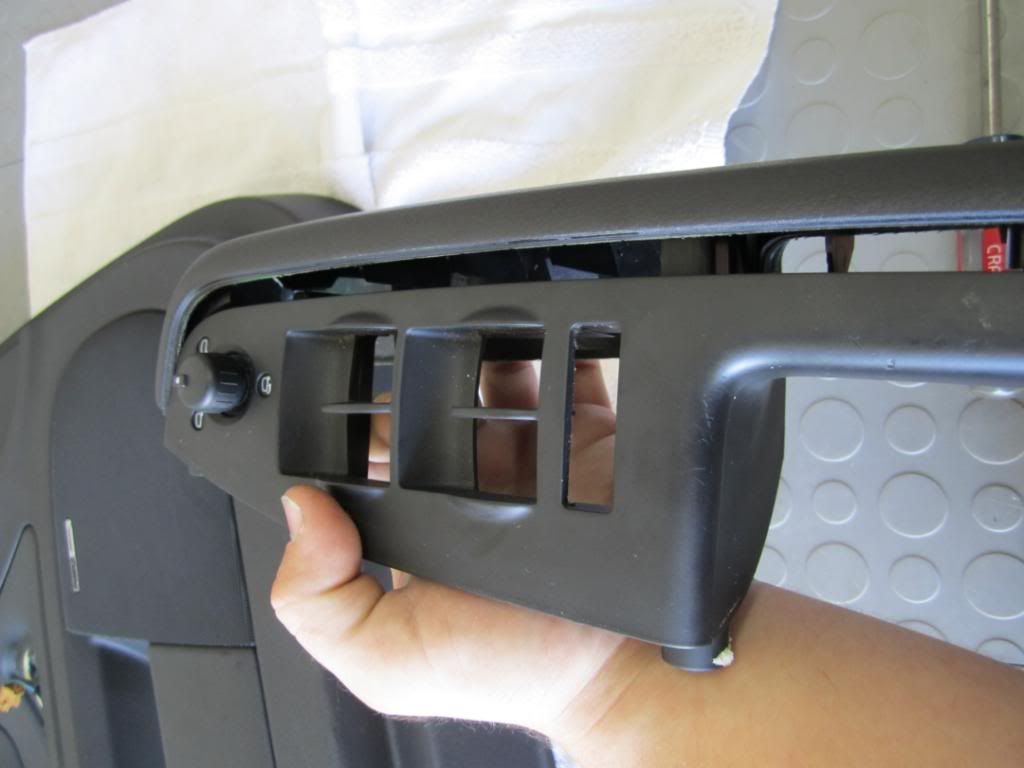
    Step 3: In this next step, the pictures show the switch pannel already removed from the handle shell. This is not necessary at all so pretend it's still there. The next step is to remove the handle shell from the handle assembly by just pulling the two apart. It is clipped in pretty good and there will be some funk holding it on, so a very firm hard pull will be necessary


    Step 4: use a flathead to pop the mirror adjustment knob out of the handle shell like so:


    Step 5: snap the new window switch panel into the handle shell as well as the mirror adjustment knob. This switch fits perfectly for a $1 switch

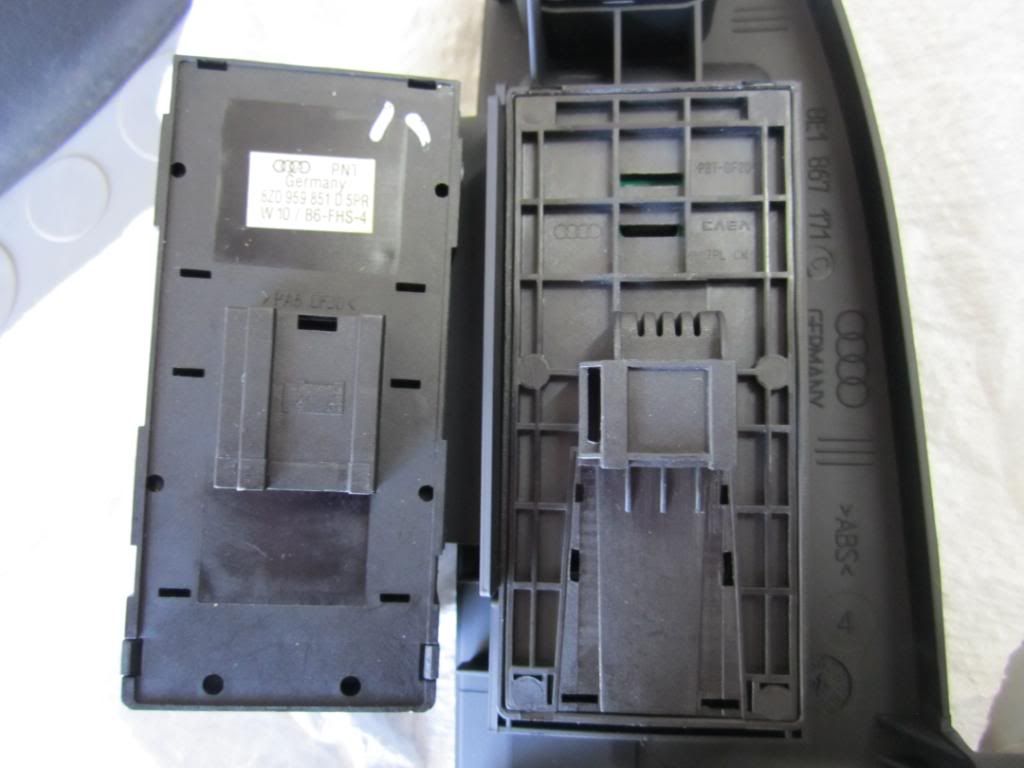
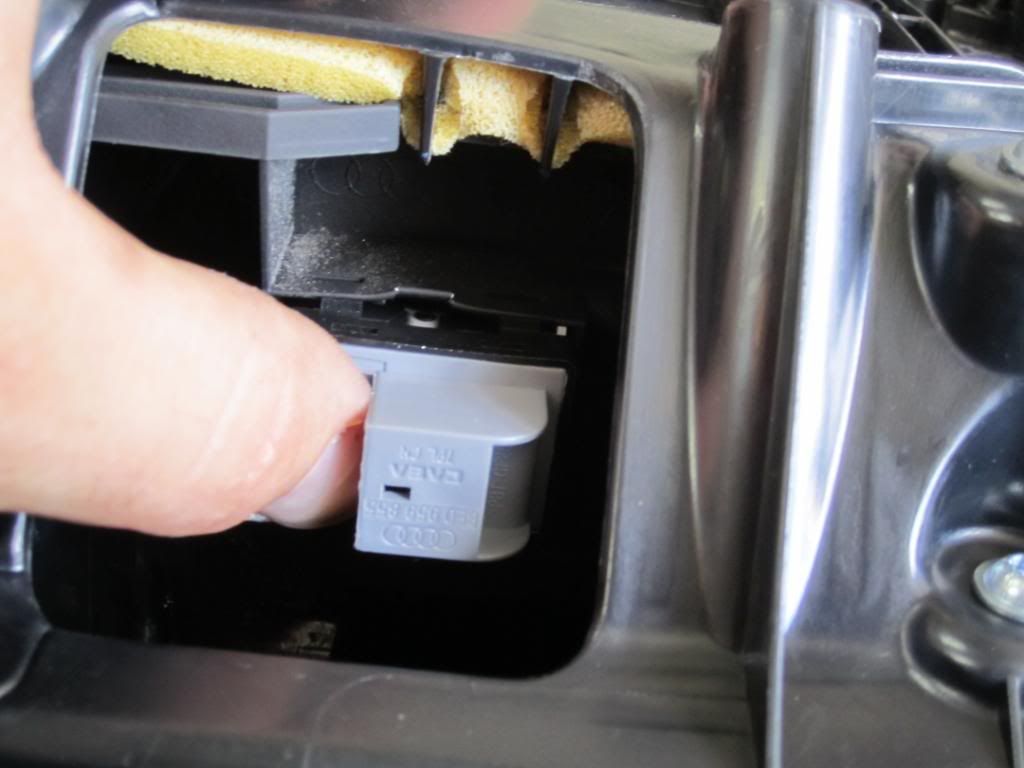
    For reference, this is the back of the OEM switch next to the Hong-Kong special:


    Step 6: Snap the new handle shell into the handle assembly. Then connect the wires and re-install it into the door-card


    The install of the door card is reverse of removal. One thing I would like to point is out is to make sure the the top of the door card is hooked over the ledge on top of the door.
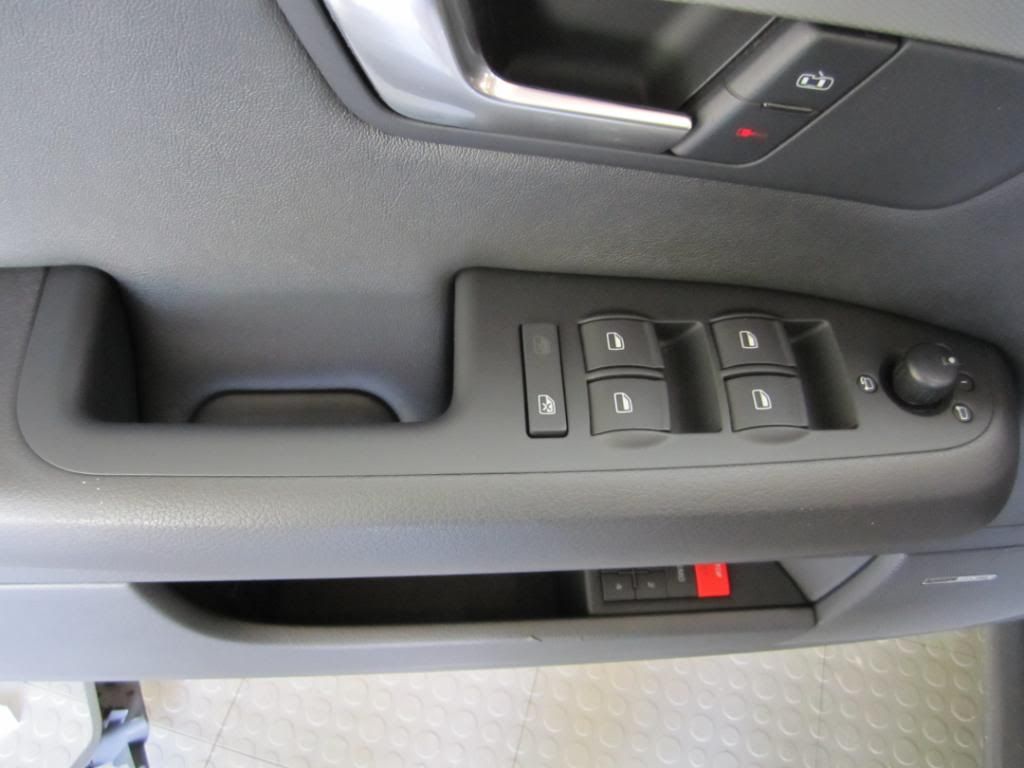
    All done!


    The Chinese knockoff switches work better than the OEM units do in my opinion. The edge of the switch is more rounded which looks better and feels better. The switch has a more solid click and the click sound is slightly different between the first position and the express position. The click stroke is also longer to it is easy to roll the windows down just a little unlike the OEM ones that want to always express up/down. I had these in my A4 for about 2 years and they looked brand new the day I sold the car, so I highly recommend them
    Last edited by B6JoeS4; 09-10-2011 at 09:44 AM.

  2. #2
    Active Member Four Rings B6JoeS4's Avatar
    Join Date
    Sep 13 2008
    AZ Member #
    32998
    Location
    Western Chicago Burbs

    Phase 3: Passenger side (Same process is used for the both the driver and passenger side rear door cards)

    Step 1: Door card removal is the same as the driver side, with exception of the bolt locations in some spots. The one that is on the handle is a little hard to get to, but not impossible. Remove all the bolts and remove the door-card the same way as the driver's side, as well as the wiring harness' and latch cable


    Step 2: I did not replace the handle shell, so I did not remove the entire handle assembly, but if you wanted to replace the shell, you would remove the Torx bolts holding it on, and the shell would pop out the same way the driver's side one does


    Step 3: To remove the window switch, disconnect the harness, then push the switch out from the top side with your thumb. It takes quite a bit of force for it to finally pop out, but this is really the only way to do it without damaging the clips that hold it in on the shell.


    Step 4: Take your new switch, and install it by pressing it from the back side. You will hear the clips engage. Then install the wiring harness and you're done


    Same rules apply for re-installing the door card as with the driver's side.
    Last edited by B6JoeS4; 09-10-2011 at 10:36 AM.

  3. #3
    Veteran Member Four Rings beemercer's Avatar
    Join Date
    Aug 14 2008
    AZ Member #
    31944
    My Garage
    '90 Cq - '13 R
    Location
    obamaland

    Quote Originally Posted by B6JoeS4 View Post
    your greasy hands touch
    speak for yourself, greaseball lol
    You represent the idiocy of today.

  4. #4
    Veteran Member Four Rings drew's Avatar
    Join Date
    Jul 27 2004
    AZ Member #
    2917
    My Garage
    E60 M5 Gone: 996TT stage 3, E46 M3, B6 S4
    Location
    Orange County

    Very nice Joe. My door handle is a little crusty and could use replacing.

  5. #5
    Veteran Member Three Rings likewater's Avatar
    Join Date
    Sep 18 2006
    AZ Member #
    11696
    My Garage
    2012 Honda Pilot, 2005 F150 FX4
    Location
    So Cal

    Nice write up. Thanks.
    Current - 2011 B8 S4 DSG Presitge - APR Stg 1 | RS4 Grill | Magnaflow Xpipe and Mufflers | K&N | Apikol Rear Diff Mount (Race)| H&R OE Sports | Avant Garde M310 19X9.5 ET 40

    SOLD - 2005 B6 S4 6MT with many mods.

  6. #6
    Veteran Member Four Rings vhstejskal's Avatar
    Join Date
    Feb 01 2011
    AZ Member #
    70333
    Location
    UT

    Joe, very nice write up... *2 on these switches also have one installed and seem to work better then the OEM ones.
    -Vic

  7. #7
    Veteran Member Four Rings dparm's Avatar
    Join Date
    Apr 24 2009
    AZ Member #
    41628
    Location
    Frisco, TX

    My driver's window switch has failed. I'll need this. Thanks man.

  8. #8
    Veteran Member Four Rings Mr.Wrong's Avatar
    Join Date
    Dec 07 2009
    AZ Member #
    51748
    Location
    East Coast

    Great DIY as it is one of the most common issues on B6/7 platforms.
    Joe, out of curiosity, why not just repaint them with flat black color for less than $15, just like in Peeling Fix DIY? Less hassle, convenience factor?
    2005 AUDI //S4 B6 6MT Atlas Gray 1/5 - Project Atlas Build Thread
    Forget the B8, keep the V8!
    Buying a used B6/7 S4 is like playing Russian roulette...

  9. #9
    Veteran Member Four Rings mbgt72's Avatar
    Join Date
    May 18 2008
    AZ Member #
    28915
    My Garage
    2003 Jeep Wrangler
    Location
    Nashville TN

    I think we ALL needed this. I've just been too lazy to order the parts. Thanks for the writeup though. I need to tackle this, my right rear window switch on the drivers console is starting to go, and they all are starting to look a little rough. Thanks a lot joe, will be using this in the future.

    Also, the B6 & B7 window switches are the same, correct? And the mirror switch is a separate part, correct? Do you have the part number for that, I think that may be starting to die on mine.
    Current: 996TT
    Sold but not forgotten: 2005.5 S4 MT6 l JHM Parts: Stg 1 S/C, LTH, IM, SS Trio, LW Front Rotors, LWFW, Stg IV clutch, 4:1 Diff, Stern Motor Mounts, Snub/Trans/Diff Mounts, F.I.Exhaust l H&R C.O. 24.75" G-F, 034 Adj UCA's, H-Sport RS4 Rear Sway l Hawk HPS Pads, SS lines & SuperBlue l Fly'sV4 LEDs l 15% Tint, 50% Front l VMR V710 GM 19" & Enkie RPF01's l JL 10W7, Focal Components l V1 Mirror Display l

  10. #10
    Established Member Two Rings fas4tt's Avatar
    Join Date
    Apr 30 2009
    AZ Member #
    41884
    Location
    NY

    Mr. Wrong i think that its cheap enough to do it the way joe did it. Looks great and will def last longer then paint, plus it wont smell. Joe you made me now want to do this and i will prob start my interior project (suede inserts). just trying to finalize on a color, Charcoal, Red, or Black. Car is DG. Great job Joe

  11. #11
    Active Member Four Rings B6JoeS4's Avatar
    Join Date
    Sep 13 2008
    AZ Member #
    32998
    Location
    Western Chicago Burbs

    Thanks a lot guys. I am just as shocked as you that nobody has ever made a diy like this before

  12. #12
    Active Member Four Rings B6JoeS4's Avatar
    Join Date
    Sep 13 2008
    AZ Member #
    32998
    Location
    Western Chicago Burbs

    Mr. Wrong - The parts only cost about $60 total and painting them would never look as good. It would be hard to make all the window icons look perfect too

    mgbt - The B6 and B7 switches are identical. Early '02 A4's had a slightly different connector so make sure you get the one I got or one that is specified to work with all B6 and B7 cars (besides cabs). I'll get the part number for the mirror switch and add it to the DIY

    fas4tt, make a diy for the suede stuff. I've been wanting to do my headliner and the inserts on the doors for quite some time now

  13. #13
    Active Member Four Rings B6JoeS4's Avatar
    Join Date
    Sep 13 2008
    AZ Member #
    32998
    Location
    Western Chicago Burbs

    Added part numbers for the mirror switch, all window switches, and the passenger side handle shell.

    Finsihed the passenger side DIY too

  14. #14
    Deactivated Two Rings
    Join Date
    Aug 19 2011
    AZ Member #
    80029
    My Garage
    1998 Audi A4, Quattro, 2.8/30v, Tip; 2001.5 VW Passat GLS, 2.8/30v, 5spd, w/Unitronic
    Location
    Groton, CT

    Great write up on this DIY. Seems to be common problem with Audi between any model line with the rubberized window switch trim. My B5 A4 windor switch trim looks just a little worse then in the 1st picture.

  15. #15
    Veteran Member Three Rings
    Join Date
    Nov 10 2009
    AZ Member #
    50524
    My Garage
    GM trucks/vans(OBAMA motors)polaris 4 wheeler,urinal,dart board,wash bay
    Location
    American Gardens Bldg(midwest)

    Joe...you are one picky F**K! ... thought those greasy hands looked farmiliar. wish we were neighbors...i need my switches replaced too. nice writeup as usual.

    PB.
    "I CANT SPECIFY BLONDE ENOUGH" 2013 S4.(REPURCHASED BY AOA FALL 2013!!) 6MT,Monsoon.Sport diff.SS texture trims.Awe catback|Eurocode STS|AluKreuz|sways/links|3m crystaline windshield tint 70%crystaline/sides&rear pinnacle 35%ceramic|HR O.E.springs(Garbage)|Tyrol Caliper Sliders|SS Lines|S-Flo intake|Clear bra|Vag Com Mods.
    Liscense plate delete/...and some other shit im forgetting.
    2008 Porsche Carrera 4S. 6MT. Daily Driven grins ear to ear.

  16. #16
    Active Member One Ring
    Join Date
    May 19 2011
    AZ Member #
    75746
    Location
    British Columbia

    Anyone have a pic of the non folding handle shell, I'm out of the country but would like make sure that what I order is correct so I can get this done when I get home.
    Thanks for the great DIY

  17. #17
    Active Member Four Rings B6JoeS4's Avatar
    Join Date
    Sep 13 2008
    AZ Member #
    32998
    Location
    Western Chicago Burbs

    The non-folding looks the same but it doesn't have the little icon for folding the mirrors at the 6 o-clock position on the knob. I'll get the PN for you today

  18. #18
    Veteran Member Four Rings oatzel's Avatar
    Join Date
    Jun 02 2004
    AZ Member #
    2350
    Location
    LA

    great write up
    Current: '14 allroad, Premium +, Sport, Black on Black, H&R c/o, Magnaflow exhaust, Hotchkis swaybars, Neuspeed Gunmetal RSe102, CR-15
    '19 s4, P+, Quantum Grey on Black

    Old: '12 4dr GTI Autobahn, Black on Black
    07 s4 avant, ibis, stasis exhaust, vogtland c/o, h-sport rs4 sways, vmr gunmetal v710s, 50/35% tint
    09 A4 2.0t
    03 a4 3.0qms
    00 1.8TQ

  19. #19
    Active Member One Ring
    Join Date
    May 19 2011
    AZ Member #
    75746
    Location
    British Columbia

    Thanks for that!!
    Quote Originally Posted by B6JoeS4 View Post
    The non-folding looks the same but it doesn't have the little icon for folding the mirrors at the 6 o-clock position on the knob. I'll get the PN for you today

  20. #20
    Veteran Member Three Rings adioman6000's Avatar
    Join Date
    Jan 12 2011
    AZ Member #
    69381
    Location
    SLC

    It says its for a c5 a6 the look identical to ours. Is it the same switch you ordered?

  21. #21
    Established Member Two Rings
    Join Date
    Nov 07 2012
    AZ Member #
    103675
    Location
    east coast

    Thanks for the great writeup, Joe.
    It was very helpful.
    Got my driver door apart, replaced the window switches and grab handle without incident.
    Reassembled to find i hadn't gotten the window motor connector fully seated even though the purple lever was in the captured position (stupidest nazi plug design i've seen yet), took it back apart, seated the plug with a ridiculously hard push, and everything works.
    Except i managed to punch a hole in the woofer with one of the panel pins! <slap self in face>.
    (easy fix w/ some crazyglue and a bit of card stock).
    moral - pay attention, don't work in the dark, and check your connections *before* reassembly....none of which i did despite knowing better.

  22. #22
    Veteran Member Four Rings Sharkfin's Avatar
    Join Date
    Nov 01 2007
    AZ Member #
    22242
    My Garage
    B7 A4 2.0TQT
    Location
    PA

    I'm dealing with a failed driver window switch as well, is it simple as replacing that one switch? The part number you posted was for the whole assembly on GAP. Thanks in advance

  23. #23
    Veteran Member Four Rings IVRINGS's Avatar
    Join Date
    Mar 27 2009
    AZ Member #
    40422
    Location
    Columbus, Ohio

    So is the Mfg Part# 8E0959851D5PR working in the the B6s? Cause I can't get a 100% yes or no. I have one switch on my drivers side not working. I'm thinking it is the drivers side switch as the passengers switch is still working for the window on that door, but not on the switch on the drivers. Let me know cause I've been wondering as even ECS has it for 35.52. http://www.ecstuning.com/ES2586727/

  24. #24
    Veteran Member Three Rings GameBreaker's Avatar
    Join Date
    Mar 19 2008
    AZ Member #
    26619
    My Garage
    Phantom Black S6, GONE but Not forgotten: Dolphin Grey B6 S4
    Location
    Chicago

    You should just buy them from the seller on ebay. I purchased mine a couple months back before I sold the car and they worked great.

  25. #25
    Veteran Member Three Rings 19jdog's Avatar
    Join Date
    Jul 28 2014
    AZ Member #
    268946
    My Garage
    2006 Mini Cooper s - 2013 Mini Cooper S - 2007 C6 Avant - 2006 GSXR 750
    Location
    SACRAMENTO

    Bumping this cause I REALLY need to do this!
    11 Q7 Prestige TDI S Line - Stance SF 03 20x10

    04 B6 A4 USP 2.7t
    USP CLUB MEMBER #198
    BEL 2.7t SWAP- Rohana RC7 19x9.5 33mm - 034 REAR SWAYBAR - TIP TO 6 SPEED SWAP

Bookmarks

Posting Permissions

  • You may not post new threads
  • You may not post replies
  • You may not post attachments
  • You may not edit your posts
  •  


    © 2001-2025 Audizine, Audizine.com, and Driverzines.com
    Audizine is an independently owned and operated automotive enthusiast community and news website.
    Audi and the Audi logo(s) are copyright/trademark Audi AG. Audizine is not endorsed by or affiliated with Audi AG.