Audizine - An Automotive Enthusiast Community

Page 1 of 2 12 LastLast
Results 1 to 40 of 48
  1. #1
    Veteran Member Four Rings DRAKLORE's Avatar
    Join Date
    Oct 14 2009
    AZ Member #
    49253
    My Garage
    '81 Mk1 VW CADDY/2012 Honda Ruckus
    Location
    Okinawa Japan

    $20 Carbon Clean-up 2.0T FSI *reference/walkthrough*

    Guest-only advertisement. Register or Log In now!
    BIG EDIT!!!!- I have found the PDF Walkthrough/DIY for the turbo,intake manifold, hpfp and injectors!
    This is the god of all DIYs and should supersede any of the steps in my Walkthrough. Feel free to still use my pics as reference. But everything is clearly defined in the PDF

    B7-A4-Turbo-Intake-Manifold-Removal-(STaSIS-DIY-PDF)


    Listen- it seems that more than a few of us have forgotten to make sure each installed injector has an o-ring upon reassembly. WHEN YOU ARE READY TO GO BACK TOGETHER, AND YOUR INJECTORS ARE ALL INSTALLED RESPECTIVELY. MAKE SURE THERE IS A BLUE O RING ON THE TOP OF EACH ONE. SOMETIMES THEY GET STICK IN THE FUEL RAIL, OR FALL OFF. IF YOU DON'T DO THIS YOU COULD BE REINSTALLING THE MANIFOLD AGAIN!
    So here's the beans. I see everyone on here paying hundreds of doll hairs and Monēt to get their valves cleaned. So I figured Id at least try to help you save some $$, first off I'm cheap, this will cost you 15-30$ depending on what tools you already have and how crazy you want to get cleaning the gunk.
    Second is that I learned how to remove the manifold after searching for days to find an rs4 inj DIY posted by a big tuning company for their ko4 kit DIY. If you can find it than link it.
    Tools I can remember using.... Torx 25? Definently 27&30
    An 8" bit driver extension preferably magnetized. 10mm 6pt with bit driver adapter. Assorted pliers and screw drivers. A 13,14,17mm open end wrenches. Maybe a 19mm too lol
    A triple square bit, can't remember the size but I remember that the first time I took off the manifold I used a large Allen that fit the hole well, since then I went to autozone and bought the set of four, Bassically if your going to touch your audi pay the 12$ for the set...
    Materials needed: some extra coolant, if your good you won't need much (1 qaurt) brakleen/carb cleaner of choice (at least four cans) shop rags and a drink of choice.

    *****READ THIS BEFORE ATTEMPTING ANYTHING, I NOR THE AZ ARE RESPONSIBLE FOR YOUR ACTIONS. USE THIS FOR REFERENCE ONLY, I WROTE THIS ON AN IPHONE AND IT'S BY NO MEANS A STEP BY STEP DIY BECAUSE I'M 100% I'M FORGETTING SOMETHING OR TAKING A SHORTCUT THAT I MYSELF FEELS COMFORTABLE DOING.... BE PREPARED TO SWEAT, SWEAR AND SAVE $$$.$$

    First step:

    Remove your PCV, for me it was simple, for you maybe not... If this seems out of your league than go ahead and pay someone capable the 600$ to wash chemicals past your valves, after doing this three times, it's clear that no amount of chemicals unless pure acid will do shit to this gunk...
    Step two:

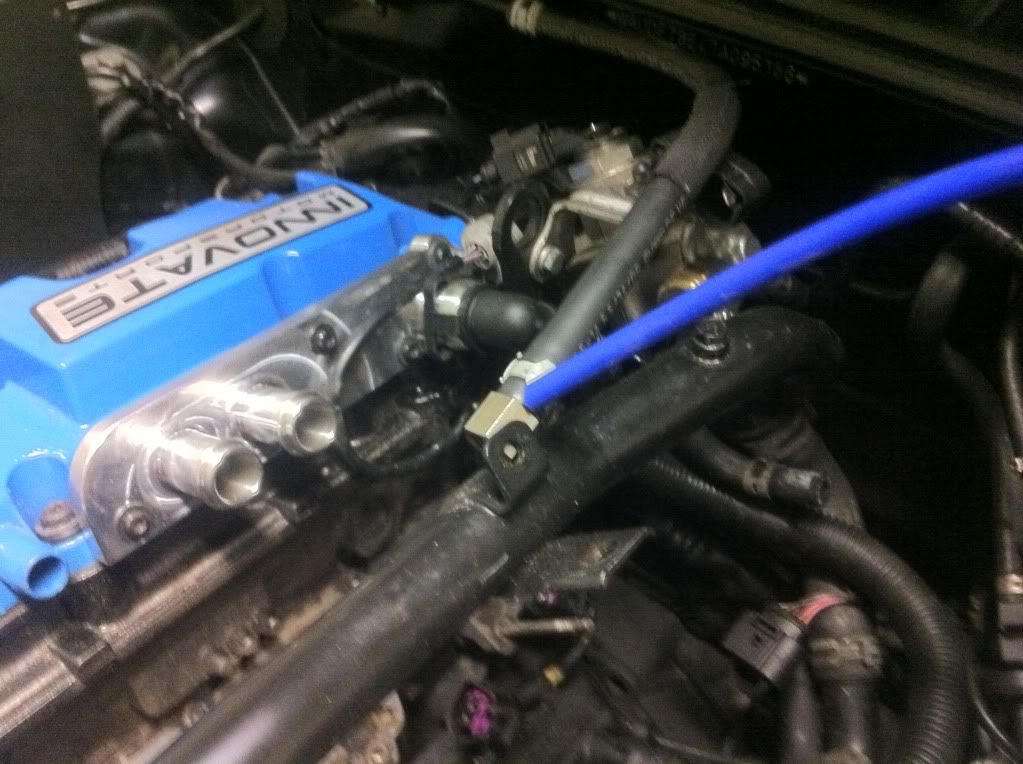
    Remove the fuel line accross the top of the manifold, it is a 13/14mm and 17mm. I usually let the car sit a few hours before touching it, let's it cool down and the fuel bleed off, if you are eager and like getting 3rd degree burns beware cause this lone will piss fuel everywhere if you go at it immediately. Also notice the screw on that black tube, that is your coolant bleed 10mm just remember thats where and what I'm talking about.
    Step ?:

    Disconnect your hpfp, the pissing fuel rule applies here as well, if u want and have small hands, it helps to reach down and pull up on the metal line while gently using your fore finger to undo the metal nut. Caution possibly hot.. Also unplug your hpfp connector just for giggles. If your running a boost tap
    Than unplug that and set it to the side.
    Step get it done:
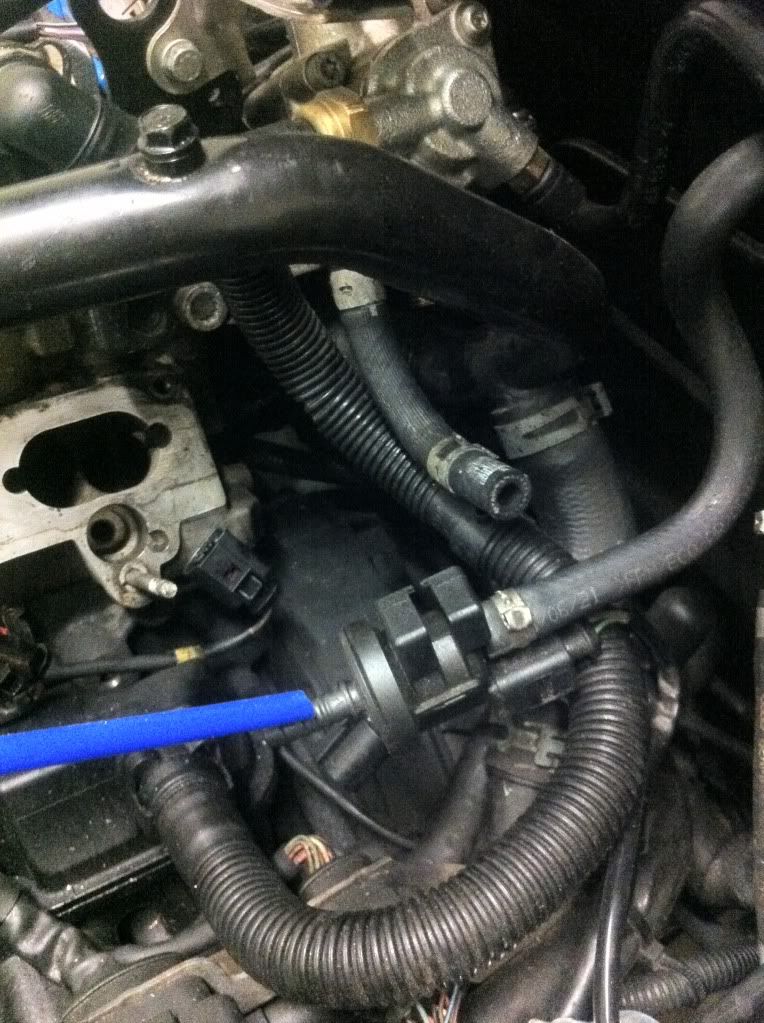
    Here's your upper coolant tube, where that blue rubber points is a hidden screw, t27? Undo it and it will let you move the upper hose enough to get the other torx below it, after that get some rags or w/e and undo that clamp, slide apart the hose and tube and position the hose so it's not spewing out coolant off to the side.
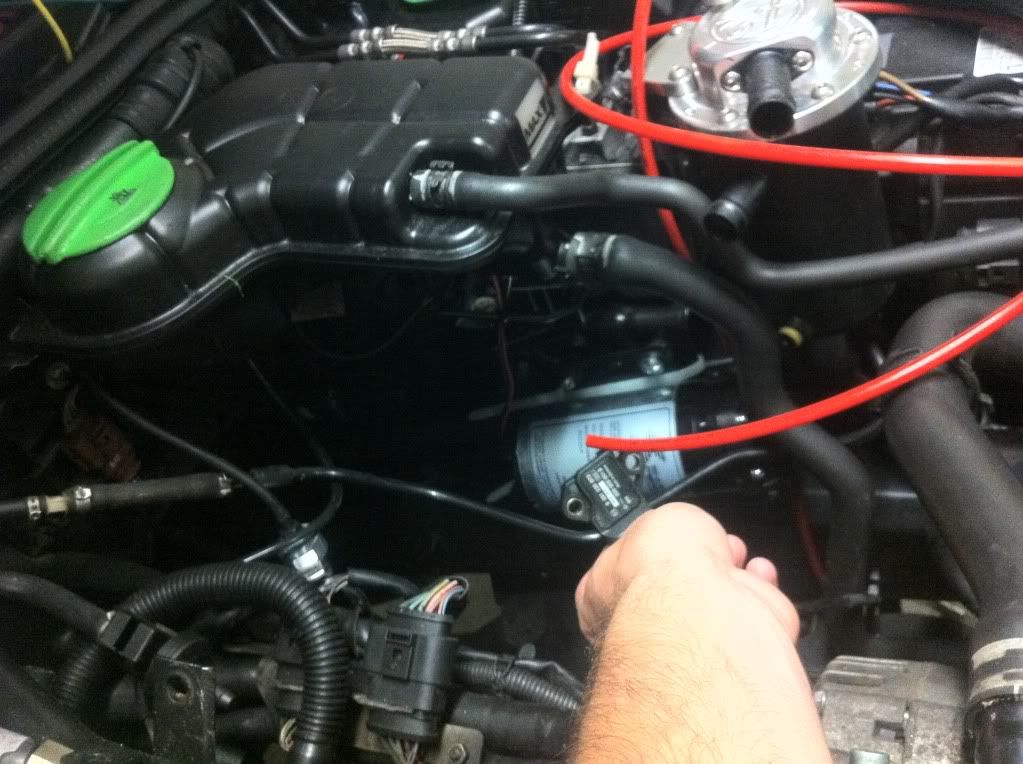
    Under here is a sensor, unplug it..
    A step:

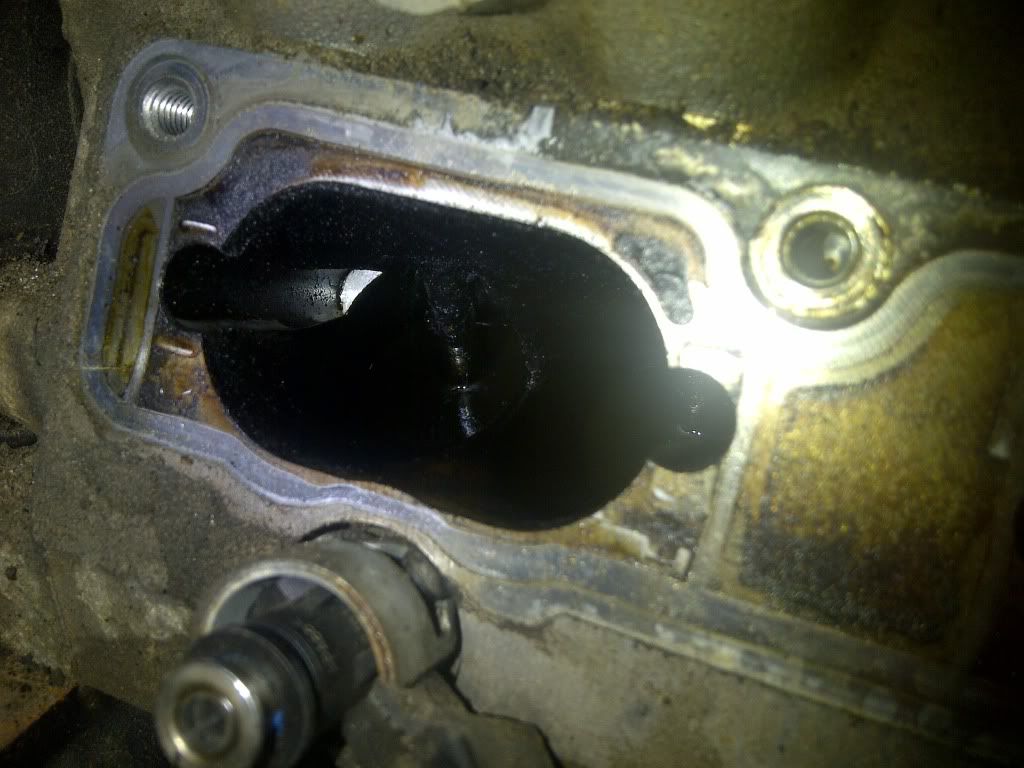
    Here's some connectors to remove, you will swear the middle and right one don't exist, but as soon as you got to remove the manifold u will see lol, if you search u can find them and remove with a flathead screwdriver, wait for the familiar VAG click and then wiggle them off, at this point I suggest removing your charge pipe, you do not need to remove your throttle body! If you want more clearance than do it, it's literally just another four t27 bolts, regardless you will need to remove the TWO connectors from it, than walla. Now look at your dipstick tube, it's got a t27 holding it the the IM, remove the screw and yank, ideally you would remove your dipstick but I'm laZy and u don't need to for the remove portion. Now look down next to whee you just yanked out your tube. There is a funny looking triple square bolt, this one is attached to a support bracket that connects to the IM and is right next to another that I've misstakingly taken out before :-/ ideally use the proper tool but I've used a large metric Allen, and a flat head the second time :/ lol

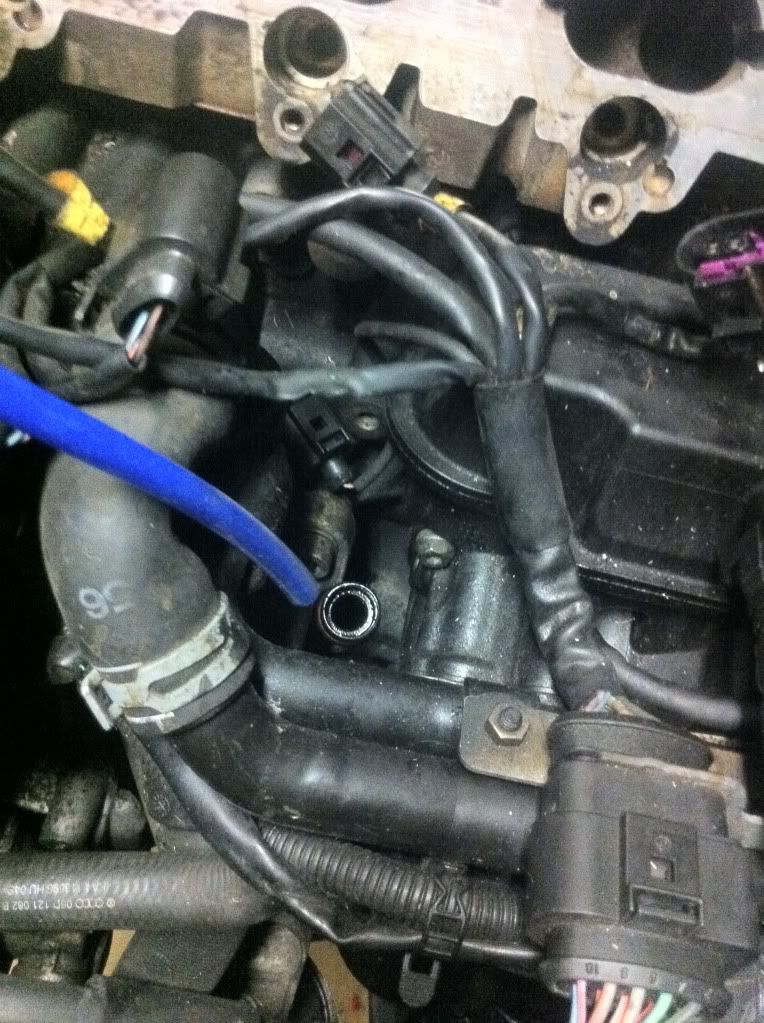
    ^^ dipstick tube hole>> the IM support bracket bolt is literally the one a few inches above this hole, do yourself a favor and remove it completely ;-) next is a weird vacuum thing that needs to get removed, it's got on of those PITA clips that can't be reused, I always zip tie mine back on, you do whatever you want. Idc

    ^ note that you can disconnect it further up, but then you would have to disconnect that connector=extra step and like I said I'm lazy.
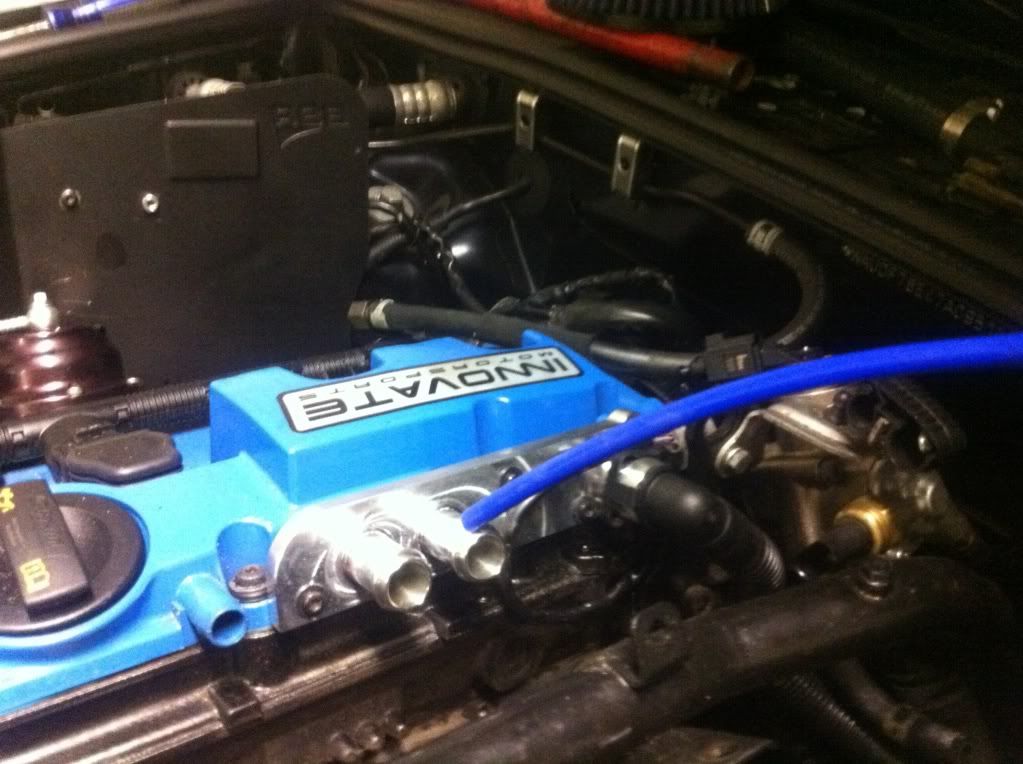
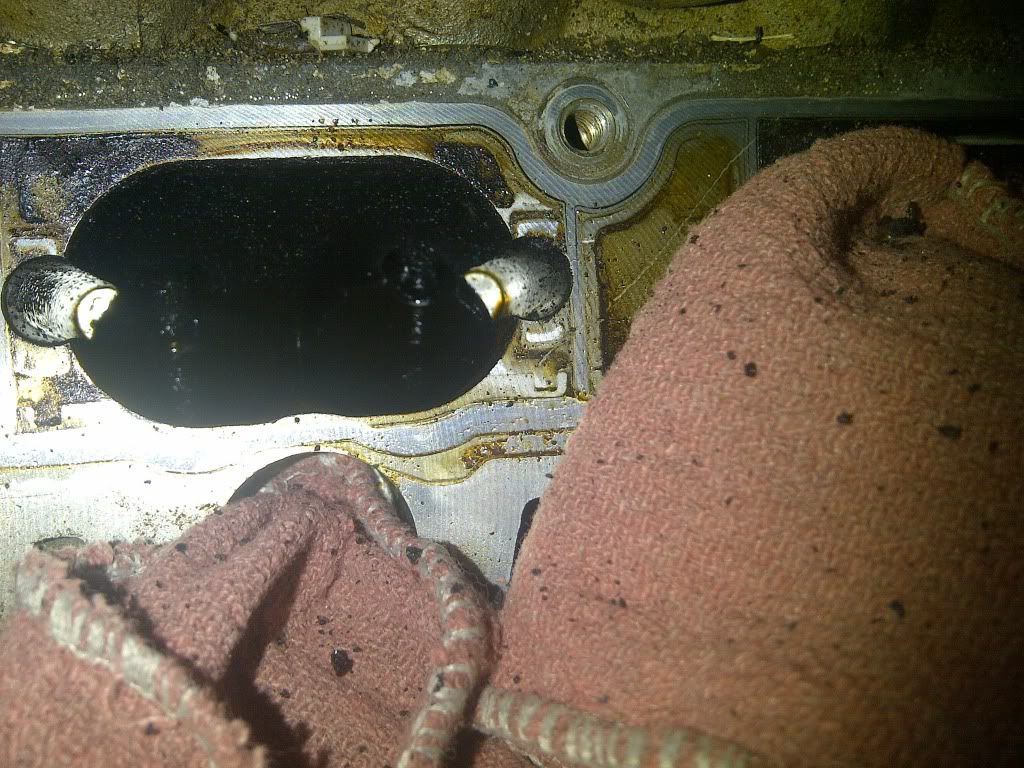
    Great pic here

    Here you can see the hidden middle
    Connector at the top of the pic and one of the throttle body area connectors,
    Also you can see where I disconnected that vacuum deal from and the support bracket for the manifold. Here my TB is removed, not neccesary, someone asked if I replace those inset rubber gaskets.
    ME NO! You... ? If you have the dough and want that extra "insurance" go ahead, in my personal experience Ford deems this exact design gasket to be "multi use" that's why it sets I a track and is a quality rubber material, I've personally never replaced mine not had a problem, but if I do this again than yes I will because this is a wear and tear item after multiple torque downs and where I'm running a BT... So do what you want.
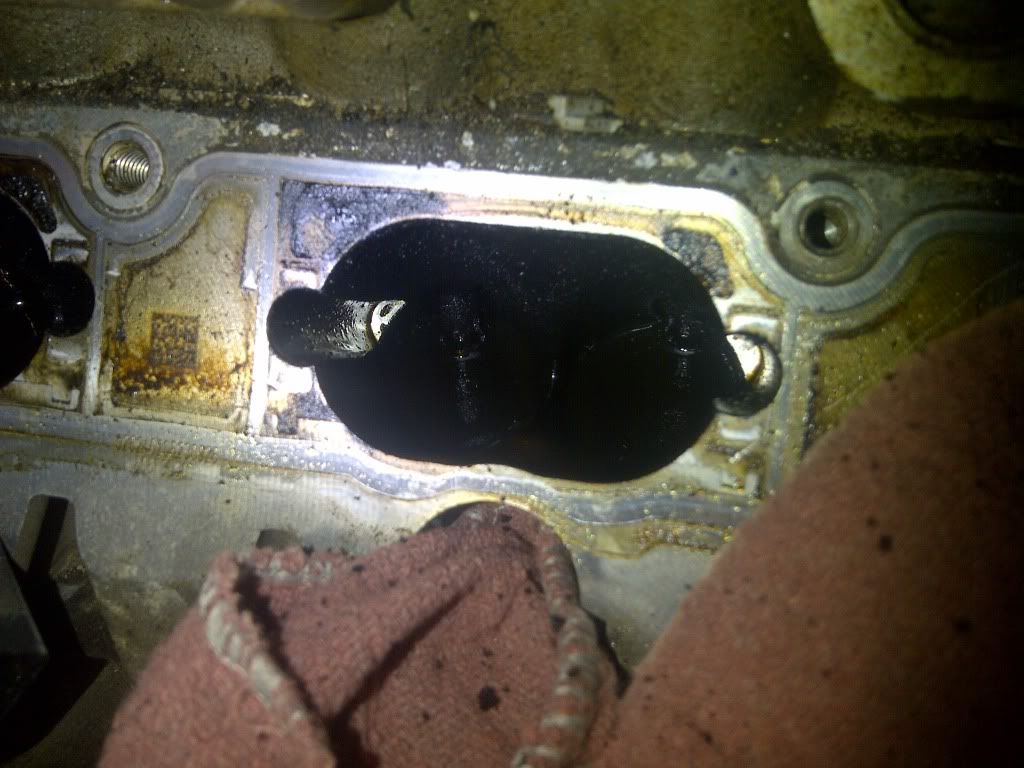
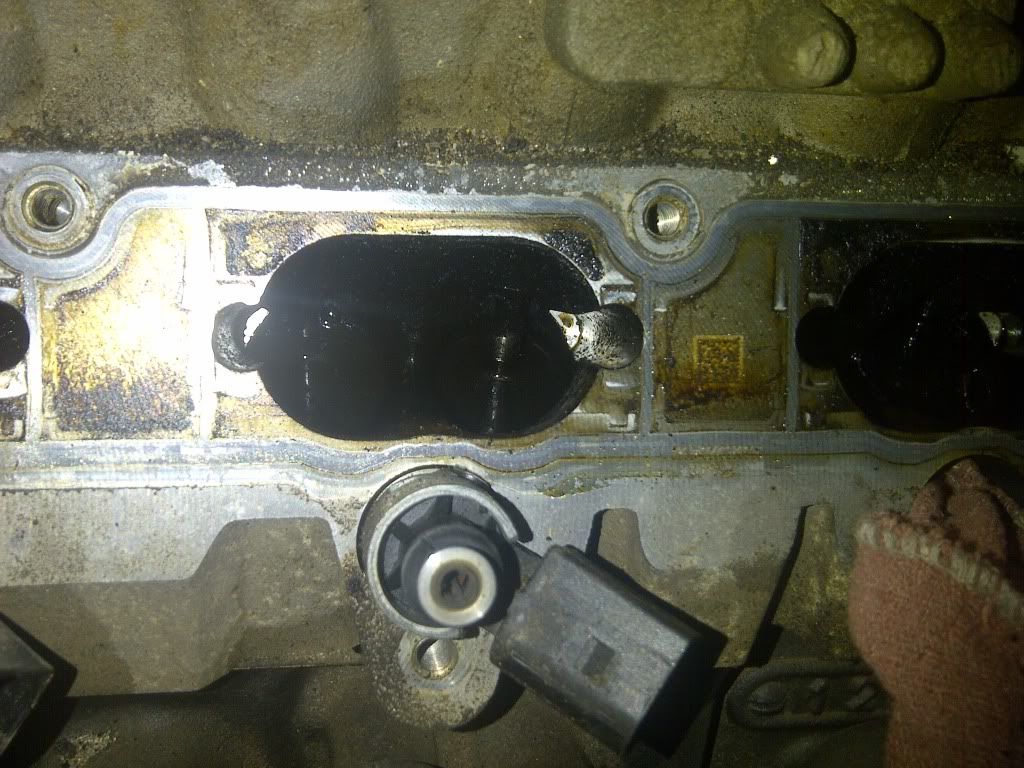
    Here is a better pic of the manifold mounting surface

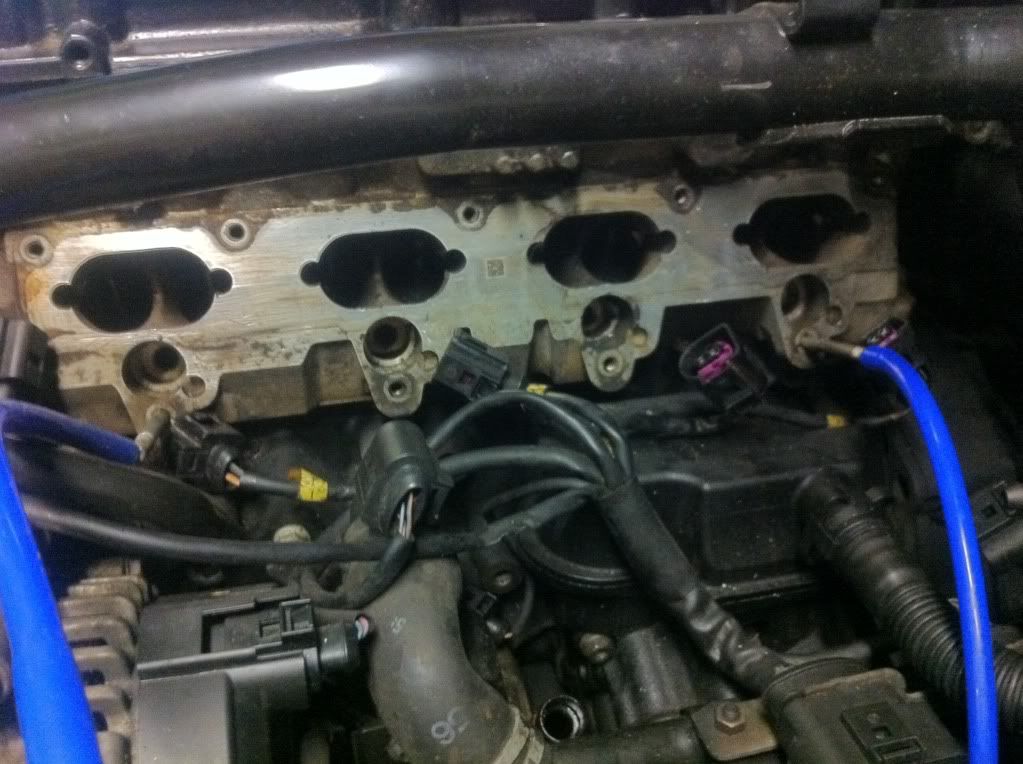
    As you can plainly see, the top of the manifold has FIVE bolts... The bottom of the manifold has TWO bolts In the center, and ONE stud/nut on each lower corner. These all have very accessible tracks that with a bit driver and extension can be reached easily, I suggest a magnet tip to grab them out, especially the nuts... The bolts are t27 and the nuts are 10mm. After this
    You now can yank out the manifold!!!! You must first
    Lift up on the coolant tube and get the corresponding bracket away from the tab it sits in, then move the other bracket up and away from it's plastic resting spot. Now finangle with the fuel line to get it situated and yank! It is really on there, you will wiggle and yank and swear it's still bolted on somewhere, maybe you left the support bracket still connected! But here comes the hardest part. The two lower studs are just long enough to make you think the manifold isn't coming off without removing the other metal tube bracketed on the left of the IM but your wrong, once the injectors
    Let go of the manifold you just really give it some maneuvering and yanking and it will come right out. Just check all four injectors for the blue o ring as some times those come off. :-() you can now replace your injectors if u want? Go ahead and take them out and clean them, getting them out can be tricky, but if your smart you won't need the special tool :-)
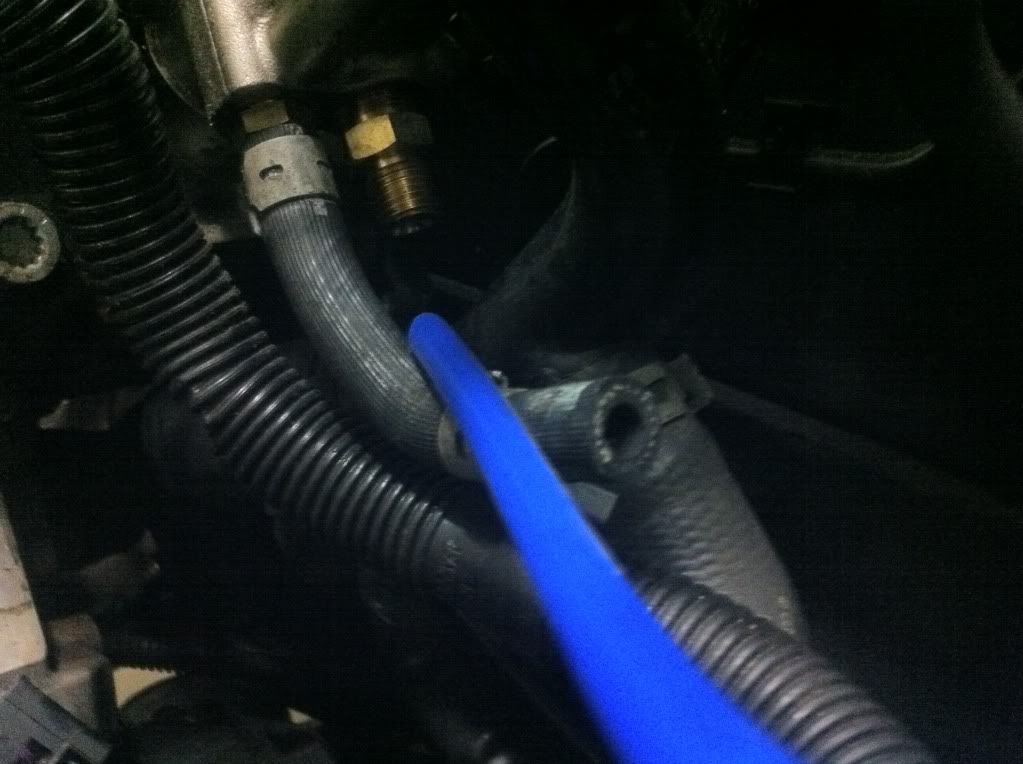
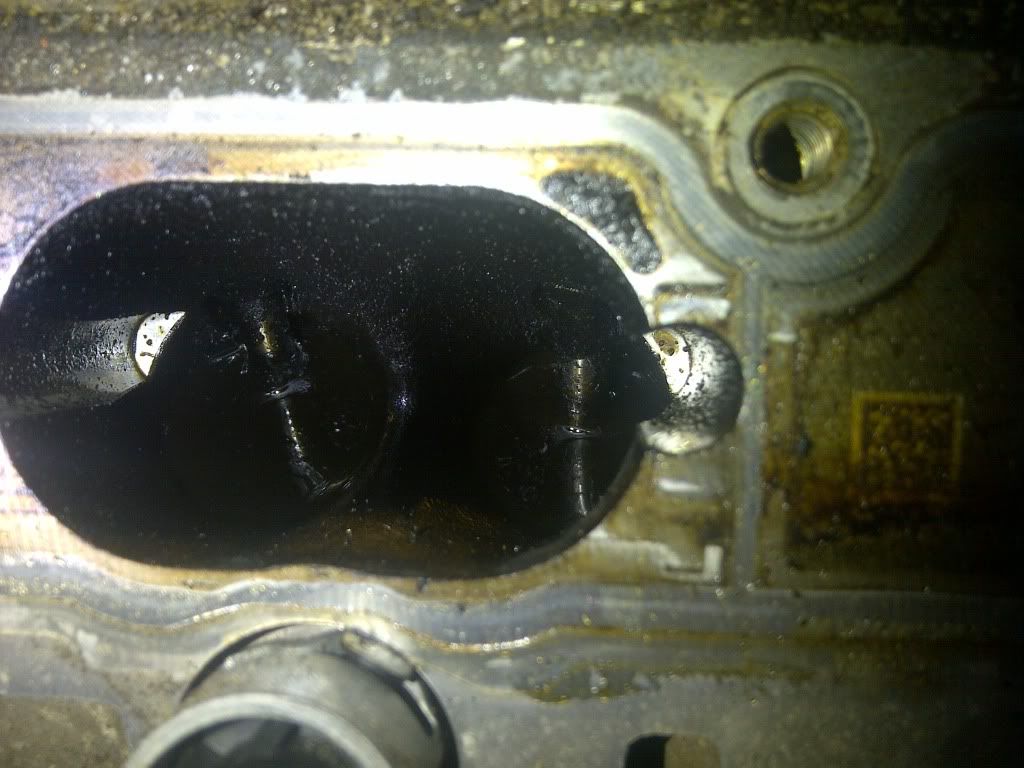
    Here's a pic of your map sensor, if you have a FMIC, or upgraded charge pipe, I suggest just removing it as opposed to pushing or stressing it to the side :-/

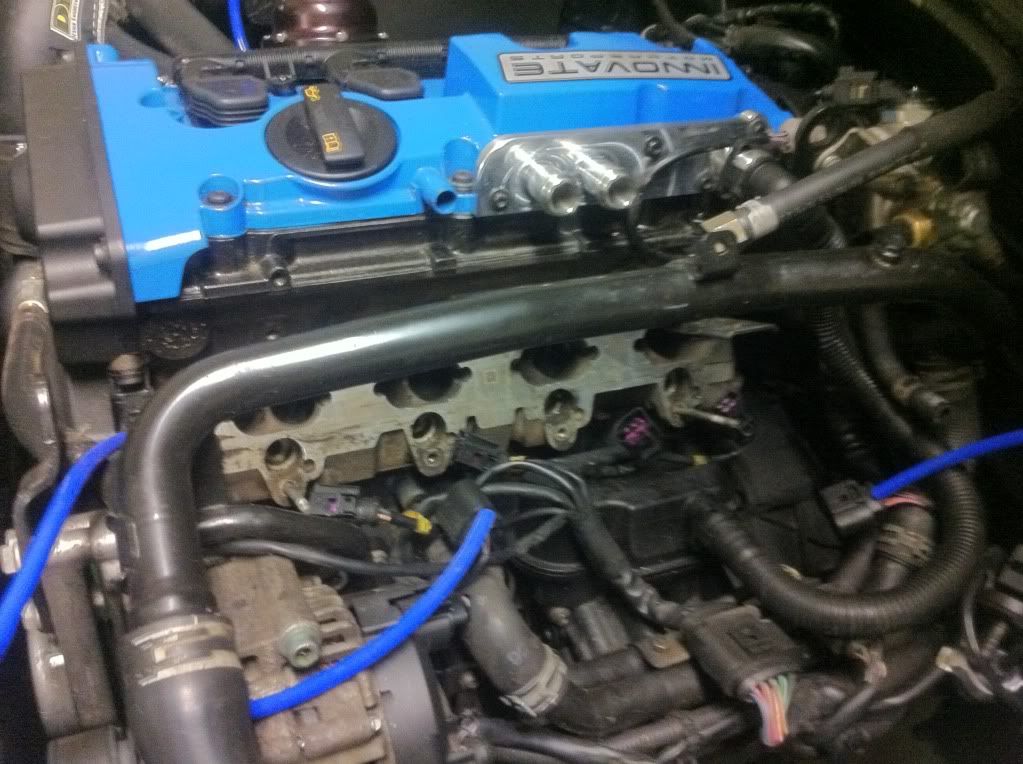
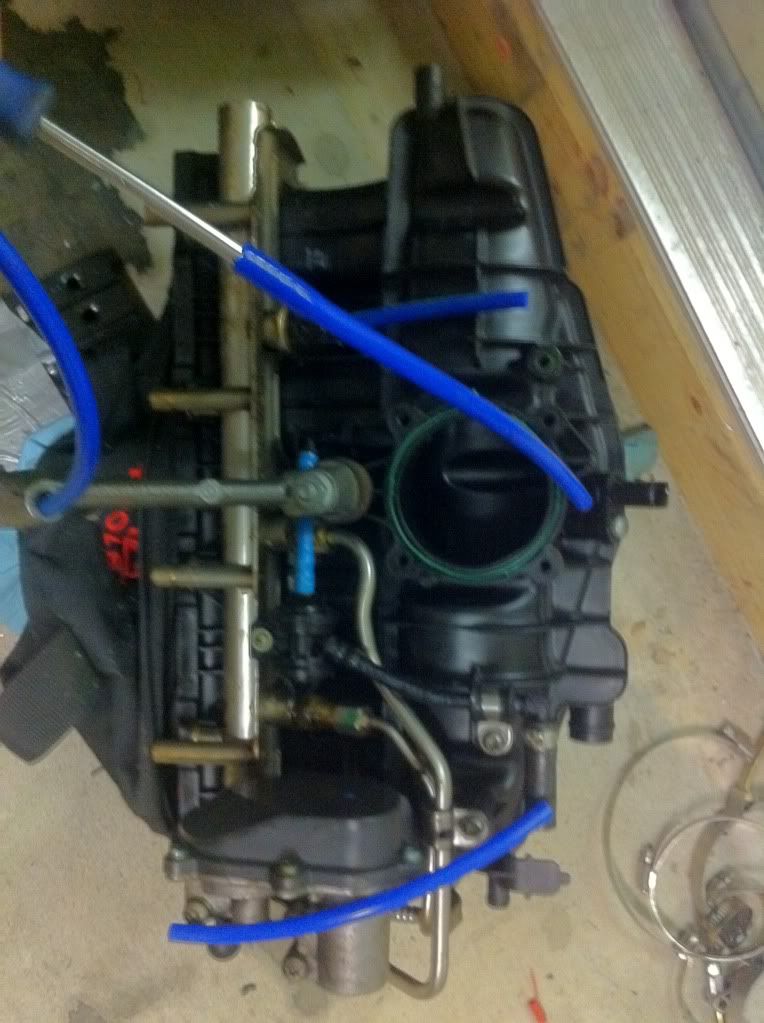
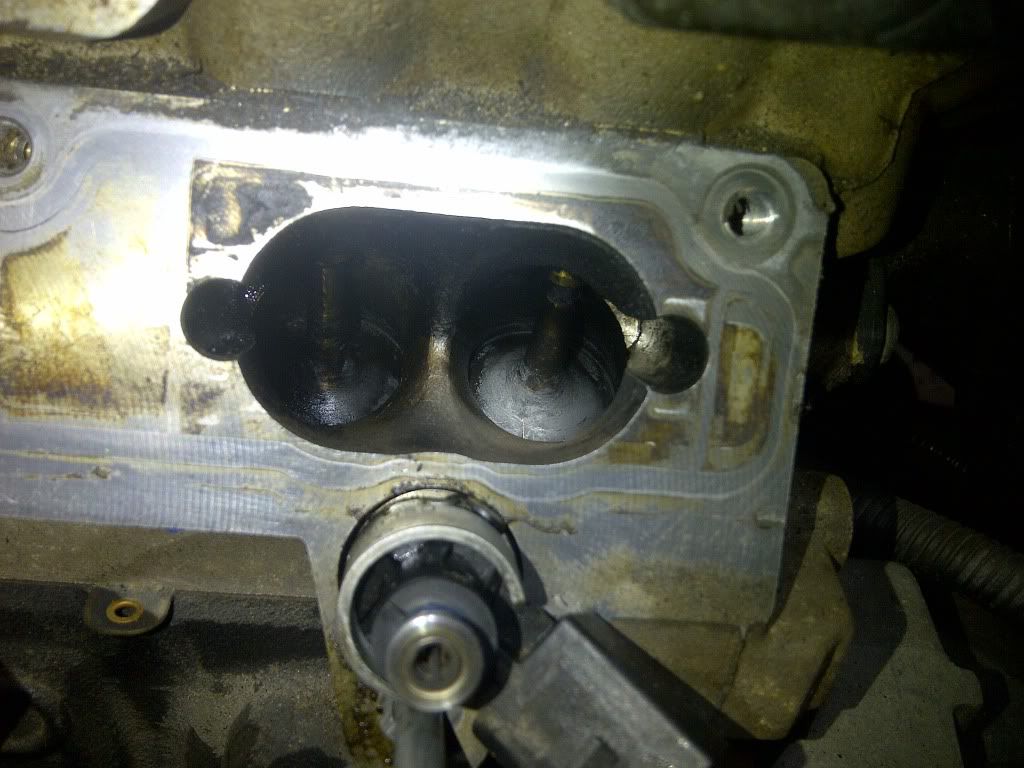
    Here's the face of the I'M you can see the flappers and gasket, I've never had to clean the inside of the manifold.
    Here's your charge pipe and TB on meth, you can see three of the four TB bolt holes and connector interface.

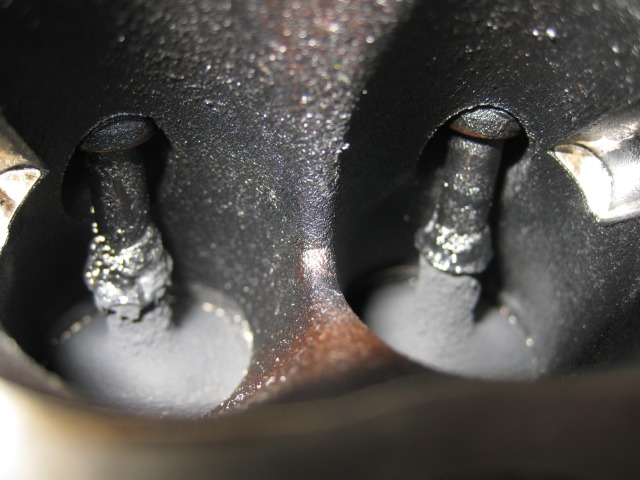
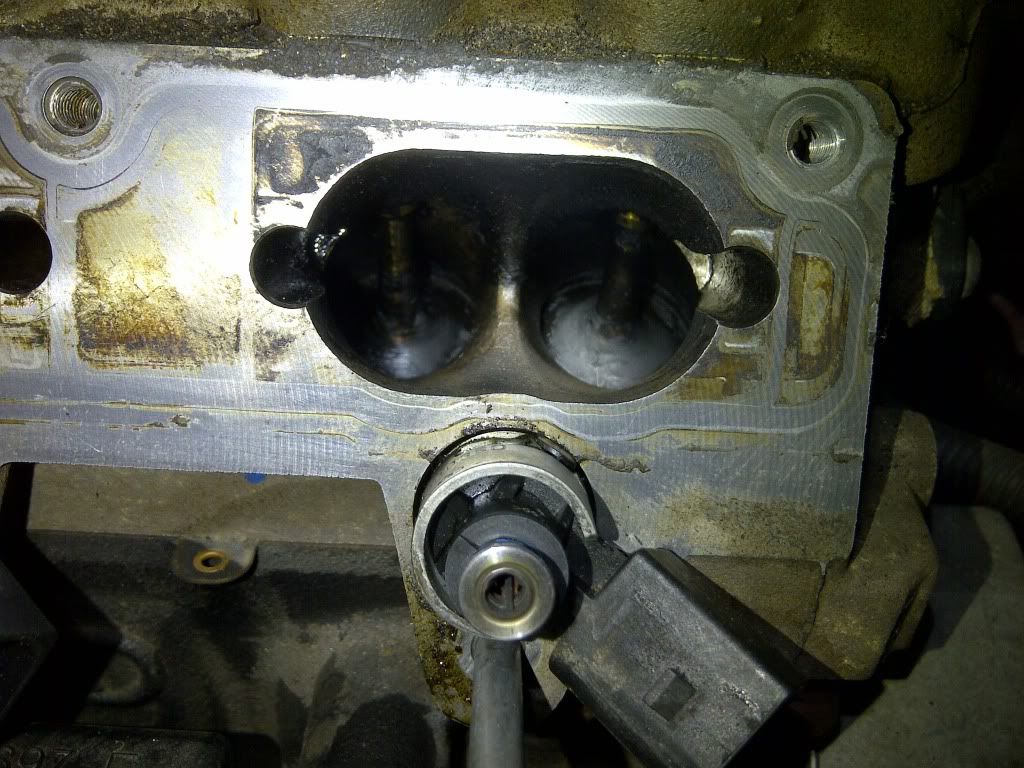
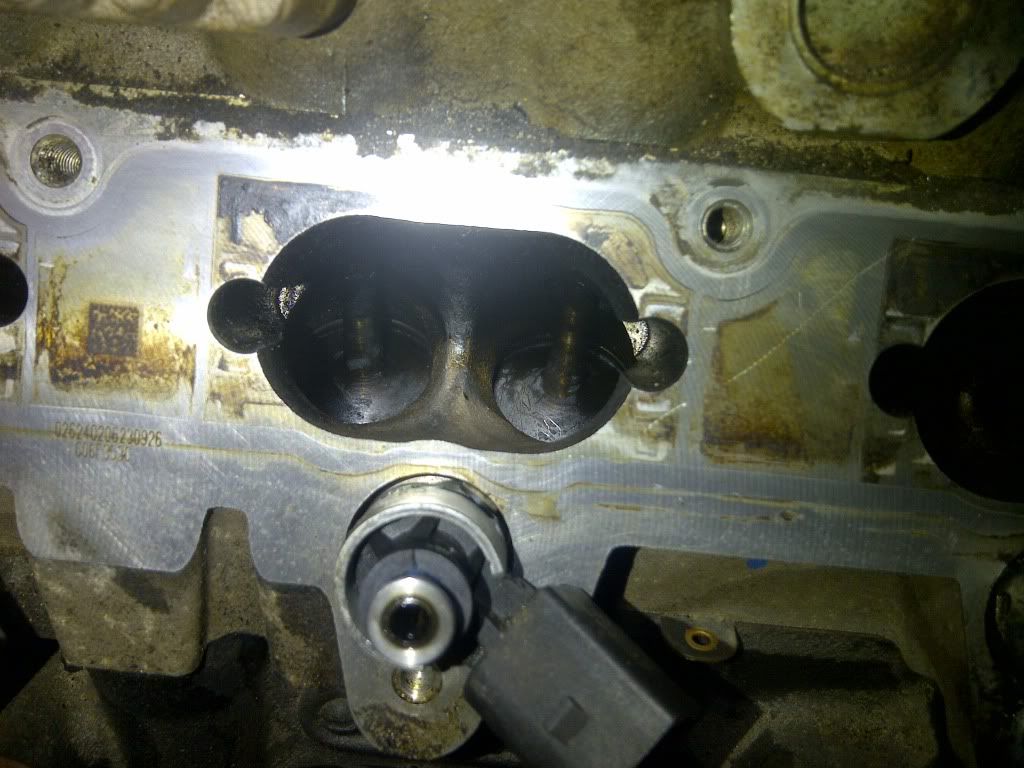
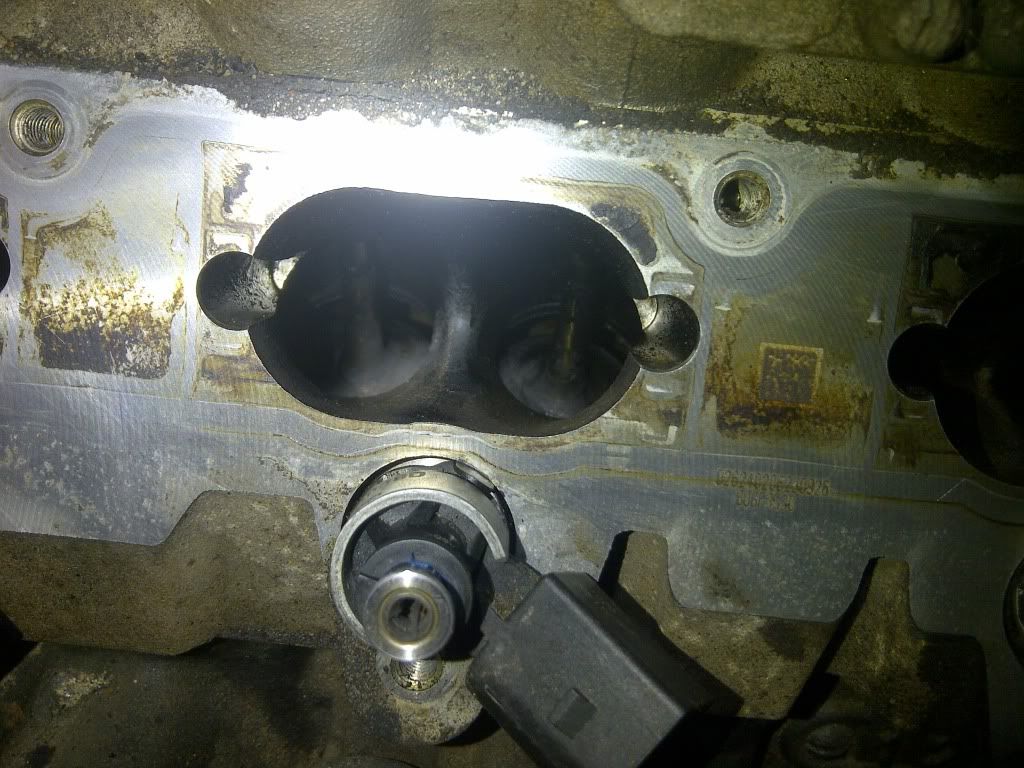
    Now CLEAN YOUR VALVES- (there are metal shims that split each intake port in half, pull these out gently and clean them) your valves are right there in front of you, exposed you can see the situation, you will have a few if not most of them will he closed, my method is this, I spray them with cleaner and if the valve is closed I let them soak, I then take my trusty this long and skinny flathead and GENTLY scrape the carbon away, DO NOT PRY, CHIP, STAB OR HAMMER! use your head and take your time, I woulnt recommend using anything that is not solid to do this B/C u don't want to drop anything in that chamber :/ also I don't use a wire brush, they lose the bristles and now you have a potential for a bent valve, I just keep repeating this process until the valves are like new.
    Clean and check everything prior to install as organization is the key to success! Make sure all of your seals and connectors/ bolts are there and routed, clean your mating surface as well!

    To reassemble just repeat your steps backwards, only
    Difference will be lining up the holes/studs, and after your finished you need to remove that coolant bleed screw (remember) and fill your coolant, let the car prime the fuel pump before starting, turn key on and
    Of at least twice, then turn over, car will run funny for a few
    Seconds then come right out of it, after the car runs long enough for the thermostat to open turn the car off, loosen the bleeder and fill resevoir until it comes out the bleeder.
    SIT BACK enjoy the 600$ you just saved and don't forget to thank me :-)

    I AM NOT RESPONSIBLE IF YOU FUCK THIS UP!! it's simple and easy
    For me, if you feel overwhelmed at any point PM me or post in this thread and we will help you, do not start this without proper preparation***

    Sorry if the pics don't work, this was all done by iPhone so I will fix them later
    Last edited by DRAKLORE; 03-20-2012 at 02:46 PM.
    -Shane Drake-
    1981 VW Caddy 5.4L V8 Swap Speedhunters Feature!
    2006 A4 Avant Dolphin Grey
    2007 GT3071R A4 Moro Blue-RIP
    >DRAKLOREs Build<
    Formerly DRAKES-PERFORMANCE

  2. #2
    Veteran Member Four Rings
    Join Date
    Sep 27 2008
    AZ Member #
    33525
    Location
    Phoenix

    This is a great tutorial, thx DRAKLORE.

  3. #3
    Active Member Four Rings drumnjuny's Avatar
    Join Date
    Jul 12 2010
    AZ Member #
    61335
    My Garage
    848 Corse, SQ5
    Location
    washington dc area

    i am way too pansy to attempt this by myself. anyone in CO with experience wanna tag team this bitch?

    and thanks for the DIY, looks easy enough

  4. #4
    Veteran Member Four Rings billyhoyle's Avatar
    Join Date
    Jul 29 2010
    AZ Member #
    62011
    My Garage
    2007 GSXR-600, 1977 GS750, mice
    Location
    Calgary, Alberta

    Wow, great writeup. I've been wondering how much of a process this was. What type of cleaner should you use?
    2005 B7 A4 2.0T | Brilliant Red | 6MT

  5. #5
    Veteran Member Four Rings DRAKLORE's Avatar
    Join Date
    Oct 14 2009
    AZ Member #
    49253
    My Garage
    '81 Mk1 VW CADDY/2012 Honda Ruckus
    Location
    Okinawa Japan

    Anything like brakleen or carb cleaner, u can use seafoam and let it sit on there but basically anything your not afraid to run through the cylinder real quick, I use brakleen cause I like how high... I mean I like how it evaporates so I don't have to run it through the motor. If you use something that doesn't necessarily evaporate, than you run the extremely small risk of using too much and hydrolocking your motor, of course that's extreme but some dumbass will take a garden hose or pressure washer to his valves just watch lol
    -Shane Drake-
    1981 VW Caddy 5.4L V8 Swap Speedhunters Feature!
    2006 A4 Avant Dolphin Grey
    2007 GT3071R A4 Moro Blue-RIP
    >DRAKLOREs Build<
    Formerly DRAKES-PERFORMANCE

  6. #6
    Veteran Member Four Rings
    Join Date
    Sep 27 2008
    AZ Member #
    33525
    Location
    Phoenix

    Do you have any before and after pics?

  7. #7
    Veteran Member Four Rings DRAKLORE's Avatar
    Join Date
    Oct 14 2009
    AZ Member #
    49253
    My Garage
    '81 Mk1 VW CADDY/2012 Honda Ruckus
    Location
    Okinawa Japan

    I'll take some after pics, I dint snap any befores, but if you search for 2.0tfsi carbon valves on google images than you will get the idea, there is literally no limit to how clean you can get your valves
    -Shane Drake-
    1981 VW Caddy 5.4L V8 Swap Speedhunters Feature!
    2006 A4 Avant Dolphin Grey
    2007 GT3071R A4 Moro Blue-RIP
    >DRAKLOREs Build<
    Formerly DRAKES-PERFORMANCE

  8. #8
    Veteran Member Four Rings billyhoyle's Avatar
    Join Date
    Jul 29 2010
    AZ Member #
    62011
    My Garage
    2007 GSXR-600, 1977 GS750, mice
    Location
    Calgary, Alberta

    Quote Originally Posted by DRAKLORE View Post
    Anything like brakleen or carb cleaner, u can use seafoam and let it sit on there but basically anything your not afraid to run through the cylinder real quick, I use brakleen cause I like how high... I mean I like how it evaporates so I don't have to run it through the motor. If you use something that doesn't necessarily evaporate, than you run the extremely small risk of using too much and hydrolocking your motor, of course that's extreme but some dumbass will take a garden hose or pressure washer to his valves just watch lol
    Lol hey, pressure washer sounds like a great idea
    2005 B7 A4 2.0T | Brilliant Red | 6MT

  9. #9
    Registered Member Four Rings BoSNiaN's Avatar
    Join Date
    Jun 02 2011
    AZ Member #
    76367
    My Garage
    2012 Benz ML350, 2007 BMW 325xi, 2006 Audi A4 2.0T
    Location
    Canada

    Quote Originally Posted by DRAKLORE View Post
    I'll take some after pics, I dint snap any befores, but if you search for 2.0tfsi carbon valves on google images than you will get the idea, there is literally no limit to how clean you can get your valves
    Did you have time to snap some after pics?
    2006 A4 2.0T 6 SPD MT // Dolphin Grey on Black // Sport + Premium Package // Quattro

    ==> Complete Mod List <==

  10. #10
    Veteran Member Four Rings papadelogan's Avatar
    Join Date
    Jul 31 2011
    AZ Member #
    79072
    My Garage
    1999 F250 7.3 Powerstroke
    Location
    Gulf Coast of Florida

    Quote Originally Posted by drumnjuny View Post
    i am way too pansy to attempt this by myself. anyone in CO with experience wanna tag team this bitch?

    and thanks for the DIY, looks easy enough
    I'm in Frederick, CO and just bought my B7 A4 about 2 weeks ago with ~100k on the clocks. Let me read through this a couple more times and maybe we can get a couple people together and knock a few out in one (long?) afternoon.

  11. #11
    Veteran Member Four Rings DRAKLORE's Avatar
    Join Date
    Oct 14 2009
    AZ Member #
    49253
    My Garage
    '81 Mk1 VW CADDY/2012 Honda Ruckus
    Location
    Okinawa Japan

    Sorry Bosnian but this writip was written after the fact. So all the pictures are actually after cleaning.
    If your willing to trust me I've pulled some images that I believe are a gods representation of my valves before and after. You can look the the pictures above and see even the tracts are the white aluminum color.

    *not my pic*
    before representation-


    Again not my pic but a very very clear representation of my results-

    Of course I cleaned up a bit more than that pic shows but again very close
    -Shane Drake-
    1981 VW Caddy 5.4L V8 Swap Speedhunters Feature!
    2006 A4 Avant Dolphin Grey
    2007 GT3071R A4 Moro Blue-RIP
    >DRAKLOREs Build<
    Formerly DRAKES-PERFORMANCE

  12. #12
    Veteran Member Four Rings EMAXX's Avatar
    Join Date
    Jul 12 2008
    AZ Member #
    30811
    Location
    Denver, CO

    So I have a question. When you were doing this, did you scrape out all the carbon and then just let it drop into the motor, or did you clean it out with something?

  13. #13
    Veteran Member Four Rings DRAKLORE's Avatar
    Join Date
    Oct 14 2009
    AZ Member #
    49253
    My Garage
    '81 Mk1 VW CADDY/2012 Honda Ruckus
    Location
    Okinawa Japan

    big edit at the top of the page!!!
    I would spray in the cleaner and let it soak, then with a rag on the end of the screwdriver I would soak up the carbon soup and repeat. Everything else I did let fall into the engine, if you can find a way to get it all out then cool. But it mostly a fine carbon silt and I doubt it would hurt anything
    -Shane Drake-
    1981 VW Caddy 5.4L V8 Swap Speedhunters Feature!
    2006 A4 Avant Dolphin Grey
    2007 GT3071R A4 Moro Blue-RIP
    >DRAKLOREs Build<
    Formerly DRAKES-PERFORMANCE

  14. #14
    Site Moderator Four Rings kristokes's Avatar
    Join Date
    Jan 03 2007
    AZ Member #
    14586
    My Garage
    VW/Audi/Ducati
    Location
    Houston

    Moved.
    Stokes - Site Moderator, Audizine

    B8.5 Audi SQ5 | APR Stage 1
    8v Audi RS3 | Unitronic Stage 2
    8s Audi TTRS | Unitronic Stage 4

  15. #15
    Veteran Member Four Rings DRAKLORE's Avatar
    Join Date
    Oct 14 2009
    AZ Member #
    49253
    My Garage
    '81 Mk1 VW CADDY/2012 Honda Ruckus
    Location
    Okinawa Japan

    Hey thx man, Some good info
    -Shane Drake-
    1981 VW Caddy 5.4L V8 Swap Speedhunters Feature!
    2006 A4 Avant Dolphin Grey
    2007 GT3071R A4 Moro Blue-RIP
    >DRAKLOREs Build<
    Formerly DRAKES-PERFORMANCE

  16. #16
    Veteran Member Three Rings Nikoman's Avatar
    Join Date
    Feb 04 2008
    AZ Member #
    24871
    My Garage
    2015 Jeep Grand Cherokee
    Location
    Chicago, IL

    My before / after pics from 12/6/11:

    BEFORE:


    AFTER:


    2017 A4 Premium Plus Mythos Black + Sport + Cold Weather

  17. #17
    Registered Member Four Rings BoSNiaN's Avatar
    Join Date
    Jun 02 2011
    AZ Member #
    76367
    My Garage
    2012 Benz ML350, 2007 BMW 325xi, 2006 Audi A4 2.0T
    Location
    Canada

    Wow, big difference. Although I would say you didn't say a lot of build up in the first place which makes sense since your mileage is low (I've seen a ton of worse pictures).

    On another note, can you post a picture or maybe find one on google of the tools you think would be best to clean the insides with?
    2006 A4 2.0T 6 SPD MT // Dolphin Grey on Black // Sport + Premium Package // Quattro

    ==> Complete Mod List <==

  18. #18
    Veteran Member Four Rings DRAKLORE's Avatar
    Join Date
    Oct 14 2009
    AZ Member #
    49253
    My Garage
    '81 Mk1 VW CADDY/2012 Honda Ruckus
    Location
    Okinawa Japan

    Awesome follow ups guys, let's get ericpaulyoungs pics in here too
    -Shane Drake-
    1981 VW Caddy 5.4L V8 Swap Speedhunters Feature!
    2006 A4 Avant Dolphin Grey
    2007 GT3071R A4 Moro Blue-RIP
    >DRAKLOREs Build<
    Formerly DRAKES-PERFORMANCE

  19. #19
    Veteran Member Four Rings shiro1745's Avatar
    Join Date
    Jul 26 2009
    AZ Member #
    45522
    Location
    DMV Area

    1. If the valve is closed, is there a risk for the cleaner to leak into the chamber. I'm basically wondering if the closed valve holds the cleaner 100% so nothing goes into the chamber? Or it's leaking very slowly and I should be careful how long I let it soak?
    I'm planning to do this in a week or so when I'll do my timing belt and RS4 PRV.

    2. Is there anything I should check or replace since I'll do these?

    3. I guess there no way to do a quick injector cleaning, is there? I know I could send my injectors and have them cleaned by a specialized shop, but just wandering if there's a method to do a safe quick cleaning at home.
    - Chip

    K0R-GT -- S3 injectors -- Maestro tune -- IE Drop-in rods

    "It took 4 bad crankshaft seals and lots of cursing to build my avatar"

  20. #20
    Veteran Member Four Rings DRAKLORE's Avatar
    Join Date
    Oct 14 2009
    AZ Member #
    49253
    My Garage
    '81 Mk1 VW CADDY/2012 Honda Ruckus
    Location
    Okinawa Japan

    The cleaner is extremely flammable... Thus evaporates rapidly. I would reccomend that after you clean everything, let it sit for an hour (if your worried)

    I feel most of you will not be able to beat my record time of 25 mins putting the manifold on and by the time
    Your ready to start te motor the cleaner will have evaporatd, if not. It will get pushed out the valves after a few cranks


    Great idea on doin the PRV while manifold is off.
    Could be a good time to tackle your thermostat, or n80, replace inter cooler piping, clean your map, clean your intake flappers, clean your TB,

    I filled a glass with the cleaner, then set the bottom portions of the injectors in the fluid.
    I used light abrasives to clean the bodies of the injectors and a toothbrush to clean everything else on them.
    -Shane Drake-
    1981 VW Caddy 5.4L V8 Swap Speedhunters Feature!
    2006 A4 Avant Dolphin Grey
    2007 GT3071R A4 Moro Blue-RIP
    >DRAKLOREs Build<
    Formerly DRAKES-PERFORMANCE

  21. #21
    Veteran Member Four Rings DRAKLORE's Avatar
    Join Date
    Oct 14 2009
    AZ Member #
    49253
    My Garage
    '81 Mk1 VW CADDY/2012 Honda Ruckus
    Location
    Okinawa Japan

    HERE IS A TESTIMONIAL TYPE THREAD, I know there are a few more out there. But some good cliff notes and pictures in this thread!
    http://www.audizine.com/forum/showth...O-FAST-RESULTS
    -Shane Drake-
    1981 VW Caddy 5.4L V8 Swap Speedhunters Feature!
    2006 A4 Avant Dolphin Grey
    2007 GT3071R A4 Moro Blue-RIP
    >DRAKLOREs Build<
    Formerly DRAKES-PERFORMANCE

  22. #22
    Veteran Member Four Rings papadelogan's Avatar
    Join Date
    Jul 31 2011
    AZ Member #
    79072
    My Garage
    1999 F250 7.3 Powerstroke
    Location
    Gulf Coast of Florida

    I attempted this task today but ran in to a problem getting the forwardmost IM nut & bolt out. The oil feed line would not move enough for the to be able to gain access to remove either one. After the past few weeks of busting my butt to build a permanent roof over my deck, I just was not in the mood to fight with anything. I know I could probably remove the oil feed line for the turbo and that would resolve the issue, but I'll post a picture up to see if anyone has another idea that would let me get these loose.

    2013 Phantom Black A5 P+ Cabriolet (2.0T quattro) mods4cars, mesh grill, gunmetal VMR 701, HFC "Boudica"

    2007 Ibis White B7 A4 Ti Avant 6MT quattro JHM Stage 2, HFC, Milltek CatBack, GFB DV+ "the YETI" sold

    2005.5 Black B7 A4 6MT quattro sold

  23. #23
    Veteran Member Four Rings DRAKLORE's Avatar
    Join Date
    Oct 14 2009
    AZ Member #
    49253
    My Garage
    '81 Mk1 VW CADDY/2012 Honda Ruckus
    Location
    Okinawa Japan

    If you dsconnect the rubber coolant hose from the metal hard tube and rice the bolt from the manifold, then push that somewhat out of the way. Then try to push the oil line out of the way enough to get an extension down to the bolt. Then walla you should be good. It's going to have to move enough to sneak the manifold
    Past it anyways.

    Good luck
    -Shane Drake-
    1981 VW Caddy 5.4L V8 Swap Speedhunters Feature!
    2006 A4 Avant Dolphin Grey
    2007 GT3071R A4 Moro Blue-RIP
    >DRAKLOREs Build<
    Formerly DRAKES-PERFORMANCE

  24. #24
    Veteran Member Four Rings papadelogan's Avatar
    Join Date
    Jul 31 2011
    AZ Member #
    79072
    My Garage
    1999 F250 7.3 Powerstroke
    Location
    Gulf Coast of Florida

    I had the tube & coolant pipe disconnected and can see that once it's loose, I can see how the manifold would slide out, but getting those last 2 locations freed up..... UGH. Looks like my Carbon Cleaning weekend will have to be combined with when I put in my HFC and turbo rebuild. Goody goody. I'll have everything ripped off the block by time I'm half-way done.
    2013 Phantom Black A5 P+ Cabriolet (2.0T quattro) mods4cars, mesh grill, gunmetal VMR 701, HFC "Boudica"

    2007 Ibis White B7 A4 Ti Avant 6MT quattro JHM Stage 2, HFC, Milltek CatBack, GFB DV+ "the YETI" sold

    2005.5 Black B7 A4 6MT quattro sold

  25. #25
    Veteran Member Three Rings schmiesus's Avatar
    Join Date
    Jul 25 2011
    AZ Member #
    78757
    Location
    BC

    With the open Valves how did you handle those or did you roll the motor over?
    2007 A4 S-Line TI Brilliant Black - .......Not Stock

    Bought Not Built, Build!

  26. #26
    Veteran Member Four Rings DRAKLORE's Avatar
    Join Date
    Oct 14 2009
    AZ Member #
    49253
    My Garage
    '81 Mk1 VW CADDY/2012 Honda Ruckus
    Location
    Okinawa Japan

    I
    Didn't, but
    Most just roll the motor over via the crank bolt.
    The carbon is gummy and some
    Guys have managed to shop vac out each valve. Regardless of how
    You manage it, I wouldn't be too worried of a little of the carbon fell into Le cylinder, it will just blow
    Out when you crank the motor over
    -Shane Drake-
    1981 VW Caddy 5.4L V8 Swap Speedhunters Feature!
    2006 A4 Avant Dolphin Grey
    2007 GT3071R A4 Moro Blue-RIP
    >DRAKLOREs Build<
    Formerly DRAKES-PERFORMANCE

  27. #27
    Veteran Member Three Rings schmiesus's Avatar
    Join Date
    Jul 25 2011
    AZ Member #
    78757
    Location
    BC

    All good I just kicked the motor over
    2007 A4 S-Line TI Brilliant Black - .......Not Stock

    Bought Not Built, Build!

  28. #28
    Veteran Member Four Rings DRAKLORE's Avatar
    Join Date
    Oct 14 2009
    AZ Member #
    49253
    My Garage
    '81 Mk1 VW CADDY/2012 Honda Ruckus
    Location
    Okinawa Japan

    How were the results?
    -Shane Drake-
    1981 VW Caddy 5.4L V8 Swap Speedhunters Feature!
    2006 A4 Avant Dolphin Grey
    2007 GT3071R A4 Moro Blue-RIP
    >DRAKLOREs Build<
    Formerly DRAKES-PERFORMANCE

  29. #29
    Veteran Member Three Rings schmiesus's Avatar
    Join Date
    Jul 25 2011
    AZ Member #
    78757
    Location
    BC

    New car basically, hasn't idled this well since I bought her.
    2007 A4 S-Line TI Brilliant Black - .......Not Stock

    Bought Not Built, Build!

  30. #30
    Veteran Member Four Rings DRAKLORE's Avatar
    Join Date
    Oct 14 2009
    AZ Member #
    49253
    My Garage
    '81 Mk1 VW CADDY/2012 Honda Ruckus
    Location
    Okinawa Japan

    Awesome!
    -Shane Drake-
    1981 VW Caddy 5.4L V8 Swap Speedhunters Feature!
    2006 A4 Avant Dolphin Grey
    2007 GT3071R A4 Moro Blue-RIP
    >DRAKLOREs Build<
    Formerly DRAKES-PERFORMANCE

  31. #31
    Veteran Member Four Rings DoThisMyWay's Avatar
    Join Date
    Aug 24 2004
    AZ Member #
    3252
    My Garage
    B9Q5
    Location
    Honolulu, HI

    I did a carbon clean this past weekend. Thank you for the walk through and PDF. It came in handy when I got stuck a couple times. Over all the job was pretty easy but very time consuming and if I do it again, I might invest in a walnut shell blaster. The digging, scrapping, spraying took a really long time. Also, the valves were dirty but I expected the conditions to be worse since I have almost 140k on the clock but the cleaning did help. I only had a couple issues with a lost o-ring and brittle breather hose that snapped in half. Other than that, the whole job went as planned and I save myself some $.

    Oh yeah, the damn banjo bolt would not come off. So, the HPFP had to come out with the intake manifold and I'm happy to report with 60k on my second follower, it still looks brand new! No follower issues with this 2.0T!
    Current:
    2024|A5 SB PP+ S-line, 2019|Q5

    Previous:
    2017|S3, 2016|A4 2.0T Quattro, 2006|A4 Avant 2.0T Quattro S-line, 2005|A4 3.0 Quattro UltraSport

  32. #32
    Veteran Member Four Rings DRAKLORE's Avatar
    Join Date
    Oct 14 2009
    AZ Member #
    49253
    My Garage
    '81 Mk1 VW CADDY/2012 Honda Ruckus
    Location
    Okinawa Japan

    That's good to hear, I'm going to have to tackle a carbon clean on my new B7 to get a baseline and see where it's at!
    Wish me luck
    -Shane Drake-
    1981 VW Caddy 5.4L V8 Swap Speedhunters Feature!
    2006 A4 Avant Dolphin Grey
    2007 GT3071R A4 Moro Blue-RIP
    >DRAKLOREs Build<
    Formerly DRAKES-PERFORMANCE

  33. #33
    Veteran Member Four Rings fR3ZNO's Avatar
    Join Date
    Feb 09 2013
    AZ Member #
    109199
    Location
    WNY

    A friend of mine has a B7 and I don't think he's aware of this carbon build up issue. But, would it be possible to use Seafoam sucked in through a vacuum line to clean the carbon out? Or would it not really do anything?
    "If one does not fail at times, then one has not challenged himself." - Ferdinand Porsche

  34. #34
    Veteran Member Four Rings DRAKLORE's Avatar
    Join Date
    Oct 14 2009
    AZ Member #
    49253
    My Garage
    '81 Mk1 VW CADDY/2012 Honda Ruckus
    Location
    Okinawa Japan

    It's been done many times before, and honestly it doesn't really tackle the buildup. At least not even close to the extent of the manual cleaning
    -Shane Drake-
    1981 VW Caddy 5.4L V8 Swap Speedhunters Feature!
    2006 A4 Avant Dolphin Grey
    2007 GT3071R A4 Moro Blue-RIP
    >DRAKLOREs Build<
    Formerly DRAKES-PERFORMANCE

  35. #35
    Veteran Member Four Rings fR3ZNO's Avatar
    Join Date
    Feb 09 2013
    AZ Member #
    109199
    Location
    WNY

    Quote Originally Posted by DRAKLORE View Post
    It's been done many times before, and honestly it doesn't really tackle the buildup. At least not even close to the extent of the manual cleaning
    Ah I see, I should have known, if it cleaned the valves as well as a manual cleaning, then what would be the point of tearing apart the intake and everything?
    "If one does not fail at times, then one has not challenged himself." - Ferdinand Porsche

  36. #36
    Veteran Member Four Rings papadelogan's Avatar
    Join Date
    Jul 31 2011
    AZ Member #
    79072
    My Garage
    1999 F250 7.3 Powerstroke
    Location
    Gulf Coast of Florida

    Quote Originally Posted by fR3ZNO View Post
    Ah I see, I should have known, if it cleaned the valves as well as a manual cleaning, then what would be the point of tearing apart the intake and everything?
    Winner winner chicken dinner!

    Sent from my SCH-I535 using Tapatalk
    2013 Phantom Black A5 P+ Cabriolet (2.0T quattro) mods4cars, mesh grill, gunmetal VMR 701, HFC "Boudica"

    2007 Ibis White B7 A4 Ti Avant 6MT quattro JHM Stage 2, HFC, Milltek CatBack, GFB DV+ "the YETI" sold

    2005.5 Black B7 A4 6MT quattro sold

  37. #37
    Veteran Member Three Rings
    Join Date
    Oct 29 2010
    AZ Member #
    66327
    Location
    Phoenix

    Did Audi change the color of the injector o-ring by chance. Everywhere I look they are black like in this link http://www.europaparts.com/injector-...35906149a.html

    Are these the correct o-rings for a B7 A4? Its just the color that's throwing me off.

    Thanks!

  38. #38
    Veteran Member Four Rings DRAKLORE's Avatar
    Join Date
    Oct 14 2009
    AZ Member #
    49253
    My Garage
    '81 Mk1 VW CADDY/2012 Honda Ruckus
    Location
    Okinawa Japan

    Quote Originally Posted by youloze View Post
    Did Audi change the color of the injector o-ring by chance. Everywhere I look they are black like in this link http://www.europaparts.com/injector-...35906149a.html

    Are these the correct o-rings for a B7 A4? Its just the color that's throwing me off.

    Thanks!
    Could just be a generic pic, but my guess is that they have put out a revision on the O-Ring and they are now black.
    Says it will fit, I would go for it. Worse case scenario just contact hugh?
    -Shane Drake-
    1981 VW Caddy 5.4L V8 Swap Speedhunters Feature!
    2006 A4 Avant Dolphin Grey
    2007 GT3071R A4 Moro Blue-RIP
    >DRAKLOREs Build<
    Formerly DRAKES-PERFORMANCE

  39. #39
    Veteran Member Three Rings
    Join Date
    Oct 29 2010
    AZ Member #
    66327
    Location
    Phoenix

    Quote Originally Posted by DRAKLORE View Post
    Could just be a generic pic, but my guess is that they have put out a revision on the O-Ring and they are now black.
    Says it will fit, I would go for it. Worse case scenario just contact hugh?
    Yeah I'm thinking the same, just didn't want to tear everything apart only to find out they won't work and be stuck.

    Thank you sir. Also thanks for the write up!

  40. #40
    Veteran Member Three Rings
    Join Date
    Oct 29 2010
    AZ Member #
    66327
    Location
    Phoenix

    Thanks for the writeup and the link to the Stassis PDF Draklore. Did my cleaning yesterday and it turned out great. Although I'm an idiot and I put the manifold back on without the dividers that sit in the valves. At least I got very good at taking the manifold off :)

    I dont really have any extra advice for anyone that hasn't already been covered but here are a couple before and after pics of my cleaning. Thanks again. BTW, idle is so much better, no more shaking and boost comes on harder as well. Good stuff.

    **Edit** I actually do have something to note. I noticed that it was much easier to scrape the majority of the carbon off the valves when they were dry (before I sprayed cleaner on them or poured in Seafoam). I was able to get most of the carbon off that way and it's easier to blow out/vacuum. Then I poured Seafoam in and let them soak and cleaned again. Then finally I used carb cleaner for the final clean. Lots of work but tuned out good.


Bookmarks

Posting Permissions

  • You may not post new threads
  • You may not post replies
  • You may not post attachments
  • You may not edit your posts
  •  


    © 2001-2025 Audizine, Audizine.com, and Driverzines.com
    Audizine is an independently owned and operated automotive enthusiast community and news website.
    Audi and the Audi logo(s) are copyright/trademark Audi AG. Audizine is not endorsed by or affiliated with Audi AG.