


So this is sort of a follow-up to my previous DIY: *DIY*- Making your Cruise Control work after 5 speed Swap
This is the other part of 5-speed swapping your A4 that just doesn't plug in. The Tiptronic transmission has a "Multifunction Range Switch" that takes care of switching the reverse lights on, among many other things. The 5-speed cars have just a simple switch that is internal to the transmission to handle reverse light activities. As you can imagine, the connectors are completely different, not to mention all the extra wires in the Tiptronic plug.
**NOTE: This DIY was initially written for 2000 model year cars after VIN 8D-Y-200 001, and 2001+ cars (even B6's!). The earlier cars use a different Multi Function Switch connector, so please reference the photo and notes at the end for specific wiring details for the early cars. All of the steps are steps are basically the same, except interfacing with the factory connector.
Again, I will separating this DIY into 2 "phases". Wait, no I'm not. Forget the phases, they were stupid. Onward.
The first thing we need to do is find a suitable plug for the reverse light switch connector. Wait, you don't know where the reverse light switch connector is?! Eeesh. Alrighty, the reverse switch connector is mounted to the transmission case above the driver's side axle output shaft. Basically right above the vehicle speed sensor. Here is a (admittedly horrible) picture:

Ok, looking at it closely (if you could, sorry about my crappy photo), you would see that it is a 5-pin connector, with only 2 pins actually present. Armed with the info we take a quick check of ETKA to see where we can source these bad boys...erm, girls - it's the female side of the connector we are after.
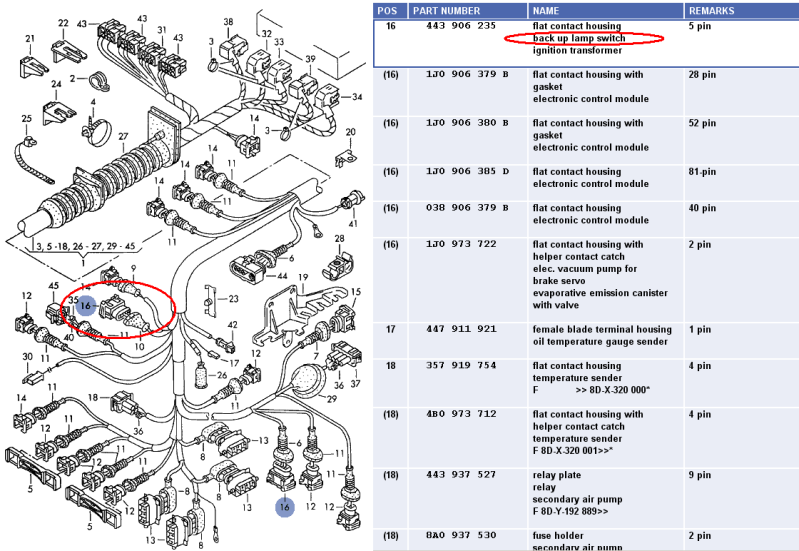
We can see the 5-pin back-up switch connector there. This also tells us the very same 5-pin connector is used for one of the connectors of the Ignition Control Module on the AEB cars. So there is 1 source. Find somebody who converted their AEB to push-down coils and they'd probably give you that connector if it didn't hit the trash can yet. I chose a different option.

Find yourself a 1995 Audi A6 in the junkyard. Admire it's beauty and magical ability to hold off the rust even in such conditions. Think about the many years of reliable service it gave to it's previous owners. Now, get out your wire cutters and pop the hood. I figured that the A6's 12V engine certainly had an ICM from which I could harvest the connector. DRAT, it only has a 4-pin connector on these ones (3 channel wasted spark system I'm assuming). So that won't work. Keep looking...lots of 2 pin and 3 pin connectors. Ooh, the MAF! Ah, 4-pin..foiled again! Then I saw it: the wiper motor. Could it be? [EDIT: Nope, this is actually a plug for the HVAC. But it is near the wiper motor. There is actually *another* 5-pin connector on the passenger side as well] I Unplug that guy and take a look:

Yes, it uses a 5 pin Bosch connector with a pretty nice length of wire as well. Back at the shop, I take nice close-up of the connector housing, a perfect match to the B5 part number from ETKA. Thank you, Audi, for your cross-millennium compatibility.

Now we take a look at the other end of the madness - interfacing to the existing Tiptronic connector. I tied mine up to the frame rail with the other harnesses. Wherever you hid yours, you're on your own there.

At this point you could hack off the mating connector from your Range Switch on the tiptronic trans that is now sitting in your garage/shed/yard/bedroom. But those switches are kind of expensive, so I didn't want to hack mine up. We just need some male blade terminals to slide into the 2 pins we want. So I found myself a nice scrap of 92 Toyota Camry wiring harness.
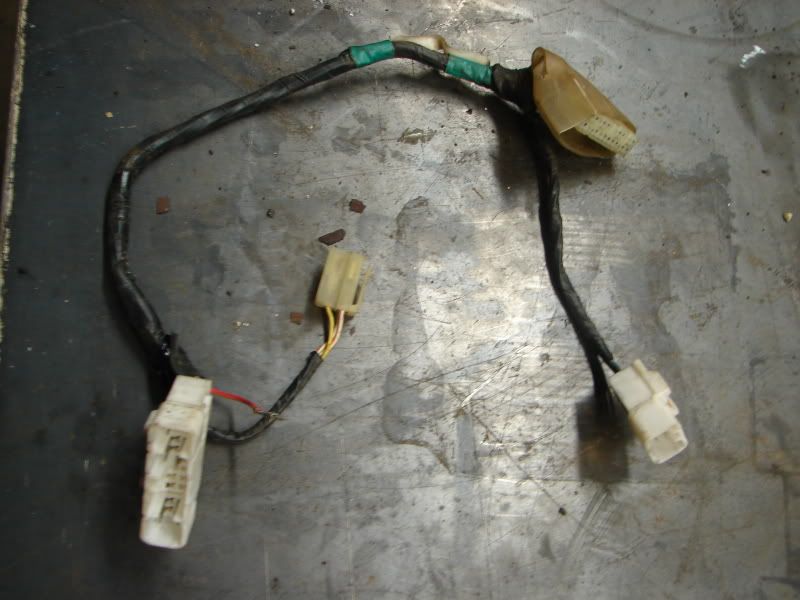
I hope it will add some of it's donor's legendary reliability to my car. *So* wish it was that easy, I'd be bolting on Camry parts right and left. Anyway, let's de-pin this guy. You need a small implement to push the plastic tab up. Tab is identified with the RED arrow. Up is shown with the GREEN arrow...in case you forgot which way "up" is, lol.

Once it is held up, you just pull the pin and wire out the back. At this point you'll realize that didn't work and that you need to pop up the little clip on the top:

Now it works. Slide 2 of those buggers out.

Then you can remove the sticky bits, and separate the wires from the harness.

At this point I momentarily forgot to keep taking pictures. I blame the lack of a good snack supply at the shop. I'll have to address that. So here is my next picture:

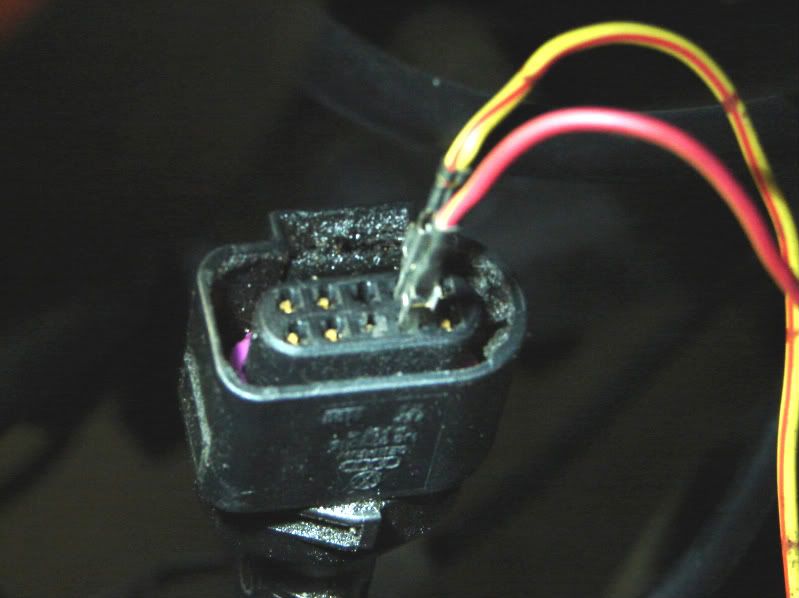
So basically what you missed is just me figuring out which pins in the reverse switch connector were the important ones, and then which wire colors correspond with those. And then me soldering up the 2 toyota wires to the aforementioned "important wires". Yeah, that was it. So basically the most important part of this entire thing, lol. The wires we want in the wiper motor connector are the RED/YELLOW and GRAY (or was it yellow?). Anyway, your colors will probably be different anyway. Here is a quick diagram I made to show which pins we need:

So you just use a meter or a test light or some way to make sure you've got the right wires. Then you just solder to those and tape it up a bit.
Then back to the car, and take a look at the Tiptronic plug. We are interested in 2 pins. Pin #7 is 12V+ from Fuse 31. Pin #8 is the Reverse Light load. So we just plug in our little blade terminals into those.
Now you just tape that up, like it's your JOB. It really needs to be a good tape job to keep the wee-beasties out of there. And you need to make sure you tape the 2 terminals individually so they cannot touch each other. That is important. Route your newly created harness along the frame rail and back to the plug on the trans. I hope you made it long enough (key point: make sure it is long enough). Mine was just right.
And the money shot:

Freaking reverse lights...on my car...and they work. So when I back up, I can like, you know, see and stuff. It's pretty awesome - you should try it.
ADDENDUM for early A4's with the older style MultiFunction (Range) Switch connector:
Your connector is round instead of "D" shaped. The 2 pins you are after are:
Pin #1 = Black/Blue = 12V+ from Fuse #31
Pin #8 = Blue/Red = Output to Reverse Lights
Here is a visual. That is the only difference. You will probably need to just cut those 2 wires on the back side and solder your 5 speed pigtail onto it. Or whatever you want...
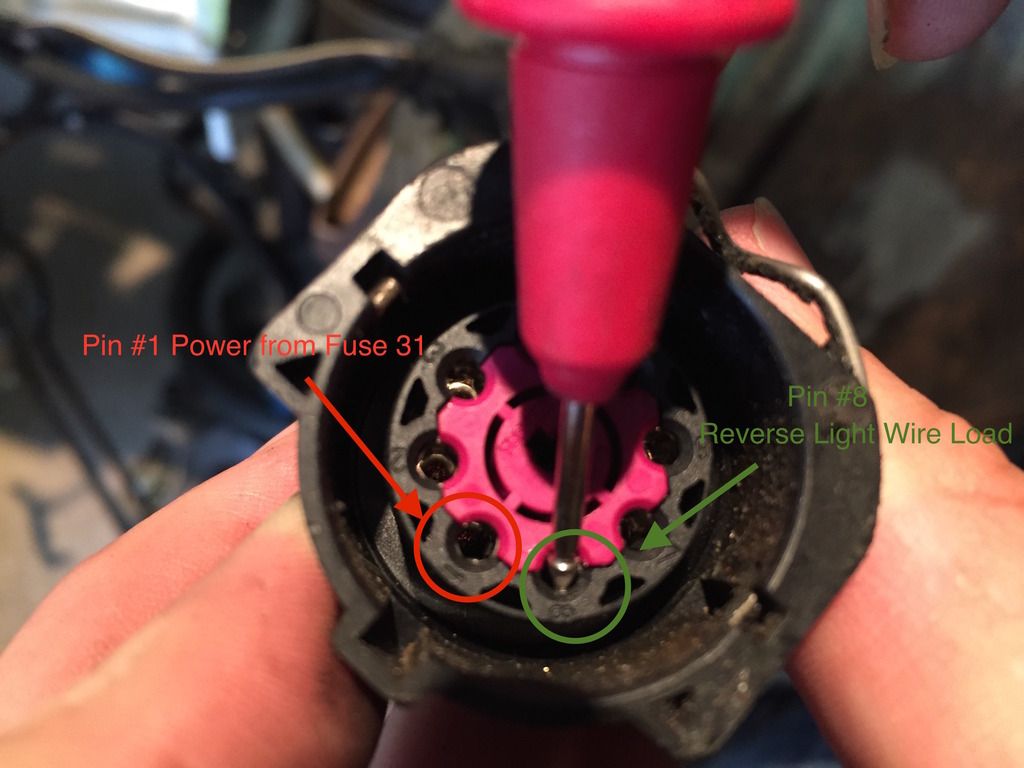
Big thanks to AZ member crazexr7 for providing this photo and the suggestion to add it to the DIY.

 Reply With Quote


Bookmarks