


The B6/B7 avant roof rails can be easily removed without dropping the headliner. There are 3 allen head nuts holding each rail on that can be accessed by removing all the trim around the headliner. Unfortunatlely, the cargo area also has to be dismantled to get this trim off.
For this DIY all you need is a screwdriver, a torx set, and a long 8mm allen wrench.
Step 1: Remove cargo area floor.
Step 2: Remove 4 torx screws along the back bumper, remove trim that covers tailgate latch.
Step 3: Remove all 4 tow hooks. There are two torx-head screws on each.
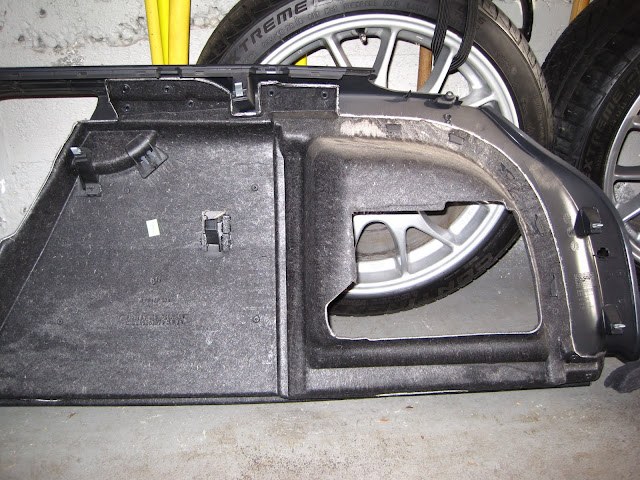
Step 4: Remove side panel. There is one screw on each side panel, where the panel meets the D pillar trim. After removing this screws, you can just pull the side panel off; there are four metal clips that are very strong. Pull straight out towards the opposite side of the car. Pull, pull, pull and then pull more. You will feel like youre going to break the panel. The panel is very strong though. I’ve done this on 4 avants have not had any problems whatsoever. Below is a picture of the back side of the side panel and you can see the 4 metal clips.
The best strategy is to find the metal clips with your hands and pull as close to them as possible, just to make sure youre not bending things too much when you pull. The four clips are show below.
Step 5: Remove torx bolt behind clothes-hanger hook. Open the spring loaded cover and you will see the torx bolt behind there.
After removing this bolt, all you have are 2 metal punch clips like the side panels, and a metal clip that you slide the d pillar trim away from, towards the back of the car.
Like the side panel, try to stick your hand under the D pillar trim and pull from where the clips are located so as to reduce the leverage you are putting on the trim piece. After removing the two clips and the torx bolt, pull towards the back of the car and the trim will slide away from the last clip. Do not pull outwards; you will break the clip. Below is a picture of the back side of the trim showing the attachment areas.

Your first allan-head rail nut has been exposed! It is an 8mm nut.

Step 6: Remove trim above rear door. This is held on by 4 screws and one big torx bolt. After removing the D pillar trim, you have already exposed the first torx head screw. Next, like the D pillar trim, push the spring loaded cover open on the clothes hanger hook to expose the large torx bolt. Remove this.
Pop the covers open on the “oh shit” handles with a screw driver. You will see 2 torx head screws. Remove these.


Pop open the plastic cover with “Air Bag” bag written on it. Remove the screw you have exposed. You can now remove the trim above the rear door. You have now exposed the second roof rail nut. It is also a 8mm allan-head nut.

You should look like this now.

The trim above the front door and A-Pillar doesn’t have to be completely removed, just pulled aside to expose the last rail nut. Pop the covers open on the “oh shit” handles and remove the screws. Pull the trim back and you have exposed the last nut. This one is tricky, and you may want to unscrew one of the curtain airbag screws and pull it down to get enough access to it. Your best bet is the longest, skinniest 8mm allen wrench you can find.


Reinstallation is the same as removal, but from the front of the car to the back.

Black

Aluminum!

 Reply With Quote


")


Bookmarks