


Table of Contents:
Why is this guide needed
What this guide isn't
Benefits
Drawbacks
Needed and optional hardware
OEM Wheel clearance and Spacers
Difficulty
Installation instructions
Measure aftermarket wheel clearance
Why is this guided needed?
There is incomplete, sparse and conflicting information out there regarding this swap, this guide will help address these problems.
What this guide isn't:
It is not meant to compare which aftermarket kit/brand is better or worse. Please keep the discussion to OEM S4 vs OEM RS4, recommendations for pads/fluids/rotors/lines are welcome.
Benefits:
The Caliper:
The OEM is a 2 pad single piston cast steel with a weight of 17.6lb (w/fluid, pads, bracket,line) it applies force on one side resulting in the inside pad and rotor surface to wear out faster than the outside.
The RS4 is a Brembo 4 pad, 8 piston aluminum monoblock with a weight of 15.1lb (w/fluid, pads, bracket,line), The advantage is having the caliper apply force on both sides of the rotor creating even ware and is lighter by 2.5lb. This is the same caliper used on C5 RS6 and Lamborghini Gallardo.
The Rotor:
The OEM is a traditional cast iron 345mm (13.6") diameter with a thickness of 30mm and a weight of 25lb.
The RS4 is a cross drilled 365mm (14.4") floating rotor utilizing an aluminum hat, with a thickness of 34mm and a weight of 24lb. The advantage is despite being thicker and 20mm (0.8") bigger it weighs less than the OEM but there is a catch, I address this in the next section. Its bigger air gap between the two friction surfaces allows for better cooling and the pad bites into a faster spinning rotor creating more friction and allowing the caliper to apply more torque/leverage.
Drawbacks:
Maintenance cost; RS4 hawk HPS pads are $230-250 while the S4 hawk HPS are under $100.
oem rotors are $140-200 per pair while RS4 are in $650-700 range, even just replacing the friction surface and keeping your aluminum hat you are looking at $450-500.
The caliper is very wide and wheel clearance is an issue.
When you move unsprung weight further away from the axel you end up "loosing hp" or you will put less power to the ground. So pound for pound, the farther the weight is from the axel the bigger the loss. This has to do with moment of Inertia, because the RS4 friction ring is heavier and bigger than the oem ring, you will end up losing hp, If the 1/4 mile time is very important to you and you are doing this swap you must get the lighter weight frictions rings.
What you need to do the swap:
Time:
There is about 2 hours worth of work per side which includes bleeding and trimming oem dust shield.
Tools:
Jack and jack stands
Flat head screw driver
BIG torque wrench
T-30 torx wrench or bit
21mm socket (with various extensions and swivel joint recommended)
10mm socket OR open ended wrench
11mm open ended wrench
If modifying your oem splash shield you will need bolt cutters or a dremel
A minimum of 1 liter brake fluid (2 liters recommended and a power bleeder highly highly recommended)
Hardware: (I included factory part numbers for reference)
RS4 Rotors 8E0615301AB
RS4 Calipers 8E0615107 and 8E0615108
RS4 Pads 8E0698151Q
RS4 Brake Lines 8E0611707H X2
RS4 Mounting brackets for ABS and pad sensor wires 8E0615133G & 8E0615134G
RS4 Small brackets, these secure the brake line at the caliper 4B3615133D & 4B3615134D
Optional hardware:
RS4 Dust shields 8e0 615 311D, 8E0 615 312D
Aftermarket stainless steel braided brake lines (new oem lines are pricey)
4 New caliper to spindle 21mm bolts (these are replaced at dealerships, any brake or suspension bolts that are removed are never reused) but you can reuse you original bolts
2 New brake caliper screws (this is the small screw that prevents the rotor form falling while the caliper is removed) N10648301
OEM Wheel clearance:
If you have oem 18" Avus wheels you will need 10mm spacers with longer 40mm ball seat lug bolts.
If you have aftermarket wheels the only true way to find out is to install the brakes and see, there is an ingenious way to calculate the size spacer you need, I will address this later.
For spacers I recommend once with hub-centric chamfer (ex; ECS or Apikol) rather than universal once (ex; H&R) this will allow for a snug fit and trouble free installation, if the universal spacers aren’t installed just right they will cause vibrations.
Difficulty:
I would only rate this as 2 out of 5, there are some special tools/sockets involved but the most difficult part is removing stubborn bolts and freeing a rusty rotor.
Installation instructions:
If starting with the driver side, turn the wheel all the way to the right, this will make the bolts more accessible.
Jack up the car and remove the wheel
This should look like this:


Disconnect the pad sensor wire, if it's giving you trouble you can insert a small flat head screw driver in between them and at the same time lift the clip.
Using a flat head screw driver push the rubber grommet which holds the ABS/Pad sensor wire up and out of the bracket.

On the back of the spindle there is a 10mm bolt that holds a small bracket and the rest of the ABS sensor wire, slide the rubber grommet out then remove the bolt.

Using the biggest wrench you have remove the 2 - 21 mm bolts that hold the caliper to the spindle. You will need to find the best angle to remove them by using various extensions and swivel joint, these bolts can be very hard to remove, WD-40 spray the night before can help loosen them.

There is no need to disconnect the brake line just yet.
If your brakes are somewhat worn out a lip formed on the outer edge of the rotor and the caliper wont slide out. If this happens insert a tube to the bleeder valve and lead in down to a container, open it using an 11mm open ended wrench, with a flat head screw driver push on the top edge of the brake pad until a gap forms between the brake pad and the caliper, insert the screw drive into this gap widening it, then pull the caliper out, close the valve.

Place the caliper on the ground or on a box, so there is no tension on the brake line.
Remove the small screw that hold the rotor in place with a T-30 torx wrench or bit.
If your rotor is slightly rusty, it will take some force to remove it. Place something under and in front of the rotor to catch it so it doesn't fall on hard ground.
Do not hit the rotor with a hammer you will just damage it.
Place anything resembling a crowbar (I used my hydraulic jack handle) between the back of the rotor and where the caliper attaches to the spindle and pull towards you until the rotor breaks loose.

Using a T-30 torx wrench remove the 4 screws that hold the dust shield.

Either install the RS4 dust shield
or
Install the RS4 caliper to test fit how much the oem dust shield needs to be trimmed, using either bolt cutters, dermal, or even some heavy duty wire cutters and cutting or bending small amounts back and forth until they break, trim about 1" from both ends until it clears the caliper.

Install the new rotor, you will notice that it has two holes for the small screws, but only one will line up to your hub, install the small screw.
As you can see the oem dust shield is just slightly larger than the RS4 rotor.

Prep the Caliper by Installing the RS4 brake pads and brake line with the small anchoring bracket.
Install the RS4 caliper using your oem 21mm bolts.

This is why you oem lines don’t work they bolt up to the hard line at the body, but at the caliper end the RS4 line becomes a hard line and takes a 90 degree turn

Working as quickly as possible disconnect the oem brake line (11mm open ended wrench) at the body and quickly attach the new brake line to the opening, this will minimize brake fluid loss and reduce the amount of air that enters the system.
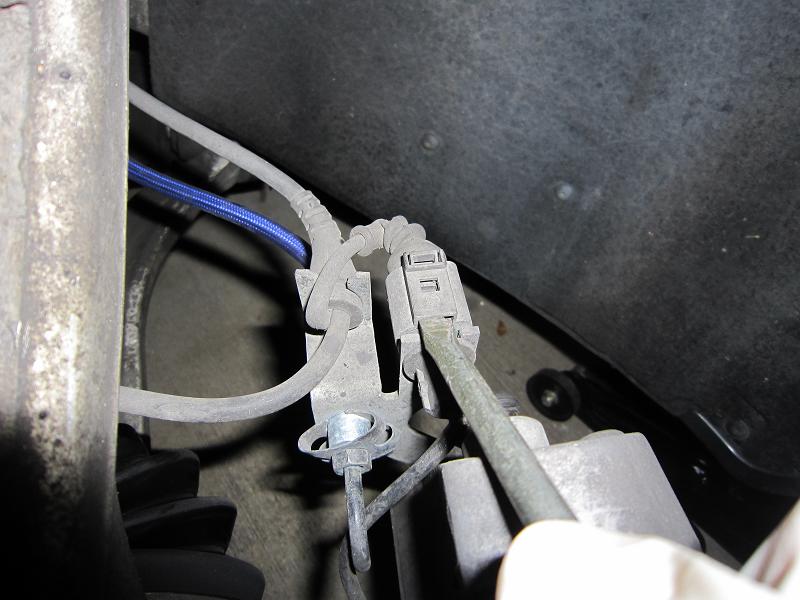
Install the RS4 bracket to the back of the spindle (reusing your oem 10mm bolt) and connect your ABS and pad sensor wires and brake line this should look like this
Notice how the pad sensor wire goes up and over the bracket

Notice how the ABS sensor goes under the bracket

Another shot from the back

Repeat other side.
Bleed the brakes in this order: Drive side inside valve, driver side outside valve, passenger side inside valve, passenger side outside valve.
If you have oem wheels Install the 10mm spacers with longer lug bolts.
Measure aftermarket wheel clearance:
If you have aftermarket wheels, in order to accurately calculate the spacer that’s required to clear the wheels, purchase some large metal washers, bring a lug bolt with you to test fit the inside hole, you can find these at most home improvement stores. Using tape install 2-3 washers over the lug openings, and install the wheel, increase or decrease the amount of washers needed until the spokes clear the caliper by 2-3mm, 4mm being best . Measure the thickness of the washers, this thickness is the spacer you'll need, you will also need longer lug bolts. oem are 28mm in length + the size of your spacer rounded up. So if you needed a 10mm spacer they don’t make 38mm lug bolts but they make 35mm and 40mm, because we are rounding up you will need the 40mm.

As you can see the caliper does clear the inside of the wheel, with 2mm gap its very close.

Repeat other side.
If using new pads, follow the recommended bed in procedure.
DONE


 Reply With Quote


 Those Avus wheels don't do them justice.


Bookmarks