Audizine - An Automotive Enthusiast Community

Page 1 of 7 123 ... LastLast
Results 1 to 40 of 251
  1. #1
    Veteran Member Four Rings NWS4Guy's Avatar
    Join Date
    Sep 29 2009
    AZ Member #
    48541
    My Garage
    2015 Range Rover Evoque 2010 Audi S4
    Location
    Seattle, WA

    DIY: Protection screen for intercooling radiator

    Guest-only advertisement. Register or Log In now!
    What this is for and why do it?

    The B8 S4 has a supercharger, which uses internal intercoolers (radiators) built into the unit, which sits as a single piece on top of the center of the engine, nestled in the "V" of the V6 engine. This system compresses and cools the compressed air in order to make more engine power. To cool the compressed (or charged) air, an air to liquid system is used much like the engine's radiator system. Cool liquid passes through the intercoolers as the charge air is pushed between the blades of these little radiators, taking the heat from the charged air and pulling it into the liquid. Once heated by this air, a pump pushes the liquid in a closed loop through tubing to the intercooling radiator - a small aluminum radiator which sits in the lower half of the area behind the grill on the front of the car. As the car moves, fresh cool air is forced over and through this radiator, and the heat pulled from the charged air now stored in the liquid, is released to the atmosphere, cooling the liquid so it can be recycled back through to the intercoolers and used over and over again.

    Two people now on the vairious boards have thought they lost their water pump, but in fact have had holes punched in their intercooling radiators by errant road debris which strikes the radiator at highway speeds and perforates it. Since the engine and supercharger cooling systems share the same overflow container, but are seperate loops, it's only a matter of time before both systems have lost all coolant liquid, due to the one way valve system, the heating and cooling of the coolant and the shared overflow tank. This is not covered by Audi Warranty, and is considered wear and tear. It also removes the car from service until it parts are obtained and it can be repaired, not to mention the cost and frustration.

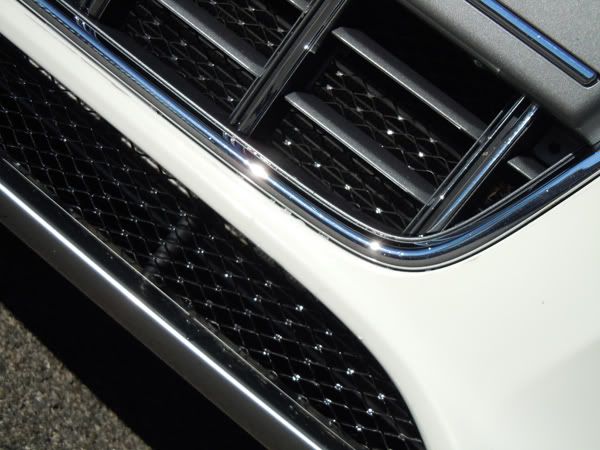
    This is not a foolproof fix, but it does offer a much better chance of catching and stopping any debris large enough to damage the radiator from hitting it. APR uses something similar on their B8 S4 race car, since it is tracked and a lot fo debris can and is kicked up when cars cut a corner and hit the dirt during racing. This DIY will allow you to offer more protection for your car without it being very noticable, like the APR setup seen here:


    Tools needed:
    - Torx T30 bit
    - Torx T25 bit
    - Screwdriver for insertion of Torx bits
    - Small flathead screwdriver
    - Wire cutters/Dikes/Tin snips
    - Heavy gloves
    - 34" x 24" hardware cloth


    Removal of parts to access front area

    You will need the T30 bit to remove the 4 screws shown below.


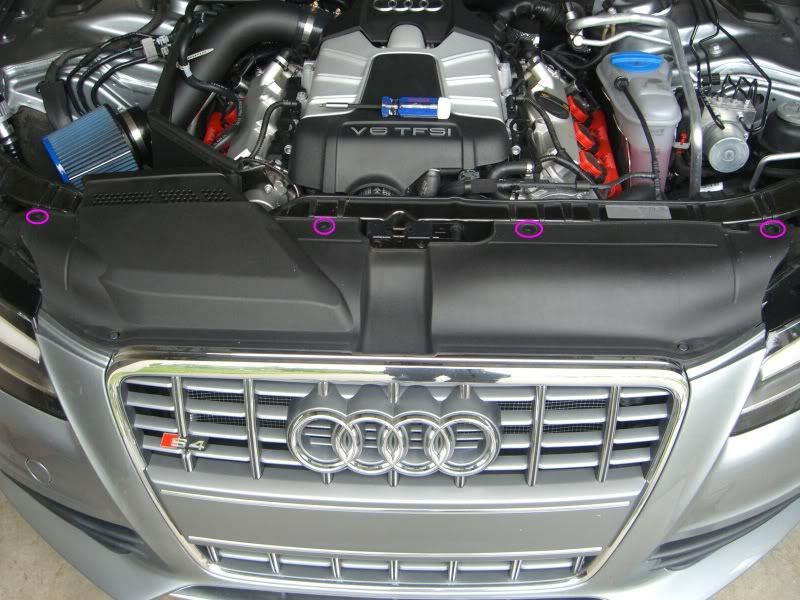
    Once these are removed, you can set them aside somewhere safe for reinstall later. To remove the plastic radiator cover, you will lift it from the engine side an inch or so, then gently slide it back towards the engine to pull the tabs that mesh with the car's grill.


    Once free of the tabs that mesh with the grill, you can safely lift this up and out of the engine bay, also setting it aside.

    Removal of intake scoop

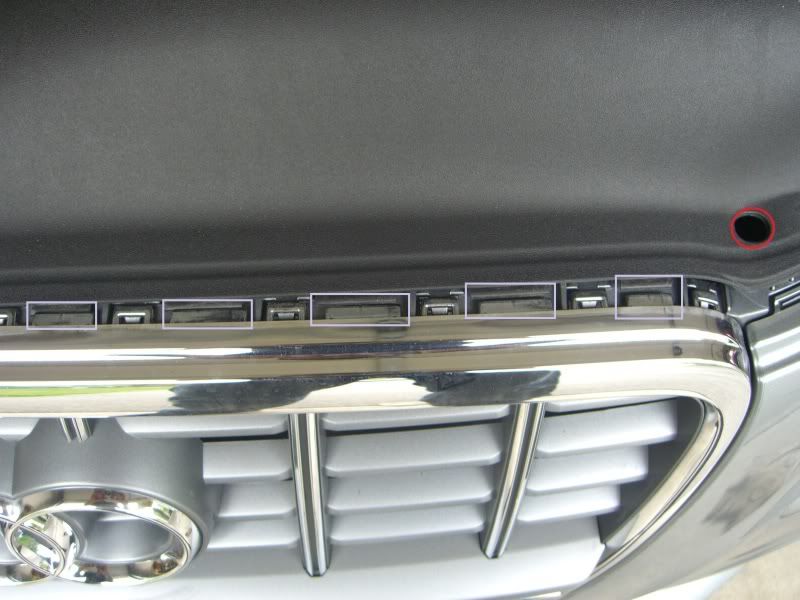
    You now need to swap to the T25 bit to remove the 2 screws holding the intake scoop in place.


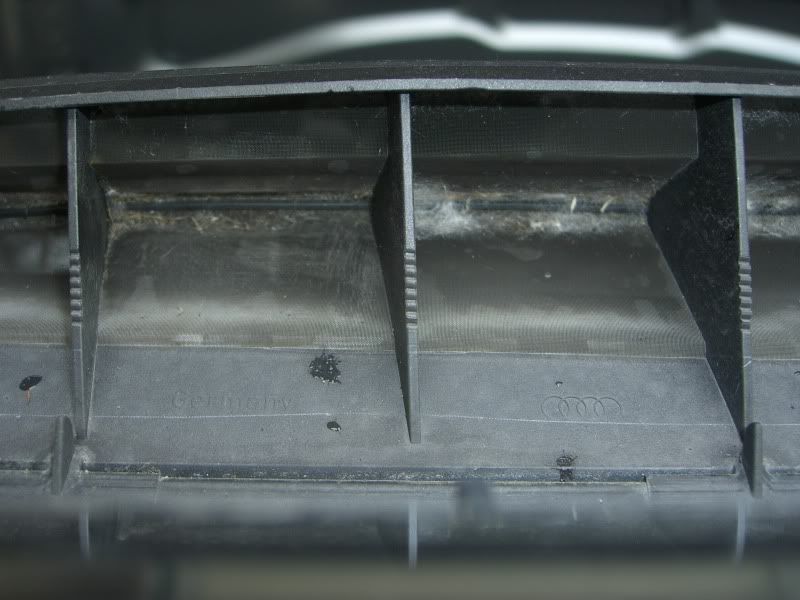
    You will notice that the scoop has a very fine mesh over the opening to the air intake area. This is an excellent time to clean it, as it picsk up bugs, pollen, and all assorted particles before the air hits your air cleaner in the stock air filter box. The mesh is pretty soft, so it's best to blow it out and gently use a finger to loosen any debris trapped in it. Here you can see the side cleaned on the left, versus what it looked like when I took it out on the right.


    Once removed, set the air scoop and it's screws aside with the other parts already removed.

    Familiarity with the setup and system

    Looking down on the top of the front area once the cover and scoop are removed, looks like this -


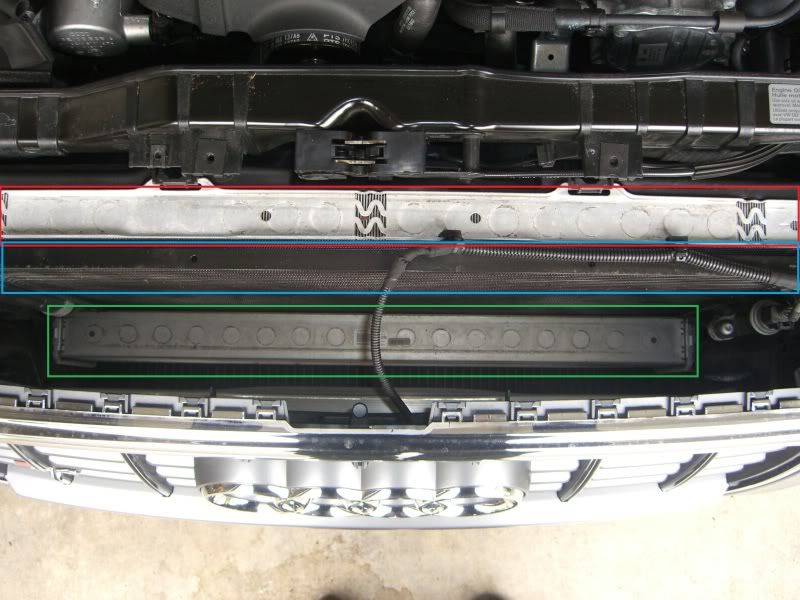
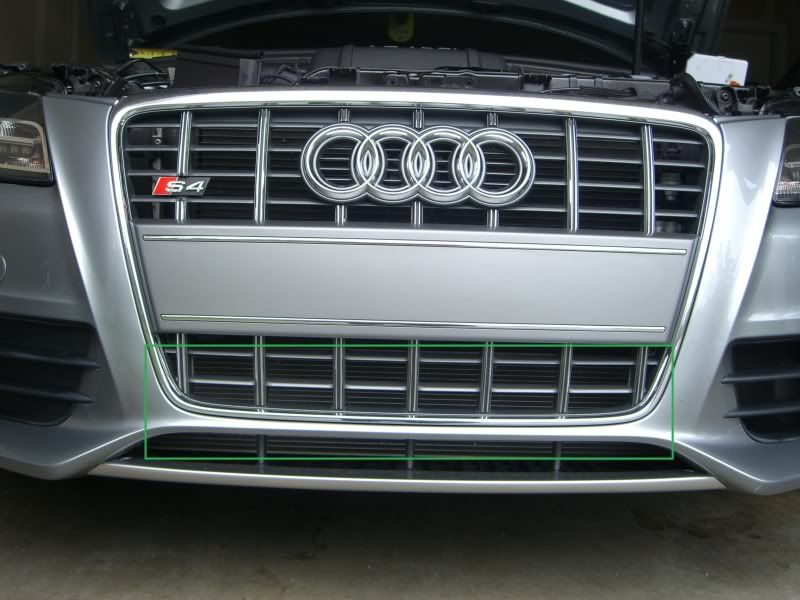
    The RED box is the aluminum engine radiator, which cannot be seen through the grill from the front of the car. This is because it is obscured by the black air conditioner condenser, seen outlined in BLUE, which you can see above the filler plate/front license holder through the grill from outside the car. The intercooling radiator is aluminum, like the engine radiator, and it only a little less than half the height of the engine radiator and A/C condenser, in this picture, it's outlined in GREEN. Also notable in this shot, is the electical feed coming from the engine bay, spanning the gap over the coolers to connect to the HomeLink garage door opening system, which is located behind the 4 interlocking rings of the Audi logo on the front grill.

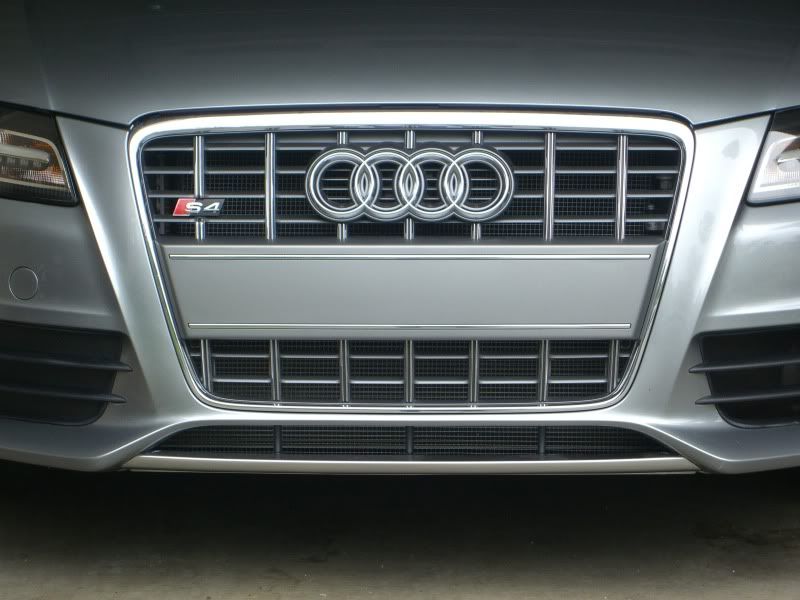
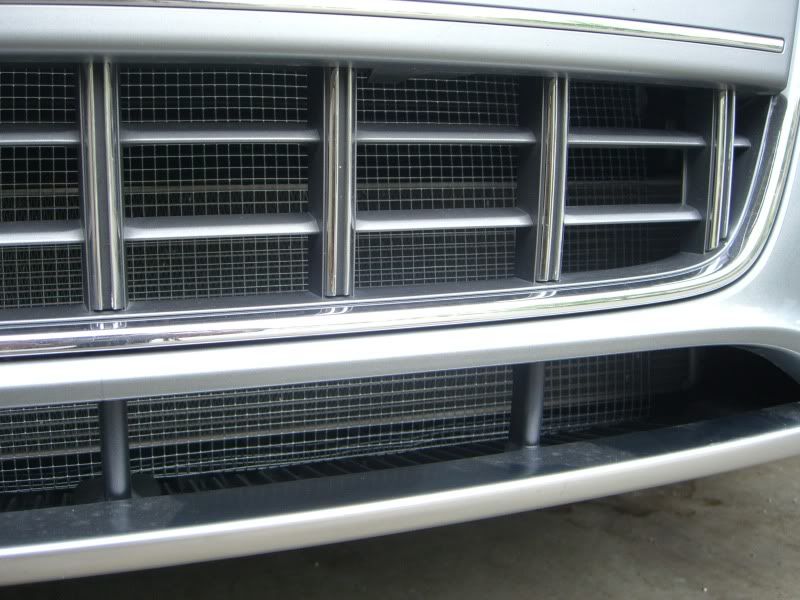
    Here is a shot of the front of the car before anything has been installed, so let you see the silver colored aluminum intercooling radiator (again boxed in GREEN) in the lower portion of the grill, and the top is black due to the condenser being open to view, since the intercooling radiator is only a few inches high. You can also see the area below the grill proper and above the front splitter which offers a VERY large area with nothing to stop large debris from entering the front of the car and damaging the radiator.


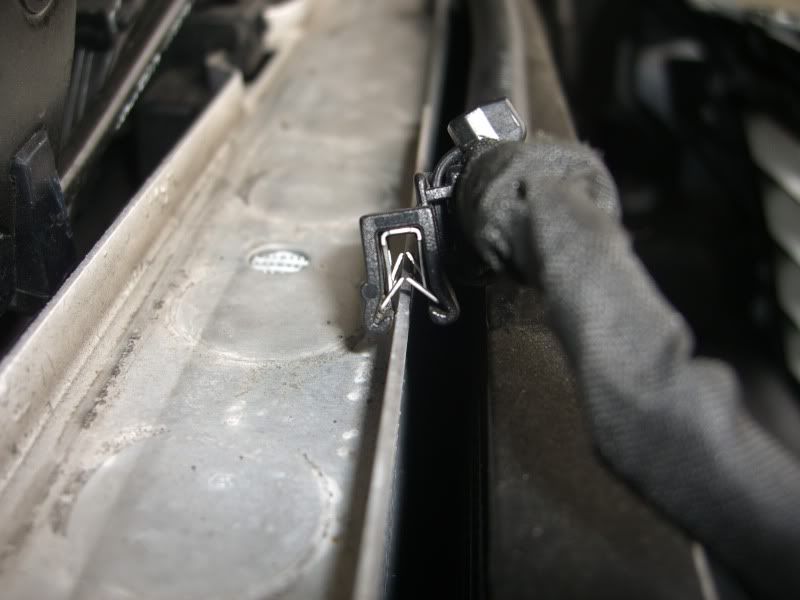
    Next, you will need to unlock the 2 clips holding the HomeLink wire to the top of the radiator. These have little teeth which grip the radiator lip when pushed down onto it, so in order to remove these, you need a small flathead screwdriver to work between the teeth and radiator lip, in order to coax them off.


    Once off you now have a clear shot straight down to the top side of the front splitter which is just under the intercooling radiator:


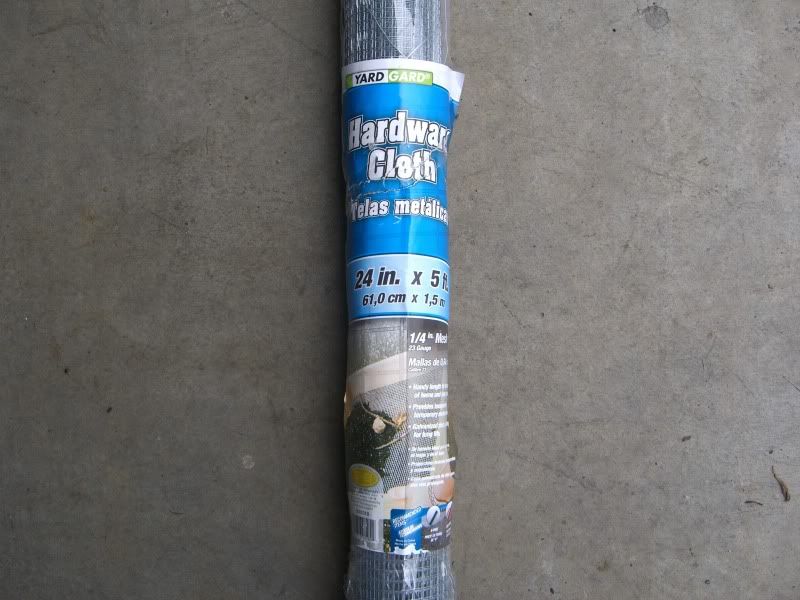
    For this project, I went to the local hardware store and bought a roll of 24" wide and 5' long hardware cloth. I wanted something with as small a holes are possible in order to stop as much debris as possible. I chose .25" mesh, which came in 23 guage wire.


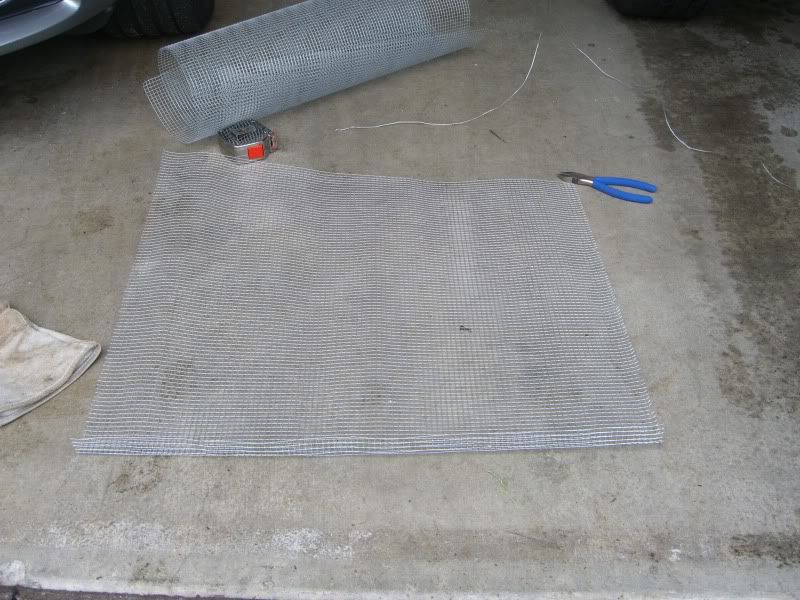
    Using dikes to cut this into a 34" long piece, and wearing heavy suede work gloves to handle the wire is highly recommended. The wire is VERY sharp and you WILL cut yourself if you are not very careful. Rolling this new piece opposite the way it is pacakged, will eventually yield a nice flat 24 x 32 piece to work with for this project. Once flattened, you will take one of the short 24" sides and fold it at a 90 degree angle about 1.5 inches from the edge.


    This angled piece will slide under the front of the intercooling radiator, and look like so:


    You can see the 90 degree bent piece sliding under the intercooling radiator above. Next take the couple of inches of cloth at the top, and gently bend and fold it into the space between the condenser and engine radiator. Be careful not to catch the delicate radiator fins on the mesh as you feed it between the condenser and radiator. Once you get the slack out of the mesh in front of the condenser and intercooling radiator, you can press harder on the part at the top of the condenser to crimp it in place with a bend in the mesh - take care that the mesh it tucked behind the small cylinder on the front drivers side of the condeser:


    Now you can push the clips back onto the radiator lip for the HomeLink wiring which will also help keep this mesh in place:


    Since the intercooling radiator sticks out farther to the front of the car than the condenser, the mesh will not lay flat against everything - this is desirable. The purpose is for the mesh not to sit flush against everything, so that it can catch and stop debris before contact is made with the radiators in the first place.

    Now replace the parts removed in the reverse order from the first few steps, and you are done. Here are some after shots, one from 5 feet away, the other showing the lower part of the grill up close where the intercooling radiator is now better protected.


    Last edited by NWS4Guy; 06-06-2010 at 01:01 PM.
    Like a surgeon with a scalpel, my S4 is a precision instrument, with which I carve and dissect my way through traffic.

    2010 S4 Prem+, Quartz Gray, S-tronic, Sport Diff, B&O, Nav, Gray Birch
    StopTech ST-60 BBK - Stratmosphere intake - APR v2.2 Stage 2 w/pulley + exhaust, v2 Coolant System
    Alu-Kreuz, Apikol rear diff mount, 034 transmission mount

  2. #2
    Veteran Member Four Rings ibiski's Avatar
    Join Date
    May 21 2008
    AZ Member #
    29026
    Location
    312

    Nice write up! +rep. Oh wait, no more rep on AZ.

  3. #3
    Established Member Two Rings
    Join Date
    Jan 09 2008
    AZ Member #
    23994
    Location
    SF Bay Area

    Excellent write up. I think I might try this soon, but I might try to spray the mesh black first. Thanks!

  4. #4
    Veteran Member Four Rings nick71692's Avatar
    Join Date
    Jan 16 2008
    AZ Member #
    24221
    My Garage
    2010 S4, 2005 A4 USP, 2008 BMW 650I Conv. Sport, 2013 Jetta GLI
    Location
    Ohio and GTA

    Nice write up, doesnt look bad at all
    2005 Dolphin Grey USP
    USP CLUB MEMBER #210
    2008 Ibis White S-Line A4 6mt, Stasis Exhaust (Gone)
    2010: S4, Ibis White, S-Tronic (Gone)
    2011 MKVI GTI 4 Door, Carbon, DSG (Gone)
    2012 S4, Monsoon Gray, 6MT (Gone)
    2014 S4, Glacier White - fully loaded (Gone)
    2019 S4, Glacier White - Prestige

  5. #5
    Senior Member Three Rings BlackS4TT(Josh)'s Avatar
    Join Date
    Jan 24 2006
    AZ Member #
    9880
    Location
    Ohio

    Interesting... I've never heard of normal rocks/debris cracking a heat exchanger.

    Nice work. Spray the mesh black to further conceal.
    B7 S4 Avant

  6. #6
    Senior Member Three Rings
    Join Date
    May 11 2010
    AZ Member #
    58885
    My Garage
    2011 S4
    Location
    CT

    Awesome write up. Great pics and explanations. Thanks.

  7. #7
    Veteran Member Four Rings NWS4Guy's Avatar
    Join Date
    Sep 29 2009
    AZ Member #
    48541
    My Garage
    2015 Range Rover Evoque 2010 Audi S4
    Location
    Seattle, WA

    Quote Originally Posted by BlackS4TT(Josh) View Post
    Interesting... I've never heard of normal rocks/debris cracking a heat exchanger.

    Nice work. Spray the mesh black to further conceal.
    This is the latest thread with it happening which made me decide to stop pondering and do it - http://www.audizine.com/forum/showth...nt-quot-Thread....
    Like a surgeon with a scalpel, my S4 is a precision instrument, with which I carve and dissect my way through traffic.

    2010 S4 Prem+, Quartz Gray, S-tronic, Sport Diff, B&O, Nav, Gray Birch
    StopTech ST-60 BBK - Stratmosphere intake - APR v2.2 Stage 2 w/pulley + exhaust, v2 Coolant System
    Alu-Kreuz, Apikol rear diff mount, 034 transmission mount

  8. #8
    Senior Member Two Rings
    Join Date
    Oct 11 2009
    AZ Member #
    49080
    My Garage
    S4 B8 SprintBlue S-tronic
    Location
    Russia

    Nice work and writing.
    I've done this after the first 1500 miles - as far as I've noticed that even the smallest road debris harm (bend and block) very thin aftercooler fins.
    Used fine aluminium mesh, painted black - but far more rigid than NWS4Guy used. And protected only the area below the license plate.
    I removed the front bumper and fixed the mesh with screws. Works fine for almost a year already.
    Absolutely invisible from the outside as it's black-painted.
    I have also protected the radiator behind left fog lamp in the same manner.

    By the way, I thoroughly checked the same radiators area of the A6's 290 hp 3.0TFSI and noticed no such aftecooler at all.
    Sorry for my English - I'm an ignorant Russian bear... just love Audis.

  9. #9
    Active Member Two Rings
    Join Date
    Jan 17 2010
    AZ Member #
    53529
    Location
    Cleveland, OH

    Thank you for the very detailed post. The step by step pics are great. I will be doing something like this for sure when I get my car back. This is the kind of stuff the forums are made for. I recommend everyone consider this before it is too late and you find yourself all too familiar with Audi Roadside Assistance. Thanks again NWS4Guy

  10. #10
    Veteran Member Four Rings Chestlock's Avatar
    Join Date
    May 30 2010
    AZ Member #
    59701
    Location
    Victoria, BC

    Great info and fantastic pics, thanks a bunch NWS4. Do you think there's any relatively painless way to secure mesh to the inside of the grill and to the inside of the lower left intake as opposed to hanging it? If not, I'll definitely do it your way.

  11. #11
    Veteran Member Four Rings NWS4Guy's Avatar
    Join Date
    Sep 29 2009
    AZ Member #
    48541
    My Garage
    2015 Range Rover Evoque 2010 Audi S4
    Location
    Seattle, WA

    Quote Originally Posted by Chestlock View Post
    Great info and fantastic pics, thanks a bunch NWS4. Do you think there's any relatively painless way to secure mesh to the inside of the grill and to the inside of the lower left intake as opposed to hanging it? If not, I'll definitely do it your way.
    I wanted something unobtrusive that I could remove or change easily. You could certainly use something wider than the 24" I did and see about making some holes in the bumper or grill and screw things in for a more permanent solution.
    Like a surgeon with a scalpel, my S4 is a precision instrument, with which I carve and dissect my way through traffic.

    2010 S4 Prem+, Quartz Gray, S-tronic, Sport Diff, B&O, Nav, Gray Birch
    StopTech ST-60 BBK - Stratmosphere intake - APR v2.2 Stage 2 w/pulley + exhaust, v2 Coolant System
    Alu-Kreuz, Apikol rear diff mount, 034 transmission mount

  12. #12
    Veteran Member Four Rings HyperM3's Avatar
    Join Date
    Mar 20 2004
    AZ Member #
    1353
    Location
    Lawrenceville, NJ

    Good stuff and great detailed write-up! Gonna do this sometime this week.
    21 S5 Coupe - RacingLine strut brace/034RearSwayBar/CTSTransMount/034 tune/VPS Res Delete/CTSIntake
    10 S4 (gone),13 S6 (gone),14 S6 (gone),14 S6 (gone),16 S6 (gone),17 A4 (gone),19 S4 (gone)
    20 BMW R1250RS

    ACNA Lifetime Member - 26690

    Respond to a post with an answer, they will keep asking questions. Teach them how to RTFM, they will learn to help others.

  13. #13
    Veteran Member Four Rings NWS4Guy's Avatar
    Join Date
    Sep 29 2009
    AZ Member #
    48541
    My Garage
    2015 Range Rover Evoque 2010 Audi S4
    Location
    Seattle, WA

    Quote Originally Posted by HyperM3 View Post
    Good stuff and great detailed write-up! Gonna do this sometime this week.
    I also did one for the fogs (You already changed) and upgrading the 4.3K HID bulbs in the headlamps - you can look them up with search if interested, they were done around late Dec.
    Like a surgeon with a scalpel, my S4 is a precision instrument, with which I carve and dissect my way through traffic.

    2010 S4 Prem+, Quartz Gray, S-tronic, Sport Diff, B&O, Nav, Gray Birch
    StopTech ST-60 BBK - Stratmosphere intake - APR v2.2 Stage 2 w/pulley + exhaust, v2 Coolant System
    Alu-Kreuz, Apikol rear diff mount, 034 transmission mount

  14. #14
    Active Member Two Rings
    Join Date
    Jan 17 2010
    AZ Member #
    53529
    Location
    Cleveland, OH

    Would 12 squares per inch be too small for proper airflow? I was thinking I want to go smaller than the 4 squares you used for more protection. Don't want to restrict the air too much though and cause the radiator to be less effective. My gut tells me it would be ok but wanted to see what others thought. I saw this online and am strongly considering it. It is also .028" wire and stainless steel with a black epoxy. I like the idea of black like others have said.


  15. #15
    Veteran Member Four Rings NWS4Guy's Avatar
    Join Date
    Sep 29 2009
    AZ Member #
    48541
    My Garage
    2015 Range Rover Evoque 2010 Audi S4
    Location
    Seattle, WA

    Quote Originally Posted by sdh1123 View Post
    Would 12 squares per inch be too small for proper airflow? I was thinking I want to go smaller than the 4 squares you used for more protection. Don't want to restrict the air too much though and cause the radiator to be less effective. My gut tells me it would be ok but wanted to see what others thought. I saw this online and am strongly considering it. It is also .028" wire and stainless steel with a black epoxy. I like the idea of black like others have said.
    In all honesty I think it will be fine, however, depending on conditions (we have something called Cottonwood trees here, which has a fluffy pollen which looks like cotton - you can see it crammed in the instake filter pic I took) the entire screen could become clogged easily with things like bugs, and other things - so cleaning it will be a must with something like a power washer or removal for cleaning could become a chore. Likewise if you collect some stuff which blocks a lot of the screen while driving you could encounter an overheating situation. Just food for thought while trying to balance filtration versus airflow.

    Also depending on how it's mounted, the finer wire from a smaller square likely will not provide as much resistance, which is the purpose here since larger debris is what is hitting the intercooling radiator and causing punctures, not something very small unless it's a VERY hard item and you are travelling VERY fast (or it is).
    Like a surgeon with a scalpel, my S4 is a precision instrument, with which I carve and dissect my way through traffic.

    2010 S4 Prem+, Quartz Gray, S-tronic, Sport Diff, B&O, Nav, Gray Birch
    StopTech ST-60 BBK - Stratmosphere intake - APR v2.2 Stage 2 w/pulley + exhaust, v2 Coolant System
    Alu-Kreuz, Apikol rear diff mount, 034 transmission mount

  16. #16
    Established Member Two Rings bimmerhead12's Avatar
    Join Date
    Oct 20 2009
    AZ Member #
    49493
    Location
    Maryland

    Thank you for the detailed instructions! :)

  17. #17
    Veteran Member Four Rings t0mt0m's Avatar
    Join Date
    Apr 26 2005
    AZ Member #
    6240
    Location
    Nothern Va

    great write up! I wasn't even aware of this problem with our cars
    here are my concerns
    -being able to service it (clean it)
    -kinda ugly
    -how strong of a shield is it?

    to further build in your setup and idea, maybe we can fab a thin black rectangular mesh box to go over the radiator that fits in between that area so that we can take it out to clean as well, i think this will give it some strength to knock back the rocks and still look stealth
    B6 A4 1.8t 5MT Quattro - Sold
    B8 S4 '10 6MT Prem+ - Sold

  18. #18
    Veteran Member Four Rings NWS4Guy's Avatar
    Join Date
    Sep 29 2009
    AZ Member #
    48541
    My Garage
    2015 Range Rover Evoque 2010 Audi S4
    Location
    Seattle, WA

    Due to the .25 inch holes, it's seldom anything will get stuck in it, of it does, just a garden hose with a spray nozzle to knock it out. The look is subjective, you can't see/notice it from more than a few feet away, I took pics at ground level, not eye level, for effect. The issue with fabrication of something like you propose is that you still will need to take part of the car apart to get to it if you want to remove it. As for strenght, it's .23 guage gavanized steel mesh. It will deflect or absorb the impact of most things which would perforate the radiators should they fly up and hit them. This is not something to eliminate the potential, just a little extra $8 insurance. The main open portion of the intake area for this, is ~6-8 inches off the ground, so the only things which will be getting in there large enough to damage the radiators (unless you are offroading) would be an errant rock which gets kicked up and bounces JUST right to make it inside the area above the splitter, AND be travelling with enough force and have enough mass to damage the soft aluminum of the radiators.
    Like a surgeon with a scalpel, my S4 is a precision instrument, with which I carve and dissect my way through traffic.

    2010 S4 Prem+, Quartz Gray, S-tronic, Sport Diff, B&O, Nav, Gray Birch
    StopTech ST-60 BBK - Stratmosphere intake - APR v2.2 Stage 2 w/pulley + exhaust, v2 Coolant System
    Alu-Kreuz, Apikol rear diff mount, 034 transmission mount

  19. #19
    Veteran Member Four Rings LeadToRome's Avatar
    Join Date
    Apr 25 2010
    AZ Member #
    58130
    Location
    I-95

    Quote Originally Posted by sdh1123 View Post
    Would 12 squares per inch be too small for proper airflow? I was thinking I want to go smaller than the 4 squares you used for more protection. Don't want to restrict the air too much though and cause the radiator to be less effective. My gut tells me it would be ok but wanted to see what others thought. I saw this online and am strongly considering it. It is also .028" wire and stainless steel with a black epoxy. I like the idea of black like others have said.

    I really like the stainless and epoxy coated part but agree that it might get clogged so you'd have to make it easily removable/accessible. Do you know who makes that stuff and/or what they call it, sdh? I'd like to see if they have something 8 squares to the inch or failing that go back to quarter -inch and follow OP's DIY but with that material.

    edit: Thomas.net shows a dozen or so U.S. manufacturers but I don't need a freight car full.

  20. #20
    Active Member Two Rings
    Join Date
    Jan 17 2010
    AZ Member #
    53529
    Location
    Cleveland, OH

    I was looking at this stuff on twpinc.com and it looks like you can buy smaller quantities by the square foot (12 sq ft minimum). They call this 12 Mesh T304 Black Epoxy Stainless .028" Wire 48 Inch Wide. I can't seem to find where they have the black with any larger square sizes. I will keep looking on other sites.

    I really wasn't thinking about things getting clogged in there but that is a good point to consider. I guess I am just extra nervous because I didn't see whatever punctured mine...so I am thinking it wasn't that big. But it is hard to say when it happened since the leak was so small. All I know is, I am very cautious of any debris before this even happened since when I bought my 2003 A4, I had it about a week when a truck threw a stone that hit my A pillar and chipped my paint all the way to the metal. What is it with me and major damage with less than 5,000 miles?

    In this case (S4), I never heard or saw anything suspicious...just the low coolant warning. Ouch.

  21. #21
    Veteran Member Four Rings Alkivar's Avatar
    Join Date
    May 16 2009
    AZ Member #
    42591
    My Garage
    '08 A5 3.2L S-line, '03 Passat GLX 4Motion
    Location
    Maine aka Canada Jr.

    sdh something nearly identical to that 12 Mesh is available at Home Depot... along with aluminum window screening material
    THIS SIGNATURE HAS BEEN CENSORED BY AZ MODERATORS.

  22. #22
    Veteran Member Four Rings NWS4Guy's Avatar
    Join Date
    Sep 29 2009
    AZ Member #
    48541
    My Garage
    2015 Range Rover Evoque 2010 Audi S4
    Location
    Seattle, WA

    Problem is that aluminum wire this fine will be very soft and flexible, and prone to tearing - it mght not provide much protection from something with enough size or force to perforate the radiator.
    Like a surgeon with a scalpel, my S4 is a precision instrument, with which I carve and dissect my way through traffic.

    2010 S4 Prem+, Quartz Gray, S-tronic, Sport Diff, B&O, Nav, Gray Birch
    StopTech ST-60 BBK - Stratmosphere intake - APR v2.2 Stage 2 w/pulley + exhaust, v2 Coolant System
    Alu-Kreuz, Apikol rear diff mount, 034 transmission mount

  23. #23
    Established Member Two Rings Vixcan's Avatar
    Join Date
    May 18 2010
    AZ Member #
    59180
    My Garage
    2014 Audi R8 V10
    Location
    Burke, Virginia

    Thanks a ton for the DIY write-up. I did the installation today with my air intake, but instead of just one layer of 1/4 mesh, I cross layered it with two so it forms X's. Hoping thats going to be
    more sturdier.

  24. #24
    Veteran Member Four Rings NWS4Guy's Avatar
    Join Date
    Sep 29 2009
    AZ Member #
    48541
    My Garage
    2015 Range Rover Evoque 2010 Audi S4
    Location
    Seattle, WA

    Quote Originally Posted by Vixcan View Post
    Thanks a ton for the DIY write-up. I did the installation today with my air intake, but instead of just one layer of 1/4 mesh, I cross layered it with two so it forms X's. Hoping thats going to be
    more sturdier.
    Good plan, I think it will definitely help make it sturdier.
    Like a surgeon with a scalpel, my S4 is a precision instrument, with which I carve and dissect my way through traffic.

    2010 S4 Prem+, Quartz Gray, S-tronic, Sport Diff, B&O, Nav, Gray Birch
    StopTech ST-60 BBK - Stratmosphere intake - APR v2.2 Stage 2 w/pulley + exhaust, v2 Coolant System
    Alu-Kreuz, Apikol rear diff mount, 034 transmission mount

  25. #25
    Established Member Two Rings Reverserewind's Avatar
    Join Date
    Jun 15 2005
    AZ Member #
    6890
    Location
    OOOOak Ridges

    what about actually mounting it to the back of the grill piece? How easy is that to remove? I know you mentioned that it is installed so that it is not tight againts the ratiador but something hard/fast enough to puncture the rad will it not deflect that mesh into it anyways? I know it'll help take some of the forces out, but mounting it further away on the grill would help more. It also may help with cleaning since it would have more open space behind it and if you're pressure spraying it clean you wouldn't just be pushing the dirt/debris into the rad?

    Just some random thoughs. I haven't taken delivery yet so I'm relying on pictures sorry, I might be way off base... I appreciate the effort this is something I will definately look at doing as I've had coolant leak problems in my past car and it is a pain!

  26. #26
    Veteran Member Four Rings NWS4Guy's Avatar
    Join Date
    Sep 29 2009
    AZ Member #
    48541
    My Garage
    2015 Range Rover Evoque 2010 Audi S4
    Location
    Seattle, WA

    Quote Originally Posted by Reverserewind View Post
    what about actually mounting it to the back of the grill piece? How easy is that to remove? I know you mentioned that it is installed so that it is not tight againts the ratiador but something hard/fast enough to puncture the rad will it not deflect that mesh into it anyways? I know it'll help take some of the forces out, but mounting it further away on the grill would help more. It also may help with cleaning since it would have more open space behind it and if you're pressure spraying it clean you wouldn't just be pushing the dirt/debris into the rad?

    Just some random thoughs. I haven't taken delivery yet so I'm relying on pictures sorry, I might be way off base... I appreciate the effort this is something I will definately look at doing as I've had coolant leak problems in my past car and it is a pain!
    I'm sure that would work if you have the time and effort to do something very customized. As I said this is not a sure fire fix, but will help a lot (not sure there is something which could deflect or absorb everything possible. The closer to the grill the more noticable, which many might not prefer though.
    Like a surgeon with a scalpel, my S4 is a precision instrument, with which I carve and dissect my way through traffic.

    2010 S4 Prem+, Quartz Gray, S-tronic, Sport Diff, B&O, Nav, Gray Birch
    StopTech ST-60 BBK - Stratmosphere intake - APR v2.2 Stage 2 w/pulley + exhaust, v2 Coolant System
    Alu-Kreuz, Apikol rear diff mount, 034 transmission mount

  27. #27
    Established Member Two Rings Reverserewind's Avatar
    Join Date
    Jun 15 2005
    AZ Member #
    6890
    Location
    OOOOak Ridges

    Quote Originally Posted by NWS4Guy View Post
    ...The closer to the grill the more noticable, which many might not prefer though.
    Yeah that's a really good point, didn't think of that.

    I did something "custom" on my car in university that looked ok, but lets just say the grill didn't have the appeal of the S4 ;) Thanks for the pics and the write up, it will definately help a lot.

  28. #28
    Established Member Two Rings
    Join Date
    Jan 09 2008
    AZ Member #
    23994
    Location
    SF Bay Area

    It looked like the APR race car had installed right to the back of the front grill. Seemed much more noticeable than NWS4Guy install. Again painting it black might help too.

  29. #29
    Veteran Member Four Rings NWS4Guy's Avatar
    Join Date
    Sep 29 2009
    AZ Member #
    48541
    My Garage
    2015 Range Rover Evoque 2010 Audi S4
    Location
    Seattle, WA

    Quote Originally Posted by dgibbs View Post
    It looked like the APR race car had installed right to the back of the front grill. Seemed much more noticeable than NWS4Guy install. Again painting it black might help too.
    Correct on all counts sir!
    Like a surgeon with a scalpel, my S4 is a precision instrument, with which I carve and dissect my way through traffic.

    2010 S4 Prem+, Quartz Gray, S-tronic, Sport Diff, B&O, Nav, Gray Birch
    StopTech ST-60 BBK - Stratmosphere intake - APR v2.2 Stage 2 w/pulley + exhaust, v2 Coolant System
    Alu-Kreuz, Apikol rear diff mount, 034 transmission mount

  30. #30
    Established Member Two Rings Vixcan's Avatar
    Join Date
    May 18 2010
    AZ Member #
    59180
    My Garage
    2014 Audi R8 V10
    Location
    Burke, Virginia

    Hmm.. I came across a concern today about the shield. It was raining fairly hard this afternoon and I realized that water is going to hit the shield if I drive the car, which might cause rusting. Does anyone know how long it takes galavanized metal to rust? And if it does, is there any methods to preventing rust?

  31. #31
    Veteran Member Four Rings NWS4Guy's Avatar
    Join Date
    Sep 29 2009
    AZ Member #
    48541
    My Garage
    2015 Range Rover Evoque 2010 Audi S4
    Location
    Seattle, WA

    Galvanization is to explicitly prevent (or at least retard) rust. It should last a few years at least. If I have to spend $8 and 10 minutes every few years I am ok with that. I would be more concerned with the epoxy coated offerings, as the coating will get nicks from the debris it's blocking and this will let water to the ungalvanized metal underneath - becoming like a dishwasher rack gets when the coating gets perforated. The metal under the coating rusts and swells as it does so, potentially closing off the holes and causing airflow issues, but absolutely becoming brittle and not offering any protection at all.

    Like a surgeon with a scalpel, my S4 is a precision instrument, with which I carve and dissect my way through traffic.

    2010 S4 Prem+, Quartz Gray, S-tronic, Sport Diff, B&O, Nav, Gray Birch
    StopTech ST-60 BBK - Stratmosphere intake - APR v2.2 Stage 2 w/pulley + exhaust, v2 Coolant System
    Alu-Kreuz, Apikol rear diff mount, 034 transmission mount

  32. #32
    Established Member Two Rings Vixcan's Avatar
    Join Date
    May 18 2010
    AZ Member #
    59180
    My Garage
    2014 Audi R8 V10
    Location
    Burke, Virginia

    I've been on these audizine, and audiworld ghosting for a few months and the amount of helpful info that you know is amazing =o. Well that takes care of my anxiety, phew. Thanks for the reply btw!

  33. #33
    Veteran Member Four Rings NWS4Guy's Avatar
    Join Date
    Sep 29 2009
    AZ Member #
    48541
    My Garage
    2015 Range Rover Evoque 2010 Audi S4
    Location
    Seattle, WA

    You bet, and good thought process, always smart to try and see the problems you might encounter and how to prevent them in advance!
    Like a surgeon with a scalpel, my S4 is a precision instrument, with which I carve and dissect my way through traffic.

    2010 S4 Prem+, Quartz Gray, S-tronic, Sport Diff, B&O, Nav, Gray Birch
    StopTech ST-60 BBK - Stratmosphere intake - APR v2.2 Stage 2 w/pulley + exhaust, v2 Coolant System
    Alu-Kreuz, Apikol rear diff mount, 034 transmission mount

  34. #34
    Established Member Two Rings Vixcan's Avatar
    Join Date
    May 18 2010
    AZ Member #
    59180
    My Garage
    2014 Audi R8 V10
    Location
    Burke, Virginia

    Haha, I try. Just hoping this grill is going to last more then a year.

  35. #35
    Active Member Two Rings simulacrum's Avatar
    Join Date
    May 21 2010
    AZ Member #
    59294
    Location
    Phila PA

    wish I had seen this post before and acted on it. Took the car in today with a coolant leak--supercharger radiator perforated. $800ish to fix, insurance (comprehensive claim) will cover all but deductible.

    Thinking about how this happened--probably on i-95 on a long road trip with the two kids--I'd do this mod more for reliability than for the potential money-savings. Don't like to think about being sidelined by an errant pebble with wife and two babies in the car.

    Good info as always NWS4guy.
    2011 S4 - 7 Cogs - Meteor - Black/Magma - SDiff - Nav (unless it's hot out) - Bangin' Olufsen

  36. #36
    Veteran Member Four Rings NWS4Guy's Avatar
    Join Date
    Sep 29 2009
    AZ Member #
    48541
    My Garage
    2015 Range Rover Evoque 2010 Audi S4
    Location
    Seattle, WA

    Quote Originally Posted by simulacrum View Post
    wish I had seen this post before and acted on it. Took the car in today with a coolant leak--supercharger radiator perforated. $800ish to fix, insurance (comprehensive claim) will cover all but deductible.

    Thinking about how this happened--probably on i-95 on a long road trip with the two kids--I'd do this mod more for reliability than for the potential money-savings. Don't like to think about being sidelined by an errant pebble with wife and two babies in the car.

    Good info as always NWS4guy.
    Sorry to hear you had this cost you some cash - if it makes you feel better, there is no telling for sure if this would have saved you, but it can't hurt. I've had mine on since this writeup, so call it 9 months and still looks like new, no rust or signs that it doesn't wear well.
    Like a surgeon with a scalpel, my S4 is a precision instrument, with which I carve and dissect my way through traffic.

    2010 S4 Prem+, Quartz Gray, S-tronic, Sport Diff, B&O, Nav, Gray Birch
    StopTech ST-60 BBK - Stratmosphere intake - APR v2.2 Stage 2 w/pulley + exhaust, v2 Coolant System
    Alu-Kreuz, Apikol rear diff mount, 034 transmission mount

  37. #37
    Established Member Two Rings S4DIT's Avatar
    Join Date
    Dec 19 2010
    AZ Member #
    68427
    Location
    MN

    Good write up NWS4Guy! I always appreciate what you have to say. I noticed GMG Racing has something like this that I've had my eyes on (same company that plans on releasing a SC crank pulley replacement soon):

    http://www.gmgracing.com/audi_b8s4.shtml


    S4DIT
    2010 S4 Prestige | Ice Silver | Black & Silver Nappa | DSG | Carbon | Rear Sports Diff | APR ECU | AWE Exhaust w/resonated DP's | AWE S-Flo intake | Hawk ceramic pads | AWE boost gauge | RS5 pedals | RS6 Shifter | R8 Y-design 10 spoke wheels | Hoen Fogs | LED Lighting | Vag Com available if you need someone local to mod you

  38. #38
    Senior Member Two Rings dr bryan's Avatar
    Join Date
    Apr 12 2010
    AZ Member #
    57515
    Location
    Tualatin, OR

    How much $$$ GMG?

    Anyone know how much GMG is charging for that? If they are actually making them why wouldn't they put up a price... maybe they don't want to sell any.
    '17 S6

  39. #39
    Veteran Member Three Rings
    Join Date
    Nov 11 2010
    AZ Member #
    66887
    My Garage
    2023 S8, 2020 Range Rover
    Location
    Minnesota

    I bought the aluminum gutter guard material at home depot that resembles the diamond pattern in S4dit's post. I took things apart is listed in the opening post but I wired it to the back of the grill farther away from the radiator. The hard part is that I haven't found a spray paint that sticks the best to the aluminum with our salty nasty upper midwest winter. perhaps I didn't get it totally clean and had a little oil on it when I painted the guards.

  40. #40
    Veteran Member Four Rings Chestlock's Avatar
    Join Date
    May 30 2010
    AZ Member #
    59701
    Location
    Victoria, BC

    Quote Originally Posted by S4DIT View Post
    Good write up NWS4Guy! I always appreciate what you have to say. I noticed GMG Racing has something like this that I've had my eyes on (same company that plans on releasing a SC crank pulley replacement soon):

    http://www.gmgracing.com/audi_b8s4.shtml


    I'm (supposed to be) heading down to LA in early April, talked to GMG a few months ago about getting it installed (travelmate just got new job, we may not go now though). IIRC it was about $650 installed, but I'd confirm it with them, I could be wrong (and I've deleted the email).

    Edit: Confirmed at that price - talk to Fabryce at GMG
    Last edited by Chestlock; 03-03-2011 at 09:26 PM.

Page 1 of 7 123 ... LastLast


Bookmarks

Posting Permissions

  • You may not post new threads
  • You may not post replies
  • You may not post attachments
  • You may not edit your posts
  •  


    © 2001-2025 Audizine, Audizine.com, and Driverzines.com
    Audizine is an independently owned and operated automotive enthusiast community and news website.
    Audi and the Audi logo(s) are copyright/trademark Audi AG. Audizine is not endorsed by or affiliated with Audi AG.