Audizine - An Automotive Enthusiast Community

Page 1 of 2 12 LastLast
Results 1 to 40 of 62
  1. #1
    Veteran Member Four Rings
    Join Date
    Jun 18 2009
    AZ Member #
    43894
    Location
    Phoenix, AZ

    Front wheel bearing replacement

    Guest-only advertisement. Register or Log In now!
    Tools needed:

    - Jack
    - Jack stand
    - 1/2" socket wrench and/or breaker bar
    - 3/8" socket wrench and extension
    - T30 torx bit
    - 12mm triple square
    - 17mm allen bit, 1/2" drive (a few inches long as pictured)(do not buy an allen key, the axle bolt has to be torqued into place)

    - 13/16" socket (or equivelant metric size)
    - Hanger wire
    - Penetrating oil
    - Locktite
    - Work light?

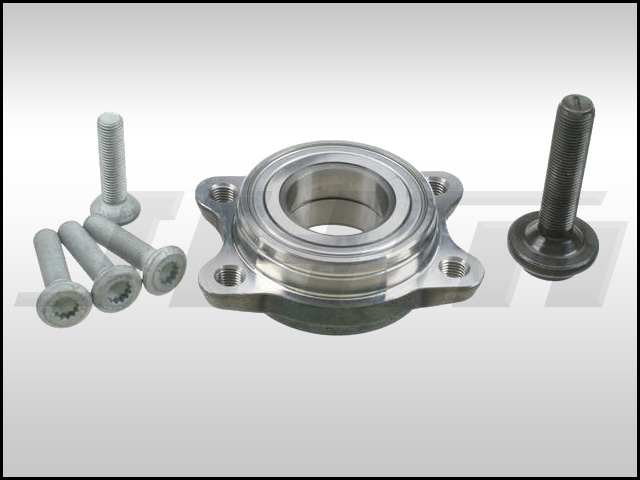
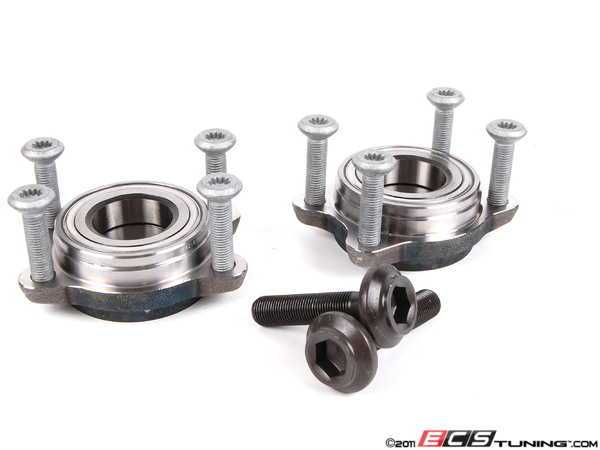
    The bearing itself can be purchased at JHM Motorsports, here's the direct link - http://www.jhmotorsports.com/shop/ca...roducts_id=323

    Here's what you get:


    1.) You need to crack the axle bolt loose and you can either have the car on the ground and do it, or get the tired off and have someone step on the brake pedal to keep the hub from spinning. So I jacked up the car, took the wheel off, popped the center cap off, put the wheel back on with two bolts, put it back on the ground partially, put the allen in and crack it loose, get it back up in the air and take the wheel back off.


    2.) You need to remove the caliper and rotor so start by taking the brake pad sensor wire connector off, then take the ABS sensor wire out of its rubber grommet bracket, then remove the caliper bracket (and caliper) which bolts to the knuckle with two large bolts, I used a 13/16" socket which fit perfectly, I didn't have a big enough metric socket, it's got to be about 21mm. Once the caliper is off, I used a thick coat hanger wire to tie the caliper up out of the way, hanging by the tie rod. Make sure not to kink the brake line or pull on any wires if you left them attached.


    Bolts out -


    3.) Remove the rotor. The chance that this T30 torx bolt is on your car is about 50/50 depending on who replaced your rotors last, but it shouldn't be too bad to remove. If yours is really tight, spray it with some penetrating fluid. If the rotor won't come off easily, take a hammer and firmly hit the area around where the wheel bolts go, sometimes rust causes the rotor to bond to the hub mounting surface. If you can, spray some penetrating oil from behind the rotor into that area.


    4.) Remove the splash guard. There are 4 T30 bolts, should come right out.


    5.) Take a 3/8" extension rod (or similar) and GENTLY tap the axle out of the hub in the area seen, the axle only goes partially into the hub so you have to gently hit the end of the axle as pictured. It does NOT take a lot of force so don't whip out your sledge, I only just tapped it a few times with my hammer to get it out.


    Here's the reverse angle, the axle is mostly out, NOTE, the axle WILL NOT COME ALL THE WAY OUT OF THE HUB, there isn't enough play in the axle CV joints at either end to allow it to come all the way out of your way, unfortunately. But don't worry about it, you can work around it. You can also see 3 of the 4 triple square bolts you need to get at.


    6.) Remove the wheel bearing bolts. This is kind of a pain because of the axle being in the way, but with the axle out of the hub as far as it can go, it does move around a lot and so you can position your wrench as pictured. I always had the 1/2" wrench handle pointing to the back of the car for the best position. You want to remain perpandicular to the bolt to make sure the triple square gets the best grip on the bolt before you start trying to back it out. I could have used a slightly shorter version of it in this photo.. and, they are very tight, but as soon as they get loose they are very easy to keep unscrewing.


    Here's another shot of the socket on the bottom rear bolt, the socket is right up against it, but it's very easy to move because the axle is so loose.


    So eventually after some swearing and some sore wrists, you'll get all the bolts out and the whole assembly should fall out of the knuckle.


    7.) Press the old bearing off the hub and press the new one on. I took mine down the street to Monro muffler, gave the guy a $20 bill, and he did it in 15 minutes. It does indeed take a press, you can't seperate the two any other way because as you can see in the photo, the hub is actually pressed onto the INSIDE of the bearing instead of the bearing being pressed to the inside of the hub on some other kinds of carrs.

    Old bearing and hub next to new bearing -


    New bearing on hub -


    8.) Install wheel bearing assembly. I used some red lock tite (in a tube) on the 4 bolts since it looks like the original bolts had locktite on them. But other than that, install is reverse of removal. Tighten the 4 bolts as much as you can. I don't have exact torque specs, but the bolt will suddenly get tight and I could only maybe turn it another 1/8th of a turn before it just wouldn't go any more, and was probably tighter than the original bolts were when I took them off.


    Axle back in the hub, new axle bolt threaded in -


    9.) Torque the axle bolt to 145 ft/lbs. The last thing I did was put the wheel back on the car, lower the car completely back onto the ground, left the center cap off and torqued the bolt down. Snap the center cap back on, torque the wheel bolts down, and DONE!
    Last edited by FWP!; 05-03-2010 at 07:27 AM.
    2017 Camaro SS 1LE

  2. #2
    Veteran Member Four Rings beemercer's Avatar
    Join Date
    Aug 14 2008
    AZ Member #
    31944
    My Garage
    '90 Cq - '13 R
    Location
    obamaland

    Nice writeup, I'll be using it soon. Need to replace all 4.
    You represent the idiocy of today.

  3. #3
    Stage 2 Banner Advertiser Four Rings jaybquick@JHM's Avatar
    Join Date
    Aug 23 2005
    AZ Member #
    7701
    Location
    Lathrop, CA

    Nice write up. We keep these front wheel bearings in stock as well for the same price as your eBay guy. We also carry the hubs in case yours were very bad and hurt the hubs (rare).

    Check them out here in our store -> http://www.jhmotorsports.com/shop/ca...roducts_id=323

    We have the rear wheel bearings in stock as well -> http://www.jhmotorsports.com/shop/ca...roducts_id=382

    Hope this helps for those who don't like using ebay or want to buy all their parts in one place.


    JHMotorsports AZ tuner spotlight VIDEO
    Check out our 11 and 10 second passes on YouTube

    B8 S5 4.2l - JHM Stage 1 SC Kit (ET: 11.8 @ 119mph) -- B6 S4 - JHM Stage 2 SC Kit (ET: 11.1 @ 128mph) – JHM Nitrous (ET: 12.29 @ 117mph) - JHM Bolt Ons -ALL MOTOR (ET: 12.70 @ 111mph) -- B5 S4 - JHM RS6-R (ET: 10.8 @ 130mph)

  4. #4
    Veteran Member Four Rings
    Join Date
    Jun 18 2009
    AZ Member #
    43894
    Location
    Phoenix, AZ

    Update my post with your link, thanks!
    2017 Camaro SS 1LE

  5. #5
    Senior Member Three Rings alwaysaudi's Avatar
    Join Date
    Mar 11 2008
    AZ Member #
    26313
    My Garage
    2008 RS4, 2011 A3 2.0T Quattro, 73 MG Miget, 87 325is Chumpcar, 2000 323i SCCA racecar
    Location
    VIR

    Thanks FWP! just used this. Made it very easy. Don't know how you didn't have to hammer your out with the Rochester winters/salt...mine needed some persuasion from an 8lb friend.
    2008 Ibis RS4 Titanium package - Milltek CB - Stasis MS - H-sways F&R - EBwerk droplinks - JHM R3 clutch + LWFW - JHM LW Crank pulley - JHM IM spacers - Roti SNAs with 275 Supersports

  6. #6
    Established Member Two Rings VisionPaintball's Avatar
    Join Date
    Jun 26 2007
    AZ Member #
    19064
    Location
    Keyport,NJ

    where did the pictures go?
    '02 B5 S4 Avant

  7. #7
    Veteran Member Four Rings
    Join Date
    Jun 18 2009
    AZ Member #
    43894
    Location
    Phoenix, AZ

    Sorry, had to change web servers, I'll work on getting the pictures re-up'ed.


    edit: Photos re-uploaded, should be working now.
    Last edited by FWP!; 10-10-2010 at 11:08 AM.
    2017 Camaro SS 1LE

  8. #8
    Established Member Two Rings VisionPaintball's Avatar
    Join Date
    Jun 26 2007
    AZ Member #
    19064
    Location
    Keyport,NJ

    wow thanks!!!

    Im doing it now and cant seem to get enough space to get the triple square bit on the bolt.
    Any tips?
    '02 B5 S4 Avant

  9. #9
    Senior Member Three Rings
    Join Date
    Aug 05 2008
    AZ Member #
    31615
    Location
    Boston

    Guys how easy is to push the hub/bearing assembly out of the control arm once the 4 torx screws are removed? Is it stuck in there? My indy mechanic gave me some BS that he needs to take the control arm off/blah blah...this doesn't look all that bad (?)

    Thanks!

  10. #10
    Established Member Two Rings VisionPaintball's Avatar
    Join Date
    Jun 26 2007
    AZ Member #
    19064
    Location
    Keyport,NJ

    When I did my wifes car, they came out with a few blows from a dead hammer. On my car I had to take the whole assembly out and hit the bearing out from behind using a 1/2" socket extension. Not too hard just more time consuming.
    '02 B5 S4 Avant

  11. #11
    Veteran Member Four Rings sa_seahawker's Avatar
    Join Date
    Sep 03 2009
    AZ Member #
    47282
    Location
    San Antonio, TX

    great write-up! I will be using this one when I swap out my control arms.
    "Some people wear Superman pajamas, but Superman wears Russell Wilson pajamas..."

    "Amy" 2003 A4 1.8TQM - Amulet Red
    440cc Green Giants | Motoza 1+ | ER FMIC | forge 007 DV | Magnaflow 16601 | TT DP | 034 HFC
    H&R Sports | Koni yellows | VMR 19ET38 708s | 235/35R19 Goodyear Eagle GTs
    MY BUILD

  12. #12
    Senior Member Three Rings
    Join Date
    Aug 05 2008
    AZ Member #
    31615
    Location
    Boston

    Quote Originally Posted by VisionPaintball View Post
    When I did my wifes car, they came out with a few blows from a dead hammer. On my car I had to take the whole assembly out and hit the bearing out from behind using a 1/2" socket extension. Not too hard just more time consuming.
    What does it take to take the assembly out from the car? This control arm is connected at the top correct? Do you have to take the ball joints out? One thought was that if you can get the hub/bearing without taking out the control arm then the car does not need an alignment? Thoughts?

  13. #13
    Senior Member Three Rings jonnybravo's Avatar
    Join Date
    Nov 23 2009
    AZ Member #
    51152
    Location
    San Jose

    How did you know yours were going bad?

  14. #14
    Senior Member Two Rings 4Ring's Avatar
    Join Date
    Oct 08 2010
    AZ Member #
    65438
    Location
    Seattle, WA

    You can usually hear the groaning repetitive noise with every rotation that speeds up as you go faster and slows down as you go slower.

  15. #15
    Stage 2 Banner Advertiser Four Rings ECS Tuning-Audi's Avatar
    Join Date
    Oct 02 2006
    AZ Member #
    70746
    Location
    Wadsworth,OH

    Front wheel bearing kits for the left and right side available below with FREE shipping!!

    Click HERE to order or for more information.

    Cheers!

    Jason

  16. #16
    Established Member Two Rings
    Join Date
    Mar 05 2009
    AZ Member #
    39484
    Location
    Martinez%2C%20CA%20

    Yep! I did one of mine, about to do the other. I guess both my wheel bearings were bad because after doing one side, I have less noise, but it isn't gone. I made my best guess as to the side, since the wubba wubba sound didn't seem to change much with steering or engine load. I also rotated the tires to make sure it was not a cupped tire.

    I found the bearing carrier flange part came out pretty easily without removing the control arms, but it took some time tapping it from the back. I took my triple square tool with an extension in the back of each loose bolt, and tapped it with a medium sized ball peen hammer, working around doing a bit on each bolt, loosening them a bit as it progresses it's way out.

    If I was a pro mechanic, I would probably find a faster way to do it, but I'm not on anybody's clock but my own. Took about 15 minutes, IIRC.

    I think the Bentley manual suggested not doing this method, but I don't see the harm as long as you don't let it get too cockeyed on the way out.

    So the Bentley manual says to replace the brake caliper bolts each time you remove them. Seems a bit excessive to me. Those bolts are BEEFY and short, so I can't imagine they are stretch bolts like the head bolts. My pessimistic theory is that they just like to run up the parts bill with some of these. I can see if the bolts are boogered up or something, but these things are not cheap. They don't look particularly special to me, other than the captive serrated washers, so I wonder what this recommendation is based on. Anybody know?

    I do have new 12 point bolts and the main 17mm axle bolt.

  17. #17
    Senior Member Three Rings MoRbiD's Avatar
    Join Date
    Sep 06 2004
    AZ Member #
    3399
    My Garage
    2005 Audi A4 1.8TQ 6MT
    Location
    Rochester, NY

    Bringing this thread back

    After reading the OP DIY and being from the same town I had guts to give it a shot.
    I love working on my cars and boy did I have a Front Bearing that needed replacement.

    I was able to snag a NIB Genuine Audi replacement hub off fleabay for $100.00 and ordered the bearing kit for $135.00.
    So far so good. I can have a hub and bearing assembly all set up and ready to go. Just jack up the car and follow the procedure.
    Sadly it wasn't to be.

    1st off when I took the Hub and Bearing to the local Audi Service Center the Service Manager told me he couldn't press them together. This after trying
    the local Pep Boys which couldn't do it that day cuz they were too busy.

    Apparently VAG/VAS Tools has a mobile hydraulic press now for pressing on and off the hub and bearings. Manual shop press is somewhere
    in the back of the shop collecting dust and no one was even sure what plates to use with it anymore.
    He gave me some tips one how to go about getting both parts pressed together but for the sake of brevity I'll exclude them here.

    Luckily on the way home I stopped by a shop that specializes in racing and the guy had them pressed together in less than 7 minutes.

    The next day was Saturday and I was chomping at the bit to do some wrenching. Followed this thread and was able to get the axle out about as far
    as stated using a wobble extension on the triple square bit for the back bolts. Snapped the head on one breaker bar getting the axle bolt broke free though.
    I'm a buck 80 and I had to lean on the ratchet handle with all I had to break them though. All told I'm only into it for about 1 hour and a half.

    Well I was ready for the money shot actually dropping the old hub/bearing and putting in the new one's but hit another snag.
    The bearing was seized onto the carrier. I banged, swore and prayed to the almighty but nothing was removing that bearing from the front.

    That cost me an additional two/three hours. I thought about following the repair procedure in Elsa which I have and then trying to knock it out from the back.

    However after reading so many horror stories about the Pinch Bolt for the Upper Control Arms and getting the ABS Sensor out which the manual says needs to be removed
    I decided discretion was the better part of valor and put everything back together before I broke something. I felt like a wus, 5 hours and I completely failed at the task.
    I started the project at 4:00 PM and it was now close to 10 before I had closed shop for the day.

    To add insult to injury, now the bearing was making more noise than before so I had to take the car to the Service Center to install the parts bright and early Monday AM.

    They charged me the full price for labor, $263.00, even though they were not re-using the old hub and I brought them the a new bearing/hub already assembled.
    Although the Shop Manual states that's how it goes in, the claim was with the new mobile press they have a new procedure and having the items assembled made for more work.

    Okay this post has been long and if your still with me I'll get to the point.

    We live in a area where Winters are close to 6 months long with lots of snow which means plenty of salt on the roads. Fact of the matter is unless you live somewhere
    where there is little moisture at all undercar parts are likely to be be corroded and seized together. You should have a plan to deal with that circumstance.

    Also if your planning to save some time and money buy assembling the parts yourself check with who your going to have do the work.

    To end up spending $263.00 after wasting so much time driving around town trying to get the assembly pressed together combined with fighting a part I had no hope in breaking
    free I would have gladly brought a tool like the Sir Tools B90 upfront. Allowing me to enjoy the satisfaction we all get when we do a job right ourselves.
    USP CLUB MEMBER #3399

  18. #18
    Established Member Two Rings AndreyMan's Avatar
    Join Date
    Nov 22 2011
    AZ Member #
    84269
    Location
    Montreal, QC, Canada

    Bump up from today...

    So this is good for any B6 model vehicle? I always thought that our cars had the wheel bearing without the 4 ears and it had to be pressed into the assembly that is held by the control arms... Does that apply to older models?

  19. #19
    Established Member Two Rings AndreyMan's Avatar
    Join Date
    Nov 22 2011
    AZ Member #
    84269
    Location
    Montreal, QC, Canada

    any1?

  20. #20
    Veteran Member Four Rings Slow4's Avatar
    Join Date
    Dec 02 2007
    AZ Member #
    23048
    My Garage
    2020 Ford PIU, 2017 D675R
    Location
    DC/MD/(VA)

    Quote Originally Posted by AndreyMan View Post
    Bump up from today...

    So this is good for any B6 model vehicle? I always thought that our cars had the wheel bearing without the 4 ears and it had to be pressed into the assembly that is held by the control arms... Does that apply to older models?
    Old bump but I think you're referring to the B5s.

    I will be conducting this DIY tomorrow. Wish me luck
    2015 B8 SQ5
    Click Here
    ---
    Past
    2001 B5 S4 | 2005 B6 S4 AVANT | 2013 Allroad P+ | 2013 B8.5 A4 P+


  21. #21
    Stage 2 Banner Advertiser Four Rings ECS Tuning-Audi's Avatar
    Join Date
    Oct 02 2006
    AZ Member #
    70746
    Location
    Wadsworth,OH

    B6/B7 A4's have flanged front wheel bearings and press in rear wheel bearings. B6/B7 S4's have front and rear flanged bearings.

    Jason

  22. #22
    Veteran Member Four Rings Slow4's Avatar
    Join Date
    Dec 02 2007
    AZ Member #
    23048
    My Garage
    2020 Ford PIU, 2017 D675R
    Location
    DC/MD/(VA)

    My .02 to the DIY:

    Quote Originally Posted by FWP! View Post
    [B]- 12mm triple square
    I cannot emphasize this enough, GO BUY A SET OR SPECIAL ORDER SOME BECAUSE YOU WILL NOT FIND A TRIPLE SQUARE SOCKET IN MOST STORES. I had a wrench set that I ended up cutting in half with an angular grinder because it was too long to sit properly into the triple square (12-point) and it stripped one of the bolts.


    Stripped 12-point (triple square) bolt


    Standard 1/2" 12mm 12-pt (triple square) tip, 1/2" wrench and modified 1/2" 12mm 12-pt tip. The triple square tips CAN be found at AutoZone or AAP if you cannot get your hands on a socket set.

    As a result of the stripped 12-pt bolt, I had to enlist the help of my dad and we angle grinded through the bolt to get the bearings off.


    This was a last ditch effort to get the stripped bolt off; be very careful if attempting this.


    The other troubling part MIGHT be the torx "screw" holding the rotor to the wheel hub, be VERY gentle with this and attempt to apply a LOT of PB. I ended up stripping the head and having to drill the center out.


    The torx screw literally welded to the rotor.


    Drilling it out (this is a last ditch effort if all other methods failed, be very careful if approaching this method)


    Lastly, if the caliper doesn't come off as easy as the OP made it seem, you can gently slip a flathead in between the rotor and the pad (containing the piston heads) to dislodge it.
    2015 B8 SQ5
    Click Here
    ---
    Past
    2001 B5 S4 | 2005 B6 S4 AVANT | 2013 Allroad P+ | 2013 B8.5 A4 P+


  23. #23
    Established Member Two Rings
    Join Date
    May 26 2012
    AZ Member #
    94132
    Location
    Høng, Denmark

    Front wheel bearing replacement

    Tried using this DIY.. Ruined one of the bearing bolts.. But its by far the easiest way.. Just make sure the bit is all the way in te bolt before turning..
    Now I need to get the hole carrier off, and drill it out..

    The Allen is quite large, not sure it a 17 mm.. More likely 25-35 mm

    And for the bearing bolt, its about a T55 and remember to get in 1/2" socket..
    Or else You wont get enough torque..

  24. #24
    Senior Member Two Rings Danne_gg's Avatar
    Join Date
    Oct 17 2009
    AZ Member #
    49359
    My Garage
    Touareg TDI 2012, Lupo GTi track car,Audi A1 TDI, Arctic Panthera 550, Coronet 24 weekender(boat)
    Location
    Stockholm, Sweden

    Thanks for a great writeup! Done front right, doing front left in a few weeks.
    Anyone got a DIY of rear bearings? A4 B7 2.0tq
    Thanks anyhow!

  25. #25
    Veteran Member Three Rings vwnobby's Avatar
    Join Date
    Mar 30 2009
    AZ Member #
    40525
    My Garage
    '07 A4 S Line / '97 Jetta GLX (sold) / '96 FZR600
    Location
    NJ

    Thanks for the write up. I started hearing a grinding noise this yesterday and it seems like its the passenger bearing. Hoping it's not the CV or something else. This DIY will definitely help!!
    2.0T MTQ | Revo Stage II+ | APR HPFP | 034 Engine Mounts | 034 HFC | 034 Turbo Inlet | ER SMICs | TT 2.5" DP | Magnaflow 16601 DP back | K&N Drop in filter | ECS Snub mount | RS4 Rear Sway bar kit | B5 lowering caps | "D" piston DV | TyrolSport Caliper Bushings | S4 Front Calipers/Carriers/Rotors | Goodrich SS lines | StopTech Street Performance Pads (Porterfield R4 for track) | AWE Vent Boost Gauge | NGK (4644) BKR7E (replaced NGK Iridium BKR7EIX-11)

  26. #26
    Senior Member Three Rings biglip's Avatar
    Join Date
    Oct 11 2010
    AZ Member #
    65549
    My Garage
    06 cadillac SRX V8
    Location
    ontario canada

    i just took apart my bearing on the front driver side. do u need a press to take the old one out? i got the tire mounting hub out but the rest is stuck....

  27. #27
    Veteran Member Four Rings
    Join Date
    Jun 18 2009
    AZ Member #
    43894
    Location
    Phoenix, AZ

    Quote Originally Posted by dantm View Post
    What does it take to take the assembly out from the car? This control arm is connected at the top correct? Do you have to take the ball joints out? One thought was that if you can get the hub/bearing without taking out the control arm then the car does not need an alignment? Thoughts?
    You don't have to do any of that. After you take out the axle and the hub bolts from the back side of the spindle/knuckle, the hub should pop out of there either with a few hits of a hammer, or in my case it just popped out with the push of a finger.

    The part that has to get pressed out at a shop is the actual bearing, and then press the new bearing back into the original hub.

    Quote Originally Posted by jonnybravo View Post
    How did you know yours were going bad?
    Was making a moaning noise that got louder and higher pitched the faster I went.

    Quote Originally Posted by AndreyMan View Post
    Bump up from today...

    So this is good for any B6 model vehicle? I always thought that our cars had the wheel bearing without the 4 ears and it had to be pressed into the assembly that is held by the control arms... Does that apply to older models?
    Yes, any B6.

    Quote Originally Posted by vwnobby View Post
    Thanks for the write up. I started hearing a grinding noise this yesterday and it seems like its the passenger bearing. Hoping it's not the CV or something else. This DIY will definitely help!!
    Glad it could help!

    Quote Originally Posted by biglip View Post
    i just took apart my bearing on the front driver side. do u need a press to take the old one out? i got the tire mounting hub out but the rest is stuck....
    Yea, the bearing is pressed in. I took the whole assembly (hub with bearing) to a Midas Muffler shop near me, gave them $20 and they pressed it out and pressed in the new one.
    2017 Camaro SS 1LE

  28. #28
    Veteran Member Four Rings aluthman's Avatar
    Join Date
    Mar 24 2013
    AZ Member #
    111961
    Location
    Oakdale, CT

    I'm installing new bearings in some replacement steering spindles that I bought for my car. (I broke the tabs off on each side for the pinch bolt while installing my coilovers ) Thanks for the write up! The whole process is much easier with the spindle off the car.
    -Adam

    '07 DTM A4 2.0T|6MT|EFR 7163 Twin Scroll|DoTuning|Built Motor|Meth and other go fast stuff…
    '06 A4 2.0T Quattro - RIP (Best ¼ mile pass 13.634 @ 103.30)

  29. #29
    Senior Member Three Rings
    Join Date
    Oct 24 2006
    AZ Member #
    12843
    Location
    River Oaks

    Great write up! I'm doing this tomorrow. How long did it take? I'm asking because I think im in way over my head as I'm not a master tech like all of you!!

  30. #30
    Established Member Two Rings paul61's Avatar
    Join Date
    Mar 11 2013
    AZ Member #
    111151
    Location
    Waterloo, Ontario, Canada

    Good write up!
    Thx for your efforts.
    FYI...........Local Audi Stealer wanted $900+ tax (13%) to install a front pr..........and told me I needed an alignment ($150) ! LMFAO!
    Their hub was $240 (each) with a 1 year warranty.
    Local parts guy's is $138, with a 3 yr warranty.
    STEALERS
    B6-S4 6M, Black on Black
    B5-S4 6M, Black on Black

  31. #31
    Veteran Member Four Rings
    Join Date
    Jun 18 2009
    AZ Member #
    43894
    Location
    Phoenix, AZ

    Yea, as long as you can get that triple square socket and can get it to a local shop that can press out the old bearing and get the new one in, it's a fairly straight forward job. The triple square bits can be found on amazon, I have a full set I bought recently for only like $30 and they are great.
    2017 Camaro SS 1LE

  32. #32
    Veteran Member Three Rings Brens's Avatar
    Join Date
    Jan 07 2012
    AZ Member #
    86332
    My Garage
    B5 S4, MK1 TT 225, 3rd Gen Tacoma, 3rd Gen 4Runner
    Location
    Charleston, SC

    Just did this job on my drivers side bearing. it was really onto the spindle and took a lot of beating and still didn't come out. If yours is seized like mine, take the axle out and hit the back side of the bearing with an air hammer and it should pop out no problem.

    Thought I'd share for future reference.

    Sent from my SCH-I605 using Tapatalk
    -Brendan

    Brilliant Black B6 A4 Avant - 5spd 1.8T - Recaro - RNS-E - VMR - Daz - Woody Insides - Clutch/ Tune - Pink Coolant

  33. #33
    Veteran Member Four Rings Knives1010's Avatar
    Join Date
    Mar 17 2014
    AZ Member #
    157778
    My Garage
    2006 Dodge Charger SE, 96 K2500 Suburban
    Location
    Tacoma, Wa

    I can't break loose the caliper bolts, I've soaked them in penetrating oil, any other tricks? I don't have an impact wrench


    Sent from my iPhone using Tapatalk
    Oscar "The Grouch": Is now dead thanks to a drunk driver RIP

  34. #34
    Veteran Member Three Rings Brens's Avatar
    Join Date
    Jan 07 2012
    AZ Member #
    86332
    My Garage
    B5 S4, MK1 TT 225, 3rd Gen Tacoma, 3rd Gen 4Runner
    Location
    Charleston, SC

    Try heat maybe. be very careful.

    What I did was put a 21mm wrench on it and tap the end with a 3lb hammer. Gave it some good whacks! That's what worked for me, and the bolts are pretty strong.

    Sent from my SCH-I605 using Tapatalk
    -Brendan

    Brilliant Black B6 A4 Avant - 5spd 1.8T - Recaro - RNS-E - VMR - Daz - Woody Insides - Clutch/ Tune - Pink Coolant

  35. #35
    Veteran Member Four Rings Knives1010's Avatar
    Join Date
    Mar 17 2014
    AZ Member #
    157778
    My Garage
    2006 Dodge Charger SE, 96 K2500 Suburban
    Location
    Tacoma, Wa

    Ended up getting my pivoting ratchet and fitting a cheater bar to it but thanks=)


    Sent from my iPhone using Tapatalk
    Oscar "The Grouch": Is now dead thanks to a drunk driver RIP

  36. #36
    Veteran Member Four Rings Knives1010's Avatar
    Join Date
    Mar 17 2014
    AZ Member #
    157778
    My Garage
    2006 Dodge Charger SE, 96 K2500 Suburban
    Location
    Tacoma, Wa


    Pretty sure mine is bad


    Sent from my iPhone using Tapatalk
    Oscar "The Grouch": Is now dead thanks to a drunk driver RIP

  37. #37
    Veteran Member Three Rings Baggio's Avatar
    Join Date
    Aug 28 2013
    AZ Member #
    121985
    Location
    University Heights, OH

    I just did my front passenger side wheel bearing and I also replaced the CV axle shaft because the boot was ripped near where it mounts to the transmission. The drivers side is making a slight noise, so I will be replacing that bearing as well. I checked the CV axle shaft on that side and the boots are intact, so I will just be doing the wheel bearing. This write up helped a lot. I am going to buy SKF bearing from ECS, because it comes with the bearing in a new housing and you don't have to take it to a shop the press on the bearing. It just bolts right up.
    2015 Daytona Gray Pearl Effect Audi S3 Quattro | Daytona 1 PKG | USP Motorsports interior LEDs |
    | APR Stage 2 ECU 93 HT & TCU tune | K&N | rain tray delete from airbox | REVO CF intake scoop | Spulen turbo inlet hose | APR turbo muffler delete |
    | APR IC | CTS Turbo inlet, outlet, and throttle pipes | Neuspeed 3" catted downpipe | 034 dogbone mount insert | 034 rear subframe inserts | Spulen intake coolant hose | ECS SS brake lines |

  38. #38
    Veteran Member Three Rings Brens's Avatar
    Join Date
    Jan 07 2012
    AZ Member #
    86332
    My Garage
    B5 S4, MK1 TT 225, 3rd Gen Tacoma, 3rd Gen 4Runner
    Location
    Charleston, SC

    What were your symptoms of a bad bearing?

    Sent from my SCH-I605 using Tapatalk
    -Brendan

    Brilliant Black B6 A4 Avant - 5spd 1.8T - Recaro - RNS-E - VMR - Daz - Woody Insides - Clutch/ Tune - Pink Coolant

  39. #39
    Veteran Member Four Rings Knives1010's Avatar
    Join Date
    Mar 17 2014
    AZ Member #
    157778
    My Garage
    2006 Dodge Charger SE, 96 K2500 Suburban
    Location
    Tacoma, Wa

    Clicking, wandering steering and if you jack up the car the wheel will have up and down play


    Sent from my iPhone using Tapatalk
    Oscar "The Grouch": Is now dead thanks to a drunk driver RIP

  40. #40
    Established Member Two Rings Newman378's Avatar
    Join Date
    Mar 14 2014
    AZ Member #
    156139
    My Garage
    2001 BMW X5 4.4
    Location
    SF Bay Area, CA

    Great DIY, I'm replacing the wheel hub/spindle as well and I'm not sure how to remove it from the lower arms. Everything is unbolted already. Any suggestions?


Tags for this Thread

Bookmarks

Posting Permissions

  • You may not post new threads
  • You may not post replies
  • You may not post attachments
  • You may not edit your posts
  •  


    © 2001-2025 Audizine, Audizine.com, and Driverzines.com
    Audizine is an independently owned and operated automotive enthusiast community and news website.
    Audi and the Audi logo(s) are copyright/trademark Audi AG. Audizine is not endorsed by or affiliated with Audi AG.