Audizine - An Automotive Enthusiast Community

Page 4 of 8 FirstFirst ... 23456 ... LastLast
Results 121 to 160 of 295
  1. #121
    Veteran Member Four Rings thenofjboy's Avatar
    Join Date
    Oct 08 2007
    AZ Member #
    21636
    My Garage
    08 S-line QMT6 , B5 KO4 & my german sheppard
    Location
    Jersey City

    Guest-only advertisement. Register or Log In now!
    I had the same problem with mine when I installed it. It was leaking a little and I thought it was the O ring but it turned out to be that the heater supply line wasn't seated correctly in the coolant flange. The clip was on but I could just pull out the heater line. I thought the clip was upside down but I didnt put the heater line on far enough. It was kinda a PIA, but you will feel it click in/seat on the flange and you will be good to go.

    GL
    Sean

    The New
    B7---GIAC--BBS--DDM--JHM+S4Exhaust--StaSIS SS--034--AudiUP--USP--RedEBC--IE--DrakesVC#12--B7S4 Brakes--StopTech--GFB DV+--

    The Old
    B5---GIAC-K04--RACETEC--APR--DEPO--AUTOTECH--VMR--FORGE--034--H&R--BILSTEIN--FUJITA

  2. #122
    Veteran Member Four Rings shiro1745's Avatar
    Join Date
    Jul 26 2009
    AZ Member #
    45522
    Location
    DMV Area

    It has been asked twice and no answer. Does anybody know if the oring that goes into the heater core hose is sold separately? It just seems crazy if you have to buy the whole hose which is around $100 for only an oring.

    I have a leak back there since I installed a new flange a few months ago and replaced that old oring with a universal one. It seems it wasn't a perfect fit.
    - Chip

    K0R-GT -- S3 injectors -- Maestro tune -- IE Drop-in rods

    "It took 4 bad crankshaft seals and lots of cursing to build my avatar"

  3. #123
    Veteran Member Four Rings aluthman's Avatar
    Join Date
    Mar 24 2013
    AZ Member #
    111961
    Location
    Oakdale, CT

    Quote Originally Posted by shiro1745 View Post
    It has been asked twice and no answer. Does anybody know if the oring that goes into the heater core hose is sold separately? It just seems crazy if you have to buy the whole hose which is around $100 for only an oring.

    I have a leak back there since I installed a new flange a few months ago and replaced that old oring with a universal one. It seems it wasn't a perfect fit.
    https://www.ecstuning.com/Search/Sit...ES2469/ES2469/

    I found this^ Cheap enough to give it a shot.

    Edit:

    You could also buy this guy and just steal the o-ring from it. I would imagine these types of connectors are the same size from a B6.

    https://www.ecstuning.com/ES251611/
    -Adam

    '07 DTM A4 2.0T|6MT|EFR 7163 Twin Scroll|DoTuning|Built Motor|Meth and other go fast stuff…
    '06 A4 2.0T Quattro - RIP (Best ¼ mile pass 13.634 @ 103.30)

  4. #124
    Veteran Member Four Rings fly300kts's Avatar
    Join Date
    Oct 16 2008
    AZ Member #
    34255
    My Garage
    03 Golf GTI - 03 Golf 2.0l - 04 Golf 2.0L
    Location
    South Florida - Ft Lauderdale

    Quote Originally Posted by shiro1745 View Post
    It has been asked twice and no answer. Does anybody know if the oring that goes into the heater core hose is sold separately? It just seems crazy if you have to buy the whole hose which is around $100 for only an oring.

    I have a leak back there since I installed a new flange a few months ago and replaced that old oring with a universal one. It seems it wasn't a perfect fit.
    Just ask and you will be served


    Phil

  5. #125
    Veteran Member Four Rings aluthman's Avatar
    Join Date
    Mar 24 2013
    AZ Member #
    111961
    Location
    Oakdale, CT

    Pretty sure he was referring to the o-ring inside the quick disconnect fitting that goes to the heater core.
    -Adam

    '07 DTM A4 2.0T|6MT|EFR 7163 Twin Scroll|DoTuning|Built Motor|Meth and other go fast stuff…
    '06 A4 2.0T Quattro - RIP (Best ¼ mile pass 13.634 @ 103.30)

  6. #126
    Veteran Member Four Rings Charles.waite's Avatar
    Join Date
    Jun 27 2011
    AZ Member #
    77478
    Location
    Seattle, WA

    I always found it ironic they call those quick disconnect fitting considering how much of a pain they are to get on and off sometimes.
    -CP
    2008 2.0t S-Line Ti 6MT Avant
    2017 Q7 3.0t
    SOLD -- 2012 Q5 2.0t - Stock Mommy Missile with new timing chains
    Former USP CLUB MEMBER #136
    2004 A4 1.8TQ 6MT USP - APR Stage 1+ - FSI Coils - BKR7EIX-11 - B6S4 Front + B7A4 Rear Brakes - 034 Street Trans Mount
    SOLD -- 2006 A4 2.0TQ Avant Tiptronic

  7. #127
    Veteran Member Four Rings aluthman's Avatar
    Join Date
    Mar 24 2013
    AZ Member #
    111961
    Location
    Oakdale, CT

    Quote Originally Posted by Charles.waite View Post
    I always found it ironic they call those quick disconnect fitting considering how much of a pain they are to get on and off sometimes.
    I've never had much trouble with them. Trying to unstick rubber hoses held on with spring clamps is a completely different story though.
    -Adam

    '07 DTM A4 2.0T|6MT|EFR 7163 Twin Scroll|DoTuning|Built Motor|Meth and other go fast stuff…
    '06 A4 2.0T Quattro - RIP (Best ¼ mile pass 13.634 @ 103.30)

  8. #128
    Veteran Member Four Rings shiro1745's Avatar
    Join Date
    Jul 26 2009
    AZ Member #
    45522
    Location
    DMV Area

    Quote Originally Posted by fly300kts View Post
    Just ask and you will be served


    Phil
    Thanks Phil, but Adam is right. It's the oring inside the heater core hose that clips onto the flange.
    - Chip

    K0R-GT -- S3 injectors -- Maestro tune -- IE Drop-in rods

    "It took 4 bad crankshaft seals and lots of cursing to build my avatar"

  9. #129
    Veteran Member Four Rings shiro1745's Avatar
    Join Date
    Jul 26 2009
    AZ Member #
    45522
    Location
    DMV Area

    Quote Originally Posted by aluthman View Post
    https://www.ecstuning.com/Search/Sit...ES2469/ES2469/

    I found this^ Cheap enough to give it a shot.

    Edit:

    You could also buy this guy and just steal the o-ring from it. I would imagine these types of connectors are the same size from a B6.

    https://www.ecstuning.com/ES251611/
    Wow I didn't even know they sell that end connector by itself. I already bought this https://www.ecstuning.com/ES2627307/

    but decided to buy the oem end connector you linked too. One of these two should work.

    Thanks!
    - Chip

    K0R-GT -- S3 injectors -- Maestro tune -- IE Drop-in rods

    "It took 4 bad crankshaft seals and lots of cursing to build my avatar"

  10. #130
    Veteran Member Four Rings klrider44's Avatar
    Join Date
    Aug 20 2014
    AZ Member #
    276508
    Location
    Doylestown PA

    So I found a leak coming from the coolant flange recently. After reading through this thread I'm not sure if I am gonna try this myself. I was planning on getting this kit from ECS:
    https://www.ecstuning.com/Audi-B7_A4....0T/ES2770995/

    Should I plan on purchasing anything else just in case. Such as the hoses possibly.

  11. #131
    Senior Member Three Rings
    Join Date
    Aug 04 2015
    AZ Member #
    346828
    Location
    Kansas City

    Quote Originally Posted by klrider44 View Post
    So I found a leak coming from the coolant flange recently. After reading through this thread I'm not sure if I am gonna try this myself. I was planning on getting this kit from ECS:
    https://www.ecstuning.com/Audi-B7_A4....0T/ES2770995/

    Should I plan on purchasing anything else just in case. Such as the hoses possibly.
    I'm planning to do this in a couple weeks. Looks like a pain, but certainly manageable with time and proper tools. My only suggestion would be to buy an OEM kit instead of aftermarket. I've heard that the cheap kits sometimes fail within a year and this is the type of job that you only want to do once. I'm planning to buy hoses as well.

  12. #132
    Veteran Member Four Rings Der Konig's Avatar
    Join Date
    Jul 09 2009
    AZ Member #
    44777
    My Garage
    '06 a4 2.0T 6MTQ, S3 '01.5 s4 avant 6speed, '12 KO4 Audi Q5
    Location
    Cleveland OH Area

    I think the oring for the coolant temp sensor and the heater hose is the same isn't it?

    '04 Corvette Z06 track car
    '15 F350 Platinum 6.7
    '06 APR S2+ A4 2.0T 6 Speed DD - current
    '12 Q5 2.0T P+ Built engine/CTS K04/IE tune - current
    '05 Ford F250 XLT 4x4 BP'd 6.0 - current
    '01.5 APR S3 S4 Avant 6 Speed - sold '04 Goodwood S4 6 Speed - sold '91 Jetta GL 1.8 8v manual swap - sold '99 SVT Cobra 08whp/308wtq - sold '01 Mustang GT - sold '88 Mustang LX 5.0 - sold '95 Jeep Cherokee Country - sold

  13. #133
    Registered Member One Ring
    Join Date
    Sep 23 2015
    AZ Member #
    357367
    My Garage
    2006 Audi A4 2.0t Quattro
    Location
    Ottawa, Ontario

    can you repost photos I can't see them really need this done


    Sent from my iPhone using Tapatalk

  14. #134
    Active Member One Ring
    Join Date
    Feb 07 2013
    AZ Member #
    109087
    Location
    NEW YORK

    This is my first and last audi ....I am tired of fixing things every other weekend. This car has so many issues that I can't keep count. I first experienced cam follower issue along with hpfp 6 months after I bought this vehicle from a private party. Dealer replaced cam follower and hpfp under 100 mile extended warranty and they also fixed vacuum issue which i was charged about $500. I have been since maintaining it myself in order to avoid high dealer cost. After 20k miles later, the engine blew up which I opened a case with AOA but no success. I bought an used engine and had a local mechanic installed it but there was another with camshaft on used engine. The used engine had camshaft issue which it later cost me more $$$ to repair. I dont know why audi engineers were thinking when they decided to engineering this car with cheap parts and most difficult to replace at high cost. Today, I spent half of my day trying to replace this plastic flange. Tomorrow morning, I need to go back to store to get more tools so I can replace a part that I can't see. Just wanted to say that audi engineers are piece of sh.. Sorry guys I am just venting.

  15. #135
    Veteran Member Three Rings allstock's Avatar
    Join Date
    Mar 19 2014
    AZ Member #
    159879
    Location
    greater sub of Chicago


    We've all experienced something like this. But yours does suck royally. I hear ya

  16. #136
    Veteran Member Four Rings Audibot's Avatar
    Join Date
    May 20 2010
    AZ Member #
    59252
    Location
    Maryland

    Sounds like you've just had a string of bad luck. I had a small hit of bad luck last year to the tune of $2k, but never on any car experienced what you have. You win some; you lose some.

  17. #137
    Veteran Member Four Rings Charles.waite's Avatar
    Join Date
    Jun 27 2011
    AZ Member #
    77478
    Location
    Seattle, WA

    Quote Originally Posted by Audibot View Post
    Sounds like you've just had a string of bad luck. I had a small hit of bad luck last year to the tune of $2k, but never on any car experienced what you have. You win some; you lose some.
    This. It's not an Audi issue with yours. You just bought a very neglected one. Or a lemon.
    -CP
    2008 2.0t S-Line Ti 6MT Avant
    2017 Q7 3.0t
    SOLD -- 2012 Q5 2.0t - Stock Mommy Missile with new timing chains
    Former USP CLUB MEMBER #136
    2004 A4 1.8TQ 6MT USP - APR Stage 1+ - FSI Coils - BKR7EIX-11 - B6S4 Front + B7A4 Rear Brakes - 034 Street Trans Mount
    SOLD -- 2006 A4 2.0TQ Avant Tiptronic

  18. #138
    Veteran Member Four Rings Audibot's Avatar
    Join Date
    May 20 2010
    AZ Member #
    59252
    Location
    Maryland

    Speaking of lemons... something to keep in mind if you're in that local area: if you're going to buy a new car, buy in NJ. Its lemon laws are pretty good

  19. #139
    Active Member One Ring Rody_C's Avatar
    Join Date
    Mar 04 2016
    AZ Member #
    369737
    Location
    San Diego

    Quote Originally Posted by Der Konig View Post
    I think the oring for the coolant temp sensor and the heater hose is the same isn't it?
    Same question, and any advice to remove the heater hose, thanks

  20. #140
    Established Member Two Rings
    Join Date
    Jan 24 2010
    AZ Member #
    53884
    Location
    norcal

    How the hell did you all get the bottom coolant hose connector(pointing at transmission) and the driver side coolant hose connection that are connected to the coolant flange?

    I've removed vacuum pump(that was kind of a pain to finagle and remove)

    I removed the 2-t30 connecting the flange to the block. Removed coolant temp sensor. Also disconnected the coil pack wire harness to get some extra room.

    I've removed the metal U pin/connector from the coupler that attaches to the bottom of coolant flange via prying it with an extra long screwdriver. Still can't seem to remove the two coolant hoses without cutting?


    Sent from my iPhone using Audizine mobile app

  21. #141
    Established Member Two Rings
    Join Date
    Sep 26 2013
    AZ Member #
    123897
    Location
    Ohio

    Quote Originally Posted by ksteezy View Post
    How the hell did you all get the bottom coolant hose connector(pointing at transmission) and the driver side coolant hose connection that are connected to the coolant flange?

    I've removed vacuum pump(that was kind of a pain to finagle and remove)

    I removed the 2-t30 connecting the flange to the block. Removed coolant temp sensor. Also disconnected the coil pack wire harness to get some extra room.

    I've removed the metal U pin/connector from the coupler that attaches to the bottom of coolant flange via prying it with an extra long screwdriver. Still can't seem to remove the two coolant hoses without cutting?


    Sent from my iPhone using Audizine mobile app
    Check out my post:

    http://www.audizine.com/forum/showth...1#post11116211

    Once I got the lower hose loose, I tapped it with a long pry bar on the lip a few times and it popped off.

  22. #142
    Established Member Two Rings
    Join Date
    Jan 24 2010
    AZ Member #
    53884
    Location
    norcal

    Quote Originally Posted by M0E7 View Post
    Check out my post:

    http://www.audizine.com/forum/showth...1#post11116211

    Once I got the lower hose loose, I tapped it with a long pry bar on the lip a few times and it popped off.
    I tried tapping the lower hose lip with a screwdriver but it doesn't seem to budge, I even cracked it just a bit(still ok but refer to pics below). The first 2 pics show the lip of the lower coolant flange hose unable to remove. POV is from above firewall facing towards front bumper. The last 2 pics are from the Downpipe/pass side area showing the upper coolant flange hose that also isn't budging.

    I was able to loosen the hose clamps on the upper coolant flange pointing towards the driver side but the hose seemed stuck.

    I wasn't able to use your advice and remove the hardline with the flange attached because unable to remove that lower quick connect hose on the flange...

    Anyone have tips?! I've read everything here and even tried pb blaster on the plastic quick connect lower flange hose...might have to pay to see what magic tricks the Indy guy does


    Sent from my iPhone using Audizine mobile app

  23. #143
    Established Member Two Rings
    Join Date
    Jan 24 2010
    AZ Member #
    53884
    Location
    norcal

    Update: so I got the coolant flange off and the quick connect.

    Tips for lower flange hose/heater supply quick connect: use a fatter sized flathead screwdriver about 12 inches long to tap from above after removing metal retaining clip. I had a 8" long one but it wasn't thick enough to exert force onto the heater supply quick connect hose.

    After you remove the quick connect would I actually then remove the two flange bolts. I actually replaced the torx flange bolts with m6x1.0x20mm t5 deep head hex bolts(the same style used on Diverter valve just longer) plus a washer to exert more force on a greater surface area to sit the flange flush to the block. The original coolant flange bolts were m6x1.0x20 button head torx30 bolts. This made fitting in the rear coolant flange much easier because there's more to grab to hand thread first.

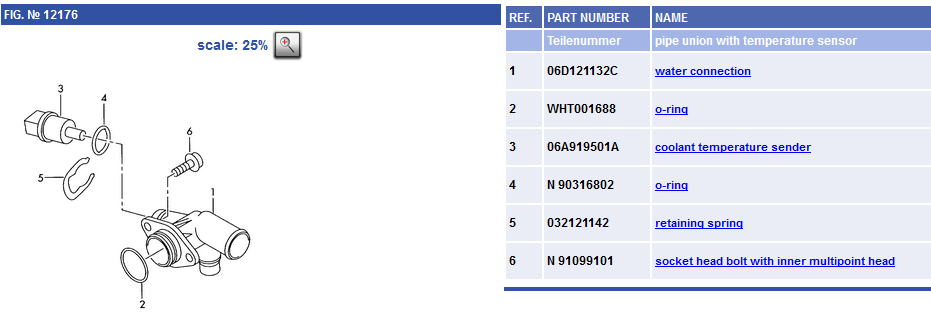
    The hardline pipe is quick easy if you disconnect the 3 torx bolts holding the metal hardline into the intake manifold. Once unbolted and bottom coolant flange quick connect are removed you can move the coolant flange with the metal hardline pipe still attached into the drivers side area of engine bay to remove hoses/hose clamps. After close inspection of the coolant flange I concluded it was the coolant temp sensor oring, coolant flange oring, the heater supply o ring, and the 2-3" rubber hose that connects to the flange. Basically everything mating to the flange was starting to show signs of wear but the flange itself was great. (I'm an 07 with 80k miles)


    Sent from my iPhone using Audizine mobile app

  24. #144
    Registered Member One Ring
    Join Date
    May 25 2016
    AZ Member #
    373811
    Location
    Newport News/VA

    Just wanted to say "Thanks !" for all the tips on this thread.

    I just did this TWICE on my car.

    Apparently the o-ring got pinched the first time, it leaded and had to do it again. Unfortunately, the o-ring was broken when I pulled the flange out so I had a delay while trying to locate someone who sold the o-ring. Since it is Sunday, the Dealer is not open and the parts department is closed tomorrow for Memorial Day. Arghh...

    Autozone, Advanced Auto, O'Rieley Auto, NAPA ... none of them carry the flange or the O-Ring. I bought an o-ring kit from Harbor Freight ($7.99) and used one from it. The kit has 3 hundred something O-rings in the kit. It has 10 of the size I ended up using, so I now have spares. :) I was a little worried about using one from Harbor Freight, but it is a Nitrile Rubber O-Ring, same description I saw for similar o-rings on car coolant systems. I think I am safe. Took a 50 mile test drive, and things are good so far.

    Here are my tips/lessons learned from doing it TWICE !!!

    Do not underestimate the comment some have made that the rubber hoses might be WELDED to the metal pipe. I spent over an hour trying to get the "lower coolant hose" off. That thing ended up tearing, but not releasing from the pipe. I finally cut it off and was able to get the metal pipe and flange out. The short hose between the pipe and flange came off my flange easily. I spent about 30 - 45 minutes taking a razor blade to clean the bits of rubber off the other end of the metal pipe where the lower coolant hose connected to the other metal pipe. I spent a lot of time cleaning that 2nd metal pipe off too. I think Audi must have used epoxy or something similar to glue that pipe and hose together. The other locations that I removed hoses from came off easily. So, the lesson learned, if you are the first to do this job on your car, buy that piece of hose, and just CUT OFF the original. The hose part # is 06D121065L. It is part #4 in the below image.


    I had an old broken down cardboard box in the garage. The 2nd time around, I laid it on top of the engine and down the front of the grill. I spent a lot of time laying on top of the engine to get to the back where the flange is located. The double layer of thick card board really make it a lot easier on my ribs and stomach, and also probably helped protect stuff I was laying on. That made it SO MUCH more comfortable.

    Definitely remove the Vacuum Pump. It is ONLY 3 hex bolts and one hose. With it removed, you can so much easier get your hands down to the flange. Plus it will almost let you see it.

    Remove the wiring harness from the iginition coils, HP Fuel pump, and disconnect the little plastic pieces holding that harness to the engine. This will allow that harness to drop completely out of the way and frees up a lot of room.

    My coolant flange was held in place w/ T-30 Torx bolts, NOT triple square fasteners.

    A dental pick that has a "U shaped" end will easily grab the metal clip from the lower hose and the plastic clip for the temp sensor.

    If you pull off the belly pans before you start, you can drain the radiator into a pan to recover the coolant PLUS when you drop something, it falls all the way to the floor. I left my car up on the ramps, so that left enough room for me to get under and pick up the random bolt or tool. If I had left the belly pans on and the car on the ground, I am sure locating a couple dropped items would have really taken a while to locate.

    I used Quicksilver "Perfect Seal" sealing compound everywhere that I connected a rubber hose. I have been doing this for many years now. First learned about it when working on my first boat. The stuff is almost like a syrup. It does not harden or dry out. It is recommended by Mercury Marine and Mercruiser (same company, really) for all hose connections on marine engines. I do not see how it would not be a good idea on car engines too, so I have been using it. Since I have a bunch left over from my boat, it doesn't cost me anything to use. I think it will prevent the "welded" on problem with the rubber hoses to the metal pipe. I am not sure of an automotive equivalent, but inboard marine engines are actually just truck gas or diesel engines w/ a propeller.

  25. #145
    Veteran Member Four Rings yeoj112689's Avatar
    Join Date
    Aug 17 2013
    AZ Member #
    121191
    Location
    Rossford, Oh

    Quick question... my flange had 10mm 6 point bolts, came off in a matter of mins, didn't take any effort at all. Did I miss something or am I crazy? I had taken my intake off due to an injector oring leaking but even so.. was crazy easy to get the leaking (cracked and basically rotting) flange off. Maybe its different per model year? OR maybe it was replaced prior? Hardest part was getting the hose off but it took about 3 mins.

    Maybe I just got lucky?
    || 2006 Audi A4 Quattro 2.0T || Mods and stuff

  26. #146
    Senior Member Three Rings
    Join Date
    Aug 04 2015
    AZ Member #
    346828
    Location
    Kansas City

    Quote Originally Posted by yeoj112689 View Post
    Quick question... my flange had 10mm 6 point bolts, came off in a matter of mins, didn't take any effort at all. Did I miss something or am I crazy? I had taken my intake off due to an injector oring leaking but even so.. was crazy easy to get the leaking (cracked and basically rotting) flange off. Maybe its different per model year? OR maybe it was replaced prior? Hardest part was getting the hose off but it took about 3 mins.

    Maybe I just got lucky?
    I've heard that removing the flange itself isn't the tough part, but just being able to reach it and remove the hoses was tough. Sounds like it went well for you. This will be my next repair so I'm encouraged by your success.

  27. #147
    Active Member One Ring nogovitsin's Avatar
    Join Date
    Nov 14 2012
    AZ Member #
    104078
    My Garage
    2006 Audi A4 2.0 FSI , 2003 Infiniti FX-45
    Location
    Houston , TX

    Hi everyone! Usually i am to lazy to wright my experience and share , but can't be silent in this case! Briefly: mechanical inclined ,strong grip , medium to large size hands.
    Be ready to be very mad , angry , cuss everything and everyone!!! OK - to the point.
    - No frkn way you can take hoses from metal pipe without damaging ! Although - much easier to take it off from plastic parts! Of cause - if you have a frkn grip!!
    - My flange bolts were M8.
    - Cable hose clamps puller is a MUST!!!( Although you going to have all the force of your hand to squeeze it all the way - the lock on them didn't work properly.)
    -You have to take vacuum pump off. Be careful with the vacuum line that penetrates the fire wall - it will be on the way and you can brake it!(my bolts for vacc. pump were P30)
    -Buy tool set for stars and different multi points fasteners with SHORT tool handle. Preferably not flat but bend on ends.(got mine in Lowes)
    -If you can't take the rubber hose off the flange (NOT heater supply line , the other one - don't waist your time - cut it!Before i started i ordered the new flange kit , the short rubber hose that connects the flange to metal line)Your position: laying on the motor facing the front shield . Follow the metal line.You will see a T. I end up cutting the hose coming from the T - connection right in middle and then used nipple and 2 stainless clips. In this case you can take the entire metal line out , clean it and attach the new short piece of hose that connects to the flange.
    -Order new heater supply line!!! And change it using the situation. And yes - the heater hose connection HAS the oil ring that ,in my case was completely unusable (i think because of the heat and time the oil ring increased in size big time and that was impossible to put it back to the connector of the heater hose. Connector:the very top movable plastic washer has a cone shape. After i couldn't put that frkn robber washer back inside of the connector ,i took it off in hopped that coned shape of the top washer of the connector will hold , but it didn't!!!(stupid of me) Took the vacuum pump second time , took the battery off and changed the supply heater core hose. Didn't have any problem remove this hose from aluminum pipe that goes inside the core. So ,if i would do it second time i would include heater supply hose!!!

  28. #148
    Senior Member Two Rings
    Join Date
    Feb 29 2012
    AZ Member #
    89052
    Location
    Charlotte, NC

    Pozdravliayu, tovarish!
    2019 Audi e-tron Prestige | Glacier White | 21” | Cold Weather | Audi Beam Rings

  29. #149
    Veteran Member Four Rings Theiceman's Avatar
    Join Date
    Feb 15 2016
    AZ Member #
    368804
    My Garage
    2006 A4Q, 1978 911 Targa, 2006 Jetta TDI
    Location
    Cambridge,Ontario

    a few tips that may save some headaches.. I did not have to cut anything.. but the coolant clamp pliers certainly helped.

    http://www.audizine.com/forum/showth...ge-no-big-deal
    2014 A4 2.0TQ Technik Manual
    2006 A4 2.0TQ Manual
    1978 Porsche 911SC Targa
    1976 Yamaha XS 360
    Note: PMs disabled, please keep requests for technical help on the forums to benefit everyone:

  30. #150
    Active Member One Ring nogovitsin's Avatar
    Join Date
    Nov 14 2012
    AZ Member #
    104078
    My Garage
    2006 Audi A4 2.0 FSI , 2003 Infiniti FX-45
    Location
    Houston , TX

    Spasibo!!

  31. #151
    Stage 2 Banner Advertiser Four Rings Jake@JHM's Avatar
    Join Date
    Aug 31 2011
    AZ Member #
    80618
    My Garage
    C7 A6 3.0T - D4 A8L 4.0T
    Location
    Lathrop

    We have these in stock and ready to ship


    Click HERE!

    JHMotorsports.com - (209) 968-0077 - JHM Dealers
    Discover Your Vehicle's True Potential with JHMotorsports | Visit Us at JHMotorsports.com 🚀🏁
    Pioneering Performance Software with Home Flashing Technology Since 2013 - SHOP JHM ECU/TCU SOFTWARE!
    JHM B8-RS5 Runs 10s w/ JHM SC Kit


  32. #152
    Registered Member One Ring
    Join Date
    Jul 05 2016
    AZ Member #
    375738
    Location
    Spokane/Washington

    Greetings, This is my first post on Audizine and want to first say thanks for all the great information! So I tackled the coolant flange this week and I have to say that the "PITA" experience that everyone talks about this job being certainly lived up to it's billing. I'll spare everyone all the gory details, only to say that I never want to do it again.

    However, as soon as I thought I was in the home stretch and the hard part was done I found myself fighting the wonderfully located coolant drain plug as it doesn't seem to want to close. As I rotate the plug clockwise it does not seem to tighten or retract and remains approximately 1/8' extended from the base. I tried adding small amounts of coolant following a quarter turn on the plug thinking it may not be designed to retract but the coolant just drains out. I'm hoping there's a trick I'm missing and it didn't decide to strip out.

    Has anyone ran into this or have any suggestions?

    Thank You!

  33. #153
    Veteran Member Four Rings Theiceman's Avatar
    Join Date
    Feb 15 2016
    AZ Member #
    368804
    My Garage
    2006 A4Q, 1978 911 Targa, 2006 Jetta TDI
    Location
    Cambridge,Ontario

    Quote Originally Posted by cwells View Post
    Greetings, This is my first post on Audizine and want to first say thanks for all the great information! So I tackled the coolant flange this week and I have to say that the "PITA" experience that everyone talks about this job being certainly lived up to it's billing. I'll spare everyone all the gory details, only to say that I never want to do it again.

    However, as soon as I thought I was in the home stretch and the hard part was done I found myself fighting the wonderfully located coolant drain plug as it doesn't seem to want to close. As I rotate the plug clockwise it does not seem to tighten or retract and remains approximately 1/8' extended from the base. I tried adding small amounts of coolant following a quarter turn on the plug thinking it may not be designed to retract but the coolant just drains out. I'm hoping there's a trick I'm missing and it didn't decide to strip out.

    Has anyone ran into this or have any suggestions?

    Thank You!
    to be honest I have no idea where that plug even is !!! I just popped off the lower connector on the flange and let the coolant dump out that I could not drain from the reservoir. then just topped it up after.
    2014 A4 2.0TQ Technik Manual
    2006 A4 2.0TQ Manual
    1978 Porsche 911SC Targa
    1976 Yamaha XS 360
    Note: PMs disabled, please keep requests for technical help on the forums to benefit everyone:

  34. #154
    Registered Member One Ring
    Join Date
    Mar 31 2016
    AZ Member #
    371125
    Location
    Hamilton, ON

    Tackled this over the past three days. One day and two evenings. Took me that long as I though i will be able to get away with basic tools.

    YOU WON'T BE ABLE TO DO THIS WITHOUT THE EXTRA TOOLS!
    The flange bolts - no way u can get them out without a microdriver set. Someone here mentioned using a 1/4 Open End Wrench and a bit - NO WAY. You won't be able to hold the bit and use the wrench at the same time, especially for driver's side. A socket bit won't fit there neither. Nor a bit clamped with vice grips.
    The hose clamps - You won't be able to get a proper grip as the firewall and surrounding hoses will keep blocking the long handle of your pliers, u need the special tool
    The hoses - all will be welded. Forcing them off will destroy them - u have to rip the adhesion with a hook tool. (Other option - force remove hose number 4 and 10, pay 30$ for replacement)

    Car: 2007 A4 B7
    Bolts on a flange were Torx T30, T27 fits too.

    This was a f****** nightmare job.
    The shopping list:

    1. Microdriver set - don't get the Husky or similar, I found a set by "Mastercraft" at CT which is half the length of Husky from Home Depot.
    2. Hose hook tool - at CT, to pry the welded hoses off the pipes (you slide it in and try to go around the pipes)
    3. Hose clamp tool - CT, this is a blessing. Throw out your regular pliers.
    4. Some sort of a foam or something thick and soft to lay on a engine plus something to step on so you can lie down on an engine.
    5. OPTIONAL - Triple Square Wrench 8mm bit, why optional? Continue reading.
    6. Beers and xanax as this BS job will give u anxiety

    Ok, so first of all, you could drain the coolant or not. I didn't and it wasn't too bad. Also if you read the original post you may get confused like I did and waste 3 hours trying to get the driver's side bolt on flange off from a driver's side. You reach both bolts from the passenger side, not the driver's side. You simply won't be able to reach them with a microdriver. Another thing, you may wanna take the plastic PCV tube off to not crack it by laying on an engine.
    To take off coolant temp sensor and the middle (firewall) pipe you don't need to take off anything except for the grounding cable secured with 10mm bolt and nut. Remove sensor clamp, pull it right out. The middle pipe, you remove the metal clip and grab it and wiggle it left and right while pressing it down, it will pop off.

    Now the fun part.
    Take your fancy hose clamp tool and remove just the bottom clamp from the hose number 4. Grab the hook tool and get it loose, once done you pinch the hose and twist/tug/push it so after a couple swears it should come off.
    Unscrew 2 Torx screws of the big black metal pipe, and the third one - Triple Square, you have two options.
    1. Go on a journey to find a triple square 8mm bit which I found at CT under the name "Internal Wrench" and it turned out bolt is not 8mm but probably 5-4mm so your CT kit is good for nothing and this DIY needs an update
    2. Take a sip of beer, grab an angle grinder and make a small cut in the bolt, so now you can use a flat screwdriver to twist it off.

    Once you done, time for the flange bolts. Grab microdriver, put T30 bit on, unbolt both bolts reaching from PASSENGER side. Pop the flange off. Pop the vacuum line from the firewall. Now do your best to wiggle the flange between all the hoses (watch for the fuel line) just to get the whole black pipe with the flange on out. DONT TAKE THE FLANGE OFF YET. Grab a sharpie to make a line on hose and flange and make sure the new flange is aligned exactly the same. If you skip this step, your flange will be misaligned an you'll most likely strip internal threads trying to get the bolts in.
    Once ready, put it back on and do everything in reverse order. BE CAREFUL and make sure the holes are aligned, try to initiate the screw in with your fingers.


    The method I used didn't involve taking anything around off. If you know how to take off a vacuum pump, do it, and you may even take off fuel pump too (3 torx bolts, 13mm bleeder valve - bleed it first before unscrewing, two connectors). I didn't take the vacuum pump as I had no idea how to get the hose coming out of it off, and I could not find any DIY about it.

    Due to not drawing the line on a flange and flex hose I had a hard time aligning the flange. One bolt got in (driver's side), the other one ended up stripping the internal thread.

    Good luck.
    Last edited by Quake; 09-21-2016 at 08:29 AM.

  35. #155
    Senior Member Two Rings
    Join Date
    Feb 29 2012
    AZ Member #
    89052
    Location
    Charlotte, NC

    Quote Originally Posted by Quake View Post
    Tackled this over the past three days. One day and two evenings. Took me that long as I though i will be able to get away with basic tools.
    ...
    Good luck.
    Great job, Quake! It took you a lot more than just luck to get this PITA job done. The only thing where chance comes in is what kind of bolts you'll find. If the car has been serviced before, God knows what bolts replaced the ones the mechanic stripped, if he replaced them at all after f&$@ing them up.

  36. #156
    Senior Member Three Rings
    Join Date
    Aug 04 2015
    AZ Member #
    346828
    Location
    Kansas City

    "Microdriver set - don't get the GearWrench or similar, I found a set by "Mastercraft" at CT which is half the length of the GearWrench or Husky from Home Depot."

    I have a stupid question: What is CT?

  37. #157
    Registered Member One Ring
    Join Date
    Mar 31 2016
    AZ Member #
    371125
    Location
    Hamilton, ON

    Quote Originally Posted by KJack View Post
    I have a stupid question: What is CT?
    Canadian Tire. Can't really tell where you could get the same one in the US, but here's a size for reference


    I'll edit this post later to show a comparison to the Husky one I have mentioned.
    EDIT: Here


    Quote Originally Posted by dcchristopher View Post
    Great job, Quake! It took you a lot more than just luck to get this PITA job done. The only thing where chance comes in is what kind of bolts you'll find. If the car has been serviced before, God knows what bolts replaced the ones the mechanic stripped, if he replaced them at all after f&$@ing them up.
    Very true. If someone has already played with the bolts, you should be prepared to use tap and die set.
    Last edited by Quake; 09-21-2016 at 08:20 AM.

  38. #158
    Senior Member Three Rings
    Join Date
    Aug 04 2015
    AZ Member #
    346828
    Location
    Kansas City

    Quote Originally Posted by Quake View Post
    Canadian Tire. Can't really tell where you could get the same one in the US, but here's a size for reference


    I'll edit this post later to show a comparison to the Husky one I have mentioned.


    Very true. If someone has already played with the bolts, you should be prepared to use tap and die set.
    Ah, excellent. Thanks for the pics, that helps.

  39. #159
    Veteran Member Four Rings Solarsuplex's Avatar
    Join Date
    Aug 20 2011
    AZ Member #
    80065
    Location
    Seattle Wa

    I just want to mention that a any bit put into a 1/4" wrench with electrical tape is really all you need to get anything loose that is stuck back there.
    -James
    F T W L T B D W I C T W
    Moonlight Blue - B8.5 S4
    Brilliant Black - B7 A4

  40. #160
    Veteran Member Four Rings Theiceman's Avatar
    Join Date
    Feb 15 2016
    AZ Member #
    368804
    My Garage
    2006 A4Q, 1978 911 Targa, 2006 Jetta TDI
    Location
    Cambridge,Ontario

    yup I used the 1/4 open ended wrench technique and it worked great, I just used a 3/8 drive bit with the torx end held it in place with my finger on the end where the socket usually goes and went at it with the 1/4 on the bit . piece of cake.

    I did the whole job in about 2 hours or so


    http://www.audizine.com/forum/showth...ge-no-big-deal
    2014 A4 2.0TQ Technik Manual
    2006 A4 2.0TQ Manual
    1978 Porsche 911SC Targa
    1976 Yamaha XS 360
    Note: PMs disabled, please keep requests for technical help on the forums to benefit everyone:

Page 4 of 8 FirstFirst ... 23456 ... LastLast


Tags for this Thread

Bookmarks

Posting Permissions

  • You may not post new threads
  • You may not post replies
  • You may not post attachments
  • You may not edit your posts
  •  


    © 2001-2025 Audizine, Audizine.com, and Driverzines.com
    Audizine is an independently owned and operated automotive enthusiast community and news website.
    Audi and the Audi logo(s) are copyright/trademark Audi AG. Audizine is not endorsed by or affiliated with Audi AG.