Audizine - An Automotive Enthusiast Community

Page 1 of 8 123 ... LastLast
Results 1 to 40 of 295
  1. #1
    Active Member One Ring
    Join Date
    Nov 26 2007
    AZ Member #
    22871
    My Garage
    66 mustang fastback, 93 civic si, 99 f350 7.3
    Location
    Cali

    DIY B7 Coolant Flange Replacement with Pics

    Guest-only advertisement. Register or Log In now!
    Got a coolant leak at the coolant flange and out of warranty like I am? Save yourself $300.

    Dealer repair ~$350, fix = a couple of hours and ~$50 bucks (part ~$14, coolant ~$25, tools ~$14).

    Disclaimer= First and foremost, YES my motor is not very sparkly... now then: I fixed it last weekend (hence the after-the-fact pics) and may be off on minor tricks used and tool sizes, you are also responsible for diagnosing the issue, finding the parts (my dealer had it for $14 or so with sensor o-ring, I will look for the part number and update the post), what they may cost, and any damage you do using this method. Dont forget to grab some coolant while at the dealer, gotta get the special stuff apparently...

    My diagnosis, coolant smell in cabin and outside of vehicle (shoulda fixed it at this point) puddle of coolant on the floor finally sparked me to grab a mirror and a flashlight to look at the back of the passenger side of the motor above the exhaust manifold to find the classic pink chalky residue and corrosion around the coolant flange. Here is what the part looks like, be careful ordering online though, the ones I saw did not seem to match exactly. Part number on old one is 06d 121 133a. Honestly, the piece looks fine but the main o-ring looks thrashed, my money says the o-ring could have fixed it alone, but for $14 and the fact that you have to remove it anyway, just replace the assembly.


    Remove engine cover plate and set aside, then we have to remove the coolant resorvoir to give us some room. Disconnect one hose at a time and drain them into a cup. You can plug bottom hose to save whatever coolant you have left. Once you remove the one screw holding it in and the two hoses and sensor plug on the bottom the front lifts ups and the tank pulls out. (Channel locks or vise-grips work well on hose clamps)


    Breather bolt can be backed out to allow air in so the coolant can drain easier. We unbolted and disconnected the metal coolant line (partially highlighted in yellow) to work out the flange from the drivers side of the motor since my coolant lines on that side were difficult to get loose. It wasn’t too much extra work but you may be able to get yours off at the flange. Another option is to buy the coolant hose immediately attached to the flange, then you can cut the hose to remove flange and just replace the hose. I didn’t have the size for the Triple square screw shown so we backed it out with an extractor and replaced it with good old metric. Can’t recall size of the 2 torx screws either, but they weren’t anything special. Two hoses shown yellow and coolant hose were removed for more wiggle room.


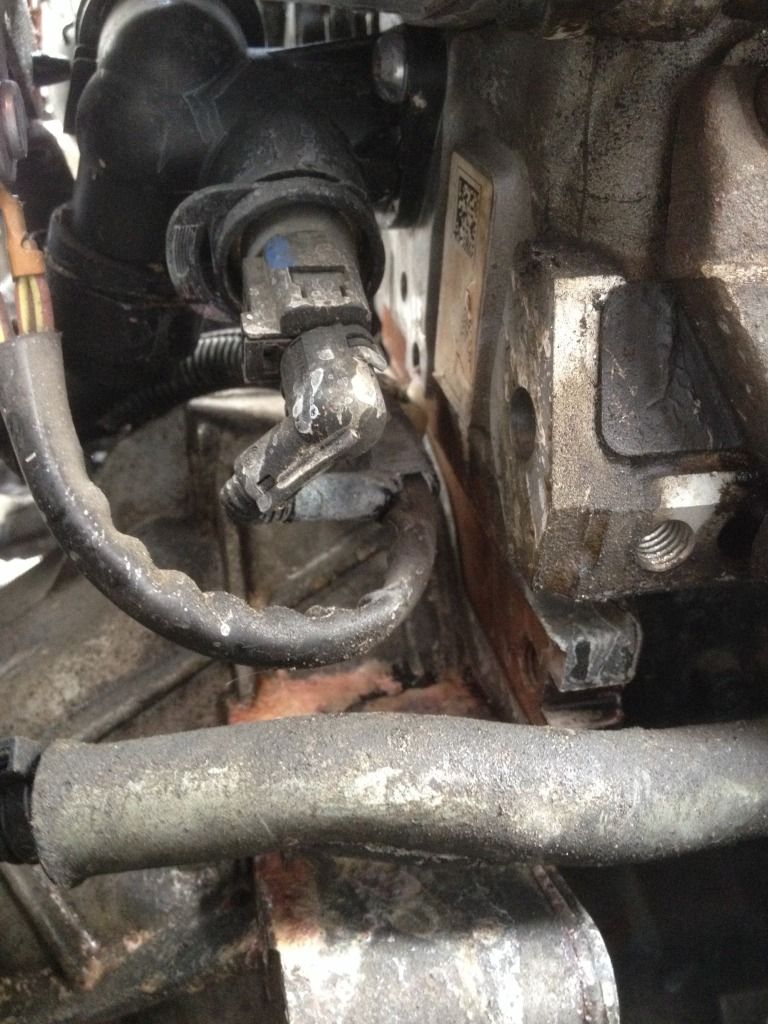
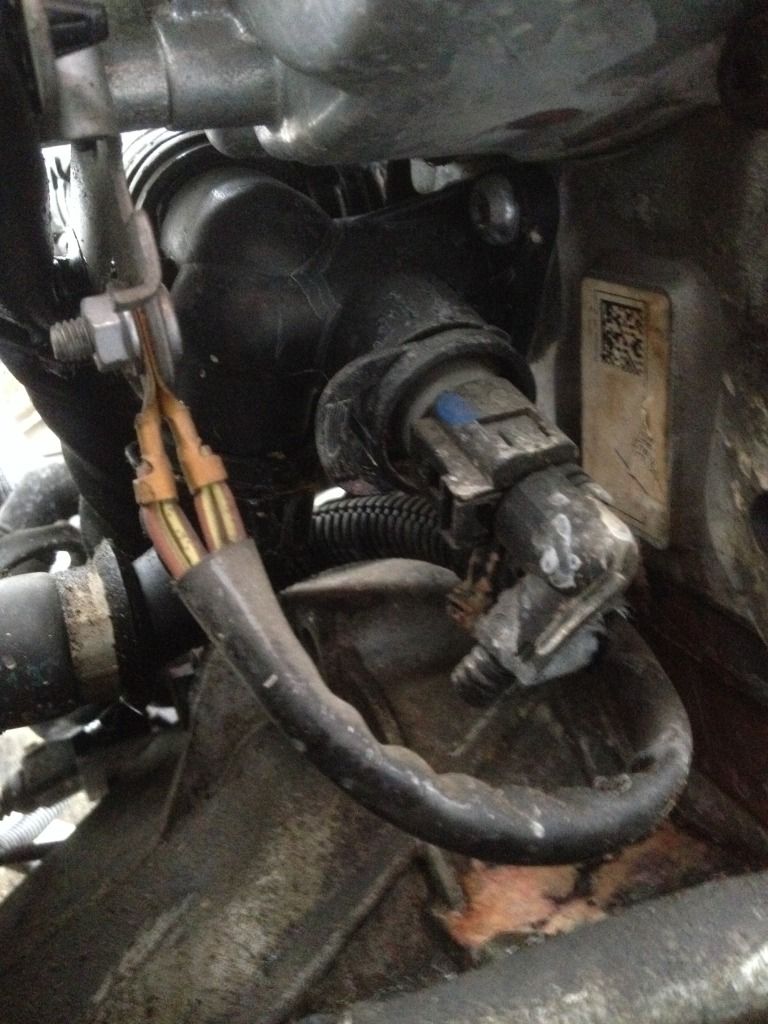
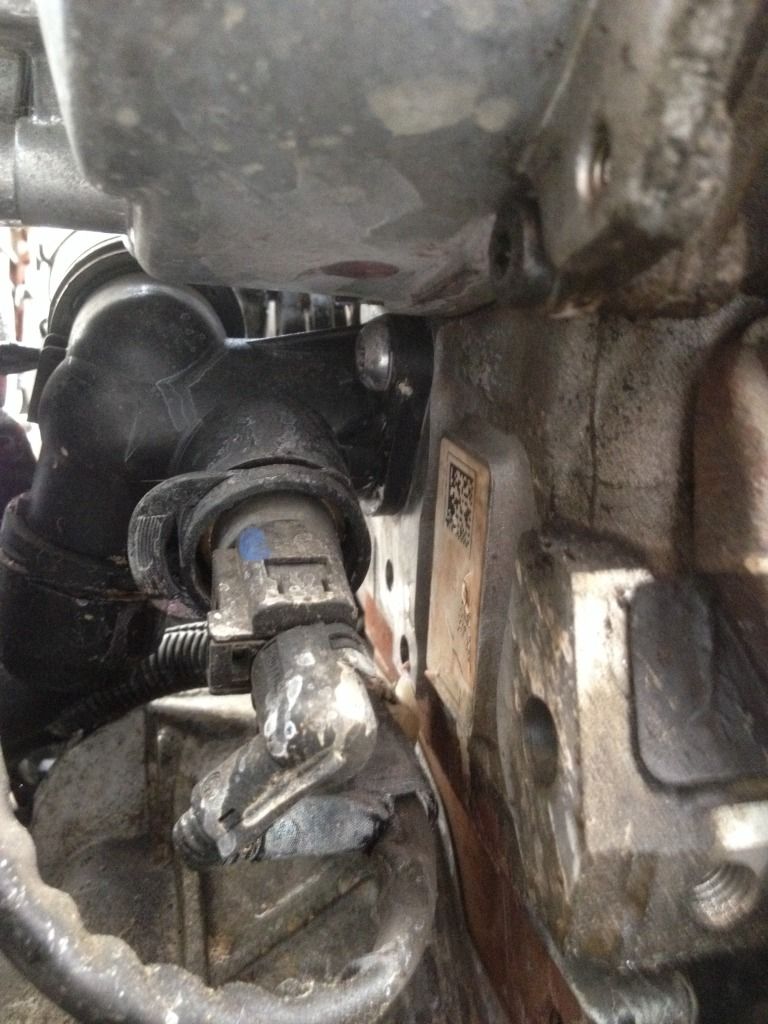
    This is a view that you won’t see without a mirror or a camera, it’s at the passenger firewall above the exhaust manifold at back of motor. You can get to the two clips (don’t lose them) with a needle nose or a dentist type hook/pick to release the coolant line to the left (firewall) and sensor to the right (motor). The sensor comes right out but the coolant line was a PITA to get out, wiggle it and lean on it a bit and it should pop off, mine took some work. The flange is being replaced, but you don’t want to break the attachment on the end of the hose.

    Notice the corrosion coming from below the flange. Time to remove the two #8 “4 squares” holding in the flange. The tool we used (below left) had to be held on with one hand and broken loose with the other using an open ended wrench. You may have access to better tools, but this setup actually worked out pretty good since one hand was already there to finger loosen the screws the rest of the way out. You can get one arm around each end of the motor lying on top of it accomplish this, but you’ll have to work blindly.


    Once it is unbolted you can manipulate it up to the drivers side of the motor and out the top to remove the last coolant line and swap it out. There is one more coolant line that we did not need to remove that kept it from coming completely out, but there was ample room from that point to swap the flange. After that you can work your way in reverse to re-assemble. There should be an o-ring included with the flange, I think its for the sensor plug, confirm with the old piece and be sure to install it with the new one. Try to get the hose clamps back in their original position on all the hoses, and top it off with 50/50 G12 and distilled water. Run her a bit, check for leaks and recheck your fluid level after completion. Pat yourself on the back for spending a few hours to save $300 BUCKS! Let me know how it worked!

  2. #2
    Veteran Member Three Rings Zebman's Avatar
    Join Date
    Dec 25 2007
    AZ Member #
    23632
    My Garage
    '06 A4, 08 R6s
    Location
    Morgantown/Hurricane, WV

    Re: DIY B7 Coolant Flange Replacement with Pics

    Did you have any pictures you referenced? I need to do this. I'm running through cheap autozone coolant every two weeks. You say the part number you listed is the old flange; isn't there an updated, better part now?
    2006 A4Q 6MT Arctic White - StageII++
    STaSIS SS Coilovers, EVOMS Intake, APR 93, OZ Ultraleggeras 17x8, APR Exhaust w/034 HFC, GSG Intake Pipe, AWE Front Mount, APR HPFP.


    2008 R6s
    : Racebike, don't feel like writing it all out.

    I don't get on Audizine anymore, so if you need me... sorry.

  3. #3
    Active Member One Ring
    Join Date
    Nov 26 2007
    AZ Member #
    22871
    My Garage
    66 mustang fastback, 93 civic si, 99 f350 7.3
    Location
    Cali

    Re: DIY B7 Coolant Flange Replacement with Pics

    Pics Didnt post? (I can see them in the post, sorry first timer...) I am 99% sure the part # is the same. See quote from OG post below:

    Part number on old one is 06d 121 133a. Honestly, the piece looks fine but the main o-ring looks thrashed, my money says the o-ring could have fixed it alone, but for $14 and the fact that you have to remove it anyway, just replace the assembly.
    I will look for the receipt again...

  4. #4
    Veteran Member Three Rings Zebman's Avatar
    Join Date
    Dec 25 2007
    AZ Member #
    23632
    My Garage
    '06 A4, 08 R6s
    Location
    Morgantown/Hurricane, WV

    Re: DIY B7 Coolant Flange Replacement with Pics

    Pictures are there now.
    Last edited by Zebman; 01-05-2010 at 09:53 AM.
    2006 A4Q 6MT Arctic White - StageII++
    STaSIS SS Coilovers, EVOMS Intake, APR 93, OZ Ultraleggeras 17x8, APR Exhaust w/034 HFC, GSG Intake Pipe, AWE Front Mount, APR HPFP.


    2008 R6s
    : Racebike, don't feel like writing it all out.

    I don't get on Audizine anymore, so if you need me... sorry.

  5. #5
    Active Member One Ring
    Join Date
    Nov 26 2007
    AZ Member #
    22871
    My Garage
    66 mustang fastback, 93 civic si, 99 f350 7.3
    Location
    Cali

    Re: DIY B7 Coolant Flange Replacement with Pics

    Correction. Part # on receipt from dealership is actually a LOWER number? Flange: 06D-121-132-A $10.98 and Seal: part # N-903-168-02 $1.35. $13.53 w/CA sales tax isnt bad. Dont forget the G12 coolant!

  6. #6
    Active Member One Ring
    Join Date
    Nov 26 2007
    AZ Member #
    22871
    My Garage
    66 mustang fastback, 93 civic si, 99 f350 7.3
    Location
    Cali

    Re: DIY B7 Coolant Flange Replacement with Pics

    I am an idiot, uploaded to Audizine photo album and didn't make them public, easy enough fix... duh. Better?

  7. #7
    Veteran Member Three Rings schizzy's Avatar
    Join Date
    Jun 29 2009
    AZ Member #
    44347
    My Garage
    2008 SRT4
    Location
    New Jersey

    Re: DIY B7 Coolant Flange Replacement with Pics

    Wow... guessing this is a normal audi problem? Just had audi fix mine... but I'm lucky for my warranty
    Ocean Blue b7 a4: -Revo stage II -apr/BB exhaust w/ tp -eibach/kw coil overs -19" sportec mono 10 -forge dv -rs4 swaybar -rs style grill -euro jet pcv fix -apr snub mount -custom intake -m3 spoiler -35% tints...... TOTALED BY DUMP TRUCK

    Current: 1990 vw

  8. #8
    Veteran Member Four Rings Tusin's Avatar
    Join Date
    Mar 16 2009
    AZ Member #
    39967
    Location
    Anchorage, AK

    Re: DIY B7 Coolant Flange Replacement with Pics

    You know.... I am headed out to a indy shop (no warranty) here in a few hours for the exact same symptoms.

    Coolant smell in cabin (sometimes), coolant smell outside of car. I do remember when I stuck my nose by the air intake for the cabin (passenger side, where the cabin filter goes), I smelled a faint coolant smell.

    Of course first thought was heater core, but my heat seems to work ok.

    I think I will call the dealer and see if they have these parts in stock, pick them up before heading out (indy shop is a hour drive), worst case I have a spare part.

  9. #9
    Veteran Member Four Rings Tusin's Avatar
    Join Date
    Mar 16 2009
    AZ Member #
    39967
    Location
    Anchorage, AK

    Re: DIY B7 Coolant Flange Replacement with Pics

    Of course the dealer only has the seal in stock....

  10. #10
    Veteran Member Three Rings TheHeggi's Avatar
    Join Date
    Aug 03 2008
    AZ Member #
    31580
    My Garage
    05.5 2.0t A4 + 02 CBR600 F4i
    Location
    Redlands, CA

    Re: DIY B7 Coolant Flange Replacement with Pics

    Dealer replaced mine under warranty at 50k luckily. Dumb bastards ended up messing up, had to keep my car over the weekend and I got an 08 Mercedes C300 as a weekend ride
    05.5 DG 2.0TM FWD
    [Stasis SS][RS4 Rear Sway][APR 91][AEM intake][034 HFC][podi/stepper boost gauge][Satin Black B6 USPs][S-Line front bumper][RS4 Grille][Satin Black S4 blades][DIY Ti vinyl][DEPO projectors w/6000k]

  11. #11
    Veteran Member Four Rings Tusin's Avatar
    Join Date
    Mar 16 2009
    AZ Member #
    39967
    Location
    Anchorage, AK

    Re: DIY B7 Coolant Flange Replacement with Pics

    Got back from the Indy shop, and it does look to be the flange. Getting it replaced Friday, and service contract is covering it.

    But here is some info that I don't think to many were aware of. All of the tech's at the Indy shop used to work for the VW/Audi dealer here. And there WAS a recall for this flange (well technically the seal, but he said they would always just replace the whole unit). We even called the dealer and verified the recall (not a TSB), and it was a open campaign for 15 months, and ended 6 months ago.

  12. #12
    Veteran Member Three Rings illegitimus's Avatar
    Join Date
    Mar 17 2009
    AZ Member #
    40007
    My Garage
    2006 B7 A4 Quattro Tip S-line
    Location
    Boston, MA

    Re: DIY B7 Coolant Flange Replacement with Pics

    Quote Originally Posted by Tusin View Post
    Got back from the Indy shop, and it does look to be the flange. Getting it replaced Friday, and service contract is covering it.

    But here is some info that I don't think to many were aware of. All of the tech's at the Indy shop used to work for the VW/Audi dealer here. And there WAS a recall for this flange (well technically the seal, but he said they would always just replace the whole unit). We even called the dealer and verified the recall (not a TSB), and it was a open campaign for 15 months, and ended 6 months ago.
    There're two seals. Which one is the faulty one, the one that goes to the temperature sending sensor?

  13. #13
    Active Member One Ring
    Join Date
    Nov 26 2007
    AZ Member #
    22871
    My Garage
    66 mustang fastback, 93 civic si, 99 f350 7.3
    Location
    Cali

    Re: DIY B7 Coolant Flange Replacement with Pics

    Recalled you mean.... good question. On mine, sensor side looked near new. Motor side looked like a green flat rubber band...

  14. #14
    Veteran Member Four Rings Tusin's Avatar
    Join Date
    Mar 16 2009
    AZ Member #
    39967
    Location
    Anchorage, AK

    Re: DIY B7 Coolant Flange Replacement with Pics

    It must be the one that looked like the flat rubber band. Because I swung by the dealer and purchased some G12 (just in case) and this seal N-903-168-02. When I showed the Indy Shop owner he said that seal was for the temp sensor.

  15. #15
    Veteran Member Three Rings illegitimus's Avatar
    Join Date
    Mar 17 2009
    AZ Member #
    40007
    My Garage
    2006 B7 A4 Quattro Tip S-line
    Location
    Boston, MA

    Re: DIY B7 Coolant Flange Replacement with Pics

    Quote Originally Posted by Tusin View Post
    It must be the one that looked like the flat rubber band. Because I swung by the dealer and purchased some G12 (just in case) and this seal N-903-168-02. When I showed the Indy Shop owner he said that seal was for the temp sensor.
    Thanks!

  16. #16
    Registered Member One Ring MatP's Avatar
    Join Date
    Jan 16 2010
    AZ Member #
    53460
    Location
    Portsmouth ENGLAND

    Re: DIY B7 Coolant Flange Replacement with Pics

    After seeing this, i've embarked on this adventure!!!!
    Currently, I have no skin on the back of my hands/ wrists and forehead!!!
    But after more cursing than can be believed, i'm nearly there!!!
    Just one thing, were your hoses welded to the metal pipes???
    Going to Audi tomorrow for parts, but so far all ok, but seriously hard work!!!!


    Thanks to b8mnj, was going to cost 300UK Pounds!!!

  17. #17
    Veteran Member Three Rings WayzataAudi's Avatar
    Join Date
    Feb 18 2009
    AZ Member #
    38886
    My Garage
    911SC Targa
    Location
    Colorado

    Re: DIY B7 Coolant Flange Replacement with Pics

    Im planning on doing this over the weekend. wouldnt it be easier just to completely drain your coolant system? that way you wouldnt have to worry about dripping coolant and using vice grips/ channel locks...ive never really done any work w/ coolant or lines like this so im a bit nervous to disconnect the lines w/o draining the whole system...
    I <3 Whatever

  18. #18
    Established Member Two Rings Bart-Man's Avatar
    Join Date
    Aug 19 2008
    AZ Member #
    32112
    My Garage
    06 audi a4 2.0T
    Location
    Toronto

    I have to do this next weekend. i tried to find the part last night, and jesus that is tight and blind...
    Anyone have any tips for this? the thermometer fix last weekend was an 8 hour bitch. I don't want this to take 8 hours...

  19. #19
    Veteran Member Three Rings Kid Red's Avatar
    Join Date
    Feb 05 2008
    AZ Member #
    24931
    Location
    Orlando, FL

    Quote Originally Posted by Bart-Man View Post
    I have to do this next weekend. i tried to find the part last night, and jesus that is tight and blind...
    Anyone have any tips for this? the thermometer fix last weekend was an 8 hour bitch. I don't want this to take 8 hours...
    Seems I have the corrosion around that hose too. There is no leak or coolant smell however. But I think I'll get the part and plan to change it before it goes.

    Thanks for posting the DIY, I just wish the pics still worked.
    2010 BMW 335i Sapphire Black + Black leather interior + Sport + Nav + PDC. Mods - Carbon Fiber wrapped interior - Gloss Black grill - 15% tint - more coming

    2006 A4 2.0T Quartz Grey + Black leather interior + Convenience. Mods - 19" VM RS4 reps - FK Silverline coilovers - APR 93 - Navigation - S4 mirror caps - S-Line E-Codes/Bi-Xenons - XenonMatch Hoen Fogs - RS4 sport pedals - LED License plate lights - black grill - 15% tint all around & More mods coming.

  20. #20
    Veteran Member Three Rings Kid Red's Avatar
    Join Date
    Feb 05 2008
    AZ Member #
    24931
    Location
    Orlando, FL

    What a f-king PITA!!!! Anyone that did this, maybe you can help. I've got the flange removed, but I can;t get the hoses disconnected from it. The one going rearward with the metal clip, is just not budging. The other, the one with two clamps that connects to the metal pipe above the engine is just as difficult because I don't have a 6mm 12 point bit (triple square, serrated wrench, blah blah) because I never saw it listed as a needed tool to remove the metal bleeder pipe. So I can't create any room to dislodge the hose.

    Any suggestions on how to get the hoses off the flange? Or is moving that top coolant metal hose essential to creating the needed wiggle room?
    2010 BMW 335i Sapphire Black + Black leather interior + Sport + Nav + PDC. Mods - Carbon Fiber wrapped interior - Gloss Black grill - 15% tint - more coming

    2006 A4 2.0T Quartz Grey + Black leather interior + Convenience. Mods - 19" VM RS4 reps - FK Silverline coilovers - APR 93 - Navigation - S4 mirror caps - S-Line E-Codes/Bi-Xenons - XenonMatch Hoen Fogs - RS4 sport pedals - LED License plate lights - black grill - 15% tint all around & More mods coming.

  21. #21
    Veteran Member Four Rings mcpcartier's Avatar
    Join Date
    Oct 14 2011
    AZ Member #
    82586
    My Garage
    12 Taco, 13 Ex, 16 Civic EX, 15 JKUR
    Location
    SoCal

    ughhh....I can't help, but this thread caught my attention because I've had the flange sitting in the garage for a few months and have it on my list to knock out in September. Any hints you provide will be appreciated.

    btw....the pics are still there for me? Not sure why you can't see them.
    2007 2.0T Q 6MT, S-Line, Ti Package, BB
    Revo Stage 2 | JHM Stage 1 Clutch | K&N Drop in | APR HPFP | 034 HFC | AWE Catback | 034 SD Tranny & Motor Mounts | Neuspeed Snub | H&R Sport Springs | Bilsteins | Moog ACA | B5 Perches (removed) | RS4 RSB | ABT Drilled n Slotted Rotors | Redstuff Front & Akebono Rear | Podi Stepper Boost Gauge | Recaro's | H&R Spacers 15f/20r | Clear Corners w/Blackout | Smoked Frt Markers | Cupra R Lip | 20% Tint

  22. #22
    Veteran Member Three Rings Kid Red's Avatar
    Join Date
    Feb 05 2008
    AZ Member #
    24931
    Location
    Orlando, FL

    I gave up, lol, taking it to my Indy guy. We got the flange off and was going to get a pair of hose clamps when my wife noticed the new temp sensor was a 4 prong and the current one we were replacing is two prong. The guy at Audi gave me the parts based on my VIN, so I wonder if there was a recall I never heard about, a new replacement part or a mistake giving me the wrong part? I didn't want to get the old flange completely out and find out the new flange is a new design as well, so we put it back together and bowed our heads in defeat.

    Anyways , my red, raw arms, with a cut on both thumbs can attest this is not an easy job.
    2010 BMW 335i Sapphire Black + Black leather interior + Sport + Nav + PDC. Mods - Carbon Fiber wrapped interior - Gloss Black grill - 15% tint - more coming

    2006 A4 2.0T Quartz Grey + Black leather interior + Convenience. Mods - 19" VM RS4 reps - FK Silverline coilovers - APR 93 - Navigation - S4 mirror caps - S-Line E-Codes/Bi-Xenons - XenonMatch Hoen Fogs - RS4 sport pedals - LED License plate lights - black grill - 15% tint all around & More mods coming.

  23. #23
    Veteran Member Four Rings mcpcartier's Avatar
    Join Date
    Oct 14 2011
    AZ Member #
    82586
    My Garage
    12 Taco, 13 Ex, 16 Civic EX, 15 JKUR
    Location
    SoCal

    Dang....I knew it was is a tough location but didn't think it would be that difficult.

    I've check all the part numbers so I know I have the correct parts.

    I'll take a stab at it over the next 2 weeks....juggling the priorities as usual.
    2007 2.0T Q 6MT, S-Line, Ti Package, BB
    Revo Stage 2 | JHM Stage 1 Clutch | K&N Drop in | APR HPFP | 034 HFC | AWE Catback | 034 SD Tranny & Motor Mounts | Neuspeed Snub | H&R Sport Springs | Bilsteins | Moog ACA | B5 Perches (removed) | RS4 RSB | ABT Drilled n Slotted Rotors | Redstuff Front & Akebono Rear | Podi Stepper Boost Gauge | Recaro's | H&R Spacers 15f/20r | Clear Corners w/Blackout | Smoked Frt Markers | Cupra R Lip | 20% Tint

  24. #24
    Veteran Member Three Rings Kid Red's Avatar
    Join Date
    Feb 05 2008
    AZ Member #
    24931
    Location
    Orlando, FL

    I am not a skilled mechanic by any stretch, so don't let my failure have too much impact.

    My wife looked up the part number and believes the part we were given was for Quattro instead of our FWD. So that seems like a simple mistake. My hands are still sore. It's that hose that goes rearward, it had the coolant corroded all in and around the end of it. So it was fused in place, I got no movement on it at all and I didn't want to mess that piece up using prying tools.
    2010 BMW 335i Sapphire Black + Black leather interior + Sport + Nav + PDC. Mods - Carbon Fiber wrapped interior - Gloss Black grill - 15% tint - more coming

    2006 A4 2.0T Quartz Grey + Black leather interior + Convenience. Mods - 19" VM RS4 reps - FK Silverline coilovers - APR 93 - Navigation - S4 mirror caps - S-Line E-Codes/Bi-Xenons - XenonMatch Hoen Fogs - RS4 sport pedals - LED License plate lights - black grill - 15% tint all around & More mods coming.

  25. #25
    Veteran Member Four Rings mcpcartier's Avatar
    Join Date
    Oct 14 2011
    AZ Member #
    82586
    My Garage
    12 Taco, 13 Ex, 16 Civic EX, 15 JKUR
    Location
    SoCal

    Quote Originally Posted by Kid Red View Post
    I am not a skilled mechanic by any stretch, so don't let my failure have too much impact.

    My wife looked up the part number and believes the part we were given was for Quattro instead of our FWD. So that seems like a simple mistake. My hands are still sore. It's that hose that goes rearward, it had the coolant corroded all in and around the end of it. So it was fused in place, I got no movement on it at all and I didn't want to mess that piece up using prying tools.
    I can relate. Not the most skilled either but dig in a do most everything myself (thanks mostly to all the info I get from AZ).

    I have found a few parts that appear easy to remove/install to be extremely challenging for a number of reasons. I end up with most of my bumps and bruises from the easy jobs...get too complacent. My daughter asked why my thumbnail is blue the other day....got that while changing out the Rear Sway Bar....one of the easiest items I've done but came out of it with a zinger on the thumb. Stupid thing was stuck in there and gave it a yank...it came free alright, too quickly.

    I'll take some pics while doing it and post...don't appear to be too many helpful shots for this challenge.
    2007 2.0T Q 6MT, S-Line, Ti Package, BB
    Revo Stage 2 | JHM Stage 1 Clutch | K&N Drop in | APR HPFP | 034 HFC | AWE Catback | 034 SD Tranny & Motor Mounts | Neuspeed Snub | H&R Sport Springs | Bilsteins | Moog ACA | B5 Perches (removed) | RS4 RSB | ABT Drilled n Slotted Rotors | Redstuff Front & Akebono Rear | Podi Stepper Boost Gauge | Recaro's | H&R Spacers 15f/20r | Clear Corners w/Blackout | Smoked Frt Markers | Cupra R Lip | 20% Tint

  26. #26
    Veteran Member Three Rings Kid Red's Avatar
    Join Date
    Feb 05 2008
    AZ Member #
    24931
    Location
    Orlando, FL

    Haha, I hope I never get a blue fingernail. Because I work with a mouse in my hand (user interface designer) 8 hours a day, I am hesitant to commit my hands to anything too crazy or stubborn that might result in more than just raw or cut skin. I met my threshold with this flange :)
    2010 BMW 335i Sapphire Black + Black leather interior + Sport + Nav + PDC. Mods - Carbon Fiber wrapped interior - Gloss Black grill - 15% tint - more coming

    2006 A4 2.0T Quartz Grey + Black leather interior + Convenience. Mods - 19" VM RS4 reps - FK Silverline coilovers - APR 93 - Navigation - S4 mirror caps - S-Line E-Codes/Bi-Xenons - XenonMatch Hoen Fogs - RS4 sport pedals - LED License plate lights - black grill - 15% tint all around & More mods coming.

  27. #27
    Veteran Member Four Rings mcpcartier's Avatar
    Join Date
    Oct 14 2011
    AZ Member #
    82586
    My Garage
    12 Taco, 13 Ex, 16 Civic EX, 15 JKUR
    Location
    SoCal

    So I cheated.....I figured I was due for a carbon cleaning and my vacuum pump was leaking so I made room by removing the intake manifold and the vacuum pump (which is mounted right above the coolant flange).

    I still found the lower hose crazy painful to pull off the flange. I left the flange connected to the block and used a big screwdriver to pry it down, it finally popped free. I don't know how you'd separate them if the flange was swinging in the air. The o-ring that goes inside the elbow fell out, luckily I saw it sitting on top of my tranny so didn't figure that out when it leaked.

    A couple of things to note....the old flange had started to disintegrate at the bottom by the o-ring, hence the big leak. The second thing that I noticed was the bottom outlet looks different on the new flange....I was worried, but its been a few days and no leaks...so I guess that doesn't matter.


    By mcpcartier at 2012-09-11

    Here are some pics that just give some vantage points for viewing....

    the first two are the new one installed...


    By mcpcartier at 2012-09-11


    By mcpcartier at 2012-09-11


    notice all the degradation on the one being removed...a bit of carbon buildup as well. I was able to leave the hose connected and pull it up above the engine to disconnect because the vacuum pump was removed....therefore giving me room to swing it up between the firewall and block. I think if if the vacuum pump was there it would have been challenging pulling the big hose back enough on the drivers side to get it out that way....but it might have been possible, but i didn't need to find out the hard way.


    By mcpcartier at 2012-09-11
    2007 2.0T Q 6MT, S-Line, Ti Package, BB
    Revo Stage 2 | JHM Stage 1 Clutch | K&N Drop in | APR HPFP | 034 HFC | AWE Catback | 034 SD Tranny & Motor Mounts | Neuspeed Snub | H&R Sport Springs | Bilsteins | Moog ACA | B5 Perches (removed) | RS4 RSB | ABT Drilled n Slotted Rotors | Redstuff Front & Akebono Rear | Podi Stepper Boost Gauge | Recaro's | H&R Spacers 15f/20r | Clear Corners w/Blackout | Smoked Frt Markers | Cupra R Lip | 20% Tint

  28. #28
    Veteran Member Four Rings Charles.waite's Avatar
    Join Date
    Jun 27 2011
    AZ Member #
    77478
    Location
    Seattle, WA

    Haha you guys think this is bad? Try replacing the flange on the 1.8t! Worst experience ever...

    Best way to do this is to get enough slack on the hoses and remove the flange first with the hoses attached. Also takeout the airbox to give yourself some access from the side if necessary, if only to be able to stop and see what you're doing occasionally.

    Then use a straight or angled pick and pry the hoses off the flange. The coupler with the metal locking tab takes quite a bit of grunt but just try to wiggle it loose and pull, but don't go full gorilla on it or you might break the coupler. Install in reverse. I would install the new temp sensor (if you got one) before mounting the flange back on.

    Also the temp sensor is a grey, two pin kind. If you got a green 4 pin one it's the old style for the b6 1.8t and is the wrong one. It's physically similar and if you connect the 2 pins on the connector to the correct pins on the sensor it'll work just fine, but its stupid to mess with that and possibly cut harness wires just because you have the wrong sensor. Buy the right one.

    Also I've never attempted to remove the vacuum pump, but getting that out of the way would make this job MUCH easier. It might take a bit more time, but it'll save you a LOT of frustration.
    -CP
    2008 2.0t S-Line Ti 6MT Avant
    2017 Q7 3.0t
    SOLD -- 2012 Q5 2.0t - Stock Mommy Missile with new timing chains
    Former USP CLUB MEMBER #136
    2004 A4 1.8TQ 6MT USP - APR Stage 1+ - FSI Coils - BKR7EIX-11 - B6S4 Front + B7A4 Rear Brakes - 034 Street Trans Mount
    SOLD -- 2006 A4 2.0TQ Avant Tiptronic

  29. #29
    Veteran Member Four Rings mcpcartier's Avatar
    Join Date
    Oct 14 2011
    AZ Member #
    82586
    My Garage
    12 Taco, 13 Ex, 16 Civic EX, 15 JKUR
    Location
    SoCal

    Quote Originally Posted by Charles.waite View Post
    Haha you guys think this is bad? Try replacing the flange on the 1.8t! Worst experience ever...

    Best way to do this is to get enough slack on the hoses and remove the flange first with the hoses attached. Also takeout the airbox to give yourself some access from the side if necessary, if only to be able to stop and see what you're doing occasionally.

    Then use a straight or angled pick and pry the hoses off the flange. The coupler with the metal locking tab takes quite a bit of grunt but just try to wiggle it loose and pull, but don't go full gorilla on it or you might break the coupler. Install in reverse. I would install the new temp sensor (if you got one) before mounting the flange back on.

    Also the temp sensor is a grey, two pin kind. If you got a green 4 pin one it's the old style for the b6 1.8t and is the wrong one. It's physically similar and if you connect the 2 pins on the connector to the correct pins on the sensor it'll work just fine, but its stupid to mess with that and possibly cut harness wires just because you have the wrong sensor. Buy the right one.

    Also I've never attempted to remove the vacuum pump, but getting that out of the way would make this job MUCH easier. It might take a bit more time, but it'll save you a LOT of frustration.
    The 1.8T looked crazy...I found a DIY, but not for the B7. I like how you just keep removing parts until you can actually work on it. These babies are really hidden away.

    http://www.a4mods.com/index.php?page...tml&category=5
    2007 2.0T Q 6MT, S-Line, Ti Package, BB
    Revo Stage 2 | JHM Stage 1 Clutch | K&N Drop in | APR HPFP | 034 HFC | AWE Catback | 034 SD Tranny & Motor Mounts | Neuspeed Snub | H&R Sport Springs | Bilsteins | Moog ACA | B5 Perches (removed) | RS4 RSB | ABT Drilled n Slotted Rotors | Redstuff Front & Akebono Rear | Podi Stepper Boost Gauge | Recaro's | H&R Spacers 15f/20r | Clear Corners w/Blackout | Smoked Frt Markers | Cupra R Lip | 20% Tint

  30. #30
    Veteran Member Four Rings Charles.waite's Avatar
    Join Date
    Jun 27 2011
    AZ Member #
    77478
    Location
    Seattle, WA

    Oh the humanity!!!

    Yea man its a total joke with the 1.8t. Luckily (or unluckily depending on how you look at it) I had my engine half apart when I did the rear flange on my 1.8t, but even then I had to remove a ton of crap just to get there.

    Of particular interest should be the random spiderwebs of hoses and check valves that you 2.0t guys will never have to deal with. Be VERY VERY thankful...

    Of course the 1.8t has no super-fun-time HPFP/Cam Follower to deal with, so you win some, you lose some...

    Edit: Pics of my Rear flange. It was disgusting...
    -CP
    2008 2.0t S-Line Ti 6MT Avant
    2017 Q7 3.0t
    SOLD -- 2012 Q5 2.0t - Stock Mommy Missile with new timing chains
    Former USP CLUB MEMBER #136
    2004 A4 1.8TQ 6MT USP - APR Stage 1+ - FSI Coils - BKR7EIX-11 - B6S4 Front + B7A4 Rear Brakes - 034 Street Trans Mount
    SOLD -- 2006 A4 2.0TQ Avant Tiptronic

  31. #31
    Veteran Member Three Rings Noodle's Avatar
    Join Date
    Oct 16 2007
    AZ Member #
    21839
    Location
    Pittsburgh, PA

    If you aren't in a rush to get them I found them on genuineaudiparts.com. I'm running into the same issue but I only noticed it this morning on my way here (after topping it off last night just because I thought it was low).

    I still have to poke around when I get home. Def going to take some extra water on the ride though..

  32. #32
    Established Member Two Rings
    Join Date
    Oct 23 2012
    AZ Member #
    102780
    Location
    castle rock, colorado

    Quote Originally Posted by mcpcartier View Post
    ....clip... The second thing that I noticed was the bottom outlet looks different on the new flange....I was worried, but its been a few days and no leaks...so I guess that doesn't matter.


    By mcpcartier at 2012-09-11
    mcpcartier,
    I think you are saying the bottom outlet has that plastic ring on it and the new flange does not. I believe that ring came from inside the plastic housing/fitting that fits onto the bottom outlet. That ring goes up inside the housing/fitting and pushes up against the o-ring to hold it in place. I have seen this very same thing happen on the radiator fittings. If you are not leaking then the o-ring probably is seated correctly so i wouldn't bother taking it back apart. Just wanted to make others aware in case they have the same thing happen.

  33. #33
    Established Member Two Rings
    Join Date
    Oct 23 2012
    AZ Member #
    102780
    Location
    castle rock, colorado

    I made my second attempt to change out the coolant flange this weekend. As stated above this is a PITA job especially if you have big ape hands like me. Here are some tips. The flange bolts are 8mm triple square (12 point) drivers. You can buy a kit at Orilley, Carquest, Advance Auto for about $6 that have the 8mm like the picture above. On my first attempt I was able to get the passenger side flange bolt loose but ended up stripping the drivers side bolt so I stopped and put it all back together. The problem is these 12 point drivers have a 13mm hex (see picture above) which makes them too fat to get a strait shot at the bolt on the drivers side. These 12 point bolt heads also do not have very much engagement length. So it is very easy to strip out the head if you are not careful. Needless to say I am not very impressed with these triple square fasteners - I'll take a good old fashion 6 point hex (allen head) any day over these things!!!!!

    For my second attempt I did some more searching here on AZ and with a stripped bolt head I decided I needed more room to work. I decided to go ahead and remove the vacuum pump. I have to tell you that IMO this is the only way to do this job. The vacuum pump has three bolts (T30 torx) and one vacuum hose. It takes all of about 15 or 20 minutes to remove. The bottom T30 bolt is a little difficult but nothing like the flange bolts. Once it is removed you can actually reach down from directly above and with a mirror you can actually see what you are working on.

    With the pump removed and the passenger flange bolt out I was able to twist and break the flange out just leaving the stripped bolt in the head. O.K. now I am beyond the point of no return. It is either get that bolt out or call the tow truck!!!! After trying a couple of different things I was actually able to get a large vice grips on the bolt head and broke it free. I decided to abandon the worthless triple square bolts and use good old 6 point hex (allen) bolts on the flange. Size was 6mmX20mm, found these a Lowes.

    The next challenge was getting the damn hose clamp back on the flange. What is up with these hoses? They weld themselves to the metal pipe and it is impossible to get them off without damaging them. I ended up just using a good old fashion screw type hose clamp on the flange. As stated above it would make things much easier to just buy one or two of the hoses ahead of time and just cut them to remove then replace them. If anyone has a trick to get these hoses off the metal pipes I would like to know what it is. WD40, Kriol, PB Blaster did nothing. If I had to do it over I would R&R the hose at the flange and one of the others off the metal pipe. Reason being the flange hose clamp it difficult to get to and by replacing one of the metal pipe hoses you could take the whole assembly out of the car to get the flange clamp on.

    Hope these few tips help out for future DIYers. BTW my flange was is terrible shape - plastic was completely disintegrated. If it is any indication of the condition of the other plastic components in the cooling system then this car is a ticking time bomb.

  34. #34
    Senior Member Two Rings
    Join Date
    Feb 29 2012
    AZ Member #
    89052
    Location
    Charlotte, NC

    Here's a little background ... last year, around this time, this car started giving me the "coolant system performance" error code while also leaking coolant. I took it to the dealer in Pittsfield, MA. It went in about three times and they would do bullshit repairs like replace the temp sender, etc. I finally had enough of them and my client in the Berkshires and went back to Dallas and decided to work on the car myself. I did the Thermostat DIY and that took care of the error code but I noticed the coolant leak had stopped once I got to Dallas. The trick was the ambient temperature. No sooner did winter hit Dallas (albeit a lot milder than in the Berkshires) that the coolant leak returned. Interestingly enough, the error code hasn't. That means the thermostat replacement was not for nothing. Still, now the car is leaking coolant again, and fast. I had no idea there was yet ANOTHER f***ing coolant pipe junction in this mofo. That back side of the engine is TIGHT. I have no idea how people managed to get anything done in there. I will give it a try though. If I can wait a couple of months (until temps rise, basically), I may even get away with having it do it in a hurry. I would rather do it all as part of my planned fuel delivery overhaul (new fuel pumps, new injectors, valve cleaning, etc).

    Anyway, thank you to the OP for creating this thread. I finally searched for "audi a4 b7 coolant leak" and found this. Last time I was misdirected due to the CEL error code.

    Here are some things I learned from doing the thermostat replacement which apply to this DIY as well:
    a) draining the coolant is probably the neatest way to approach any coolant line work ... you can even save the coolant (if it's mostly new) and put it back into the system when you're done
    b) that being said, turning the coolant drain valve is a b***h! It's at the bottom driver-side corner of the radiator, near where the big coolant pipe connects to it. It's plastic and it won't budge (at least it didn't for me) so be careful not to break it. I had to crawl under the bumper and contort my hands in a certain way to reach it. I think I used pliers to get it to move eventually.
    c) the flexible coolant lines (elbows, mostly) can be removed with grips ... just squeeze in the middle and pull ... they won't tear; if you want to play it safe, buy replacement ones from the dealer for around $5 each
    d) invest in a clamp remover ... they're around $25-35 at auto part stores but are worth every penny ... you can sit there and f*** around with grips for half an hour and trying to squeeze with one hand while you move the clamp with the other or you can do it in 5 seconds with a proper tool ...

    Merry f***ing Christmas, everybody! (I hate this car, and especially the dealer who replaced the temp sender, probably noticed the bad seal on the flange, and said, "f*** him, he'll just have to bring it back in and pay another $300 to fix that")
    2019 Audi e-tron Prestige | Glacier White | 21” | Cold Weather | Audi Beam Rings

  35. #35
    Veteran Member Four Rings mcpcartier's Avatar
    Join Date
    Oct 14 2011
    AZ Member #
    82586
    My Garage
    12 Taco, 13 Ex, 16 Civic EX, 15 JKUR
    Location
    SoCal

    Even after fighting through all the maintenance crap (TB, thermostat, coolant flange, carbon cleaning) I still love driving this baby.

    I was quoted $1084 by mission audi to change the vacuum pump and coolant flange...so probably a little more than $300 to do it.

    Can you post a pick or link of the clamp remover.....I don't have one and could really use one but not sure what you're talking about. Every time I run up against one of those clamps I cringe. The one on the turbo intake is a pain and I keep taking that stuff out to get better results cleaning the engine bay.
    2007 2.0T Q 6MT, S-Line, Ti Package, BB
    Revo Stage 2 | JHM Stage 1 Clutch | K&N Drop in | APR HPFP | 034 HFC | AWE Catback | 034 SD Tranny & Motor Mounts | Neuspeed Snub | H&R Sport Springs | Bilsteins | Moog ACA | B5 Perches (removed) | RS4 RSB | ABT Drilled n Slotted Rotors | Redstuff Front & Akebono Rear | Podi Stepper Boost Gauge | Recaro's | H&R Spacers 15f/20r | Clear Corners w/Blackout | Smoked Frt Markers | Cupra R Lip | 20% Tint

  36. #36
    Senior Member Two Rings
    Join Date
    Feb 29 2012
    AZ Member #
    89052
    Location
    Charlotte, NC

    You're right, it's not the car's fault. I was just driving it a couple of hours ago and was thinking to myself "when it's not taking a dump on me, it is an absolute joy to drive." I'm just mad at the brand for making these so difficult (read: expensive) to maintain and at the dealers for capitalizing on that and screwing us every chance they get. I don't mind paying for a repair but the s***'s not even getting fixed properly.

    Anyway, I'm glad you asked about the hose clamp pliers ... here's what I bought at AZ: http://www.autozone.com/autozone/acc...er=607069_0_0_ ... currently selling for 34.99. If you're not in a rush you can probably shop around for prices and manufacturers but I was in a bind and thanked my lucky stars they had this. At first I balked at the idea of paying $35 when similar, non-sophisticated tools cost much less than this but seeing is believing ... after unsuccessfully battling a hose clamp with channellock pliers for an hour and cursing up and down, you use this tool and move it EFFORTLESSLY within seconds and suddenly a halo lights up above you. It was like a Christmas miracle in March for me. For the largest hose clamps (air box, etc), you will need to nudge one end of the clamp a little with some tool before attaching the hose clamp plier spring as it only goes so wide (2" maybe?). It was still feasible though. The rest of the clamps in the car are a piece of cake. It's like going from a square wheel to a round wheel.
    2019 Audi e-tron Prestige | Glacier White | 21” | Cold Weather | Audi Beam Rings

  37. #37
    Veteran Member Four Rings mcpcartier's Avatar
    Join Date
    Oct 14 2011
    AZ Member #
    82586
    My Garage
    12 Taco, 13 Ex, 16 Civic EX, 15 JKUR
    Location
    SoCal

    Quote Originally Posted by dcchristopher View Post
    You're right, it's not the car's fault. I was just driving it a couple of hours ago and was thinking to myself "when it's not taking a dump on me, it is an absolute joy to drive." I'm just mad at the brand for making these so difficult (read: expensive) to maintain and at the dealers for capitalizing on that and screwing us every chance they get. I don't mind paying for a repair but the s***'s not even getting fixed properly.

    Anyway, I'm glad you asked about the hose clamp pliers ... here's what I bought at AZ: http://www.autozone.com/autozone/acc...er=607069_0_0_ ... currently selling for 34.99. If you're not in a rush you can probably shop around for prices and manufacturers but I was in a bind and thanked my lucky stars they had this. At first I balked at the idea of paying $35 when similar, non-sophisticated tools cost much less than this but seeing is believing ... after unsuccessfully battling a hose clamp with channellock pliers for an hour and cursing up and down, you use this tool and move it EFFORTLESSLY within seconds and suddenly a halo lights up above you. It was like a Christmas miracle in March for me. For the largest hose clamps (air box, etc), you will need to nudge one end of the clamp a little with some tool before attaching the hose clamp plier spring as it only goes so wide (2" maybe?). It was still feasible though. The rest of the clamps in the car are a piece of cake. It's like going from a square wheel to a round wheel.
    Thanks for posting....I think I need one of those before my next chore under the hood.

    Changing out the tranny and rear diff fluids later this week so it can wait a little bit.
    2007 2.0T Q 6MT, S-Line, Ti Package, BB
    Revo Stage 2 | JHM Stage 1 Clutch | K&N Drop in | APR HPFP | 034 HFC | AWE Catback | 034 SD Tranny & Motor Mounts | Neuspeed Snub | H&R Sport Springs | Bilsteins | Moog ACA | B5 Perches (removed) | RS4 RSB | ABT Drilled n Slotted Rotors | Redstuff Front & Akebono Rear | Podi Stepper Boost Gauge | Recaro's | H&R Spacers 15f/20r | Clear Corners w/Blackout | Smoked Frt Markers | Cupra R Lip | 20% Tint

  38. #38
    Established Member Two Rings jpjmustang's Avatar
    Join Date
    May 23 2013
    AZ Member #
    115769
    My Garage
    2014 Audi Q7 TDI - 2011 BMW 328I
    Location
    Missouri

    2006 a4 2.0t - BOLTS

    All that I read he is correct - one of the worst jobs to date - even worse than the timing belt

    The bolts on the 2006 were 35 torx - I tried everything else - 8 double square - 30 and 40

    Just happend to have a 35 is a cheap set - and it fit

    Im not going to comment on how long it took

    JPJM
    Last edited by jpjmustang; 10-26-2013 at 11:29 AM.

  39. #39
    Senior Member Three Rings Jhad's Avatar
    Join Date
    Aug 03 2012
    AZ Member #
    98058
    My Garage
    '11 Touareg
    Location
    SEPA

    ^ I know your pain. I did this on a b6 about a month ago... What a pain in the balls

  40. #40
    Senior Member Two Rings joshigd's Avatar
    Join Date
    Oct 22 2012
    AZ Member #
    102716
    My Garage
    1994 Toyota Supra - 624Whp,538Wtq on 93 Pump (667whp on E65..more to come)
    Location
    Kentucky

    I seem to have sprung a coolant leak as well... Does mine look similar to your alls? I doesnt look as if the flange leaked where it makes contact with the motor.. looks more like bottom part of flange leaked.. I hope its this or I may have bigger problems...


    On this last picture, it looks as if there is some coolant ABOVE the flange... like maybe the flange sprayed?? coolant up there? Fingers crossed its not coming from above :(

    Supra Dyno - http://www.youtube.com/watch?v=RCtwRmd-rM4 _ Its in the middle of body work.....
    Supra Dyno Graph - 93 Pump Gas - http://batlground.com/blog/batlgroun...josh-pump1.jpg (Bigger Pic Now)

Page 1 of 8 123 ... LastLast


Tags for this Thread

Bookmarks

Posting Permissions

  • You may not post new threads
  • You may not post replies
  • You may not post attachments
  • You may not edit your posts
  •  


    © 2001-2025 Audizine, Audizine.com, and Driverzines.com
    Audizine is an independently owned and operated automotive enthusiast community and news website.
    Audi and the Audi logo(s) are copyright/trademark Audi AG. Audizine is not endorsed by or affiliated with Audi AG.