


So far we have the following:
Remote Windows
Independent Fogs
Seat Belt Chime Off
RNS-E Directions via Cluster
Service Interval Reset
Increase Rear Taillight, Brake Light, and Fog Light Brightness
Equipment Required:
Laptop with Vag-Com software
Vag-Com Cable
Many people get very intimidated and uneasy about messing around with the car settings on the computer. The most important thing to know is that everything you do in this DIY CAN BE UNDONE. There is no reason to get nervous, you will not do any damage to your car. Simply follow the instructions and you will be fine.
I am doing all of this via Ross-Tech Vag-Com with USA factory settings. If you are outside the USA the stored values might vary. Also, other conventional vag-com units can be purchased to do these modifications. The process is probably somewhat the same.
Step 1: Hooking up the Vag-Com
First step is to plug in your Vag-Com to the OBD-2 port. It is the purple connector located right behind the hood latch under the steering wheel. Once you have plugged it in, connect it to your laptop device.
Make sure you are running the most recent version of Ross-Tech's software. You will most likely be prompted if you are not.
***HAVE YOUR KEY IN THE IGNITION TURNED ON ACCESSORY MODE. VCDS WILL NOT WORK IF THS IS NOT DONE***
Step 2: Let the fun begin!
Start VCDS
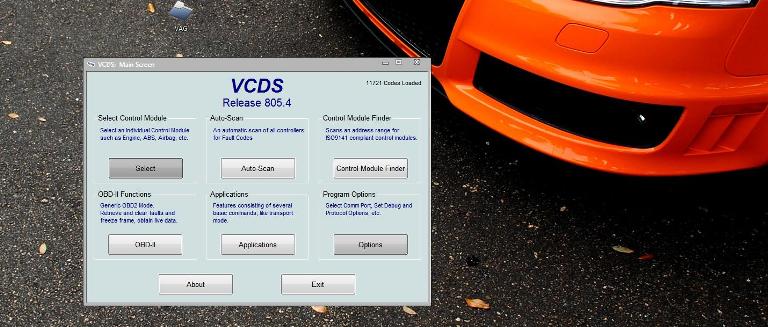
First thing you want to do is to make sure the VAG-COM is properly connected to your car. Click OPTIONS in the bottom right corner.
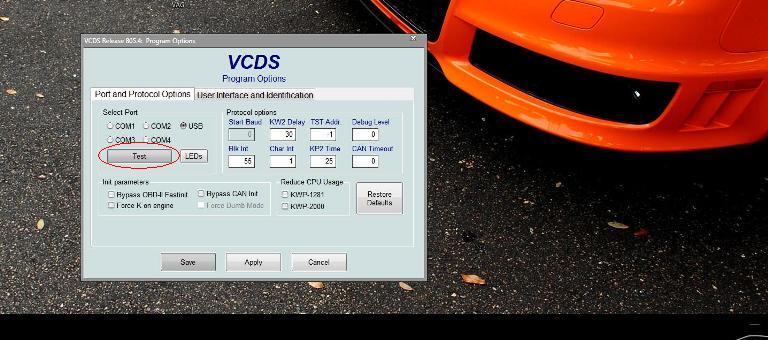
You will now be taken to the Program Options menu. Under Port and Protocol Options select TEST as shown below.
After you hit test the program will test the connection between the Vag-Com and the cars computer. After a few seconds you will get a screen shown below. Make sure the Status reads READY.
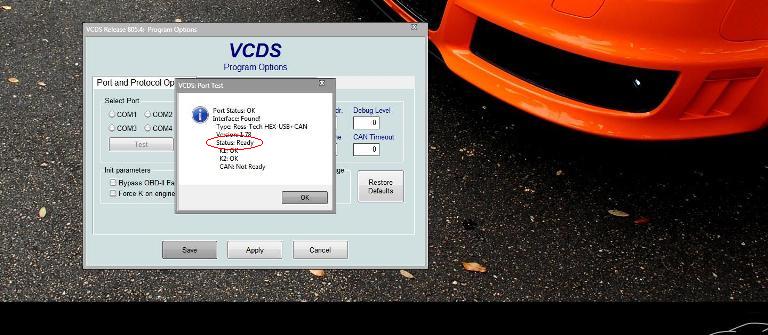
Hit SAVE and return to the make screen.
REMOTE WINDOWS
This procedure will enable you to roll up/down your windows via key fob. Note that this will close your sunroof, but will not open it when holding the unlock button down.
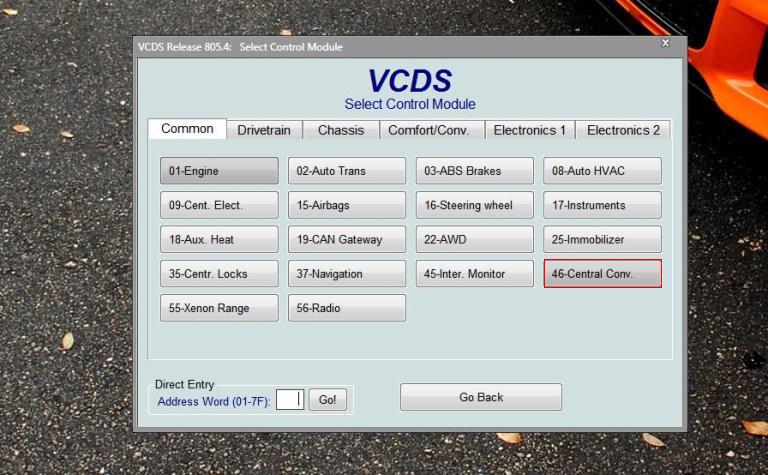
From the start screen hit SELECT under Select Control Module

You will now be taken to a list of the control modules present in your car. For this modification we are interested in 46-Central Convenience.
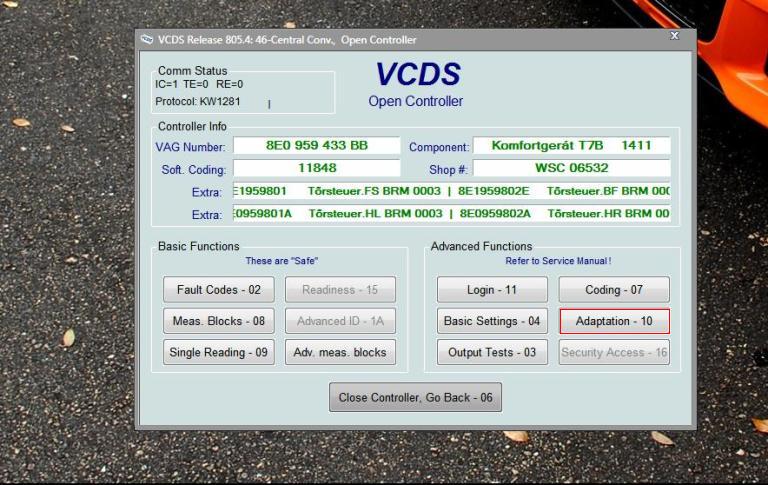
Once you select Central Convenience you will be taken to the Open Controller screen shown below. We must first check a value in the adapation menu. Select Adaptation-10.
You will now be taken to the adaptation menu for the central convenience module. In the Channel section type in 62. Once you type this value in, hit READ.
*A quick explanation here about the coding. A numbered value (bits) represents an action in the car computer. Changing a value will cause different effects in the car.
For example, let's take the screen below. In order for this mod to work we need a value of 95 in the Stored Value section. Well what does that mean you might ask? It is quite simple. As we review the pop up screen in the picture below... We can see that if we add the ON bits we will get 95.
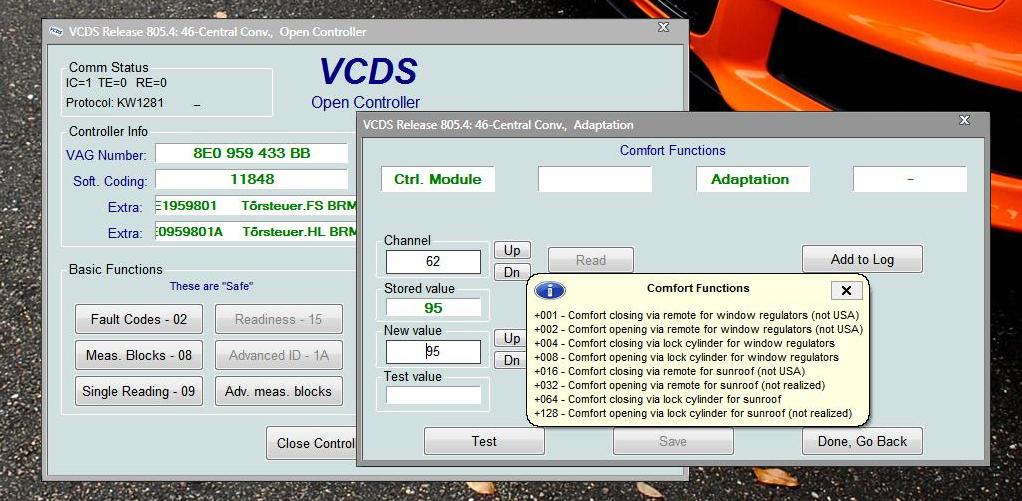
ON +1 Comfort Closing with remote
ON +2 Comfort Opening with remote
ON + 4 Windows up with key in lock cylinder
ON + 8 Windows down with key in lock cylinder
ON +16 Comfort Close for sunroof close with remote
OFF +32 Comfort Open for sunroof with remote
ON +64 Comfort sunroof close with key in lock cylinder
OFF +128 Comfort sunroof open with key in lock cylinder
The bits that are ON will do just what they say. Say we change the value to 94, esentially turning off bit 1. This action will cause the windows up with remote to become disabled. For a better explanation please click HERE.
Back to the procedure; If you have a value of 95 you are good to go. If you do not have a value of 95 in Stored Value simply type in 95 under New Value and hit TEST. Next hit SAVE. The coding will then be stored. Finally hit DONE GO BACK.
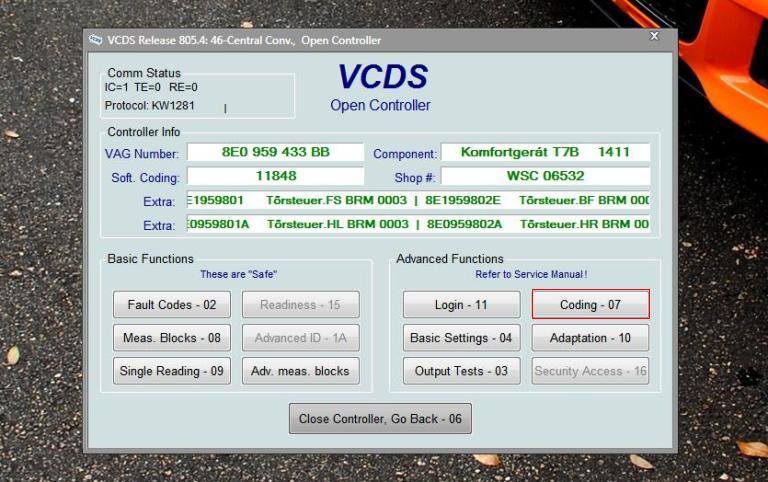
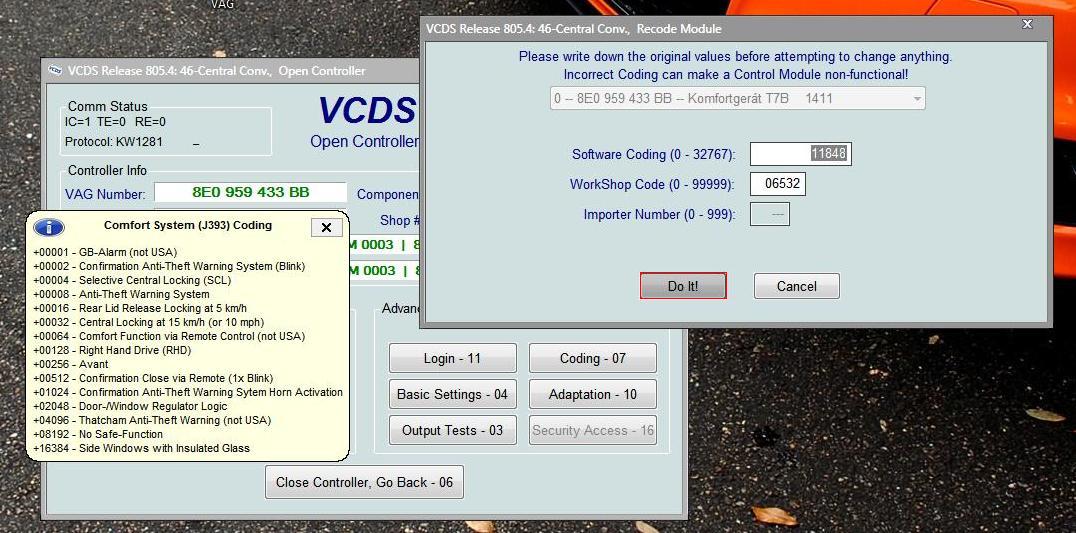
You will be taken back out to the Open Controller screen. Now we want to select CODING-07.
You will be prompted with the Recode Module. If this is the first time working via VAG-COM your Software Coding should read a value of 11788. If it does not, don't freak out. This just means someone has changed the coding already.
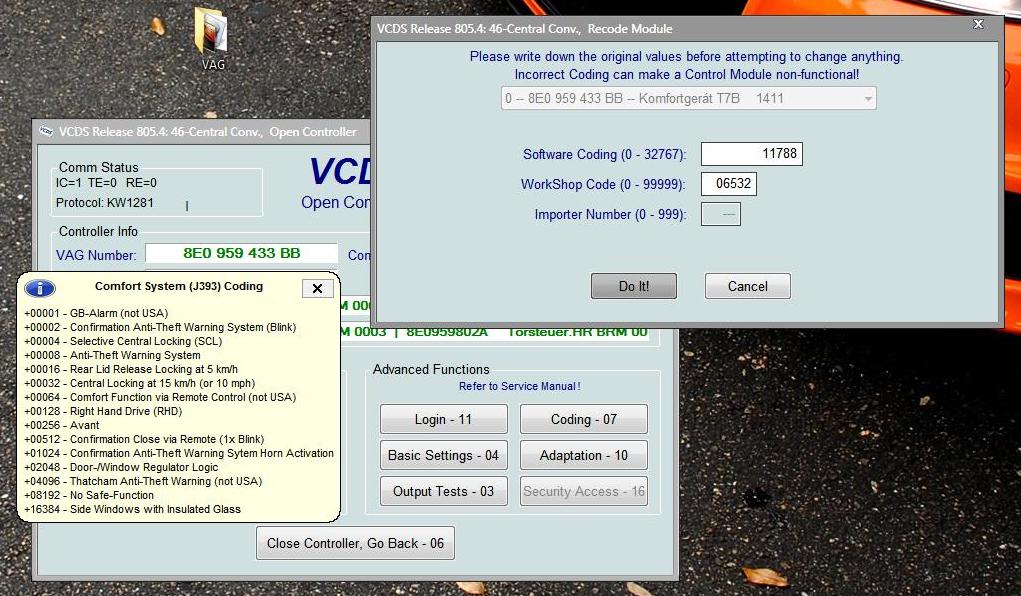
As you can see the coding works just like the adaptation function did. In the pop up menu you will see:
+00064- Comfort Function Via Remote Control
In order to enable this feature we must add a value of 64 to the existing software value of 11788.
11788 + 64 = 11852
Note in the picture below i have a value of 11848. This is because i have selective locking turned off. Check the pop up menu again. By subtracting 4 i am able to 1 touch open all of my doors with my remote. It is optional, personal preference. Once you have the value you want stored hit DO IT!
Your computer will now accept the coding. Once finished hit DONE GO BACK. Next hit CLOSE CONTROLLER, GO BACK.
You are done. Pop out your key and give it a test! Cool huh?
Independent Fogs
In addition to the hands on procedure found here....
FOG LIGHT MOD
We need to do a quick re-code for the independent fogs to work.
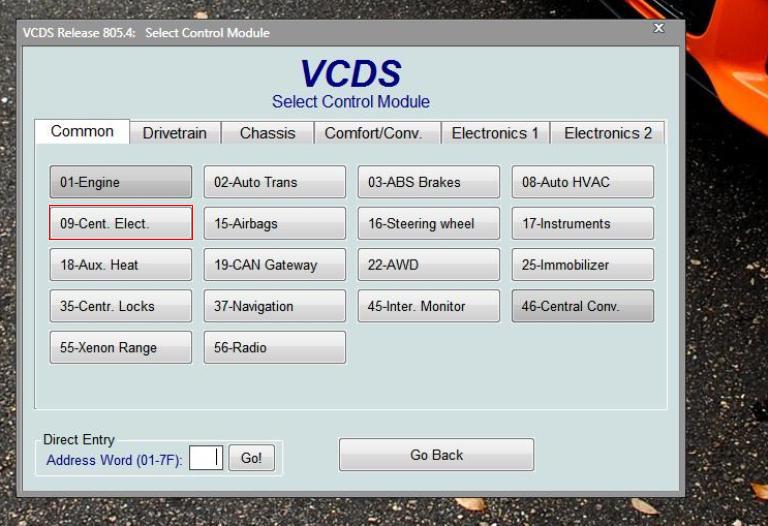
From the start screen hit SELECT under Select Control Module
You will now be taken to a list of the control modules present in your car. For this modification we are interested in 09- Central Electric.
Once in the Open Controller select CODING-07.
You will be prompted with the Recode Module. If this is the first time working via VAG-COM your Software Coding should read a value of XXXX3 (If in USA). We are only concerned with the last digit here. As you can see from the pop up the XXXX3 represents USA. We need to change this in order to run independent fogs. Simply change the XXXX3 to XXXX1 (Rest of the World) and hit DO IT!
Your computer will now accept the coding. Once finished hit DONE GO BACK. Next hit CLOSE CONTROLLER, GO BACK.
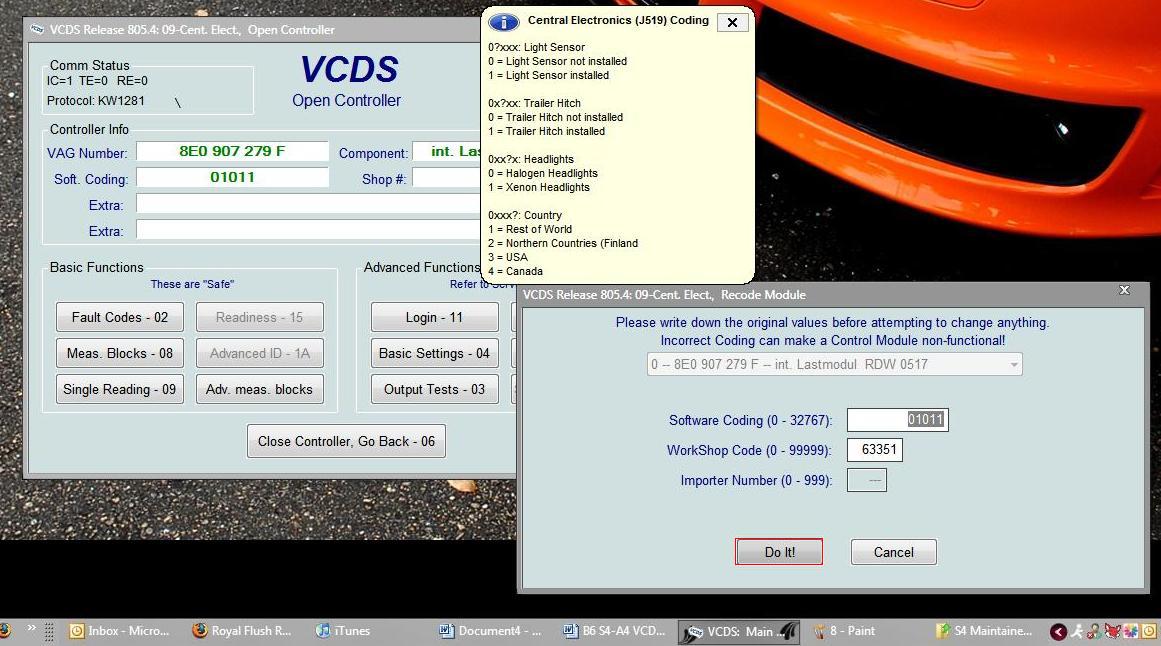
NOTE: It has been brought to my attention thanks to clumpymold that the B7 coding screen is a bit different. Below is how to enable this on the B7 S4.
Instead of the screen shown above, you will be prompted with a window that looks like this.

As you can see you have a couple of different options. To run independent fogs (DRL off) simply change the current value to 01031. Note the FOURTH digit should either be 1 (for halogen setups) or 3 (for xenon setups). Finally hit DO IT!

Your computer will now accept the coding. Once finished hit DONE GO BACK. Next hit CLOSE CONTROLLER, GO BACK.
You are done. Turn the headlight dial to the fog option and pull out once!
Seatbelt Chime OFF
Tired of that stupid chime? Let's get rid of it.
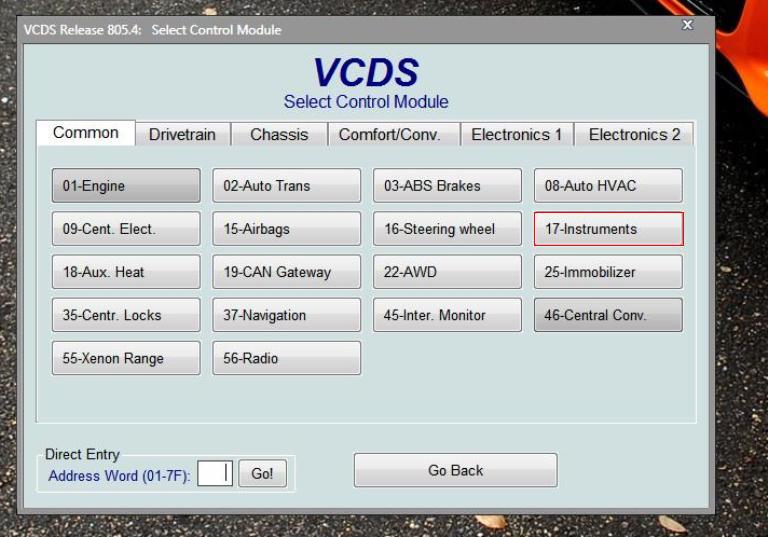
From the start screen hit SELECT under Select Control Module
You will now be taken to a list of the control modules present in your car. For this modification we are interested in 17- Instruments.
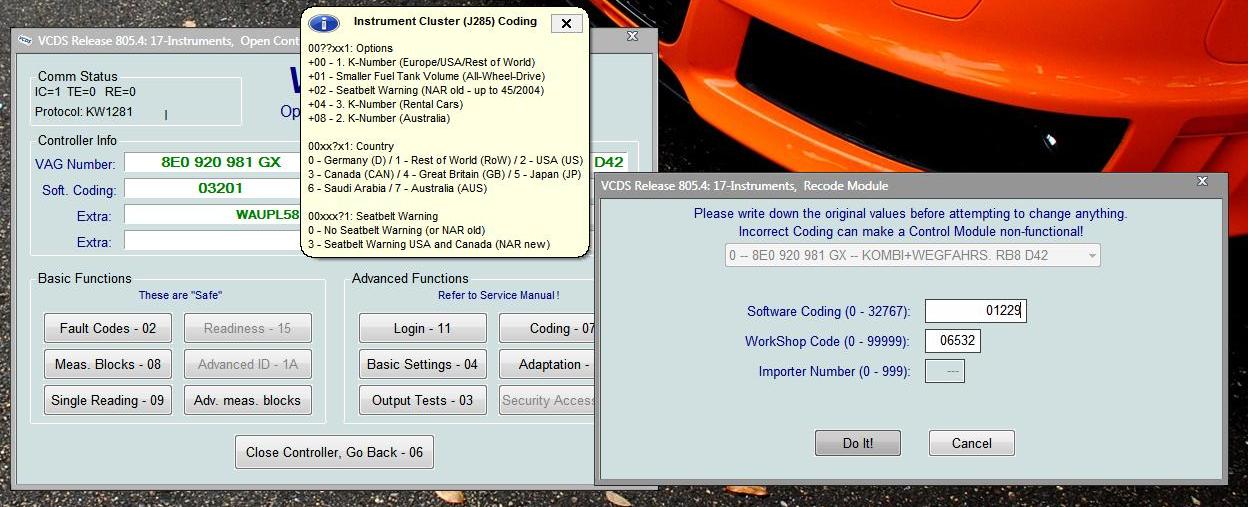
Once in the Open Controller select CODING-07.
You will be prompted with the Recode Module. If this is the first time working via VAG-COM your Software Coding should read a value 01231. The 2nd to last value (01231) is what we want to change. In this instance it is the "3".
In the Software Coding box RE-CODE to 01201. Hit DO IT!
Your computer will now accept the coding. Once finished hit DONE GO BACK. Next hit CLOSE CONTROLLER, GO BACK.
NOTE: This modification may or may not work. I have had success with many seat belt chimes by doing it this way, however, it has come to my attention that it doesnt work for some people. If it doesnt, simply recode to the previous value and forget it. If it does, you may now enjoy seat belt chime free!
RNS-E Directions in Instrument Cluster
Want to see directions pop up in your instrument cluster? Here's how.
From the start screen hit SELECT under Select Control Module
You will now be taken to a list of the control modules present in your car. For this modification we are interested in 17- Instruments.
Once in the Open Controller select Adaptation-10.
You will now be taken to the adaptation menu for the instrument module. In the Channel section type in 62. Once you type this value in, hit READ.
Depending what factory options you have will dictate the value in Stored Value. My stored value was set to 3. As we see in the pop up menu, you must add +4 to the stored value in order to get directions via instrument cluster.
Stored Value + 4 = Direction via Cluster
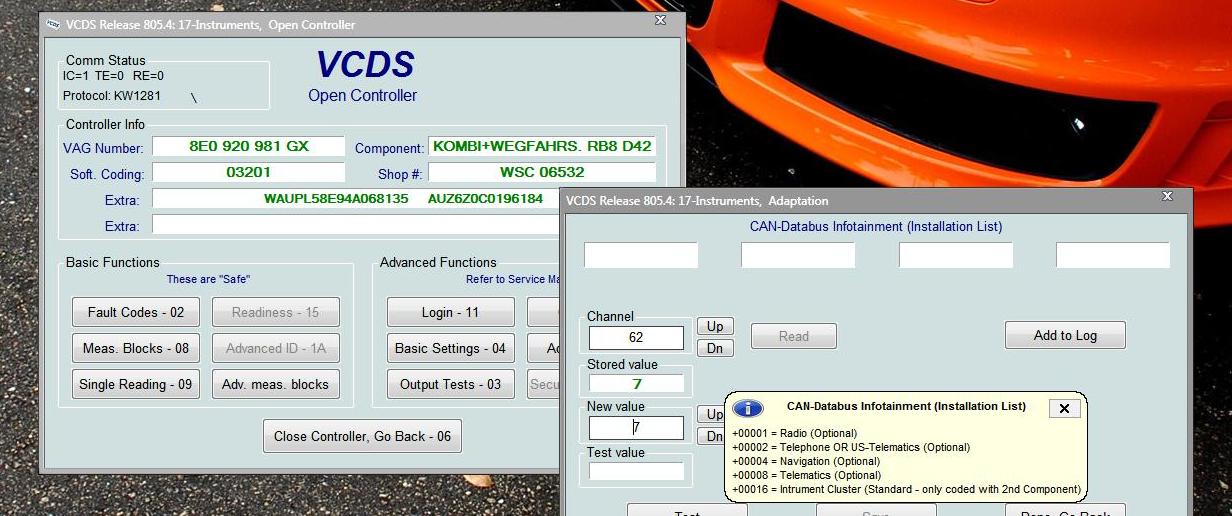
Once you add 4, hit TEST. Next hit SAVE. The coding will then be stored. Finally hit DONE GO BACK.
Please note that it may take up to 24 hours for this modification to take effect due to the CAN coding.
Service Interval Reset
Here's how to reset your service interval notification
From the start screen hit APPLICATIONS under Program Options
You will now be taken to the applications menu. Select SRI RESET.
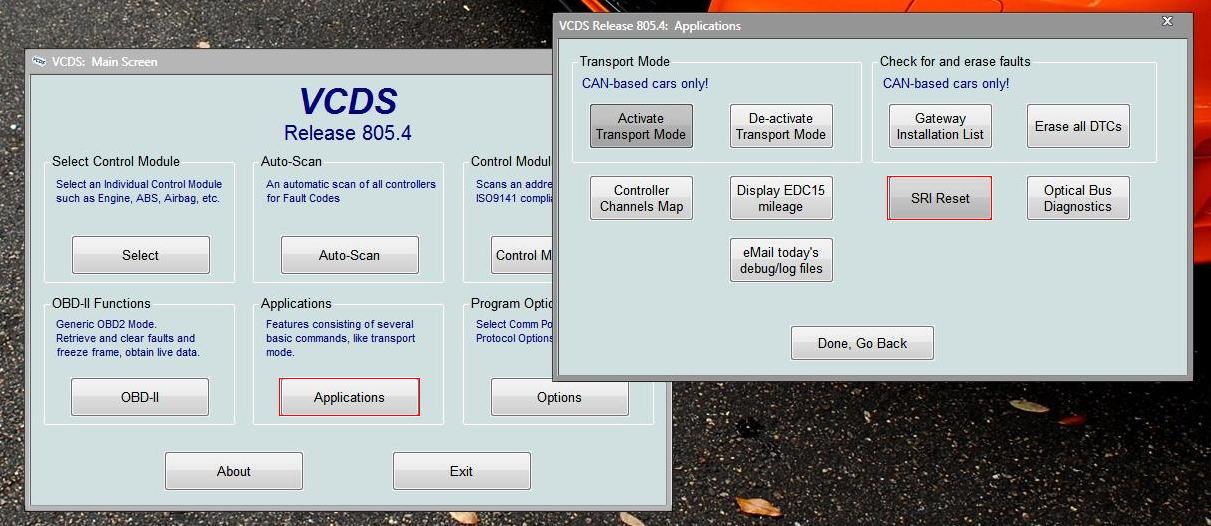
Here you can choose to do a simple Sevice Reminder Interval Reset. You can customize the SRI to how you like. For more information on customization please follow the link below
SRI Reset
Increase Tail Light Brightness
Here we can increase or decrease the brightness of the rear taillights, brakes, and foglight.
From the start screen hit SELECT under Select Control Module
You will now be taken to a list of the control modules present in your car. For this modification we are interested in 09- Central Electric.
Once in the Open Controller select Adaptation-10.
You will now be taken to the adaptation menu for the Central Electric module. In the Channel section you can select Channels 02, 03, 04; all of which control brightness of each component. Once you type in the value you want, hit READ.
After picking a percentage of brightness, hit TEST. Next hit SAVE. The coding will then be stored. Finally hit DONE GO BACK.
There we go guys, this is what i have down for now. Hope this helps.


Bookmarks