Audizine - An Automotive Enthusiast Community

Page 1 of 2 12 LastLast
Results 1 to 40 of 62
  1. #1
    Veteran Member Four Rings
    Join Date
    Feb 17 2004
    AZ Member #
    607
    Location
    Liberty Hill, TX

    DIY: B6 A4 1.8T - Thermostat Replacement

    Guest-only advertisement. Register or Log In now!
    I used the writeup by Mark955 on AW, but thought I'd add some pics for the more visually-oriented =)

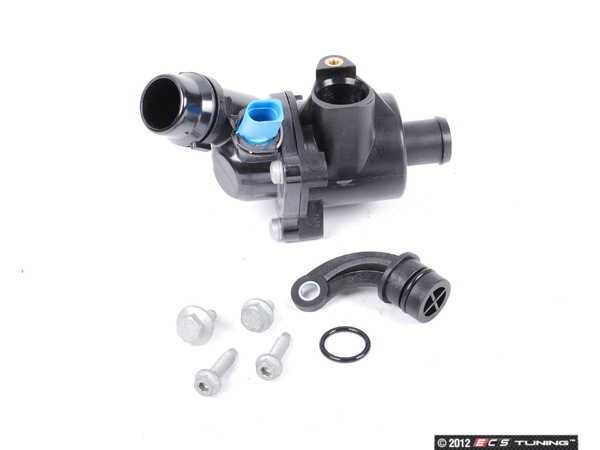
    Thermostat is part # 06B-121-111-G. my original was a -D, and I believe G is being replaced by H (as per my invoice).
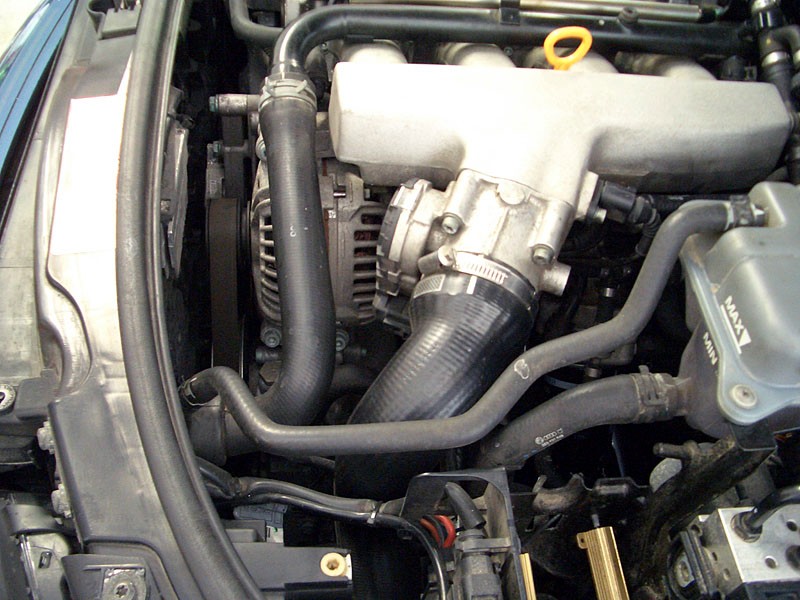
    the operating area:


    Step 1: Drain coolant (sorry no pics)

    Remove bottom belly pan. Remove coolant reservior tank cap. Remove plastic clip holding coolant sensor in place at lower radiator hose/pipe. With bucket/catch pan underneath, remove sensor and let coolant drain.


    Step 2: Remove upper radiator hose

    remove the small hose connecting the coolant reservior to the upper radiator hose. Then remove the larger hose from the hard pipe running along the intake and from the radiator. You'll need to pop up (but not off) the metal clip holding the hose to the radiator, then firmly pull back:
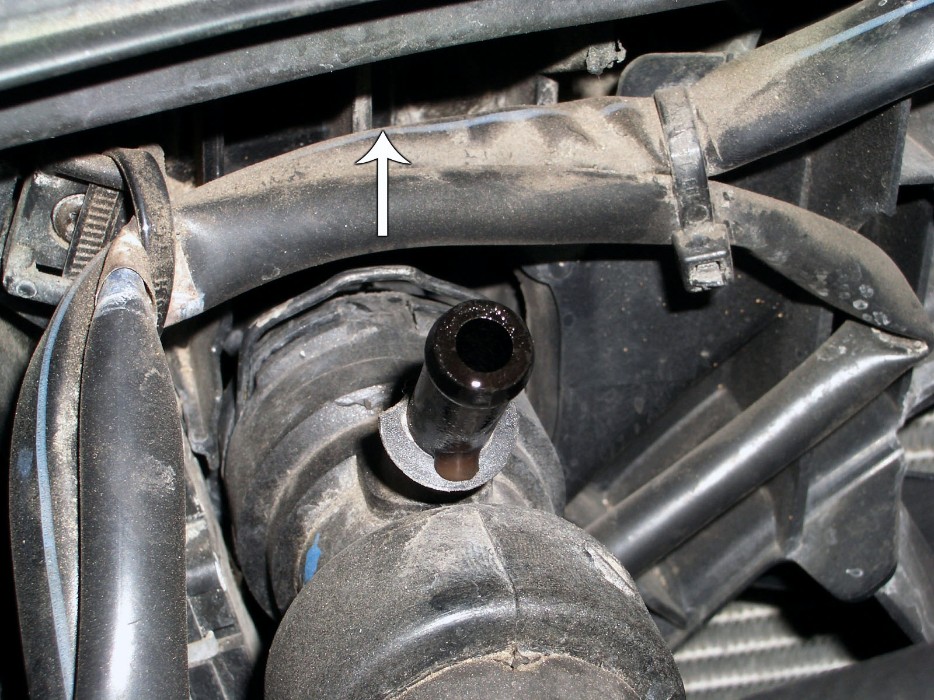


    hose removed:


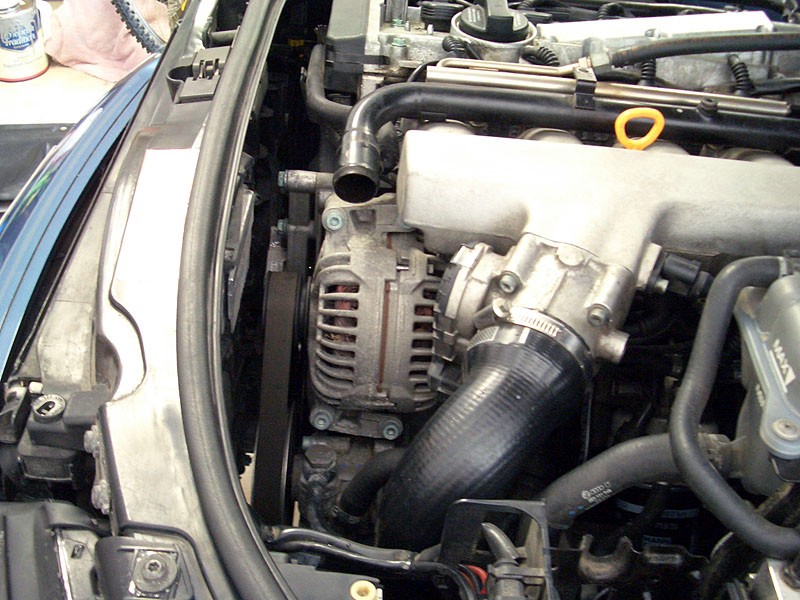
    Step 3: Remove intake hose (throttle body-to-intercooler)

    remove driver's side headlight (not necessary but makes it a lot easier). Loosen clamp at each end and remove hose.


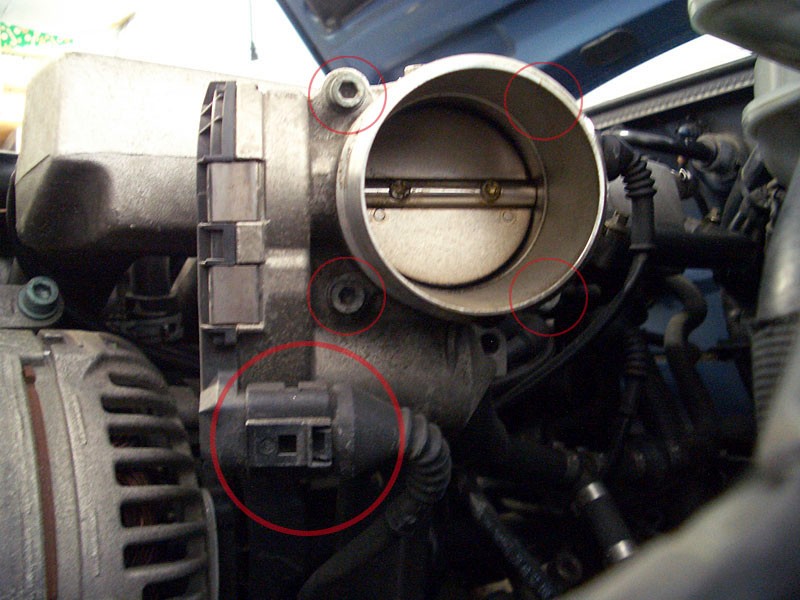
    Step 4: Remove throttle body

    remove electrical connector and 4 hex bolts (5mm):
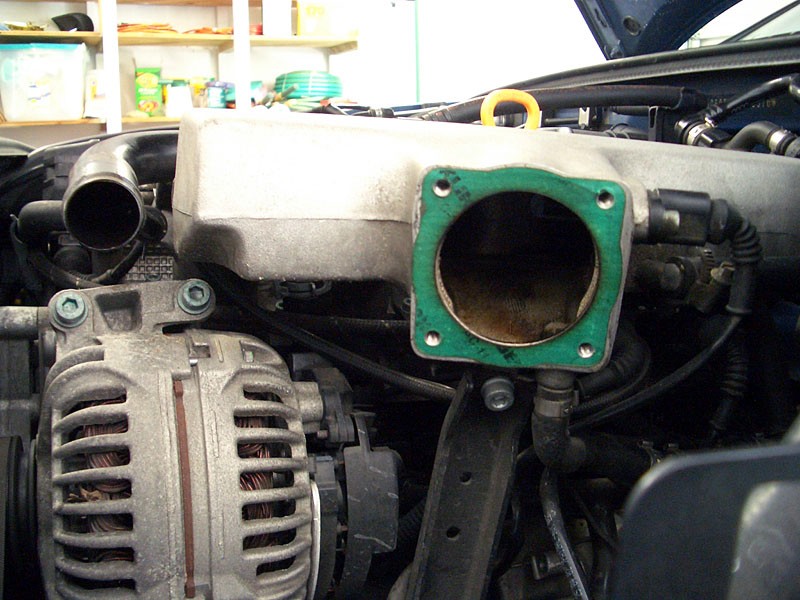


    removed:


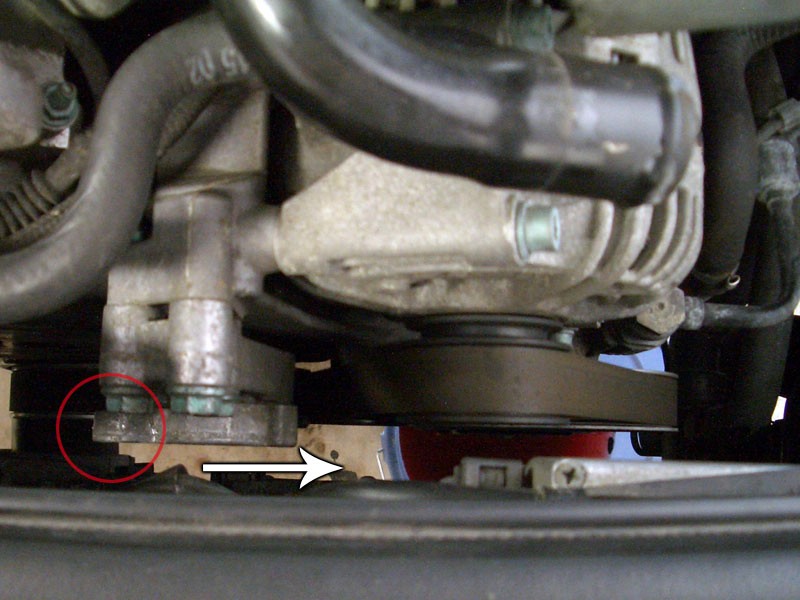
    Step 5: Loosen serpentine belt and slip off of alternator

    use a box-end or adjustable wrench on tensioner, pull to the right. Carefully slip belt off alternator (towards front of car). Allow to hang loose below


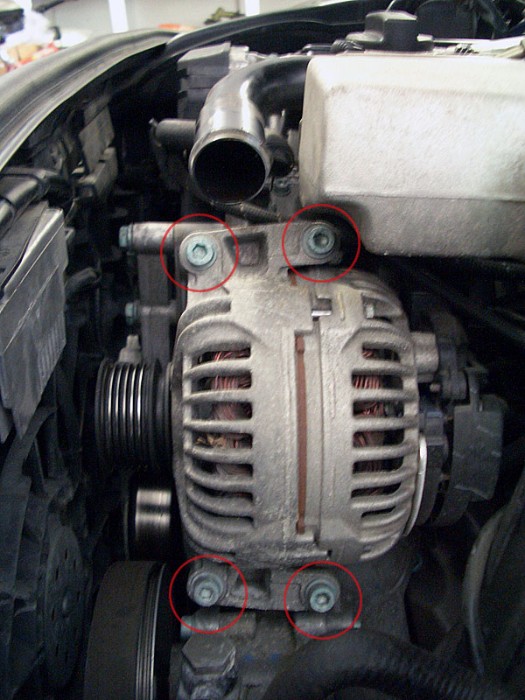
    Step 6: Remove alternator bolts

    remove 4 bolts holding alternator to bracket:


    Step 7: Remove electrical connector and grounding cable from alternator

    after removing the 4 bolts, lay the alternator face down on the top of the fan and remove the electrical connector, and the grounding strap. If you haven't disconnected the battery, be sure to cover the grounding strap in tape so it cannot touch other metal surfaces


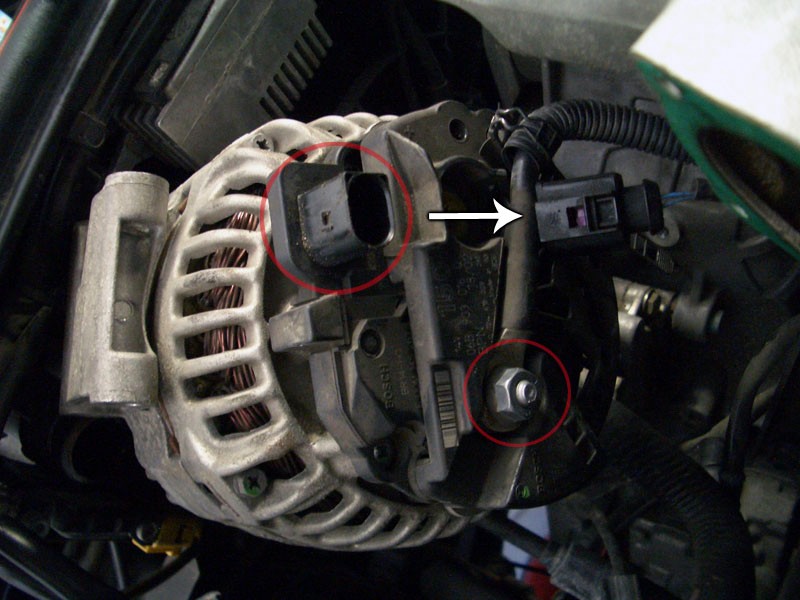
    alternator removed; grounding strap shown:


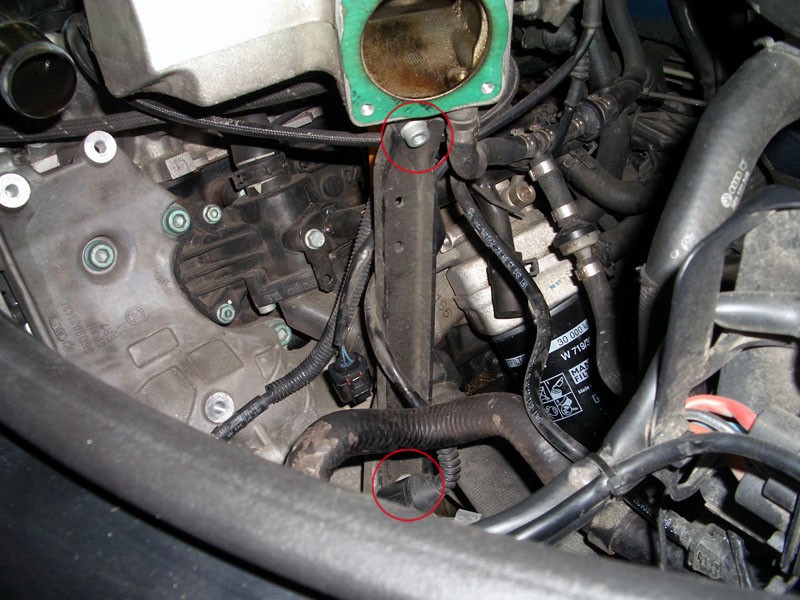
    Step 8: Remove vertical support piece from intake manifold to block

    remove the two bolts holding the support piece (6mm hex):


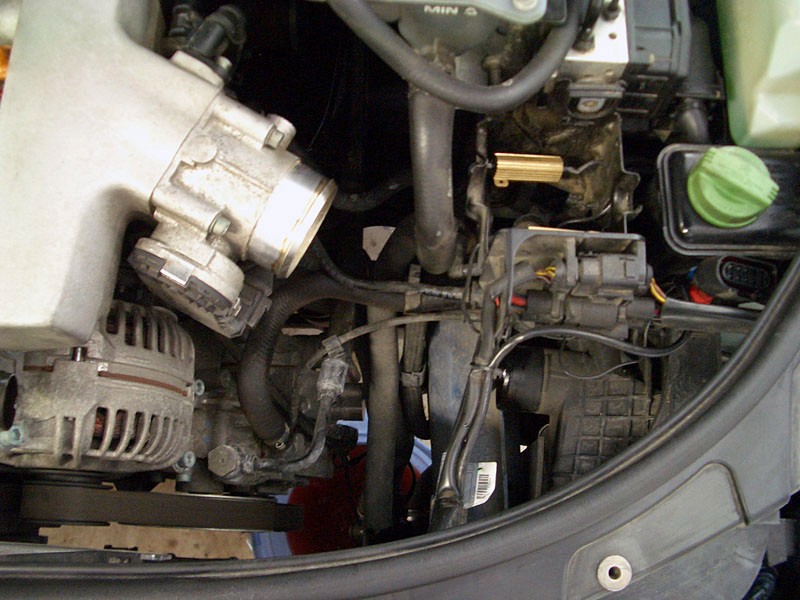
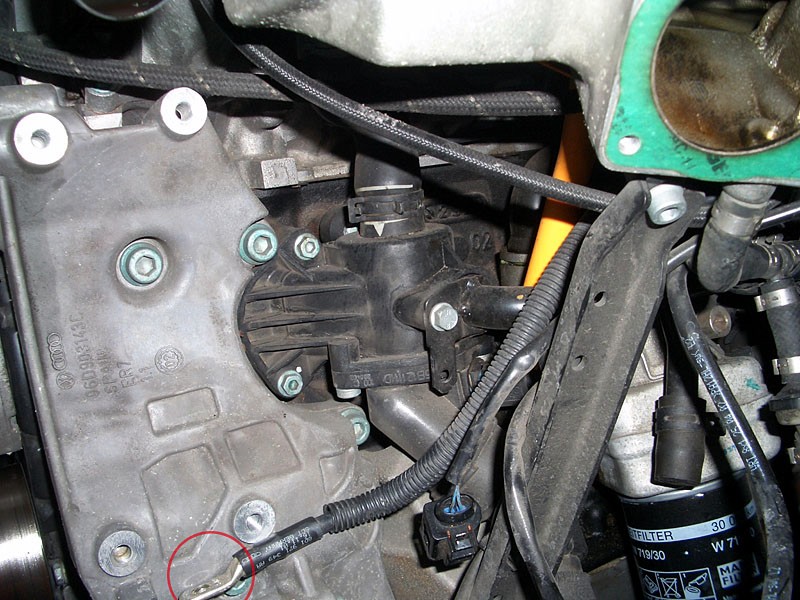
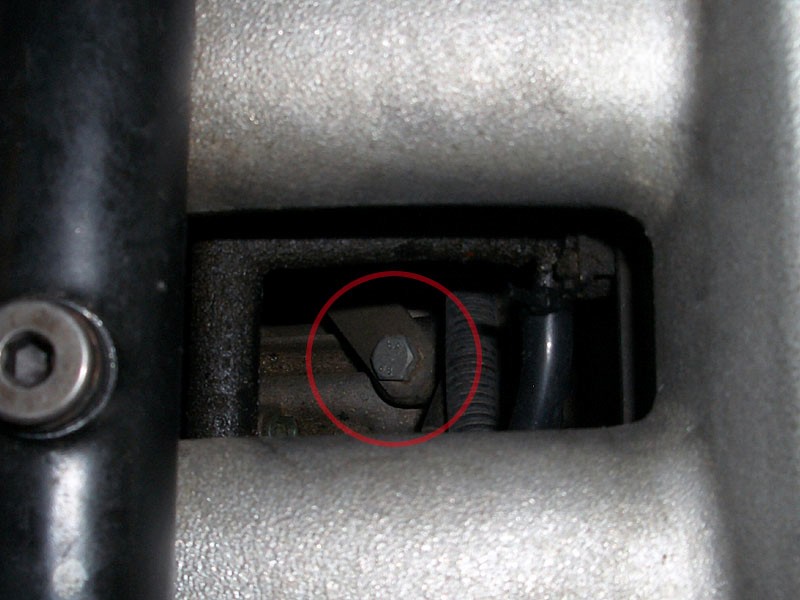
    Step 9: Remove bolt from metal hose on t-stat; remove bolt from top of oil cooler

    this will allow you to move the hard pipe away from t-stat. On my car, even after removing the bolt I was unable to remove the hard pipe at this time - I had to remove the thermostat from the block, then wiggle it free from the pipe afterwards

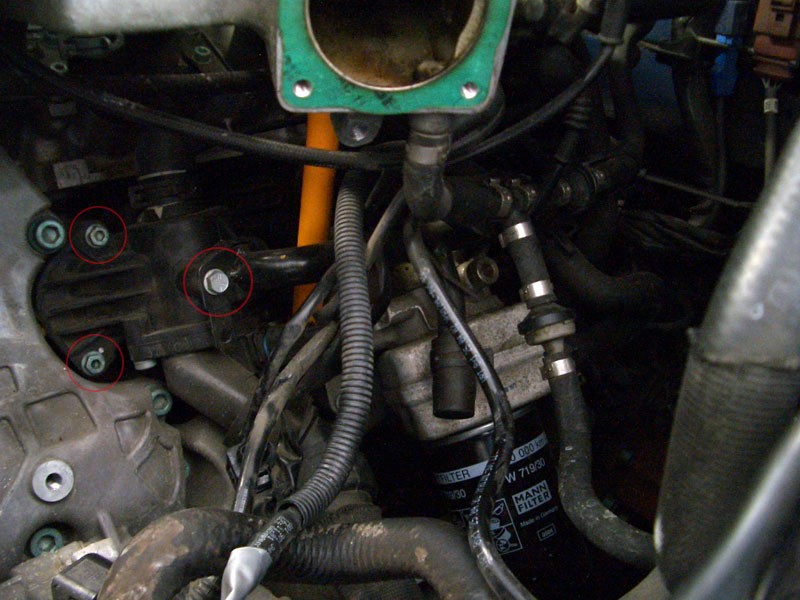
    bolt holding the hard pipe on the right, two bolts holding the t-stat to the block on the left:


    bolt holding the metal pipe to the top of the oil cooler (as seen from top of intake):


    Step 10: Remove upper and lower hoses fom t-stat. Remove electrical connector on back side


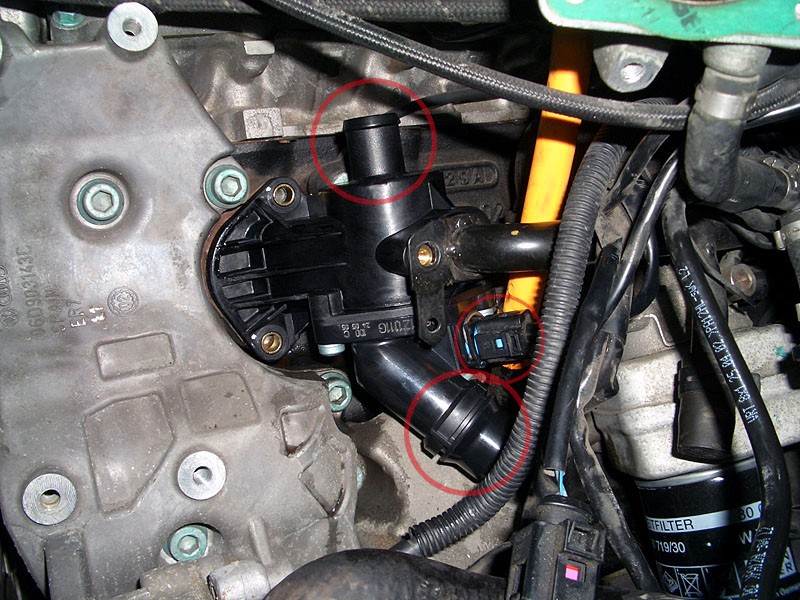
    Step 11: Remove 2 bolts holding t-stat to block, and remove t-stat


    Step 12: Install new thermostat

    install new thermostat, making sure to remove the old O-ring. The new t-stat will include a new one. I wet my finger with coolant and ran it along the O-ring to pre-lube it before installation. Otherwise, install is reverse of removal:

    All done - looks just like when we started!


    Disclaimer: this information is for informational purposes only. I am not responsible if you somehow manage to blow up your car in the process.
    Last edited by Matt Devo; 10-22-2009 at 01:01 PM. Reason: fix image links
    2012 TT-RS | Sepang/Ebony
    2014 Allroad | Glacier/Ebony (sold and bought back)

    Sold: 2007 RS4 | Sprint/Ebony

    RIP 2002 A4 2.0TQM Denim/Ebony, 243k
    FWD->AWD, Bische-tuned GT2871R

  2. #2
    Registered Member One Ring
    Join Date
    Oct 01 2009
    AZ Member #
    48614
    Location
    South Carolina

    Re: DIY: B6 A4 1.8T - Thermostat Replacement

    Fantastic Post Mike - Perfect description of what I need to do. Thanks a lot!

  3. #3
    Registered Member Two Rings EuroTrashin's Avatar
    Join Date
    Feb 25 2008
    AZ Member #
    25735
    My Garage
    B6 A4 1.8T, MkIV Jetta
    Location
    Portland, OR

    i'ma be using it today

  4. #4
    Veteran Member Three Rings tuner culture's Avatar
    Join Date
    Jul 19 2007
    AZ Member #
    19661
    My Garage
    1.8T Q 1+, Honda Odessy
    Location
    Florida

    thanks for the discription - did mine this weekend and worked out perfect. _ i do recomend getting the part behind the Thermostat when you buy the thermostat, (shaped like a "J" and is held in with one bolt.) I thought the thermostat was leaking, once all taken apart, that "j" plug was the culpirt, but thanks to the audi parts specialist for telling me to replace it . When i removed the part, it came out in 3 pieces - broken plastic. I will try and get the part number a photo. the part was $10
    2003 A4 1.8Tq
    19" RPM | Bridgestone Potenza RE960AS
    APR stage 1+ | Forge 007 | Kerscher | AWE | Race tec | RS4 pedals | S4 Grille |

  5. #5
    Veteran Member Four Rings heywier427's Avatar
    Join Date
    Jan 08 2010
    AZ Member #
    53108
    My Garage
    - Dolphin '02 A4 1.8tQ, 91 Q45, 02 caddy ext, 85 datsun 720, 71 datsun 510, 08 Ducati 848, Mk1 TD
    Location
    CT Shoreline

    great write up. as long as your in there, change out the front knock sensor. you need to remove the thermostat to get at it, so nows a good time.

  6. #6
    Veteran Member Four Rings audi_nightrider's Avatar
    Join Date
    Oct 08 2009
    AZ Member #
    48949
    My Garage
    12 more rings
    Location
    Northridge, CA

    Sorry for reviving this thread...

    I'm kinda stuck w/ removing the hose connected to the bottom part, any tips/tricks?? I keep on pushing it down and twist but won't move at all.

    TIA!
    Silver 02 Audi A4 1.8T Q MT

    '11 2.0T Audi A5 Premium Plus quattro...Auto GONE

    C7 S7 ESTORIL BLUE 4.0 TT Prestige GONE =(

  7. #7
    Veteran Member Four Rings sa_seahawker's Avatar
    Join Date
    Sep 03 2009
    AZ Member #
    47282
    Location
    San Antonio, TX

    Quote Originally Posted by Matt Devo View Post

    This bolt was a serious PIA getting back in. Make sure you grab an elbow socket and long extension. I also had to dive deep under the intake and towards the motor and "feel" the bolt back into place to start it. Simply put, it's pretty hard to start a bolt at an angle with an elbow socket.


    Quote Originally Posted by audi_nightrider View Post
    Sorry for reviving this thread...

    I'm kinda stuck w/ removing the hose connected to the bottom part, any tips/tricks?? I keep on pushing it down and twist but won't move at all.

    TIA!
    after you pull up the metal retaining clip, you have to put some serious "stank" on it.


    Great write up, btw...I approve
    "Some people wear Superman pajamas, but Superman wears Russell Wilson pajamas..."

    "Amy" 2003 A4 1.8TQM - Amulet Red
    440cc Green Giants | Motoza 1+ | ER FMIC | forge 007 DV | Magnaflow 16601 | TT DP | 034 HFC
    H&R Sports | Koni yellows | VMR 19ET38 708s | 235/35R19 Goodyear Eagle GTs
    MY BUILD

  8. #8
    Senior Member Three Rings jettman's Avatar
    Join Date
    Feb 27 2006
    AZ Member #
    10573
    Location
    punta cana, dominican republic

    uff the screw for the thermostat fell some ware!! i cant find it. were can i get another one!!....dang precidente beer
    Kiss the rings bitch

  9. #9
    Veteran Member Three Rings mexiricer's Avatar
    Join Date
    Aug 20 2011
    AZ Member #
    80108
    Location
    Alhambra, CA

    Thanks for this write up! I did mine this morning along with the J-plug. Good thing I checked for play on the J-plug when I was swapping the t-stat. Despite no leaking from the J-plug it sheared transversly along the plug itself when i wiggled it Had to dig out some of the pieces from the block and then put in the new one In case anyone was wondering, since I just did a simple drain from the sensor (1.8T) hole and whatever spalshed out from the block when I took out the t-stat, it took me roughly a bit over a gallon of G12 to get the resevoir back to "max" fill line after repeated drive and checking. Have at least 1.5 gals on standby imo


    Edit: btw be careful with that little openning of the engine block support right below the t-stat. my old J-plug fell in there and took like 20mins to get it out of there It's a tight fit but you can easily lose a screw in there too! Tape it up or just be extra careful around that area. You'll noticed it when you're there (1.8 block), hehe.
    Last edited by mexiricer; 03-26-2012 at 11:38 PM.

  10. #10
    Stage 2 Banner Advertiser Four Rings ECS Tuning-Audi's Avatar
    Join Date
    Oct 02 2006
    AZ Member #
    70746
    Location
    Wadsworth,OH

    Posting this in here for people who want a complete service kit for the thermostat.

    Click HERE to order or for more information.


    Jason
    Last edited by ECS Tuning-Audi; 07-15-2014 at 11:53 AM.

  11. #11
    Established Member Two Rings subversion's Avatar
    Join Date
    Mar 05 2009
    AZ Member #
    39517
    Location
    US

    Make sure to pay attention to the orientation of the plugs/ground for the alternator when putting everything back together. If you put it in upside-down (as I initially did) it won't fit flush against the body no matter how hard to you try and you'll end up breaking a part of the solid metal body trying to force it in. In the correct orientation, the alternator connector plug should be above the grounding connection.

    Another tip: It took me 2 seconds and no effort to put the serpentine belt on the alternator when I had the alternator unscrewed. The alternator will tighten just fine with the serpentine belt on it (but tension off of it, so be sure to stick something in the tensioner to keep it from tightening the belt).

    This job was a bitch, but mainly because I was doing it at 2AM and made some dumb mistakes that made the job take a lot longer than it should have.

  12. #12
    Veteran Member Four Rings
    Join Date
    Jun 15 2011
    AZ Member #
    76931
    My Garage
    08 A4 Q Stock, '58 Porsche 356A, '73 BMW 2002
    Location
    Exiled.......

    Also whats the part # for the hard line gasket/o -ring? Is there a parts diagram anywhere? I want to replace that with new along with the Jplug so that this is a one time afffair.

    post script: I am looking at this thing on the Genuine Audi Parts.com site with their diagrams....cant figure it the part # for that hard line to thermostat o ring.
    Last edited by B72011; 11-05-2012 at 06:14 PM.

  13. #13
    Senior Member Three Rings 03AudiA41.8T's Avatar
    Join Date
    Nov 08 2008
    AZ Member #
    35062
    My Garage
    zx7r
    Location
    Pittsburgh,PA

    Quote Originally Posted by ECS Tuning-Audi View Post
    Posting this in here for people who want a complete service kit for the thermostat.

    Click HERE to order or for more information.


    Jason
    Does this include the actual thermostat itself?

  14. #14
    Stage 2 Banner Advertiser Four Rings ECS Tuning-Audi's Avatar
    Join Date
    Oct 02 2006
    AZ Member #
    70746
    Location
    Wadsworth,OH

    Quote Originally Posted by 03AudiA41.8T View Post
    Does this include the actual thermostat itself?
    Yes, everything that's pictured comes in the kit.

    Jason

  15. #15
    Veteran Member Three Rings parimal's Avatar
    Join Date
    Oct 20 2008
    AZ Member #
    34380
    Location
    Glendale, AZ / Danbury, CT

    Can't get the thermostat off that metal pipe! Do you have to remove the bolt in the back too to get be pipe off? Or do you just have to wiggle the thermostat out?
    Current: 2016 S4 Monsoon Grey

    Past: 2009 2.0T Prestige | RIP Old Ride: Totaled )'04 B6 1.8T B7 {RS4} Front Conversion -

  16. #16
    Veteran Member Four Rings vhstejskal's Avatar
    Join Date
    Feb 01 2011
    AZ Member #
    70333
    Location
    UT

    Quote Originally Posted by parimal View Post
    Can't get the thermostat off that metal pipe! Do you have to remove the bolt in the back too to get be pipe off? Or do you just have to wiggle the thermostat out?
    Remove the bolt in the back as well... Trying to bend the hard pipe doesn't give you enough room to remove the thermostat housing...

    Also, don't forget to replace that o-ring off the hard pipe...
    -Vic

  17. #17
    Veteran Member Three Rings parimal's Avatar
    Join Date
    Oct 20 2008
    AZ Member #
    34380
    Location
    Glendale, AZ / Danbury, CT

    Quote Originally Posted by vhstejskal View Post
    Remove the bolt in the back as well... Trying to bend the hard pipe doesn't give you enough room to remove the thermostat housing...

    Also, don't forget to replace that o-ring off the hard pipe...
    Thanks! I was able to wiggle it out, the back bolt like a PITA to get and get back on...
    Current: 2016 S4 Monsoon Grey

    Past: 2009 2.0T Prestige | RIP Old Ride: Totaled )'04 B6 1.8T B7 {RS4} Front Conversion -

  18. #18
    Veteran Member Four Rings
    Join Date
    Jun 15 2011
    AZ Member #
    76931
    My Garage
    08 A4 Q Stock, '58 Porsche 356A, '73 BMW 2002
    Location
    Exiled.......

    STEP #2 --How the hell do you get that hose off? I pulled like a mother*****er---nothing. I even twisted a bit here and there.
    Am I just not pulling hard enough?

  19. #19
    Veteran Member Four Rings
    Join Date
    Jun 15 2011
    AZ Member #
    76931
    My Garage
    08 A4 Q Stock, '58 Porsche 356A, '73 BMW 2002
    Location
    Exiled.......

    Whats the part # for the O-ring off the hard pipe? Do you know where to find a diagram or the part # itself. I looked on GAP and cant make sense of it.

    Quote Originally Posted by vhstejskal View Post
    Remove the bolt in the back as well... Trying to bend the hard pipe doesn't give you enough room to remove the thermostat housing...

    Also, don't forget to replace that o-ring off the hard pipe...

  20. #20
    Veteran Member Four Rings DownhillA4's Avatar
    Join Date
    Jun 23 2008
    AZ Member #
    30226
    Location
    90210

    Any and all tips will be appreciated. Plan on doing my Thermostat this upcoming weekend! Anyway to get around losing coolant or not lose so much?
    "If you are a true automotive enthusiast whom loves their car,
    you learn to catch rides to parties and leave your car at home."- dougyfresh

  21. #21
    Veteran Member Four Rings
    Join Date
    Jun 15 2011
    AZ Member #
    76931
    My Garage
    08 A4 Q Stock, '58 Porsche 356A, '73 BMW 2002
    Location
    Exiled.......

    I am in the middle of this job and make sure you take out the headlight---way more room that way. Also if the top most radiator hose wont pull out (I cant get mine out)--you can get at most everything by moving it around while you pull $hit out of the way.
    The DIY says pull hard back-I did that---aint going no where.

    The J-pipe plug was a bitch on mine---I had to wedge a chisel in there and pound it out for awhile. When the new one went in it slipped right in. I would replace this part. When it came out the rubber o ring didnt look good at all!

    Also, the hard pipe was ridiculous to separate from the thermostat assembly. I had to pry it off and then twist--replace the o-ring for sure.
    Audi part N 90365302 ---peace of mind for about a buck.

    When replacing the bolt on the hard pipe thats under the manifold---be very careful as you can easily break/shatter that oil dipstick tube. In fact I'd go out to that it would be a great time to replace it--as its not if but when it will shatter. For $15 it might save you a lot of time later. There's a writeup out there on AZ on how to avoid getting the orange plastic pieces down into the tube. Use it.

    I wouldnt call this job hard, but it sure as hell aint easy.


    Quote Originally Posted by DownhillA4 View Post
    Any and all tips will be appreciated. Plan on doing my Thermostat this upcoming weekend! Anyway to get around losing coolant or not lose so much?
    Last edited by B72011; 11-21-2012 at 11:36 AM.

  22. #22
    Veteran Member Three Rings parimal's Avatar
    Join Date
    Oct 20 2008
    AZ Member #
    34380
    Location
    Glendale, AZ / Danbury, CT

    Yea it was tough but it will come off. I used a flat head screw driver with some coolant on it to get it wet under the hose. Keep wiggling it and it will come off.
    Quote Originally Posted by B72011 View Post
    STEP #2 --How the hell do you get that hose off? I pulled like a mother*****er---nothing. I even twisted a bit here and there.
    Am I just not pulling hard enough?
    Current: 2016 S4 Monsoon Grey

    Past: 2009 2.0T Prestige | RIP Old Ride: Totaled )'04 B6 1.8T B7 {RS4} Front Conversion -

  23. #23
    Veteran Member Four Rings heywier427's Avatar
    Join Date
    Jan 08 2010
    AZ Member #
    53108
    My Garage
    - Dolphin '02 A4 1.8tQ, 91 Q45, 02 caddy ext, 85 datsun 720, 71 datsun 510, 08 Ducati 848, Mk1 TD
    Location
    CT Shoreline


  24. #24
    Established Member Two Rings lucaq's Avatar
    Join Date
    Jun 12 2007
    AZ Member #
    18731
    My Garage
    87 GTI VR6
    Location
    Roanoke, TX

    I did this on Friday. I was doing a timing belt and radiator anyway, so I just pulled off the entire lock carrier. I didn't take off the t-body or the hose leading to it from the intercooler. I did not pull the intake manifold support either. Since I was taking off the water pump to do the timing belt, I pushed my j-plug out from the inside. It came out in one piece, and it was in fair condition (did not crumble).

    Thumbs-up to ECS for their all inclusive kit.

  25. #25
    Stage 2 Banner Advertiser Four Rings ECS Tuning-Audi's Avatar
    Join Date
    Oct 02 2006
    AZ Member #
    70746
    Location
    Wadsworth,OH

    Quote Originally Posted by lucaq View Post
    I did this on Friday. I was doing a timing belt and radiator anyway, so I just pulled off the entire lock carrier. I didn't take off the t-body or the hose leading to it from the intercooler. I did not pull the intake manifold support either. Since I was taking off the water pump to do the timing belt, I pushed my j-plug out from the inside. It came out in one piece, and it was in fair condition (did not crumble).

    Thumbs-up to ECS for their all inclusive kit.
    Thanks for the feed back!

    We just did a PDF on how to replace your coolant flange on the back of the block! Shoot me a PM and I'll be happy to send it your way or check the site under B6 A4 1.8T>> Cooling>> Cooling Flanges>>ES#2602901

    Cheers!

    Jason

  26. #26
    Veteran Member Three Rings nihil's Avatar
    Join Date
    Oct 01 2007
    AZ Member #
    21487
    My Garage
    Too small
    Location
    N/A

    Thanks for the great writeup. Did mine this evening and the only problem I had was getting that damn belt back on (cold weather, belt wasn't cooperating). Got the thermostat at the dealer, o-rings from local parts shop.

    .-.-.-.-.
    `-`-`-`-`

    2002 A4 1.8TQMS (sold)
    1982 MB Geländewagen 300GD
    1968 Charger R/T

    1987 Porsche 944 (sold)
    2015 Tacoma TRD/OR
    2007 4Runner
    2022 Tenere700
    2009 TW200


  27. #27
    Veteran Member Three Rings
    Join Date
    Apr 10 2012
    AZ Member #
    91607
    My Garage
    2003 Audi A4 1.8T Quattro
    Location
    Fort Worth,TX

    waiting on my t-stat kit from ECS and will be doing this tomorrow, sucks because i just did a complete coolant flush like 3 months ago :(

  28. #28
    Veteran Member Three Rings
    Join Date
    Apr 10 2012
    AZ Member #
    91607
    My Garage
    2003 Audi A4 1.8T Quattro
    Location
    Fort Worth,TX

    started this tonight, noticed the hose clamp for the hose that goes from the intake to the intercooler is inaccessible on the intercooler side, the end with the screw is facing the firewall. guess ill have to just move the hose out of the way when i get to that point.

  29. #29
    Veteran Member Three Rings
    Join Date
    Apr 10 2012
    AZ Member #
    91607
    My Garage
    2003 Audi A4 1.8T Quattro
    Location
    Fort Worth,TX

    looks like i need a new upper radiator hose, when trying to pull of the smaller hose from the plastic fitting, it broke the nipple off, freaking $90 at the dealer :(

    Note to everyone else in the future, be careful pulling it off, or better yet just remove the end connected to the reservoir and leave this end connected.
    Last edited by daverdfw; 03-23-2013 at 08:31 AM.

  30. #30
    Veteran Member Four Rings CrazyCal's Avatar
    Join Date
    Sep 10 2011
    AZ Member #
    81074
    Location
    None

    Just a tip for everyone having difficulty removing that hose from the hard pipe. I use hose pliers. Just grip tighly and twist. It will break the glue-like attachment the hose has to the pipe. Works like magic. Cheap and worth every penny. Got mine in a huge set of pliers at Costco for $20.


  31. #31
    Senior Member Three Rings
    Join Date
    Jun 05 2007
    AZ Member #
    18579
    Location
    Nashville, TN

    Quote Originally Posted by sa_seahawker View Post
    This bolt was a serious PIA getting back in. Make sure you grab an elbow socket and long extension. I also had to dive deep under the intake and towards the motor and "feel" the bolt back into place to start it. Simply put, it's pretty hard to start a bolt at an angle with an elbow socket
    Instead of removing this rear bolt, I loosened it. This gave me enough wiggle room to remove the thermostat, and saved me the inevitable headache of replacing this bolt. I had a hard enough time getting a socket on it to loosen and re-tighten it. I imagine trying to start it would be the hardest part of this whole job. Oh, and I used a 13mm socket on it. I had a really hard time figuring out which socket fit, since it's such a weird angle.

    I hope that helps somebody!

    Rob

  32. #32
    Veteran Member Four Rings Pr0n's Avatar
    Join Date
    Jul 10 2007
    AZ Member #
    19450
    My Garage
    Bus pass + 2004.5 A4 1.8TQM6
    Location
    trunk

    Good write-up.

    A friend of mine did this yesterday on my car and noticed some things in the DIY are missing that you encounter along the way, but others have mentioned some of the things in this thread.

    The thermostat was leaking and throwing a code ("17700 - Map Controlled Engine Cooling Thermostat (F265): Open Circuit. P1292 - 004 - No Signal/Communication - Intermittent") but the code hasn't come back once the new thermostat was put in.
    My J-Plug was actually in good condition and was hard to get out, so we ended up breaking it into pieces to get it out as I prefer to have the new one in while there replacing the thermostat.

    Thanks.
    2004.5 B6 A4 6 speed Transmission 02X AWD Quattro GJW + rear diff for sale

    Red on Black Team Member #1 (sorry you can't join, invite only)
    Red on Black leather interior makes me feel special

    Stage 0 minus - .5
    Running an ST (small turbo) making mine the slowest B6 A4 "evar!"

  33. #33
    Established Member Two Rings marmstrong's Avatar
    Join Date
    Apr 06 2011
    AZ Member #
    73541
    Location
    Maryland

    Great write up! Just followed this today! Even ordered the ECS kit. So far everything is smooth and my needle isn't jumping up and down anymore!! Good kit ECS!

  34. #34
    Established Member Two Rings squeegy200's Avatar
    Join Date
    Jun 05 2013
    AZ Member #
    116623
    My Garage
    1990 VW Corrado G60, 1992 VW Golf 16V, 2011 VW Jetta 2.5SE
    Location
    United States

    Thank you. This was extremely helpful when I did this repair

    Sent from my Nexus 7 using Tapatalk

  35. #35
    Stage 2 Banner Advertiser Four Rings ECS Tuning-Audi's Avatar
    Join Date
    Oct 02 2006
    AZ Member #
    70746
    Location
    Wadsworth,OH

    Thanks for all the orders! Glad to see a lot of members getting this done them selves with this DIY and our kit!

    Jason

  36. #36
    Established Member Two Rings Wakeskate124's Avatar
    Join Date
    Jun 29 2013
    AZ Member #
    118058
    Location
    salt lake city /Utah/USA

    Water pump
    Last edited by Wakeskate124; 03-22-2015 at 11:22 AM.

  37. #37
    Established Member Two Rings
    Join Date
    Nov 10 2015
    AZ Member #
    364284
    Location
    Northeast Ohio

    Would it be necessary to replace the throttle body gasket after removal? I always thought you had to replace that if the throttle body is ever removed.

    Sent from my SM-N910V using Tapatalk

  38. #38
    Veteran Member Four Rings old guy's Avatar
    Join Date
    Dec 28 2006
    AZ Member #
    14483
    My Garage
    '13 A5, '24 Tiguan SEL R-Line
    Location
    Western Maryland

    I have reused mine four times. Still OEM.
    '03 A4 5-MT Motoza tuned Frankenturbo F21L With full supporting mods. Sold (and missed dearly).
    '13 A5 6-MT Needs more Fun Stuff: Neuspeed PM / 3.0 TDI Intercooler / H&R OE Sport Springs / Bilstein B8 Shocks / TyrolSport Brake Stiffeners / ECS Short Shifter / S5 Side Skirts / RS Grille

  39. #39
    Established Member Two Rings
    Join Date
    Nov 10 2015
    AZ Member #
    364284
    Location
    Northeast Ohio

    Okay awesome. Thanks!

    Sent from my SM-N910V using Tapatalk

  40. #40
    Veteran Member Three Rings fabric8's Avatar
    Join Date
    May 14 2013
    AZ Member #
    115170
    Location
    US

    I did this last night and have a question about the thermostat housing fitment. When you put the new one back on the block, is it supposed to sit even/parallel and close to flush with the block? I've done t-stats/t-stat housings on my TT and previous b5.5 passat and those t-stat housings would seat evenly when you push it into the block, then tighten the screws so it was flush to the block.

    But with this housing, I couldn't get it to seat evenly. Either the bottom screw hole would be flush, or the top would be flush. It would not 'seat into position' so to speak like I'm used to, when I pushed it against the block.

    So I ended up tightening the top and bottom screws evenly, taking turns with each, until the t-stat housing was flush against the block. But I don't know if that's right, and if the o-ring is seated correctly into position inside. It 'doesn't seem right' to me and am wondering if the o-ring on the part I bought might be the wrong size, or not. FWIW, I bought the part from a reputable seller on eBay (as I have in the past for my other car's t-stats).
    HIS - 2016 Golf R 6MT
    HERS - 2002 B6 A4 1.8TQM Avant | Motoza Stg.1.5 | OEM A6 4.2 17" forged fat fives

Bookmarks

Posting Permissions

  • You may not post new threads
  • You may not post replies
  • You may not post attachments
  • You may not edit your posts
  •  


    © 2001-2025 Audizine, Audizine.com, and Driverzines.com
    Audizine is an independently owned and operated automotive enthusiast community and news website.
    Audi and the Audi logo(s) are copyright/trademark Audi AG. Audizine is not endorsed by or affiliated with Audi AG.