Audizine - An Automotive Enthusiast Community

Page 1 of 2 12 LastLast
Results 1 to 40 of 70
  1. #1
    Veteran Member Four Rings yoogene83's Avatar
    Join Date
    Apr 27 2004
    AZ Member #
    1910
    My Garage
    2017 Pacifica Limited / 2014 BMW M5
    Location
    Seoul

    B6 A4 1.8T: Motor Mounts DIY

    Guest-only advertisement. Register or Log In now!
    Author: HurricaneSteve Supplemental Author: Will Mahoney, WJM, Yoogene83

    Utilizing an original text by Hurricane Steve, I have added to the content for completeness and clarity. Hope it helps. -Will

    i added more picts and tips for the b6 frame - Eugene


    so your motor mount tore and leaked fluid? well, then this is the diy for you. I heard a bad clunking noise from the front passenger side of my car and became pretty convinced it was my motor mount. so i swapped them for the ones from 034 motorsports rubberized constructed ones. they're $45 a pop and better than OEM s4/rs4 mounts since they don't have any fluid in them.


    and can be purchased here:
    http://www.034motorsport.com/product...roducts_id=772


    anyways, onto the writeup:

    Passenger Side Mount Removal/Installation:

    FROM ABOVE:

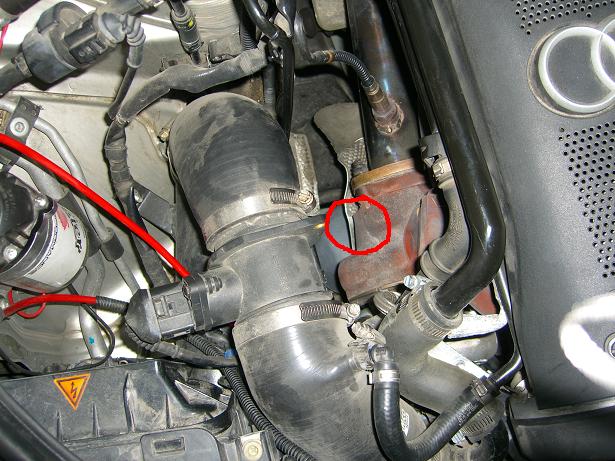
    1) Remove airbox (no other way I could get to the top nut on that motor mount) Stage 3 cars have the turbo VERY close to the mount, a K03 or K04 may have more working room. there is a 13mm nut inside the red circle. you can go at it several ways, but i just did my best with my socket set and some crescent wrenches


    Instead of accessing the nut from the top, I accessed it from under the car. This may not work for everybody but for me it was much easier, and did not have to touch the filter box or the heat shield. - other dude

    I first used the regular size 3/8 drive to move the nut, then 1 /4 very small ratchet to undo it completely. Reverse for installation. (Comment by Jan Jonak)

    2) Pull heat shield under the turbo up as far as you can to give you maximal working room.

    3) Remove nut...its 13mm...you can only get a stubby wrench on it, and its too tight for that, so use a 13mm 1/4 drive socket that has a hole big enough for the bolt to come through. You won't be able to lock the socket wrench in, but you can get it in just enough to loosen it. It will come off with your fingers after that. (WJM Notes: I was able to break it free pretty easily, and then found I could get a fairly flat 1/4" driver on the nut. I had to finish the removal with the stub wrench though because as the nut backed off the 1/4" driver got pinned against the cat/heatshielding)


    FROM BELOW:

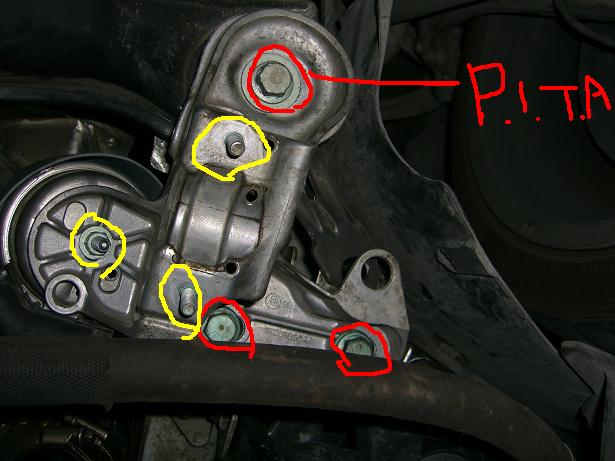
    4) Remove the four (both driver and passenger side) 13mm bolts (circled in yellow in the pic) holding the sway bar bushings to the lower frame mounts.


    5. You may need to loosen the end links (circled in yellow) and just swing the bar out of the way. 16 mm bolts on the end links. If you do this however, make sure your car is on ramps, and NOT jackstands! the pressure will shear the bolt and ruin your sway bar


    make sure you just LOOSEN the endlinks, and only do so AFTER you have taken the bushings off the lower frame mounts. i broke the bolt holding the end links and now have to buy another bolt and figure out how to get the leftover bolt inside the sway bar out.

    6) Mark the spot where the bottom mount nut is relative to the bracket (circled in yellow on the left side). Just draw a circle around it with a marker. Also notice where the little nub protrudes from the mount into the hole on the bracket. Look at your new mount...see how it has one nub, but the bracket has holes 180 degrees apart? This lines up the top of the mount, so mark it.


    7) Remove the lower nut (13mm here too) from the engine mount.

    8) Rig up a way to hold the engine up. I used a hydraulic jack, a piece of 2x4, and a piece of 3/4" plywood to push on both the oil pan and the snub mount bracket. Don't raise the engine, or raise it just a hair so you know you have it. Make sure this is stable. I put a jackstand next to it for safety (engine's...not mine).


    9) Remove the three 18mm (circled in red) bolts holding the mount bracket to the frame. just use a breaker bar to get them loose, as soon as you do, it's pretty easy from there. the rear one is a bitch, so be prepared to use some elbow grease


    10) There is some wiring attached to the bracket, it will keep it from falling out, but it can be rotated to allow the engine mount to come out. Pull it out and grab the washer that is on top of the mount. Put it on the new mount. Slide the new mount up and into place, remembering the little nub on the bottom, and making sure the two tabs go into the slots on the top bracket. (WJM-Its hard to see, but if you look at your new mount you will see two tabs or ears on the top. These locate the mount into the bracket. When you install the new mount, you will feel it "seat" in the proper orientation, just take note of the nub side....again I think there are openings 180 deg apart so it probably doesn't matter, but might as well)

    11) Push the whole assembly back into place.

    12) Bolt everything back together...one caveat...it will be very hard to get the top nut tight. I got it flush by hand, then used a stubby 13mm wrench and got it fairly tight. Then I put the 13mm stubby wrench on it and used a 3/4 long wrench to push the stubby 13mm wrench. (WJM-Remember that 1/4 " ratchet? Yeah will it fit again and I was able to snug it down real easily J)
    I found this to be a big pain in my ass, so i used a crow's foot 13mm attached to a u-joint, attached to an extension then to my socket.

    ***NOTE: If doing driverside mount, fully install the passenger side mount, but do not reattach the sway bar.***

    Driverside Mount Removal/Installation:

    The driverside is very similar, yet WAY easier than the passenger. Since the sway bar is disconnected all you have to do, is:

    13) Remove the screw holding the coolant reservoir tank in position, and swing the reservoir out of the way.

    14) With a 13mm socket, remove the top engine mount nut.

    15) Conduct steps 6-12 from above...

    16) Reattach sway bar, and retighten end links.

    Be careful, work slow, you should have no trouble.

    Took me about 2 hours...the passenger side took me 1.5 hours and the drivers took me 30 minutes. the top nut is a bitch, the rear bolt is a bitch, and the damn lower frame didn't fall down all the way so you had to finagle the mount in and out.
    Last edited by yoogene83; 07-06-2007 at 09:50 AM.

  2. #2
    Veteran Member Four Rings Hamann's Avatar
    Join Date
    Oct 14 2006
    AZ Member #
    12539
    My Garage
    2017%20VW%20Touareg%20Executive%3B%202015%20S8
    Location
    Tampa, FL

    Re: B6 A4 1.8T: Motor Mounts DIY

    damn...fuck that.

    good DIY!!
    2013 S4

  3. #3
    Veteran Member Four Rings dirtybrd's Avatar
    Join Date
    Mar 21 2006
    AZ Member #
    10955
    My Garage
    Revo Tuned 2.0L w/35r
    Location
    Lakeland, FL.

    Re: B6 A4 1.8T: Motor Mounts DIY

    You did that the hard way. All you have to do is unbolt the snub mount, remove the top motor mount nuts, then the bottom mount nuts, and raise the motor until there is enough clearance to get them out. Then reverse the procedure to put them back in.
    BetaAlphaTauMember#6

    I'm back bitches!

    35r and REVO...what?

  4. #4
    Veteran Member Four Rings yoogene83's Avatar
    Join Date
    Apr 27 2004
    AZ Member #
    1910
    My Garage
    2017 Pacifica Limited / 2014 BMW M5
    Location
    Seoul

    Re: B6 A4 1.8T: Motor Mounts DIY

    that would have been nice to know in my other thread! aggghhhhh

  5. #5
    Veteran Member Four Rings yoogene83's Avatar
    Join Date
    Apr 27 2004
    AZ Member #
    1910
    My Garage
    2017 Pacifica Limited / 2014 BMW M5
    Location
    Seoul

    Re: B6 A4 1.8T: Motor Mounts DIY

    quick review on the 034 motor mounts.

    they are AWESOME.

    drove the car to work this morning; no more clunking and the slop between shifts is gone. car shifts smooth as butter now and i don't have this horrendous noise when i downshift from 4th-2nd without double clutching.

  6. #6
    Veteran Member Four Rings AudiA4Style's Avatar
    Join Date
    Feb 24 2004
    AZ Member #
    859
    My Garage
    B8.5 S4 l 75 CB550 Cafe Racer
    Location
    Los Angeles

    Re: B6 A4 1.8T: Motor Mounts DIY

    Awesome write up

    I have the neuspeed snub mount, neuspeed short shifter, B5S4 engine mounts, southbend clutch and the difference is night and day.
    2013 S4 l Prestige l Moonson Gray l S-Tronic l Sports Diff l Fine Nappa l Carbon Atlas
    2006 S4 l Avant l Premium l Dolphin Gray l MT6 l Bose l Silk Nappa Leather l Gray Birch

  7. #7
    Registered Member One Ring
    Join Date
    Oct 11 2007
    AZ Member #
    21722
    Location
    Washington DC

    Re: B6 A4 1.8T: Motor Mounts DIY

    Quote Originally Posted by dirtybrd View Post
    You did that the hard way. All you have to do is unbolt the snub mount, remove the top motor mount nuts, then the bottom mount nuts, and raise the motor until there is enough clearance to get them out. Then reverse the procedure to put them back in.
    What's the safest way raise the motor with a jack?

  8. #8
    Veteran Member Four Rings yoogene83's Avatar
    Join Date
    Apr 27 2004
    AZ Member #
    1910
    My Garage
    2017 Pacifica Limited / 2014 BMW M5
    Location
    Seoul

    Re: B6 A4 1.8T: Motor Mounts DIY

    same way i did it. with the 2x4 between the oil pan and the jack

  9. #9
    Veteran Member Three Rings Nasty's Avatar
    Join Date
    Feb 13 2004
    AZ Member #
    391
    My Garage
    B8.5 S4/F80 M3/F31 330i/GO1 X3M40I
    Location
    OC

    Thumbs up Props Yoogene!

    You've got mad diy skills Bro!

    Peace!
    | NASTY |

  10. #10
    Veteran Member Four Rings F16HTON's Avatar
    Join Date
    Jul 04 2004
    AZ Member #
    2688
    My Garage
    992 Carrera
    Location
    Makai - Kaka'ako

    Re: B6 A4 1.8T: Motor Mounts DIY

    Way to much work this way...follow Dirty's instructions, that is how I did mine...about 10 minutes per side

  11. #11
    Registered Member One Ring
    Join Date
    Oct 11 2007
    AZ Member #
    21722
    Location
    Washington DC

    Re: B6 A4 1.8T: Motor Mounts DIY

    Hmm.. pls bear with me here.. trying to confirm that I understand Dirty's method correctly:

    keep the bracket mount and sway bar in place, and remove the top and bottom mount nuts, loosen the snub mount, and raise the motor up -- that would be a raising the motor about 10" up to get the clearance? (the mount top and bottom threads are about 3" each)

  12. #12
    Veteran Member Four Rings rxrep's Avatar
    Join Date
    Feb 28 2006
    AZ Member #
    10607
    My Garage
    has nothing in it but memories.
    Location
    Pittsburgh-Philly

    Re: B6 A4 1.8T: Motor Mounts DIY

    Don't worry, you'll be fine. Just watch the hoses behind the area where the coilpacks are. They will hit the firewall. Yes, the engine goes up pretty high.
    Be sure to undo your snub mount!
    And be very careful letting it back down. It is easier with two people, because one can guide the new bolts in while the other lets the jack slowly down. Watch your fingers!
    And be careful with the oil pan. Not just for a puncture (with wood it should be OK), but also for the wood and jack to slip out, since the oil pan is angled and probably slippery.
    My 2004.5 APR Stage 3+ is SOLD

  13. #13
    Established Member Two Rings 04A41.8TCVT's Avatar
    Join Date
    Jan 09 2007
    AZ Member #
    14733
    My Garage
    02.AMB.QT/04AMB.CVT
    Location
    Houston, TX

    Re: B6 A4 1.8T: Motor Mounts DIY

    Has the price changed in 5 months? It shows $75 a pop now vs $45 mentioned.

  14. #14
    Veteran Member Three Rings V8EATER's Avatar
    Join Date
    Nov 15 2006
    AZ Member #
    13425
    Location
    Trophy Club TX

    Re: B6 A4 1.8T: Motor Mounts DIY

    ^^^Yeah I was under the same impression as A4041.8TCVT I thought they where $75 a piece
    2006 Audi S4 Avant - K&N Panel - Custom 2.5'' exhaust

  15. #15
    Veteran Member Four Rings vdubstreets's Avatar
    Join Date
    Feb 20 2007
    AZ Member #
    15772
    My Garage
    02 a4, 97 Gti, 90 wrangler
    Location
    ct

    Re: B6 A4 1.8T: Motor Mounts DIY

    little off topic, but what kind of jack is that? and how do you like it?

  16. #16
    Established Member Two Rings
    Join Date
    Feb 10 2007
    AZ Member #
    15556
    My Garage
    17 GTI, 14 Jetta, 18 GC SRT, Yamaha Apex
    Location
    Sparta NJ

    Re: B6 A4 1.8T: Motor Mounts DIY

    Quote Originally Posted by vdubstreets View Post
    little off topic, but what kind of jack is that? and how do you like it?
    Looks like a Costco aluminum jack, about $90 and works great.

  17. #17
    Veteran Member Three Rings 1/4 scale's Avatar
    Join Date
    Mar 03 2004
    AZ Member #
    1071
    Location
    North Carolina

    Re: B6 A4 1.8T: Motor Mounts DIY

    A few other tips:

    1. undo your TIP hose at the airbox so as not to stretch it
    2. do the same for your throttle body hose
    3. keep watch at the back of the engine (don't crush any secondary plenum valving)
    4. 1/4" small ratchet with 13mm socket from below will release the top right mount nut, just bend the metal heatshield up a bit for clearance.
    5. yes, you only need to remove your snub mount w/ bracket for this install
    6. the 034s ROCK! (or don't rock! :-)
    2002 A4 Avant 1.8T • APR +1 • DSMIC • JJ tip • RS4 mounts • SB OFE HD • Apikol snub • B5 S4 binders • 18" Ultraleggeras w/ Conti D/Ws • APR exhaust • APR TBHose • Stasis SS • S4 rear sway • AMS ss • e-codes • Pzwo lip • S4 blades • USP roof spoiler • Apex track studs

  18. #18
    Veteran Member Three Rings converted2audi's Avatar
    Join Date
    Jan 21 2007
    AZ Member #
    15026
    My Garage
    B6 1.8T Quattro
    Location
    MI

    Re: B6 A4 1.8T: Motor Mounts DIY

    this should be in the DIY forum.....unless it already is and im retarded....
    She said its just a car...i said you're just a girl.

  19. #19
    Active Member Four Rings Maverick's Avatar
    Join Date
    May 03 2007
    AZ Member #
    17752
    My Garage
    german
    Location
    heaven/hell

    Re: B6 A4 1.8T: Motor Mounts DIY

    hard works needed to be appreciated,lol
    F80 M3 DCT|C250 Coupe|i3|16 RS7
    B6 A4 3.0 back to stock |B8 S4
    E46 M3 Heavily Modded IR/Black Cloth - track car
    E46 M3 TiAg/IR Moton/GC Track Ready - sold
    E92 M3 Melbourne Red/Black cloth/CF Roof - Exported
    E93 M3 AW/Black Sold
    E39 540iA Minor front end mods. Smashed|E39 540iA Aggressor - sold
    W126 1989 560SEC Totaled
    Bentley Continental GT Black/Black Mulliner Package - sold
    Porsche 944 NA - totaled

  20. #20
    Registered User Four Rings
    Join Date
    Feb 26 2006
    AZ Member #
    10540
    My Garage
    Over 20! too many plant pots!
    Location
    Earth

    Re: B6 A4 1.8T: Motor Mounts DIY

    Very nice,
    Thanks for the review!
    those who need mounts I am currently running a GB on them:

    http://audizine.com/forum/showthread.php?t=198354

  21. #21
    Veteran Member Three Rings converted2audi's Avatar
    Join Date
    Jan 21 2007
    AZ Member #
    15026
    My Garage
    B6 1.8T Quattro
    Location
    MI

    Re: B6 A4 1.8T: Motor Mounts DIY

    Quote Originally Posted by 04A41.8TCVT View Post
    Has the price changed in 5 months? It shows $75 a pop now vs $45 mentioned.
    it must have.....they are doing a group buy on them right now, listed as 15% off, but in the end you only end up saving like $10 than if you pay full price for them straight from the website because for the group buy there is a flat rate shipping of $23 and you have to pay 3% paypal fees, whereas if you buy it directly from the site shipping (to my address at least) was only $12 and you dont have to pay 3% paypal fees......essentially you dont end up getting much of a discount at all in the group buy.....which is pretty lame imo.....

    plus the group buy states its open until the end of the month, but when i PM'ed him he said only until the 15th of april.....but seeing as you only end up saving approx $9, im in no rush to order them.....
    She said its just a car...i said you're just a girl.

  22. #22
    Registered Member One Ring
    Join Date
    Feb 06 2007
    AZ Member #
    15447
    Location
    SoCal

    9) Remove the three 18mm (circled in red) bolts holding the mount bracket to the frame. just use a breaker bar to get them loose, as soon as you do, it's pretty easy from there. the rear one is a bitch, so be prepared to use some elbow grease

    Bringing up an old thread... =)

    You didnt mention whether these bolts were stretch bolts and whether you replaced them or not? I cannot seem to find a straight answer on this so any help would be great!

  23. #23
    Veteran Member Four Rings rxrep's Avatar
    Join Date
    Feb 28 2006
    AZ Member #
    10607
    My Garage
    has nothing in it but memories.
    Location
    Pittsburgh-Philly

    Why do those bolts even need removed? I don't see the need. There is a much easier way. Loosen and remove snub mount arm. Loosen the four total mount nuts. Jack up engine from below, using a wood block so you don't pierce the oil pan. It goes up further than you'd think; almost back to the firewall.
    Remove mounts. Replace with new. Have helper hold mounts while you slowly let engine back down in to place. Be very careful not to squash helper's fingers. Hand tighten mounts and replace and hand tighten snub arm. Start engine. Rev a few times and let idle for a few minutes. Then, tighten all hand-tightened nuts/bolts to torque specs.

    Done and done.

  24. #24
    Veteran Member Three Rings Casius's Avatar
    Join Date
    Aug 14 2007
    AZ Member #
    20315
    Location
    Ottawa, ON, CA

    Holy crap they are $95 now. Street density or track density?

  25. #25
    Veteran Member Four Rings RLB6's Avatar
    Join Date
    Sep 20 2006
    AZ Member #
    11804
    My Garage
    '05 MV Agusta F4-1000
    Location
    MD

    You'd want the street density

    Current: '23 etron-GT | Prestige

    Previous: S5 | Prestige


  26. #26
    Veteran Member Three Rings 1/4 scale's Avatar
    Join Date
    Mar 03 2004
    AZ Member #
    1071
    Location
    North Carolina

    You may also want to loosen and temporary remove one end of your throttle body hose and the airbox end of your TIP. Don't want to rip those babies ...


    Quote Originally Posted by rxrep View Post
    Why do those bolts even need removed? I don't see the need. There is a much easier way. Loosen and remove snub mount arm. Loosen the four total mount nuts. Jack up engine from below, using a wood block so you don't pierce the oil pan. It goes up further than you'd think; almost back to the firewall.
    Remove mounts. Replace with new. Have helper hold mounts while you slowly let engine back down in to place. Be very careful not to squash helper's fingers. Hand tighten mounts and replace and hand tighten snub arm. Start engine. Rev a few times and let idle for a few minutes. Then, tighten all hand-tightened nuts/bolts to torque specs.

    Done and done.
    2002 A4 Avant 1.8T • APR +1 • DSMIC • JJ tip • RS4 mounts • SB OFE HD • Apikol snub • B5 S4 binders • 18" Ultraleggeras w/ Conti D/Ws • APR exhaust • APR TBHose • Stasis SS • S4 rear sway • AMS ss • e-codes • Pzwo lip • S4 blades • USP roof spoiler • Apex track studs

  27. #27
    Veteran Member Four Rings gotboost's Avatar
    Join Date
    Nov 04 2007
    AZ Member #
    22341
    Location
    Minnesota

    Quote Originally Posted by rxrep View Post
    Why do those bolts even need removed? I don't see the need. There is a much easier way. Loosen and remove snub mount arm. Loosen the four total mount nuts. Jack up engine from below, using a wood block so you don't pierce the oil pan. It goes up further than you'd think; almost back to the firewall.
    Remove mounts. Replace with new. Have helper hold mounts while you slowly let engine back down in to place. Be very careful not to squash helper's fingers. Hand tighten mounts and replace and hand tighten snub arm. Start engine. Rev a few times and let idle for a few minutes. Then, tighten all hand-tightened nuts/bolts to torque specs.

    Done and done.
    If done this way, is there any need to remove the sway bar? Doing mine next week.
    Current:
    2002 A4 Avant - Eibach Pro Dampers | Rev Motoring Springs | 034 Motor Mounts | 710N DV | Apikol Snub Mount | 18" S4 Peeler's

    Past:
    2001 Imola S4 Satge 2+
    2003 A4 GT2871r 303 AWHP 291 AWTQ

  28. #28
    Veteran Member Three Rings msharifi's Avatar
    Join Date
    Aug 13 2008
    AZ Member #
    31918
    Location
    Orange County Cali

    Very nice info question on the mount... If my driver side is worn out and the passanger side is in good shape do I need to get the driver side from dealer since I'm not replacing both? I'm wondering the after market might act differently then OEM and cause something?

  29. #29
    Veteran Member Three Rings 1/4 scale's Avatar
    Join Date
    Mar 03 2004
    AZ Member #
    1071
    Location
    North Carolina

    For the price of one OEM mount you could change both to aftermarket (034 or similar).
    2002 A4 Avant 1.8T • APR +1 • DSMIC • JJ tip • RS4 mounts • SB OFE HD • Apikol snub • B5 S4 binders • 18" Ultraleggeras w/ Conti D/Ws • APR exhaust • APR TBHose • Stasis SS • S4 rear sway • AMS ss • e-codes • Pzwo lip • S4 blades • USP roof spoiler • Apex track studs

  30. #30
    Veteran Member Three Rings msharifi's Avatar
    Join Date
    Aug 13 2008
    AZ Member #
    31918
    Location
    Orange County Cali

    Quote Originally Posted by 1/4 scale View Post
    For the price of one OEM mount you could change both to aftermarket (034 or similar).
    OEM is about $75 each how is a Aftermarket any cheaper? 034s are $99 or more per mount..

  31. #31
    Veteran Member Three Rings 1/4 scale's Avatar
    Join Date
    Mar 03 2004
    AZ Member #
    1071
    Location
    North Carolina

    Opps ... I think I paid $90 or so for the set a couple of years ago ... guess there was a price hike!
    2002 A4 Avant 1.8T • APR +1 • DSMIC • JJ tip • RS4 mounts • SB OFE HD • Apikol snub • B5 S4 binders • 18" Ultraleggeras w/ Conti D/Ws • APR exhaust • APR TBHose • Stasis SS • S4 rear sway • AMS ss • e-codes • Pzwo lip • S4 blades • USP roof spoiler • Apex track studs

  32. #32
    Active Member One Ring
    Join Date
    Jul 29 2009
    AZ Member #
    45660
    Location
    Colorado Springs

    Just a quick addendum for those with a 3 Litre V6 engine.

    Thank you Yoogene83 et al for a great descriptive write up, which was a good starting place for attempting this project on the V6.

    Yoogene83's method of entire motor mount bracket removal is the only method that will work for our cars as the engine simply will not raise high enough to get the mounts out any other way (the engine also does not raise high enough for easy replacement of our snub mount either, removal of the front bumper is the only way to do this, then remove the 6 torx bolts that are at the back of the front bumper main mounts, then remove the 2 torx bolts on the sides which allows the bottom of the front bumper frame to swing out and allow sufficient space to insert the new snub mount, bracket and cup) fml!

    You cannot access the top motor mount nuts from above and to get sufficient space to work in and access the top nut from below, you need to remove the two 10mm bolts that hold together the two pieces of exhaust pipe/muffler heat shroud above the motor mount, once the two bolts are out carefully fold up the two pieces of heat shroud to increase the working space above the top nut.

    You definitely need a short length 1/4 inch ratchet drive with a 13mm socket to undo and remove the top motor mount nut, as the top motor mount bracket has 'ears' on the side for strength which precludes the use of an ordinary spanner/wrench as there is no lateral space for it to rotate.

    WARNING: Do not start this procedure unless you have 2 jacks, one is required to simply hold up your motor whilst you remove the bottom bracket and motor mount, the other jack being required to lift up the front subframe (which will drop down after the removal of the bottom bracket) or simply hold it in place, in order to replace the 3 18mm bolts that hold on the bottom bracket.

    Why they make the bolts on the top and bottom of the motor mount so long is an absolute mystery to me; must be sadistic vegetarians? Also, buy plenty of blue thread lock and check the durometer of your mounts before fitting them with the 034 website, I ordered track, they sent me street!
    Last edited by brynreynolds; 09-28-2010 at 05:46 PM.

  33. #33
    Senior Member Three Rings tamaneri's Avatar
    Join Date
    Apr 02 2007
    AZ Member #
    16915
    Location
    New Jersey (Northern)

    Actually just ordered 2 034 street density mounts, and an APR snub mount. I hope this makes everything awesome. :)
    Taylor A. Maneri

    2003 A4 1.8TQ B6 Black/Black
    Unitronic Stage 2 | TT 386cc injectors | RAI test pipe | Magnaflow 16601 | Milltek downpipe | Forge 007 DV | rs4 rear sway | vent pod boost gauge | JHM short throw | 034 engine mounts | ARP snub | ECS RA4 stage 1 clutch/flywheel | Bilstein / H&R
    tamaneri (AIM)

  34. #34
    Veteran Member Four Rings PDX04a4's Avatar
    Join Date
    Jun 22 2008
    AZ Member #
    30204
    My Garage
    2006 A4 Avant S-line
    Location
    SL,UT

    not really sure why you made your post reynolds when dirty, rxrep and others have clearly described a much easier way to replace the mounts. you dont need two jacks, you dont need to remove the entire assembly, you dont need to remove the heat shield. you're just making too much work of this.
    Thanks for the EFF shack. -Dirty Mike and the Boyz

  35. #35
    Senior Member Three Rings
    Join Date
    Jul 29 2008
    AZ Member #
    31422
    My Garage
    2003 A4 1.8TQM5
    Location
    PA

    I believe he's referring to the 3.0 and not the 1.8t.

  36. #36
    Active Member One Ring
    Join Date
    Jul 29 2009
    AZ Member #
    45660
    Location
    Colorado Springs

    Quote Originally Posted by PDX04a4 View Post
    not really sure why you made your post reynolds when dirty, rxrep and others have clearly described a much easier way to replace the mounts. you dont need two jacks, you dont need to remove the entire assembly, you dont need to remove the heat shield. you're just making too much work of this.
    Was the title in bold insufficient to prevent you from making uninformed comments? If you had actually read the post, the V6 engine does not raise sufficiently for your quoted methods to work due to length of the bolts and too little gap between the motor and firewall.

  37. #37
    Veteran Member Four Rings PDX04a4's Avatar
    Join Date
    Jun 22 2008
    AZ Member #
    30204
    My Garage
    2006 A4 Avant S-line
    Location
    SL,UT

    Quote Originally Posted by brynreynolds View Post
    Was the title in bold insufficient to prevent you from making uninformed comments? If you had actually read the post, the V6 engine does not raise sufficiently for your quoted methods to work due to length of the bolts and too little gap between the motor and firewall.
    ahh yes, im sorry. ever since the update to the message board this summer i seem to gloss over the title of posts without noticing them. my bad.
    Thanks for the EFF shack. -Dirty Mike and the Boyz

  38. #38
    Active Member One Ring
    Join Date
    Nov 15 2010
    AZ Member #
    67048
    Location
    Queens

    Anyone know where I can purchase those same lower frame mounts or is it a dealer only item?

  39. #39
    Senior Member Two Rings
    Join Date
    Aug 11 2010
    AZ Member #
    62603
    Location
    New Jersey

    Quote Originally Posted by rxrep View Post
    Why do those bolts even need removed? I don't see the need. There is a much easier way. Loosen and remove snub mount arm. Loosen the four total mount nuts. Jack up engine from below, using a wood block so you don't pierce the oil pan. It goes up further than you'd think; almost back to the firewall.
    Remove mounts. Replace with new. Have helper hold mounts while you slowly let engine back down in to place. Be very careful not to squash helper's fingers. Hand tighten mounts and replace and hand tighten snub arm. Start engine. Rev a few times and let idle for a few minutes. Then, tighten all hand-tightened nuts/bolts to torque specs.

    Done and done.

    Would this work for a B7?

  40. #40
    Veteran Member Four Rings 7speed's Avatar
    Join Date
    Sep 15 2006
    AZ Member #
    11351
    Location
    Saint Cloud, Fl

    You don't have to lower the frame. His write-up is the hard way. This can be done completely in less than 30 mins start to finish.

    - Undo snub mount and slide it backwards
    - Unscrew all 4 snub bolts
    - Place wood on jack, place jack under oil pan
    - Lift engine, it goes really high
    - Remove mounts, replace mounts
    - Reverse
    instagram ------------> low_enforcement

Bookmarks

Posting Permissions

  • You may not post new threads
  • You may not post replies
  • You may not post attachments
  • You may not edit your posts
  •  


    © 2001-2025 Audizine, Audizine.com, and Driverzines.com
    Audizine is an independently owned and operated automotive enthusiast community and news website.
    Audi and the Audi logo(s) are copyright/trademark Audi AG. Audizine is not endorsed by or affiliated with Audi AG.