


Usual disclaimer applies here; I am not responsible for any of your work. This procedure is done at your own risk, and my write-up is merely a guide to help you do it (as model years and options vary).
Big thanks to Pete (Gallep) for answers to my questions and insight on issues. Thanks to A4Mods for the bumper and headlight removal guides and Jordan for the coolant flush guide
And one more thing, this is not the only way to change the belt. It can be changed without removing the A/C condenser and radiator (though I’m sure it’s a bitch this way); however I wanted to have plenty of room to work....so I took it all off.
TOOLS/SUPPLIES LIST:
Metric sockets: 10mm, 13mm, 14mm, 19mm (12 point).
Allen sockets: 5mm, 6mm, 8mm
Breaker bar
Torx sockets: T45, T30, T25, T20, T15
Set of metric wrenches
ECS Ultimate timing belt solution here: ECS kit (Make sure you get the correct one based on your model year and VIN)
2 Buckets to catch coolant and windshield washer fluid if you want to reuse those
That's definitely not everything, but I don't think there's anything else out of the ordinary you'll need. Screwdrivers, socket wrench, extensions, etc...Just normal stuff. A lift would help if you have access to one, but it's not necessary....jack stands will suffice.
General notes before beginning
1. Get the car up on jack stands and remove wheels.
2. The connector plugs on the car are all a PITA if you haven’t taken them off before. Basically you push both ends of the plugs together and then press down on the tab to get it over the jut in the plug and then pull…all in one motion. If you have done work on any of the German vehicles before you’ll know what I mean.
FRONT BUMPER REMOVAL:
1. Remove the plastic underpan; 6 screws underneath and 2 plastic screws in each wheel well.
2. Remove two small grills and fog lights (if applicable) on front bumper; the grills come out just by pulling.
3. Remove headlights by following the tutorial here on A4mods.com:
http://a4mods.com/index.php?page=web...earcorner.html
4. Follow Martini’s guide to removing the front bumper here:
http://a4mods.com/index.php?page=web...erremoval.html
A/C CONDENSOR AND RADIATOR REMOVAL:
1. Drain the coolant. Loosen the cap on the filler tank in the engine compartment. Now look for a plug underneath your car coming from the lower radiator hose. On the drivers side right above where the front bumper lip ends you will see a drain plug connected to an electrical connection coming out of the radiator. There is a little "U" type clip holding the drain plug in. Pull the clip off. You can do this with a flat head screw driver. Then yank down on the drain plug with the electrical connection still attached (not too hard). Coolant will fly out like crazy. Make sure you have a catch pan underneath it ready to catch the coolant. It goes everywhere. Also make sure you have the rubber o ring that goes around the gold colored part of the drain plug. Sometimes it pops off and falls into the catch pan you're using when you yank it out. Let it drain for a couple minutes. After that push the plug back in (with rubber washer on it). Sometimes it's hard to get it to seat in there so you might need to use a little force (not too much) and maybe twist the plug a little bit. Put the clip back on.....it goes on 90deg from how you might think it goes on. There is an air bleed valve right on/near the sensor that you can use to bleed the air out of the system later when you refill the coolant.
2. Disconnect the upper and lower radiator hoses. First, pry up the clip around the radiator fitting with a flathead screwdriver:

Do this for the top and bottom hoses. Now, pull firmly (vulgarity is allowed here) to get the hoses off. I had to jiggle and pull with all my might since the rubber had stuck to the plastic, so put some muscle into it.
3. Remove the 4 screws (torx t25 iirc) that hold the AC condenser in place. BE VERY CAREFUL where you set the condenser down as the fins get damaged very easily (as I learned the hard way)

4. Now pull the P/S cooler that runs in front of the A/C condenser out of the way. The two 10 mm bolts are shown by the red dots in the picture above. Check the clamps connecting the rubber hoses to the P/S cooler while you have it loose.
5. Disconnect the sensor that connects on the driver’s side of the A/C condenser
6. Now; pull up and then out on the condenser; set it on the ground (try not to drop anything on it as I said before about the fins).

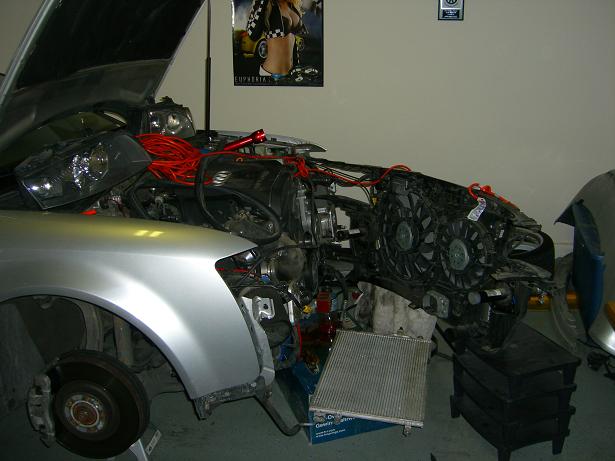
REMOVING LOCK CARRIER:
1. Remove the bumper post bolts with a Torx T45 bit. Both sides will have 3 bolts which are holding the bumper posts

4. Remove the two Torx T25 bolts at the front edge of the hood on each side.

5. Remove one Torx T25 bolt underneath each headlight; you should have 6 bolts you take out altogether.

6. Slowly slide the lock carrier out towards the front of the car; be careful it is heavy and there are still wires running to the lock carrier (unclip these as you see fit, I only did the passenger side and swung mine out towards the drivers side), as you will see. Remove the hood release. Do your best to unclip the wires routed around the fan housings, so that you can lay the lock carrier off to the driver's side.
7. It should look something like this; make sure you have something to support the carrier if you don’t unclip everything; I used my deep turkey fryer and random computer monitor supports. Make sure you use something to hold the lock carrier so it doesn’t fall down (I didn’t have bungee cords so I improvised with extension cord)
TIMING BELT:
First, let's make sure we're on the same page as far as the parts in the "kit." As seen in the picture below, you should have (1) timing belt, (1) serpentine belt, (1) tensioner, (1) tensioner pulley, (1) water pump, (1) bolt, (1) washer, and (1) metal collar/sleeve. By the way, DO NOT PULL THE PIN ON THE TENSIONER, until the instructions say to do so.

1. Remove the upper timing belt cover by releasing the two "clips" and moving the hose that runs in front.

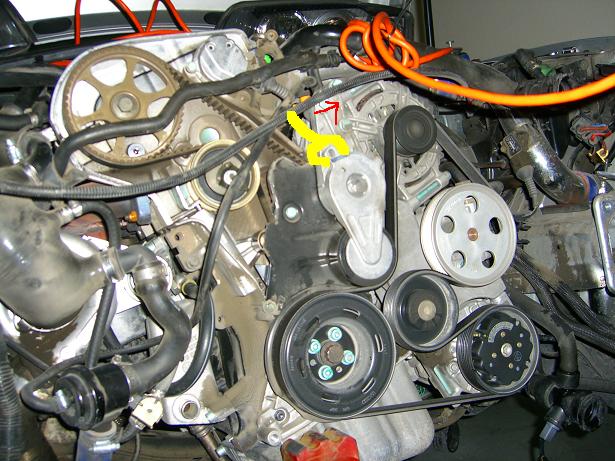
2. Remove the main serpentine belt by rotating the spring-loaded tensioner; use a crescent wrench (I believe 17mm) and rotate clockwise, hold it while you remove the belt. Remove this tensioner--three 13 mm bolts. You like my yellow crescent wrench? :-)
3. Remove the dampner pulley; have hold the pulley with a 19mm 12pt. socket on a breaker bar, while you remove the four 6mm hex bolts (Allen keys won't cut it here, you'll need a socketed hex).

4. Remove the lower timing belt cover; there are 3-10mm bolts for the middle cover, and 2-10mm bolts for the lower cover behind the pulley.

5. This step is the very critical. Carefully align the 2 timing marks (one on the cam sprocket, the other on the edge of the valve cove) by turning the engine by hand, clockwise, using the 19mm bolt on the crank (where you removed the dampner pulley from earlier). While you have the belt off, you must make sure that these marks remain perfectly aligned. DO NOT use the top cam to turn the engine; always turn at the crank when the tbelt is installed!
Another tip is to mark the belt where the mark is and then mark where the crank pulley mark is at. This way you can count the teeth (if need be) if you aren’t sure your marks are lined up with the new belt.

Also make your own mark the lower toothed sprocket on the crank, just for your
own comfort of knowing that the sprocket remained in the same position throughout the install. I scratched an arrow on the sprocket; as you can see in the picture that the mark aligns with the tip of that protrusion in the metal above it. So after you have marked the top cam and the bottom crank continue to the next step you will also notice that the top cam is very hard to turn by hand so it most likely won't move but marks are critical!

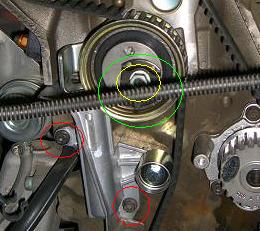
6. Remove the old tensioner and pulley. BEFORE doing this, take note of the position of the tension pin (circled in red) AND the distance between the pulley and tensioner. So you know how far to tension your new belt.
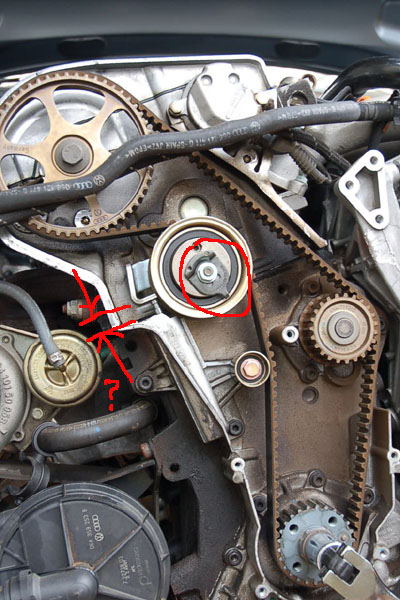
7. Remove the two bolts (I think 6mm Allen socket) holding the tensioner to the block (red circles). Remove the 10mm nut holding the pulley on (as circled in yellow, partially hidden from view). The pulley/tensioner complex should now be free and you can now remove the belt.

WATER PUMP change (2 steps total)
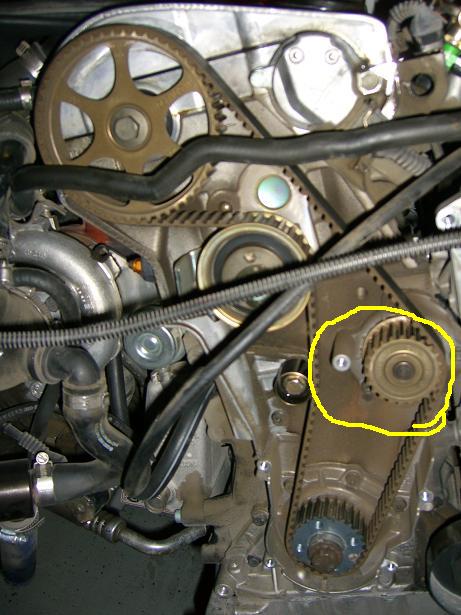
8. The engine should look like this now, the tensioner and timing belt had been removed. The water pump sits in the yellow area circled in the picture. Its not that hard to change so do it while you are in there, if you don’t want to do this step skip to step #10 and continue with the Tbelt change instructions
9. Remove the 2-6mm Allen bolts holding the water pump in. NOTE: there is still coolant in the block, so there is pressure built up between the water pump and the block, so coolant will come out when you take this out. Be sure to have a bucket ready to catch flying coolant. Also, the pump is in there pretty good, so you will have to pull on it pretty hard to get it to come out. I just used a flathead and wedged it out.
10. Time to assemble and install the tensioner and pulley. Install the new tensioner to the block. See below for assembly of the pulley and the misc. hardware. I forgot to snap a pic during the installation process, thus you get this VERY crude attempt at a 3D rendering.
NOTE: STUDY the design of the pulley and pin inside. It’s a very interesting design that will make your job way easier when tensioning the belt if you can understand how it works. I spent 20 minutes figuring things out (yea, I’m a little slow) and was able to tension the belt in one swift move.

11. Attach the upper tensioner pulley and using a 13mm socket in your hand, thread the center nut attaching the pulley to the block (careful not to cross-thread, if you feel resistance back it out and try again) a little bit so it doesn’t fall off. The pulley setup should look like it does below. Now move the pulley around so you can slide the lower tensioner in. tighten the bolts for the lower tensioner and take a step back…if everything looks like it does below, tight the center nut on the pulley.
12. Install the timing belt. Carefully slide the belt over the toothed sprockets, making sure that you don't move the sprockets. I got mine on by going over the crank first, then around the cam pulley and tensioner, and finally pulling it over the water pump.

13. Almost done. See that hex hole in the pulley? Put an 8 mm Allen socket (you can also use an Allen key) in that hole, and pull clockwise. This will allow you to push the pulley to the right. You can use a specific VAG tool to tension the crazy tensioner pin to get the space between the 2 arrows is between 6-10mm (I threw a 7mm Allen key in between the tensioners to get proper spacing) or you can do what I did and use a crescent wrench to turn it.. Go back and double check all the bolts for the tensioner and pulley, be sure they're all tight (no torque specs at the moment).
14. Make sure your setup looks like is spaced correctly with all the tension correct. If so, PULL THE PIN!

15. With the belt and tensioner now properly installed, hand-crank the engine around one full rotation (always go clockwise) to make sure your MARKS on the top cam sprocket line up at the same time your mark on the bottom crank sprocket. Turn the bottom crank sprocket one full time and get back to your original mark you made earlier, if the bottom and top mark match up = everything is fine
16. That's it...reverse the process and re-install all of the above. You do remember how it all went together, right? It is easier if you but the bolts you had taken off or loosened up back into the hole where they came from to make it easier during reassembly
17. After you get everything back together you will want to refill the coolant in the system. When filling up the empty coolant system, take the screw holding down the reservoir off. Pour in the water/coolant mix. Then grab the reservoir and pick it up in the air so the coolant can drain into the system better. It will glug glug glug and suck down the coolant much better. Fill it up again and repeat. After the reservoir is relatively full you can take an Allen head and unscrew the little bolt on the metal coolant hardline that lies on top of the intake manifold. Don't take the bolt completely off, just get some air into there and the coolant will come flowing up. Be ready as it can come up quickly and spill out the top onto your engine parts below. Get the bolt back tighten down as quick as possible so it doesn't spill out the top too much. Position the reservoir back in place, screw the thing back down and fill to max level. Drop the car to the ground if you haven't already and take the car around the block. Go back and pop the hood and fill reservoir back to max level if needed. You're good for take off...
Andy wrote the original timing belt write-up for the B5 1.8T


Bookmarks